headlamp MINI Hardtop 2 Door 2007 Owner's Manual
[x] Cancel search | Manufacturer: MINI, Model Year: 2007, Model line: Hardtop 2 Door, Model: MINI Hardtop 2 Door 2007Pages: 148, PDF Size: 2.43 MB
Page 13 of 148
Reference
At a glance Controls Driving tips Mobility
11
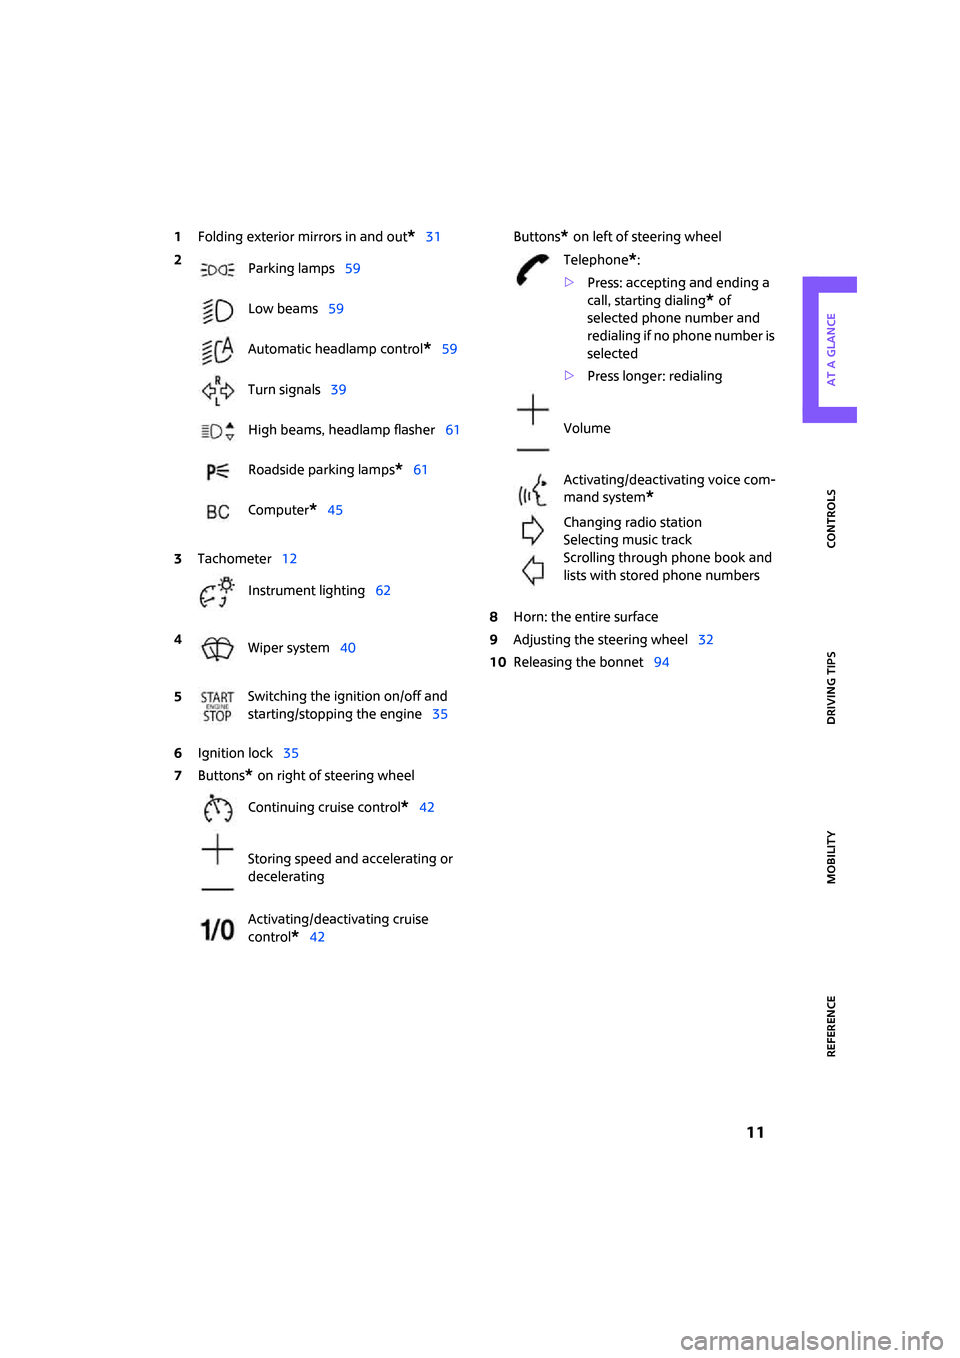
1Folding exterior mirrors in and out*31
6Ignition lock35
7Buttons
* on right of steering wheelButtons
* on left of steering wheel
8Horn: the entire surface
9Adjusting the steering wheel32
10Releasing the bonnet94 2
Parking lamps59
Low beams59
Automatic headlamp control
*59
Turn signals39
High beams, headlamp flasher61
Roadside parking lamps
*61
Computer
*45
3Tachometer12
Instrument lighting62
4
Wiper system40
5Switching the ignition on/off and
starting/stopping the engine35
Continuing cruise control
*42
Storing speed and accelerating or
decelerating
Activating/deactivating cruise
control
*42
Telephone*:
>Press: accepting and ending a
call, starting dialing
* of
selected phone number and
redialing if no phone number is
selected
>Press longer: redialing
Volume
Activating/deactivating voice com-
mand system
*
Changing radio station
Selecting music track
Scrolling through phone book and
lists with stored phone numbers
Page 41 of 148
ReferenceAt a glance Controls Driving tips Mobility
39
transmission automatically returns to D, auto-
matic drive.
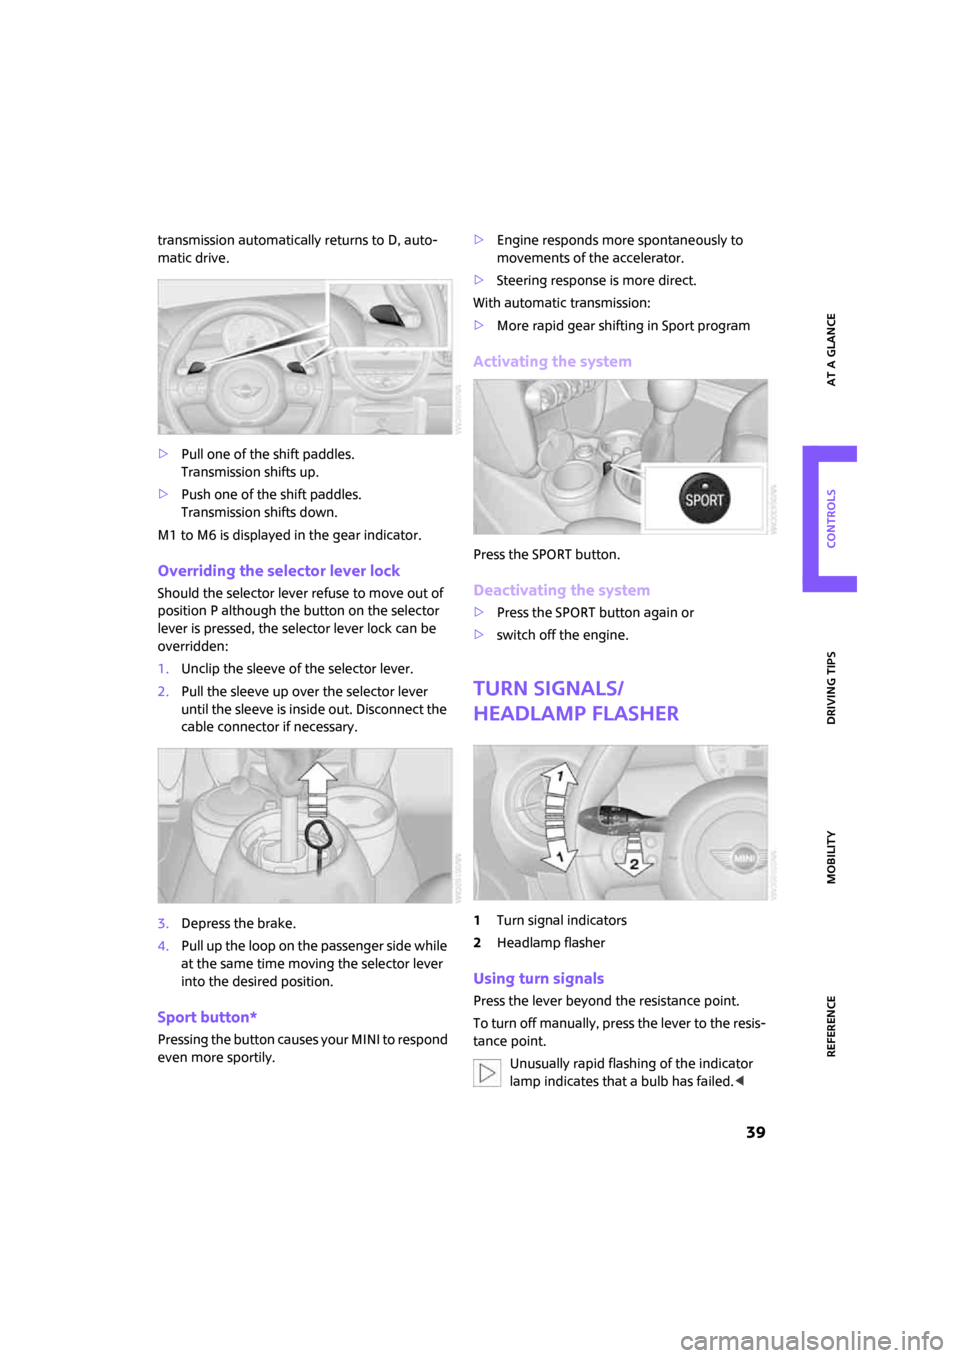
>Pull one of the shift paddles.
Transmission shifts up.
>Push one of the shift paddles.
Transmission shifts down.
M1 to M6 is displayed in the gear indicator.
Overriding the selector lever lock
Should the selector lever refuse to move out of
position P although the button on the selector
lever is pressed, the selector lever lock can be
overridden:
1.Unclip the sleeve of the selector lever.
2.Pull the sleeve up over the selector lever
until the sleeve is inside out. Disconnect the
cable connector if necessary.
3.Depress the brake.
4.Pull up the loop on t he passeng er side w hile
at the same time moving the selector lever
into the desired position.
Sport button*
Pressing the button causes your MINI to respond
even more sportily.>Engine responds more spontaneously to
movements of the accelerator.
>Steering response is more direct.
With automatic transmission:
>More rapid gear shifting in Sport program
Activating the system
Press the SPORT button.
Deactivating the system
>Press the SPORT button again or
>switch off the engine.
Turn signals/
headlamp flasher
1Turn signal indicators
2Headlamp flasher
Using turn signals
Press the lever beyond the resistance point.
To turn off manually, press the lever to the resis-
tance point.
Unusually rapid flashing of the indicator
lamp indicates that a bulb has failed.<
Page 42 of 148

Driving
40
Indicating a turn briefly
Press the lever as far as the resistance point for
as long as you wish to indicate a turn.
Triple turn signal activation
Press the lever as far as the resistance point.
Turn signal flashes once.
You can set whether the turn signal is to flash
once or three times.
1.Switch on the ignition, refer to page35.
2.Briefly press the button in the turn indicator
lever repeatedly until "SET/INFO" is dis-
played.
3.Press and hold the button until the display
changes.
4.Briefly press the button repeatedly until the
symbol and "SET" are displayed.
5.Press and hold the button until the display
changes.6.Briefly press the button repeatedly until the
display shows the illustrated symbol, arrow.
7.Press and hold the button until the display
changes.
8.Briefly press the button to select:
>
Brief indication of a turn.
>
Triple turn signal.
9.Press and hold the button until the display
changes. The setting is stored.
Wiper system
0Wipers parked
1Intermittent wipe or rain sensor
*
2Normal wiper speed
3Fast wiper speed
4Switching off wipers or brief wipe
5Cleaning windshield and headlamps
*
Intermittent wipe or rain sensor*
If the car is not equipped with a rain sensor, the
intermittent-wipe time is a preset.
Page 43 of 148
ReferenceAt a glance Controls Driving tips Mobility
41
If the car is equipped with a rain sensor, the time
between wipes is controlled automatically and
depends on the intensity of the rainfall. The sen-
sor is mounted on the windshield, directly in
front of the interior rearview mirror.
Activating intermittent wipe or rain
sensor
Press the lever upward once, arrow1.
Deactivate the rain sensor before entering
an automatic car wash. Failure to do so
could result in damage caused by undesired
wiper activation.<
Deactivating intermittent wipe or rain
sensor
Press the lever downward once, arrow4.
Brief wipe
Press the lever downward once, arrow4.
Switching on wipers
Press the lever upward.
The lever automatically returns to its initial posi-
tion when released.
Normal wiper speed
Press twice, arrow2.
The system switches to intermittent operation
when the vehicle is stationary.
Fast wiper speed
Press three times or press beyond the pressure
point, arrow3.
The system switches to normal speed when the
vehicle is stationary.
Cleaning windshield and headlamps*
Pull the lever, arrow 5.
Washer fluid is sprayed onto the windshield and
the wipers are operated for a short time.
When the vehicle lighting system is switched on,
the headlamps are cleaned at regular and
appropriate intervals.In cars equipped with an alarm system, the
headlamps cannot be cleaned when the bonnet
is open.
Do not use the washers when the washer
fluid reservoir is empty, otherwise you will
damage the washer pump.
Only use the washers if the bonnet has been
completely closed, otherwise the headlamp
washer system
* may be damaged. Do not use
the washers if there is any danger that the fluid
will freeze on the windshield. If you do, your
vision could be obscured. For this reason, use
antifreeze.<
Window washer nozzles
The window washer nozzles are heated auto-
matically while the engine is running or the igni-
tion is switched on
*.
Rear window wiper
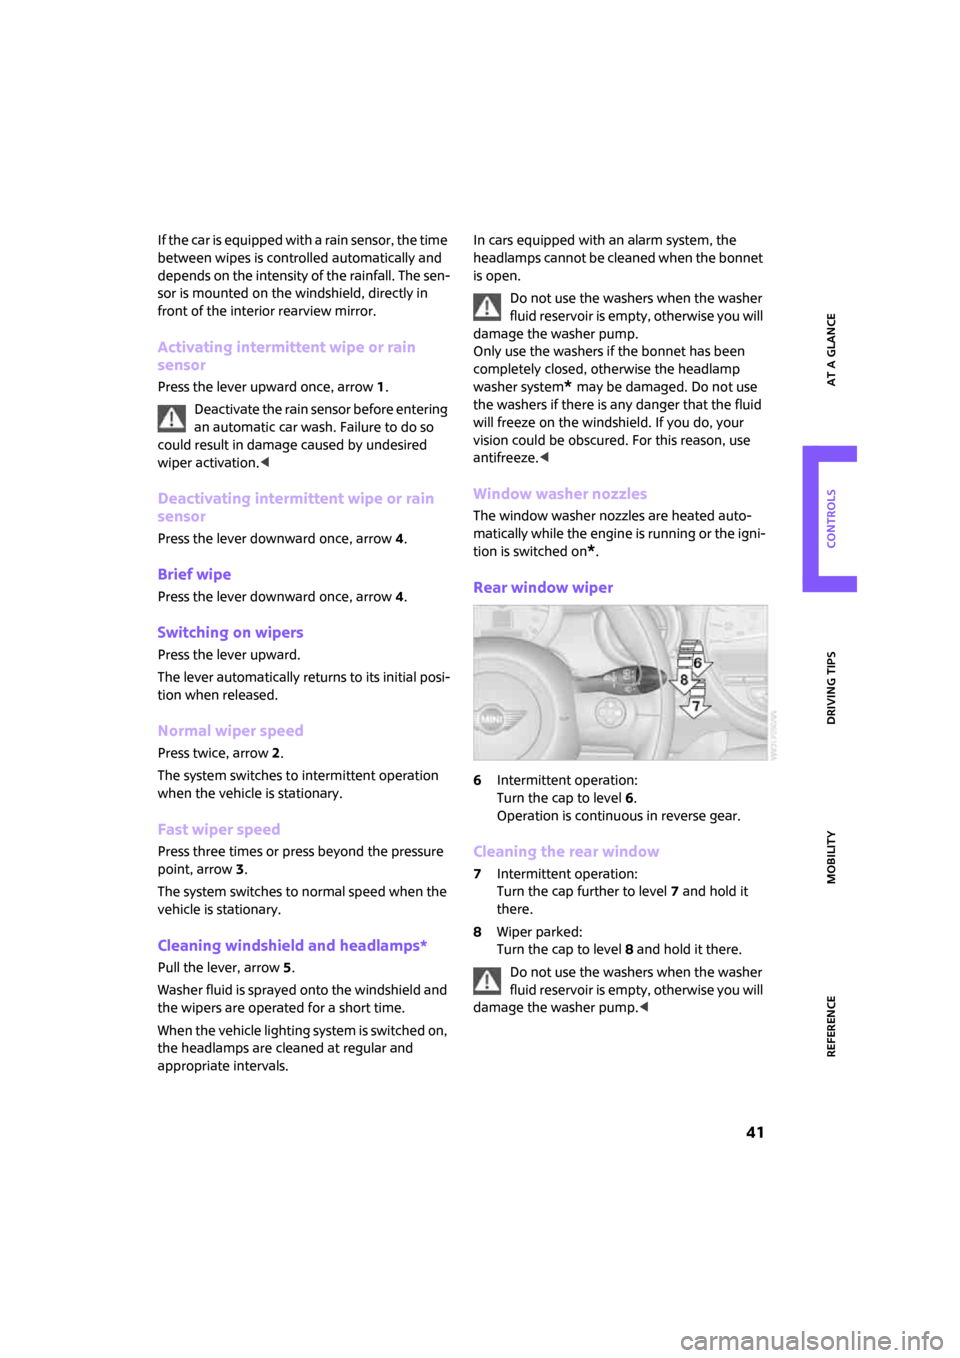
6Intermittent operation:
Turn the cap to level6.
Operation is continuous in reverse gear.
Cleaning the rear window
7Intermittent operation:
Turn the cap further to level7 and hold it
there.
8Wiper parked:
Turn the cap to level8 and hold it there.
Do not use the washers when the washer
fluid reservoir is empty, otherwise you will
damage the washer pump.<
Page 44 of 148
Driving
42
Washer fluid
Washer fluid antifreeze is flammable.
Always keep it well away from sparks and
open flames, and store it in the tightly closed
original container, well out of the reach of chil-
dren. Comply with the instructions on the con-
tainer.<
Washer fluid reservoir
Fill with water and, if required, with a washer
antifreeze, according to manufacturer's recom-
mendations.
Mix the water and antifreeze before filling
the washer fluid reservoir to make sure
the correct concentration is maintained.<
Capacity
Approx. 2.6 US quarts/2.5 liters.
With headlamp washer system:
Approx. 4.8 US quarts/4.5 liters.
Cruise control*
The concept
Cruise control is available for use at speeds
above approx. 20 mph or 30 km/h. The car then
stores and maintains the speed that you specify
using the button on the steering wheel.
Do not use cruise control when driving at
constant speed is prevented by adverse
conditions, e.g. winding roads, dense traffic or
poor road conditions due to, e.g., snow, rain, ice
or loose surfaces. Otherwise you could lose con-
trol of the vehicle and cause an accident as a
result.<
Activating
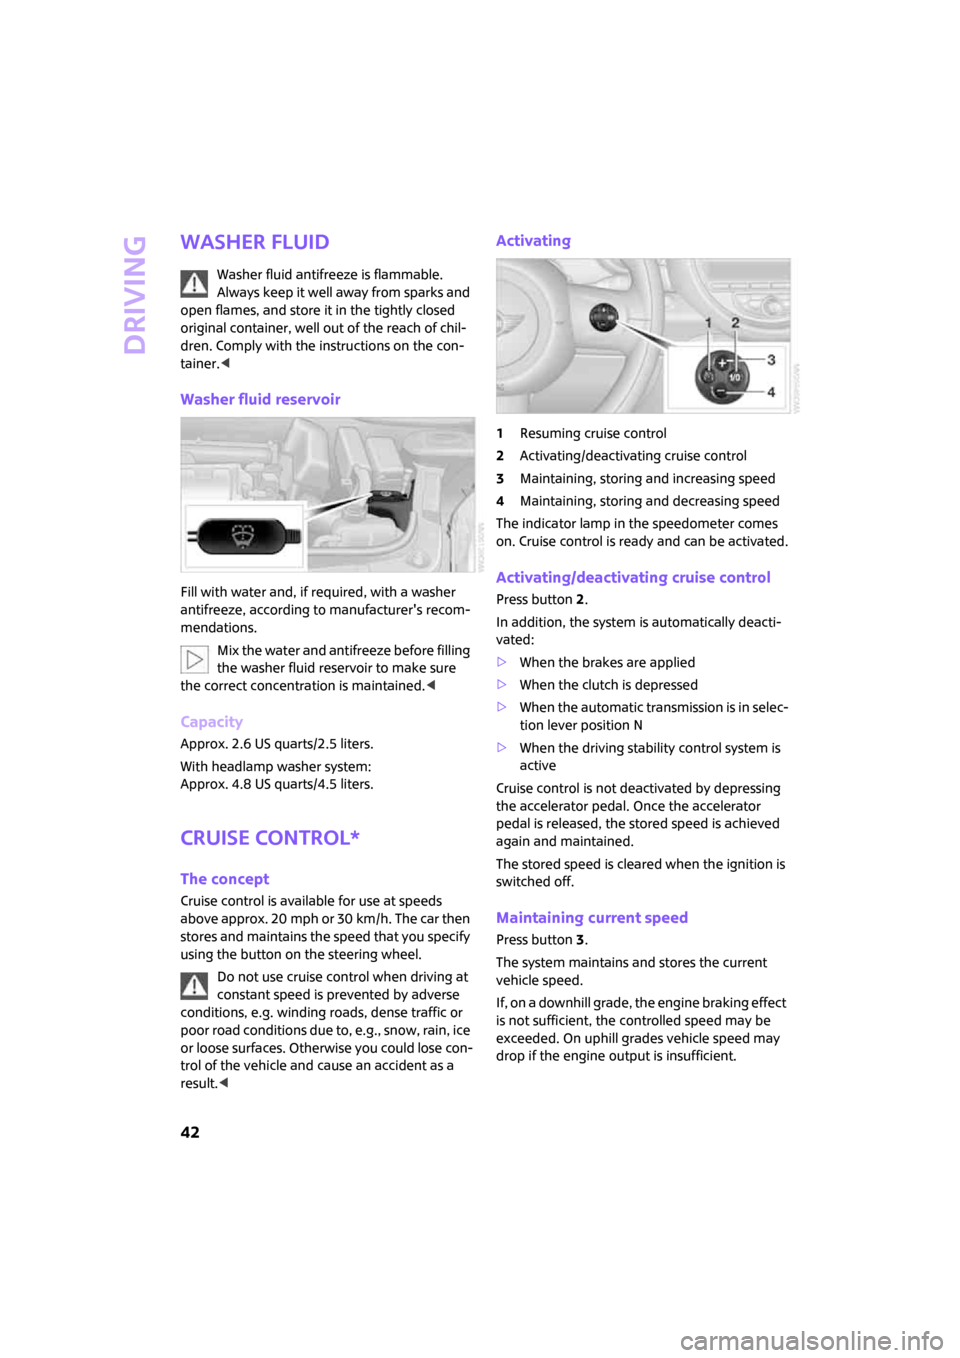
1Resuming cruise control
2Activating/deactivating cruise control
3Maintaining, storing and increasing speed
4Maintaining, storing and decreasing speed
The indicator lamp in the speedometer comes
on. Cruise control is ready and can be activated.
Activating/deactivating cruise control
Press button 2.
In addition, the system is automatically deacti-
vated:
>When the brakes are applied
>When the clutch is depressed
>When the automatic transmission is in selec-
tion lever position N
>When the driving stability control system is
active
Cruise control is not deactivated by depressing
the accelerator pedal. Once the accelerator
pedal is released, the stored speed is achieved
again and maintained.
The stored speed is cleared when the ignition is
switched off.
Maintaining current speed
Press button3.
The system maintains and stores the current
vehicle speed.
If, on a downhill grade, the engine braking effect
is not sufficient, the controlled speed may be
exceeded. On uphill grades vehicle speed may
drop if the engine output is insufficient.
Page 61 of 148
ReferenceAt a glance Controls Driving tips Mobility
59
Lamps
Parking lamps/low beams
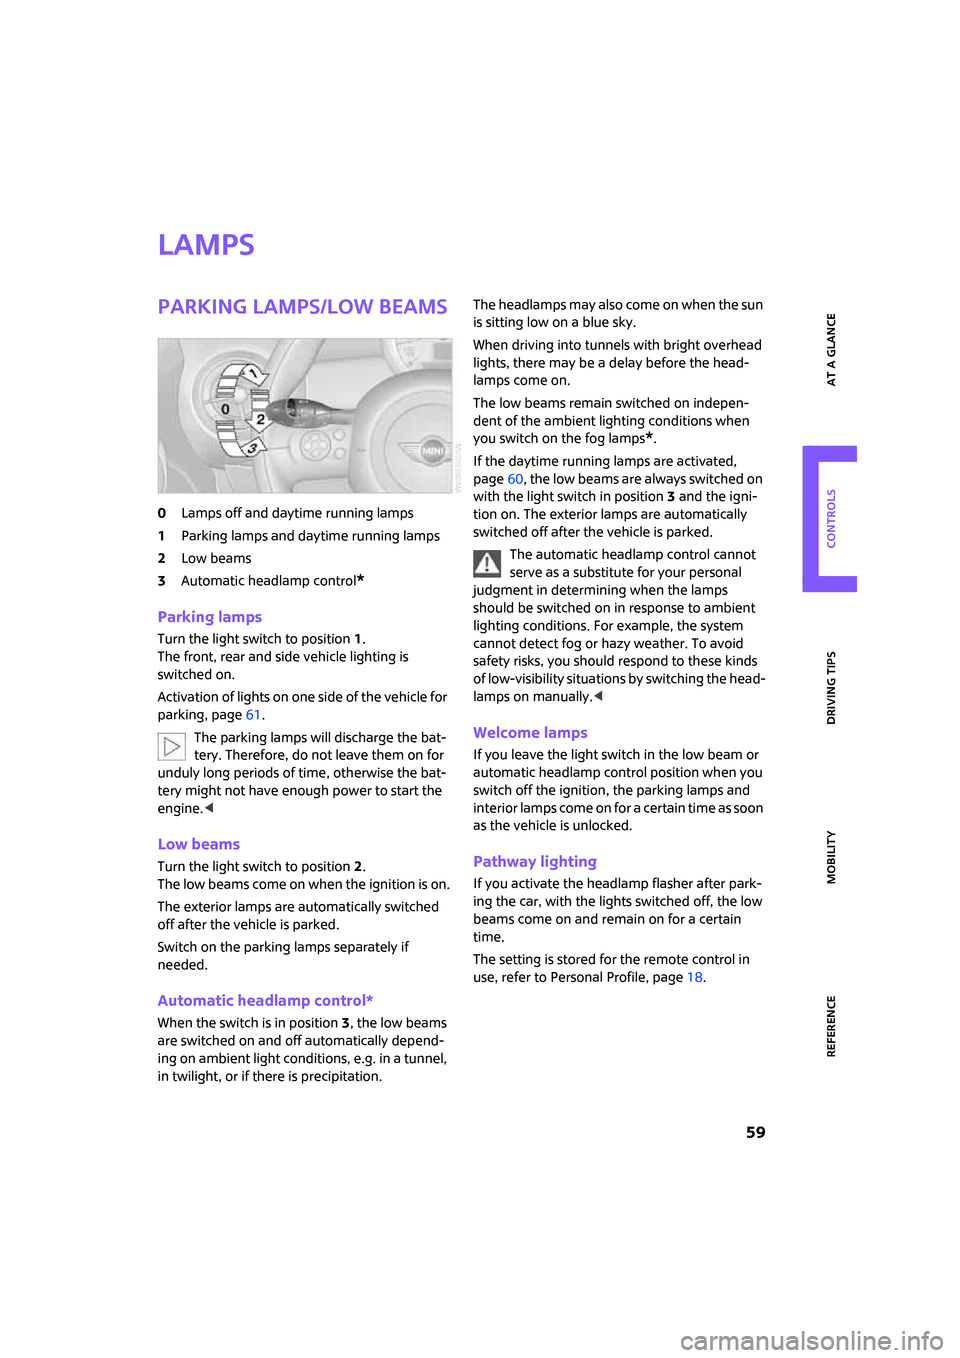
0Lamps off and daytime running lamps
1Parking lamps and daytime running lamps
2Low beams
3Automatic headlamp control
*
Parking lamps
Turn the light switch to position 1.
The front, rear and side vehicle lighting is
switched on.
Activation of lights on one side of the vehicle for
parking, page61.
The parking lamps will discharge the bat-
tery. Therefore, do not leave them on for
unduly long periods of time, otherwise the bat-
tery might not have enough power to start the
engine.<
Low beams
Turn the light switch to position 2.
The low beams come on when the ignition is on.
The exterior lamps are automatically switched
off after the vehicle is parked.
Switch on the parking lamps separately if
needed.
Automatic headlamp control*
When the switch is in position3, the low beams
are switched on and off automatically depend-
ing on ambient light conditions, e.g. in a tunnel,
in twilight, or if there is precipitation.The headlamps may also come on when the sun
is sitting low on a blue sky.
When driving into tunnels with bright overhead
lights, there may be a delay before the head-
lamps come on.
The low beams remain switched on indepen-
dent of the ambient lighting conditions when
you switch on the fog lamps
*.
If the daytime running lamps are activated,
page60, the low beams are always switched on
with the light switch in position 3 and the igni-
tion on. The exterior lamps are automatically
switched off after the vehicle is parked.
The automatic headlamp control cannot
serve as a substitute for your personal
judgment in determining when the lamps
should be switched on in response to ambient
lighting conditions. For example, the system
cannot detect fog or hazy weather. To avoid
safety risks, you should respond to these kinds
of low-visibility situations by switching the head-
lamps on manually.<
Welcome lamps
If you leave the light switch in the low beam or
automatic headlamp control position when you
switch off the ignition, the parking lamps and
interior lamps come on for a certain time as soon
as the vehicle is unlocked.
Pathway lighting
If you activate the headlamp flasher after park-
ing the car, with the lights switched off, the low
beams come on and remain on for a certain
time.
The setting is stored for the remote control in
use, refer to Personal Profile, page18.
Page 63 of 148

ReferenceAt a glance Controls Driving tips Mobility
61
4.Briefly press the button repeatedly until the
symbol and "SET" are displayed.
5.Press and hold the button until the display
changes.
6.Briefly press the button repeatedly until the
display shows the illustrated symbol, arrow.
7.Press and hold the button until the display
changes.
8.Briefly press the button to select:
>
Daytime running lamps activated.
>
Daytime running lamps deactivated.
9.Press the button for a longer period.
The setting is stored.High beams/roadside
parking lamps
1Turn signal indicators/roadside parking
lamps
*
2Switching on high beams
3Switching off high beams/headlamp flasher
Roadside parking lamps, left or right*
The vehicle can be illuminated on one side for
parking. Comply with local regulations when
doing so.
Switching on
After parking the vehicle, press the lever up or
down, arrow 1.
The roadside parking lamps drain the bat-
tery. Therefore, do not leave them on for
unduly long periods of time, otherwise the bat-
tery might not have enough power to start the
engine.<
Switching off
Press the lever up or down to the pressure point.
Page 64 of 148

Lamps
62
Fog lamps*
1Fog lamps*
2Rear fog lamp*
Press the respective switch to turn the lamps on/
off.
Fog lamps*
The parking lamps or low beams must be
switched on for the fog lamps to operate. The
green indicator lamp comes on when the fog
lamps are switched on.
Depending on your vehicle's equipment, the fog
lamps are switched off when you activate the
headlamp flasher or switch on the high beams.
If the automatic headlamp control is acti-
vated, the low beams will come on auto-
matically when you switch on the fog lamps.<
Rear fog lamp*
The low beams or parking lamps with fog lamps
must be switched on. The yellow indicator lamp
comes on when rear fog lamp is switched on.
Instrument lighting
You can adjust the brightness of the instrument
lighting only when the parking lamps or the low
beams are on.
Increasing brightness
Press and hold the button until the desired
brightness is reached.
Reducing brightness
Press the button briefly.
The brightness decreases every time the button
is pressed briefly.
Interior lamps
The interior lamps, the footwell lamps* and the
cargo area lamp are controlled automatically.
To avoid draining the battery, all lamps
inside the car are switched off about
30 minutes after the ignition is switched off,
refer to Start/stop button on page35.<
Switching interior lamps on/off manually
To switch the interior lamps on/off.
Press the switch.
To switch off the interior lamps permanently,
press the button for about 3 seconds.
Page 96 of 148

Under the bonnet
94
Under the bonnet
Do not work on the car unless you possess
the necessary technical knowledge. If you
are not familiar with the regulations to be
observed, have the necessary work on your
vehicle carried out only by a MINI Dealer or a
workshop that has specially trained personnel
working in accordance with the specifications of
the MINI manufacturer. If this work is not carried
out properly, there is a danger of subsequent
damage and related safety hazards.<
Bonnet
Releasing
Pull the lever.
Do not clean the windshield and head-
lamps if the bonnet is unlocked as this
may damage the headlamp washer system
*.<
Opening
To avoid damage, make sure that the
wiper arms are against the windshield
before you open the bonnet.<
Press the release handle and open the bonnet.
Closing
Close the bonnet from a height of approx. 16 in/
40 cm with momentum. It must be clearly heard
to engage.
If you notice any signs while driving your
vehicle that the bonnet is not completely
closed, stop at once and close it securely.
Make sure that the closing path of the bonnet is
clear, otherwise injuries may result.<
Page 97 of 148
ReferenceAt a glance Controls Driving tips Mobility
95
Important parts of the engine compartment
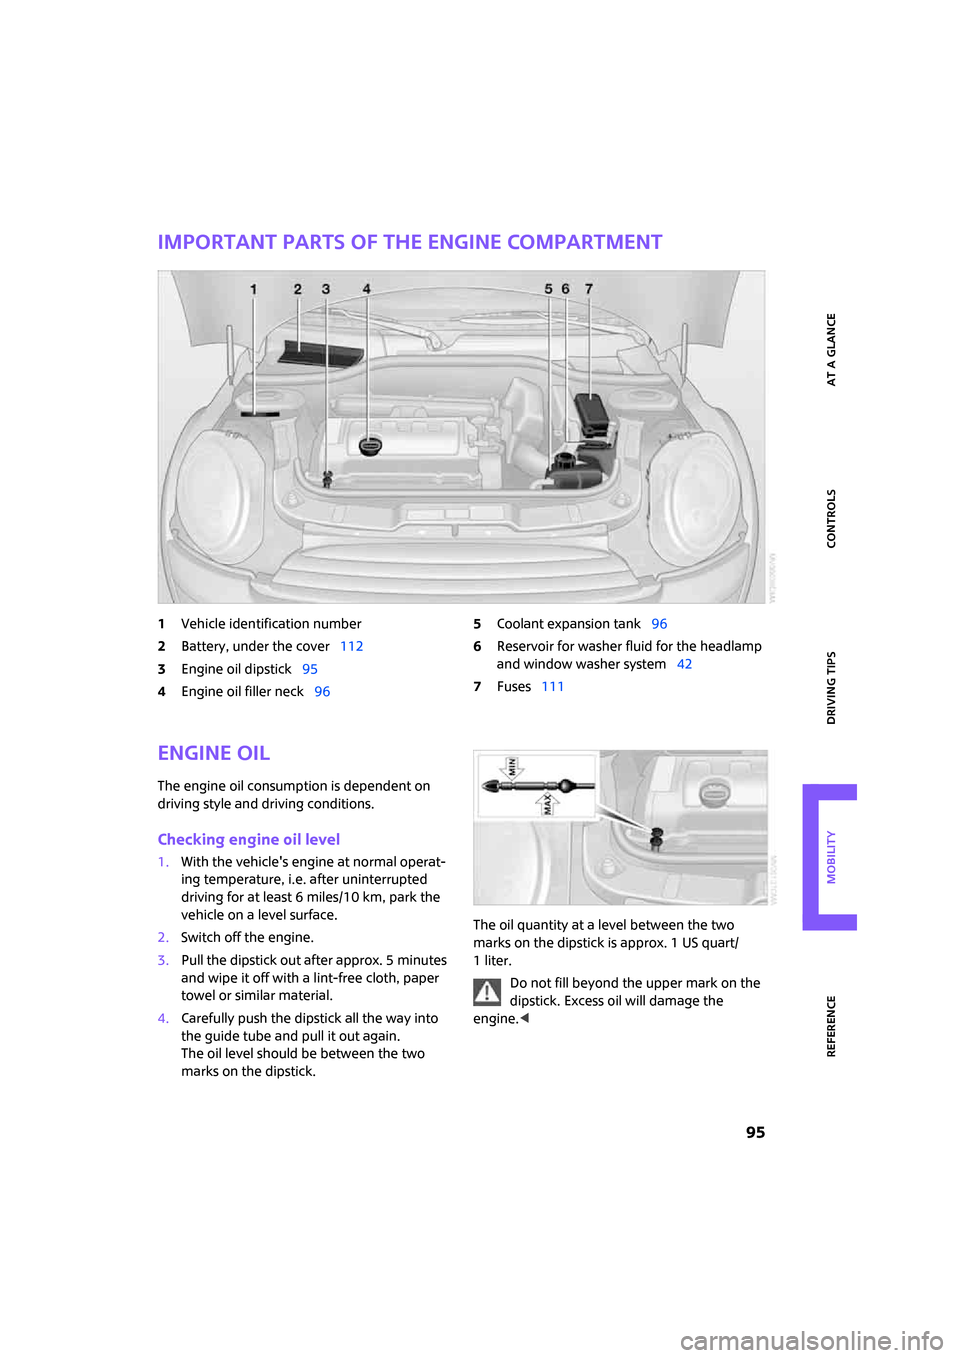
1Vehicle identification number
2Battery, under the cover112
3Engine oil dipstick95
4Engine oil filler neck965Coolant expansion tank96
6Reservoir for washer fluid for the headlamp
and window washer system42
7Fuses111
Engine oil
The engine oil consumption is dependent on
driving style and driving conditions.
Checking engine oil level
1.With the vehicle's engine at normal operat-
ing temperature, i.e. after uninterrupted
driving for at least 6 miles/10 km, park the
vehicle on a level surface.
2.Switch off the engine.
3.Pull the dipstick out after approx. 5 minutes
and wipe it off with a lint-free cloth, paper
towel or similar material.
4.Carefully push the dipstick all the way into
the guide tube and pull it out again.
The oil level should be between the two
marks on the dipstick.The oil quantity at a level between the two
marks on the dipstick is approx. 1 US quart/
1liter.
Do not fill beyond the upper mark on the
dipstick. Excess oil will damage the
engine.<