warning MINI Hardtop 2 Door 2007 Owner's Manual
[x] Cancel search | Manufacturer: MINI, Model Year: 2007, Model line: Hardtop 2 Door, Model: MINI Hardtop 2 Door 2007Pages: 148, PDF Size: 2.43 MB
Page 5 of 148
ReferenceAt a glance Controls Driving tips Mobility
3
Contents
The fastest way to find information on a particu-
lar topic or item is by using the index, refer to
page134.
Using this Owner's Manual
4Notes
6Reporting safety defects
At a glance
10Cockpit
Controls
18Opening and closing
28Adjustments
33Transporting children safely
35Driving
44Everything under control
53Technology for driving comfort and safety
59Lamps
64Climate
69Practical interior accessories
Driving tips
76Things to remember when driving
Mobility
84Refueling
86Wheels and tires
94Under the bonnet
98Maintenance
100Care
102Replacing components
112Giving and receiving assistance
116Indicator and warning lamps
Reference
130Technical data
134From A to Z
Page 8 of 148
Notes
6
including operation of any mobile phone from
within the vehicle without using an externally
mounted antenna, or transceiver equipment, for
instance, CBs, walkie-talkies, ham radio or simi-
lar accessories, may cause extensive damage to
the vehicle, compromise its safety, interfere with
the vehicle's electrical system or affect the valid-
ity of the MINI Limited Warranty. See your MINI
Dealer for additional information.<
Maintenance, replacement, or repair of
the emission control devices and systems
may be performed by any automotive repair
establishment or individual using any certified
automotive part.<
California Proposition 65 warning
California law requires us to issue the following
warning:
Engine exhaust and a wide variety of
automobile components and parts,
including components found in the interior fur-
nishings in a vehicle, contain or emit chemicals
known to the State of California to cause cancer
and birth defects and reproductive harm. In
addition, certain fluids contained in vehicles and
certain products of component wear contain or
emit chemicals known to the State of California
to cause cancer and birth defects or other repro-
ductive harm.
Battery posts, terminals and related accessories
contain lead and lead compounds. Wash your
hands after handling.
Used engine oil contains chemicals that have
caused cancer in laboratory animals. Always
protect your skin by washing thoroughly with
soap and water.<
Service and warranty
We recommend that you read this publication
thoroughly.
Your MINI is covered by the following warran-
ties:
>New Vehicle Limited Warranty
>Rust Perforation Limited Warranty
>Federal Emissions System Defect Warranty
>Federal Emissions Performance Warranty
>California Emission Control System Limited
Warranty
Detailed information about these warranties is
listed in the Service and Warranty Information
Booklet for US models or in the Warranty and
Service Guide Booklet for Canadian models.
Reporting safety defects
For US customers
The following applies only to vehicles owned
and operated in the US.
If you believe that your vehicle has a defect
which could cause a crash or could cause injury
or death, you should immediately inform the
National Highway Traffic Safety Administration,
NHTSA, in addition to notifying MINI of North
America, LLC, P.O. Box 1227, Westwood, New
Jersey 07675-1227, Telephone 1-800-831-
1117.
If NHTSA receives similar complaints, it may
open an investigation, and if it finds that a safety
defect exists in a group of vehicles, it may order
a recall and remedy campaign. However, NHTSA
cannot become involved in individual problems
between you, your dealer, or MINI of North
America, LLC.
To contact NHTSA, you may call the Vehicle
Safety Hotline toll-free at 1-888-327-4236
(TTY: 1-800-424-9153);
go to http://www.safercar.gov; or write to:
Administrator, NHTSA, 400 Seventh Street, SW.,
Washington, DC 20590. You can also obtain
Page 14 of 148
Cockpit
12
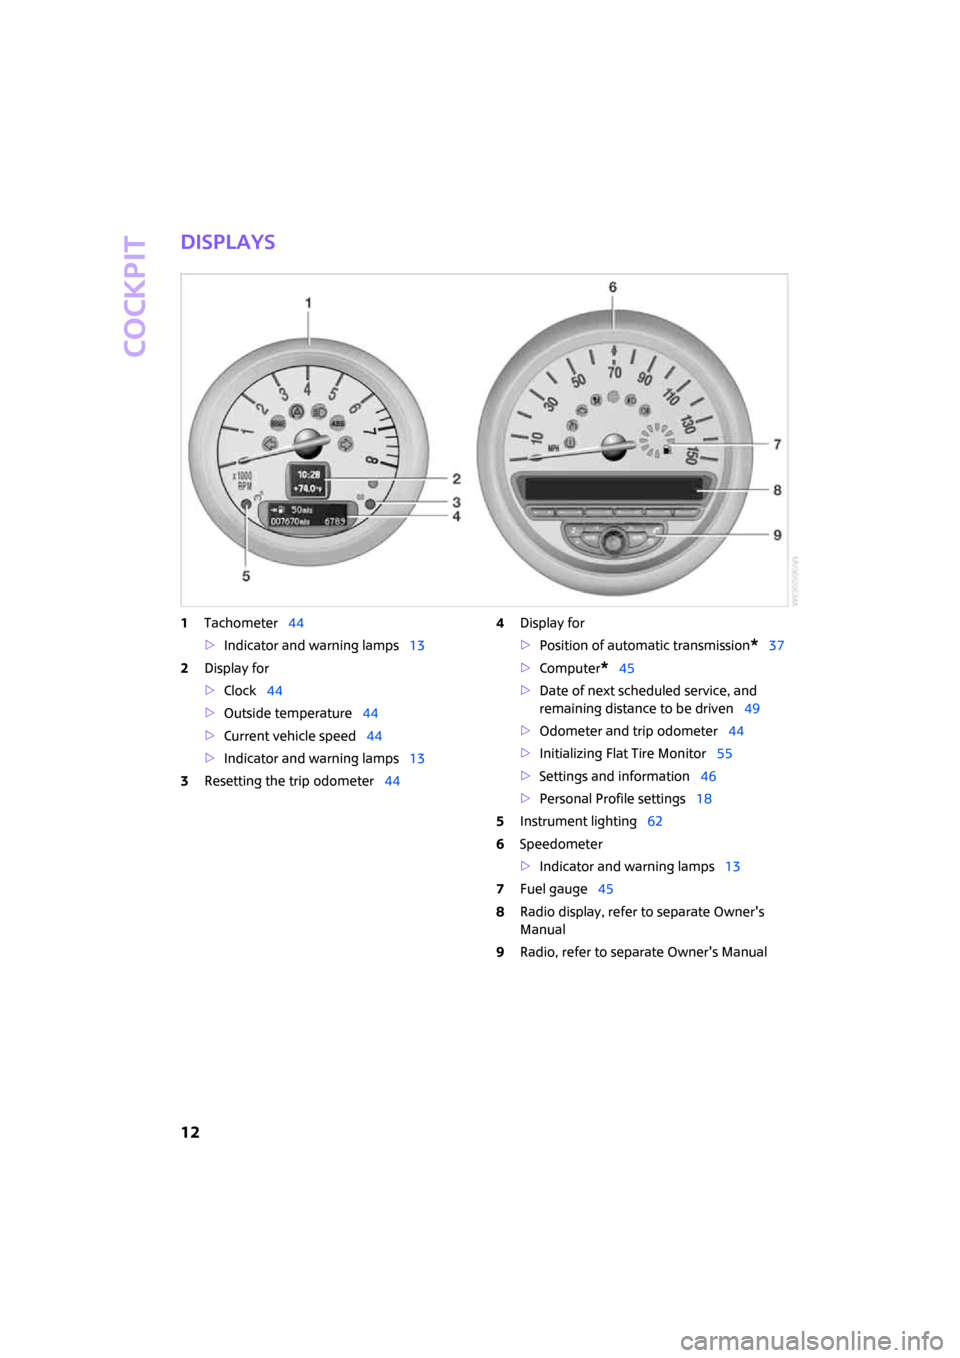
Displays
1Tachometer44
>Indicator and warning lamps13
2Display for
>Clock44
>Outside temperature44
>Current vehicle speed44
>Indicator and warning lamps13
3Resetting the trip odometer444Display for
>Position of automatic transmission
*37
>Computer
*45
>Date of next scheduled service, and
remaining distance to be driven49
>Odometer and trip odometer44
>Initializing Flat Tire Monitor55
>Settings and information46
>Personal Profile settings18
5Instrument lighting62
6Speedometer
>Indicator and warning lamps13
7Fuel gauge45
8Radio display, refer to separate Owner's
Manual
9Radio, refer to separate Owner's Manual
Page 15 of 148

Reference
At a glance Controls Driving tips Mobility
13
Indicator and warning
lamps
The concept
Indicator and warning lamps can light up in var-
ious combinations and colors in the indicator
areas 1 and2.
Some lamps are checked for proper functioning
and thus come on briefly when the engine is
started or the ignition is switched on.
What to do in case of a malfunction
A list of all indicator and warning lamps, as well
as notes on possible causes of malfunctions and
on how to respond, can be found starting on
page116.
Page 17 of 148
Reference
At a glance Controls Driving tips Mobility
15
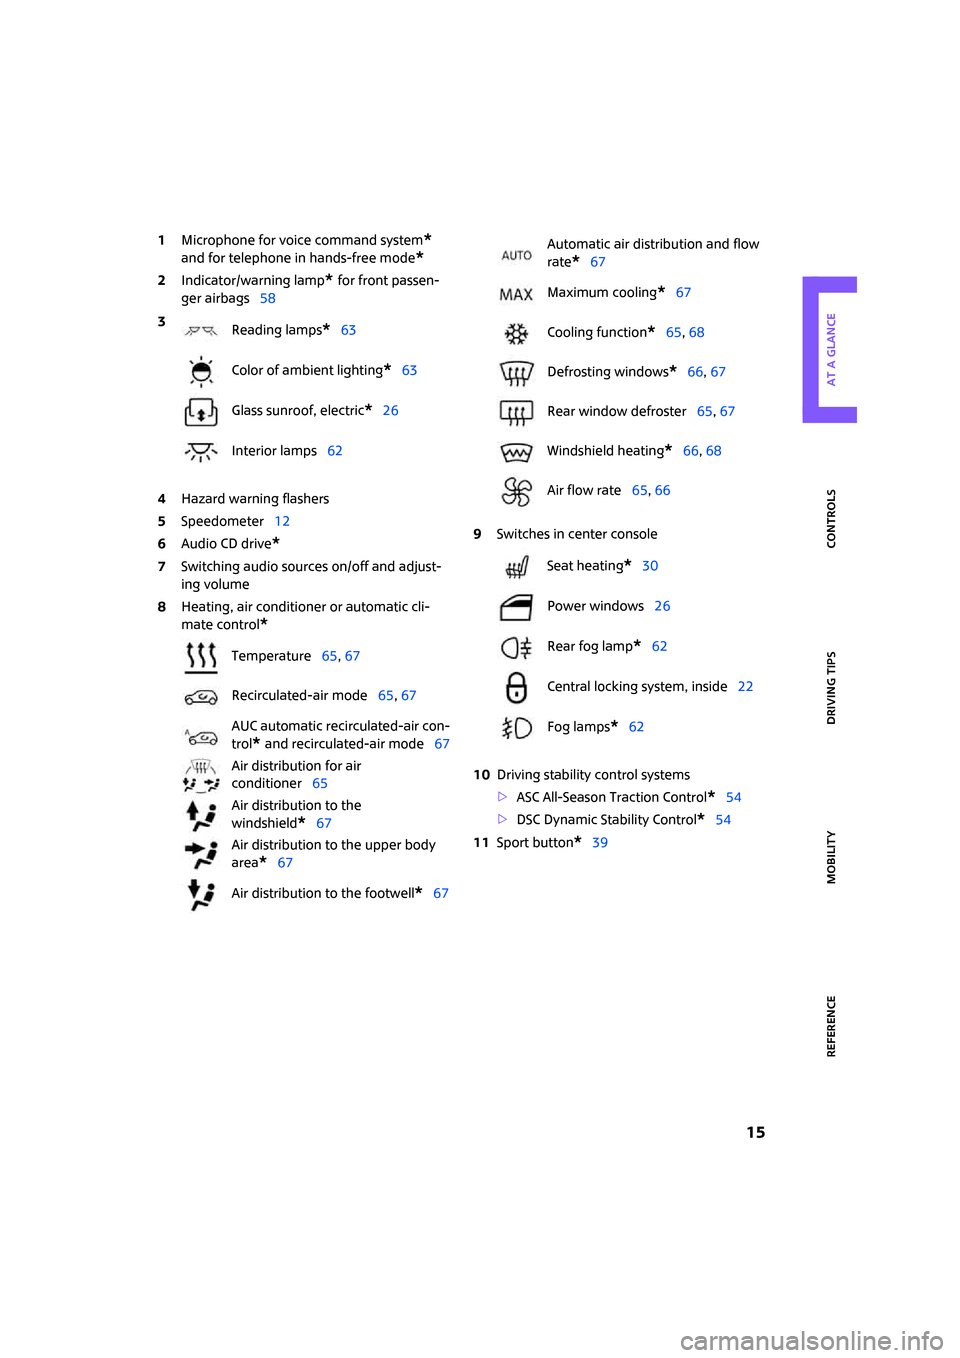
1Microphone for voice command system*
and for telephone in hands-free mode*
2Indicator/warning lamp* for front passen-
ger airbags58
4Hazard warning flashers
5Speedometer12
6Audio CD drive
*
7Switching audio sources on/off and adjust-
ing volume
8Heating, air conditioner or automatic cli-
mate control
*
9Switches in center console
10Driving stability control systems
>ASC All-Season Traction Control
*54
>DSC Dynamic Stability Control
*54
11Sport button
*39 3
Reading lamps
*63
Color of ambient lighting
*63
Glass sunroof, electric
*26
Interior lamps62
Temperature65, 67
Recirculated-air mode65, 67
AUC automatic recirculated-air con-
trol
* and recirculated-air mode67
Air distribution for air
conditioner65
Air distribution to the
windshield
*67
Air distribution to the upper body
area
*67
Air distribution to the footwell
*67
Automatic air distribution and flow
rate
*67
Maximum cooling
*67
Cooling function
*65, 68
Defrosting windows
*66, 67
Rear window defroster65, 67
Windshield heating
*66, 68
Air flow rate65, 66
Seat heating
*30
Power windows26
Rear fog lamp
*62
Central locking system, inside22
Fog lamps
*62
Page 21 of 148

ReferenceAt a glance Controls Driving tips Mobility
19
>Pathway lighting59
>Daytime running lamps60
>Triple turn signal activation40
>Audio volume, refer to separate Owner's
Manual
>Speed-dependent volume, refer to separate
Owner's Manual
Central locking system
The concept
The central locking system is ready for operation
whenever the driver's door is closed.
The system simultaneously engages and
releases the locks on the following:
>Doors
>Tailgate
>Fuel filler door
Operating from outside
>Via the remote control
>Via the door lock
>In cars with convenient access
*, via the door
handles on the driver's and passenger's
sides
The anti-theft system is also operated at the
same time. It prevents the doors from being
unlocked using the lock buttons or door han-
dles. The remote control can also be used to
switch on/off the welcome lamps and interior
lamps.
Operating from inside
Button for central locking system, page22.
In the event of a sufficiently severe accident, the
central locking system unlocks automatically. In
addition, the hazard warning flashers and inte-
rior lamps come on.
Opening and closing:
from outside
Using the remote control
Persons or animals in a parked vehicle
could lock the doors from the inside. Take
the key with you when you leave the vehicle so
that the vehicle can be opened from the out-
side.<
Unlocking
Press the button.
The welcome lamps and interior lamps come on.
Unlocking mode
You can also set which parts of the car are
unlocked. The setting is stored for the remote
control in use.
1.Switch on the ignition, refer to page35.
2.Briefly press the button in the turn indicator
lever repeatedly until "SET/INFO" is dis-
played.
3.Press and hold the button until the display
changes.
4.Briefly press the button repeatedly until the
symbol and "SET" are displayed.
Page 23 of 148

ReferenceAt a glance Controls Driving tips Mobility
21
8.Briefly press the button to select:
>
The hazard warning flashers light up dur-
ing unlocking/locking.
>
An acoustic signal sounds during unlock-
ing/locking.
>
The hazard warning flashers light up and
an acoustic signal sounds during unlock-
ing/locking.
>
The function is deactivated.
9.Press and hold the button until the display
changes. The setting is stored.
Switching on interior lamps
While the car is locked:
Press the button.
You can also use this function to locate your
vehicle in parking garages, etc.
Unlocking the tailgate
Press the button.
In order to avoid damage, make sure
there is sufficient clearance before open-
ing the tailgate.
A previously locked tailgate is locked again after
closing.
Before and after each trip, check that the tail-
gate has not been inadvertently unlocked.<
Malfunctions
The remote control may malfunction due to
local radio waves. If this occurs, unlock and lock
the car at the door lock with the integrated key.
If the car can no longer be locked with a remote
control, the battery in the remote control is dis-
charged. Use this remote control during an
extended drive; this will recharge the battery,
page18.
For US owners only
The transmitter and receiver units comply with
part 15 of the FCC/Federal Communications Commission regulations. Operation is governed
by the following:
FCC ID:
LX8766S
LX8766E
LX8CAS
Compliance statement:
This device complies with part 15 of the FCC
Rules. Operation is subject to the following two
conditions:
>This device must not cause harmful interfer-
ence, and
>This device must accept any interference
received, including interference that may
cause undesired operation.
Any unauthorized modifications or
changes to these devices could void the
user's authority to operate this equipment.<
Using the door lock
You can set which parts of the car are unlocked,
page19.
Convenient operation
You can operate the windows and glass sun-
roof
* via the door lock.
Hold the key in the position for unlocking or
locking.
Watch during the closing process to be
sure that no one is injured. Releasing the
key stops the operation.<
Manual operation
In the event of an electrical malfunction, the
driver's door can be unlocked or locked by turn-
Page 27 of 148
ReferenceAt a glance Controls Driving tips Mobility
25
If the vehicle detects that a remote control
has been accidentally left inside the
locked vehicle's cargo area after the tailgate is
closed, the tailgate will reopen. The hazard
warning flashers flash and an acoustic signal
*
sounds.<
Windows and glass sunroof, electric*
If the engine is switched off, you can still operate
the windows and glass sunroof so long as a door
or the tailgate has not been opened.
If the doors and tailgate are closed again and the
remote control is located inside the vehicle, the
windows and the glass sunroof can be operated
again.
Insert the remote control into the ignition lock to
be able to operate the windows or glass sunroof
when the engine is switched off and the doors
are open.
Switching on radio readiness
Switch on radio readiness by briefly pressing the
start/stop button, page35.
Do not depress the brake or the clutch,
otherwise the engine will start.<
Starting the engine
The engine can be started or the ignition can be
switched on when a remote control is inside the
vehicle. It is not necessary to insert a remote
control into the ignition lock, page35.
Switching off the engine in cars with
automatic transmission
The engine can only be switched off when the
selector lever is in position P, page36.
To switch the engine off when the selector lever
is in position N, the remote control must be in
the ignition lock.
Before driving a vehicle with automatic
transmission into a car wash
1.Insert remote control into ignition lock.
2.Depress the brake.
3.Move the selector lever to position N.
4.Switch off the engine.The vehicle can roll.
Malfunction
Convenient access may malfunction due to local
radio waves.
If this happens, open or close the vehicle via the
buttons on the remote control or using the inte-
grated key.
Insert the remote control into the ignition lock
and start the engine.
Warning lamps
The warning lamp comes on when an
attempt is made to start the engine: the
engine cannot be started. The remote
control is not inside the vehicle or is malfunc-
tioning. Take the remote control with you inside
the vehicle or have it checked. If necessary,
insert another remote control into the ignition
lock.
The warning lamp comes on when the
engine is running: the remote control is
no longer inside the vehicle. After the
engine is switched off, the engine can only be
restarted within approx. 10 seconds.
The indicator lamp comes on: replace
the battery in the remote control.
Replacing the battery
The remote control for convenient access con-
tains a battery that will need to be replaced from
time to time.
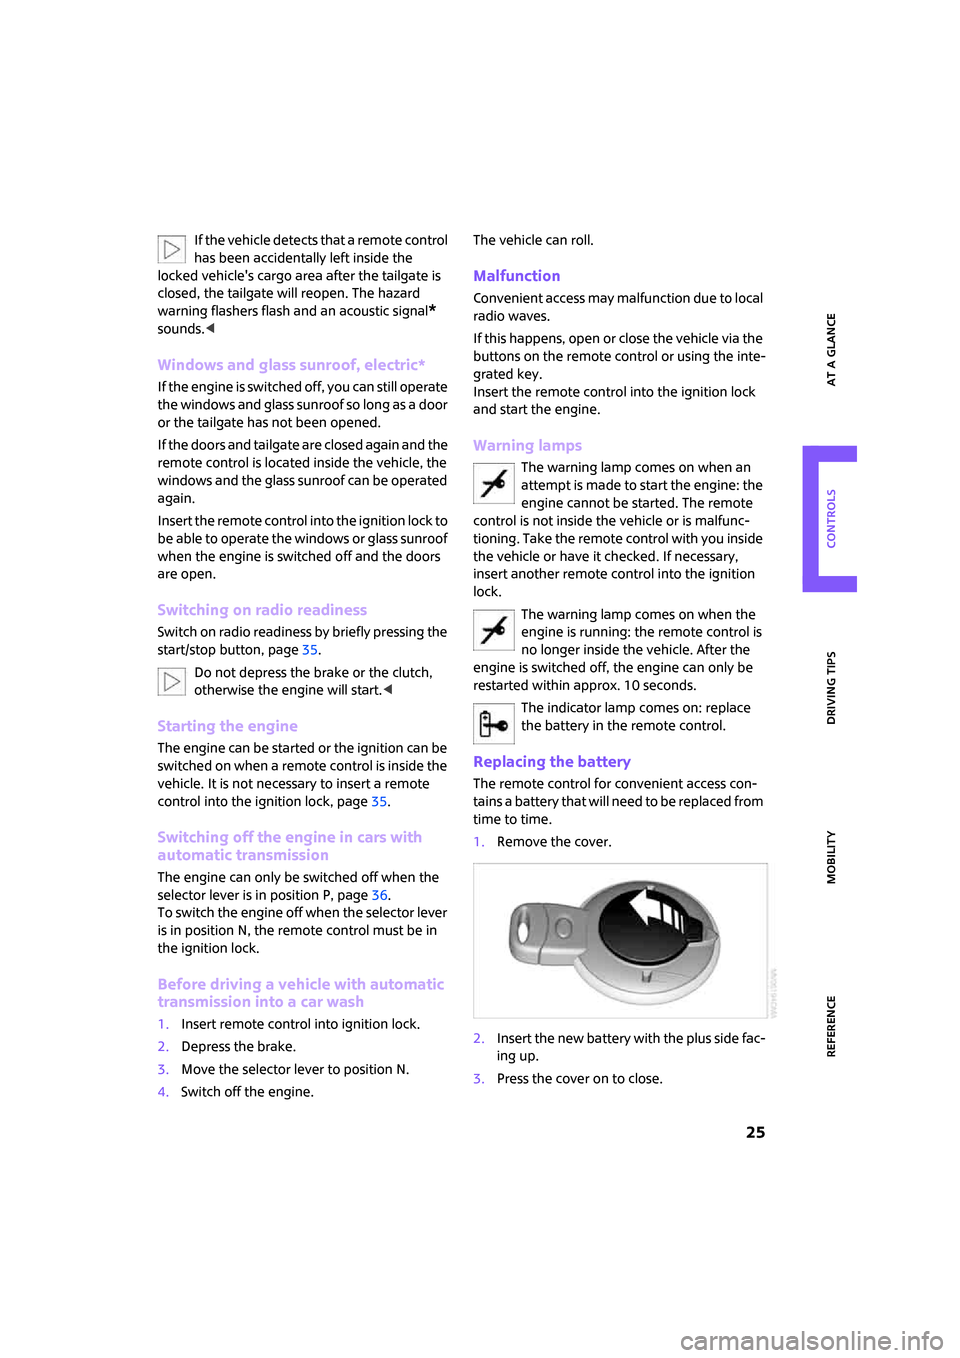
1.Remove the cover.
2.Insert the new battery with the plus side fac-
ing up.
3.Press the cover on to close.
Page 37 of 148
ReferenceAt a glance Controls Driving tips Mobility
35
Driving
Ignition lock
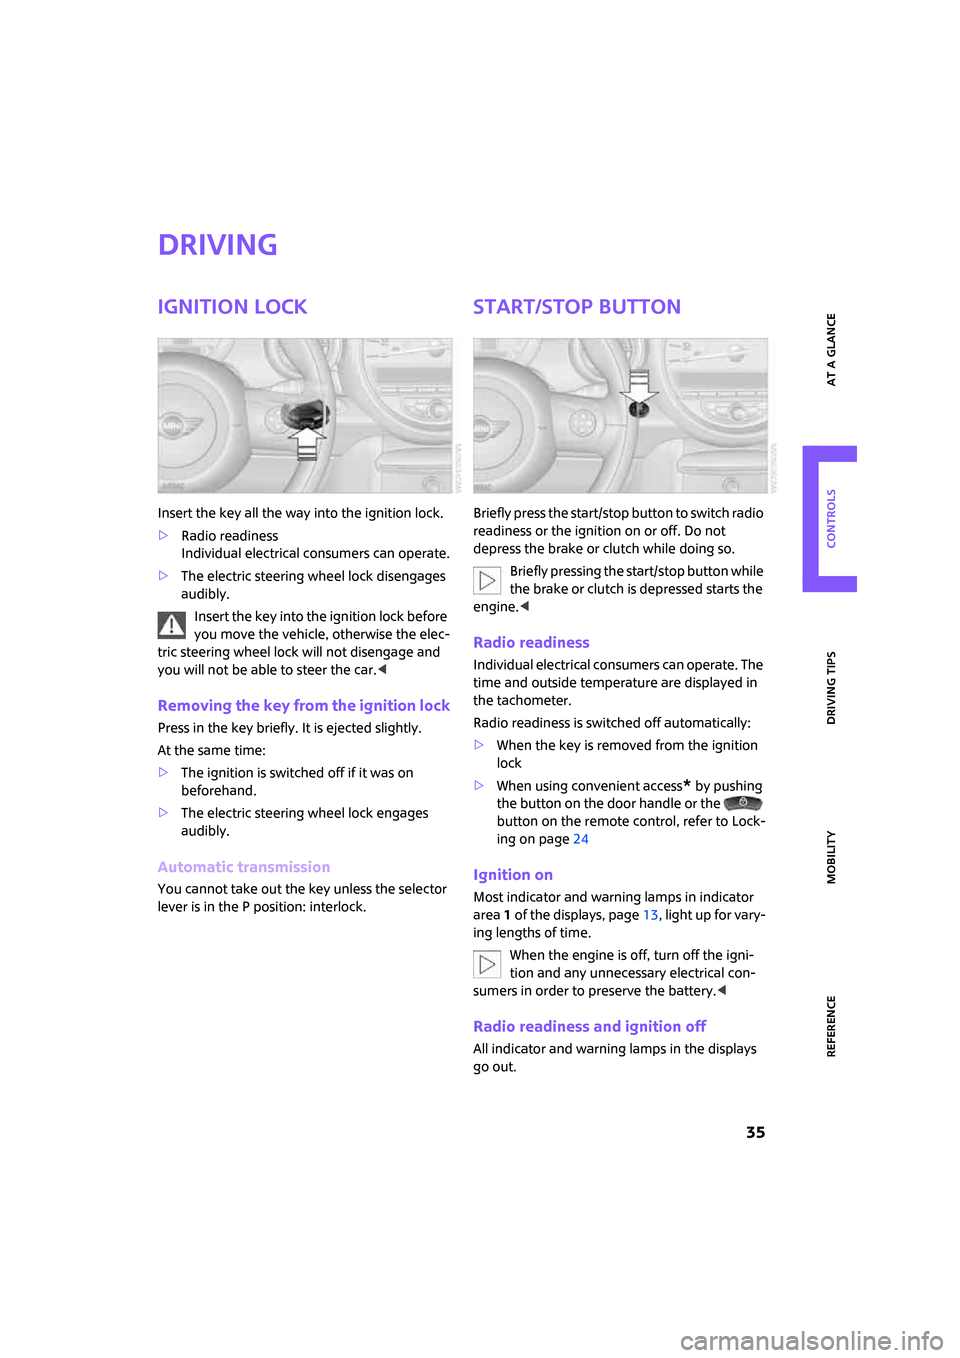
Insert the key all the way into the ignition lock.
>Radio readiness
Individual electrical consumers can operate.
>The electric steering wheel lock disengages
audibly.
Insert the key into the ignition lock before
you move the vehicle, otherwise the elec-
tric steering wheel lock will not disengage and
you will not be able to steer the car.<
Removing the key from the ignition lock
Press in the key briefly. It is ejected slightly.
At the same time:
>The ignition is switched off if it was on
beforehand.
>The electric steering wheel lock engages
audibly.
Automatic transmission
You cannot take out the key unless the selector
lever is in the P position: interlock.
Start/stop button
Briefly press the start/stop button to switch radio
readiness or the ignition on or off. Do not
depress the brake or clutch while doing so.
Briefly pressing the start/stop button while
the brake or clutch is depressed starts the
engine.<
Radio readiness
Individual electrical consumers can operate. The
time and outside temperature are displayed in
the tachometer.
Radio readiness is switched off automatically:
>When the key is removed from the ignition
lock
>When using convenient access
* by pushing
the button on the door handle or the
button on the remote control, refer to Lock-
ing on page24
Ignition on
Most indicator and warning lamps in indicator
area 1 of the displays, page13, light up for vary-
ing lengths of time.
When the engine is off, turn off the igni-
tion and any unnecessary electrical con-
sumers in order to preserve the battery.<
Radio readiness and ignition off
All indicator and warning lamps in the displays
go out.
Page 46 of 148
Everything under control
44
Everything under control
Odometer, outside tem-
perature display, clock
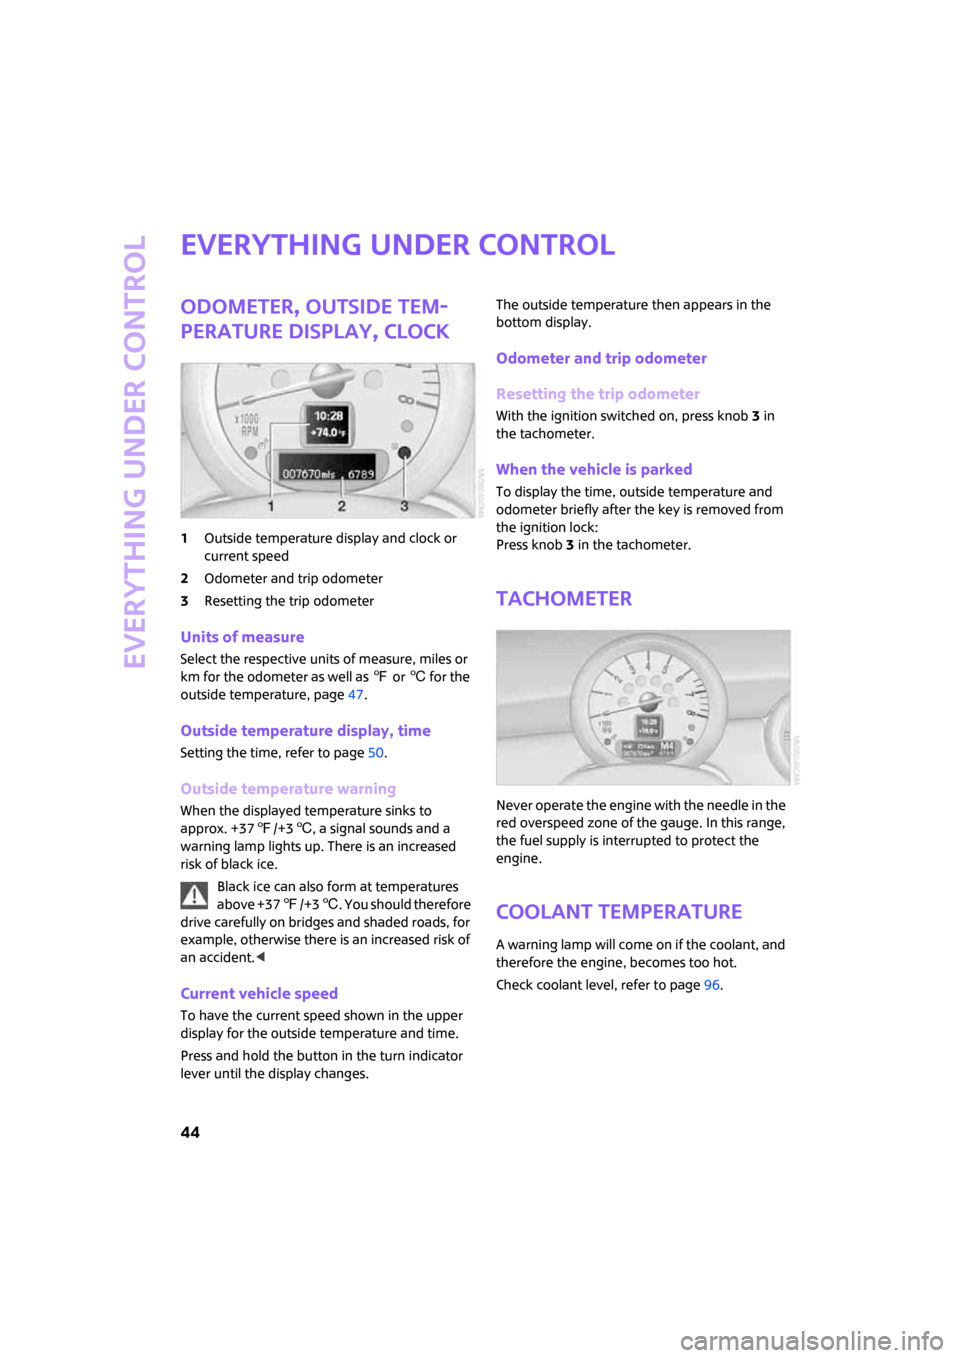
1Outside temperature display and clock or
current speed
2Odometer and trip odometer
3Resetting the trip odometer
Units of measure
Select the respective units of measure, miles or
km for the odometer as well as 7 or 6 for the
outside temperature, page47.
Outside temperature display, time
Setting the time, refer to page50.
Outside temperature warning
When the displayed temperature sinks to
approx. +377/+36, a signal sounds and a
warning lamp lights up. There is an increased
risk of black ice.
Black ice can also form at temperatures
above +377/+36. You should therefore
drive carefully on bridges and shaded roads, for
example, otherwise there is an increased risk of
an accident.<
Current vehicle speed
To have the current speed shown in the upper
display for the outside temperature and time.
Press and hold the button in the turn indicator
lever until the display changes.The outside temperature then appears in the
bottom display.
Odometer and trip odometer
Resetting the trip odometer
With the ignition switched on, press knob 3 in
the tachometer.
When the vehicle is parked
To display the time, outside temperature and
odometer briefly after the key is removed from
the ignition lock:
Press knob 3 in the tachometer.
Tachometer
Never operate the engine with the needle in the
red overspeed zone of the gauge. In this range,
the fuel supply is interrupted to protect the
engine.
Coolant temperature
A warning lamp will come on if the coolant, and
therefore the engine, becomes too hot.
Check coolant level, refer to page96.