tow MINI Hardtop 2 Door 2008 User Guide
[x] Cancel search | Manufacturer: MINI, Model Year: 2008, Model line: Hardtop 2 Door, Model: MINI Hardtop 2 Door 2008Pages: 164, PDF Size: 2.66 MB
Page 109 of 164

ReferenceAt a glance Controls Driving tips Mobility
107
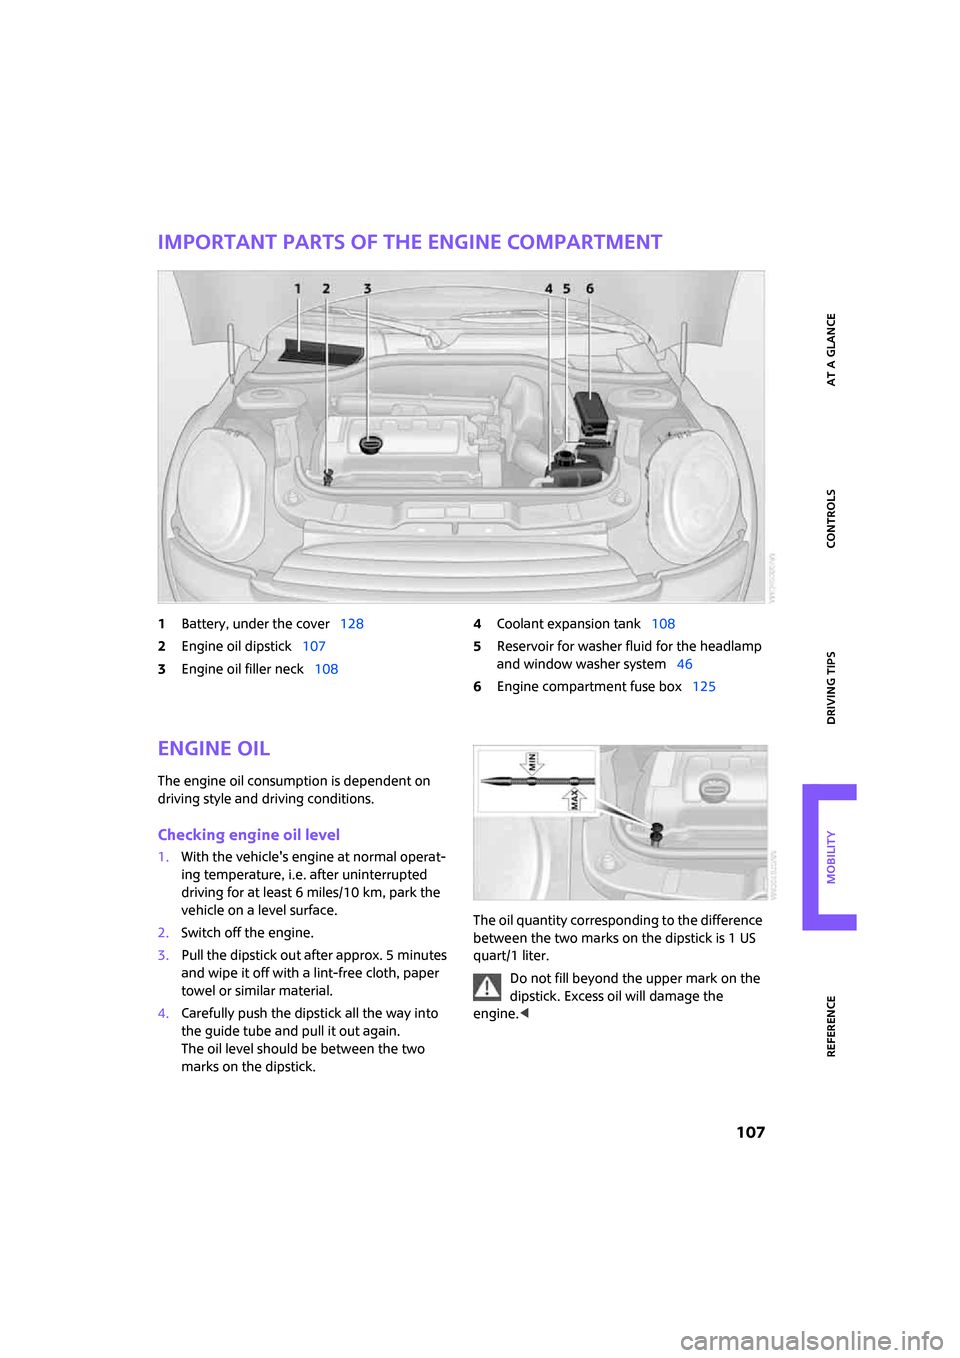
Important parts of the engine compartment
1Battery, under the cover128
2Engine oil dipstick107
3Engine oil filler neck1084Coolant expansion tank108
5Reservoir for washer fluid for the headlamp
and window washer system46
6Engine compartment fuse box125
Engine oil
The engine oil consumption is dependent on
driving style and driving conditions.
Checking engine oil level
1.With the vehicle's engine at normal operat-
ing temperature, i.e. after uninterrupted
driving for at least 6 miles/10 km, park the
vehicle on a level surface.
2.Switch off the engine.
3.Pull the dipstick out after approx. 5 minutes
and wipe it off with a lint-free cloth, paper
towel or similar material.
4.Carefully push the dipstick all the way into
the guide tube and pull it out again.
The oil level should be between the two
marks on the dipstick.The oil quantity corresponding to the difference
between the two marks on the dipstick is 1 US
quart/1 liter.
Do not fill beyond the upper mark on the
dipstick. Excess oil will damage the
engine.<
Page 116 of 164

Replacing components
114
Replacing components
Onboard tool kit
Your vehicle comes with an onboard tool kit that
varies with the equipment version; it is stored
underneath the level load floor.
>Mobility System with onboard tool kit and
tire change set
*120
>Tire change set with onboard tool kit for
space-saver spare tire122
Wiper blades
Changing the front wiper blades
1.Fold up the wiper arm.
2.Position the wiper blade horizontally.
3.Press the securing spring, arrow.
4.Unhook the wiper blade toward the wind-
shield.
5.Pull the wiper blade past the wiper arm
toward the top.
6.Insert the new wiper blade.
7.Press into position until you hear it engage.To avoid damage, make sure that the
wiper arms are against the windshield
before you open the bonnet.<
Replacing the rear wiper blade in the
MINI
1.Fold up the wiper arm.
2.Rotate the wiper blade toward the back as
far as it will go, arrow.
3.Press the wiper blade against the limit and
thus out of the mounting.
4.Press the new wiper blade into the fixture
until it engages audibly.
Replacing the rear wiper blade in the
MINI Clubman
1.Fold out the wiper arm and hold it.
2.Press together the locking spring, arrow 1,
and fold out the wiper blade.
3.Pull the wiper blade away from and out of
the catch mechanism, arrow 2.
4.Press the new wiper blade into the fixture
until it engages audibly.
Page 120 of 164

Replacing components
118
MINI Clubman
1Brake lamp/tail lamp
21 watt/5 watt bulb, W 5 W
2Turn signal lamp
21 watt bulb, P 21 W
3Rear fog lamp
* P 21 W
4Backup lamp
21 watt bulb, P 21 W
Replacing bulbs in MINI
1.Remove the cover from the sidewall of the
cargo bay.
2.Screw out the desired bulb counterclock-
wise, arrows1.
Additional bulbs are located behind the
sidewall of the cargo bay, arrow 2.
3.To insert the new bulb and replace the
cover, proceed in reverse order.
Replacing bulbs in MINI Clubman
1.Using the screwdriver from the onboard tool
kit, remove the screw at the top.
2.Swing out the tail lamp and remove it
toward the top.
3.Pull off the cable connector 1, unlock the
bulb holder, arrow2, and remove it,
arrow3.
4.Screw out the respective bulb counterclock-
wise.
5.To insert the new bulb and reinstall the tail
lamp, proceed in reverse order.
Rear fog lamp*
21 watt bulb, P 21 W
Access to the lamp via the back or underside of
the bumper.
Page 122 of 164

Replacing components
120
>MINI Mobility System, refer to the following
section
>Run-Flat Tires, page104
>Tire change with space-saver spare tire,
page122
MINI Mobility System with onboard tool
kit and tire change set*
MINI
The MINI Mobility System with onboard tool kit
and tire change set
* is located under the floor
mat in the cargo bay.
1Filling canister
2Allen wrench
*/screwdriver
3Vehicle jack
*
4Wheel stud wrench
5Wrench, screwdriver/Phillips screwdriver,
towing eyelet
6Compressor, hose with manometer and plug
for cigarette lighter socket
7Package with filling hose, valve remover and
valve core
MINI Clubman
The MINI Mobility System with tire change set
and onboard tool kit is located under the floor
mat or the level load floor in the cargo bay.1Compressor, hose with manometer and plug
for cigarette lighter socket
2Filling hose
3Wheel stud wrench
*
4Vehicle jack*
5Torx insert bit for screwdriver
6Wrench
7Flat screwdriver/Phillips screwdriver, towing
eyelet
8Hub cover remover
9Filling canister
Use of the MINI Mobility System may be
ineffective if the tire puncture measures
approx. 1/8 in/4 mm or more. Contact the near-
est MINI Dealer if the tire cannot be made driv-
able with the MINI Mobility System.<
Liquid sealant
1Filling hose
2Filling canister
Filling
1.Shake the filling canister.
2.Screw the filling hose onto the filling canis-
ter.
Page 124 of 164

Replacing components
122
Replace the defective tire as soon as possible
and have the new wheel/tire assembly bal-
anced.
Have the MINI Mobility System refilled.
Tire change set
When changing a tire, always observe the safety
measures and the procedure for changing tires
described below.
In case of a flat tire the tire change set is
not needed due to the availability of the
MINI Mobility System.<
Changing wheels
Space-saver spare tire*
To change a space-saver spare tire, proceed as
follows:
>Remove space-saver spare tire, page122
>Prepare for tire change, page124
>Jack up vehicle, page124
>Mount space-saver spare tire, page124
>Tighten lug bolts, page125
>Drive with space-saver spare tire, page124
MINI tire change set with space-saver
spare tire*
On vehicles with a space-saver spare tire, the
tire change set with onboard tools is stored
under the floor mat in the cargo bay.
1Chock, folding
2Hub cover remover
3Wheel stud wrench
4Vehicle jack5Special wrench for removing the space-
saver spare tire
6Flat screwdriver/Phillips screwdriver
7Towing eyelet
8Wrench
9Lifting handle
The onboard tool kit includes a pouch with a
plastic bag in which you can place the damaged
wheel.
Removing the space-saver spare tire
The screw connection of the space-saver spare
tire is under the floor mat in the cargo bay, on
the base of the storage compartment for the tire
change set.
1.Unscrew the screw connection with the spe-
cial wrench.
2.Take out the cover panel.
3.Screw the lifting handle from the onboard
tool kit onto the thread.
4.Raise the lifting handle slightly.
Page 125 of 164

ReferenceAt a glance Controls Driving tips Mobility
123
5.Squeeze the securing spring.
6.The space-saver spare tire is released and
must be held by the lifting handle.
7.Lower the space-saver spare tire with the
lifting handle.
8.Unscrew the lifting handle.
9.Pull the space-saver spare tire underneath
the vehicle out towards the rear.
10.Position the space-saver spare tire with the
valve facing upward.
11.Unscrew the valve extension from the valve
of the space-saver spare tire.
12.Unscrew the dust cap from the extension
and place it on the valve of the space-saver
spare tire.
Due to its different dimensions, the dam-
aged wheel cannot be placed in the recess
for the space-saver spare tire.
In vehicles with the space-saver spare tire, the
tire change set with the onboard tool kit is
located beneath the floor mat or level load floor
in the cargo bay.
1Folding chock and cover for defective wheel
2Vehicle jack
3Wrench
4Wheel stud wrench
5Hub cover remover
6Flat screwdriver/Phillips screwdriver
7Torx insert bit for screwdriver
8Towing eyelet
The onboard tool kit includes a pouch with a
plastic bag in which you can place the damaged
wheel.
Removing the space-saver spare tire
The space-saver spare tire is located under the
tire change set in the cargo bay.
1.Fold up the floor mat.
2.Unscrew the nut, arrow, and remove the
space-saver spare tire.
Page 131 of 164

ReferenceAt a glance Controls Driving tips Mobility
129
Tow-starting, towing
away
Observe the applicable laws and regula-
tions for tow-starting and towing vehi-
cles.<
Do not transport any passengers other
than the driver in a vehicle that is being
towed.<
Using a tow fitting
The screw-in tow fitting must always be carried
in the car. It can be screwed in at the front or
rear of the MINI.
It is stored in the onboard tool kit in the cargo
bay underneath the cover on the right-hand
side, page114.
Use only the tow fitting provided with the
vehicle and screw it all the way in. Use the
tow fitting for towing on paved roads only. Avoid
lateral loading of the tow fitting, e.g. do not lift
the vehicle by the tow fitting. Otherwise the tow
fitting and the vehicle could be damaged.<
Access to screw thread
Push out the rectangular cover panel in the
bumper at the recesses.
Front
Rear
Being towed
M a k e s u r e t h a t t h e i g n it i o n is s w it c h e d o n ,
refer to page39, otherwise the low
beams, tail lamps, turn signal indicators and
windshield wipers may be unavailable. Do not
tow the vehicle with just the rear axle raised, as
this would allow the steering to turn. There is no
power assist while the engine is off. Thus, brak-
ing and steering will require increased effort.<
Switch on the hazard warning flashers, depend-
ing on local regulations.
Manual transmission
Gearshift lever in neutral position.
Automatic transmission
Tow vehicles with automatic transmission
only with a tow truck or with the front
wheels lifted; otherwise the transmission can be
damaged.<
Towing with a tow bar
The towing vehicle must not be lighter
than the towed vehicle, otherwise it may
be impossible to maintain control.<
Page 132 of 164

Giving and receiving assistance
130
The tow fittings used should be on the same side
on both vehicles. Should it prove impossible to
avoid mounting the tow bar at an angle, please
observe the following:
>Clearance and maneuvering capability will
be sharply limited during cornering.
>The tow bar will generate lateral forces if it is
attached offset.
Attach the tow bar to the tow fittings only,
as attaching it to other parts of the vehicle
could result in damage.<
Towing with a tow rope
When starting off in the towing vehicle, make
sure that the tow rope is taut.
To avoid jerking and the associated
stresses on vehicle components when
towing, always use nylon ropes or nylon straps.
Attach the tow rope to the tow fittings only, as
attaching it to other parts of the vehicle could
result in damage.<
Towing with a tow truck
Have the MINI transported with a tow truck with
a so-called lift bar or on a flat bed.
Do not lift the vehicle by a tow fitting or
body and chassis parts, otherwise damage
may result.<
Tow-starting
Avoid tow-starting the vehicle whenever possi-
ble; instead, jump-start the engine, page128.
Vehicles with a catalytic converter should only
be tow-started when the engine is cold, vehicles
with an automatic transmission cannot be tow-
started at all.1.Switch on hazard warning flashers, comply
with local regulations.
2.Switch on the ignition, page39.
3.Shift into 3rd gear.
4.Have the vehicle tow-started with the clutch
completely depressed and then slowly
release the clutch. After the engine starts,
immediately depress the clutch completely
again.
5.Stop at a suitable location, remove the tow
bar or rope and switch off the hazard warn-
ing flashers.
6.Have the vehicle checked.
Page 152 of 164

From A to Z
150
From A to Z
Index
A
Accessories, refer to Your
individual vehicle4
Activated-charcoal filter for
automatic climate control75
Additives
– coolant108
– engine oil108
Adjusting temperature inside
the car, refer to Air
conditioner72
Adjusting temperature inside
the car, refer to Automatic
climate control73
Airbags64
– sitting safely30
– warning lamp65
Air conditioner71
Air conditioning mode
– air conditioner72
– automatic climate control73
– ventilation75
Air distribution
– automatic74
– individual73
– manual73
Air flow rate72,73
– air conditioning system72
– automatic climate control73
– heating, ventilation72
Airing, refer to Ventilation75
Air outlets, refer to Air vents71
Air pressure, checking, refer to
Tire inflation pressure96
Air recirculation, refer to
Recirculated-air
mode72,74
Air supply
– air conditioner72
– automatic climate control73
– ventilation75
Air vents71AKI, refer to Fuel
specifications95
Alarm system24
All-season tires, refer to Winter
tires105
All-Season Traction Control
ASC58
Ambient air, refer to
Recirculated-air
mode72,74
Ambient lighting70
Antenna, care112
Antifreeze
– coolant108
– washer fluid46
Antilock Brake System ABS58
Anti-theft alarm system, refer
to Alarm system24
Anti-theft system19
Approved axle loads, refer to
Weights146,147
Approved engine oils108
Approved gross vehicle
weight, refer to
Weights146,147
Armrest, refer to Center
armrest78
Arrival time
– computer50
Ashtray80
Assistant systems, refer to
– All-Season Traction Control
ASC58
– Dynamic Stability Control
DSC58
AUC Automatic recirculated-
air control74
Audio device, external78
Automatic
– air distribution74
– air flow rate74
– cruise control46
– headlamp control66Automatic climate control71
– automatic air distribution74
Automatic recirculated-air
control AUC74
Automatic transmission with
Steptronic41
– interlock41
– overriding selector lever
lock43
– shiftlock41
– sport program42
AUTO program for automatic
climate control74
AUX-In, refer to External audio
device78
Average fuel consumption49
– setting the units51
Average speed50
Axle loads, refer to
Weights146,147
B
Background lighting, refer to
Ambient lighting70
Backrests, refer to Seats30
Backup lamps
– replacing bulb117
– replacing bulbs in MINI118
– replacing bulbs in MINI
Clubman118
Band-aids, refer to First aid
pouch127
Bar, refer to Tow-starting,
towing away129
Battery125
– charging125
– disposal27,125
– jump starting128
– temporary power failure125
Battery renewal
– remote control27
Being towed129
Page 153 of 164

ReferenceAt a glance Controls Driving tips Mobility
151
Belts, refer to Safety belts33
Belt tensioner, refer to Safety
belts33
Beverage holders, refer to Cup
holders80
Blower, refer to Air flow
rate72,73
Bonnet106
Bottle holders, refer to Cup
holders80
Brake Assist58
Brake fluid, refer to Service
requirements53
Brake lamps
– replacing bulbs in MINI118
– replacing bulbs in MINI
Clubman118
Brake pads, breaking in84
Brake rotors85
– brakes84
– breaking in84
Brakes
– ABS58
– breaking in84
– MINI Maintenance
System110
– parking brake40
– service requirements53
Brakes, refer to Braking
safely85
Brake system84
– breaking in84
– disc brakes85
– MINI Maintenance
System110
Breakdown service, refer to
Roadside Assistance127
Breaking in the clutch84
Break-in period84
Bulb changing, refer to Lamps
and bulbs115
Button for starting the
engine39
Buttons on the steering
wheel11C
California Proposition 65
warning5
Can holders, refer to Cup
holders80
Capacities148
Capacity of cargo bay146
Car battery, refer to Vehicle
battery125
Car care112
Car-care products, refer to
Suitable car-care
products112
Care112
Cargo, securing89
Cargo area
– capacity147
Cargo area partition net, refer
to Partition net in MINI
Clubman87
Cargo bay86
– capacity146
– convenient access26
– cover86
– doors, refer to Splitdoor23
– lamp69
– lid, refer to Tailgate23
– opening from outside24
– volume146
Cargo bay, expanding86
Cargo bay doors, refer to
Splitdoor23
Cargo bay lamp69
Cargo bay lid, refer to
Tailgate23
Cargo bay partition net, refer
to Partition net in MINI
Clubman87
Cargo loading
– securing cargo89
– stowing cargo88
– vehicle86
Car key, refer to Keys/remote
controls18
Carpets, care113Car phone
– installation location, refer to
Center armrest78
– refer to separate Owner's
Manual
Car wash86
Car wash, care112
Catalytic converter, refer to
Hot exhaust system84
Center armrest78
Center brake lamp119
Center console, refer to
Around the center
console14
Central locking system19
– convenient access26
– from inside22
– from outside19
Changing bulbs
115
Changing wheels122
Chassis number, refer to
Engine compartment107
Check Control55
Child's seats36
Child-restraint fixing system
LATCH37
Child-restraint systems36
Chock, folding
– space-saver spare tire122
Chrome parts, care113
Chrome parts, refer to
Care112
Cigarette lighter80
Cleaning headlamps45
– washer fluid46
Clock48
– 12h/24h mode51
– setting time54
Closing
– from inside22
– from outside19
Clothes hooks79
Clubdoor23
Cockpit10
Cold start, refer to Starting the
engine39
Comfort access, refer to
Convenient access26