navigation system MINI Hardtop 2 Door 2010 (Mini Connected) User Guide
[x] Cancel search | Manufacturer: MINI, Model Year: 2010, Model line: Hardtop 2 Door, Model: MINI Hardtop 2 Door 2010Pages: 230, PDF Size: 4.02 MB
Page 33 of 230
MOBILITYAT A GLANCE CONTROLS DRIVING TIPS ENTERTAINMENT
31
NAVIGATION REFERENCE
7.Select a menu item:
>"Relock if not opened"
The central locking system automatically
locks the vehicle after a short time when
no door has been opened.
>"Lock after driving"
The central locking system automatically
locks the vehicle as soon as you drive off.
The setting is selected.
The setting is stored for the remote control cur-
rently in use.
Tailgate
To avoid damage, make sure there is
sufficient clearance before opening the
tailgate.<
Opening
In some market-specific versions, the tail-
gate cannot be unlocked using the remote
control unless the vehicle is unlocked first.<
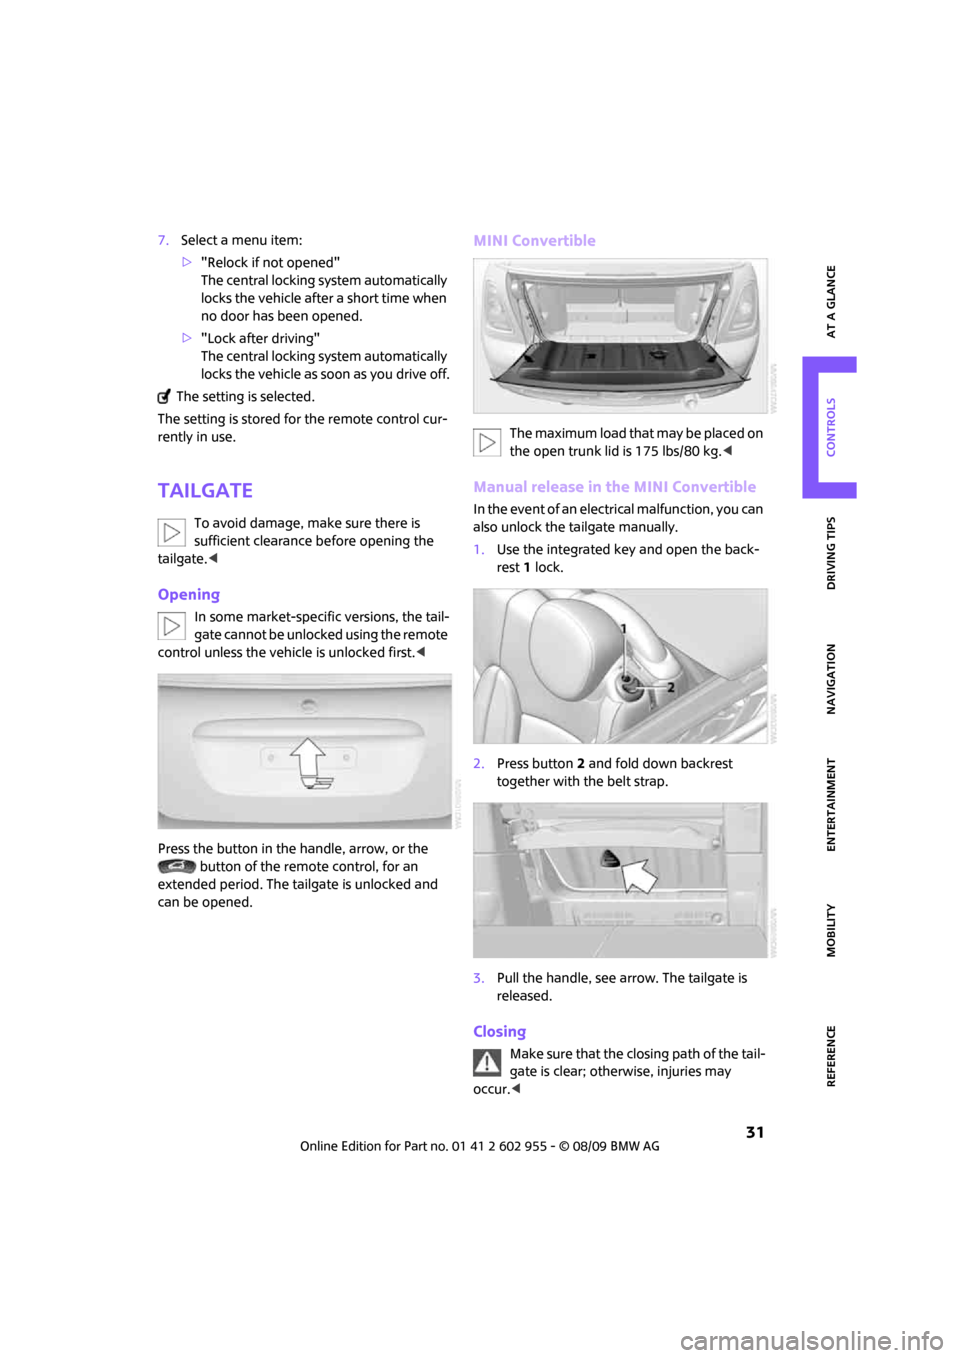
Press the button in the handle, arrow, or the
button of the remote control, for an
extended period. The tailgate is unlocked and
can be opened.
MINI Convertible
The maximum load that may be placed on
the open trunk lid is 175 lbs/80 kg.<
Manual release in the MINI Convertible
In the event of an electrical malfunction, you can
also unlock the tailgate manually.
1.Use the integrated key and open the back-
rest 1 lock.
2.Press button2 and fold down backrest
together with the belt strap.
3.Pull the handle, see arrow. The tailgate is
released.
Closing
Make sure that the closing path of the tail-
gate is clear; otherwise, injuries may
occur.<
Page 35 of 230

MOBILITYAT A GLANCE CONTROLS DRIVING TIPS ENTERTAINMENT
33
NAVIGATION REFERENCE
Tilt alarm sensor
The vehicle's inclination is monitored. The alarm
is triggered, for instance, if an attempt is made
to steal the car's wheels or tow it away.
Interior movement detector
Before the interior movement detector can
operate correctly, the windows and glass roof
must be closed.
MINI Convertible
The passenger compartment is monitored up to
the height of the seat's surface. This way, the
anti-theft alarm system including the interior
motion sensor are armed, even if the convertible
top is open. Falling objects, e.g. tree leaves, may
trigger a false alarm, refer to Avoiding false
alarms.
Avoiding false alarms
The tilt alarm sensor and the interior movement
detector can be switched off together.
This prevents false alarms, e.g. in the following
situations:
>In duplex garages
>When being transported on car-carrying
trains, ferries or trailers
>If pets are to remain inside the car
Switching off the tilt alarm sensor and
interior movement detector
>Press the button on the remote con-
trol twice in succession.
>Lock the vehicle twice with the inte-
grated key.
LEDs flash in short succession for approx. 2 sec-
onds.
The tilt alarm sensor and the interior movement
detector are switched off until the car is next
unlocked and locked.
Comfort Access*
Comfort Access enables you to enter your vehi-
cle without having to hold the remote control in your hand. All you need to do is wear the remote
control close to your body, e.g. in your jacket
pocket. The vehicle automatically detects the
remote control within the immediate vicinity or
in the passenger compartment.
Comfort Access supports the following func-
tions:
>Unlocking/locking the vehicle
>Unlocking the tailgate by itself
>Starting the engine
>MINI Convertible: Convenient closing
>MINI Convertible: Convertible top operation
Functional requirements
>The vehicle or the tailgate can only be
locked when the vehicle detects that the
remote control currently in use is outside of
the vehicle.
>The vehicle cannot be locked or unlocked
again until after approx. 2 seconds.
>The engine can only be started when the
vehicle detects that the remote control is
inside the vehicle.
>The doors and tailgate must be closed to
be able to operate the windows and glass
sunroof
*.
Comparison to standard remote controls
In general, there is no difference between using
Comfort Access or pressing the buttons on the
remote control to carry out the functions men-
tioned above.
Instructions on opening and closing are found
starting on page26.
Special features regarding the use of Comfort
Access are described below.
If you notice a brief delay while opening or
closing the windows, the glass sunroof or
the convertible top, the system is checking
whether a remote control is inside the vehicle.
Repeat the opening or closing procedure, if nec-
essary.<
Page 39 of 230

MOBILITYAT A GLANCE CONTROLS DRIVING TIPS ENTERTAINMENT
37
NAVIGATION REFERENCE
Do not close the windows until the closing
procedure for the convertible top is fin-
ished. Otherwise, it is not ensured that the side
windows will close properly against the rubber
seals of the convertible top. Convertible top,
refer to page38.<
After switching off the ignition
When the ignition is switched off, the windows
can still be operated for approx. 1 minute as
long as no door is opened.
Take the key with you when you leave the
car; otherwise, children could operate the
electric windows and possibly injure them-
selves.<
MINI: Pinch protection system
This function does not apply to the MINI Con-
vertible.
If the closing force exceeds a specific value as a
window closes, the closing action is interrupted
and the window reopens slightly.
Even though there is the pinch protection
system, always ensure that the window's
travel path is clear; otherwise, the safety system
might fail to detect certain kinds of obstructions,
such as thin objects, and the window would con-
tinue closing.
Do not install any accessories that might inter-
fere with window movement. Otherwise, the
pinch protection system could be impaired.<
Closing without pinch protection
If there is an external danger, or if ice on the win-
dows, etc., prevents you from closing the win-
dows normally, the window can be closed man-
ually.
1.Press the switch upward and hold it there.
Pinch protection is limited and the window
reopens slightly if the closing force exceeds
a certain value.
2.Press the switch upward again within
approx. 4 seconds and hold it there. The
window closes without pinch protection.
Convertible top with
integrated sliding
sunroof
To conserve battery power, if possible
operate the convertible top only while the
engine is running.
Prior to closing the convertible top, check for
and remove all debris from the windshield
frame; otherwise, the closing of the top may be
hampered.<
Opening and closing the sliding sunroof
To open:
Press the switch backward until the desired posi-
tion or the end position is reached.
To close:
Press the switch forward.
The sliding sunroof can be operated up to a road
speed of 74 mph / 120 km/h.
Power convertible top
The fully automatic convertible top provides
protection from the weather, combined with
simple and easy operation.
So that you can get the most enjoyment out
of your MINI Convertible, here are some help-
ful tips:
>It is recommended that you close the con-
vertible top whenever the vehicle is parked.
The closed convertible top not only protects
the vehicle interior from damage due to
unforeseen bad weather, but also provides a
certain degree of protection against theft.
Always keep your valuables inside the
locked luggage compartment, even if the
convertible top is closed.
Page 41 of 230

MOBILITYAT A GLANCE CONTROLS DRIVING TIPS ENTERTAINMENT
39
NAVIGATION REFERENCE
>The indicator lamp Convertible top not
locked lights up and a message is indicated
on the Control Display.
Interruption
A convertible top which is not completely
open or closed is hazardous.<
The automatic movement is immediately inter-
rupted when the button for the convertible top
operation is released. The procedure can be
continued in the desired direction by pressing
the appropriate button.
If the opening or closing procedure is inter-
rupted by releasing the respective button, the
convertible top stays in its current position for
several seconds before it slowly moves into a
more stable position. The procedure can be con-
tinued by pressing the appropriate button.
The opening and closing procedure is also inter-
rupted in case of a mechanical blockage. In this
case, in order to operate the convertible top
again:
1.Turn off the ignition and then switch it on
again.
2.Press the button to continue the procedure
in the desired direction.
Opening and closing procedure
Do not interrupt and restart the closing
procedure several times one after
another, or the convertible top mechanism
could be damaged.<
If the convertible top can be moved in only
one direction after several consecutive
attempts to operate it, the convertible top sys-
tem has overheated. Allow the system to cool
down for approx. 4 minutes.<
If the battery was disconnected, e.g. for
changing batteries or vehicle storage,
reinitialize the power windows, refer to page36.
Otherwise, the windows cannot be lowered or
the convertible top cannot be opened.<
Convenient operation
For convenient operation using the remote con-
trol, refer to page27; for operation via the door
lock, refer to page29.
Manual closing in the event of an
electrical malfunction
Only close the convertible top manually if
it is absolutely necessary. Never open it
manually. Improper handling of the convertible
top can result in damage. The closing procedure
must be completely finished. Otherwise, dam-
age or injury could result.<
Before closing
1.Remove allen key and screwdriver from
vehicle tools, refer to page185.
2.Pry out luggage compartment lamp from
the left side trim using the screwdriver.
3.Use the screwdriver and turn the gold-col-
ored screw, see arrow, one and a half turns
in the direction of the arrow.
Releasing the convertible top
1.Push cover panel forward, see arrow1.
2.In order to unlock the convertible top use
the allen key to loosen the screws of the
locking devices, see arrows 2.
Page 49 of 230

MOBILITYAT A GLANCE CONTROLS DRIVING TIPS ENTERTAINMENT
47
NAVIGATION REFERENCE
Interior mirror, automatic dimming*
The automatic dimming feature of the interior
rearview mirror
* is controlled by two photo cells
in the mirror. One photo cell is in the mirror
frame, arrow; the other is on the back of the
mirror.
In order to ensure that the system functions cor-
rectly, keep the photo cells clean, do not cover
the area between the interior rearview mirror
and windshield, and do not affix adhesive labels
or stickers of any kind to the windshield directly
in front of the mirror.
Steering wheel
Adjustments
Do not adjust the steering wheel position
while the car is in motion; otherwise, there
is a risk of accident due to an unexpected
movement.<
1.Fold the lever down.
2.Move the steering wheel to the preferred
distance and angle to suit your seated
position.
3.Swing the lever back up.Do not use force to swing the lever
back up; otherwise, the mechanism
will be damaged.<
Page 51 of 230
MOBILITYAT A GLANCE CONTROLS DRIVING TIPS ENTERTAINMENT
49
NAVIGATION REFERENCE
3.Allow the belt strap to retract and pull it taut
against the child restraint system.
The safety belt is locked.
To unlock the safety belt
1.Open the belt buckle.
2.Remove the child restraint system.
3.Allow the safety belt strap to retract all
the way.
LATCH child-restraint
fixing system
LATCH: Lower Anchors and Tethers for CHildren.
To install and use the LATCH child restraint
system, follow the operating and safety
instructions provided by the manufacturer of the
system; otherwise, the protective function of the
seat may be compromised.<
Anchor points for LATCH anchors
Before installing the child seat, pull the belt out
of the area for the child-restraint fixing system.
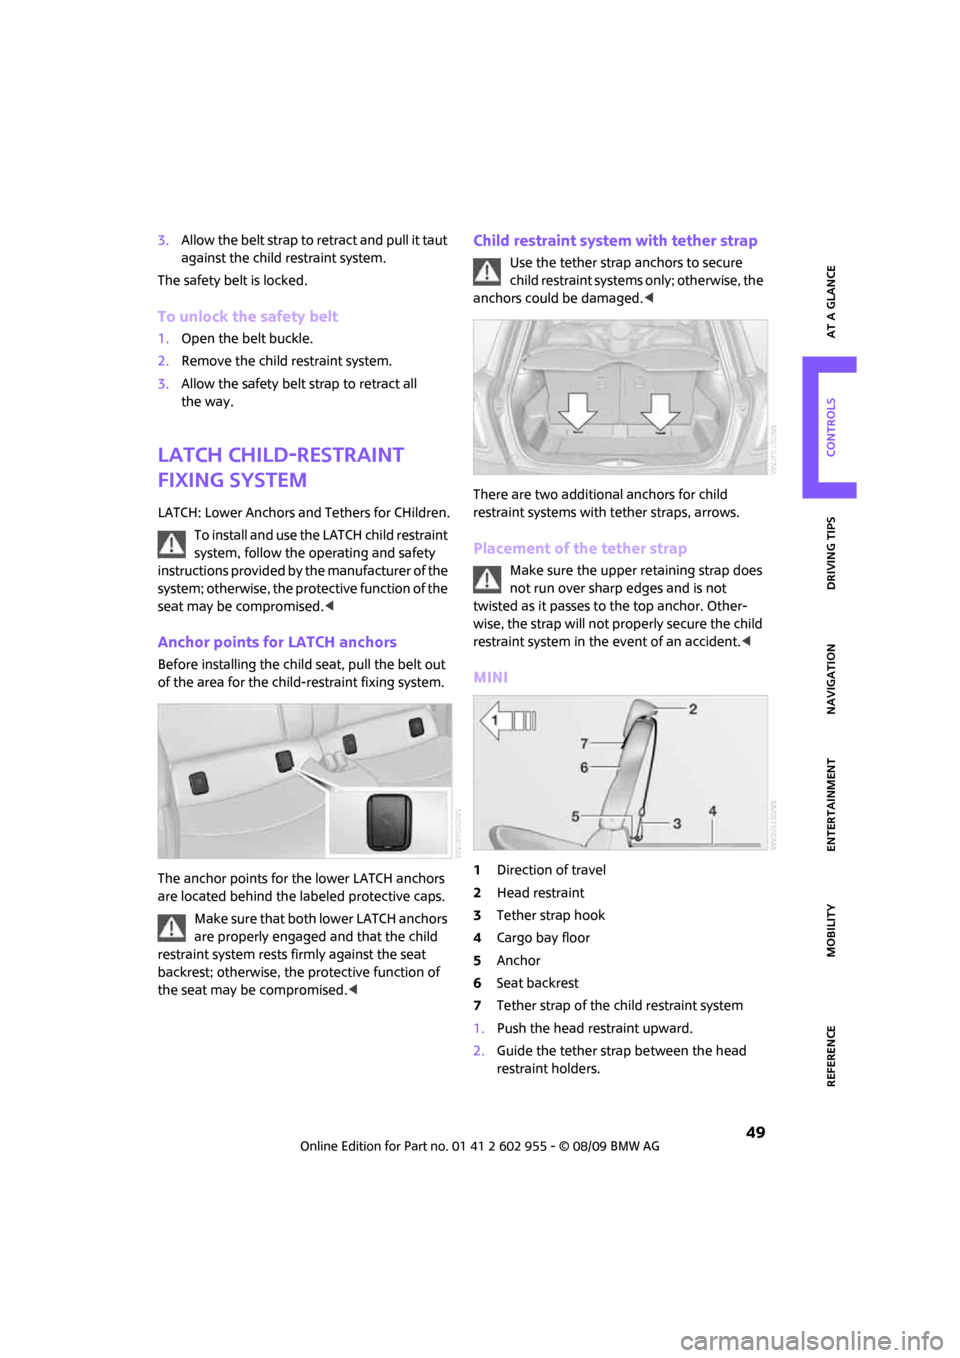
The anchor points for the lower LATCH anchors
are located behind the labeled protective caps.
Make sure that both lower LATCH anchors
are properly engaged and that the child
restraint system rests firmly against the seat
backrest; otherwise, the protective function of
the seat may be compromised.<
Child restraint system with tether strap
Use the tether strap anchors to secure
child restraint systems only; otherwise, the
anchors could be damaged.<
There are two additional anchors for child
restraint systems with tether straps, arrows.
Placement of the tether strap
Make sure the upper retaining strap does
not run over sharp edges and is not
twisted as it passes to the top anchor. Other-
wise, the strap will not properly secure the child
restraint system in the event of an accident.<
MINI
1Direction of travel
2Head restraint
3Tether strap hook
4Cargo bay floor
5Anchor
6Seat backrest
7Tether strap of the child restraint system
1.Push the head restraint upward.
2.Guide the tether strap between the head
restraint holders.
Page 59 of 230
MOBILITYAT A GLANCE CONTROLS DRIVING TIPS ENTERTAINMENT
57
NAVIGATION REFERENCE
5.Press and hold the button until the display
changes.
6.Press the button to select the desired sensi-
tivity.
7.Wait, or press and hold the button until the
display changes.
The settings are stored.
Deactivating intermittent wipe or rain
sensor
Press the button again, arrow3.
Brief wipe
Press the lever downward once, arrow2.
Cleaning windshield and headlamps*
Pull the lever, arrow 4.
Washer fluid is sprayed onto the windshield and
the wipers are operated briefly.
When the vehicle lighting system is switched on,
the headlamps are cleaned at regular and
appropriate intervals.
In cars equipped with an alarm system, the
headlamps cannot be cleaned when the bonnet
is open.
Do not use the washers when the washer
fluid reservoir is empty; otherwise, you will
damage the washer pump.
Only use the washers if the bonnet has been
completely closed; otherwise, the headlamp
washer system
* may be damaged. Do not use
the washers if there is any danger that the fluid
will freeze on the windshield. If you do, your
vision could be obscured. For this reason, use
antifreeze.<
Window washer nozzles
The window washer nozzles are heated auto-
matically
* while the engine is running or the
ignition is switched on.
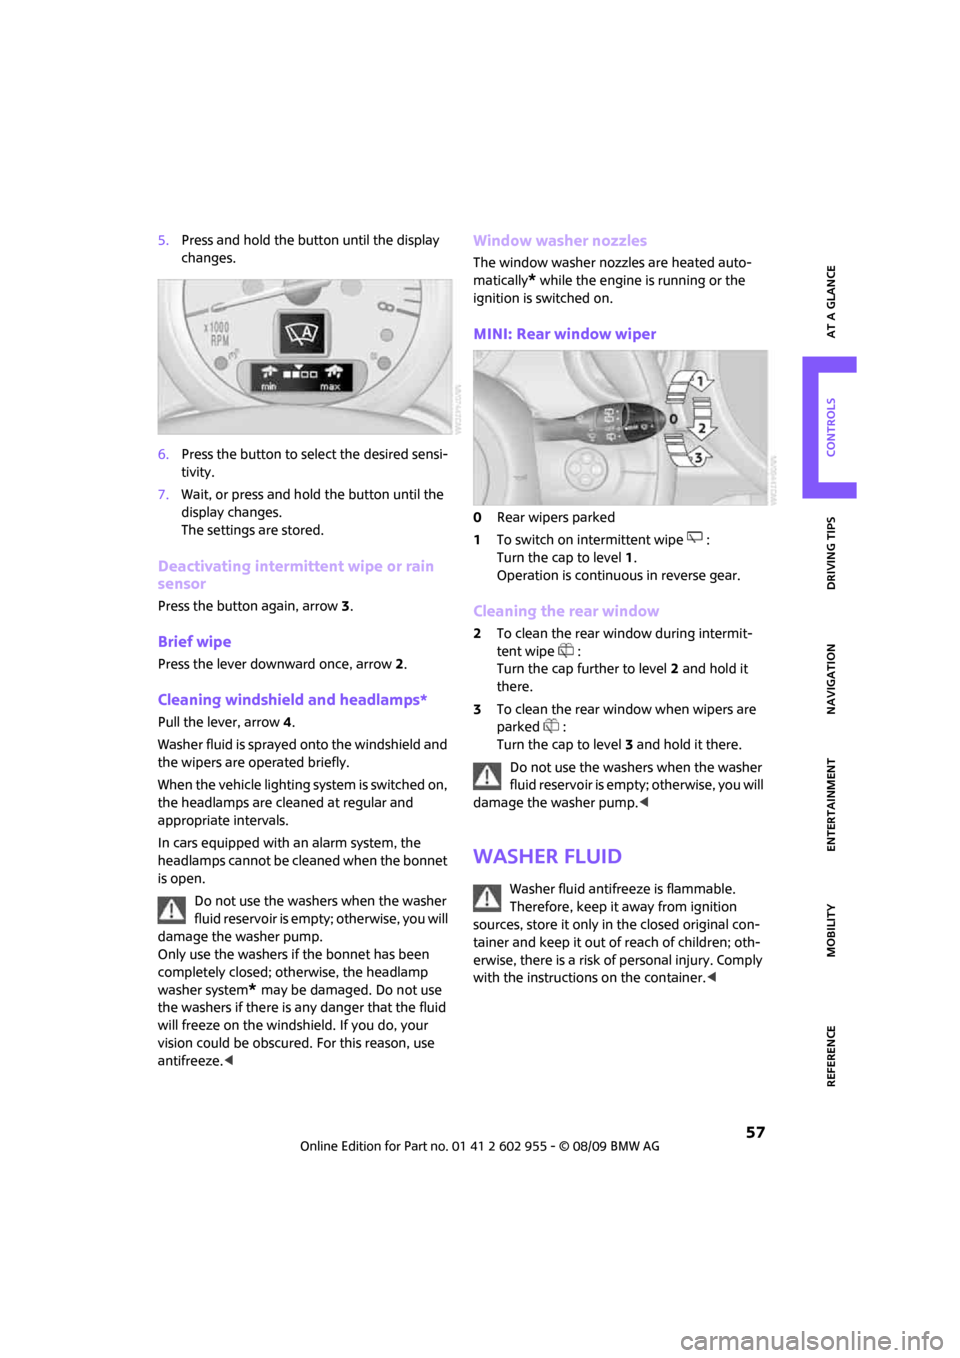
MINI: Rear window wiper
0Rear wipers parked
1To switch on intermittent wipe :
Turn the cap to level1.
Operation is continuous in reverse gear.
Cleaning the rear window
2To clean the rear window during intermit-
tent wipe :
Turn the cap further to level2 and hold it
there.
3To clean the rear window when wipers are
parked :
Turn the cap to level3 and hold it there.
Do not use the washers when the washer
fluid reservoir is empty; otherwise, you will
damage the washer pump.<
Washer fluid
Washer fluid antifreeze is flammable.
Therefore, keep it away from ignition
sources, store it only in the closed original con-
tainer and keep it out of reach of children; oth-
erwise, there is a risk of personal injury. Comply
with the instructions on the container.<
Page 61 of 230

MOBILITYAT A GLANCE CONTROLS DRIVING TIPS ENTERTAINMENT
59
NAVIGATION REFERENCE
Increasing speed
Press button3 repeatedly until the desired
speed is reached. Every time you press the but-
ton, the speed increases by approx. 1 mph or
approx. 2 km/h.
Accelerating using the button
Press and hold button3.
The vehicle accelerates without pressure on the
accelerator pedal. After the button is released,
the driving speed is maintained and stored.
Decreasing speed
Press button4 repeatedly until the desired
speed is reached.
The functions here are the same as for increas-
ing the speed or accelerating, except that the
speed will be decreased.
Resuming a speed stored beforehand
Press button 1.
The last speed stored is achieved again and
maintained.
The stored speed is cleared when the ignition is
switched off.
Display in tachometer*
Selected speed is displayed briefly.
If --- mph or --- km/h is displayed briefly in
the tachometer, the conditions necessary
for operation may not be fulfilled.<
Malfunction
The warning lamp in the tachometer
lights up if the system fails. A message
appears on the Control Display.
Page 71 of 230
MOBILITYAT A GLANCE CONTROLS DRIVING TIPS ENTERTAINMENT
69
NAVIGATION REFERENCE
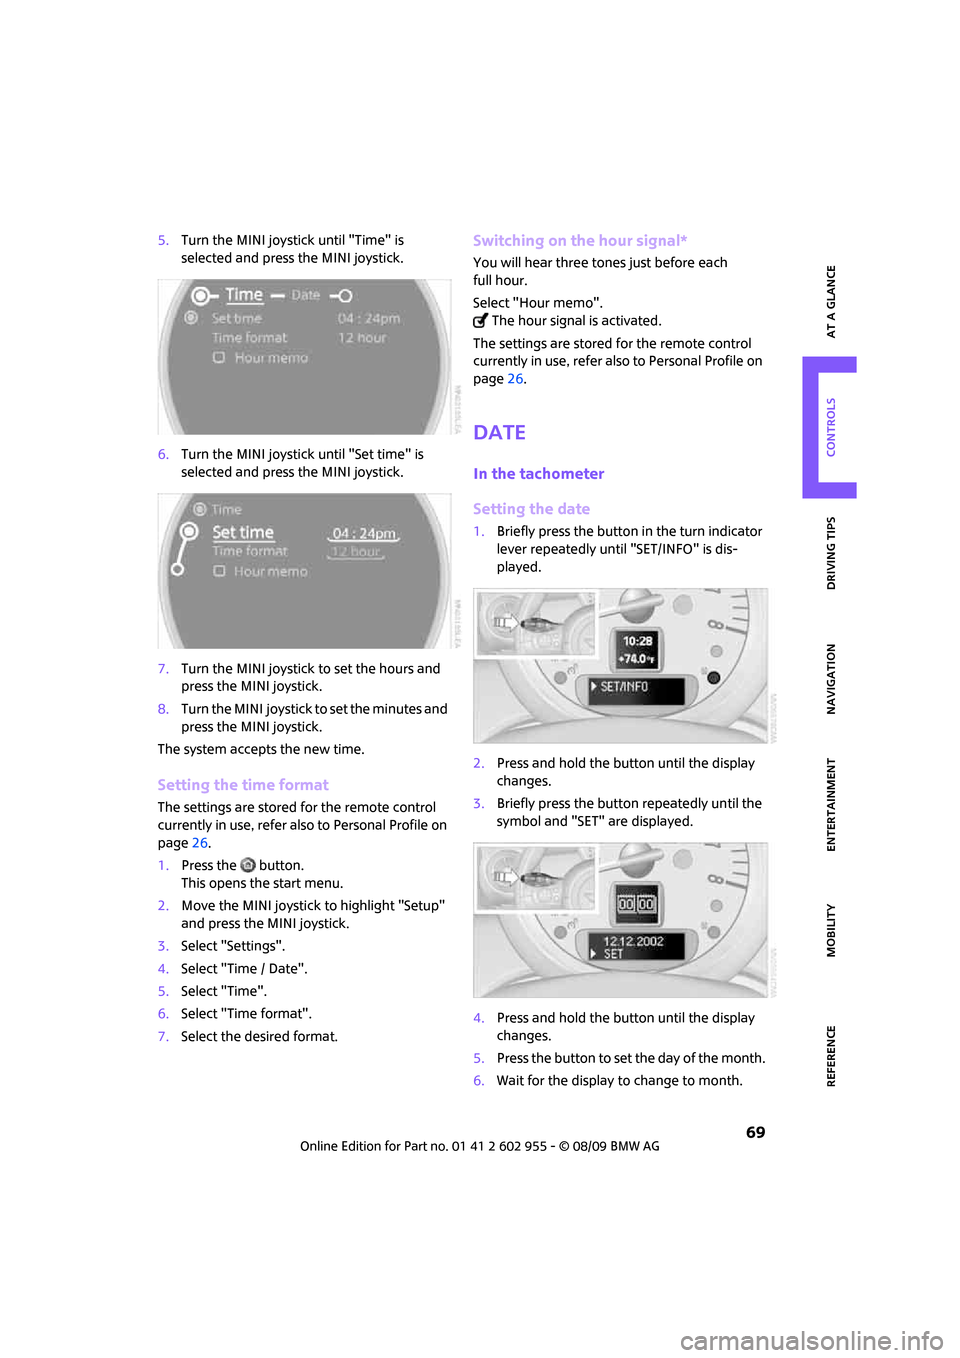
5.Turn the MINI joystick until "Time" is
selected and press the MINI joystick.
6.Turn the MINI joystick until "Set time" is
selected and press the MINI joystick.
7.Turn the MINI joystick to set the hours and
press the MINI joystick.
8.Turn the MINI joystick to set the minutes and
press the MINI joystick.
The system accepts the new time.
Setting the time format
The settings are stored for the remote control
currently in use, refer also to Personal Profile on
page26.
1.Press the button.
This opens the start menu.
2.Move the MINI joystick to highlight "Setup"
and press the MINI joystick.
3.Select "Settings".
4.Select "Time / Date".
5.Select "Time".
6.Select "Time format".
7.Select the desired format.
Switching on the hour signal*
You will hear three tones just before each
full hour.
Select "Hour memo".
The hour signal is activated.
The settings are stored for the remote control
currently in use, refer also to Personal Profile on
page26.
Date
In the tachometer
Setting the date
1.Briefly press the button in the turn indicator
lever repeatedly until "SET/INFO" is dis-
played.
2.Press and hold the button until the display
changes.
3.Briefly press the button repeatedly until the
symbol and "SET" are displayed.
4.Press and hold the button until the display
changes.
5.Press the button to set the day of the month.
6.Wait for the display to change to month.
Page 75 of 230
MOBILITYAT A GLANCE CONTROLS DRIVING TIPS ENTERTAINMENT
73
NAVIGATION REFERENCE
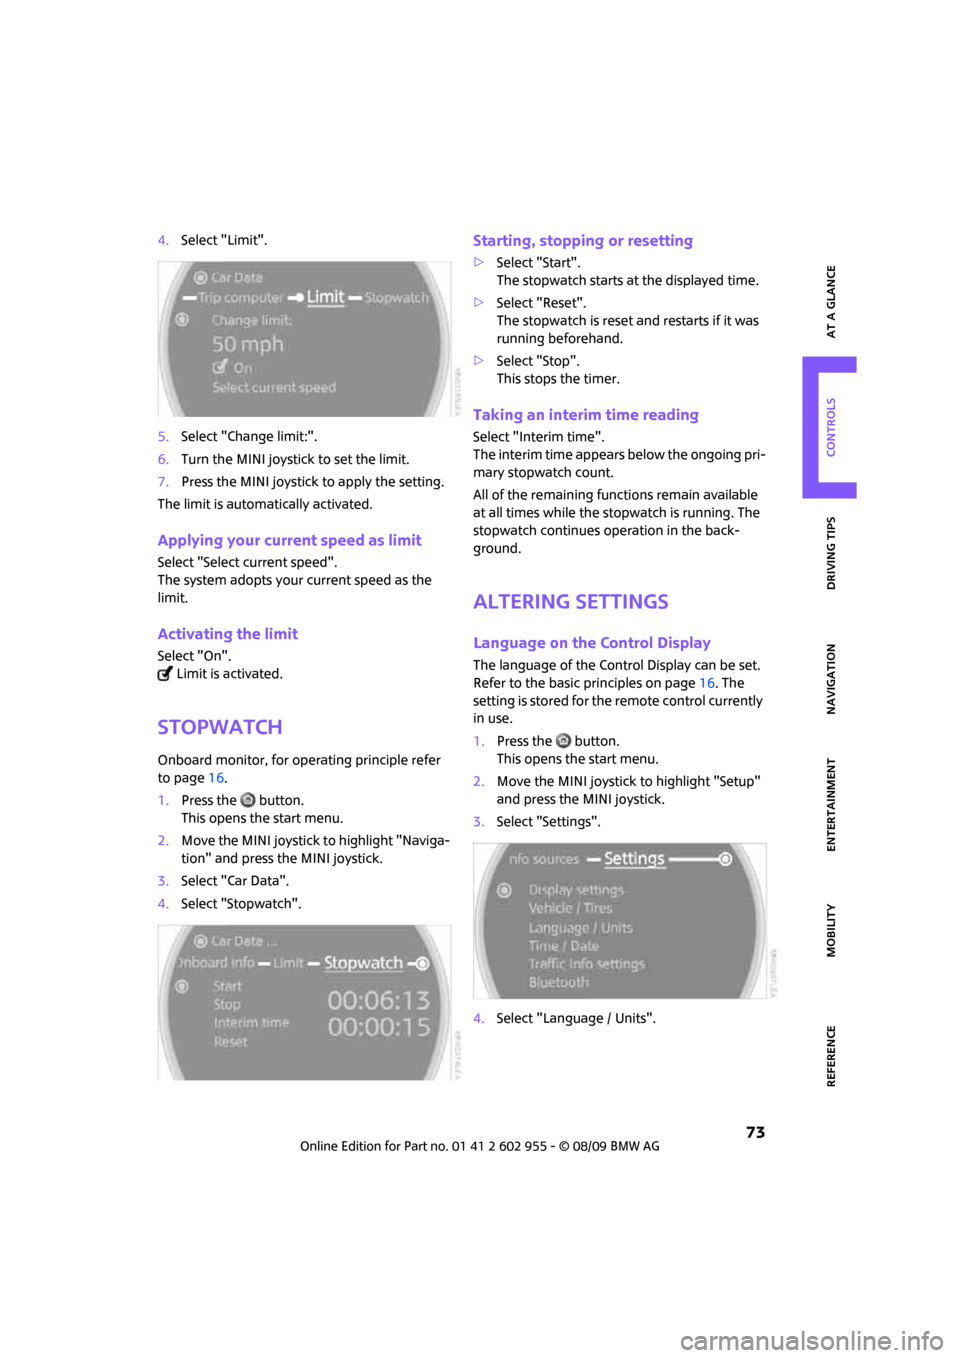
4.Select "Limit".
5.Select "Change limit:".
6.Turn the MINI joystick to set the limit.
7.Press the MINI joystick to apply the setting.
The limit is automatically activated.
Applying your current speed as limit
Select "Select current speed".
The system adopts your current speed as the
limit.
Activating the limit
Select "On".
Limit is activated.
Stopwatch
Onboard monitor, for operating principle refer
to page16.
1.Press the button.
This opens the start menu.
2.Move the MINI joystick to highlight "Naviga-
tion" and press the MINI joystick.
3.Select "Car Data".
4.Select "Stopwatch".
Starting, stopping or resetting
>Select "Start".
The stopwatch starts at the displayed time.
>Select "Reset".
The stopwatch is reset and restarts if it was
running beforehand.
>Select "Stop".
This stops the timer.
Taking an interim time reading
Select "Interim time".
The interim time appears below the ongoing pri-
mary stopwatch count.
All of the remaining functions remain available
at all times while the stopwatch is running. The
stopwatch continues operation in the back-
ground.
Altering settings
Language on the Control Display
The language of the Control Display can be set.
Refer to the basic principles on page16. The
setting is stored for the remote control currently
in use.
1.Press the button.
This opens the start menu.
2.Move the MINI joystick to highlight "Setup"
and press the MINI joystick.
3.Select "Settings".
4.Select "Language / Units".