rear entertainment MINI Hardtop 2 Door 2010 (Mini Connected) User Guide
[x] Cancel search | Manufacturer: MINI, Model Year: 2010, Model line: Hardtop 2 Door, Model: MINI Hardtop 2 Door 2010Pages: 230, PDF Size: 4.02 MB
Page 77 of 230
MOBILITYAT A GLANCE CONTROLS DRIVING TIPS ENTERTAINMENT
75
NAVIGATION REFERENCE
Technology for driving comfort and
safety
Park Distance
Control PDC*
The concept
PDC assists you with parking backwards. Acous-
tic signals and a visual indicator
warn you of the
presence of an object behind the vehicle. To
measure the distance, there are four ultrasonic
sensors in either bumper.
These sensors have a range of approx. 6.5 ft/
2 m. However, an acoustic warning does not
sound until an object is approx. 24 in/60 cm
from the rear corner sensors, or approx. 5 ft/
1.50 m from the rear center sensors.
PDC is a parking aid that can indicate
objects when they are approached slowly,
as is usually the case when parking. Avoid
approaching an object at high speed; otherwise,
physical circumstances may lead to the system
warning being issued too late.<
Automatic mode
With the engine running or the ignition switched
on, the system is activated automatically after
approx. 1 second when you engage reverse gear
or move the automatic transmission selector
lever to position R. Wait this short period before
driving.
Acoustic signals
As the distance between vehicle and object
decreases, the intervals between the tones
become shorter. If the distance to the nearest
object falls to below roughly 1 ft/30 cm, then a
continuous tone sounds.
If the distance remains constant, e.g. when driv-
ing parallel to a wall, the acoustic signal stops
after approx. 3 seconds.
Malfunction
Indicator lamp comes on: PDC is mal-
functioning. A message appears on the
Control Display. Have the system
checked.
To avoid this problem, keep the sensors clean
and free of ice or snow in order to ensure that
they will continue to operate effectively. When
using a high-pressure cleaner, do not direct the
jet toward the sensors for lengthy periods and
only spray from a distance of at least 4 in/10 cm.
PDC with visual warning
To have the system show distances to objects on
the Control Display. The contours of distant
objects are shown on the Control Display even
before the acoustic signal sounds.
Onboard monitor, for operating principle refer
to page16.
1.Press the button.
This opens the start menu.
2.Move the MINI joystick to highlight "Setup"
and press the MINI joystick.
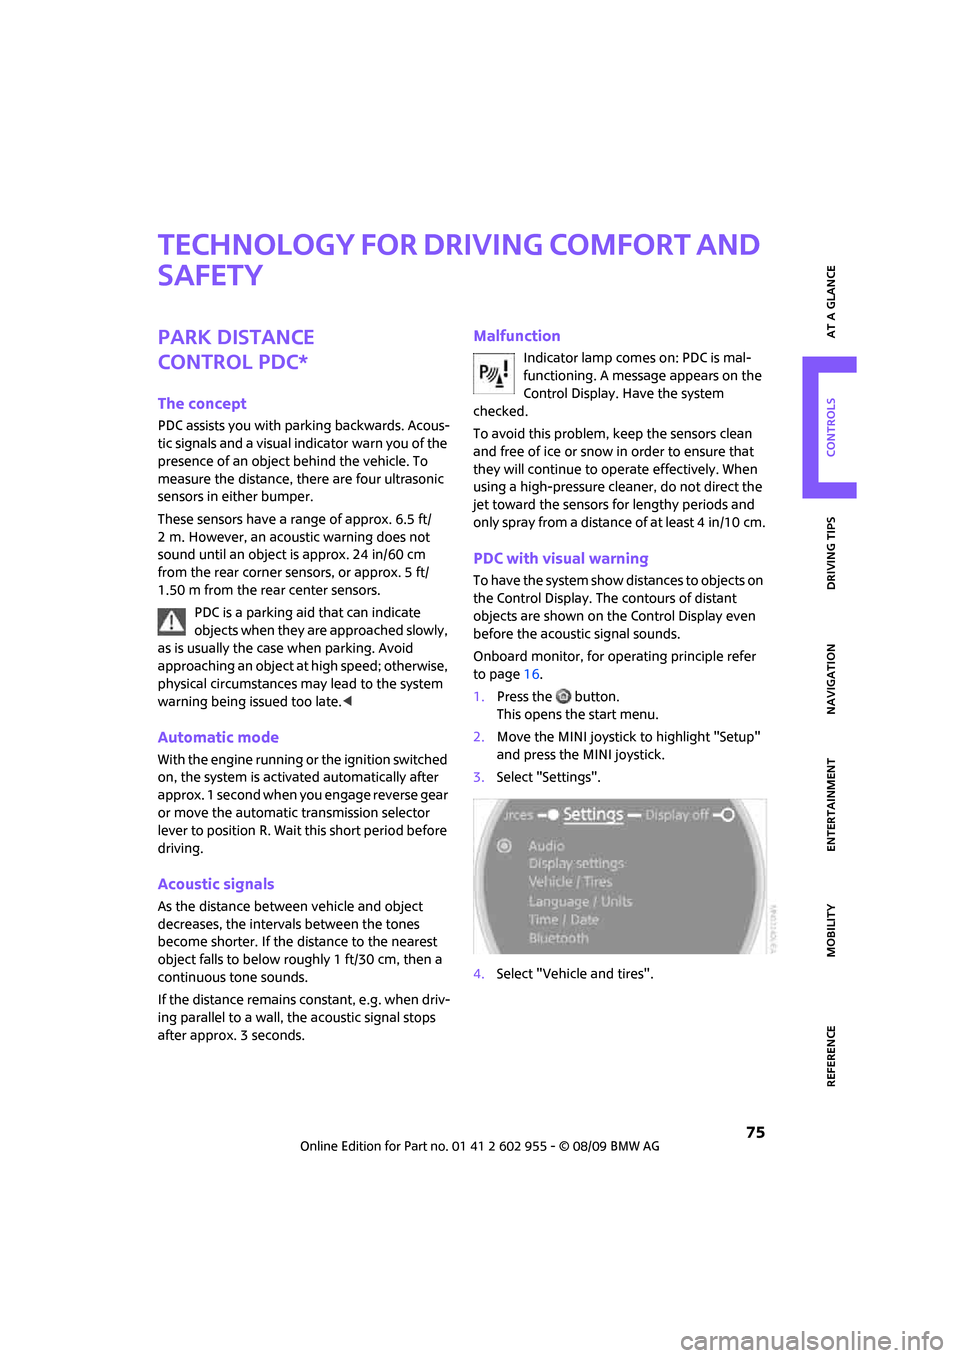
3.Select "Settings".
4.Select "Vehicle and tires".
Page 87 of 230
MOBILITYAT A GLANCE CONTROLS DRIVING TIPS ENTERTAINMENT
85
NAVIGATION REFERENCE
Automatic deactivation of the front
passenger airbags
An analysis of the impression in the front pas-
senger seat cushion determines whether and
how the seat is occupied. The front and side air-
bags for the front passenger are activated or
deactivated by the system accordingly.
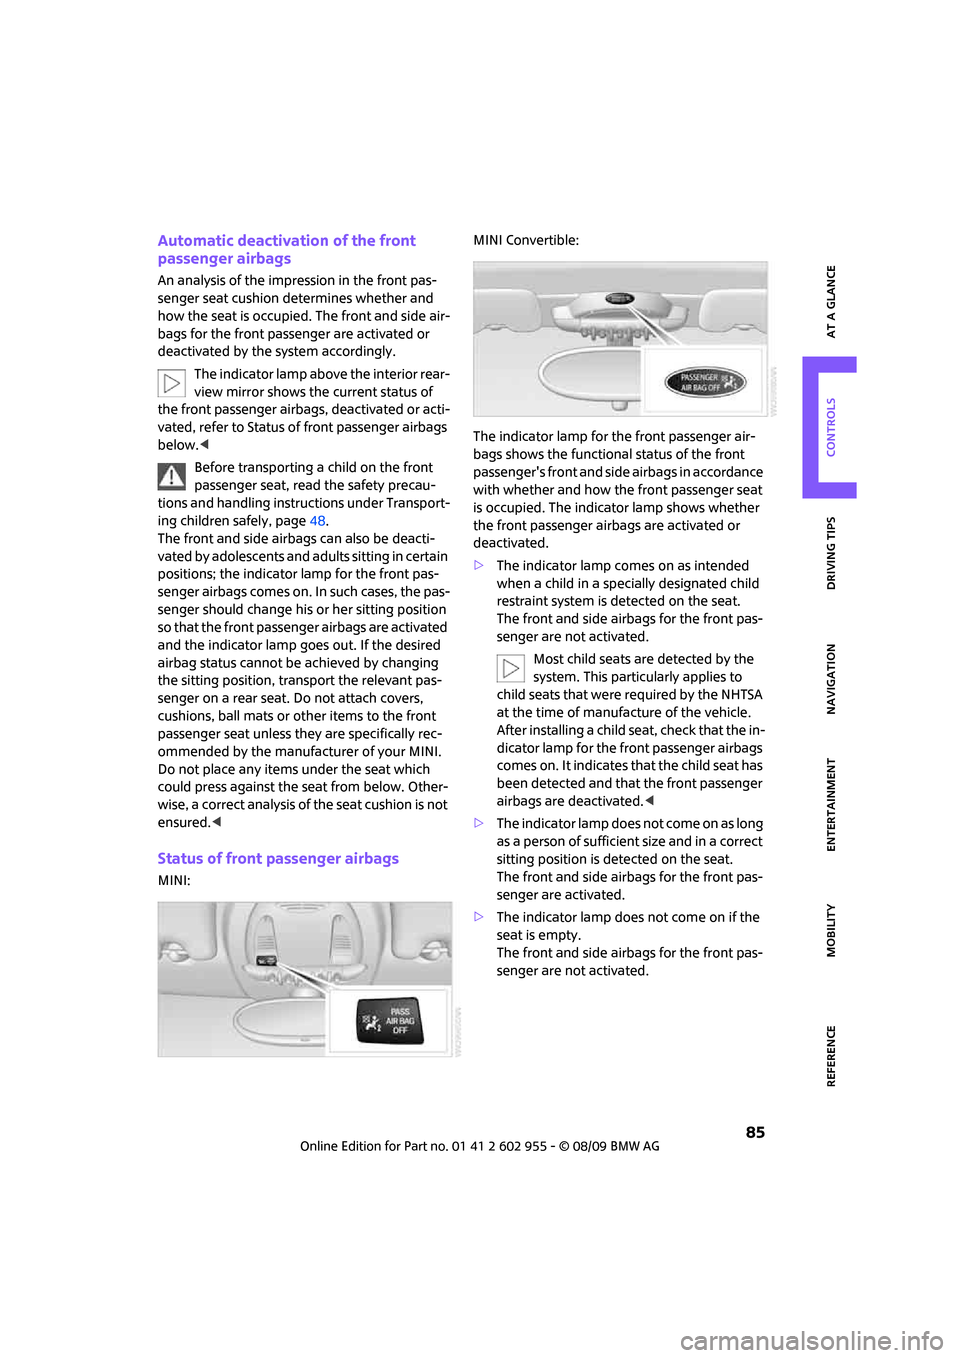
The indicator lamp above the interior rear-
view mirror shows the current status of
the front passenger airbags, deactivated or acti-
vated, refer to Status of front passenger airbags
below.<
Before transporting a child on the front
passenger seat, read the safety precau-
tions and handling instructions under Transport-
ing children safely, page48.
The front and side airbags can also be deacti-
vated by adolescents and adults sitting in certain
positions; the indicator lamp for the front pas-
senger airbags comes on. In such cases, the pas-
senger should change his or her sitting position
so that the front passenger airbags are activated
and the indicator lamp goes out. If the desired
airbag status cannot be achieved by changing
the sitting position, transport the relevant pas-
senger on a rear seat. Do not attach covers,
cushions, ball mats or other items to the front
passenger seat unless they are specifically rec-
ommended by the manufacturer of your MINI.
Do not place any items under the seat which
could press against the seat from below. Other-
wise, a correct analysis of the seat cushion is not
ensured.<
Status of front passenger airbags
MINI:MINI Convertible:
The indicator lamp for the front passenger air-
bags shows the functional status of the front
passenger's front and side airbags in accordance
with whether and how the front passenger seat
is occupied. The indicator lamp shows whether
the front passenger airbags are activated or
deactivated.
>The indicator lamp comes on as intended
when a child in a specially designated child
restraint system is detected on the seat.
The front and side airbags for the front pas-
senger are not activated.
Most child seats are detected by the
system. This particularly applies to
child seats that were required by the NHTSA
at the time of manufacture of the vehicle.
After installing a child seat, check that the in-
dicator lamp for the front passenger airbags
comes on. It indicates that the child seat has
been detected and that the front passenger
airbags are deactivated.<
>T h e i n d i c a t o r l a m p d o e s n o t c o m e o n a s l o n g
as a person of sufficient size and in a correct
sitting position is detected on the seat.
The front and side airbags for the front pas-
senger are activated.
>The indicator lamp does not come on if the
seat is empty.
The front and side airbags for the front pas-
senger are not activated.
Page 89 of 230
MOBILITYAT A GLANCE CONTROLS DRIVING TIPS ENTERTAINMENT
87
NAVIGATION REFERENCE
Lamps
Parking lamps/low beams
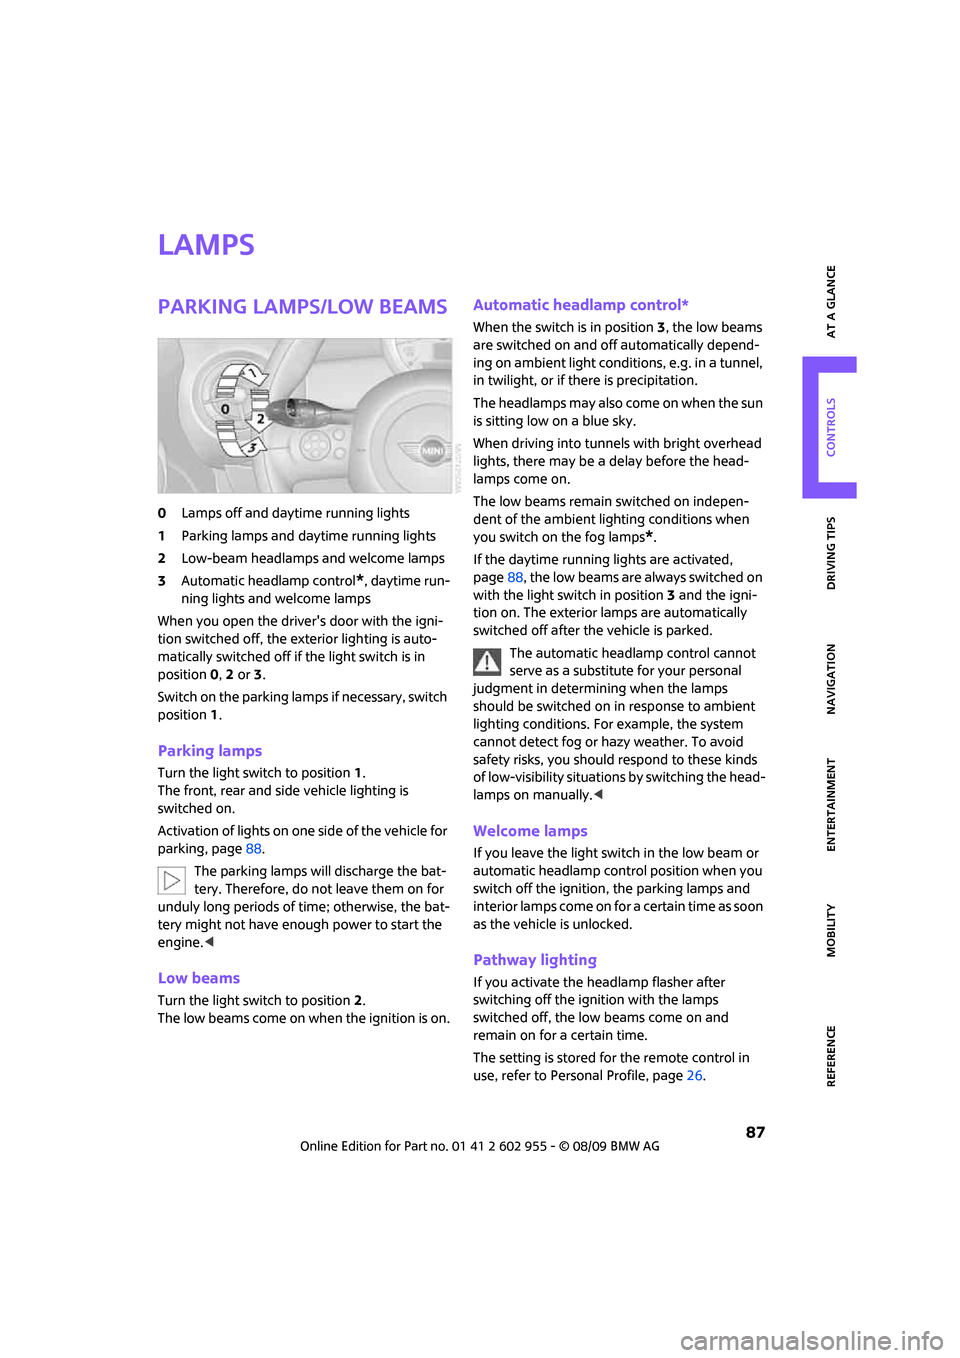
0Lamps off and daytime running lights
1Parking lamps and daytime running lights
2Low-beam headlamps and welcome lamps
3Automatic headlamp control
*, daytime run-
ning lights and welcome lamps
When you open the driver's door with the igni-
tion switched off, the exterior lighting is auto-
matically switched off if the light switch is in
position 0, 2 or 3.
Switch on the parking lamps if necessary, switch
position 1.
Parking lamps
Turn the light switch to position 1.
The front, rear and side vehicle lighting is
switched on.
Activation of lights on one side of the vehicle for
parking, page88.
The parking lamps will discharge the bat-
tery. Therefore, do not leave them on for
unduly long periods of time; otherwise, the bat-
tery might not have enough power to start the
engine.<
Low beams
Turn the light switch to position 2.
The low beams come on when the ignition is on.
Automatic headlamp control*
When the switch is in position3, the low beams
are switched on and off automatically depend-
ing on ambient light conditions, e.g. in a tunnel,
in twilight, or if there is precipitation.
The headlamps may also come on when the sun
is sitting low on a blue sky.
When driving into tunnels with bright overhead
lights, there may be a delay before the head-
lamps come on.
The low beams remain switched on indepen-
dent of the ambient lighting conditions when
you switch on the fog lamps
*.
If the daytime running lights are activated,
page88, the low beams are always switched on
with the light switch in position 3 and the igni-
tion on. The exterior lamps are automatically
switched off after the vehicle is parked.
The automatic headlamp control cannot
serve as a substitute for your personal
judgment in determining when the lamps
should be switched on in response to ambient
lighting conditions. For example, the system
cannot detect fog or hazy weather. To avoid
safety risks, you should respond to these kinds
of low-visibility situations by switching the head-
lamps on manually.<
Welcome lamps
If you leave the light switch in the low beam or
automatic headlamp control position when you
switch off the ignition, the parking lamps and
interior lamps come on for a certain time as soon
as the vehicle is unlocked.
Pathway lighting
If you activate the headlamp flasher after
switching off the ignition with the lamps
switched off, the low beams come on and
remain on for a certain time.
The setting is stored for the remote control in
use, refer to Personal Profile, page26.
Page 91 of 230
MOBILITYAT A GLANCE CONTROLS DRIVING TIPS ENTERTAINMENT
89
NAVIGATION REFERENCE
Switching off
Press the lever up or down to the pressure point.
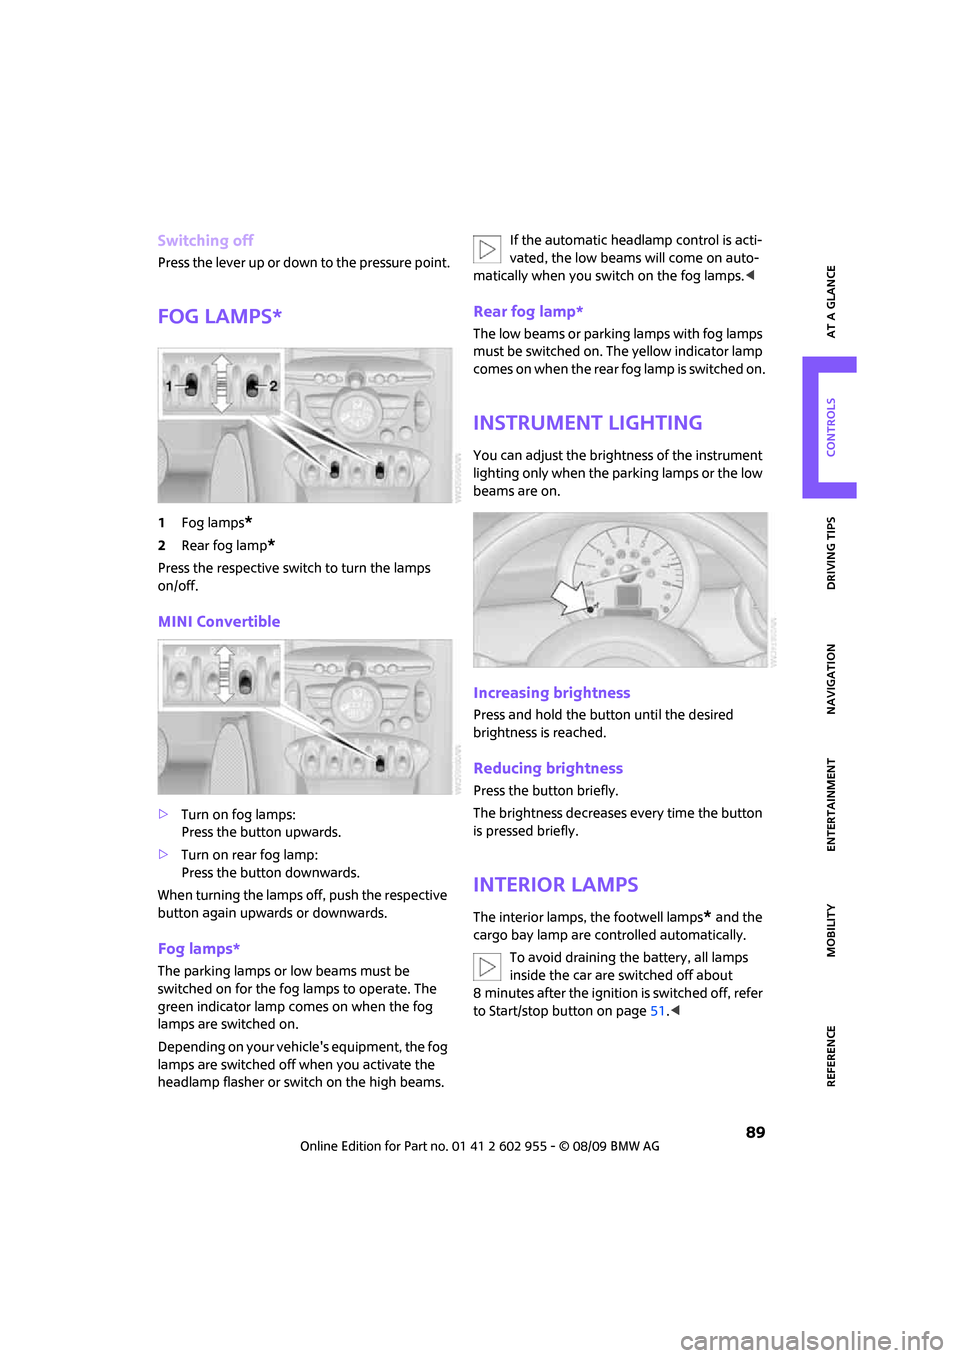
Fog lamps*
1Fog lamps*
2Rear fog lamp*
Press the respective switch to turn the lamps
on/off.
MINI Convertible
>Turn on fog lamps:
Press the button upwards.
>Turn on rear fog lamp:
Press the button downwards.
When turning the lamps off, push the respective
button again upwards or downwards.
Fog lamps*
The parking lamps or low beams must be
switched on for the fog lamps to operate. The
green indicator lamp comes on when the fog
lamps are switched on.
Depending on your vehicle's equipment, the fog
lamps are switched off when you activate the
headlamp flasher or switch on the high beams.If the automatic headlamp control is acti-
vated, the low beams will come on auto-
matically when you switch on the fog lamps.<
Rear fog lamp*
The low beams or parking lamps with fog lamps
must be switched on. The yellow indicator lamp
comes on when the rear fog lamp is switched on.
Instrument lighting
You can adjust the brightness of the instrument
lighting only when the parking lamps or the low
beams are on.
Increasing brightness
Press and hold the button until the desired
brightness is reached.
Reducing brightness
Press the button briefly.
The brightness decreases every time the button
is pressed briefly.
Interior lamps
The interior lamps, the footwell lamps* and the
cargo bay lamp are controlled automatically.
To avoid draining the battery, all lamps
inside the car are switched off about
8 minutes after the ignition is switched off, refer
to Start/stop button on page51.<
Page 93 of 230
MOBILITYAT A GLANCE CONTROLS DRIVING TIPS ENTERTAINMENT
91
NAVIGATION REFERENCE
Climate
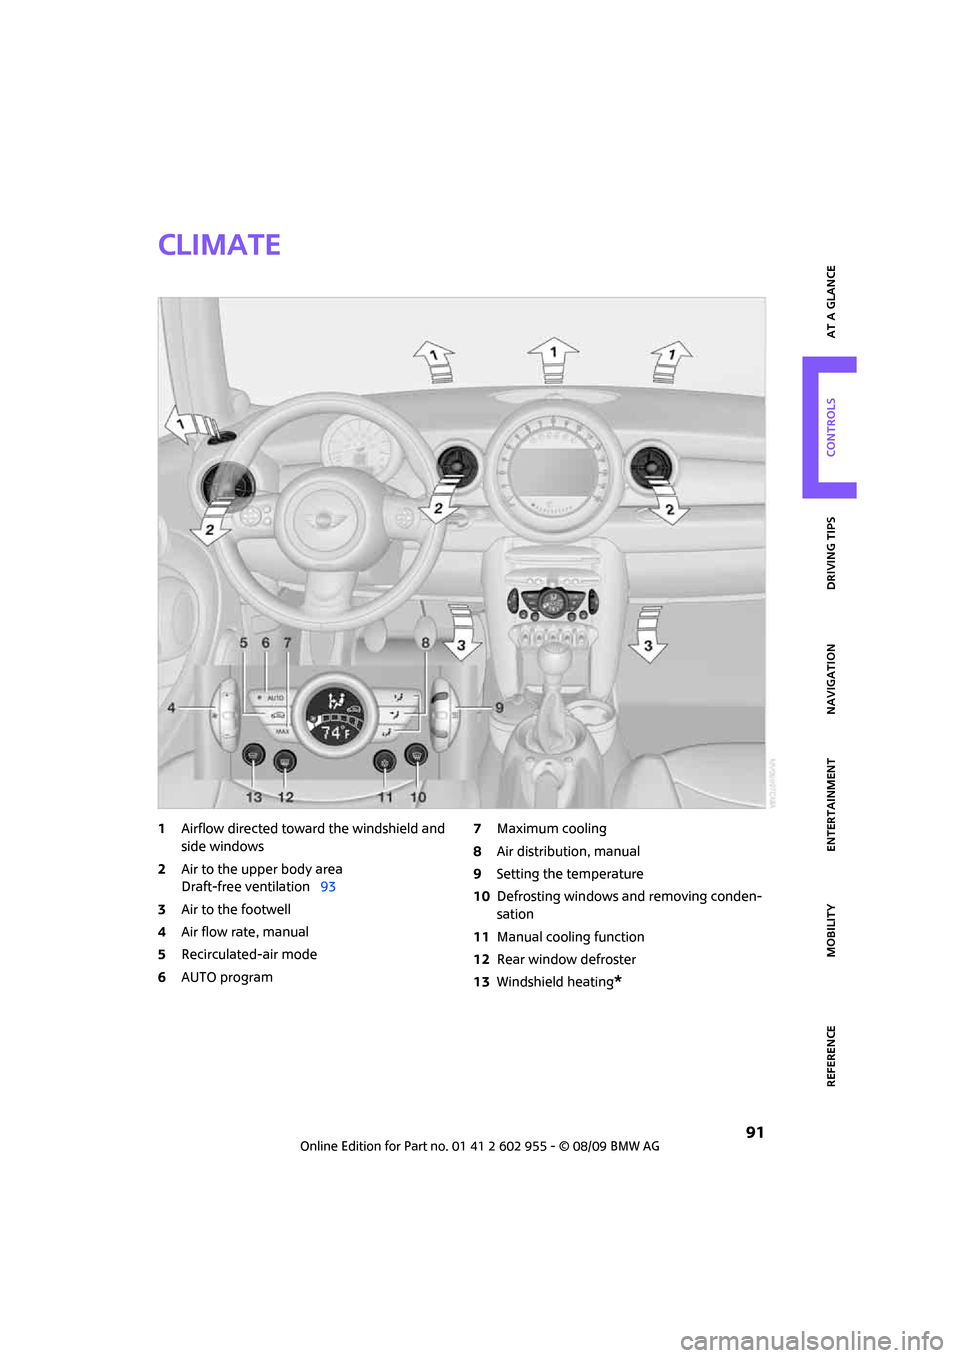
1Airflow directed toward the windshield and
side windows
2Air to the upper body area
Draft-free ventilation93
3Air to the footwell
4Air flow rate, manual
5Recirculated-air mode
6AUTO program7Maximum cooling
8Air distribution, manual
9Setting the temperature
10Defrosting windows and removing conden-
sation
11Manual cooling function
12Rear window defroster
13Windshield heating
*
Page 95 of 230
MOBILITYAT A GLANCE CONTROLS DRIVING TIPS ENTERTAINMENT
93
NAVIGATION REFERENCE
Temperature
Set the desired temperature individually.
The automatic climate control achieves
this temperature as quickly as possible
regardless of the season, using maximum
cooling or heating power if necessary, and then
maintains it.
If you switch between different tempera-
ture settings in quick succession, the auto-
matic climate control does not have enough
time to achieve the set temperature.<
Rear window defroster
The defroster is switched off auto-
matically after a certain time.
Depending on your vehicle's equip-
ment, the upper wires serve as an
antenna and are not part of the rear window
defroster.
Defrosting windows and removing
condensation
Quickly removes ice and condensa-
tion from the windshield and front
side windows.
For this purpose, also switch on the
cooling function.
The windshield heating
* is switched on auto-
matically.
Windshield heating*
The windshield heating is switched
off automatically after a certain
time.
Cooling function
When the cooling function is on,
the air is cooled, dried, then
reheated according to the temper-
ature setting. This function is only
available while the engine is running.
The cooling function helps prevent condensa-
tion on the windows or removes it quickly.Depending on the weather, the windshield may
fog over briefly when the engine is started. The
recirculated-air mode may be switched on auto-
matically.
The cooling function is automatically switched
on along with the AUTO program. The passenger
compartment can only be cooled while the
engine is running.
Microfilter/activated-charcoal filter
The microfilter captures dust and pollen. The
activated-charcoal filter provides additional pro-
tection by filtering gaseous pollutants from the
outside air. Your MINI dealer replaces this com-
bined filter as a standard part of your scheduled
maintenance.
You can call up further information in the service
requirements display, page65.
Ventilation
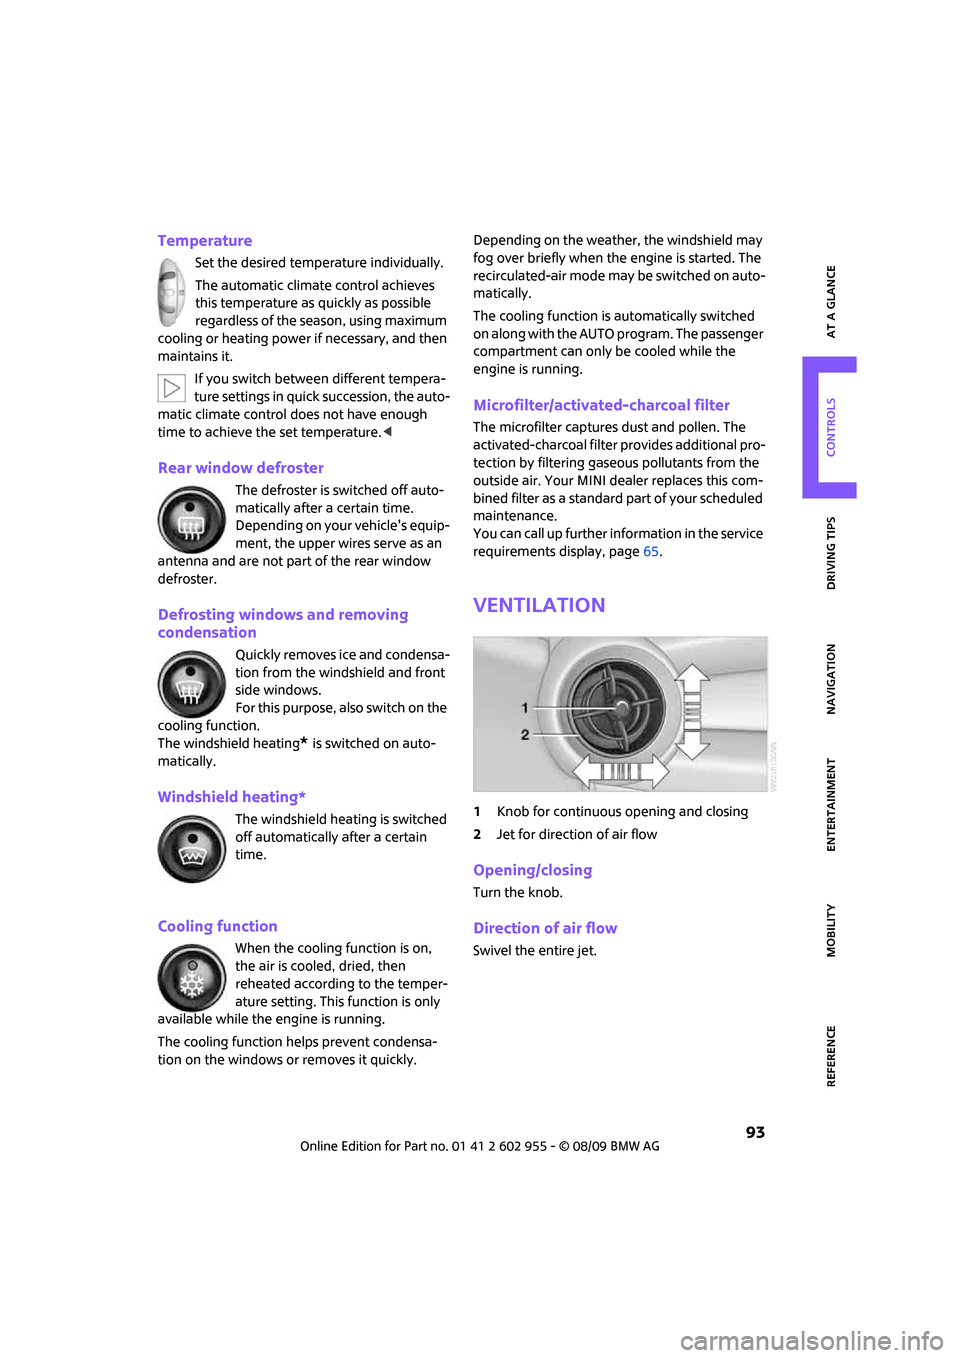
1Knob for continuous opening and closing
2Jet for direction of air flow
Opening/closing
Turn the knob.
Direction of air flow
Swivel the entire jet.
Page 99 of 230
MOBILITYAT A GLANCE CONTROLS DRIVING TIPS ENTERTAINMENT
97
NAVIGATION REFERENCE
Nets* are located in the passenger footwell and
on the backs of the front seat backrests.
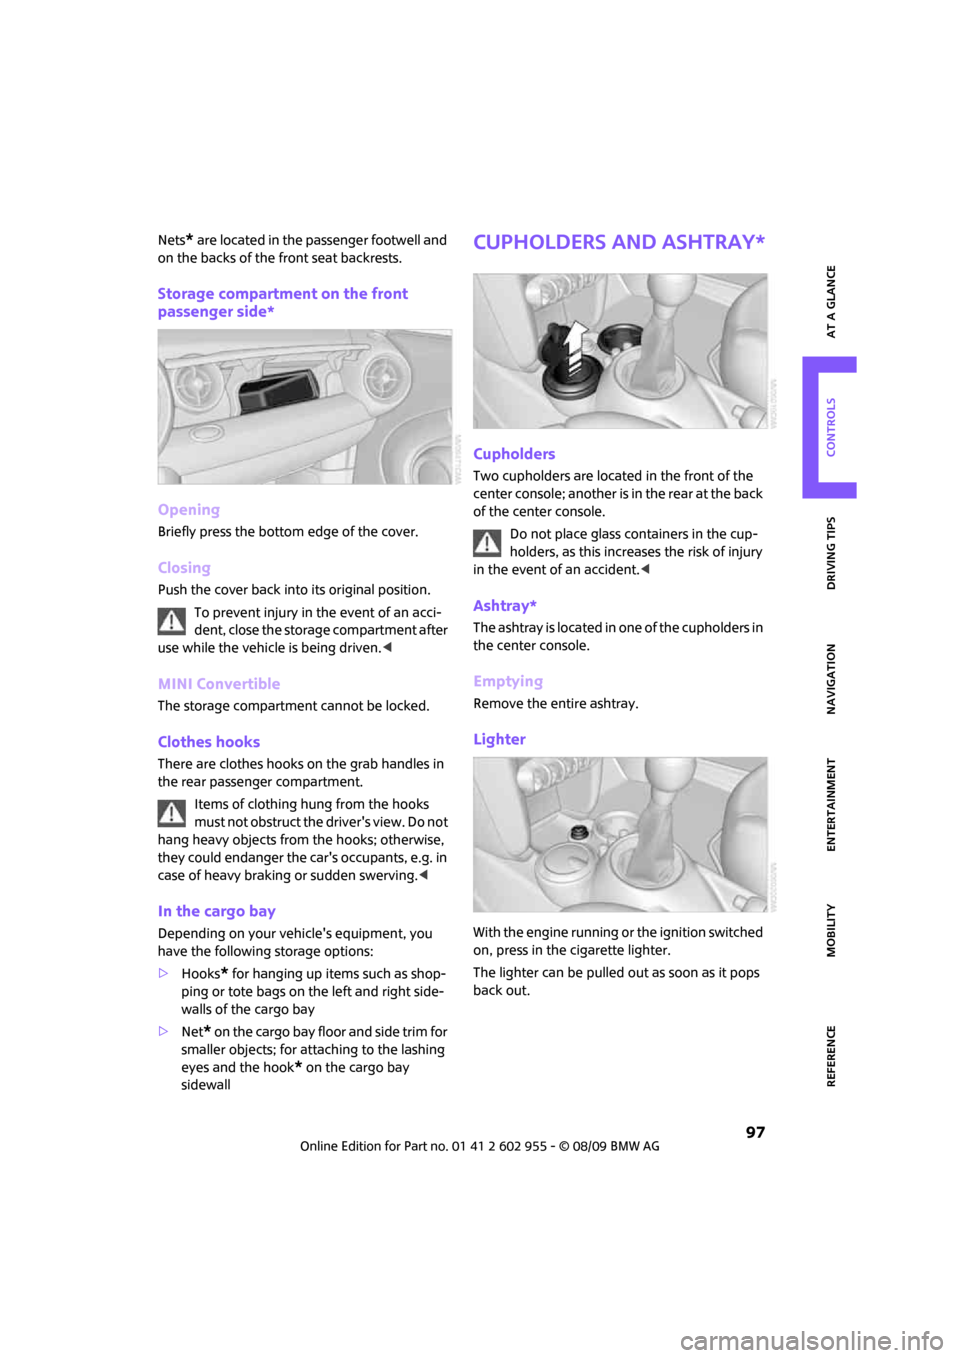
Storage compartment on the front
passenger side*
Opening
Briefly press the bottom edge of the cover.
Closing
Push the cover back into its original position.
To prevent injury in the event of an acci-
dent, close the storage compartment after
use while the vehicle is being driven.<
MINI Convertible
The storage compartment cannot be locked.
Clothes hooks
There are clothes hooks on the grab handles in
the rear passenger compartment.
Items of clothing hung from the hooks
must not obstruct the driver's view. Do not
hang heavy objects from the hooks; otherwise,
they could endanger the car's occupants, e.g. in
case of heavy braking or sudden swerving.<
In the cargo bay
Depending on your vehicle's equipment, you
have the following storage options:
>Hooks
* for hanging up items such as shop-
ping or tote bags on the left and right side-
walls of the cargo bay
>Net
* on the cargo bay floor and side trim for
smaller objects; for attaching to the lashing
eyes and the hook
* on the cargo bay
sidewall
Cupholders and ashtray*
Cupholders
Two cupholders are located in the front of the
center console; another is in the rear at the back
of the center console.
Do not place glass containers in the cup-
holders, as this increases the risk of injury
in the event of an accident.<
Ashtray*
The ashtray is located in one of the cupholders in
the center console.
Emptying
Remove the entire ashtray.
Lighter
With the engine running or the ignition switched
on, press in the cigarette lighter.
The lighter can be pulled out as soon as it pops
back out.
Page 107 of 230
MOBILITYAT A GLANCE CONTROLS DRIVING TIPS ENTERTAINMENT
105
NAVIGATION REFERENCE
Loading aid
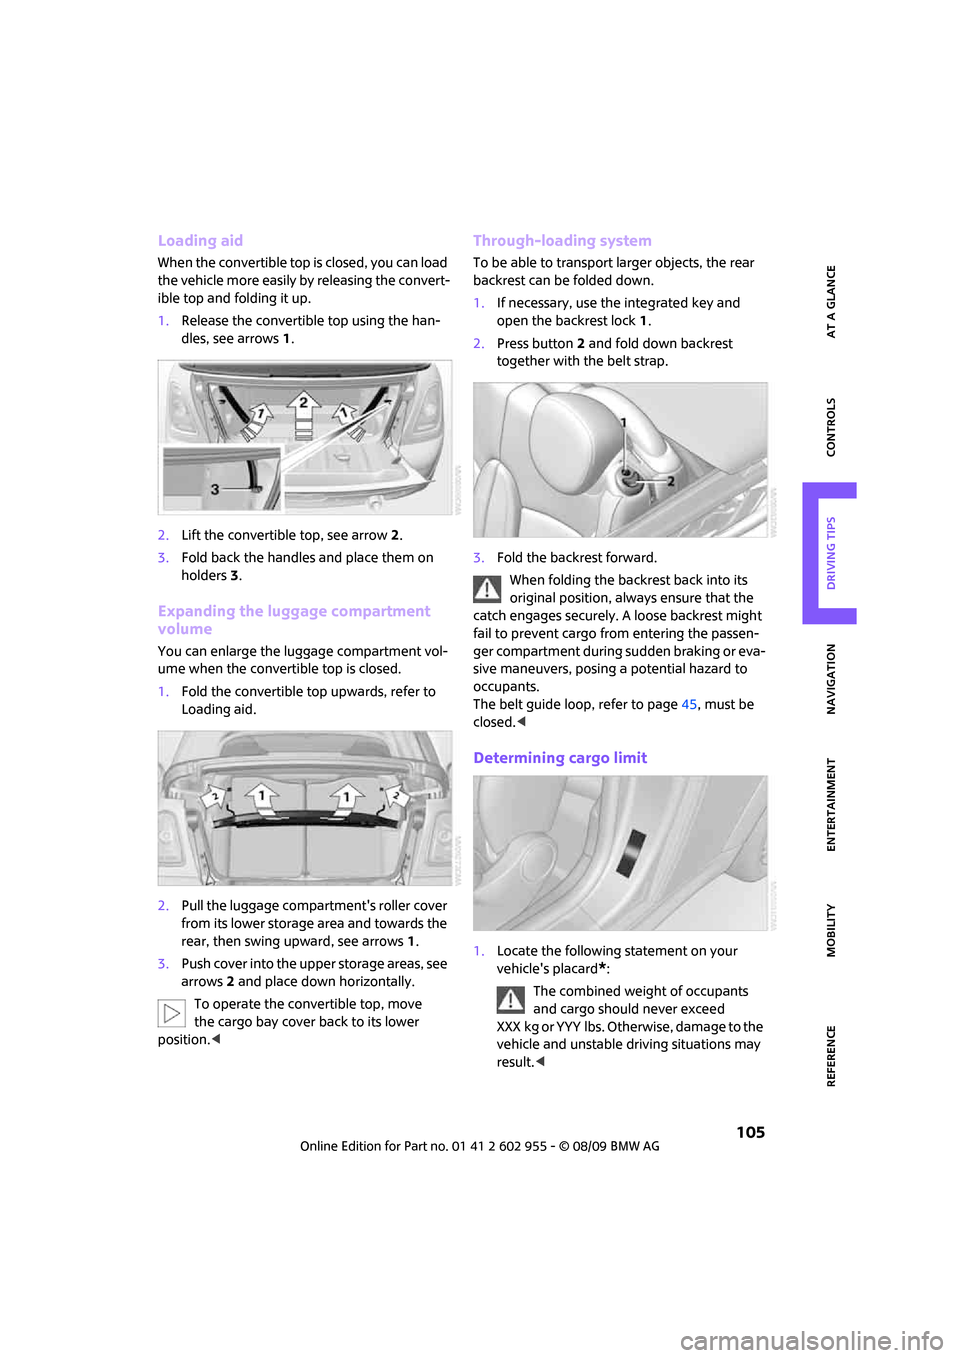
When the convertible top is closed, you can load
the vehicle more easily by releasing the convert-
ible top and folding it up.
1.Release the convertible top using the han-
dles, see arrows 1.
2.Lift the convertible top, see arrow 2.
3.Fold back the handles and place them on
holders3.
Expanding the luggage compartment
volume
You can enlarge the luggage compartment vol-
ume when the convertible top is closed.
1.Fold the convertible top upwards, refer to
Loading aid.
2.Pull the luggage compartment's roller cover
from its lower storage area and towards the
rear, then swing upward, see arrows 1.
3.Push cover into the upper storage areas, see
arrows 2 and place down horizontally.
To operate the convertible top, move
the cargo bay cover back to its lower
position.<
Through-loading system
To be able to transport larger objects, the rear
backrest can be folded down.
1.If necessary, use the integrated key and
open the backrest lock 1.
2.Press button2 and fold down backrest
together with the belt strap.
3.Fold the backrest forward.
When folding the backrest back into its
original position, always ensure that the
catch engages securely. A loose backrest might
fail to prevent cargo from entering the passen-
ger compartment during sudden braking or eva-
sive maneuvers, posing a potential hazard to
occupants.
The belt guide loop, refer to page45, must be
closed.<
Determining cargo limit
1.Locate the following statement on your
vehicle's placard
*:
The combined weight of occupants
and cargo should never exceed
X X X k g o r Y Y Y l b s . O t h e r w i s e , d a m a g e t o t h e
vehicle and unstable driving situations may
result.<
Page 109 of 230
MOBILITYAT A GLANCE CONTROLS DRIVING TIPS ENTERTAINMENT
107
NAVIGATION REFERENCE
Comply with the information enclosed with
the load-securing devices.
Always position and secure the cargo as
described above, so that it cannot endan-
ger the car's occupants, for example if sudden
braking or swerves are necessary.
Do not exceed the approved gross weight and
axle loads, page 205; otherwise, the vehicle's
operating safety is no longer assured and the
vehicle will not be in compliance with the certifi-
cation regulations.
Heavy or hard objects should not be carried
loose inside the car, since they could be thrown
around, for example as a result of heavy braking,
sudden swerves, etc., and endanger the occu-
pants. Do not secure cargo using the fastening
points for the tether strap, page49; they may
become damaged.<
MINI: Roof-mounted
luggage rack*
A special rack system is available as an option for
your MINI. Your MINI dealer will be glad to
advise you. Comply with the installation instruc-
tions supplied with the rack system.
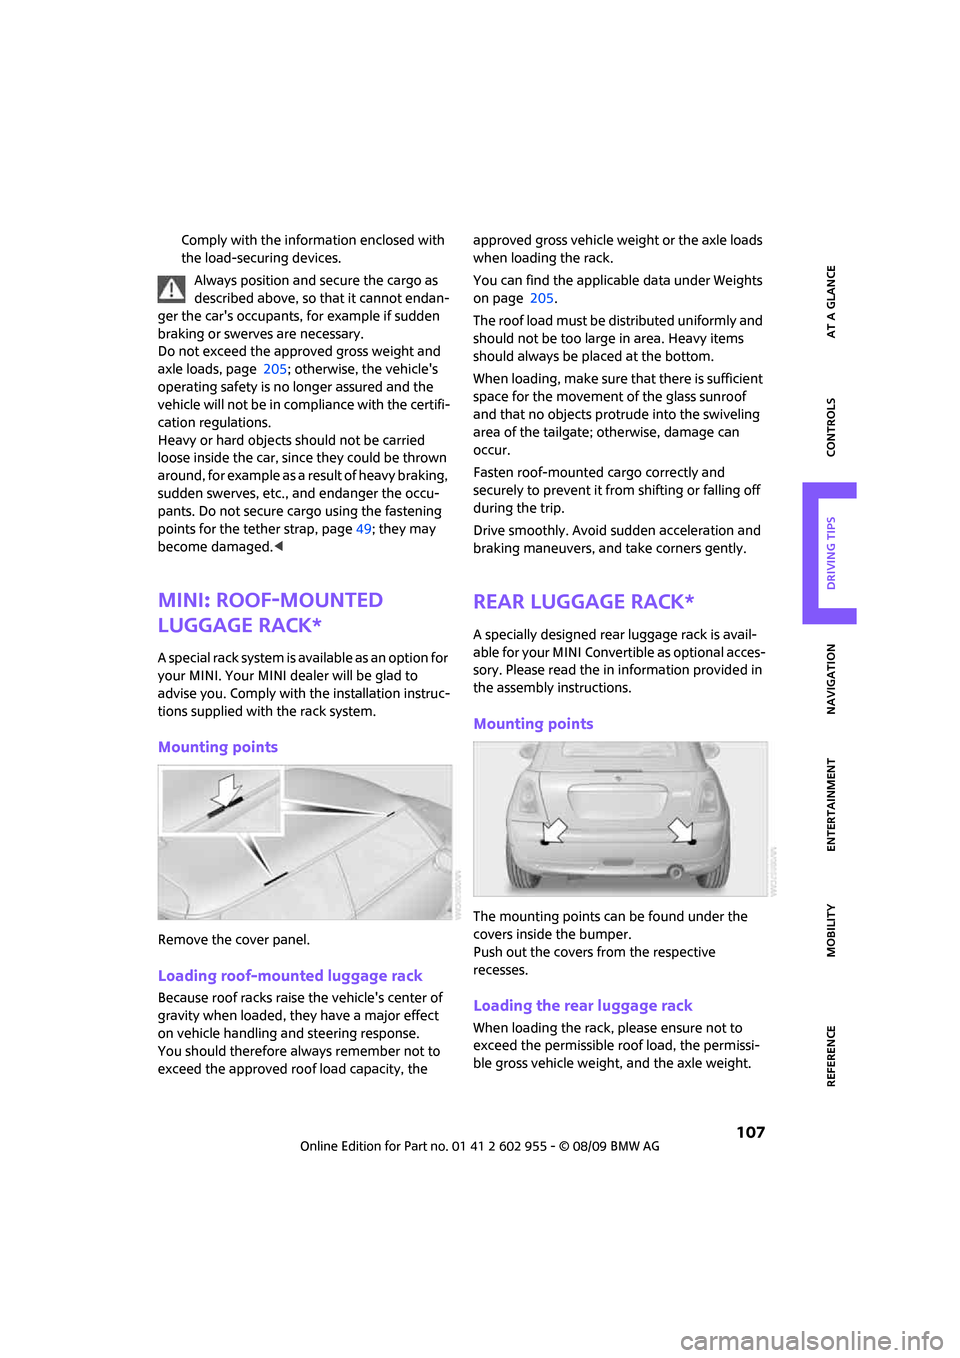
Mounting points
Remove the cover panel.
Loading roof-mounted luggage rack
Because roof racks raise the vehicle's center of
gravity when loaded, they have a major effect
on vehicle handling and steering response.
You should therefore always remember not to
exceed the approved roof load capacity, the approved gross vehicle weight or the axle loads
when loading the rack.
You can find the applicable data under Weights
on page 205.
The roof load must be distributed uniformly and
should not be too large in area. Heavy items
should always be placed at the bottom.
When loading, make sure that there is sufficient
space for the movement of the glass sunroof
and that no objects protrude into the swiveling
area of the tailgate; otherwise, damage can
occur.
Fasten roof-mounted cargo correctly and
securely to prevent it from shifting or falling off
during the trip.
Drive smoothly. Avoid sudden acceleration and
braking maneuvers, and take corners gently.
Rear luggage rack*
A specially designed rear luggage rack is avail-
able for your MINI Convertible as optional acces-
sory. Please read the in information provided in
the assembly instructions.
Mounting points
The mounting points can be found under the
covers inside the bumper.
Push out the covers from the respective
recesses.
Loading the rear luggage rack
When loading the rack, please ensure not to
exceed the permissible roof load, the permissi-
ble gross vehicle weight, and the axle weight.
Page 141 of 230
MOBILITYAT A GLANCE CONTROLS DRIVING TIPS ENTERTAINMENT
139
NAVIGATION REFERENCE
T h is s y m bo l a t t h e l o w e r e d g e o f t h e C o n t r o l
Display indicates that the audio output has been
switched off.
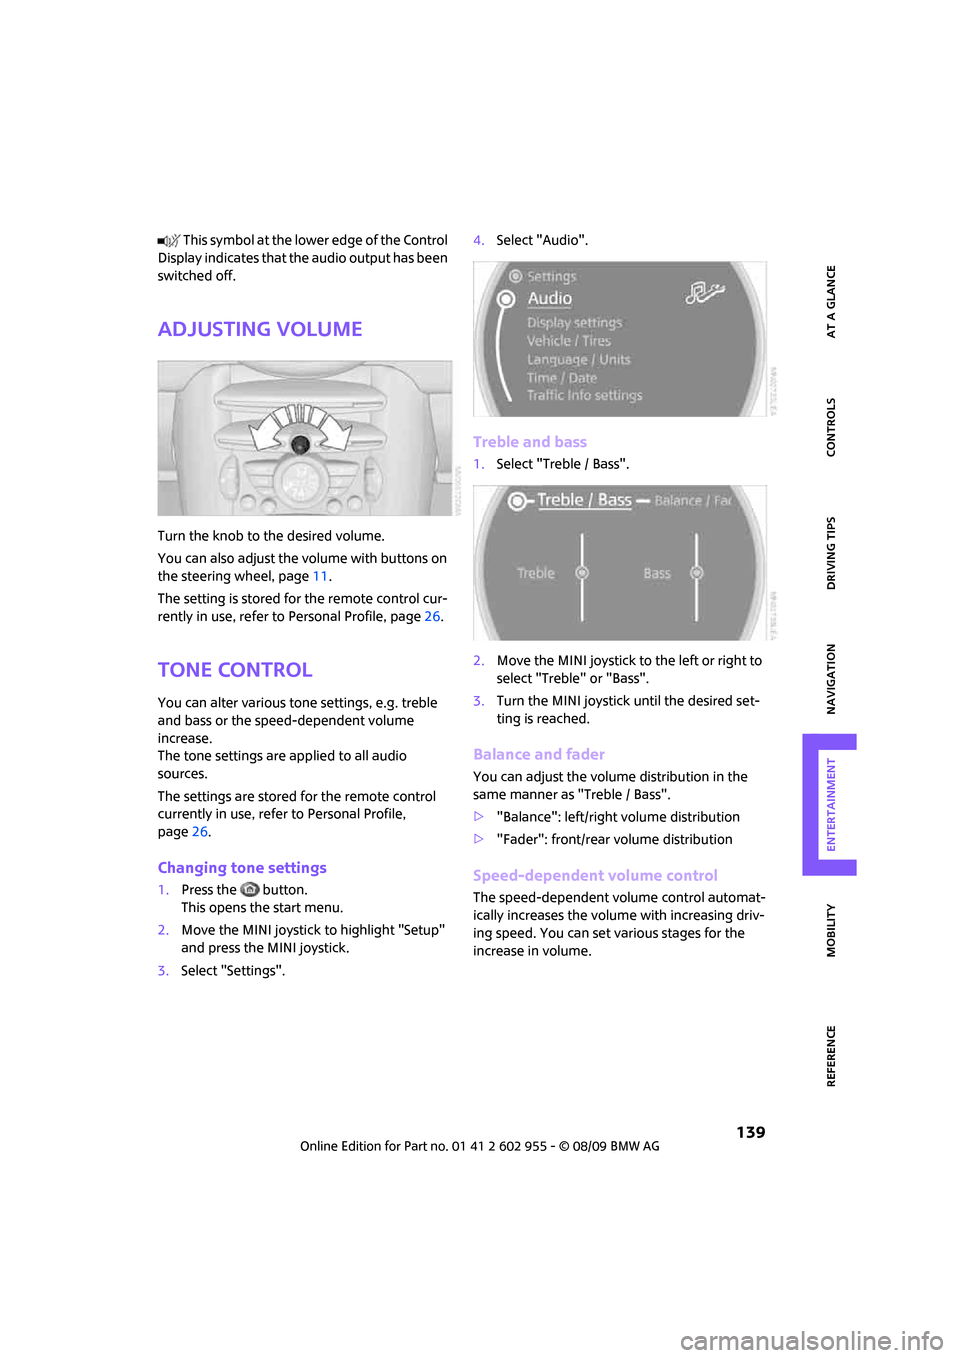
Adjusting volume
Turn the knob to the desired volume.
You can also adjust the volume with buttons on
the steering wheel, page11.
The setting is stored for the remote control cur-
rently in use, refer to Personal Profile, page26.
Tone control
You can alter various tone settings, e.g. treble
and bass or the speed-dependent volume
increase.
The tone settings are applied to all audio
sources.
The settings are stored for the remote control
currently in use, refer to Personal Profile,
page26.
Changing tone settings
1.Press the button.
This opens the start menu.
2.Move the MINI joystick to highlight "Setup"
and press the MINI joystick.
3.Select "Settings".4.Select "Audio".
Treble and bass
1.Select "Treble / Bass".
2.Move the MINI joystick to the left or right to
select "Treble" or "Bass".
3.Turn the MINI joystick until the desired set-
ting is reached.
Balance and fader
You can adjust the volume distribution in the
same manner as "Treble / Bass".
>"Balance": left/right volume distribution
>"Fader": front/rear volume distribution
Speed-dependent volume control
The speed-dependent volume control automat-
ically increases the volume with increasing driv-
ing speed. You can set various stages for the
increase in volume.