rear entertainment MINI Hardtop 2 Door 2010 Owner's Manual (Mini Connected)
[x] Cancel search | Manufacturer: MINI, Model Year: 2010, Model line: Hardtop 2 Door, Model: MINI Hardtop 2 Door 2010Pages: 230, PDF Size: 4.02 MB
Page 15 of 230

MOBILITYAT A GLANCE CONTROLS DRIVING TIPS ENTERTAINMENT
13
NAVIGATION REFERENCE
Indicator and warning
lamps
The concept
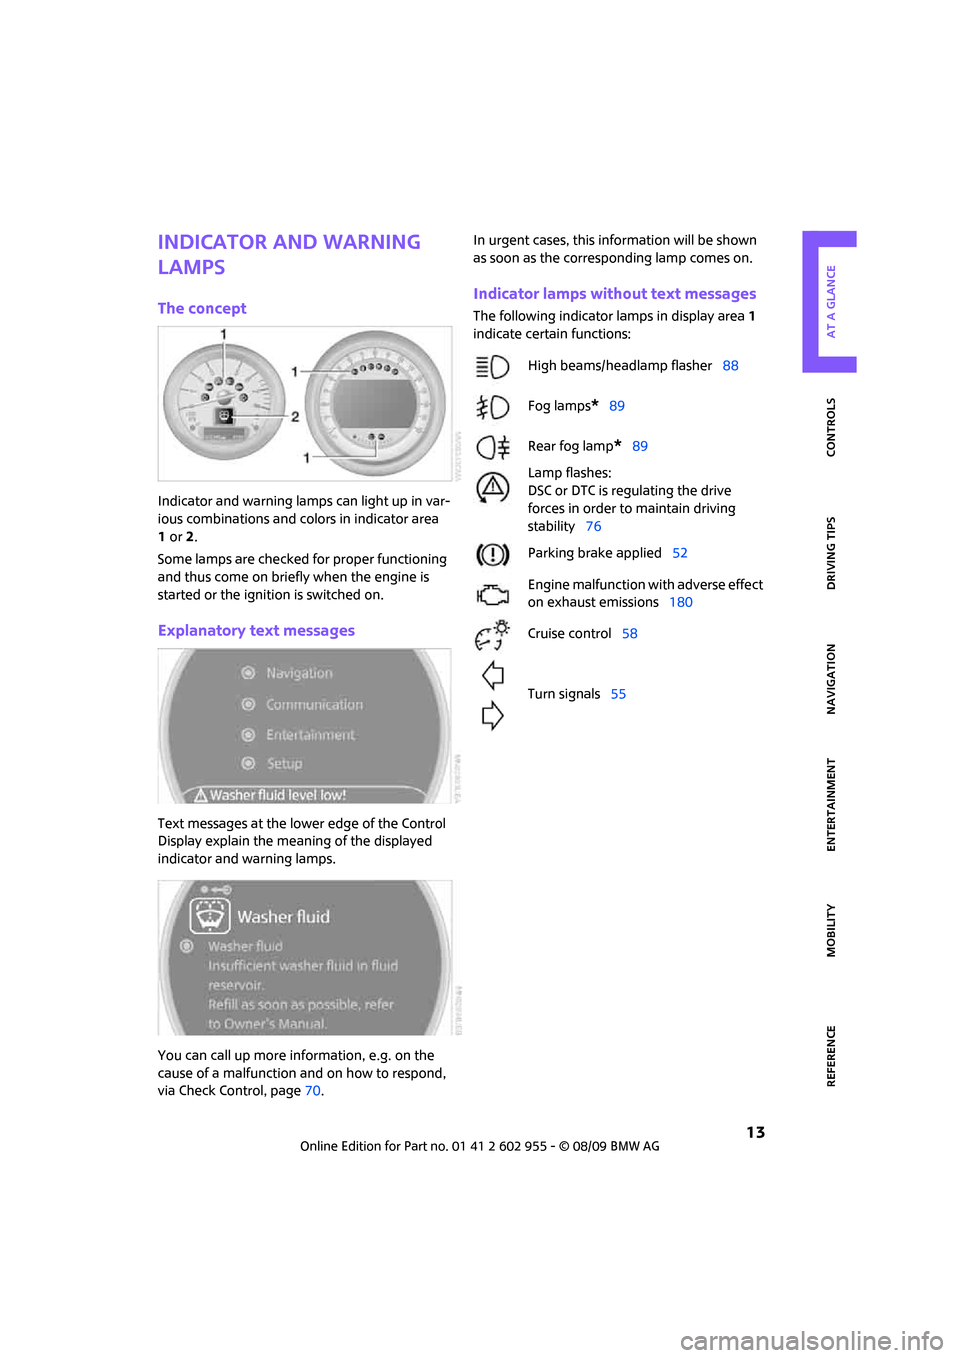
Indicator and warning lamps can light up in var-
ious combinations and colors in indicator area
1or2.
Some lamps are checked for proper functioning
and thus come on briefly when the engine is
started or the ignition is switched on.
Explanatory text messages
Text messages at the lower edge of the Control
Display explain the meaning of the displayed
indicator and warning lamps.
You can call up more information, e.g. on the
cause of a malfunction and on how to respond,
via Check Control, page70.In urgent cases, this information will be shown
as soon as the corresponding lamp comes on.
Indicator lamps without text messages
The following indicator lamps in display area 1
indicate certain functions:
High beams/headlamp flasher88
Fog lamps
*89
Rear fog lamp
*89
Lamp flashes:
DSC or DTC is regulating the drive
forces in order to maintain driving
stability76
Parking brake applied52
Engine malfunction with adverse effect
on exhaust emissions180
Cruise control58
Turn signals55
Page 17 of 230

MOBILITYAT A GLANCE CONTROLS DRIVING TIPS ENTERTAINMENT
15
NAVIGATION REFERENCE
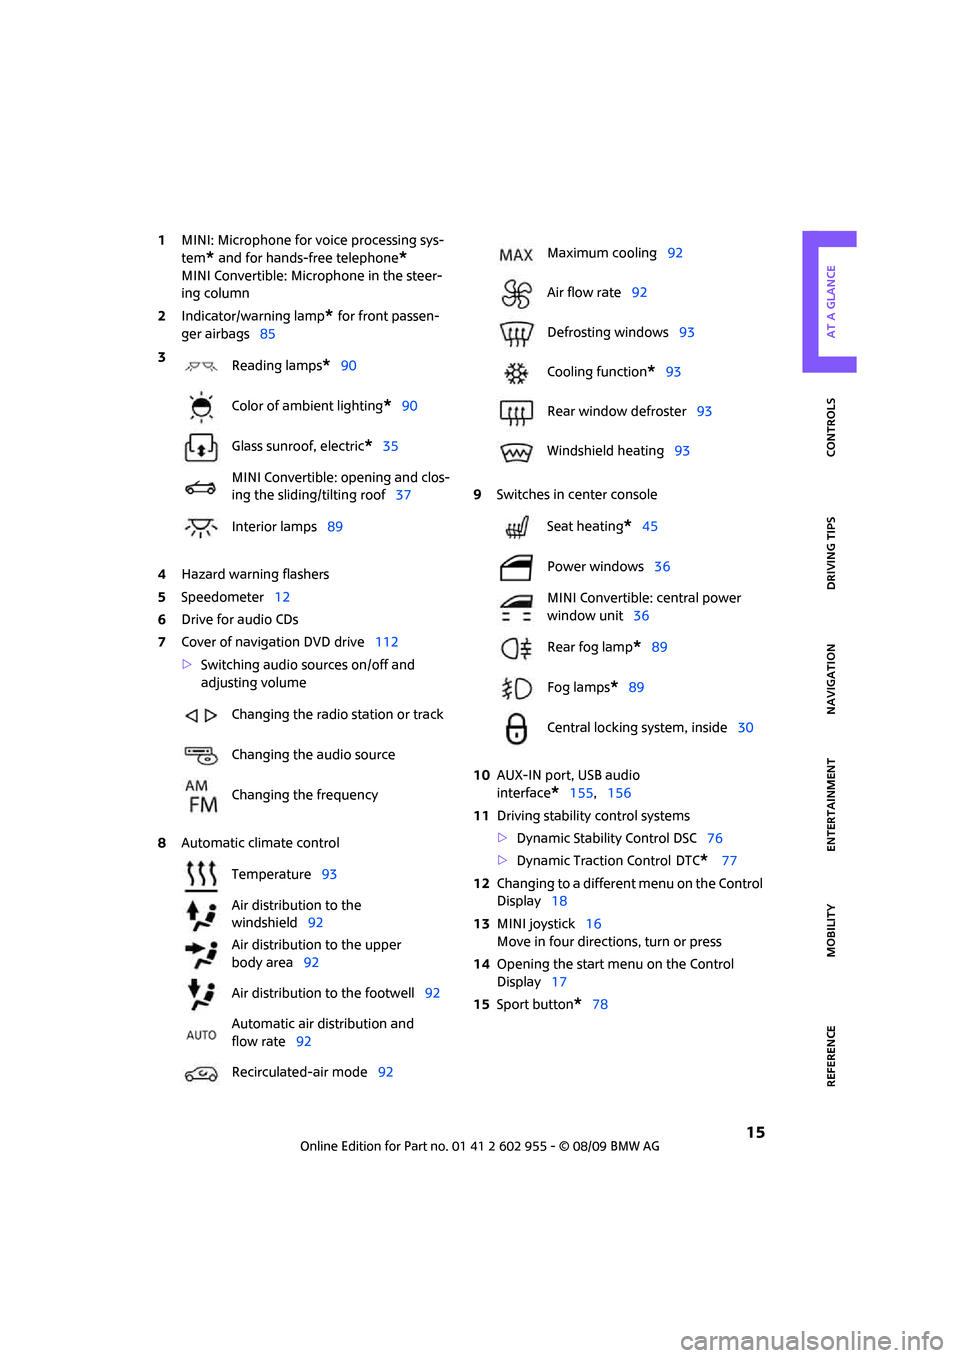
1MINI: Microphone for voice processing sys-
tem
* and for hands-free telephone*
MINI Convertible: Microphone in the steer-
ing column
2Indicator/warning lamp
* for front passen-
ger airbags85
4Hazard warning flashers
5Speedometer12
6Drive for audio CDs
7Cover of navigation DVD drive112
>Switching audio sources on/off and
adjusting volume
8Automatic climate control9Switches in center console
10AUX-IN port, USB audio
interface
*155,156
11Driving stability control systems
>Dynamic Stability Control DSC76
>Dynamic Traction Control
DTC* 77
12Changing to a different menu on the Control
Display18
13MINI joystick16
Move in four directions, turn or press
14Opening the start menu on the Control
Display17
15Sport button
*78 3
Reading lamps
*90
Color of ambient lighting
*90
Glass sunroof, electric
*35
MINI Convertible: opening and clos-
ing the sliding/tilting roof37
Interior lamps89
Changing the radio station or track
Changing the audio source
Changing the frequency
Temperature93
Air distribution to the
windshield92
Air distribution to the upper
body area92
Air distribution to the footwell92
Automatic air distribution and
flow rate92
Recirculated-air mode92
Maximum cooling92
Air flow rate92
Defrosting windows93
Cooling function
*93
Rear window defroster93
Windshield heating93
Seat heating
*45
Power windows36
MINI Convertible: central power
window unit36
Rear fog lamp
*89
Fog lamps
*89
Central locking system, inside30
Page 31 of 230

MOBILITYAT A GLANCE CONTROLS DRIVING TIPS ENTERTAINMENT
29
NAVIGATION REFERENCE
6.Select "Confirmation".
7.Select the desired signal.
The signal is activated.
Acoustic signals can be selected in vehicles with
an alarm system.
Switching on interior lamps
While the car is locked:
Press the button.
You can also use this function to locate your
vehicle in parking garages, etc.
Unlocking the tailgate
Press the button.
When it is opened, the tailgate swings
upward and outward to the rear. Make
sure that adequate clearance is available before
opening.
To prevent accidentally locking yourself out, do
not place the key down in the cargo bay. If the
tailgate was locked before opening, it will be
locked again after it is closed.
Before and after each trip, check that the tail-
gate has not been inadvertently unlocked.<
Malfunctions
The remote control may malfunction due to
local radio waves. If this occurs, unlock and lock
the car at the door lock with the integrated key.
If the car can no longer be locked with a remote
control, the battery in the remote control is dis-
charged. Use this remote control during an
extended drive; this will recharge the battery,
page26.
For US owners only
The transmitter and receiver units comply with
part 15 of the FCC/Federal Communications
Commission regulations. Operation is governed
by the following:
FCC ID:
LX8766S
LX8766E
LX8CAS
Compliance statement:
This device complies with part 15 of the FCC
Rules. Operation is subject to the following two
conditions:
>This device must not cause harmful interfer-
ence, and
>this device must accept any interference
received, including interference that may
cause undesired operation.
Any unauthorized modifications or
changes to these devices could void the
user's authority to operate this equipment.<
Using the door lock
You can set which parts of the car are unlocked,
page27.
When there is no alarm system
* or Com-
fort Access
*, only the driver's door is
locked with the door lock.<
To lock all doors, the fuel filler flap and the tail-
gate together:
With the doors closed, press the interior central
locking button, page30 to lock the vehicle.
Unlocking and opening the driver or passenger
door, page30.
Page 37 of 230

MOBILITYAT A GLANCE CONTROLS DRIVING TIPS ENTERTAINMENT
35
NAVIGATION REFERENCE
insert another remote control into the
ignition lock.
The warning lamp comes on when the
engine is running: the remote control is
no longer inside the vehicle. After the
engine is switched off, the engine can only be
restarted within approx. 10 seconds.
The indicator lamp comes on and a mes-
sage appears on the Control Display:
replace the battery in the remote
control.
Replacing the battery
The remote control for Comfort Access contains
a battery that will need to be replaced from time
to time.
1.Remove the cover.
2.Insert the new battery with the plus side fac-
ing up.
3.Press the cover on to close.
Take the old battery to a battery collection
point or to your MINI dealer.<
Glass sunroof, electric*
To prevent injuries, exercise care when
closing the glass sunroof and keep it in
your field of vision until it is shut.
Take the key with you when you leave the car;
otherwise, children could operate the sunroof
and possibly injure themselves.<
Raising
>Press the switch backward to the resistance
point and hold it there.
Both glass sunroofs are raised.
Releasing the switch stops the movement.
>With the ignition switched on, press the
switch backward beyond the resistance
point.
Both closed sunroofs are raised fully.
Pressing again stops the movement.
Opening, closing
With the ignition switched on and the glass sun-
roof raised, press the switch backward and hold
it there.
The front glass sunroof opens.
The rear glass sunroof is closed.
Releasing the switch stops the movement.
The glass sunroof can be closed in the same way
by pressing the switch forward.
The front glass sunroof remains in a raised posi-
tion. The rear glass sunroof is raised. Pressing on
the switch again closes both sunroofs com-
pletely.
Convenient operation via door lock or Comfort
Access, refer to page28,30,34.
Roller sun blind
The roller sun blind can be opened and closed
independently of the glass sunroof.
Page 43 of 230

MOBILITYAT A GLANCE CONTROLS DRIVING TIPS ENTERTAINMENT
41
NAVIGATION REFERENCE
3.Press the locking device together until it
engages, see arrow 2.
Installing and folding up
1.Push out retaining pin 2 on one side until it
engages.
2.Insert wind deflector with retaining pins into
the openings 1 and 2 on that side of the
vehicle.
3.On the opposite side of the vehicle, insert
the retaining pin 1 into the opening, pushing
against the spring load.
4.Push out retaining pin 2 on one side until it
engages.
5.Fold up the upper part of the wind deflector.
If a seat is in its rearmost position, do not
recline the backrest too far; otherwise, the
wind deflector could be damaged.<
Removing and folding
Remove the deflector following the reverse
sequence.
Push the release lever towards the center of the
wind deflector and fold both halves together.
Page 45 of 230

MOBILITYAT A GLANCE CONTROLS DRIVING TIPS ENTERTAINMENT
43
NAVIGATION REFERENCE
On the front passenger seat as well, do not
incline the backrest too far to the rear while the
vehicle is being driven; otherwise, there is a dan-
ger in the event of an accident of sliding under
the safety belt, eliminating the protection nor-
mally provided by the belt.<
Comply with the instructions on head restraint
height on page44 and on damaged safety belts
on page46.
Seat adjustment
Observe the instructions on page42 to
ensure the best possible personal pro-
tection.<
Longitudinal adjustment
Pull the lever, arrow 1, and slide the seat to the
desired position, arrows 2.
After releasing the lever, move the seat gently
forward or back to make sure it engages
properly.
Height
Pull up or push down the lever repeatedly,
arrows 1, until the desired height is reached,
arrows 2.
Backrest
Pull the lever, arrow 1, and apply your weight to
the backrest or lift it off, as necessary, arrows 2.
Lumbar support*
You can also adjust the contour of the backrest
to obtain additional support in the lumbar
region.
The upper hips and spinal column receive sup-
plementary support to help you maintain a
relaxed, upright sitting position.
Turn the wheel to increase or decrease the cur-
vature.
Entry to the rear
Easy entry on the driver's side
The easy entry feature includes a mechanical
memory function for the longitudinal adjust-
ment and backrest angle.
Page 47 of 230

MOBILITYAT A GLANCE CONTROLS DRIVING TIPS ENTERTAINMENT
45
NAVIGATION REFERENCE
3.Press button1 and pull the head restraint
out as far as it will go.
4.Additionally press button 2 and pull the
head restraint out completely.
5.Fold back the backrest.
Rear
1.Pull up as far as it will go.
2.Press button1 and pull the head restraint
out completely.
Seat heating*
Switching on
Press once for each temperature level.
Three LEDs indicate the highest temperature.
If you continue driving within the next 15 min-
utes, the seat heating is automatically activated
at the previously set temperature.
The temperature is lowered or the heating is
switched off entirely to save on battery power.
The LEDs stay lit.
Switching off
Press button longer.
Safety belts
Observe the instructions on page42 to
ensure the best possible personal pro-
tection.
safety belt as an additional safety device, but
they do not represent a substitute.
Front and rear seats
Closing
Make sure you hear the lock engage in the belt
buckle.
The upper belt anchor is suitable for adults of
any stature as long as the seat is adjusted prop-
erly, page42.
Opening
1.Grasp the belt firmly.
2.Press the red button in the buckle.
3.Guide the belt into its reel.
MINI Convertible: rear belt guide
Please ensure that the belt guide loop,
arrow, is locked when putting on the rear
seat belts.<
Page 49 of 230

MOBILITYAT A GLANCE CONTROLS DRIVING TIPS ENTERTAINMENT
47
NAVIGATION REFERENCE
Interior mirror, automatic dimming*
The automatic dimming feature of the interior
rearview mirror
* is controlled by two photo cells
in the mirror. One photo cell is in the mirror
frame, arrow; the other is on the back of the
mirror.
In order to ensure that the system functions cor-
rectly, keep the photo cells clean, do not cover
the area between the interior rearview mirror
and windshield, and do not affix adhesive labels
or stickers of any kind to the windshield directly
in front of the mirror.
Steering wheel
Adjustments
Do not adjust the steering wheel position
while the car is in motion; otherwise, there
is a risk of accident due to an unexpected
movement.<
1.Fold the lever down.
2.Move the steering wheel to the preferred
distance and angle to suit your seated
position.
3.Swing the lever back up.Do not use force to swing the lever
back up; otherwise, the mechanism
will be damaged.<
Page 55 of 230

MOBILITYAT A GLANCE CONTROLS DRIVING TIPS ENTERTAINMENT
53
NAVIGATION REFERENCE
Applying
The lever locks in position automatically.
Releasing
Pull slightly upwards, press the button and lower
the lever.
In exceptional cases, if the parking brake
has to be used to slow or stop the car, do
not pull the lever up too hard. In doing so, con-
tinuously press the button of the parking brake
lever.
Otherwise, excessive force could lead to over-
braking and loss of traction, i.e. fishtailing, at the
rear axle.<
Manual transmission
When shifting into 5th or 6th gear, press
the gearshift lever to the right. Otherwise,
the engine could be damaged if you inadvert-
ently shift into 3rd or 4th gear.<
Reverse gear
Select this only when the vehicle is stationary.
When the gearshift lever is pressed to the left, a
slight resistance has to be overcome.
Automatic transmission*
with Steptronic
In addition to the fully automatic mode, you can
shift gears manually using Steptronic, page54.
Parking the vehicle
To prevent the vehicle from rolling, always
select position P and apply the parking
brake before leaving the vehicle with the engine
running.<
Removing the key
1.Move the selector lever to position P.
2.Switch off the engine.
3.Remove the key.
Selector lever positions
P R N D M/S + –
Displays in the tachometer
P R N D DS M1 to M6
The selector lever position is displayed, or the
current gear in the manual mode.
Changing selector lever positions
>The selector lever can only be moved out of
position P if the ignition is switched on or the
engine is running: interlock.
>Before moving the lever away from P or N
with the vehicle stationary, first depress the
brake; otherwise, the selector lever will
refuse to move: shiftlock.
Page 59 of 230

MOBILITYAT A GLANCE CONTROLS DRIVING TIPS ENTERTAINMENT
57
NAVIGATION REFERENCE
5.Press and hold the button until the display
changes.
6.Press the button to select the desired sensi-
tivity.
7.Wait, or press and hold the button until the
display changes.
The settings are stored.
Deactivating intermittent wipe or rain
sensor
Press the button again, arrow3.
Brief wipe
Press the lever downward once, arrow2.
Cleaning windshield and headlamps*
Pull the lever, arrow 4.
Washer fluid is sprayed onto the windshield and
the wipers are operated briefly.
When the vehicle lighting system is switched on,
the headlamps are cleaned at regular and
appropriate intervals.
In cars equipped with an alarm system, the
headlamps cannot be cleaned when the bonnet
is open.
Do not use the washers when the washer
fluid reservoir is empty; otherwise, you will
damage the washer pump.
Only use the washers if the bonnet has been
completely closed; otherwise, the headlamp
washer system
* may be damaged. Do not use
the washers if there is any danger that the fluid
will freeze on the windshield. If you do, your
vision could be obscured. For this reason, use
antifreeze.<
Window washer nozzles
The window washer nozzles are heated auto-
matically
* while the engine is running or the
ignition is switched on.
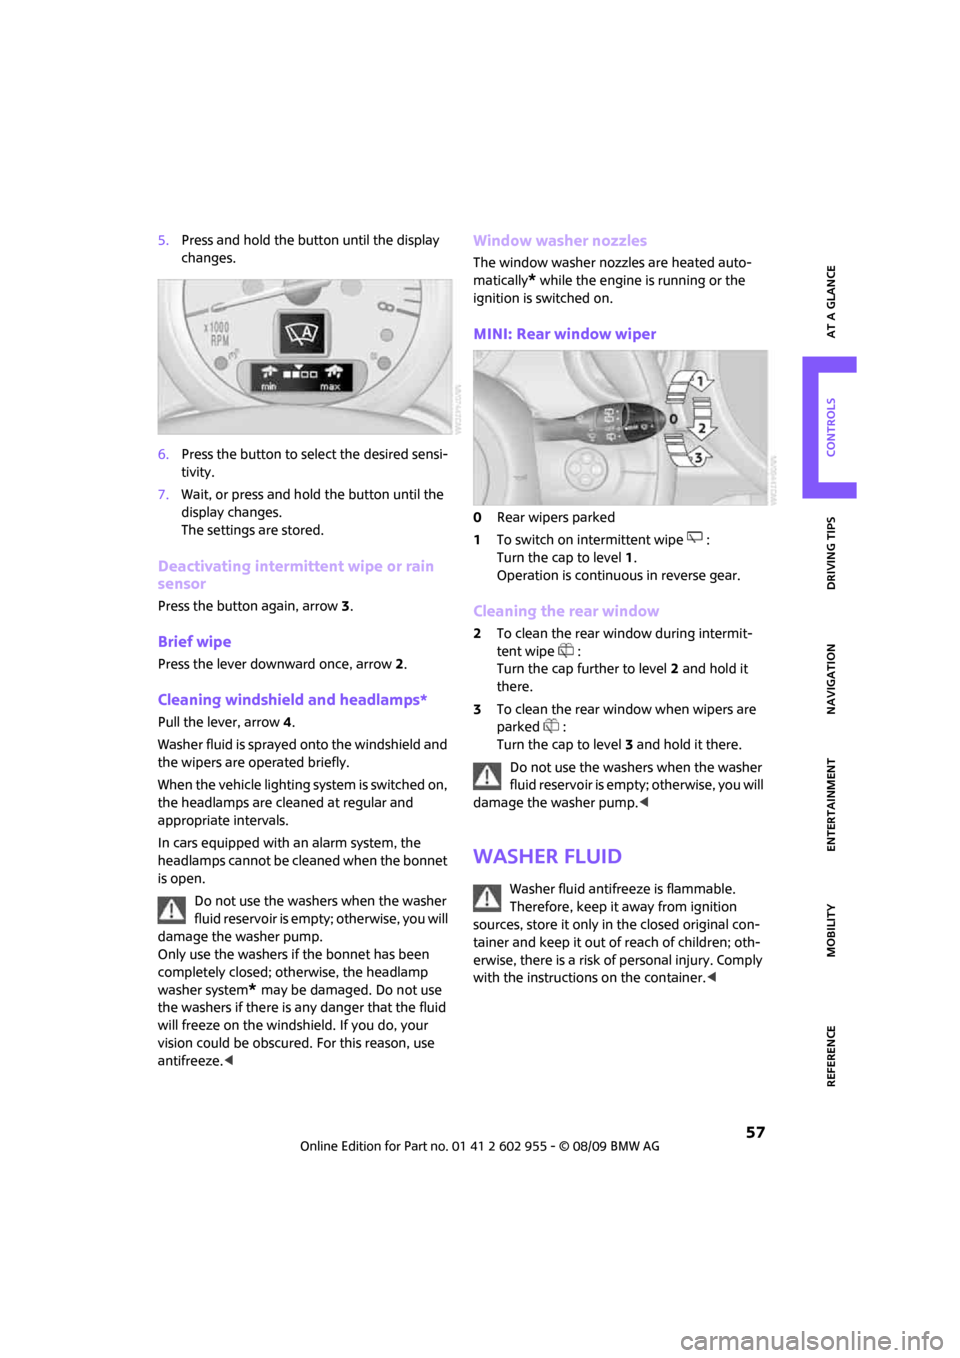
MINI: Rear window wiper
0Rear wipers parked
1To switch on intermittent wipe :
Turn the cap to level1.
Operation is continuous in reverse gear.
Cleaning the rear window
2To clean the rear window during intermit-
tent wipe :
Turn the cap further to level2 and hold it
there.
3To clean the rear window when wipers are
parked :
Turn the cap to level3 and hold it there.
Do not use the washers when the washer
fluid reservoir is empty; otherwise, you will
damage the washer pump.<
Washer fluid
Washer fluid antifreeze is flammable.
Therefore, keep it away from ignition
sources, store it only in the closed original con-
tainer and keep it out of reach of children; oth-
erwise, there is a risk of personal injury. Comply
with the instructions on the container.<