navigation MINI Hardtop 2 Door 2010 (Mini Connected) Manual Online
[x] Cancel search | Manufacturer: MINI, Model Year: 2010, Model line: Hardtop 2 Door, Model: MINI Hardtop 2 Door 2010Pages: 230, PDF Size: 4.02 MB
Page 139 of 230
ENTERTAINMENT
CONTROLS
DRIVING TIPS
NAVIGATION
MOBILITY
REFERENCE AT A GLANCE
ENTERTAINMENT
Page 141 of 230
MOBILITYAT A GLANCE CONTROLS DRIVING TIPS ENTERTAINMENT
139
NAVIGATION REFERENCE
T h is s y m bo l a t t h e l o w e r e d g e o f t h e C o n t r o l
Display indicates that the audio output has been
switched off.
Adjusting volume
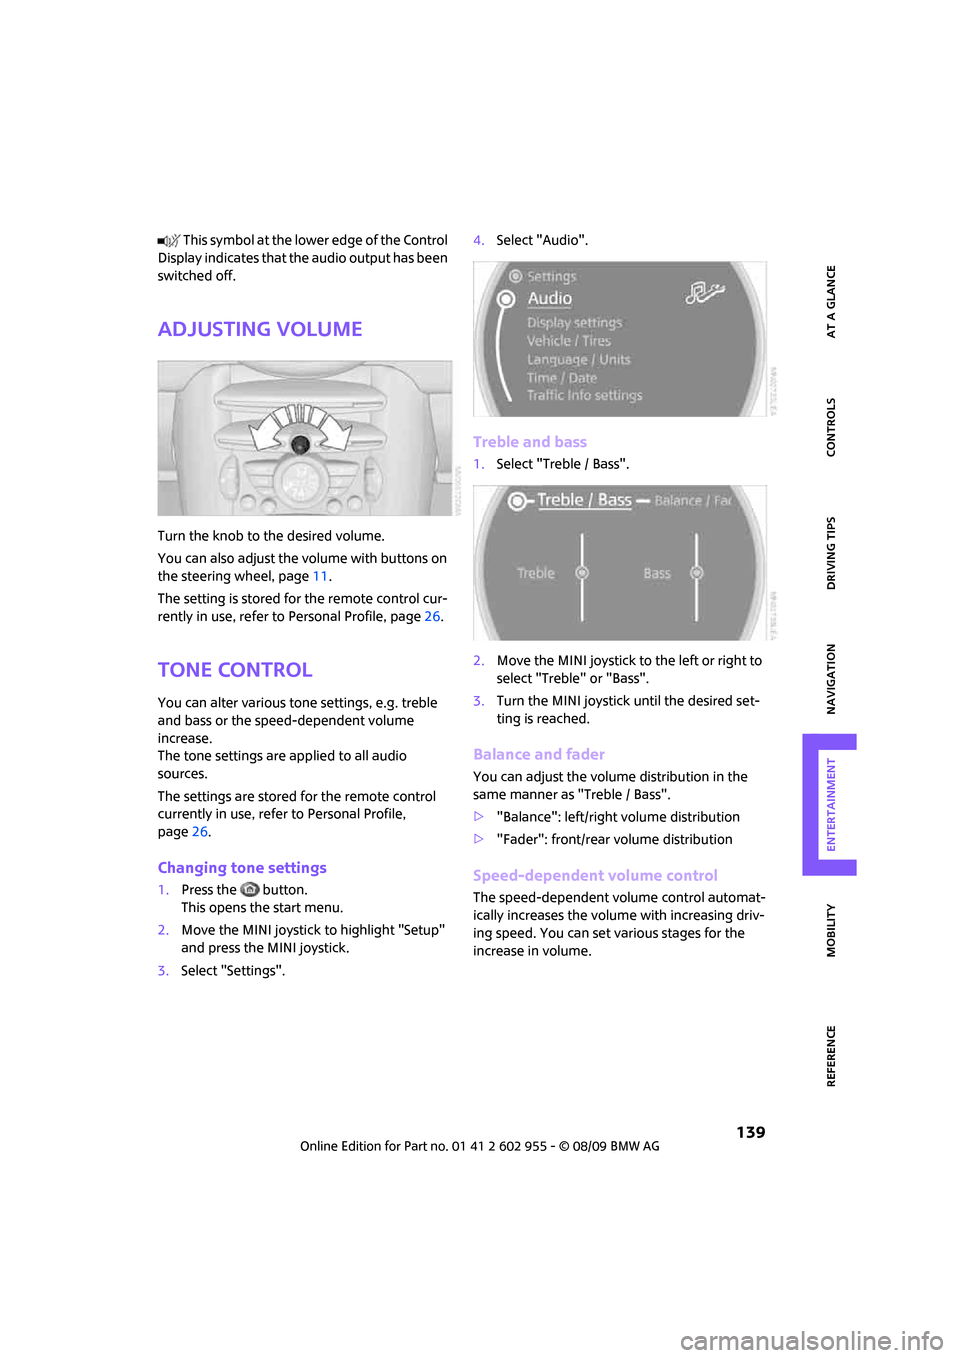
Turn the knob to the desired volume.
You can also adjust the volume with buttons on
the steering wheel, page11.
The setting is stored for the remote control cur-
rently in use, refer to Personal Profile, page26.
Tone control
You can alter various tone settings, e.g. treble
and bass or the speed-dependent volume
increase.
The tone settings are applied to all audio
sources.
The settings are stored for the remote control
currently in use, refer to Personal Profile,
page26.
Changing tone settings
1.Press the button.
This opens the start menu.
2.Move the MINI joystick to highlight "Setup"
and press the MINI joystick.
3.Select "Settings".4.Select "Audio".
Treble and bass
1.Select "Treble / Bass".
2.Move the MINI joystick to the left or right to
select "Treble" or "Bass".
3.Turn the MINI joystick until the desired set-
ting is reached.
Balance and fader
You can adjust the volume distribution in the
same manner as "Treble / Bass".
>"Balance": left/right volume distribution
>"Fader": front/rear volume distribution
Speed-dependent volume control
The speed-dependent volume control automat-
ically increases the volume with increasing driv-
ing speed. You can set various stages for the
increase in volume.
Page 143 of 230
MOBILITYAT A GLANCE CONTROLS DRIVING TIPS ENTERTAINMENT
141
NAVIGATION REFERENCE
Radio
Your radio provides reception of the FM and AM
wavebands.
Listening to the radio
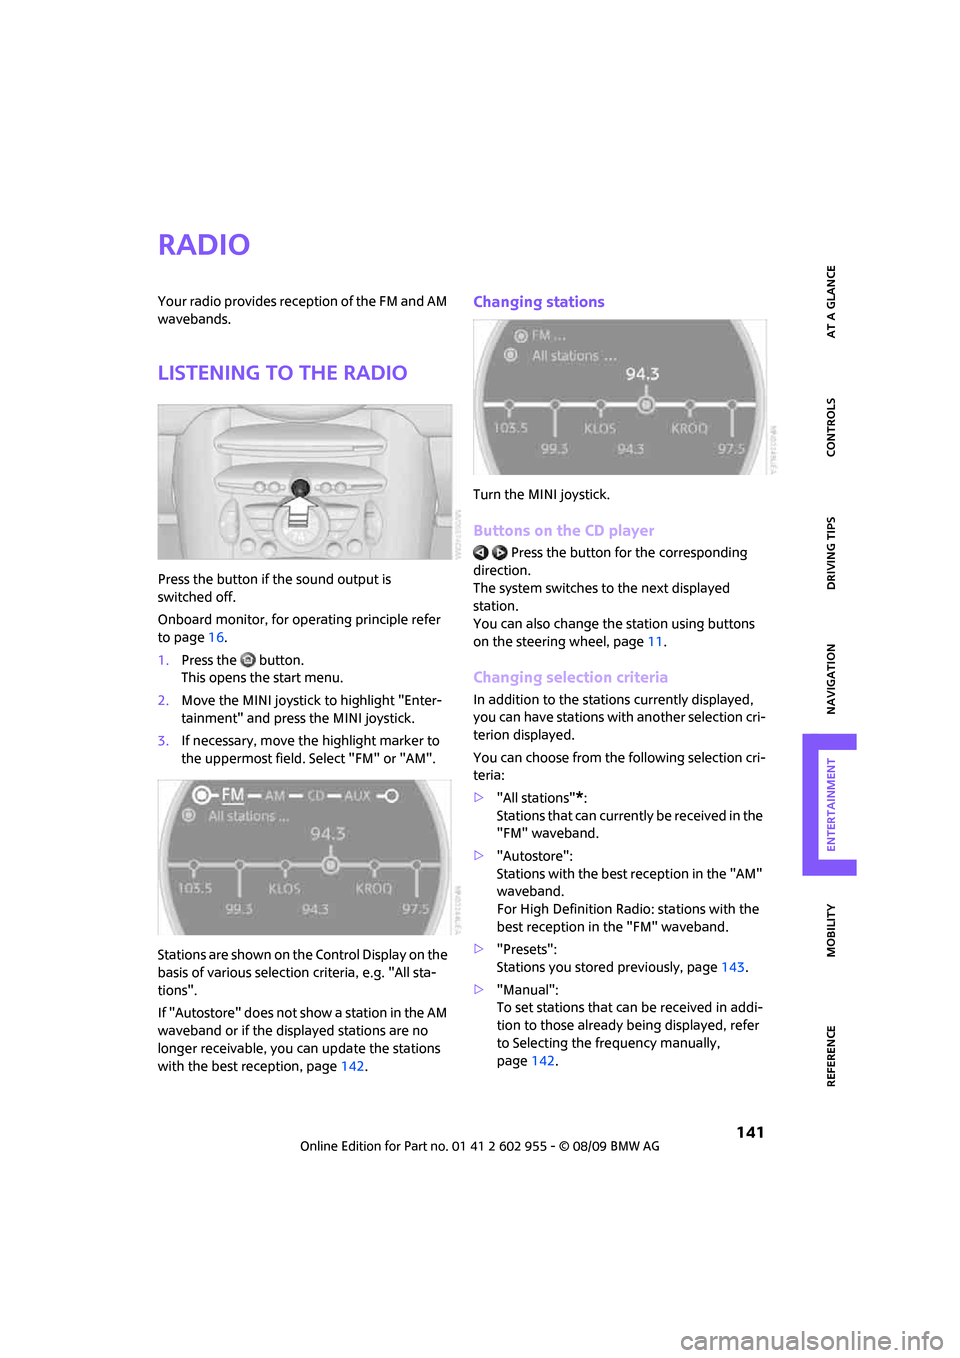
Press the button if the sound output is
switched off.
Onboard monitor, for operating principle refer
to page16.
1.Press the button.
This opens the start menu.
2.Move the MINI joystick to highlight "Enter-
tainment" and press the MINI joystick.
3.If necessary, move the highlight marker to
the uppermost field. Select "FM" or "AM".
Stations are shown on the Control Display on the
basis of various selection criteria, e.g. "All sta-
tions".
If "Autostore" does not show a station in the AM
waveband or if the displayed stations are no
longer receivable, you can update the stations
with the best reception, page142.
Changing stations
Turn the MINI joystick.
Buttons on the CD player
Press the button for the corresponding
direction.
The system switches to the next displayed
station.
You can also change the station using buttons
on the steering wheel, page11.
Changing selection criteria
In addition to the stations currently displayed,
you can have stations with another selection cri-
terion displayed.
You can choose from the following selection cri-
teria:
>"All stations"
*:
Stations that can currently be received in the
"FM" waveband.
>"Autostore":
Stations with the best reception in the "AM"
waveband.
For High Definition Radio: stations with the
best reception in the "FM" waveband.
>"Presets":
Stations you stored previously, page143.
>"Manual":
To set stations that can be received in addi-
tion to those already being displayed, refer
to Selecting the frequency manually,
page142.
Page 145 of 230
MOBILITYAT A GLANCE CONTROLS DRIVING TIPS ENTERTAINMENT
143
NAVIGATION REFERENCE
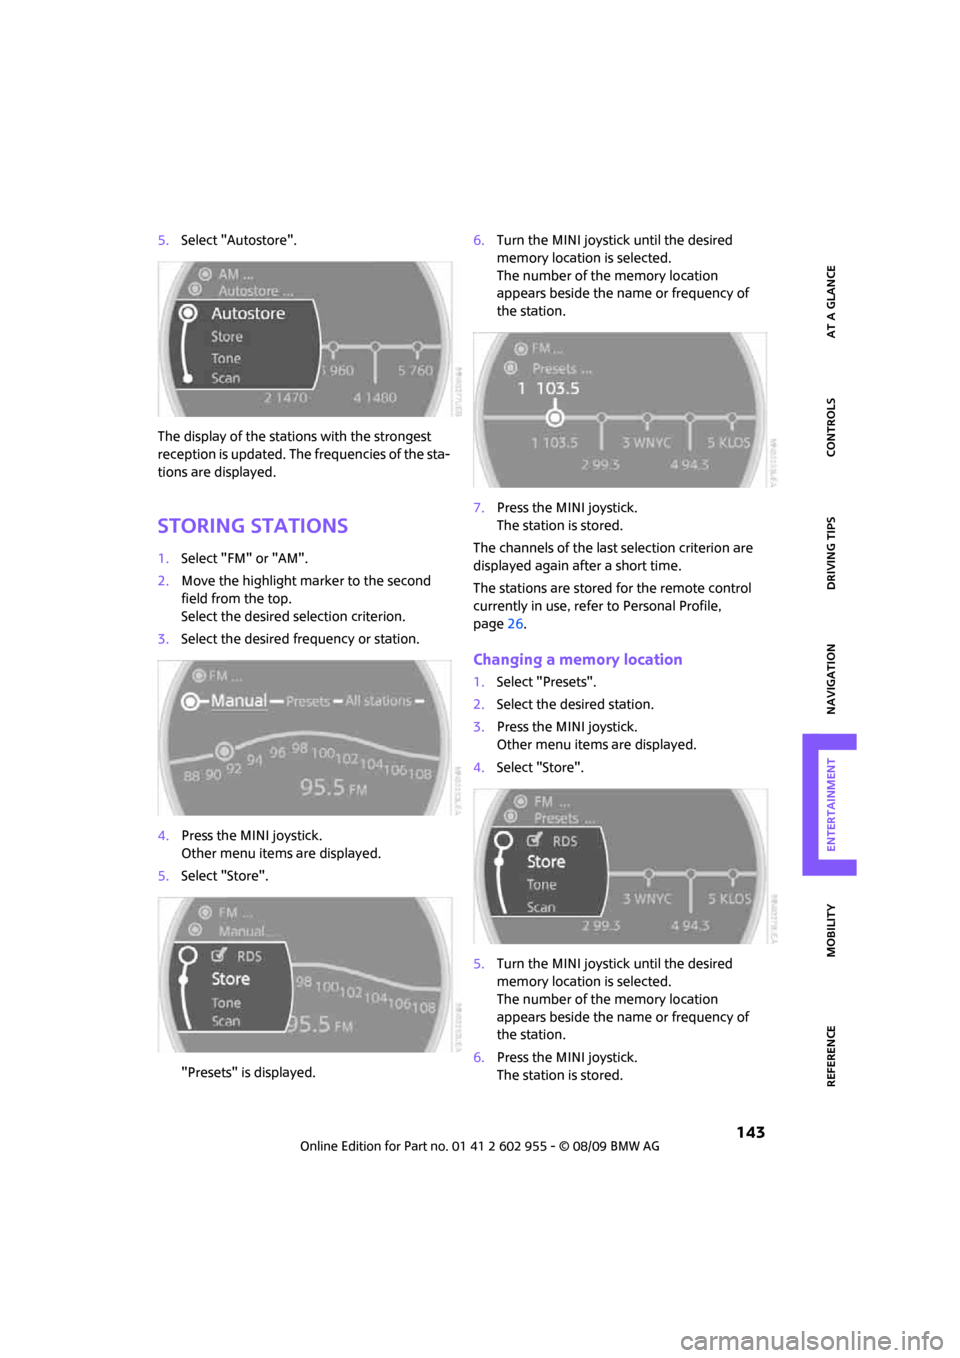
5.Select "Autostore".
The display of the stations with the strongest
reception is updated. The frequencies of the sta-
tions are displayed.
Storing stations
1.Select "FM" or "AM".
2.Move the highlight marker to the second
field from the top.
Select the desired selection criterion.
3.Select the desired frequency or station.
4.Press the MINI joystick.
Other menu items are displayed.
5.Select "Store".
"Presets" is displayed.6.Turn the MINI joystick until the desired
memory location is selected.
The number of the memory location
appears beside the name or frequency of
the station.
7.Press the MINI joystick.
The station is stored.
The channels of the last selection criterion are
displayed again after a short time.
The stations are stored for the remote control
currently in use, refer to Personal Profile,
page26.
Changing a memory location
1.Select "Presets".
2.Select the desired station.
3.Press the MINI joystick.
Other menu items are displayed.
4.Select "Store".
5.Turn the MINI joystick until the desired
memory location is selected.
The number of the memory location
appears beside the name or frequency of
the station.
6.Press the MINI joystick.
The station is stored.
Page 147 of 230
MOBILITYAT A GLANCE CONTROLS DRIVING TIPS ENTERTAINMENT
145
NAVIGATION REFERENCE
Some stations do not transmit the digital and
analog signals simultaneously. If you are in an
area in which digital reception of the selected
station is not possible continuously, reception
will alternate between analog and digital. This
can cause repetitions or interruptions. In this
case it may be preferable to switch off digital
reception.
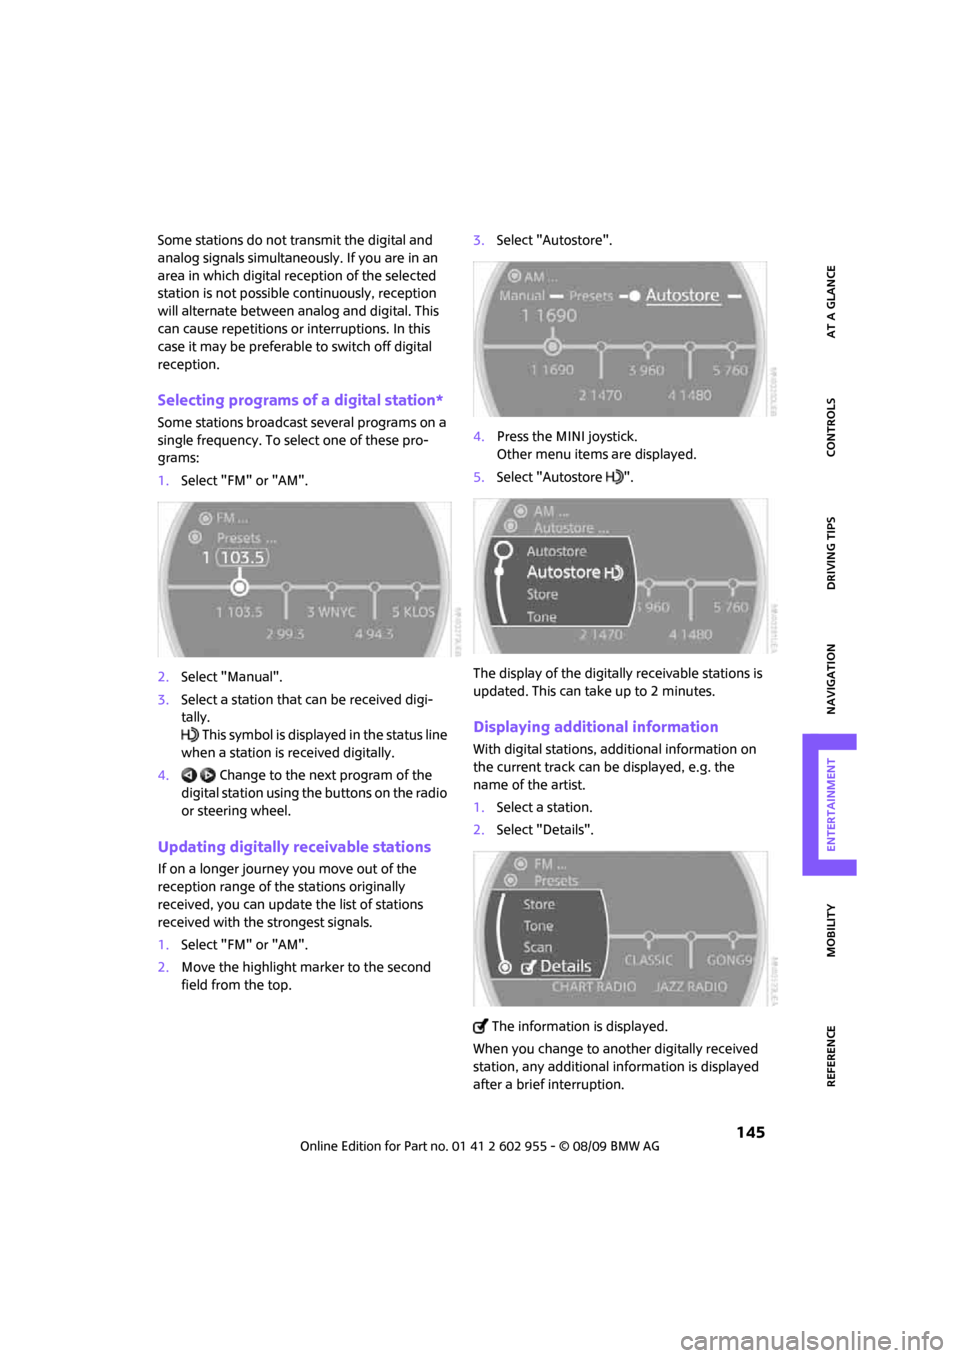
Selecting programs of a digital station*
Some stations broadcast several programs on a
single frequency. To select one of these pro-
grams:
1.Select "FM" or "AM".
2.Select "Manual".
3.Select a station that can be received digi-
tally.
This symbol is displayed in the status line
when a station is received digitally.
4. Change to the next program of the
digital station using the buttons on the radio
or steering wheel.
Updating digitally receivable stations
If on a longer journey you move out of the
reception range of the stations originally
received, you can update the list of stations
received with the strongest signals.
1.Select "FM" or "AM".
2.Move the highlight marker to the second
field from the top.3.Select "Autostore".
4.Press the MINI joystick.
Other menu items are displayed.
5.Select "Autostore ".
The display of the digitally receivable stations is
updated. This can take up to 2 minutes.
Displaying additional information
With digital stations, additional information on
the current track can be displayed, e.g. the
name of the artist.
1.Select a station.
2.Select "Details".
The information is displayed.
When you change to another digitally received
station, any additional information is displayed
after a brief interruption.
Page 149 of 230

MOBILITYAT A GLANCE CONTROLS DRIVING TIPS ENTERTAINMENT
147
NAVIGATION REFERENCE
2.Select a menu item:
>"Presets":
Up to twelve channels you previously
stored.
>"All channels":
All channels are displayed.
>"Categories":
All channels, sorted by categories, e.g.
news, jazz.
3.Press the MINI joystick.
4.If "Categories" has been selected:
Select the desired category.
The channels of this category are displayed.
5. Select a channel marked with this
symbol.6.Press the MINI joystick.
The selected station is played.
Additional information
1.Select a channel.
2.Select "Details".
The name of the channel and additional infor-
mation on the current track are displayed, e.g.
the name of the artist.
Storing a channel
1.Select the desired channel.
2.Press the MINI joystick.
Other menu items are displayed.
3.Select "Store".
"Presets" is displayed.
Page 151 of 230
MOBILITYAT A GLANCE CONTROLS DRIVING TIPS ENTERTAINMENT
149
NAVIGATION REFERENCE
CD player and CD changer
Listening to CDs
Compressed audio files*
CDs with compressed audio files, MP3s, can be
played by the CD player and CD changer.
Starting the CD player
The upper drive is for audio CDs.
Insert the CD into the drive with the labeled
side up.
The CD is drawn in automatically. Playback starts
automatically if the sound output is on. When
playing CDs with compressed audio files, it can
take the CD player approx. 1 minute to read in
the data, depending on the directory structure.
Starting playback of an inserted CD
Onboard monitor, for operating principle refer
to page16.
1.Press the button.
This opens the start menu.
2.Move the MINI joystick to highlight "Enter-
tainment" and press the MINI joystick.
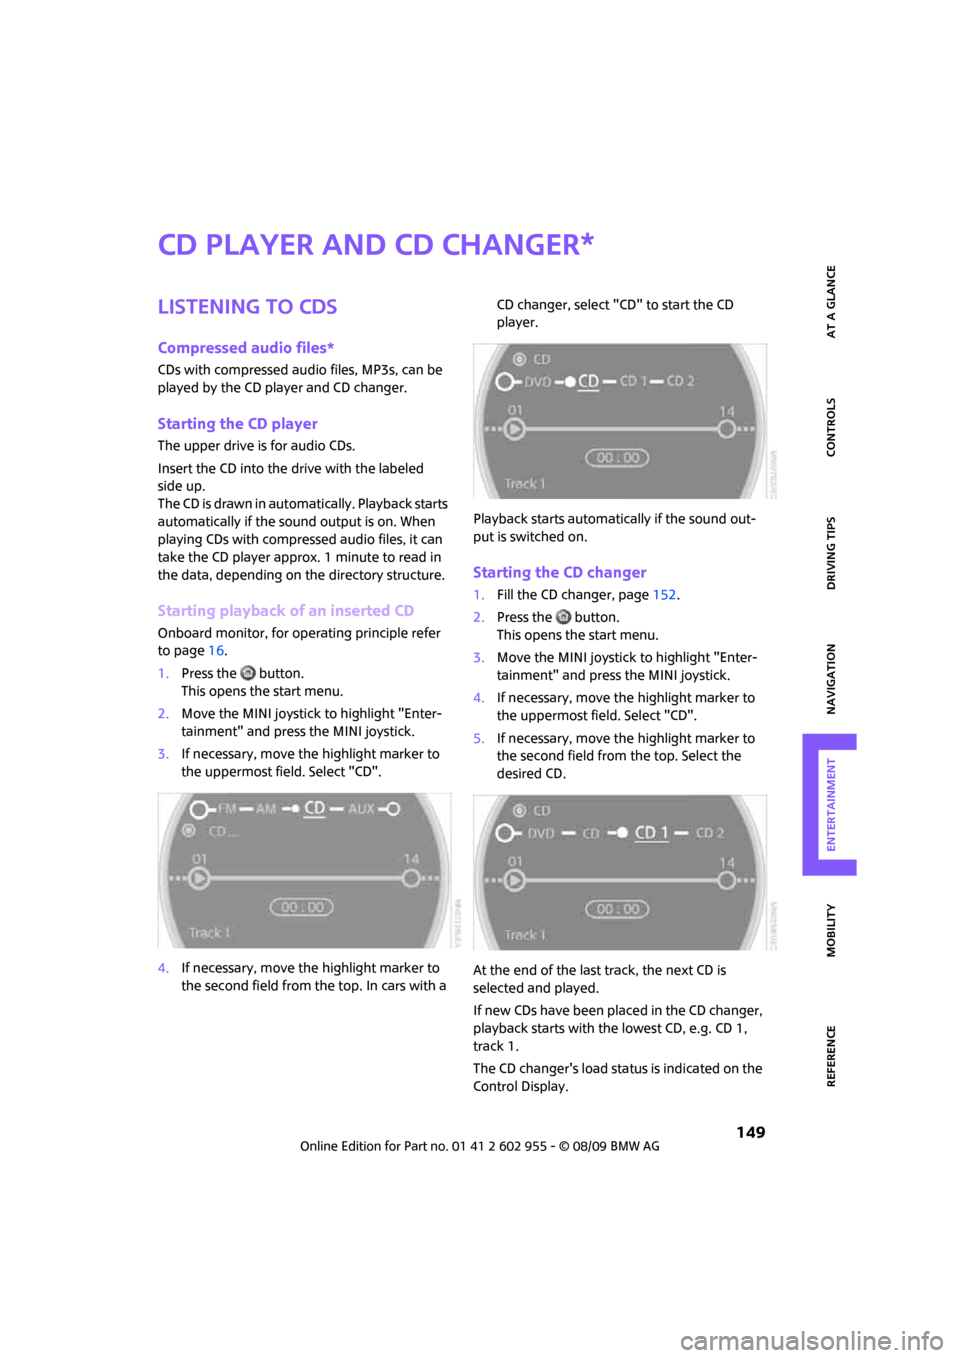
3.If necessary, move the highlight marker to
the uppermost field. Select "CD".
4.If necessary, move the highlight marker to
the second field from the top. In cars with a CD changer, select "CD" to start the CD
player.
Playback starts automatically if the sound out-
put is switched on.
Starting the CD changer
1.Fill the CD changer, page152.
2.Press the button.
This opens the start menu.
3.Move the MINI joystick to highlight "Enter-
tainment" and press the MINI joystick.
4.If necessary, move the highlight marker to
the uppermost field. Select "CD".
5.If necessary, move the highlight marker to
the second field from the top. Select the
desired CD.
At the end of the last track, the next CD is
selected and played.
If new CDs have been placed in the CD changer,
playback starts with the lowest CD, e.g. CD 1,
track 1.
The CD changer's load status is indicated on the
Control Display.
*
Page 153 of 230

MOBILITYAT A GLANCE CONTROLS DRIVING TIPS ENTERTAINMENT
151
NAVIGATION REFERENCE
Sampling tracks, Scan
All tracks on the current CD are automatically
sampled once in succession.
1.Select a track.
2.Press the MINI joystick.
Other menu items are displayed.
3.Select "Scan".
Stop sampling:
1.Press the MINI joystick.
2.Select "Scan".
Track sampling is interrupted and the selected
track is played on.
Compressed audio files*
1.Select the current track.
2.Select the desired menu item:
>To scan all tracks in the current directory:
Select "Scan directory".
>To scan all tracks on the CD: Select
"Scan all".
Stop sampling
1.Press the MINI joystick.
2.Select "Scan directory" or "Scan all".
Sampling is interrupted and the selected track is
retained.
Repeating tracks
1.Select a track.
2.Press the MINI joystick.
Other menu items are displayed.
Page 155 of 230
MOBILITYAT A GLANCE CONTROLS DRIVING TIPS ENTERTAINMENT
153
NAVIGATION REFERENCE
When loading CDs into or removing them
from the CD changer, hold them at their
edges and do not touch the reflective signal-
sensing area.<
Opening
Briefly press the bottom edge of the cover.
Closing
Push the cover back into its original position.
To prevent injury in the event of an acci-
dent, close the cover after use while the
vehicle is being driven.<
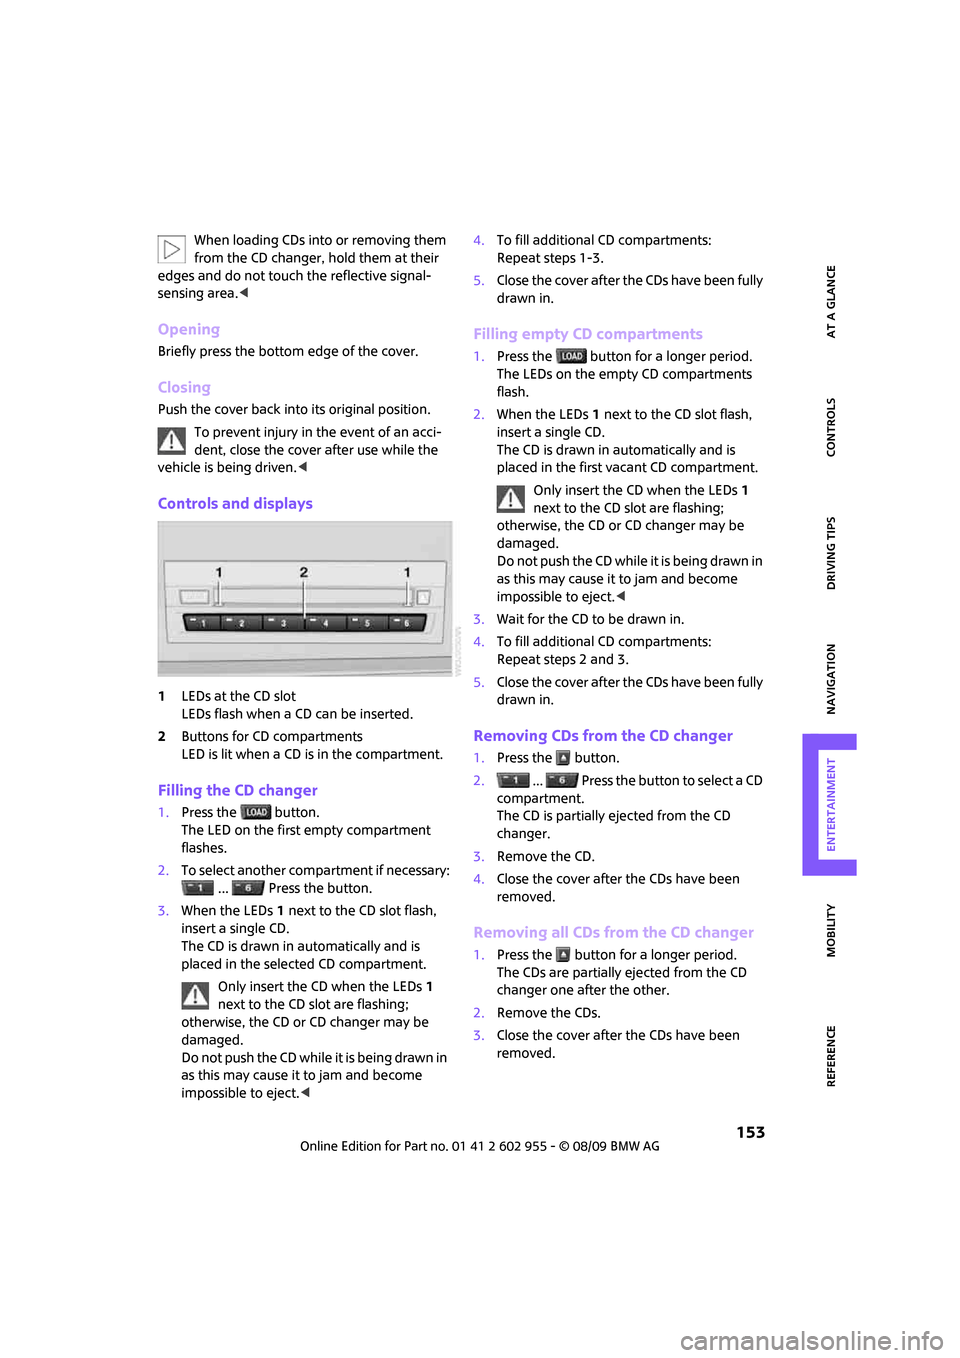
Controls and displays
1LEDs at the CD slot
LEDs flash when a CD can be inserted.
2Buttons for CD compartments
LED is lit when a CD is in the compartment.
Filling the CD changer
1.Press the button.
The LED on the first empty compartment
flashes.
2.To select another compartment if necessary:
... Press the button.
3.When the LEDs 1 next to the CD slot flash,
insert a single CD.
The CD is drawn in automatically and is
placed in the selected CD compartment.
Only insert the CD when the LEDs1
next to the CD slot are flashing;
otherwise, the CD or CD changer may be
damaged.
Do not push the CD while it is being drawn in
as this may cause it to jam and become
impossible to eject.<4.To fill additional CD compartments:
Repeat steps 1-3.
5.Close the cover after the CDs have been fully
drawn in.
Filling empty CD compartments
1.Press the button for a longer period.
The LEDs on the empty CD compartments
flash.
2.When the LEDs 1 next to the CD slot flash,
insert a single CD.
The CD is drawn in automatically and is
placed in the first vacant CD compartment.
Only insert the CD when the LEDs1
next to the CD slot are flashing;
otherwise, the CD or CD changer may be
damaged.
Do not push the CD while it is being drawn in
as this may cause it to jam and become
impossible to eject.<
3.Wait for the CD to be drawn in.
4.To fill additional CD compartments:
Repeat steps 2 and 3.
5.Close the cover after the CDs have been fully
drawn in.
Removing CDs from the CD changer
1.Press the button.
2. ... Press the button to select a CD
compartment.
The CD is partially ejected from the CD
changer.
3.Remove the CD.
4.Close the cover after the CDs have been
removed.
Removing all CDs from the CD changer
1.Press the button for a longer period.
The CDs are partially ejected from the CD
changer one after the other.
2.Remove the CDs.
3.Close the cover after the CDs have been
removed.
Page 157 of 230
MOBILITYAT A GLANCE CONTROLS DRIVING TIPS ENTERTAINMENT
155
NAVIGATION REFERENCE
AUX-IN port
You can connect an external audio device, for
instance an MP3 player, and play audio tracks
over the car's loudspeaker system. You can
adjust the tone on the onboard monitor.
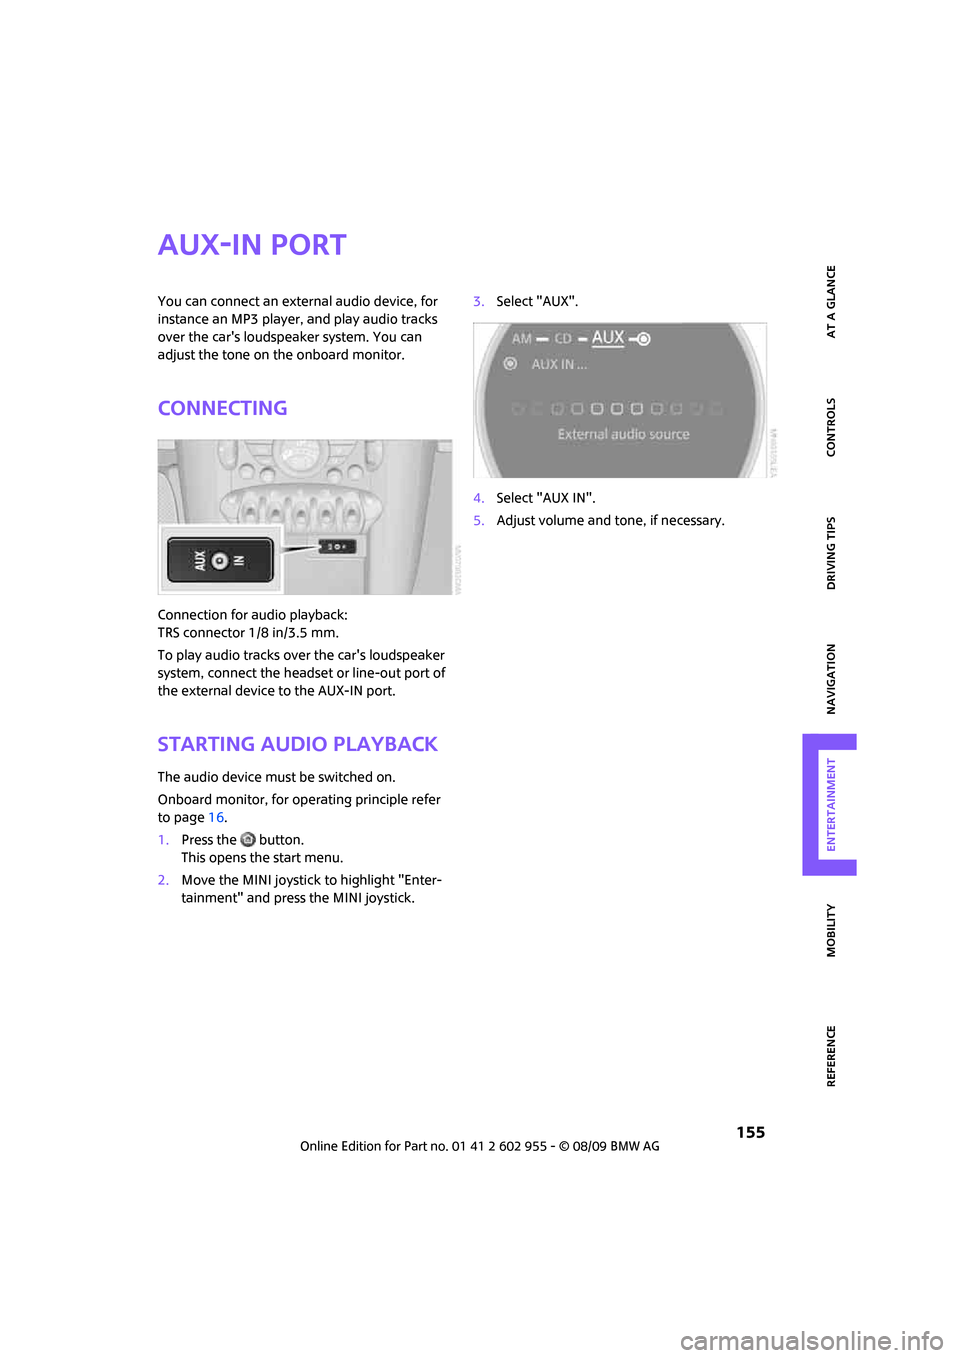
Connecting
Connection for audio playback:
TRS connector 1/8 in/3.5 mm.
To play audio tracks over the car's loudspeaker
system, connect the headset or line-out port of
the external device to the AUX-IN port.
Starting audio playback
The audio device must be switched on.
Onboard monitor, for operating principle refer
to page16.
1.Press the button.
This opens the start menu.
2.Move the MINI joystick to highlight "Enter-
tainment" and press the MINI joystick.3.Select "AUX".
4.Select "AUX IN".
5.Adjust volume and tone, if necessary.