service MINI Hardtop 2 Door 2010 Owner's Manual (Mini Connected)
[x] Cancel search | Manufacturer: MINI, Model Year: 2010, Model line: Hardtop 2 Door, Model: MINI Hardtop 2 Door 2010Pages: 230, PDF Size: 4.02 MB
Page 8 of 230

Notes
6
Service and warranty
We recommend that you read this publication
thoroughly.
Your MINI is covered by the following war-
ranties:
>New Vehicle Limited Warranty
>Rust Perforation Limited Warranty
>Federal Emissions System Defect Warranty
>Federal Emissions Performance Warranty
>California Emission Control System Limited
Warranty
Detailed information about these warranties is
listed in the Service and Warranty Information
Booklet for US models or in the Warranty and
Service Guide Booklet for Canadian models.
Reporting safety defects
For US customers
The following applies only to vehicles owned
and operated in the US.
If you believe that your vehicle has a defect
which could cause a crash or could cause injury
or death, you should immediately inform the
National Highway Traffic Safety Administration,
NHTSA, in addition to notifying MINI of
North America, LLC, P.O. Box 1227,
Westwood, New Jersey 07675-1227,
Telephone 1-800-831-1117.
If NHTSA receives similar complaints, it may
open an investigation, and if it finds that a safety
defect exists in a group of vehicles, it may order
a recall and remedy campaign. However, NHTSA
cannot become involved in individual problems
between you, your dealer, or MINI of North
America, LLC.
To contact NHTSA, you may call the Vehicle
Safety Hotline toll-free at 1-888-327-4236
(TTY: 1-800-424-9153);
go to http://www.safercar.gov; or write to:
Administrator, NHTSA, 400 Seventh Street, SW.,
Washington, DC 20590. You can also obtain other information about motor vehicle safety
from http://www.safercar.gov
For Canadian customers
Canadian customers who wish to report a
safety-related defect to Transport Canada,
Defect Investigations and Recalls, may call
1-800-333-0510 toll-free from anywhere in
Canada or 1-613-993-9851 from the Ottawa
region and from other countries, or contact
Transport Canada by mail at: Transport Canada,
ASFAD, Place de Ville, Tower C, 330 Sparks
Street, Ottawa, ON, K1A 0N5.
You can also obtain other information about
motor vehicle safety from http://www.tc.gc.ca
Page 14 of 230

Cockpit
12
Displays
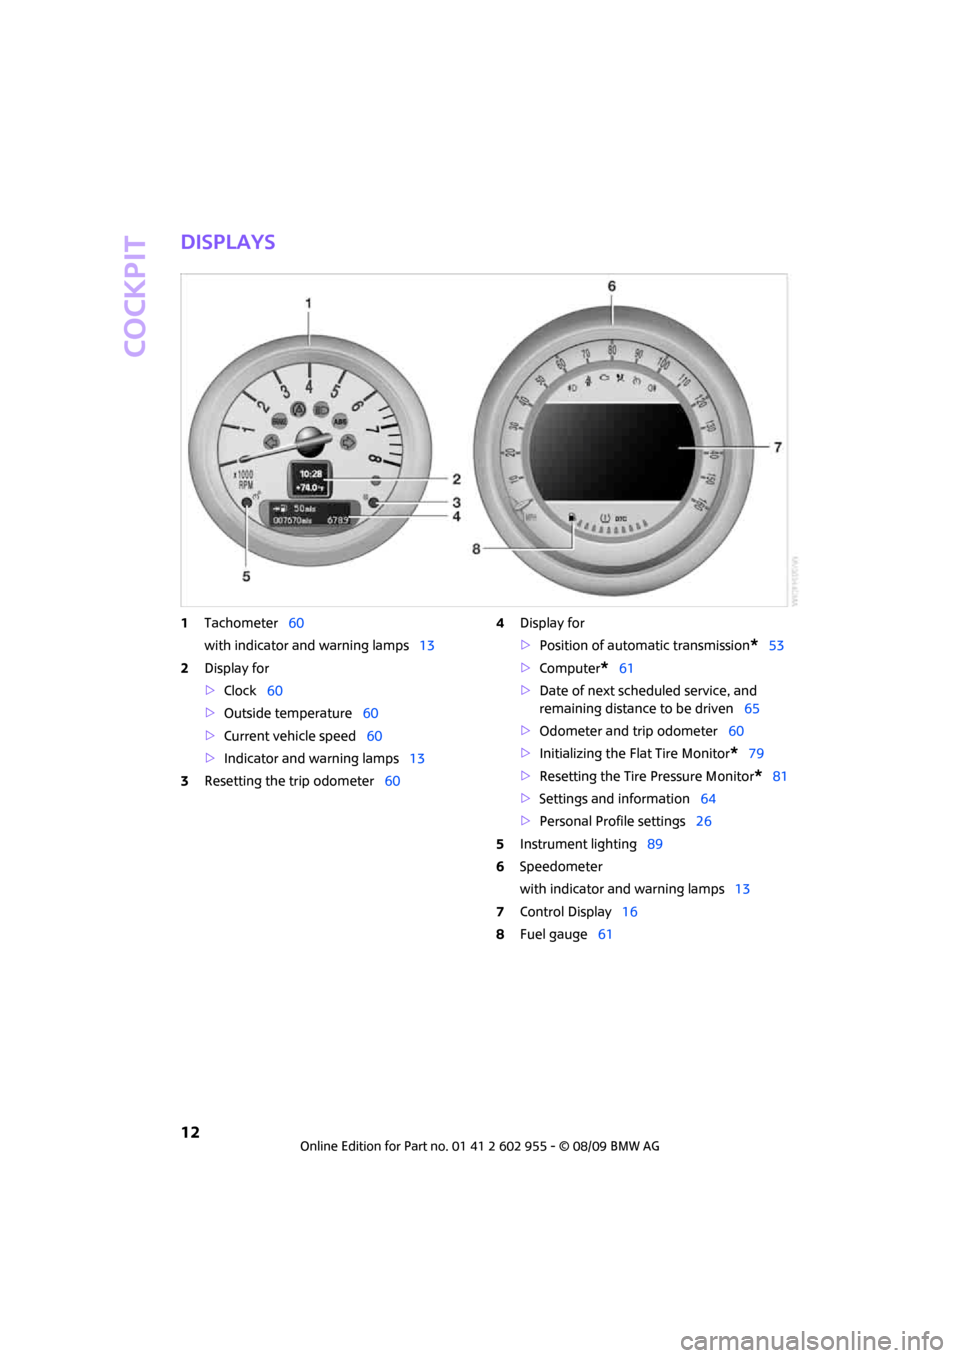
1Tachometer60
with indicator and warning lamps13
2Display for
>Clock60
>Outside temperature60
>Current vehicle speed60
>Indicator and warning lamps13
3Resetting the trip odometer604Display for
>Position of automatic transmission
*53
>Computer
*61
>Date of next scheduled service, and
remaining distance to be driven65
>Odometer and trip odometer60
>Initializing the Flat Tire Monitor
*79
>Resetting the Tire Pressure Monitor
*81
>Settings and information64
>Personal Profile settings26
5Instrument lighting89
6Speedometer
with indicator and warning lamps13
7Control Display16
8Fuel gauge61
Page 19 of 230

MOBILITYAT A GLANCE CONTROLS DRIVING TIPS ENTERTAINMENT
17
NAVIGATION REFERENCE
Setup
>Switching off Control Display
>Tone and display settings
>Settings for your vehicle, e.g. for the central
locking system
>Display of service requirements and dates
for statutory emissions and vehicle inspec-
tions
>Check Control
Operating principle
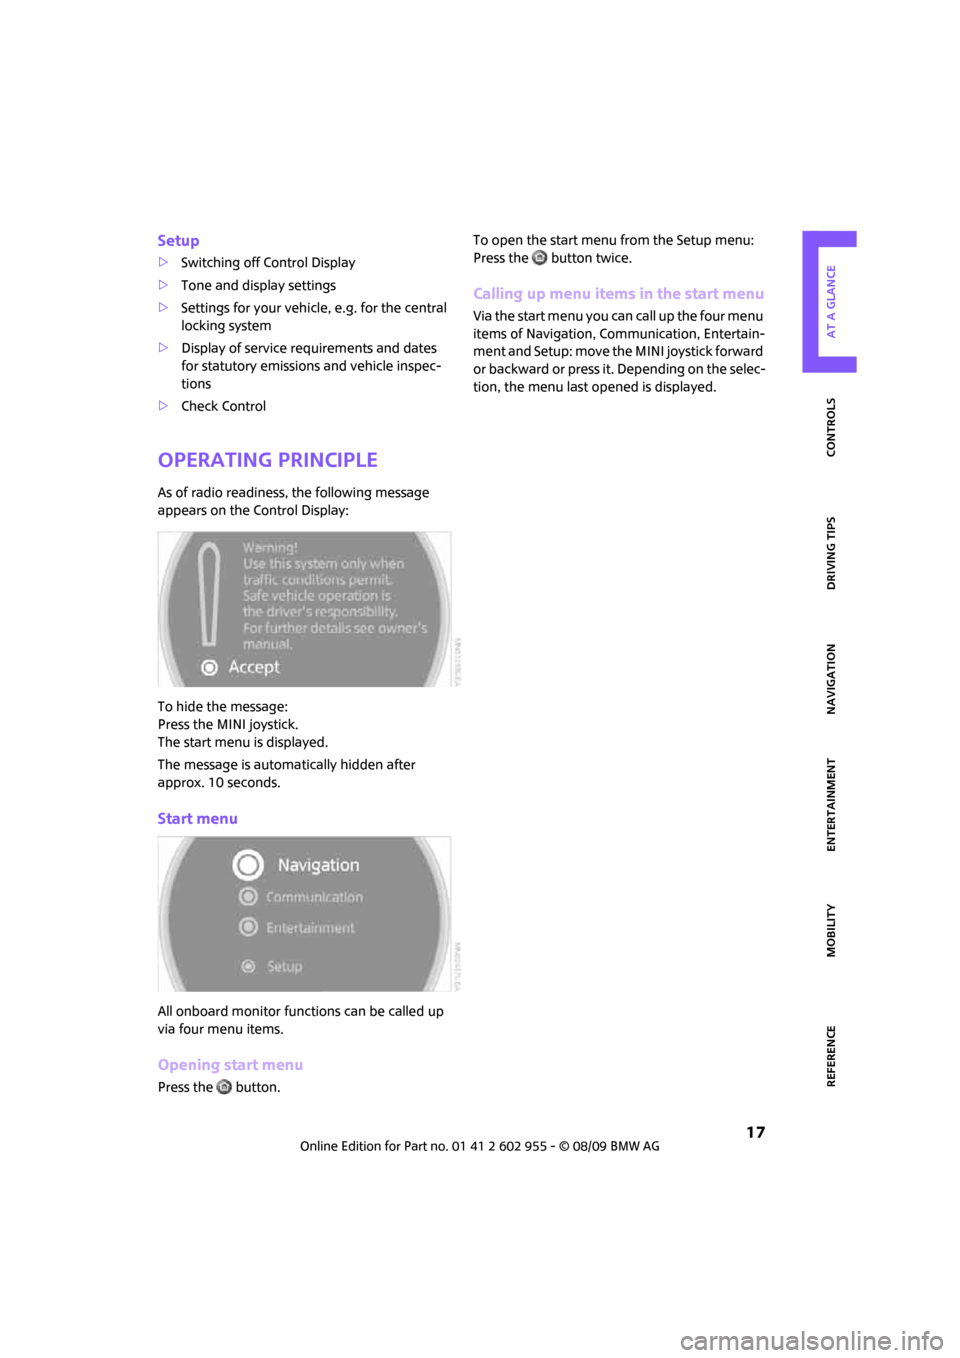
As of radio readiness, the following message
appears on the Control Display:
To hide the message:
Press the MINI joystick.
The start menu is displayed.
The message is automatically hidden after
approx. 10 seconds.
Start menu
All onboard monitor functions can be called up
via four menu items.
Opening start menu
Press the button.To open the start menu from the Setup menu:
Press the button twice.
Calling up menu items in the start menu
Via the start menu you can call up the four menu
items of Navigation, Communication, Entertain-
m e n t a n d S e t u p : m o v e t h e M I N I j o y s t i c k f o r w a r d
or backward or press it. Depending on the selec-
tion, the menu last opened is displayed.
Page 28 of 230

Opening and closing
26
Opening and closing
Keys/remote controls
Remote control
Each remote control contains a rechargeable
battery that is recharged when it is in the igni-
tion lock while the car is being driven. You
should therefore use each remote control at
least twice a year to maintain the charge status.
In vehicles equipped with Comfort Access
*, the
remote control contains a replaceable battery,
page35.
If more than one remote control unit is used, the
settings called up and implemented depend on
which remote control is recognized when the
car is unlocked, refer to Personal Profile,
page26.
In addition, information about service require-
ments is stored in the remote control, refer to
Service data in the remote control, page179.
New remote controls
Your MINI dealer can supply new remote con-
trols as additional units or as replacements in the
event of loss.
Integrated key
Press button1 to release the key.
The integrated key fits the following locks:
>Driver's door, page29.
>MINI Convertible: Glove compartment, refer
to page95.
>MINI Convertible: Locking the rear seat
backrest105.
Personal Profile
The concept
The functions of your MINI can be set individu-
ally. By means of Personal Profiles, most of these
settings are stored for the remote control cur-
rently in use. When you unlock the car, the
remote control is recognized and the settings
stored for it are called up and implemented.
This means that your settings will be activated
for you, even if in the meantime your car was
used by someone else with another remote con-
trol and the corresponding settings.
At most three remote controls can be set for
three different people. A prerequisite is that
each person uses a separate remote control.
Personal Profile settings
For more information on specific settings, refer
to the specified pages.
Page 67 of 230

MOBILITYAT A GLANCE CONTROLS DRIVING TIPS ENTERTAINMENT
65
NAVIGATION REFERENCE
Exiting displays
1.Briefly press the button in the turn indicator
lever repeatedly until "HOME" is displayed.
2.Press the button for a longer period.
The display again shows the outside tempera-
ture and the time.
Displays are also exited if no entries are made
for approx. 8 seconds.
Next setting or item of information
1.Within a setting or item of information,
briefly press the button in the turn indicator
lever repeatedly until "NEXT" is displayed.
2.Press the button for a longer period.
The display changes directly to the next setting
or item of information.
Units of measure
To set the units of measure. The settings are
stored for the remote control currently in use,
refer also to Personal Profile on page26.
1.Press the button.
This opens the start menu.
2.Move the MINI joystick to highlight "Setup"
and press the MINI joystick.3.Select "Settings".
4.Select "Language / Units".
5.Select "Units".
6.Select the menu item to be set.
7.Select the desired unit of measure.
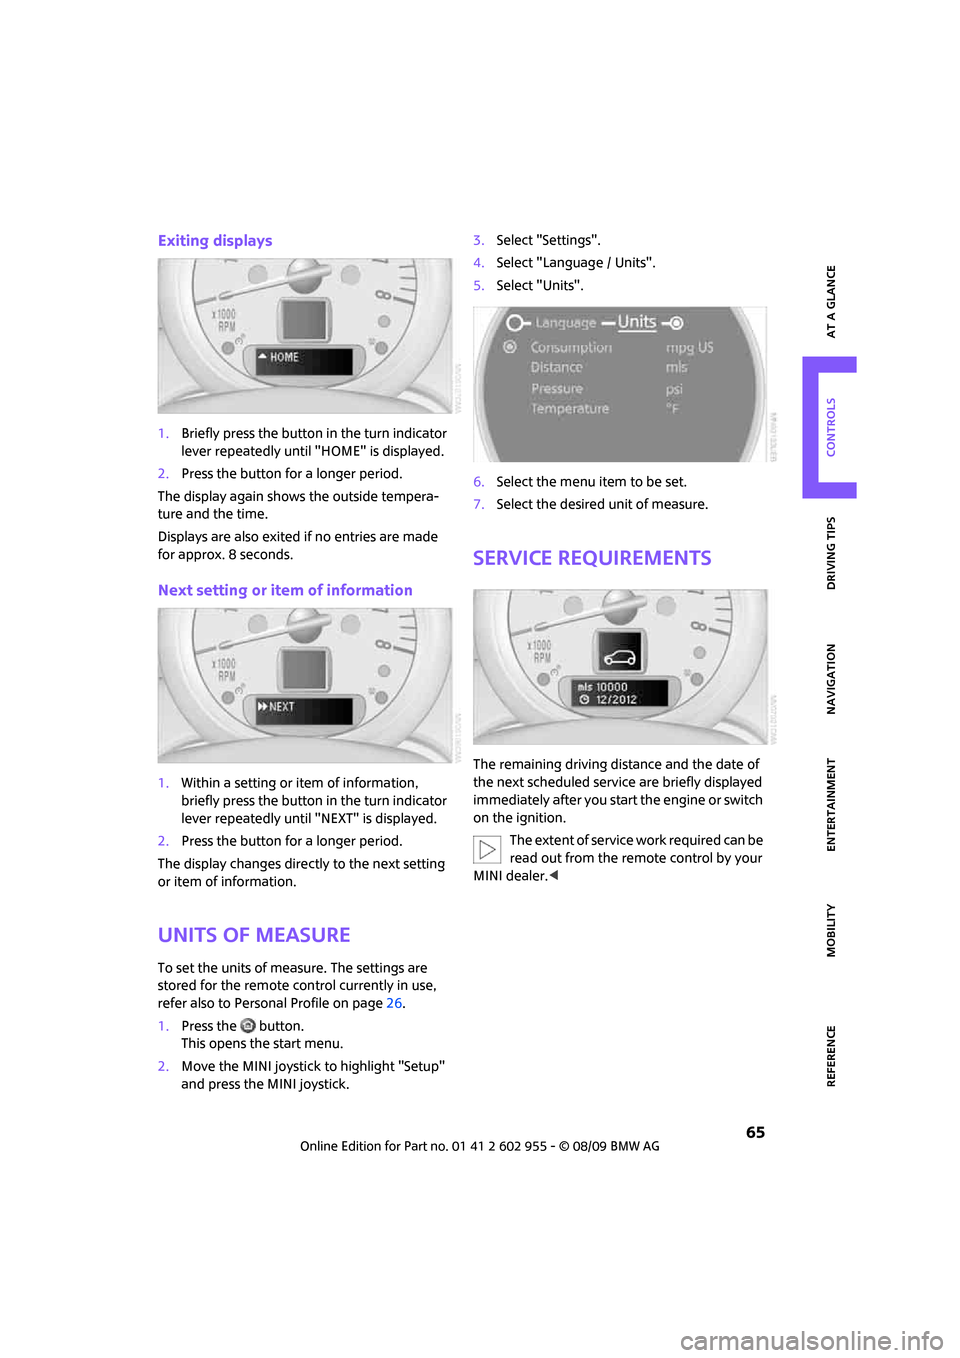
Service requirements
The remaining driving distance and the date of
the next scheduled service are briefly displayed
immediately after you start the engine or switch
on the ignition.
The extent of service work required can be
read out from the remote control by your
MINI dealer.<
Page 68 of 230

Controls overview
66
Possible displays
1Button for selecting information
2Engine oil
3Front brakes
4Rear brakes
5Vehicle check6Roadworthiness test
7Brake fluid
8Exit display65
9Next setting or item of information65
More information on the MINI Maintenance Sys-
tem can be found on page179.
Supplementary information
You can have further information on the scope
of maintenance displayed on the Control Dis-
play, refer to page16.
1.Press the button.
This opens the start menu.
2.Move the MINI joystick to highlight "Setup"
and press the MINI joystick.
3.Select "Info sources".4.Select "Service Info".
5.Select "Service requirements".
6.If necessary, move the highlight marker
to the second field from the top. Select
"Status".
Page 69 of 230

MOBILITYAT A GLANCE CONTROLS DRIVING TIPS ENTERTAINMENT
67
NAVIGATION REFERENCE
A list of selected maintenance operations and, if
applicable, inspections required by law is dis-
played.
You can have further information displayed on
each entry:
Select an entry.
Exiting the menu
Select the arrow.
Symbols
No service is currently required.
The deadline for service or a legally man-
dated inspection is approaching. Please
schedule a service appointment.
The service deadline has already passed.
Entering deadlines for legally required
inspections*
Make sure the date on the Control Display is
always set correctly, page69; otherwise, the
effectiveness of Condition Based Service CBS is
not ensured.1.Press the button.
This opens the start menu.
2.Move the MINI joystick to highlight "Setup"
and press the MINI joystick.
3.Select "Info sources".
4.Select "Service Info".
5.If necessary, move the highlight marker to
the uppermost field. Select "Service require-
ments".
6.Select "Status".
7.Select "State inspection".
8.Select "Set service date".
The month is highlighted.
9.Turn the MINI joystick to make the
adjustment.
10.Press the MINI joystick to apply the setting.
The year is highlighted.
11.Turn the MINI joystick to make the
adjustment.
12.Press the MINI joystick to apply the setting.
The date entry is stored.
Exiting the menu
Select the arrow.
Page 74 of 230

Controls overview
72
3.Press the button repeatedly until the display
shows the corresponding symbol and
"CHECK INFO".
4.Hold the button down.
"CHECK OK" appears if there are no Check
Control messages.
If a Check Control message has been stored,
the corresponding message is displayed. In
addition, the text message appears on the
Control Display.
5.Briefly press the button to check for other
messages.
Viewing more information later
Onboard monitor, for operating principle refer
to page16.
1.Press the button.
This opens the start menu.
2.Move the MINI joystick to highlight "Setup"
and press the MINI joystick.
3.Select "Info sources".
4.Select "Service Info".5.If necessary, move the highlight marker to
the uppermost field. Select "Check Control
messages".
6.Select a text message.
Exit display:
Select the arrow.
Speed limit
Enter a speed, and a Check Control message will
indicate when you reach this speed. This enables
you, for example, to receive warnings if you
exceed a speed limit in an urban area.
You are only warned of reaching this speed a
second time if your vehicle speed falls below it
again by at least 3 mph or 5 km/h.
Displaying, setting or changing the limit
Onboard monitor, for operating principle refer
to page16.
1.Press the button.
This opens the start menu.
2.Move the MINI joystick to highlight "Naviga-
tion" and press the MINI joystick.
3.Select "Car Data".
Page 86 of 230

Technology for driving comfort and safety
84
Airbags
The following airbags are located under the
marked covers:
MINI:
1Front airbags
2Side airbags in backrests
3Head airbags at the front and rearMINI Convertible:
1Front airbags
2Side/head airbags in the backrests
Protective effect
Observe the instructions on page42 to
ensure the best possible personal pro-
tection.<
The front airbags help protect the driver and
front passenger by responding to frontal
impacts in which safety belts alone cannot pro-
vide adequate restraint. When needed, the head
and side airbags help provide protection in the
event of side impact. The relevant side airbag
supports the side upper body area. The head air
bag supports the head.
The side/head airbag in the MINI Convertible
protects the head during impact.
The airbags are designed to not be triggered in
every type of collision, e.g. not in minor acci-
dents, certain rollover situations or rear impacts.
Do not apply adhesive materials to the
cover panels of the airbags, cover them or
modify them in any other way.
Keep the dashboard and window on the passen-
ger side free from obstruction, i.e. do not cover it
with adhesive film or coverings, and do not affix
any holders such as for a navigation device or a
mobile phone.
Do not attach seat covers, cushions or other
objects not specifically approved for seats with
integral side airbags to the front seats. Do not hang items of clothing such as coats or jackets
over the backrests. Do not attempt to remove
the airbag retention system from the vehicle. Do
not modify the individual components of the
system or its wiring in any way. This includes the
upholstered covers on the steering wheel,
instrument panel, seats and roof posts, as well as
the sides of the roof lining. Do not attempt to
remove or dismantle the steering wheel.
Do not touch the individual components imme-
diately after the system has been triggered,
because there is a danger of burns.
In the event of malfunctions, deactivation, or
triggering of the airbag restraint system, have
the testing, repair, removal, and disposal of air-
bag generators executed only by a MINI dealer
or a workshop that works according to repair
procedures of the manufacturer of your MINI
with correspondingly trained personnel and has
the required explosives licenses. Otherwise,
unprofessional attempts to service the system
could lead to failure in an emergency or undes-
ired airbag activation, either of which could
result in personal injury.<
Warning notices and information about the air-
bags can also be found on the sun visors.
Page 88 of 230

Technology for driving comfort and safety
86
Operational readiness of airbag system
As of radio readiness, page51, the warning
lamp comes on briefly to indicate that the entire
airbag system and the belt tensioners are oper-
ational.
Airbag system malfunction
>The warning lamp does not come on
when radio readiness or the ignition is
switched on.
>The warning lamp stays lit continuously.
In the event of a fault in the airbag system,
have it checked without delay; otherwise,
there is the risk that the system will not function
as intended even if a severe accident occurs.<
MINI Convertible:
Rollover protection
system
The rollover system is automatically activated
during an accident or dangerous driving situa-
tion, during extreme tilt of the longitudinal axis,
or during loss of ground contact. The roll bar
located behind the rear seat headrest is pro-
jected within a fraction of a second.
In addition to the reinforced windshield frame,
the rollover protection system ensures the nec-
essary head clearance for all occupants of the
vehicle.
Never block the travel path of the rollover
protection system with any objects.
Always wear your safety belt, it protects you in a
minor car accident and, depending on the
severity of the accident, the seat belt tensioner and the multilevel airbag system will
protect you.<
Lowering
If the rollover protection system releases acci-
dentally, have your MINI Service check it.
If the rollover protective system is
extended, do not operate the conver-
tible top.
Never attempt to modify the individual compo-
nents or the electrical wiring of the rollover pro-
tective system.
Have the necessary work on the rollover protec-
tion system of your MINI only carried out by an
authorized MINI dealer.
Faulty repair may lead to the failure of the sys-
tem or malfunctions.
Check the system regularly and in order to
ensure a long service life of all functions, it is
mandatory to maintain the service intervals,
refer to page65.<