ignition MINI Hardtop 2 Door 2010 Owner's Guide
[x] Cancel search | Manufacturer: MINI, Model Year: 2010, Model line: Hardtop 2 Door, Model: MINI Hardtop 2 Door 2010Pages: 174, PDF Size: 2.96 MB
Page 54 of 174

Driving
52
Activating
1Resuming cruise control
2Activating/deactivating cruise control
3Maintaining, storing and increasing speed
4Maintaining, storing and decreasing speed
Indicator lamp in the speedometer lights up. The
cruise control system is ready and can be acti-
vated.
Activating/deactivating cruise control
Press button 2.
In addition, the system is automatically deacti-
vated:
>When the brakes are applied
>When the clutch is depressed
>When the automatic transmission is in selec-
tion lever position N
>When the driving stability control system is
active
Cruise control is not deactivated by depressing
the accelerator pedal. Once the accelerator
pedal is released, the stored speed is achieved
again and maintained.
The stored speed is cleared when the ignition is
switched off.
Maintaining current speed
Press button3.
The system maintains and stores the current
vehicle speed.
If, on a downhill grade, the engine braking effect
is not sufficient, the controlled speed may be
exceeded. On uphill grades vehicle speed may
drop if the engine output is insufficient.
Increasing speed
Press button3 repeatedly until the desired
speed is reached. Every time you press the but-
ton, the speed increases by approx. 1 mph or
2km/h.
Accelerating using the button
Press and hold button3.
The vehicle accelerates without pressure on the
accelerator pedal. After the button is released,
the driving speed is maintained and stored.
Decreasing speed
Press button4 repeatedly until the desired
speed is reached.
The functions here are the same as for increas-
ing the speed or accelerating, except that the
speed will be decreased.
Resuming a speed stored beforehand
Press button 1.
The last speed stored is achieved again and
maintained.
The stored speed is cleared when the ignition is
switched off.
Display in tachometer*
Selected speed is displayed briefly.
If --- mph or --- km/h is displayed briefly in
the tachometer, the conditions necessary
for operation may not be fulfilled.<
Malfunction
The warning lamp in the tachometer
lights up if the system fails.
Page 55 of 174
REFERENCEAT A GLANCE CONTROLS DRIVING TIPS MOBILITY
53
Controls overview
Odometer, outside
temperature display,
clock
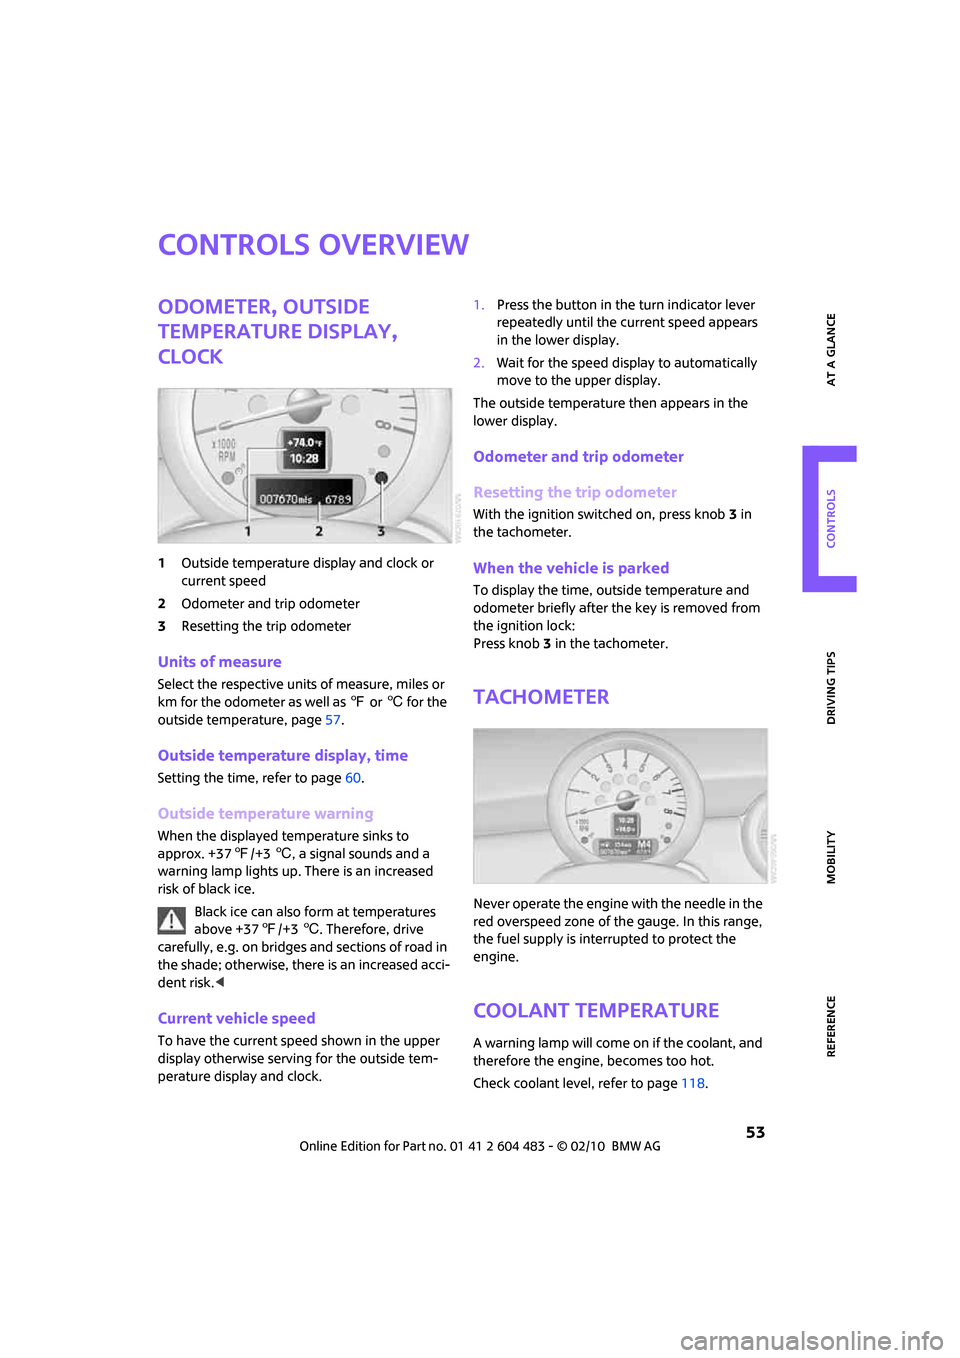
1Outside temperature display and clock or
current speed
2Odometer and trip odometer
3Resetting the trip odometer
Units of measure
Select the respective units of measure, miles or
km for the odometer as well as 7 or 6 for the
outside temperature, page57.
Outside temperature display, time
Setting the time, refer to page60.
Outside temperature warning
When the displayed temperature sinks to
approx. +377/+36, a signal sounds and a
warning lamp lights up. There is an increased
risk of black ice.
Black ice can also form at temperatures
above +377/+36. Therefore, drive
carefully, e.g. on bridges and sections of road in
the shade; otherwise, there is an increased acci-
dent risk.<
Current vehicle speed
To have the current speed shown in the upper
display otherwise serving for the outside tem-
perature display and clock.1.Press the button in the turn indicator lever
repeatedly until the current speed appears
in the lower display.
2.Wait for the speed display to automatically
move to the upper display.
The outside temperature then appears in the
lower display.
Odometer and trip odometer
Resetting the trip odometer
With the ignition switched on, press knob 3 in
the tachometer.
When the vehicle is parked
To display the time, outside temperature and
odometer briefly after the key is removed from
the ignition lock:
Press knob 3 in the tachometer.
Tachometer
Never operate the engine with the needle in the
red overspeed zone of the gauge. In this range,
the fuel supply is interrupted to protect the
engine.
Coolant temperature
A warning lamp will come on if the coolant, and
therefore the engine, becomes too hot.
Check coolant level, refer to page118.
Page 58 of 174
Controls overview
56
Settings and information
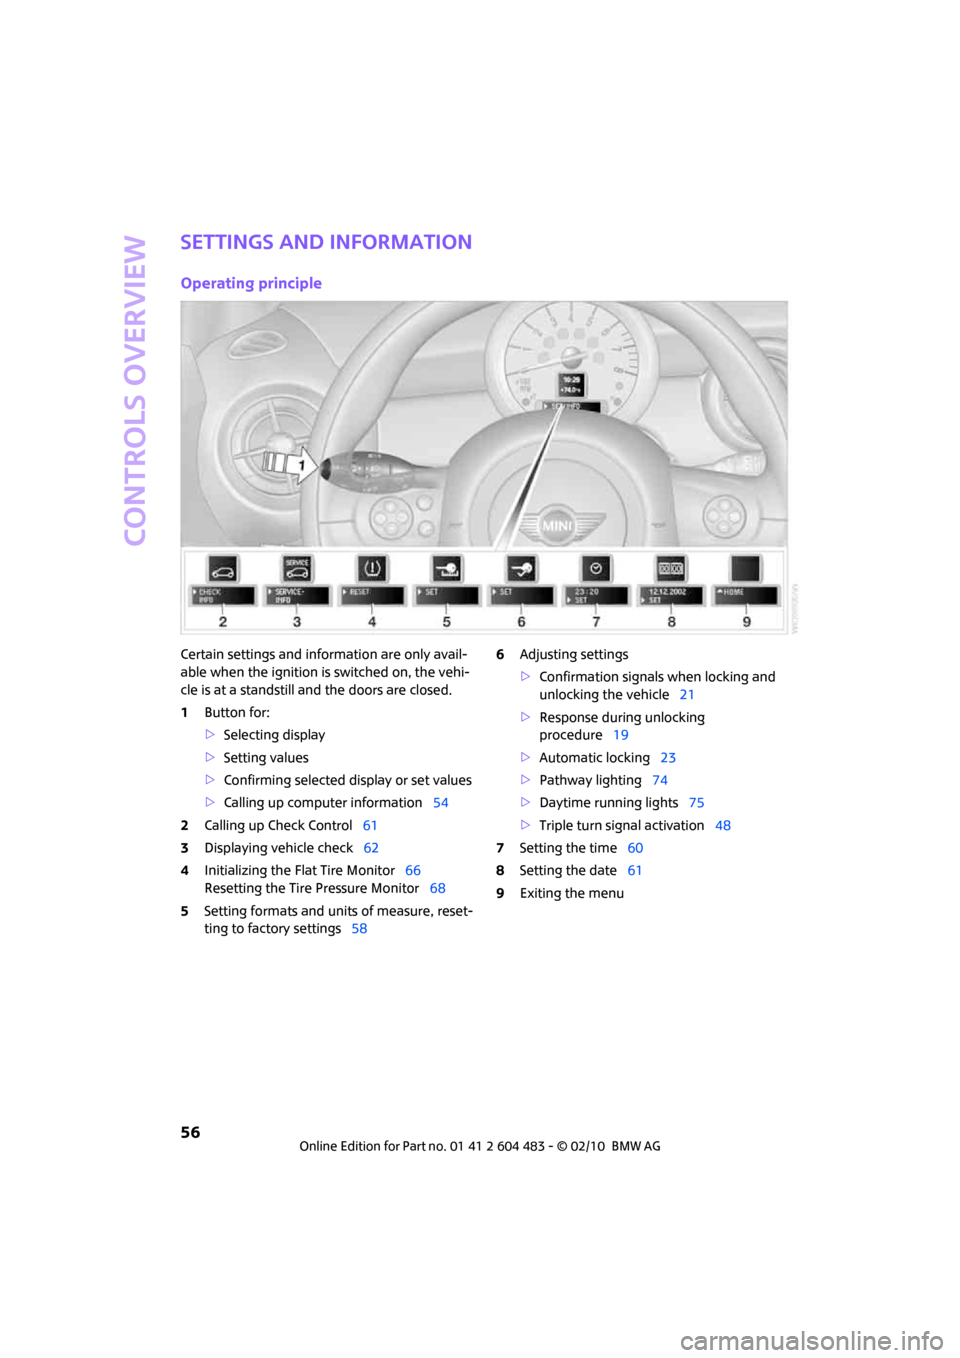
Operating principle
Certain settings and information are only avail-
able when the ignition is switched on, the vehi-
cle is at a standstill and the doors are closed.
1Button for:
>Selecting display
>Setting values
>Confirming selected display or set values
>Calling up computer information54
2Calling up Check Control61
3Displaying vehicle check62
4Initializing the Flat Tire Monitor66
Resetting the Tire Pressure Monitor68
5Setting formats and units of measure, reset-
ting to factory settings586Adjusting settings
>Confirmation signals when locking and
unlocking the vehicle21
>Response during unlocking
procedure19
>Automatic locking23
>Pathway lighting74
>Daytime running lights75
>Triple turn signal activation48
7Setting the time60
8Setting the date61
9Exiting the menu
Page 59 of 174

REFERENCEAT A GLANCE CONTROLS DRIVING TIPS MOBILITY
57
Exiting displays
1.Briefly press the button in the turn indicator
lever repeatedly until "HOME" is displayed.
2.Press the button for a longer period.
The display again shows the outside tempera-
ture and the time.
Displays are also exited if no entries are made
for approx. 8 seconds.
Next setting or item of information
1.While in a setting or information item, briefly
press the button in the turn indicator lever
repeatedly until "NEXT" is displayed.
2.Press the button for a longer period.
The display changes directly to the next setting
or item of information.
Formats and units of
measure
To set the formats and units of measure. The set-
tings are stored for the remote control currently
in use, refer also to Personal Profile on page18.
1.Switch on the ignition, refer to page44.
2.Briefly press the button in the turn indicator
lever repeatedly until "SET/INFO" is dis-
played.
3.Press and hold the button until the display
changes.
4.Briefly press the button repeatedly until the
symbol and "SET" are displayed.
5.Press and hold the button until the display
changes.
6.Briefly presss the button repeatedly until the
display shows the illustrated symbol, arrow.
Page 60 of 174
Controls overview
58
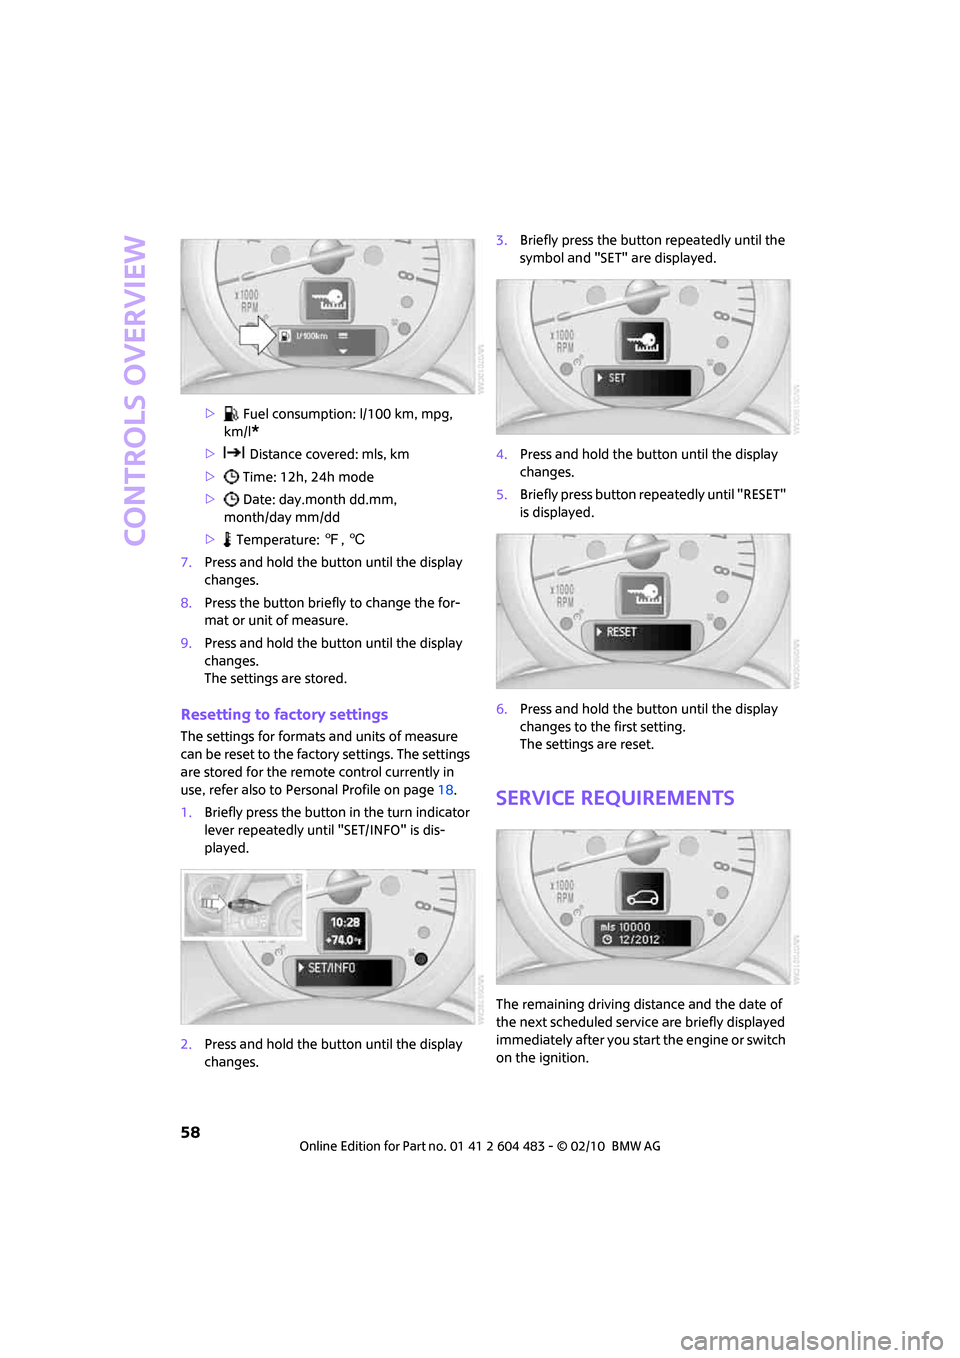
> Fuel consumption: l/100 km, mpg,
km/l
*
> Distance covered: mls, km
> Time: 12h, 24h mode
> Date: day.month dd.mm,
month/day mm/dd
> Temperature: 7, 6
7.Press and hold the button until the display
changes.
8.Press the button briefly to change the for-
mat or unit of measure.
9.Press and hold the button until the display
changes.
The settings are stored.
Resetting to factory settings
The settings for formats and units of measure
can be reset to the factory settings. The settings
are stored for the remote control currently in
use, refer also to Personal Profile on page18.
1.Briefly press the button in the turn indicator
lever repeatedly until "SET/INFO" is dis-
played.
2.Press and hold the button until the display
changes.3.Briefly press the button repeatedly until the
symbol and "SET" are displayed.
4.Press and hold the button until the display
changes.
5.Briefly press button repeatedly until "RESET"
is displayed.
6.Press and hold the button until the display
changes to the first setting.
The settings are reset.
Service requirements
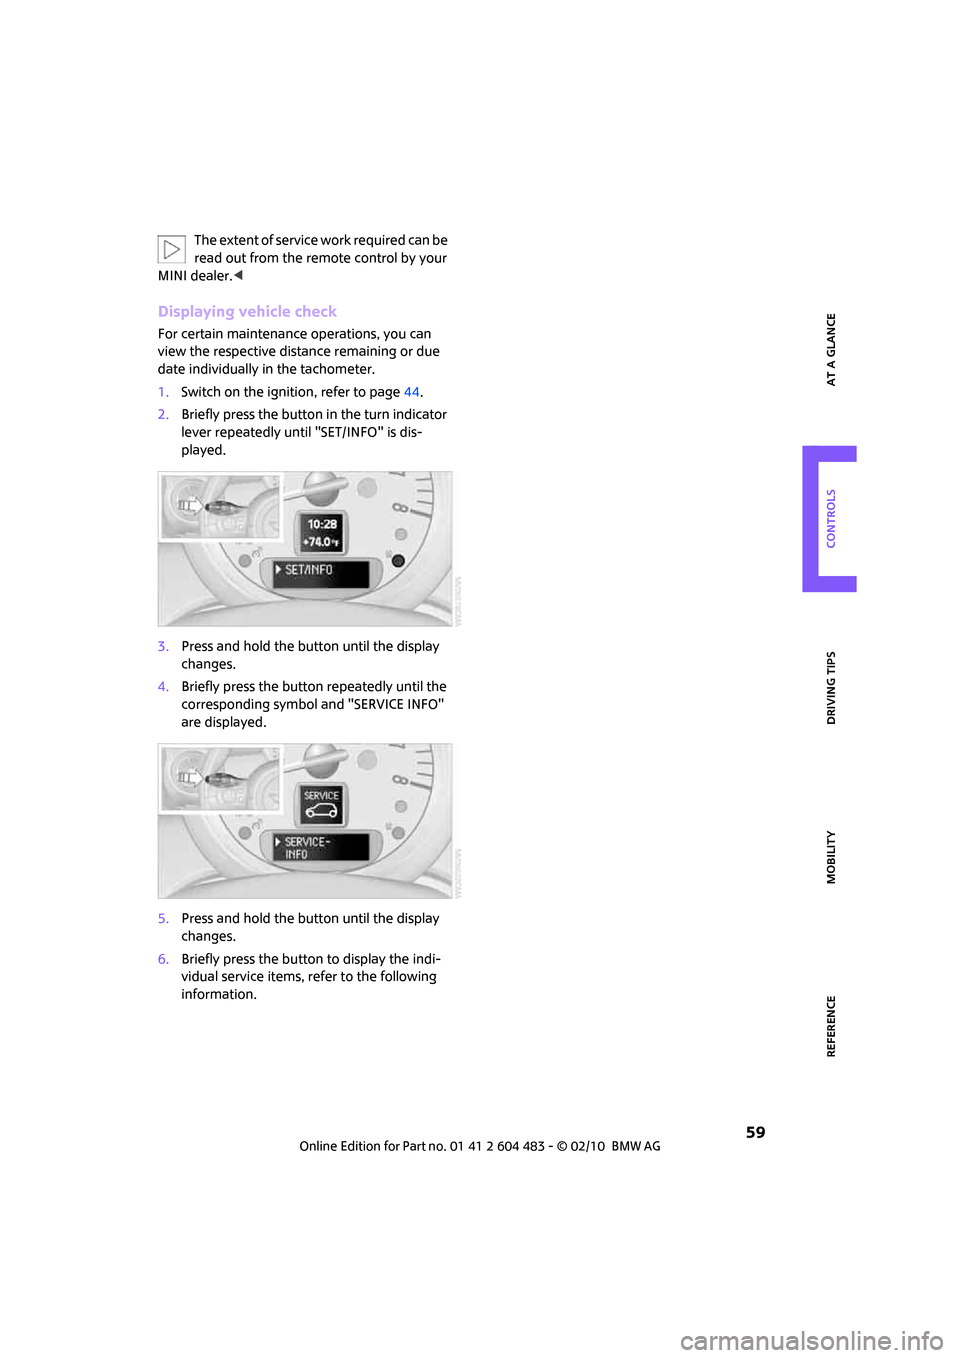
The remaining driving distance and the date of
the next scheduled service are briefly displayed
immediately after you start the engine or switch
on the ignition.
Page 61 of 174
REFERENCEAT A GLANCE CONTROLS DRIVING TIPS MOBILITY
59
The extent of service work required can be
read out from the remote control by your
MINI dealer.<
Displaying vehicle check
For certain maintenance operations, you can
view the respective distance remaining or due
date individually in the tachometer.
1.Switch on the ignition, refer to page44.
2.Briefly press the button in the turn indicator
lever repeatedly until "SET/INFO" is dis-
played.
3.Press and hold the button until the display
changes.
4.Briefly press the button repeatedly until the
corresponding symbol and "SERVICE INFO"
are displayed.
5.Press and hold the button until the display
changes.
6.Briefly press the button to display the indi-
vidual service items, refer to the following
information.
Page 65 of 174
REFERENCEAT A GLANCE CONTROLS DRIVING TIPS MOBILITY
63
Technology for driving comfort and
safety
Park Distance Control
PDC*
The concept
PDC assists you with parking backwards. Acous-
tic signals warn you of the presence of an object
behind the vehicle. To measure the distance,
there are four ultrasonic sensors in either
bumper.
However, an acoustic warning does not sound
until an object is approx. 24 in/60 cm from the
corner sensors, or approx. 5 ft/1.50 m from the
center sensors.
PDC is a parking aid that can indicate
objects when they are approached slowly,
as is usually the case when parking. Avoid
approaching an object at high speed; otherwise,
physical circumstances may lead to the system
warning being issued too late.<
Automatic mode
With the engine running or the ignition switched
on, the system is activated automatically after
approx. 1 second when you engage reverse gear
or move the automatic transmission selector
lever to position R. Wait this short period before
driving.
Acoustic signals
As the distance between vehicle and object
decreases, the intervals between the tones
become shorter. If the distance to the nearest
object falls to below roughly 1 ft/30 cm, then a
continuous tone sounds.
If the distance remains constant, e.g. when driv-
ing parallel to a wall, the acoustic signal stops
after approx. 3 seconds.
Adjustments
The volume of the acoustic signals can be
adjusted, refer to the Owner's Manual for Radio.
Malfunction
Indicator lamp comes on: PDC has
failed. Have the system checked.
To avoid this problem, keep the sensors
clean and free of ice or snow in order to ensure
that they will continue to operate effectively.
When using a high-pressure cleaner, do not
direct the jet toward the sensors for lengthy
periods and only spray from a distance of at least
4in/10cm.
System limitations
Even with PDC, final responsibility for esti-
mating the distance between the vehicle
and any obstructions always remains with the
driver. Sensors, too, have blind spots in which
objects cannot be detected. Moreover, ultra-
sonic detection can reach its physical limits with
objects such as trailer tow bars and couplings,
thin and wedge-shaped objects, etc. Low
objects already indicated, such as curbs, may
enter the sensors' blind spots before or after a
continuous audible signal is given. Higher, pro-
truding objects, such as wall ledges, may not be
detectable. Therefore, always drive cautiously;
otherwise, there is a risk of personal injury or
property damage. Loud sound sources outside
or inside the car can drown out the PDC signal.<
Driving stability control
systems
Your MINI has a number of systems that help to
maintain the vehicle's stability even in adverse
driving conditions.
The laws of physics cannot be repealed,
even with driving stability control systems.
An appropriate driving style always remains the
responsibility of the driver. Therefore do not
reduce the additional safety margin by engaging
in hazardous driving thereby running the risk of
an accident.<
Page 75 of 174

REFERENCEAT A GLANCE CONTROLS DRIVING TIPS MOBILITY
73
Operational readiness of airbag system
As of radio readiness, page44, the warning
lamp comes on briefly to indicate that the entire
airbag system and the belt tensioners are oper-
ational.
Airbag system malfunction
>The warning lamp does not come on when
radio readiness or the ignition is switched
on.
>The warning lamp stays lit continuously.
In the event of a fault in the airbag system,
have it checked without delay; otherwise,
there is the risk that the system will not function
as intended even if a severe accident occurs.<
MINI Convertible:
Rollover protection
system
The rollover system is automatically activated
during an accident or dangerous driving situa-
tion, during extreme tilt of the longitudinal axis,
or during loss of ground contact. The roll bar
located behind the rear seat headrest is pro-
jected within a fraction of a second.
In addition to the reinforced windshield frame,
the rollover protection system ensures the nec-
essary head clearance for all occupants of the
vehicle.
Never block the travel path of the rollover
protection system with any objects.
Always wear your safety belt, it protects you in a
minor car accident and, depending on the
severity of the accident, the seat belt tensioner and the multilevel airbag system will protect
you.<
Lowering
If the rollover protection system releases acci-
dentally, have your MINI Service check it.
If the rollover protective system is
extended, do not operate the convertible
top.
Never attempt to modify the individual compo-
nents or the electrical wiring of the rollover pro-
tective system.
Have the necessary work on the rollover protec-
tion system of your MINI only carried out by an
authorized MINI dealer.
Faulty repair may lead to the failure of the sys-
tem or malfunctions.
Check the system regularly and in order to
ensure a long service life of all functions, it is
mandatory to maintain the service intervals,
refer to page58.<
Page 76 of 174

Lamps
74
Lamps
Parking lamps/low beams
0Lamps off and daytime running lights
1Parking lamps and daytime running lights
2Low-beam headlamps and welcome lamps
3Automatic headlamp control
*, daytime run-
ning lights and welcome lamps
When you open the driver's door with the igni-
tion switched off, the exterior lighting is auto-
matically switched off if the light switch is in
position 0, 2 or 3.
Switch on the parking lamps if necessary, switch
position 1.
Parking lamps
Turn the light switch to position 1.
The front, rear and side vehicle lighting is
switched on.
Activation of lights on one side of the vehicle for
parking, page76.
The parking lamps will discharge the bat-
tery. Therefore, do not leave them on for
unduly long periods of time; otherwise, the bat-
tery might not have enough power to start the
engine.<
Low beams
Turn the light switch to position 2.
The low beams come on when the ignition is on.
Automatic headlamp control*
When the switch is in position3, the low beams
are switched on and off automatically depend-
ing on ambient light conditions, e.g. in a tunnel,
in twilight, or if there is precipitation.
The headlamps may also come on when the sun
is sitting low on a blue sky.
When driving into tunnels with bright overhead
lights, there may be a delay before the head-
lamps come on.
The low beams remain switched on indepen-
dent of the ambient lighting conditions when
you switch on the fog lamps
*.
If the daytime running lights are activated,
page75, the low beams are always switched on
with the light switch in position 3 and the igni-
tion on. The exterior lamps are automatically
switched off after the vehicle is parked.
The automatic headlamp control cannot
serve as a substitute for your personal
judgment in determining when the lamps
should be switched on in response to ambient
lighting conditions. For example, the system
cannot detect fog or hazy weather. To avoid
safety risks, you should respond to these kinds
of low-visibility situations by switching the head-
lamps on manually.<
Welcome lamps
If you leave the light switch in the low beam or
automatic headlamp control position when you
switch off the ignition, the parking lamps and
interior lamps come on for a certain time as soon
as the vehicle is unlocked.
Pathway lighting
If you activate the headlamp flasher after
switching off the ignition with the lamps
switched off, the low beams come on and
remain on for a certain time.
The setting is stored for the remote control in
use, refer to Personal Profile, page18.
Page 77 of 174

REFERENCEAT A GLANCE CONTROLS DRIVING TIPS MOBILITY
75
Setting the duration or deactivating the
function
1.Switch on the ignition, refer to page44.
2.Briefly press the button in the turn indicator
lever repeatedly until "SET/INFO" is dis-
played.
3.Press and hold the button until the display
changes.
4.Briefly press the button repeatedly until the
symbol and "SET" are displayed.
5.Press and hold the button until the display
changes.
6.Briefly press the button repeatedly until the
display shows the illustrated symbol.
7.Press and hold the button until the display
changes.8.Briefly press the button to select:
>
The function is deactivated.
>...
Select the corresponding duration, e.g. to
40 seconds.
9.Press the button for a longer period.
The setting is stored.
Daytime running lights*
The light switch can remain in the lamps off,
parking lamps or automatic headlamp control
*
position.
In the lamps off position, the exterior lighting is
automatically switched off after the vehicle is
parked. In the parking lamps position, the park-
ing lamps will stay on after the ignition is
switched off.
Switch on the parking lamps separately if
needed.
Activating/deactivating daytime
running lights
The setting is stored for the remote control in
use, refer to Personal Profile, page18.
1.Switch on the ignition, refer to page44.
2.Briefly press the button in the turn indicator
lever repeatedly until "SET/INFO" is dis-
played.
3.Press and hold the button until the display
changes.