USB MINI Hardtop 2 Door 2015 Owner's Manual (Mini Connected)
[x] Cancel search | Manufacturer: MINI, Model Year: 2015, Model line: Hardtop 2 Door, Model: MINI Hardtop 2 Door 2015Pages: 244, PDF Size: 11.11 MB
Page 27 of 244

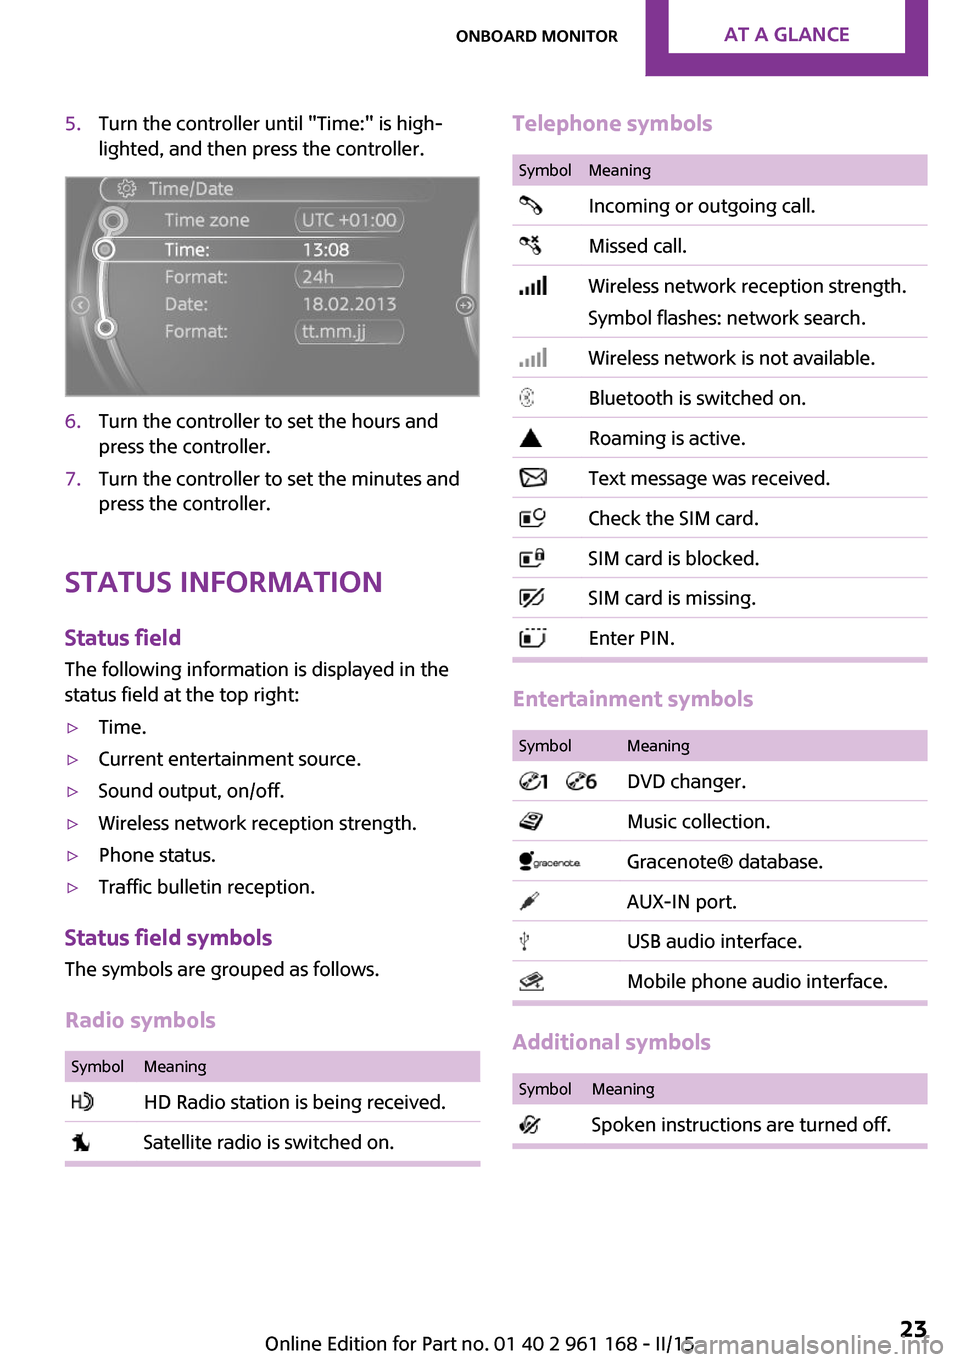
5.Turn the controller until "Time:" is high‐
lighted, and then press the controller.6.Turn the controller to set the hours and
press the controller.7.Turn the controller to set the minutes and
press the controller.
Status information
Status fieldThe following information is displayed in the
status field at the top right:
▷Time.▷Current entertainment source.▷Sound output, on/off.▷Wireless network reception strength.▷Phone status.▷Traffic bulletin reception.
Status field symbols
The symbols are grouped as follows.
Radio symbols
SymbolMeaning HD Radio station is being received. Satellite radio is switched on.Telephone symbolsSymbolMeaning Incoming or outgoing call. Missed call. Wireless network reception strength.
Symbol flashes: network search. Wireless network is not available. Bluetooth is switched on. Roaming is active. Text message was received. Check the SIM card. SIM card is blocked. SIM card is missing. Enter PIN.
Entertainment symbols
SymbolMeaning DVD changer. Music collection. Gracenote® database. AUX-IN port. USB audio interface. Mobile phone audio interface.
Additional symbols
SymbolMeaning Spoken instructions are turned off.Seite 23Onboard monitorAT A GLANCE23
Online Edition for Part no. 01 40 2 961 168 - II/15
Page 41 of 244

This can be helpful for securing and retrieving
personal settings, before delivering the vehicle
to a workshop, e.g. Profiles can be taken to an‐
other vehicle equipped with the Personal Pro‐
file function.
Export is made via the USB port to a USB de‐
vice.
Popular file systems for USB devices are sup‐
ported. FAT32 and exFAT are the recom‐
mended formats for profile export. Other for‐
mats may not support the export.1. "Settings"2."Profiles"3."Export profile"4."USB device"
Importing profiles
Profiles stored on a USB device can be im‐
ported via the USB interface.
Existing settings are overwritten with the im‐
ported profile.
1. "Settings"2."Profiles"3."Import profile"4."USB device"
Using the guest profile
The guest profile is for individual settings that
are saved in none of the three personal profiles.
This can be useful for drivers who are using the
vehicle temporarily and do not have their own
profile.
1. "Settings"2."Profiles"3."Guest"4.Adjust the settings.
The guest profile cannot be renamed. It is not
assigned to the current remote control.
Display profile list during start
The profile list can be displayed during each
start to select the desired profile.1. "Settings"2."Profiles"3.Open "Options".4."Display user list at startup"
Using the remote con‐
trol
Note Take the remote control with you
People or animals left unattended in a
parked vehicle can lock the doors from the in‐
side. Always take the remote control with you
when leaving the vehicle so that the vehicle
can then be opened from the outside. ◀
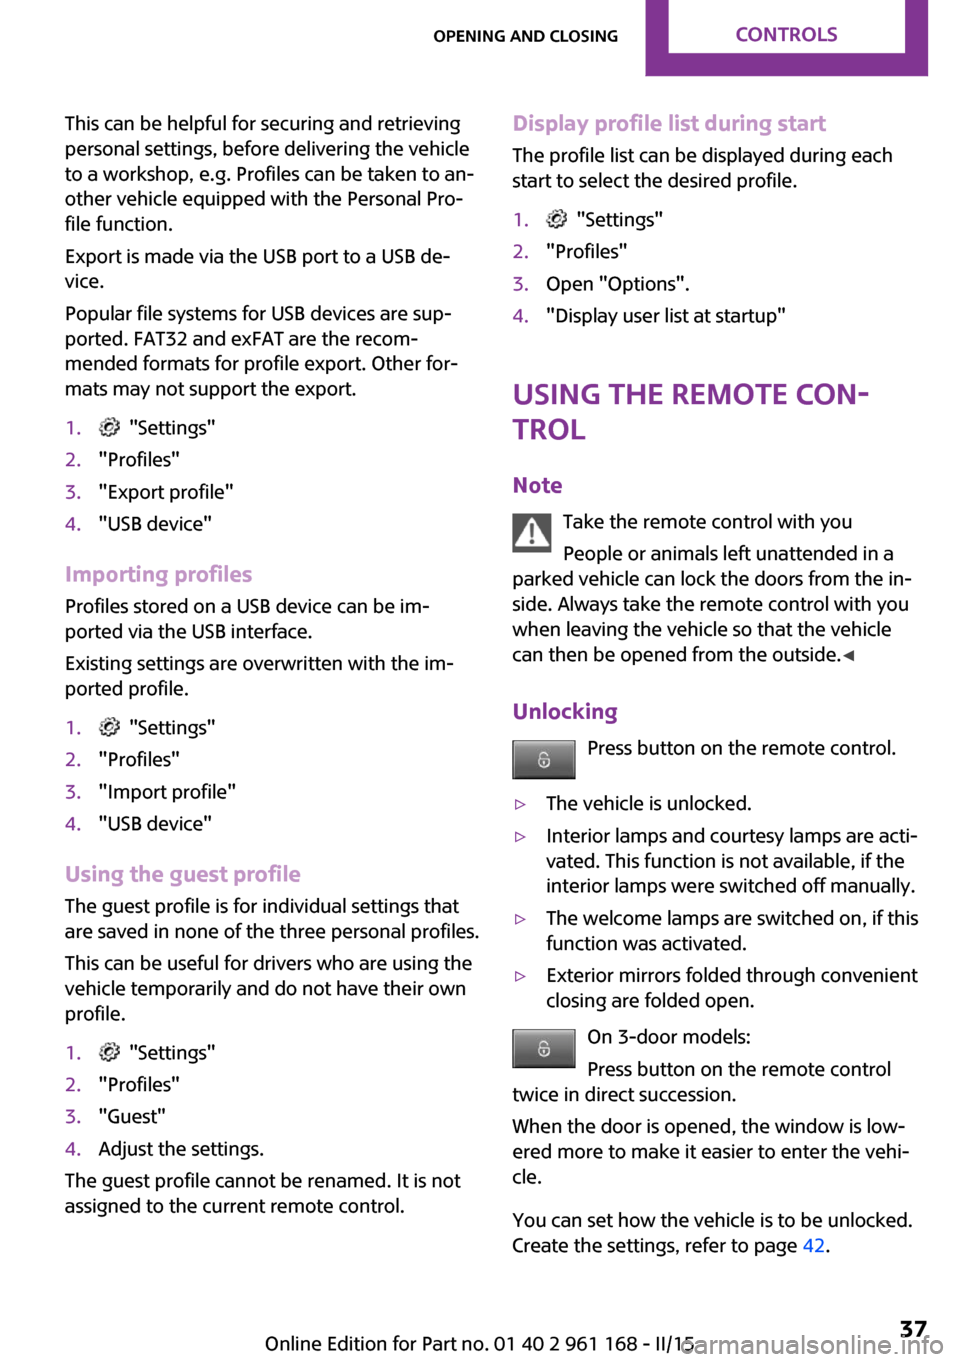
Unlocking Press button on the remote control.
▷The vehicle is unlocked.▷Interior lamps and courtesy lamps are acti‐
vated. This function is not available, if the
interior lamps were switched off manually.▷The welcome lamps are switched on, if this
function was activated.▷Exterior mirrors folded through convenient
closing are folded open.
On 3-door models:
Press button on the remote control
twice in direct succession.
When the door is opened, the window is low‐
ered more to make it easier to enter the vehi‐
cle.
You can set how the vehicle is to be unlocked.
Create the settings, refer to page 42.
Seite 37Opening and closingCONTROLS37
Online Edition for Part no. 01 40 2 961 168 - II/15
Page 148 of 244

nition switched on. The total load of all sockets
must not exceed 140 watts at 12 volts.
Do not damage the socket by using unsuitable
connectors.
In the center console
Remove the cover or cigarette lighter.
In the cargo area
The socket is located on the right side in the
cargo area.
USB interface The concept
Connection for USB devices with music files and
for importing data, such as for Personal Profile
settings.
HintsObserve the following when connecting:
▷Do not use force when plugging the con‐
nector into the USB interface.▷Do not connect devices such as fans or
lights to the USB interface.▷Do not connect any USB hard drives or USB
hubs.▷Do not use the USB interface for recharging
external devices.
At a glance
The USB interface is located in the front of the
center console.
Cargo area
Cargo cover
General information When the tailgate is opened, the cargo cover is
raised.
Note Do not deposit heavy objects
Do not deposit heavy or hard objects on
the cargo cover. Otherwise, they may pose a
risk to occupants, such as during braking and
evasive maneuvers. ◀
Removing
For storing bulky objects the cargo cover can
be removed.
1.Detach the left and right retaining straps at
the tailgate.Seite 144CONTROLSInterior equipment144
Online Edition for Part no. 01 40 2 961 168 - II/15
Page 241 of 244

Switch for Dynamic Driv‐ing 113
Switch-on times, parked-car ventilation 138
Switch, refer to Cockpit 14
Symbols 6
Symbols in the status field 23
T Tachometer 77
Tailgate 40
Tailgate via remote control 38
Tail lights 201
Technical changes, refer to Safety 7
Technical data 220
Temperature, air condi‐ tioner 133
Temperature, automatic cli‐ mate control 135
Temperature display for exter‐ nal temperature 77
Temperature, engine 82
Tempomat, see Camera- based cruise control 115
Terminal, starting aid 210
Text messages, supplemen‐ tary 76
Theft alarm system, refer to Alarm system 43
Thigh support 49
Tilt alarm sensor 44
Time of arrival 82
Tire damage 180
Tire identification marks 178
Tire inflation pressure 174
Tire inflation pressure moni‐ tor, refer to FTM 102
Tire Pressure Monitor TPM 98
Tires, changing 181
Tire sealant 183
Tires, everything on wheels and tires 174
Tires, run-flat tires 182
Tire tread 180 Tone, refer to Integrated
Owner's Manual
Tools 197
Total vehicle weight 221
Touchpad 21
Tow fitting 212
Towing 211
Tow-starting 211
TPM Tire Pressure Monitor 98
Traction control 112
TRACTION drive mode, driving dynamics 112
Transmission lock, releasing manually 70
Transmission, manual trans‐ mission 68
Transmission, see Steptronic transmission 68
Transporting children safely 56
Tread, tires 180
Trip computer 82
Triple turn signal activa‐ tion 65
Trip odometer 77
Turning circle lines, rearview camera 126
Turn signal, front 199
Turn signal, side 204
Turn signals, operation 65
Turn signals, rear, bulb re‐ placement 201
U
Unintentional alarm 44
Units of measure 85
Universal remote control 139
Unlock button, Steptronic transmission 69
Unlocking/locking via door lock 39
Unlocking/locking with re‐ mote control 37
Unlocking, settings 42 Updates made after the edito‐
rial deadline 7
Upholstery care 216
USB interface 144
V Vanity mirror 143
Vehicle battery 207
Vehicle battery, replacing 207
Vehicle, break-in 154
Vehicle care 215
Vehicle features and op‐ tions 6
Vehicle identification num‐ ber 9
Vehicle jack 205
Vehicle paint 215
Vehicle storage 217
Vehicle wash 214
Ventilation 138
Ventilation, refer to Parked- car ventilation 138
VIN, see vehicle identification number 9
Voice activation system 27
W Warning and indicator lamps, see Check Control 73
Warning displays, see Check Control 73
Warning messages, see Check Control 73
Warning triangle 209
Warranty 7
Washer fluid 67
Washer nozzles, wind‐ shield 67
Washer system 65
Washing, vehicle 214
Water on roads 155
Weights 221
Welcome lamps during un‐ locking 37 Seite 237Everything from A to ZREFERENCE237
Online Edition for Part no. 01 40 2 961 168 - II/15