light MINI Hardtop 2 Door 2015 Owner's Manual (Mini Connected)
[x] Cancel search | Manufacturer: MINI, Model Year: 2015, Model line: Hardtop 2 Door, Model: MINI Hardtop 2 Door 2015Pages: 244, PDF Size: 11.11 MB
Page 9 of 244
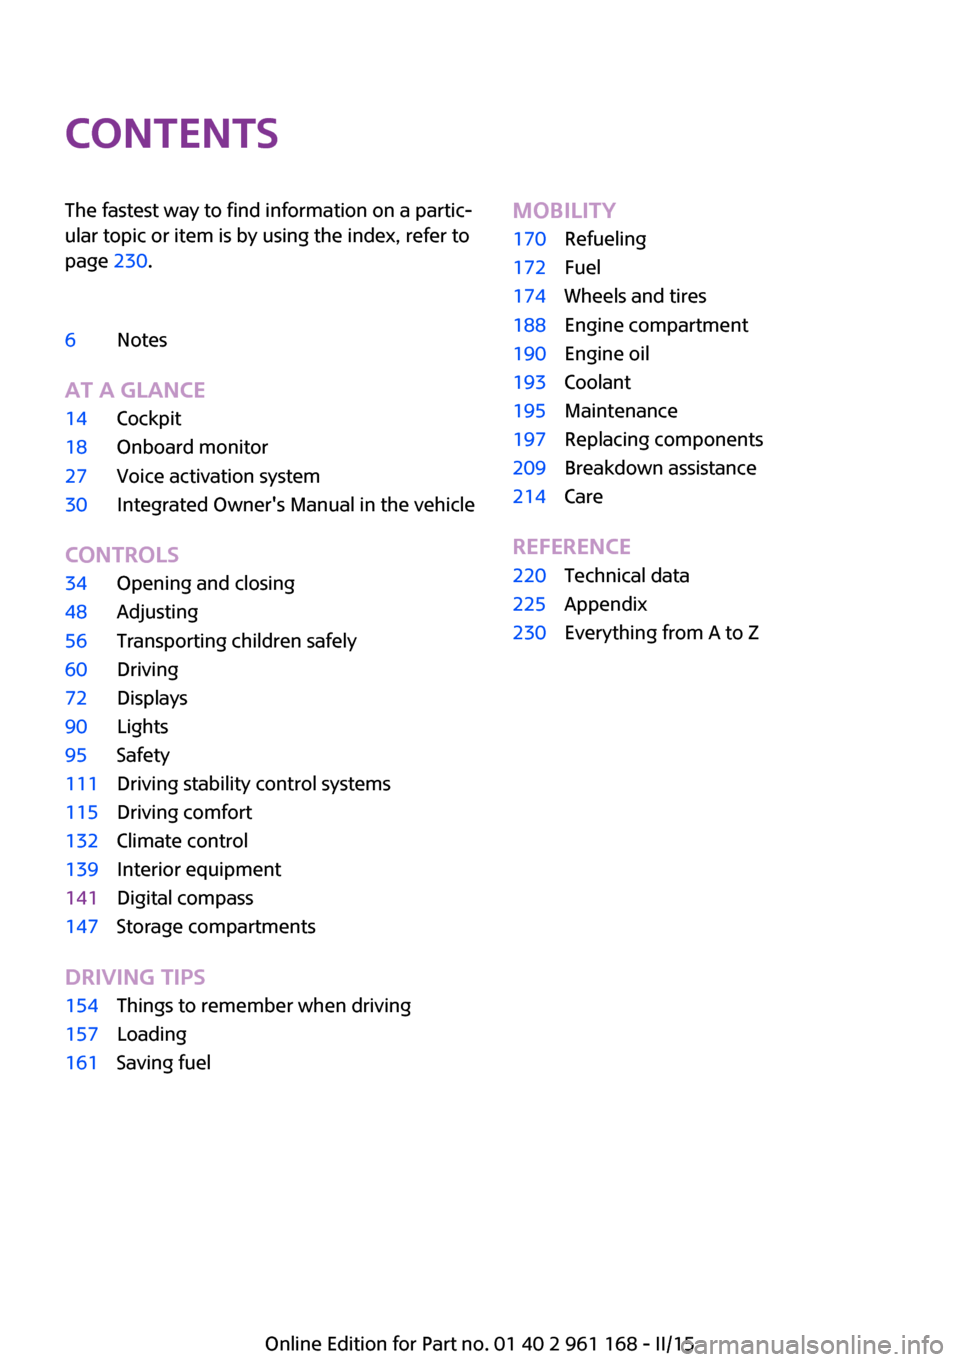
ContentsThe fastest way to find information on a partic‐
ular topic or item is by using the index, refer to
page 230.6Notes
AT A GLANCE
14Cockpit18Onboard monitor27Voice activation system30Integrated Owner's Manual in the vehicle
CONTROLS
34Opening and closing48Adjusting56Transporting children safely60Driving72Displays90Lights95Safety111Driving stability control systems115Driving comfort132Climate control139Interior equipment141Digital compass147Storage compartments
DRIVING TIPS
154Things to remember when driving157Loading161Saving fuelMOBILITY170Refueling172Fuel174Wheels and tires188Engine compartment190Engine oil193Coolant195Maintenance197Replacing components209Breakdown assistance214Care
REFERENCE
220Technical data225Appendix230Everything from A to Z
Online Edition for Part no. 01 40 2 961 168 - II/15
Page 13 of 244

▷Malfunctions and faults in important system
components, e.g., lights and brakes.▷Responses by the vehicle to special situa‐
tions such as airbag deployment or engag‐
ing the stability control system.▷Ambient conditions, such as temperature.
This data is purely technical in nature and is
used to detect and correct faults and to opti‐
mize vehicle functions. Motion profiles over
routes traveled cannot be created from this
data. When service offerings are used, e.g., re‐
pair services, service processes, warranty
claims, quality assurance, this technical infor‐
mation can be read out from the event and
fault memories by the service personnel, in‐
cluding the manufacturer, using special diag‐
nostic tools. You can obtain further information
there if you need it. After an error is corrected,
the information in the fault memory is deleted
or overwritten on a continuous basis.
With the vehicle in use there are situations
where you can associate these technical data
with individuals if combined with other infor‐
mation, e.g., an accident report, damage to the
vehicle, eye witness accounts — possibly with
the assistance of an expert.
Additional functions that are contractually
agreed with the customer - such as vehicle
emergency locating - you can transmit certain
vehicle data from the vehicle.
Event Data Recorder EDR
This vehicle is equipped with an event data re‐
corder EDR. The main purpose of an EDR is to
record, in certain crash or near crash-like situa‐
tions, such as an air bag deployment or hitting
a road obstacle, data that will assist in under‐
standing how a vehicle’s systems performed.
The EDR is designed to record data related to
vehicle dynamics and safety systems for a short
period of time, typically 30 seconds or less.
The EDR in this vehicle is designed to record
such data as:
▷How various systems in your vehicle were
operating.▷Whether or not the driver and passenger
safety belts were fastened.▷How far, if at all, the driver was depressing
the accelerator and/or brake pedal.▷How fast the vehicle was traveling.
These data can help provide a better under‐
standing of the circumstances in which crashes
and injuries occur.
EDR data are recorded by your vehicle only if a
nontrivial crash situation occurs; no data are re‐
corded by the EDR under normal driving condi‐
tions and no personal data, e.g., name, gender,
age, and crash location, are recorded.
However, other parties, such as law enforce‐
ment, could combine the EDR data with the
type of personally identifying data routinely ac‐
quired during a crash investigation.
To read data recorded by an EDR, special
equipment is required, and access to the vehi‐
cle or the EDR is needed. In addition to the ve‐
hicle manufacturer, other parties, such as law
enforcement, that have the special equipment,
can read the information if they have access to
the vehicle or the EDR.
Vehicle identification
number
The vehicle identification number can be found
in the engine compartment.
Seite 9Notes9
Online Edition for Part no. 01 40 2 961 168 - II/15
Page 18 of 244
CockpitVehicle features and op‐
tions
This chapter describes all standard, country-
specific and optional features offered with the
series. It also describes features that are notnecessarily available in your car, e. g., due to
the selected options or country versions. This
also applies to safety-related functions and sys‐
tems. The respectively applicable country provi‐
sions must be observed when using the respec‐
tive features and systems.
All around the steering wheel
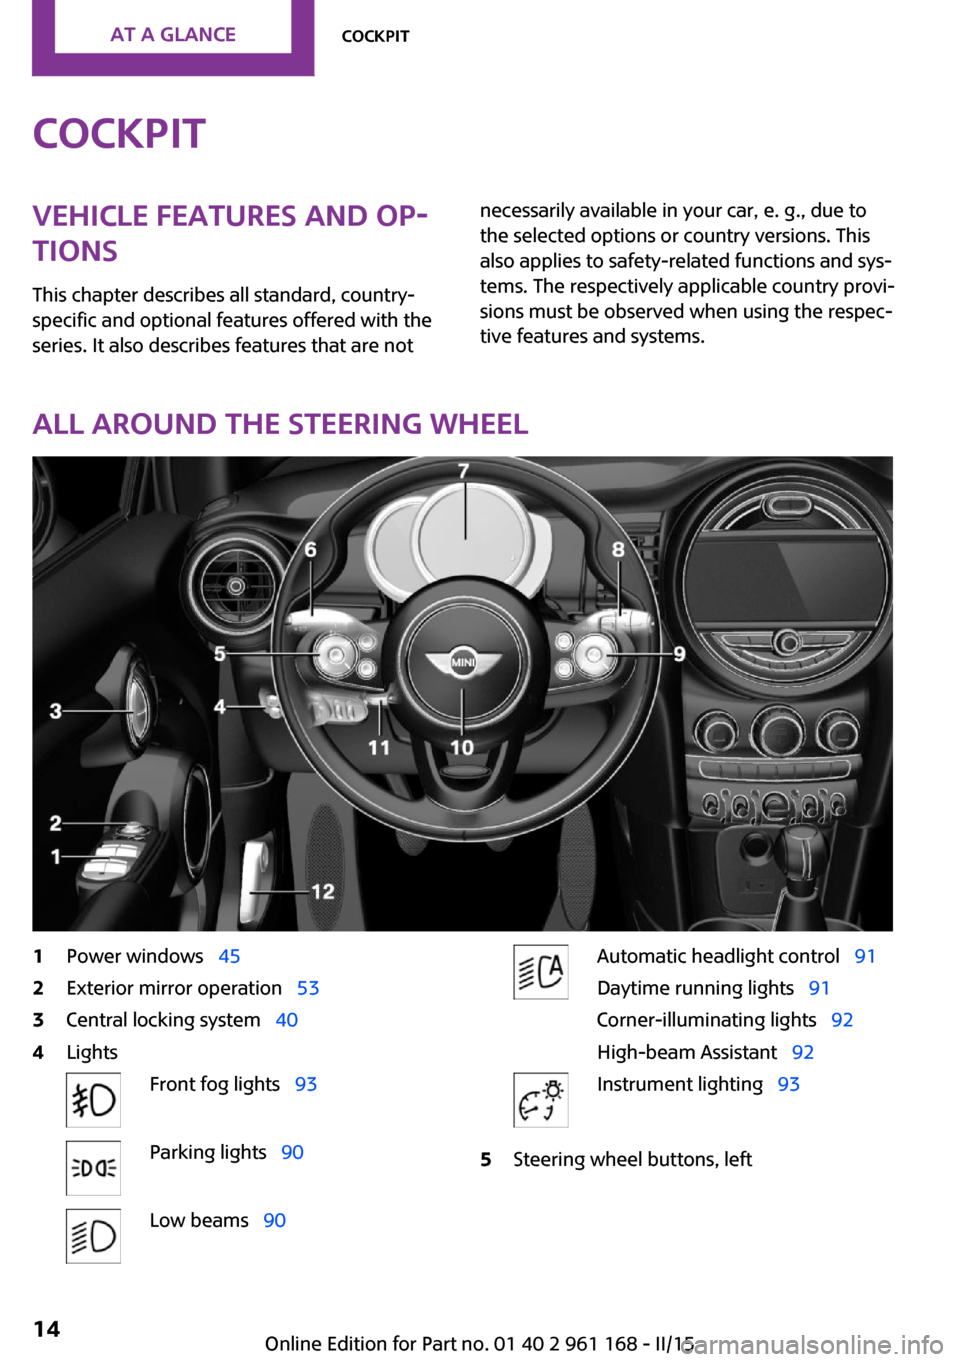
1Power windows 452Exterior mirror operation 533Central locking system 404LightsFront fog lights 93Parking lights 90Low beams 90Automatic headlight control 91
Daytime running lights 91
Corner-illuminating lights 92
High-beam Assistant 92Instrument lighting 935Steering wheel buttons, leftSeite 14AT A GLANCECockpit14
Online Edition for Part no. 01 40 2 961 168 - II/15
Page 19 of 244
Cruise control on/off, inter‐
rupt 115Cruise control on/off, inter‐
rupt 121Store speed 115, 121Resume speed 117, 122Set speed 117, 121Reduce distance 121Increase distance 1156Steering column stalk, leftTurn signal 65High beams, head‐
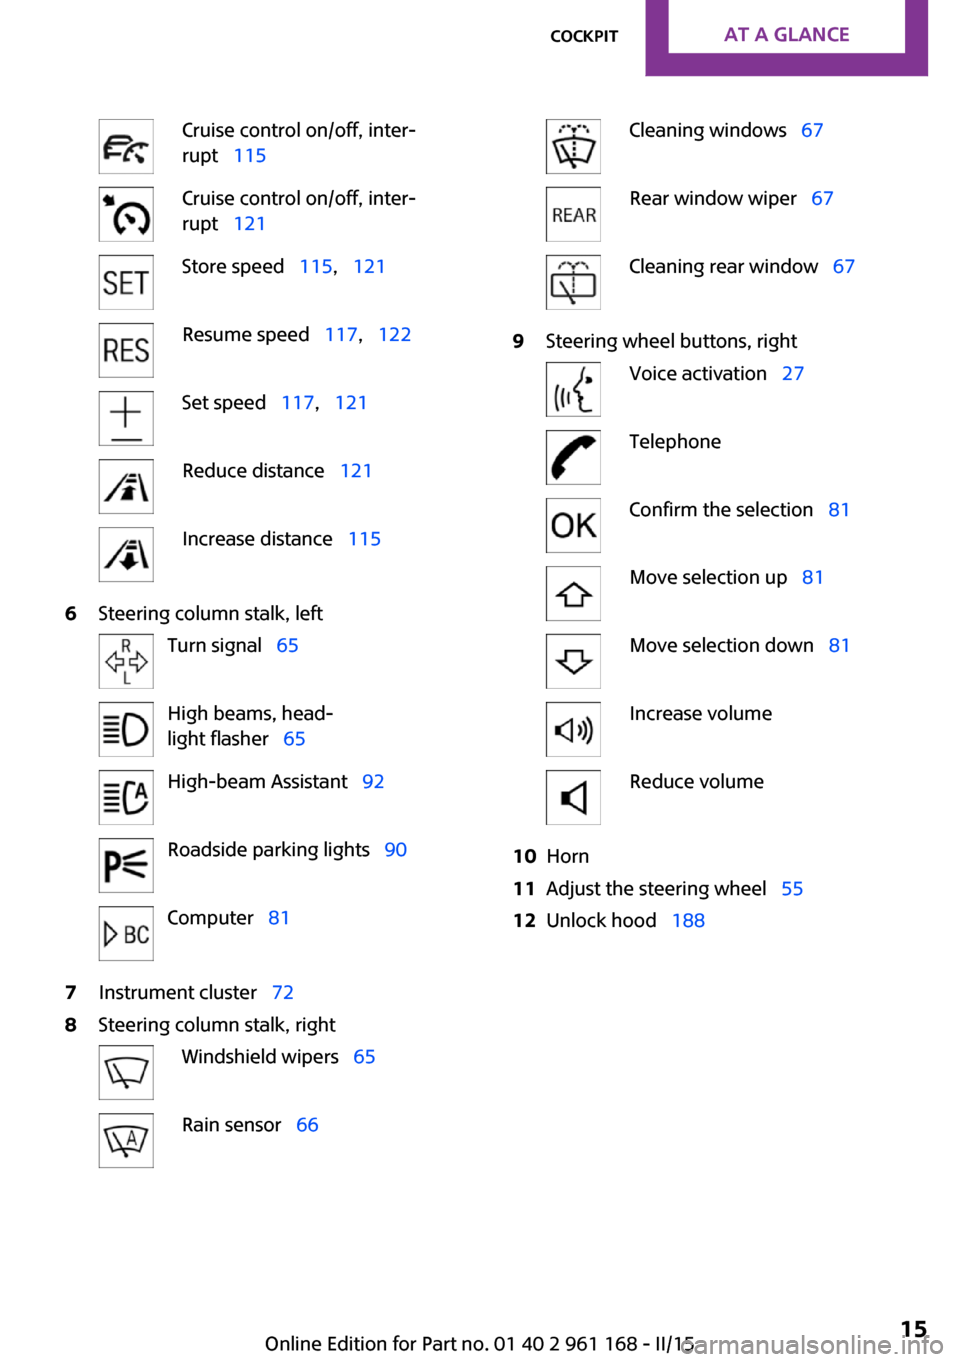
light flasher 65High-beam Assistant 92Roadside parking lights 90Computer 817Instrument cluster 728Steering column stalk, rightWindshield wipers 65Rain sensor 66Cleaning windows 67Rear window wiper 67Cleaning rear window 679Steering wheel buttons, rightVoice activation 27TelephoneConfirm the selection 81Move selection up 81Move selection down 81Increase volumeReduce volume10Horn11Adjust the steering wheel 5512Unlock hood 188Seite 15CockpitAT A GLANCE15
Online Edition for Part no. 01 40 2 961 168 - II/15
Page 21 of 244

All around the roofliner1Emergency Request2Indicator lamp, front-seat passen‐
ger airbag 973Reading lights 944Ambient light 945Glass sunroof 466Interior lights 93Seite 17CockpitAT A GLANCE17
Online Edition for Part no. 01 40 2 961 168 - II/15
Page 24 of 244
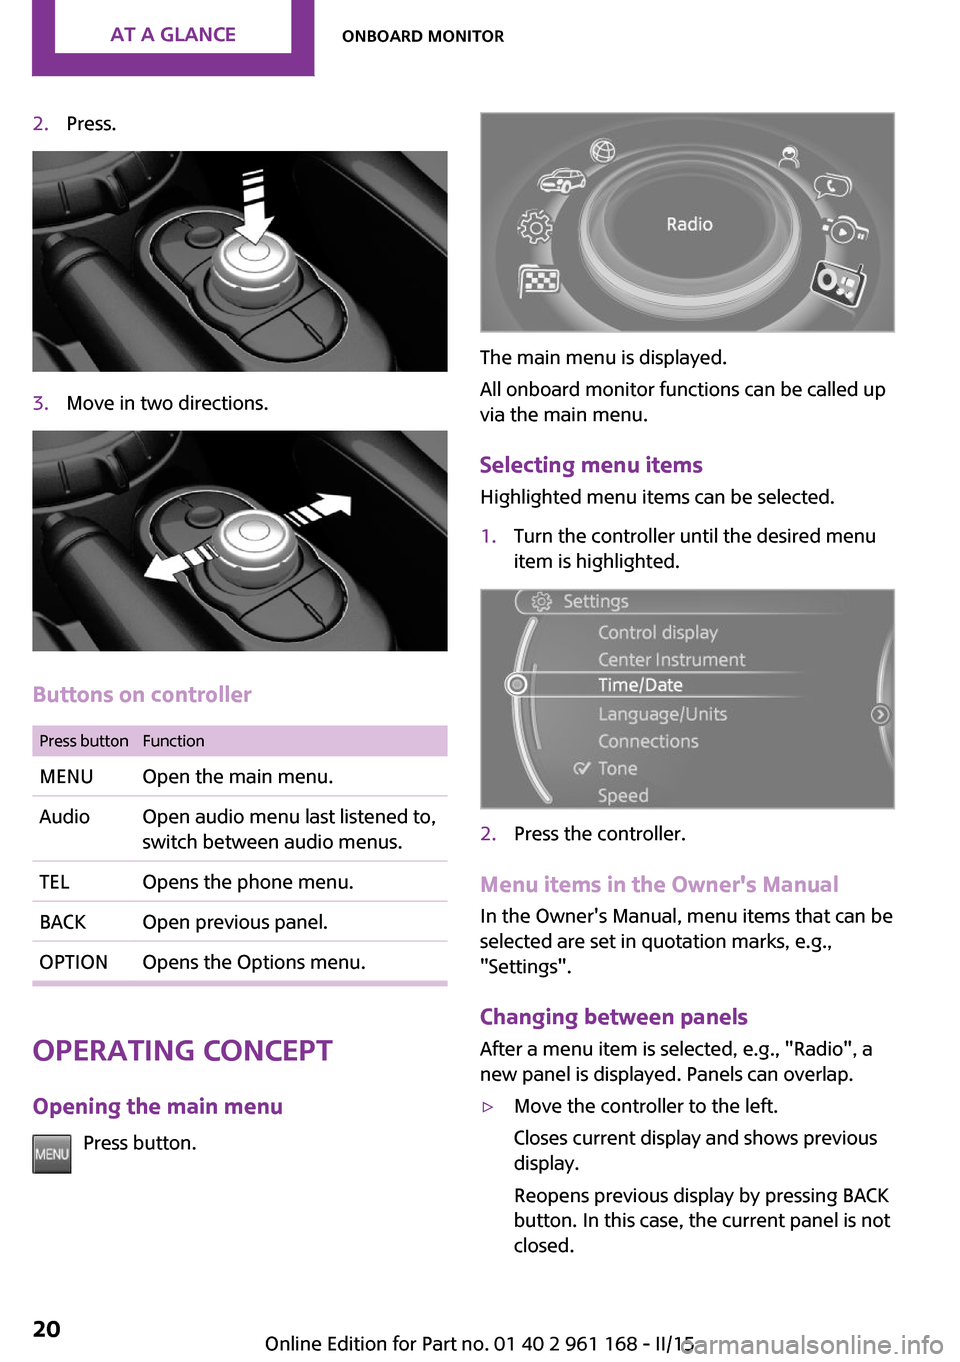
2.Press.3.Move in two directions.
Buttons on controller
Press buttonFunctionMENUOpen the main menu.AudioOpen audio menu last listened to,
switch between audio menus.TELOpens the phone menu.BACKOpen previous panel.OPTIONOpens the Options menu.
Operating concept
Opening the main menu Press button.
The main menu is displayed.
All onboard monitor functions can be called up
via the main menu.
Selecting menu items Highlighted menu items can be selected.
1.Turn the controller until the desired menu
item is highlighted.2.Press the controller.
Menu items in the Owner's Manual
In the Owner's Manual, menu items that can be
selected are set in quotation marks, e.g.,
"Settings".
Changing between panels
After a menu item is selected, e.g., "Radio", a
new panel is displayed. Panels can overlap.
▷Move the controller to the left.
Closes current display and shows previous
display.
Reopens previous display by pressing BACK
button. In this case, the current panel is not
closed.Seite 20AT A GLANCEOnboard monitor20
Online Edition for Part no. 01 40 2 961 168 - II/15
Page 26 of 244
2."Touchpad"3.Select the desired function.▷"Speller": enter letters and numbers.▷"Interactive map": viewing the interac‐
tive map.▷"Audio feedback": pronounces entered
letters and numbers.
Entering letters and numbers
Entering letters requires some practice at the
beginning. When entering, pay attention to the
following:
▷For the input of upper/lower case letters
and numbers, it may be necessary to switch
via the controller to the corresponding In‐
put mode, refer to page 25, e.g. when the
spelling of upper and lower case letters is
identical.▷Enter characters as they are displayed on
the Control Display.▷Always enter associated characters, such as
accents or periods so that the letter can be
clearly recognized. Possible input depends
on the set language. Where necessary, en‐
ter special characters via the controller.▷To delete a character, slide to the left on
the touchpad.▷To enter a blank space, slide to the right in
the center of the touchpad.▷To enter a hyphen, slide to the right in the
upper area of the touchpad.▷To enter an underscore, swipe to the right
in the lower area of the touchpad.
Operating the interactive map
The interactive map in the navigation system
can be moved via the touchpad.
FunctionControlsInteractive map.Swipe into respective
direction.Enlarge/shrink in‐
teractive map.Drag in or out on the
touchpad with fingers.Display menu.Tap once.
Changing settings
You may change control display settings via
touchpad. Swipe left or right accordingly.
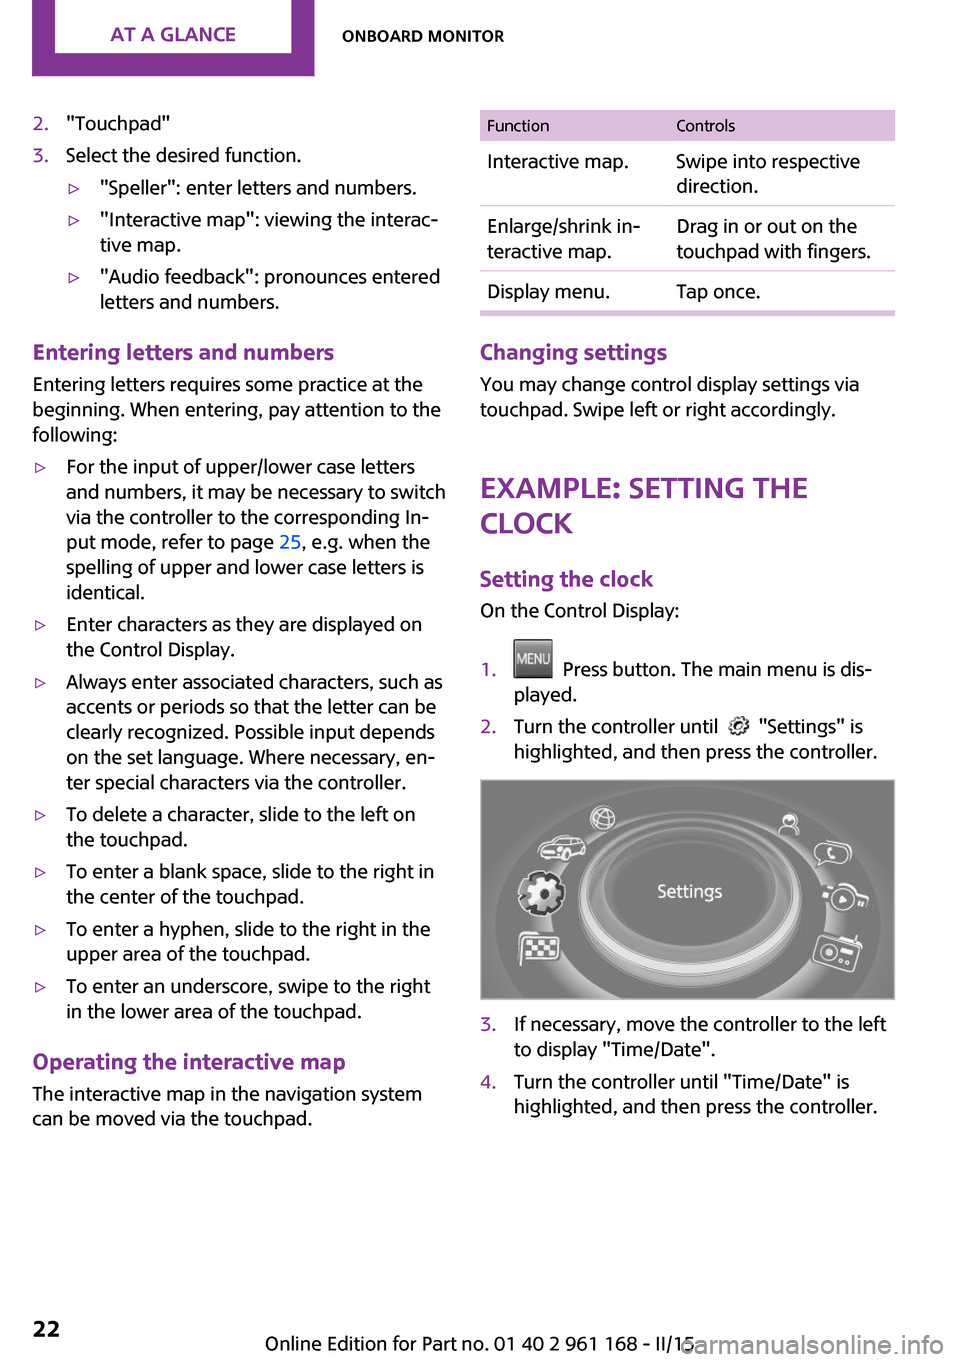
Example: setting the clock
Setting the clock
On the Control Display:
1. Press button. The main menu is dis‐
played.2.Turn the controller until "Settings" is
highlighted, and then press the controller.3.If necessary, move the controller to the left
to display "Time/Date".4.Turn the controller until "Time/Date" is
highlighted, and then press the controller.Seite 22AT A GLANCEOnboard monitor22
Online Edition for Part no. 01 40 2 961 168 - II/15
Page 27 of 244
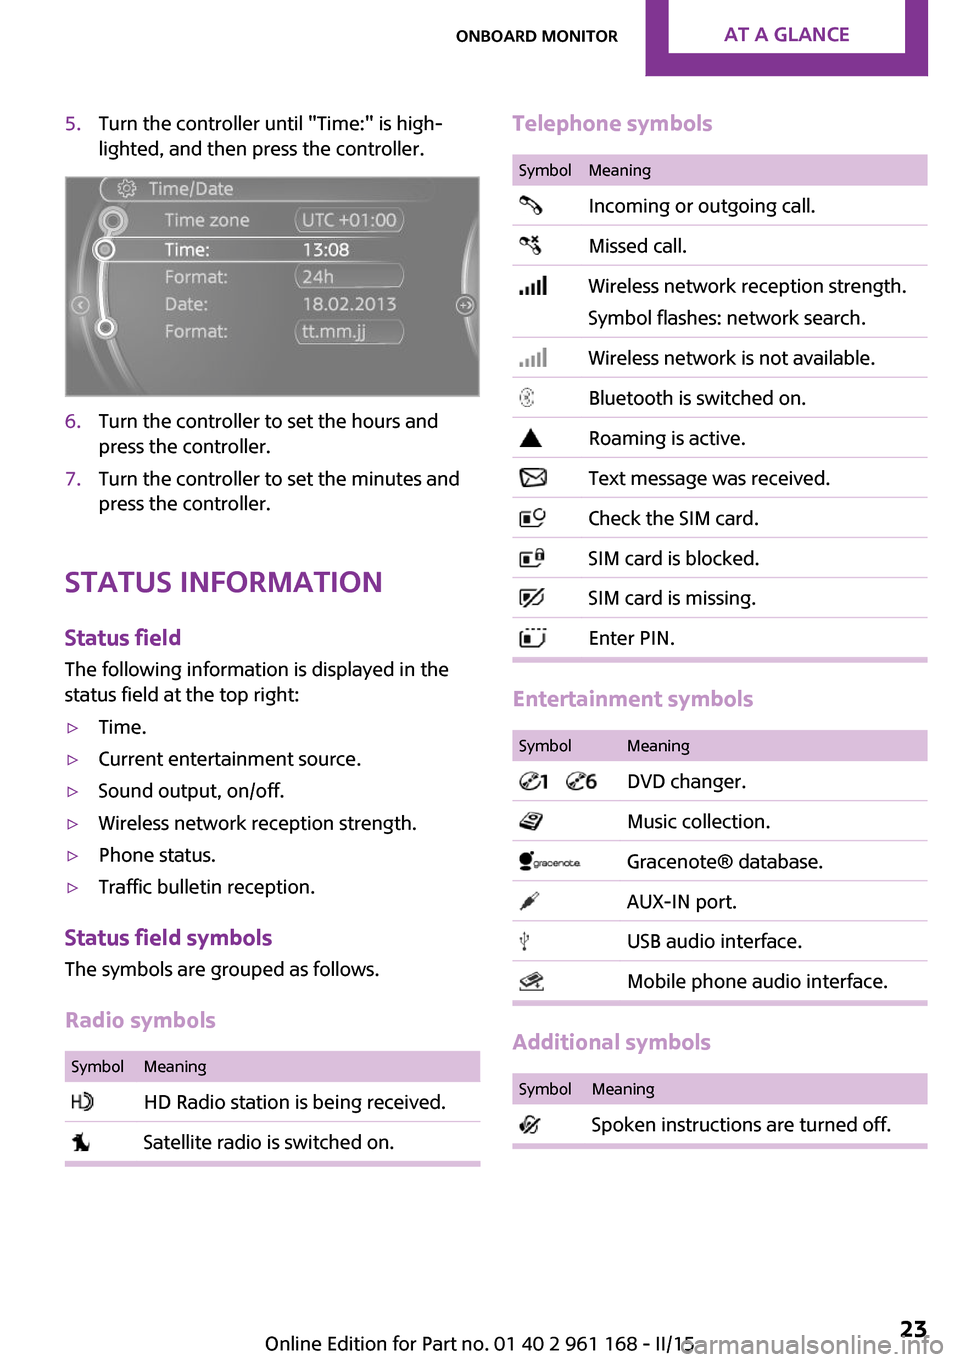
5.Turn the controller until "Time:" is high‐
lighted, and then press the controller.6.Turn the controller to set the hours and
press the controller.7.Turn the controller to set the minutes and
press the controller.
Status information
Status fieldThe following information is displayed in the
status field at the top right:
▷Time.▷Current entertainment source.▷Sound output, on/off.▷Wireless network reception strength.▷Phone status.▷Traffic bulletin reception.
Status field symbols
The symbols are grouped as follows.
Radio symbols
SymbolMeaning HD Radio station is being received. Satellite radio is switched on.Telephone symbolsSymbolMeaning Incoming or outgoing call. Missed call. Wireless network reception strength.
Symbol flashes: network search. Wireless network is not available. Bluetooth is switched on. Roaming is active. Text message was received. Check the SIM card. SIM card is blocked. SIM card is missing. Enter PIN.
Entertainment symbols
SymbolMeaning DVD changer. Music collection. Gracenote® database. AUX-IN port. USB audio interface. Mobile phone audio interface.
Additional symbols
SymbolMeaning Spoken instructions are turned off.Seite 23Onboard monitorAT A GLANCE23
Online Edition for Part no. 01 40 2 961 168 - II/15
Page 28 of 244
Split screen
General information
Additional information can be displayed on the
right side of the split screen, e.g., information
from the on-board comupter.
In the divided screen view, the so-called split
screen, this information remains visible even
when you change to another menu.
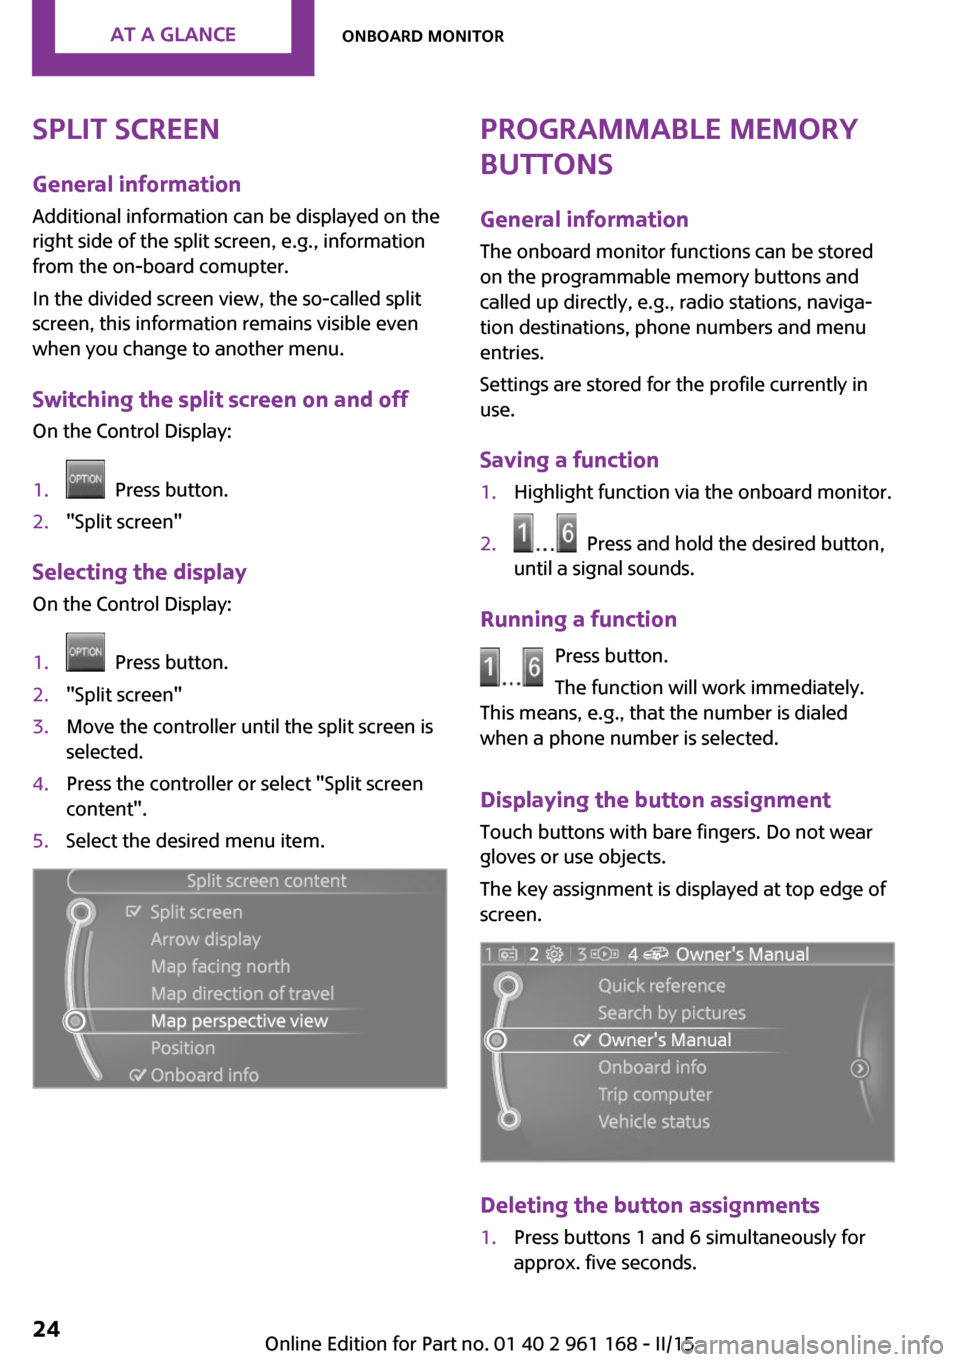
Switching the split screen on and off On the Control Display:1. Press button.2."Split screen"
Selecting the displayOn the Control Display:
1. Press button.2."Split screen"3.Move the controller until the split screen is
selected.4.Press the controller or select "Split screen
content".5.Select the desired menu item.Programmable memory
buttons
General information
The onboard monitor functions can be stored
on the programmable memory buttons and
called up directly, e.g., radio stations, naviga‐
tion destinations, phone numbers and menu
entries.
Settings are stored for the profile currently in
use.
Saving a function1.Highlight function via the onboard monitor.2. Press and hold the desired button,
until a signal sounds.
Running a function
Press button.
The function will work immediately.
This means, e.g., that the number is dialed
when a phone number is selected.
Displaying the button assignment Touch buttons with bare fingers. Do not wear
gloves or use objects.
The key assignment is displayed at top edge of
screen.
Deleting the button assignments
1.Press buttons 1 and 6 simultaneously for
approx. five seconds.Seite 24AT A GLANCEOnboard monitor24
Online Edition for Part no. 01 40 2 961 168 - II/15
Page 34 of 244
Integrated Owner's Manual in the
vehicleVehicle features and op‐
tions
This chapter describes all standard, country-
specific and optional features offered with the
series. It also describes features that are not
necessarily available in your car, e. g., due to
the selected options or country versions. This
also applies to safety-related functions and sys‐
tems. The respectively applicable country provi‐
sions must be observed when using the respec‐
tive features and systems.
Integrated Owner's
Manual in the vehicle
The Integrated Owner's Manual can be dis‐
played on the Control Display. It specifically de‐
scribes features and functions found in the ve‐
hicle.
Components of the Integrated Owner's
Manual
The Integrated Owner's Manual consists of
three parts, which offer various levels of infor‐ mation or possible access.
Quick Reference Guide The Quick Reference Guide provides informa‐
tion how to operate the car, how to use basic
vehicle functions or what to do in case of a
breakdown. This information can also be dis‐
played while driving.
Search by images Image search provides information and de‐
scriptions. This is helpful when the terminology
for a feature is not at hand.Owner's Manual
Search for information and descriptions by en‐
tering terms selected from the index.
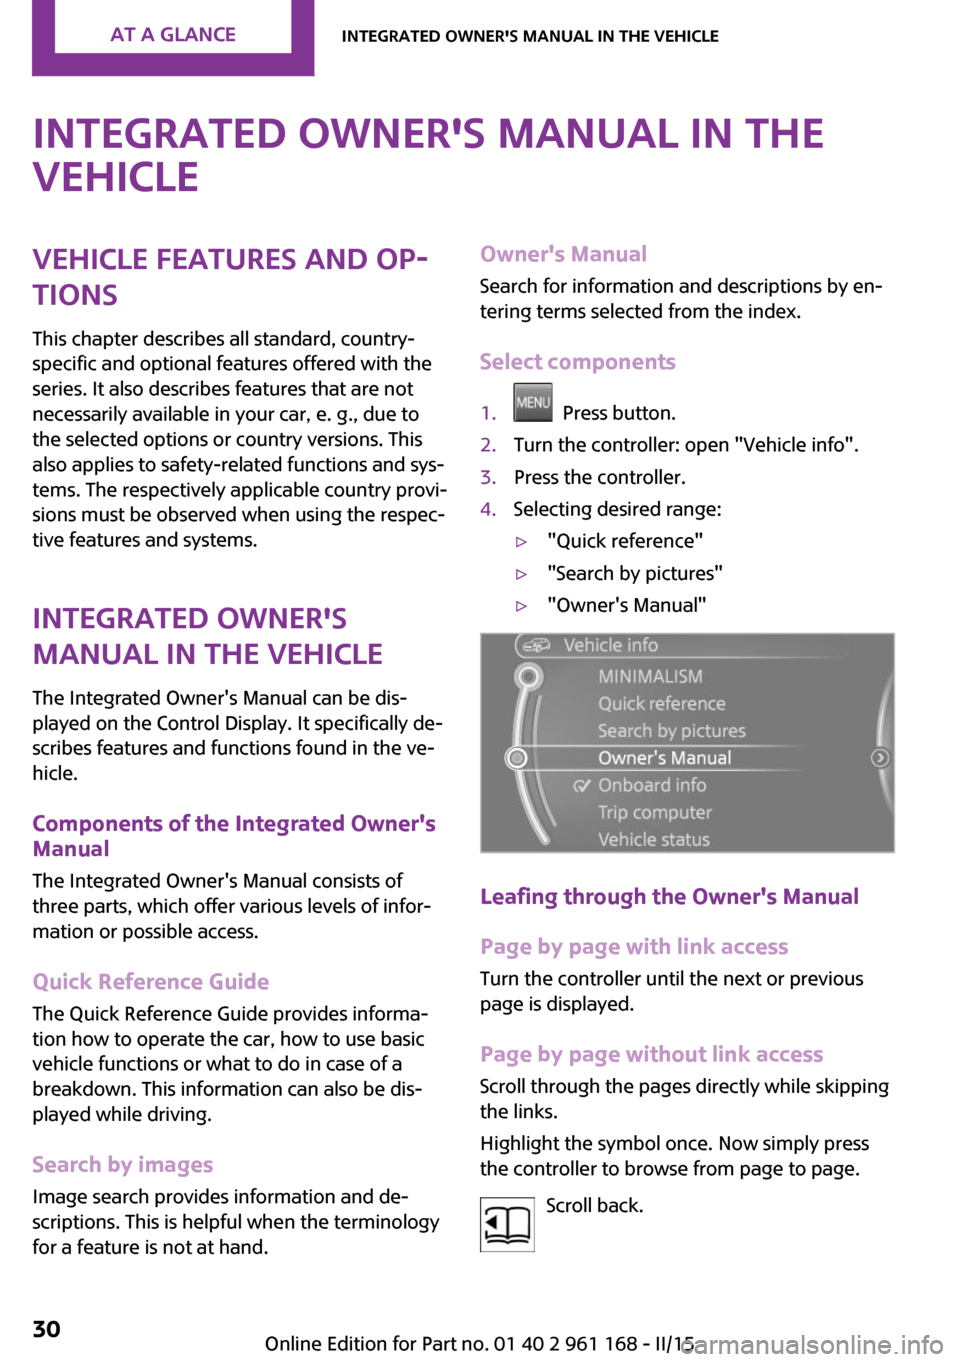
Select components1. Press button.2.Turn the controller: open "Vehicle info".3.Press the controller.4.Selecting desired range:▷"Quick reference"▷"Search by pictures"▷"Owner's Manual"
Leafing through the Owner's ManualPage by page with link access
Turn the controller until the next or previous
page is displayed.
Page by page without link access Scroll through the pages directly while skipping
the links.
Highlight the symbol once. Now simply press
the controller to browse from page to page.
Scroll back.
Seite 30AT A GLANCEIntegrated Owner's Manual in the vehicle30
Online Edition for Part no. 01 40 2 961 168 - II/15