light MINI Hardtop 2 Door 2015 Manual PDF
[x] Cancel search | Manufacturer: MINI, Model Year: 2015, Model line: Hardtop 2 Door, Model: MINI Hardtop 2 Door 2015Pages: 251, PDF Size: 11.4 MB
Page 147 of 251

The Coasting driving condition is enabled under
certain conditions.
Under certain conditions the engine is auto‐
matically decoupled from the transmission in
selector lever position D. The vehicle continues
traveling with the engine idling to reduce fuel
consumption. Selector lever position D remains
engaged. An indicator provides information
about the distance traveled in Coasting mode.
In addition, context-sensitive instructions are
displayed to assist with an optimized fuel con‐
sumption driving style.
The achieved extended range is displayed in
the instrument cluster.
At a glance The system includes the following MINIMAL
functions and displays:▷GREEN bonus range, refer to page 143.▷GREEN tips driving instruction, refer to
page 144.▷GREEN climate control, refer to page 143.▷Coasting driving condition, refer to
page 144.
Activating GREEN mode
Turn Driving Dynamics Control to
the right until GREEN mode is
displayed in the instrument clus‐
ter.
Configuring GREEN mode
Via radio
1. "Settings"2.Select between "Driving mode" or "GREEN
Mode"
Configure the program.
GREEN tip
"GREEN speed warning":
Displays a reminder when the set GREEN mode
speed is exceeded.
GREEN climate control
"GREEN climate control" :
Climate control is set to be fuel-efficient.
By making a slight change to the set tempera‐
ture, or adjusting the rate of heating or cooling
of the car's interior fuel consumption can be
economized.
The outputs of the seat heater and the exterior
Additionally heat output to seats and exterior
mirror is reduced.
Exterior mirror heat is available when outside
temperatures are very low.
Coasting
Fuel-efficiency can be optimized by disengag‐
ing the engine and Coasting, refer to page 144,
with the engine idling.
This function is only available in GREEN mode.
Display in the instrument cluster
GREEN bonus range An adjusted driving style helps
you extend your driving range.
This may be displayed as the bo‐
nus range in the instrument clus‐
ter.
The bonus range is shown in the range display.
The bonus range is automatically reset every
time the vehicle is refueled.▷Green display: efficient driving style.▷Gray display: adjust driving style, e. g. by
backing off the accelerator pedal.Seite 143Saving fuelDRIVING TIPS143
Online Edition for Part no. 01 40 2 961 140 - II/15
Page 149 of 251
The function is available in a certain speed
range.
A proactively driving style helps the driver to
use the function as often as possible and sup‐
ports the fuel-conserving effect of coasting.
Safety mode
The function is not available under one of the
following conditions.▷DSC OFF or TRACTION activated.▷Driving in the dynamic limit range and on
steep uphill or downhill grades.▷Battery charge status temporarily too low
or vehicle electrical system drawing exces‐
sive current.▷Cruise control activated.
Functional requirements
In GREEN mode, this function is available in a
speed range from approximately 30 mph, ap‐
prox. 50 km/h to 100 mph, approx. 160 km/h,
if the following conditions are met:
▷Accelerator pedal and brake pedal are not
operated.▷The selector lever is in selector lever posi‐
tion D.▷Engine and transmission are at operating
temperature.
Display
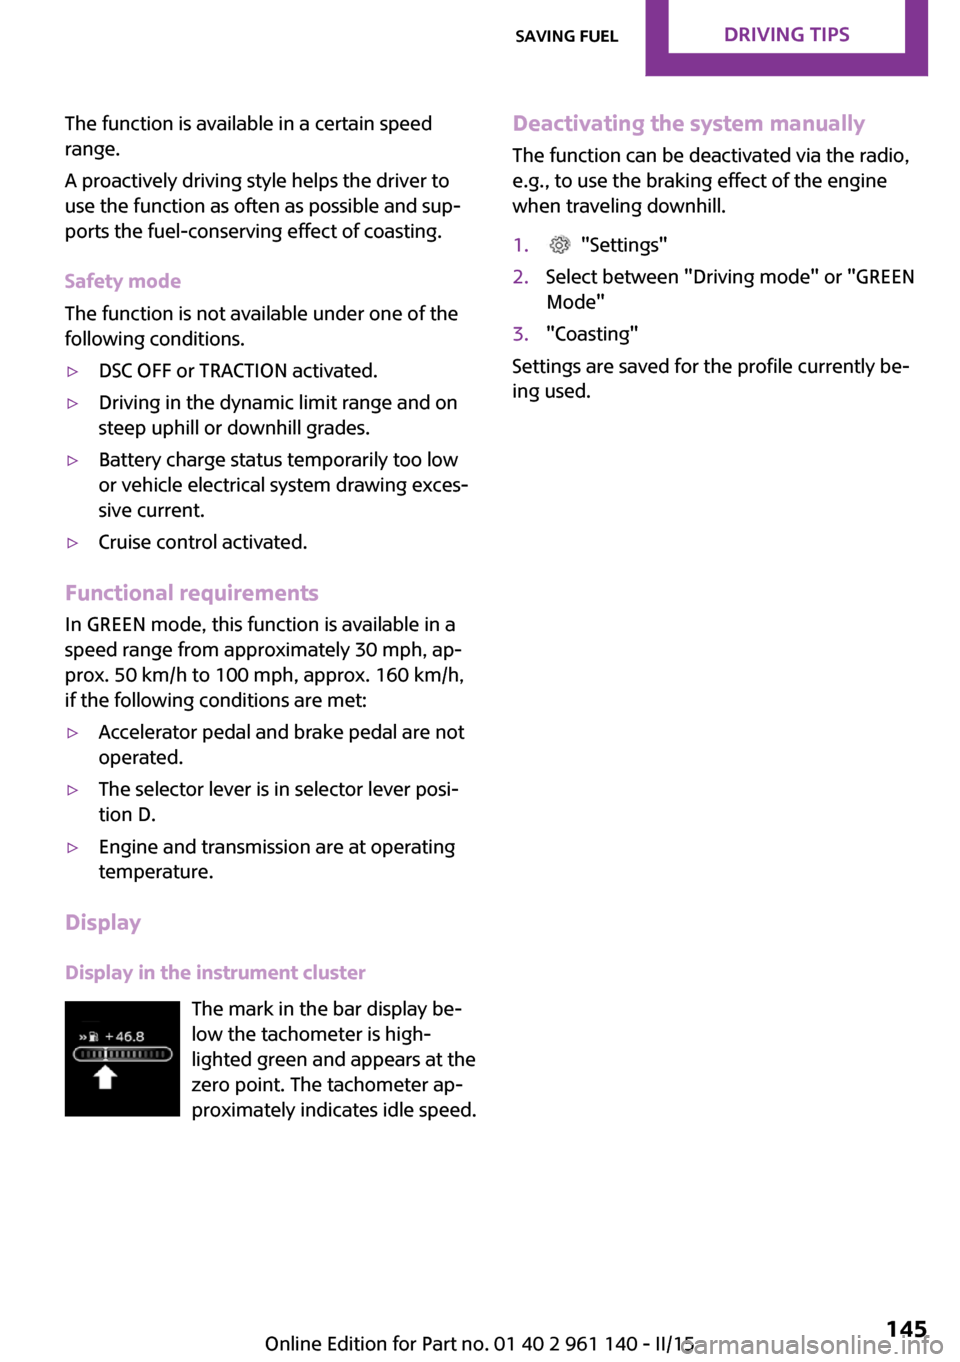
Display in the instrument cluster The mark in the bar display be‐
low the tachometer is high‐
lighted green and appears at the
zero point. The tachometer ap‐
proximately indicates idle speed.
Deactivating the system manually
The function can be deactivated via the radio,
e.g., to use the braking effect of the engine
when traveling downhill.1. "Settings"2.Select between "Driving mode" or "GREEN
Mode"3."Coasting"
Settings are saved for the profile currently be‐
ing used.
Seite 145Saving fuelDRIVING TIPS145
Online Edition for Part no. 01 40 2 961 140 - II/15
Page 153 of 251
RadioVehicle features and op‐
tions
This chapter describes all standard, country-
specific and optional features offered with the
series. It also describes features that are not
necessarily available in your car, e. g., due to
the selected options or country versions. This
also applies to safety-related functions and sys‐
tems. The respectively applicable country provi‐
sions must be observed when using the respec‐
tive features and systems.
General information Settings are stored for the profile, refer to
page 23, currently in use.
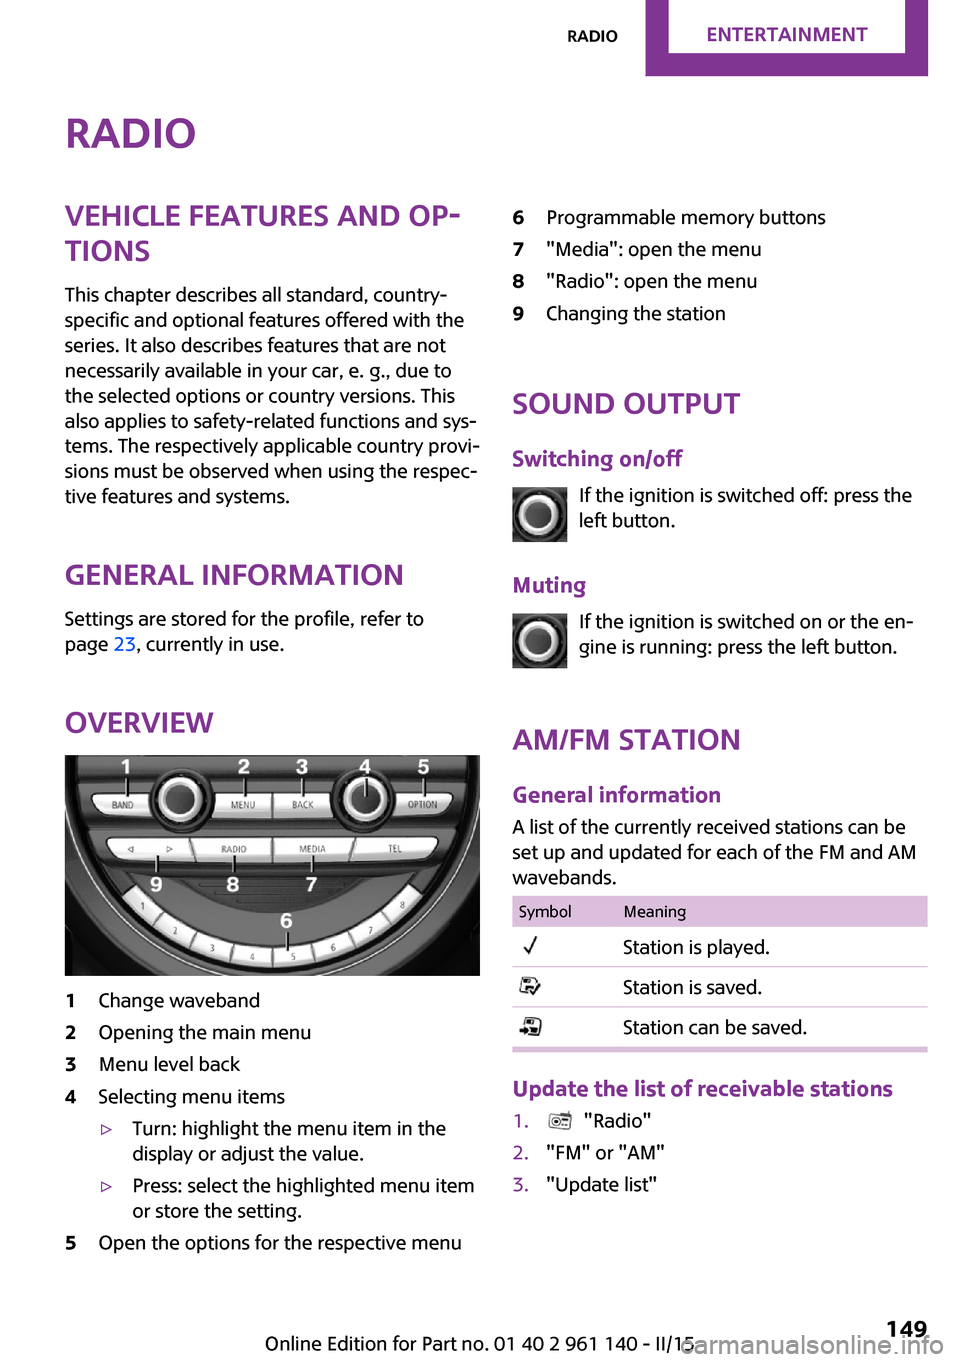
Overview1Change waveband2Opening the main menu3Menu level back4Selecting menu items▷Turn: highlight the menu item in the
display or adjust the value.▷Press: select the highlighted menu item
or store the setting.5Open the options for the respective menu6Programmable memory buttons7"Media": open the menu8"Radio": open the menu9Changing the station
Sound output
Switching on/off If the ignition is switched off: press the
left button.
Muting If the ignition is switched on or the en‐
gine is running: press the left button.
AM/FM station General information
A list of the currently received stations can be
set up and updated for each of the FM and AM
wavebands.
SymbolMeaningStation is played.Station is saved.Station can be saved.
Update the list of receivable stations
1. "Radio"2."FM" or "AM"3."Update list"Seite 149RadioENTERTAINMENT149
Online Edition for Part no. 01 40 2 961 140 - II/15
Page 158 of 251
MultimediaExternal devices
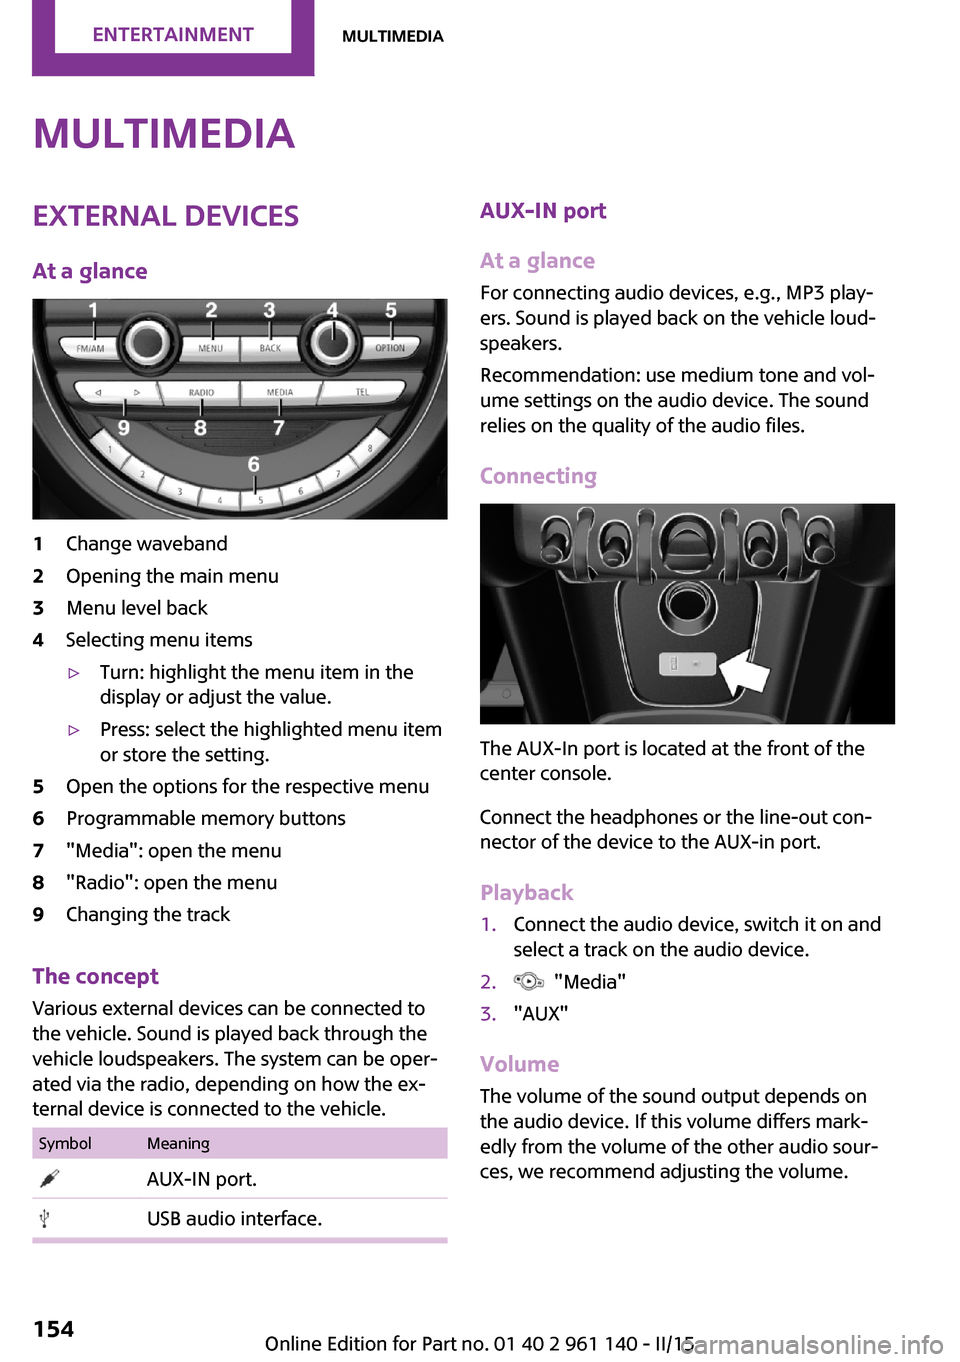
At a glance1Change waveband2Opening the main menu3Menu level back4Selecting menu items▷Turn: highlight the menu item in the
display or adjust the value.▷Press: select the highlighted menu item
or store the setting.5Open the options for the respective menu6Programmable memory buttons7"Media": open the menu8"Radio": open the menu9Changing the track
The concept
Various external devices can be connected to
the vehicle. Sound is played back through the
vehicle loudspeakers. The system can be oper‐
ated via the radio, depending on how the ex‐
ternal device is connected to the vehicle.
SymbolMeaning AUX-IN port. USB audio interface.AUX-IN port
At a glance
For connecting audio devices, e.g., MP3 play‐
ers. Sound is played back on the vehicle loud‐
speakers.
Recommendation: use medium tone and vol‐
ume settings on the audio device. The sound
relies on the quality of the audio files.
Connecting
The AUX-In port is located at the front of the
center console.
Connect the headphones or the line-out con‐
nector of the device to the AUX-in port.
Playback
1.Connect the audio device, switch it on and
select a track on the audio device.2. "Media"3."AUX"
Volume
The volume of the sound output depends on
the audio device. If this volume differs mark‐
edly from the volume of the other audio sour‐
ces, we recommend adjusting the volume.
Seite 154ENTERTAINMENTMultimedia154
Online Edition for Part no. 01 40 2 961 140 - II/15
Page 167 of 251
▷The ignition is switched on.▷Bluetooth connection on the vehicle and on
the mobile phone activated.▷Bluetooth presets may need to be made on
the mobile phone, e.g., for a connection
without confirmation or visibility, refer to
the mobile phone operating instructions.▷Set Bluetooth passkey for one-time use in
the logon procedure.▷Vehicle is stationary.
Bluetooth activation/deactivation
1. "Telephone"2. Press button.3."Bluetooth®"
Pairing and connecting
Pairing the mobile phone
To avoid becoming distracted and posing
an unnecessary hazard both to your own vehi‐
cle's occupants and to other traffic, only pair
the mobile phone while the vehicle is station‐
ary. ◀
1. "Telephone"2.A mobile phone has not yet been paired:
"OK"
A mobile phone has been paired:
"Bluetooth®"3.A mobile phone has not yet been paired:
the Bluetooth name of the vehicle is shown
on the display.
A mobile phone has not yet been paired:
"Add new phone". The Bluetooth name of
the vehicle is shown on the display.4.To perform additional steps on the mobile
phone, refer to the mobile phone operating
instructions.The Bluetooth name of the vehicle appears
on the mobile phone display. Select this.5.Enter the same passkey on the mobile
phone and on the display
Or
Compare the control number on the display
with the control number in the display of
the mobile phone and confirm.
Four mobile phones can be logged in on the
vehicle, and one mobile phone can be con‐
nected to the vehicle.
Following the initial pairing Mobile phone is connected to the vehicle after
a brief time.
The phone book entries stored on the SIM card
or in the mobile phone are transferred to the
vehicle.
Specific settings may be necessary in some mo‐
bile phones, e.g., authorization or a secure con‐
nection; refer to the mobile phone operating
instructions.
Connecting a particular mobile phone
1. "Telephone"2."Bluetooth®"3.Select the mobile phone that is to be con‐
nected.
Unpairing the mobile phone
1. "Telephone"2."Bluetooth®"3.Highlight any mobile phone that is to be re‐
moved.4. Press button.5."Remove device" or "Remove all devices"
What to do if...
Information on suitable mobile phones, refer to
page 162.
Seite 163Bluetooth hands-free systemCOMMUNICATION163
Online Edition for Part no. 01 40 2 961 140 - II/15
Page 170 of 251
Favorites
Up to 12 phone numbers can be stored in the
Favorites. Only the occupied places of the Fa‐
vorites list are displayed.
Storing Favorites1. "Telephone"2."Favorites"3. "Add favorite"4.Select the list from which the entry is to be
added:▷"Phone book"▷"Outgoing calls"▷"Received calls"5.Select entry from list and desired phone
number.6.Insert and select the cursor at the desired
place in the Favorites.
Move favorite
1.Highlight the desired favorite.2. Press button and "Move favorite".
Or
Press the right button, and select the phone
number.3.Insert and select the cursor at the desired
place in the Favorites.
Remove from Favorites
1.Highlight the desired favorite.2. Press button.3."Remove from favorites"
Deleting Favorites
1. Press button.2."Delete favorites"3."OK"Phone book
General information
The telephone accesses the contacts stored in
the mobile phone. All contacts for which a tele‐
phone number is entered are displayed. Maxi‐
mally 4 phone numbers per contact can be dis‐
played.
Displaying
Phone book entries are automatically transmit‐
ted from the mobile phone to the vehicle, de‐
pending on the mobile phone. Fig. 4 Entries in
the phone book: "Keyword search"1. "Telephone"2."Phone book"
The symbols show how the entries are stored
on the mobile phone.
SymbolMeaning Mobile phone number. Home phone number. Business phone number.
Selecting the sorting order of the
names
The phone book entries can be displayed in dif‐
ferent sequences. Depending on how the con‐
tacts are stored in the mobile phone, the sort‐
ing order of the names may differ from the
selected sorting order.
1. Press button.2."Display:""Last/First name" or "First/Last
name"3."First name Last name" or "Last name, First
name"
Calling
1.Select contact.2.Select the desired phone number.Seite 166COMMUNICATIONBluetooth hands-free system166
Online Edition for Part no. 01 40 2 961 140 - II/15
Page 188 of 251

Retreaded tires
Possibly substantial variations in the de‐
sign and age of the tire casing structures can
limit service life and have a negative impact on
road safety. ◀
Winter tires
Winter tires are recommended for operating on
winter roads.
Although so-called all-season M+S tires provide
better winter traction than summer tires, they
do not provide the same level of performance
as winter tires.
Maximum speed of winter tires
If the maximum speed of the vehicle is higher
than the permissible speed for the winter tires,
then a respective symbol is displayed in your
field of vision. You can obtain this sign from the
tire specialist or from your service center.
Maximum speed for winter tires
Do not exceed the maximum speed for
the respective winter tires; otherwise, tire dam‐
age and accidents can occur. ◀
Run-flat tires If you are already using run-flat tires, for your
own safety you should replace them only with
the same kind. No spare tire is available in the
case of a flat tire. Your service center will be
glad to advise you.
Rotating wheels between axles
Different wear patterns can occur on the front
and rear axles depending on individual driving
conditions.
The tires can be rotated between the axles to
achieve even wear. Your service center will be
glad to advise you.
After rotating, check the tire pressure and cor‐
rect if needed.Storage
Store wheels and tires in a cool, dry place with
as little exposure to light as possible.
Always protect tires against all contact with oil,
grease and fuels.
Do not exceed the maximum tire inflation pres‐
sure indicated on the side wall of the tire.
Run-flat tires Label
RSC label on the tire sidewall.
The wheels are composed of tires that are self-
supporting to a limited degree.
The support of the sidewall allows the tire to re‐
main drivable to a restricted degree in the
event of a tire inflation pressure loss.
Continued driving with a damaged tire, refer to
page 86.
Continued driving with a damaged tire, refer to
page 82.
Changing run-flat tires
For your own safety, only use run-flat tires. No
spare tire is available in the case of a flat tire.
Your service center will be glad to advise you.
Seite 184MOBILITYWheels and tires184
Online Edition for Part no. 01 40 2 961 140 - II/15
Page 195 of 251

Never reach into the engine compart‐
ment
Never reach into spaces or gaps in the engine
compartment; otherwise, there is a risk of in‐
jury, e.g., from rotating or hot parts. ◀
Fold down wiper arm
Before opening the hood, ensure that the
wiper arms are against the windshield, or this
may result in damage. ◀
Opening the hood1.Pull lever, arrow 1.
Hood is unlocked2.After the lever is released, pull the lever
again, arrow 2.
Hood can be opened.
Indicator/warning lights
When the hood is opened, a Check Control
message is displayed.
Closing the hood Hood open when driving
If you see any signs that the hood is not
completely closed while driving, pull over im‐
mediately and close it securely. ◀
Danger of jamming
Make sure that the closing path of the
hood is clear; otherwise, injuries may result. ◀
Let the hood fall from approx. 16 in/40 cm, ar‐
row.
The hood must audibly engage on both sides.
Seite 191Engine compartmentMOBILITY191
Online Edition for Part no. 01 40 2 961 140 - II/15
Page 202 of 251

Socket for OBD Onboard
Diagnosis
Note Socket for Onboard Diagnosis
The socket for onboard diagnostics may
only be used by the service center or a work‐
shop that operates in accordance with the
specifications of the vehicle manufacturer with
correspondingly trained personnel and other
authorized persons. Otherwise, use may result
in operating problems for the vehicle. ◀
Position
There is an OBD socket on the driver's side for
checking the primary components in the vehi‐
cle's emissions.
Emissions
▷The warning lamp lights up:
Emissions are deteriorating. Have
the vehicle checked as soon as pos‐
sible.▷The warning lamp flashes under certain cir‐
cumstances:
This indicates that there is excessive misfir‐
ing in the engine.
Reduce the vehicle speed and have the sys‐
tem checked immediately; otherwise, seri‐
ous engine misfiring within a brief period
can seriously damage emission controlcomponents, in particular the catalytic con‐
verter.Seite 198MOBILITYMaintenance198
Online Edition for Part no. 01 40 2 961 140 - II/15
Page 204 of 251

Replace the rear wiper blade1.Fold up and hold the wiper arm firmly.2.Turn the wiper blade all the way back.3.Continue turning the wiper blade all the
way so that it pops out of the holder.4.Press the new wiper blade into the holder
until you hear it snap into place.5.Fold the wipers in.
Lamp and bulb replace‐
ment
General information Lights and bulbs make an essential contribution
to vehicle safety.
The manufacturer of the vehicle recommends
that you entrust corresponding procedures to
the service center if you are unfamiliar those or
if they have not been described here.
You can obtain a selection of replacement
bulbs at the service center.
Hints
Lights and bulbs Danger of burns
Only change bulbs when they are cool;
otherwise, there is a danger of getting
burned. ◀
Working on the lighting system
When working on the lighting system,
you should always reel off the lights affected to
prevent short circuits.
To avoid possible injury or equipment damage
when replacing bulbs, observe any instructions
provided by the bulb manufacturer. ◀
Do not touch the bulbs
Do not touch the glass of new bulbs with
your bare hands, as even minute amounts of
contamination will burn into the bulb's surface
and reduce its service life.
Use a clean tissue, cloth or something similar,
or hold the bulb by its base. ◀
Light-emitting diodes (LEDs)
Some items of equipment use light-emitting di‐
odes installed behind a cover as a light source.
These light-emitting diodes, which are related
to conventional lasers, are officially designated as Class 1 light-emitting diodes.
Do not remove the covers
Do not remove the covers, and never
stare into the unfiltered light for several hours;
otherwise, irritation of the retina could result. ◀
Headlight glass Condensation can form on the inside of the ex‐
ternal lights in cool or humid weather. When
driving with the light switched on, the conden‐
sation evaporates after a short time. The head‐ light glass does not need to be changed.
If the headlights do not dim despite driving
with the light switched on, increasing humidity
forms, e. g. water droplets in the light, have the
service center check this.Seite 200MOBILITYReplacing components200
Online Edition for Part no. 01 40 2 961 140 - II/15