buttons MINI Hardtop 4 Door 2016 Owner's Manual (Mini Connected)
[x] Cancel search | Manufacturer: MINI, Model Year: 2016, Model line: Hardtop 4 Door, Model: MINI Hardtop 4 Door 2016Pages: 246, PDF Size: 6.36 MB
Page 14 of 246
CockpitVehicle features and op‐
tions
This chapter describes all standard, country-
specific and optional features offered with the
series. It also describes features that are notnecessarily available in your car, e. g., due to
the selected options or country versions. This
also applies to safety-related functions and sys‐
tems. The respectively applicable country provi‐
sions must be observed when using the respec‐
tive features and systems.
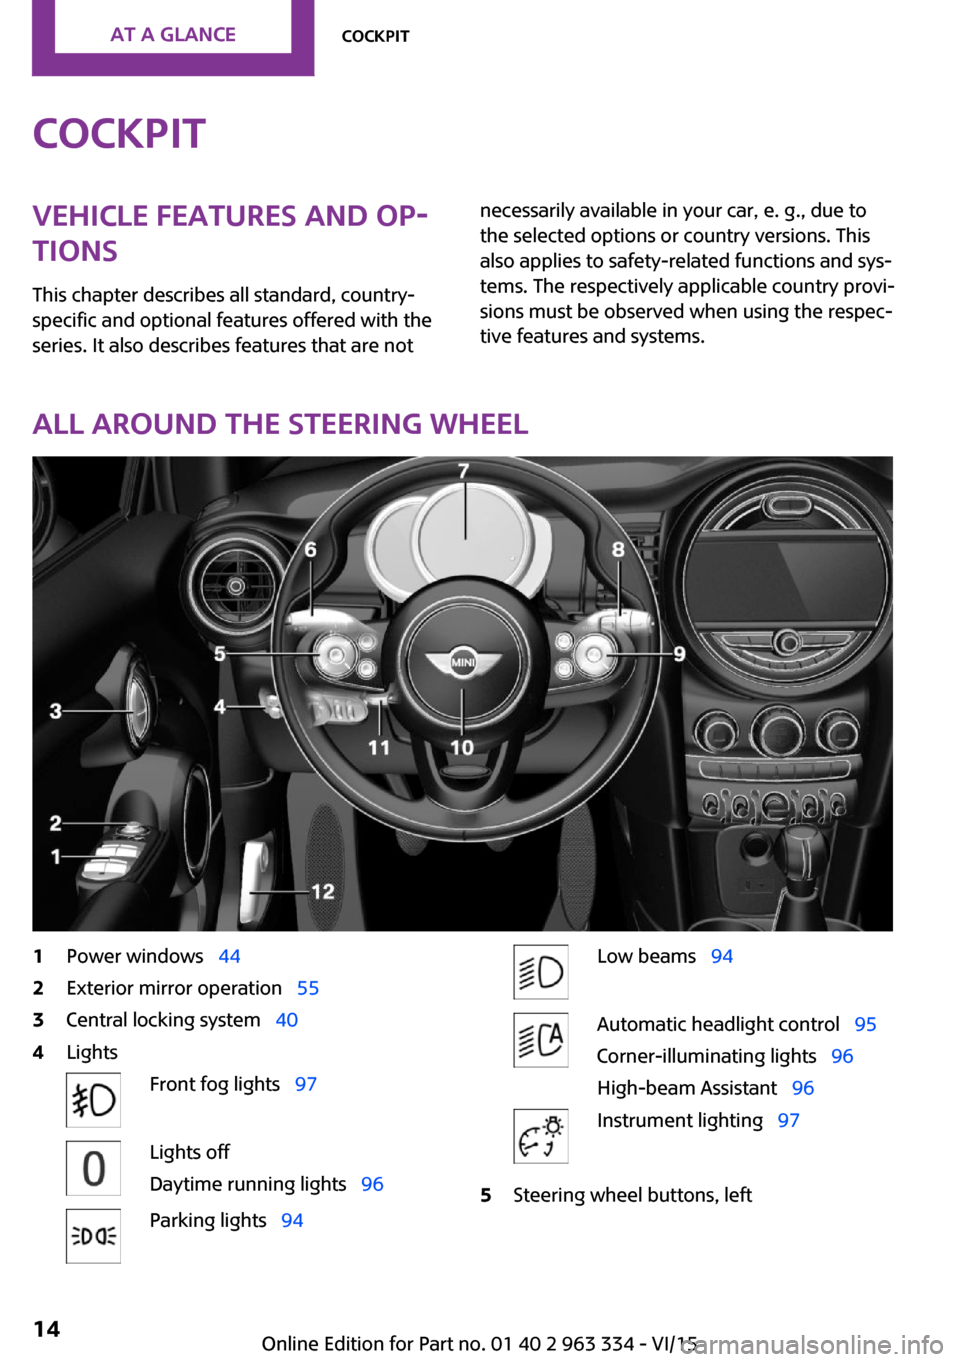
All around the steering wheel
1Power windows 442Exterior mirror operation 553Central locking system 404LightsFront fog lights 97Lights off
Daytime running lights 96Parking lights 94Low beams 94Automatic headlight control 95
Corner-illuminating lights 96
High-beam Assistant 96Instrument lighting 975Steering wheel buttons, leftSeite 14AT A GLANCECockpit14
Online Edition for Part no. 01 40 2 963 334 - VI/15
Page 15 of 246
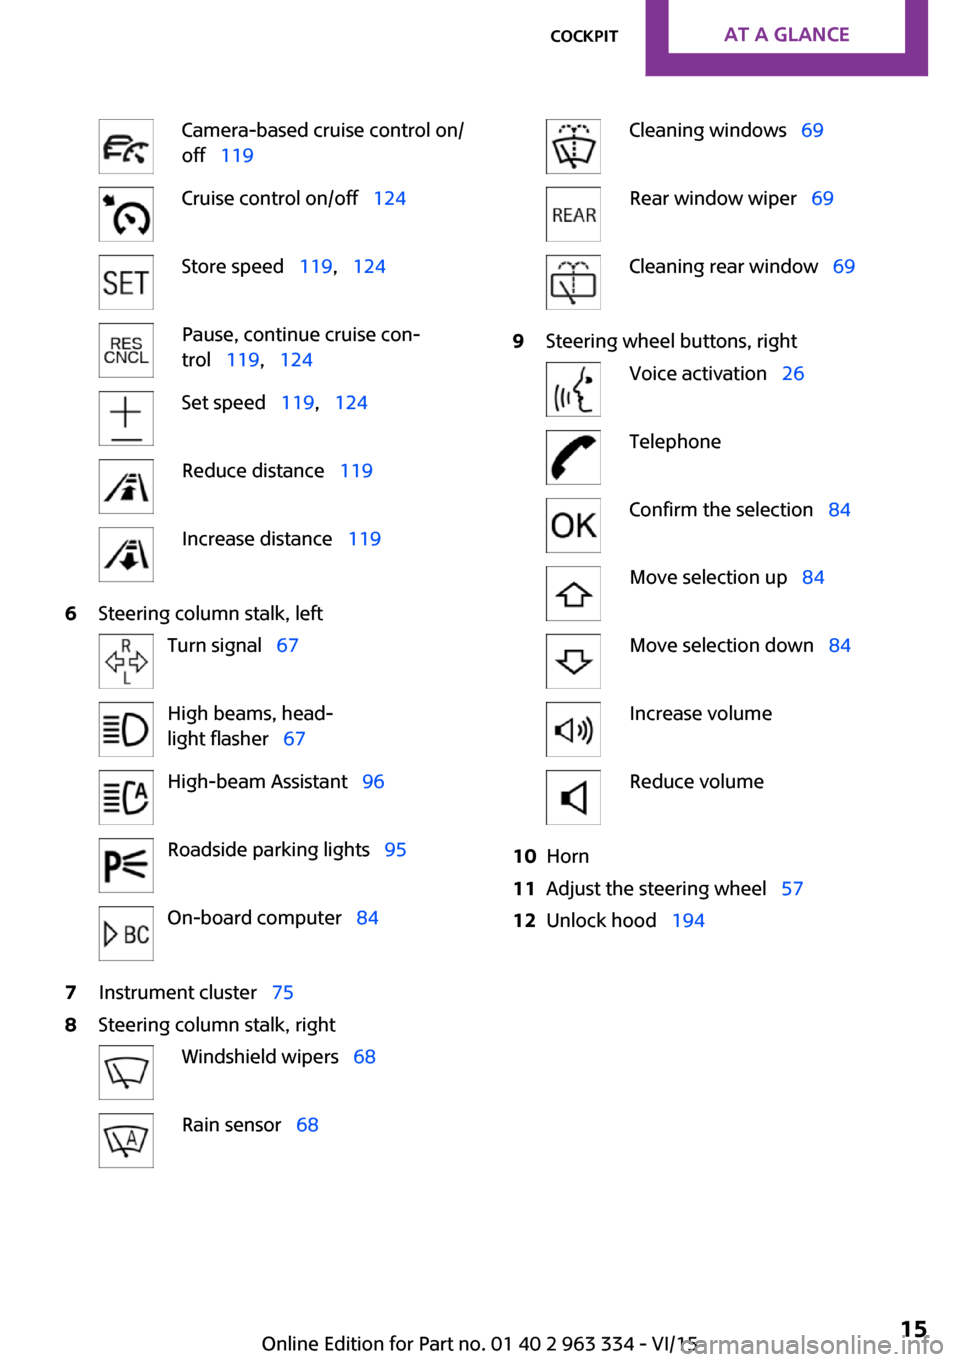
Camera-based cruise control on/
off 119Cruise control on/off 124Store speed 119, 124Pause, continue cruise con‐
trol 119, 124Set speed 119, 124Reduce distance 119Increase distance 1196Steering column stalk, leftTurn signal 67High beams, head‐
light flasher 67High-beam Assistant 96Roadside parking lights 95On-board computer 847Instrument cluster 758Steering column stalk, rightWindshield wipers 68Rain sensor 68Cleaning windows 69Rear window wiper 69Cleaning rear window 699Steering wheel buttons, rightVoice activation 26TelephoneConfirm the selection 84Move selection up 84Move selection down 84Increase volumeReduce volume10Horn11Adjust the steering wheel 5712Unlock hood 194Seite 15CockpitAT A GLANCE15
Online Edition for Part no. 01 40 2 963 334 - VI/15
Page 16 of 246
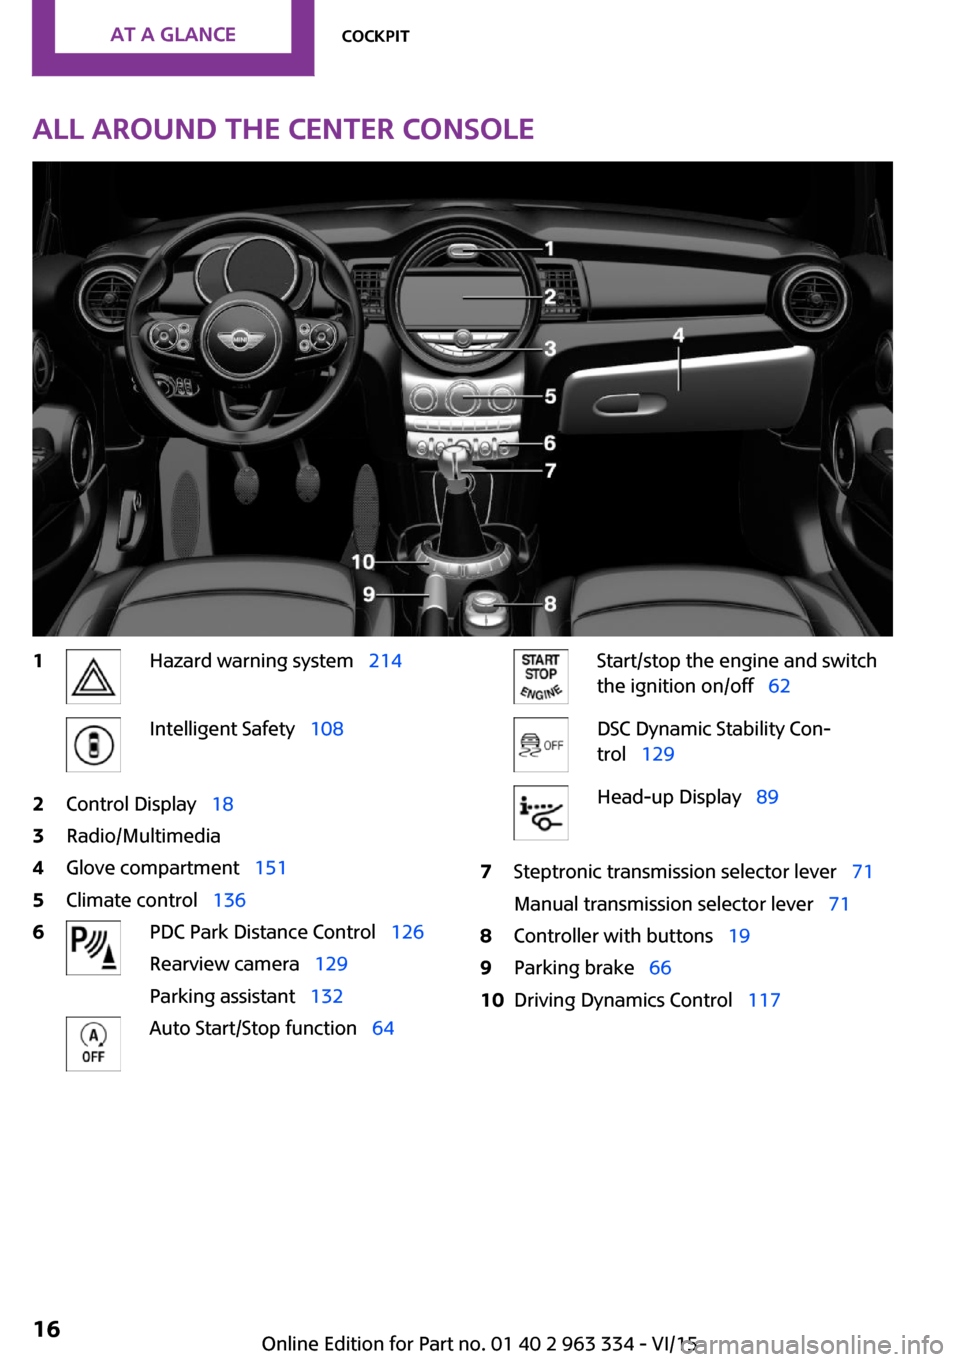
All around the center console1Hazard warning system 214Intelligent Safety 1082Control Display 183Radio/Multimedia4Glove compartment 1515Climate control 1366PDC Park Distance Control 126
Rearview camera 129
Parking assistant 132Auto Start/Stop function 64Start/stop the engine and switch
the ignition on/off 62DSC Dynamic Stability Con‐
trol 129Head-up Display 897Steptronic transmission selector lever 71
Manual transmission selector lever 718Controller with buttons 199Parking brake 6610Driving Dynamics Control 117Seite 16AT A GLANCECockpit16
Online Edition for Part no. 01 40 2 963 334 - VI/15
Page 18 of 246
Onboard monitorVehicle features and op‐
tions
This chapter describes all standard, country-
specific and optional features offered with the
series. It also describes features that are not
necessarily available in your car, e. g., due to
the selected options or country versions. This
also applies to safety-related functions and sys‐
tems. The respectively applicable country provi‐
sions must be observed when using the respec‐
tive features and systems.
The concept The onboard monitor combines the functions
of a multitude of switches. Thus, these func‐
tions can be operated from a central location.
WARNING
Operating the integrated information sys‐
tem and communication devices while driving
can distract from traffic. It is possible to lose
control of the vehicle. There is risk of an acci‐
dent. Only use the systems or devices when the
traffic situation allows. If necessary stop and
use the systems and devices while the vehicle is
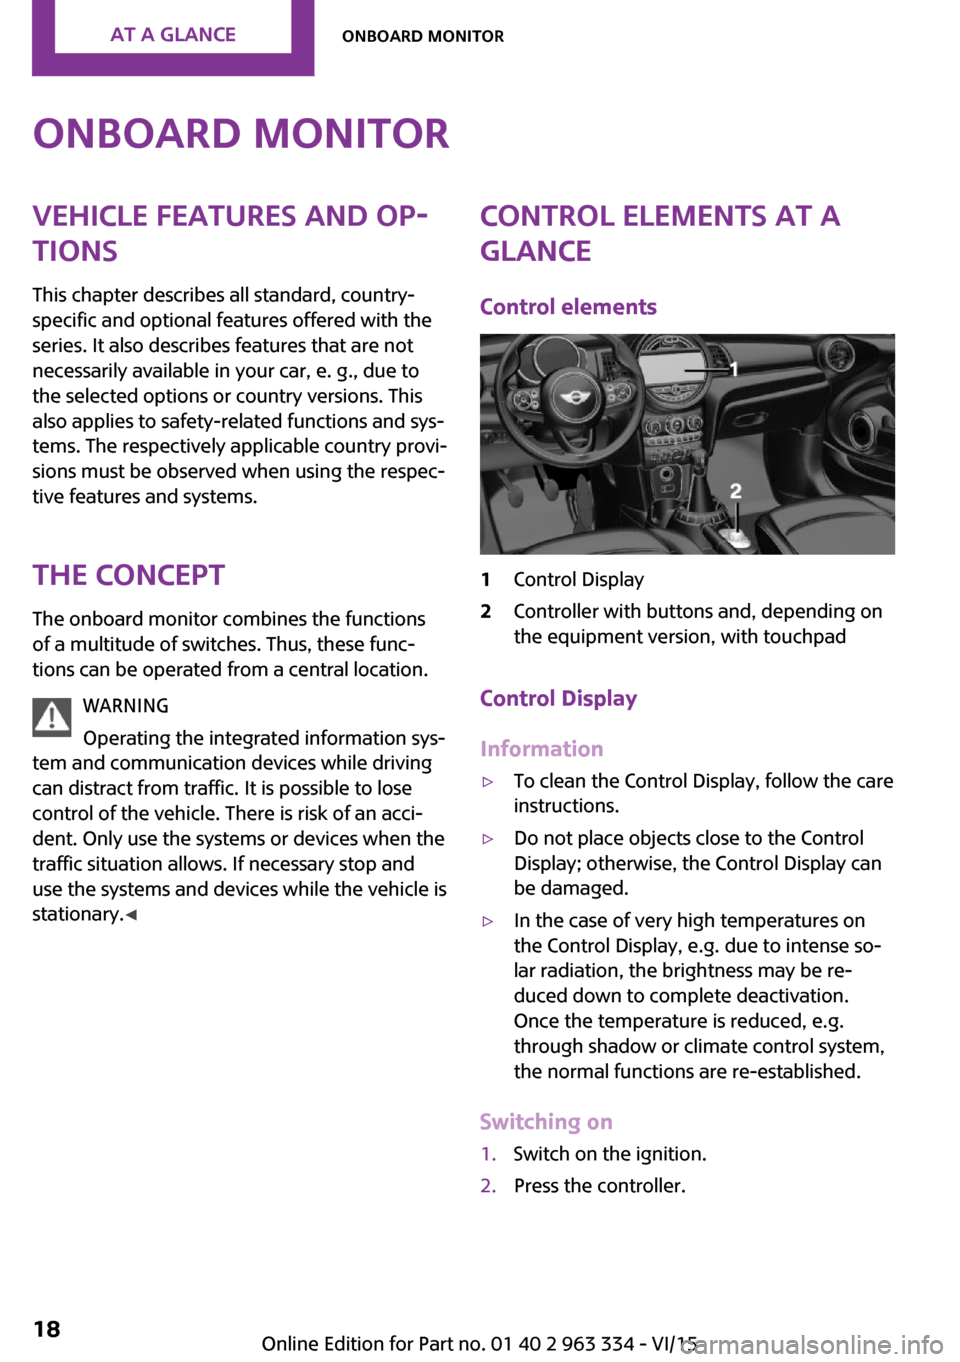
stationary. ◀Control elements at a
glance
Control elements1Control Display2Controller with buttons and, depending on
the equipment version, with touchpad
Control Display
Information
▷To clean the Control Display, follow the care
instructions.▷Do not place objects close to the Control
Display; otherwise, the Control Display can
be damaged.▷In the case of very high temperatures on
the Control Display, e.g. due to intense so‐
lar radiation, the brightness may be re‐
duced down to complete deactivation.
Once the temperature is reduced, e.g.
through shadow or climate control system,
the normal functions are re-established.
Switching on
1.Switch on the ignition.2.Press the controller.Seite 18AT A GLANCEOnboard monitor18
Online Edition for Part no. 01 40 2 963 334 - VI/15
Page 19 of 246
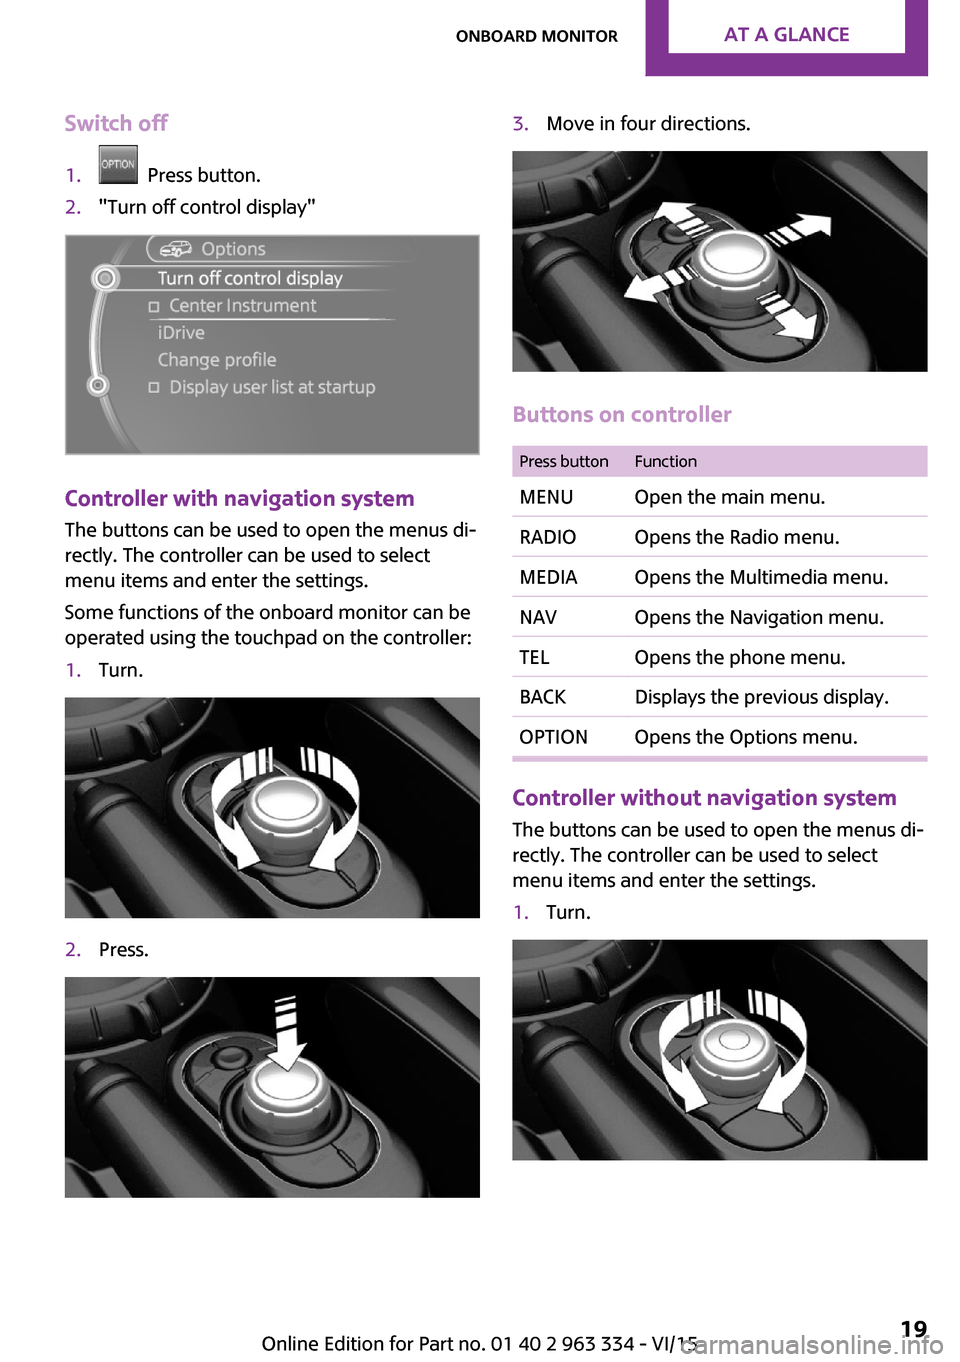
Switch off1. Press button.2."Turn off control display"
Controller with navigation system
The buttons can be used to open the menus di‐
rectly. The controller can be used to select
menu items and enter the settings.
Some functions of the onboard monitor can be
operated using the touchpad on the controller:
1.Turn.2.Press.3.Move in four directions.
Buttons on controller
Press buttonFunctionMENUOpen the main menu.RADIOOpens the Radio menu.MEDIAOpens the Multimedia menu.NAVOpens the Navigation menu.TELOpens the phone menu.BACKDisplays the previous display.OPTIONOpens the Options menu.
Controller without navigation system
The buttons can be used to open the menus di‐
rectly. The controller can be used to select
menu items and enter the settings.
1.Turn.Seite 19Onboard monitorAT A GLANCE19
Online Edition for Part no. 01 40 2 963 334 - VI/15
Page 20 of 246
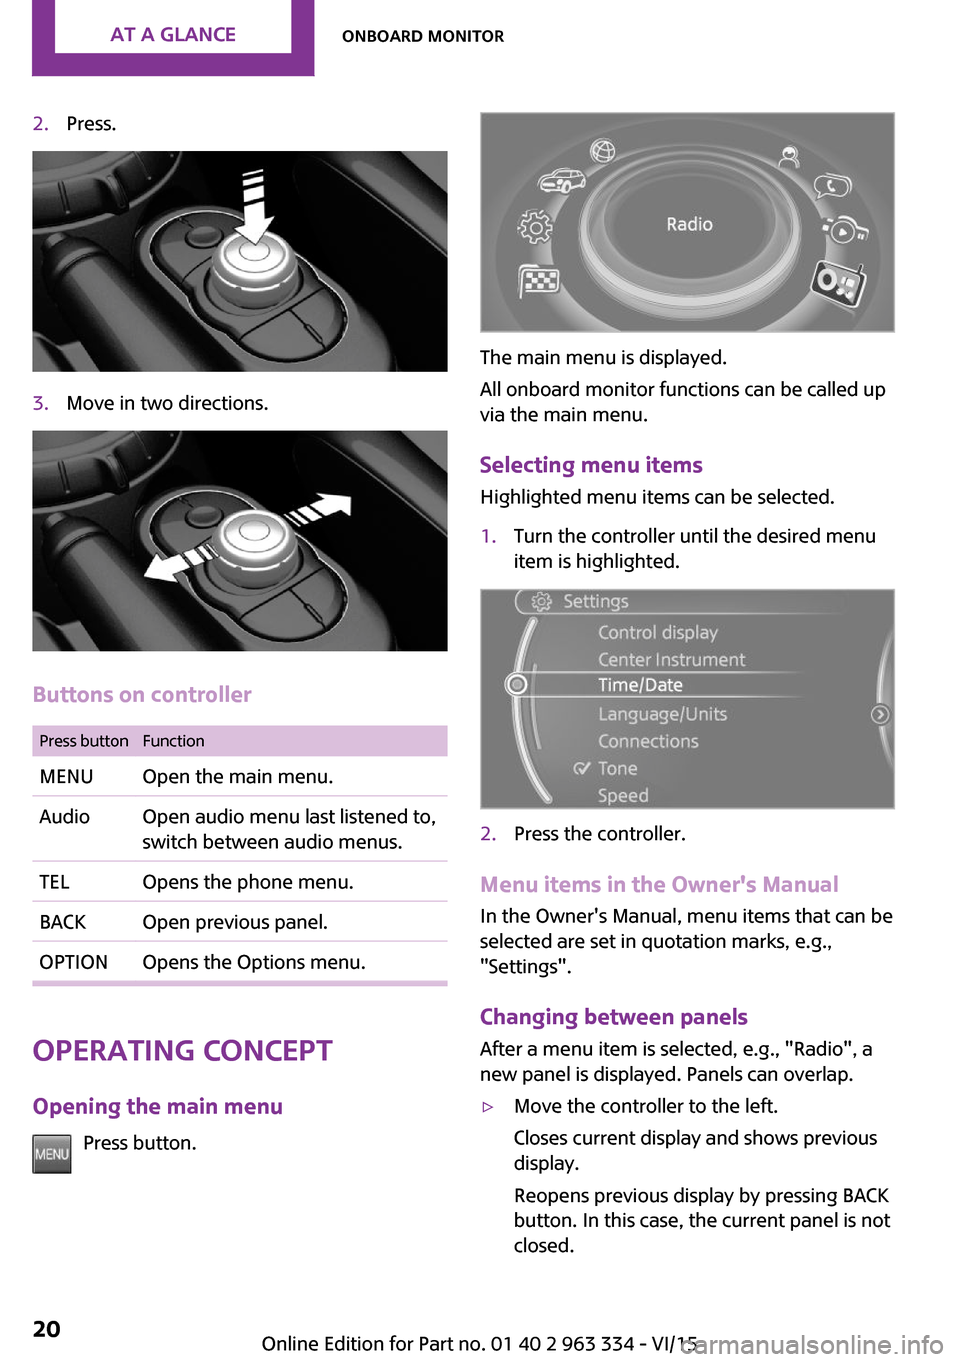
2.Press.3.Move in two directions.
Buttons on controller
Press buttonFunctionMENUOpen the main menu.AudioOpen audio menu last listened to,
switch between audio menus.TELOpens the phone menu.BACKOpen previous panel.OPTIONOpens the Options menu.
Operating concept
Opening the main menu Press button.
The main menu is displayed.
All onboard monitor functions can be called up
via the main menu.
Selecting menu items Highlighted menu items can be selected.
1.Turn the controller until the desired menu
item is highlighted.2.Press the controller.
Menu items in the Owner's Manual
In the Owner's Manual, menu items that can be
selected are set in quotation marks, e.g.,
"Settings".
Changing between panels
After a menu item is selected, e.g., "Radio", a
new panel is displayed. Panels can overlap.
▷Move the controller to the left.
Closes current display and shows previous
display.
Reopens previous display by pressing BACK
button. In this case, the current panel is not
closed.Seite 20AT A GLANCEOnboard monitor20
Online Edition for Part no. 01 40 2 963 334 - VI/15
Page 24 of 246
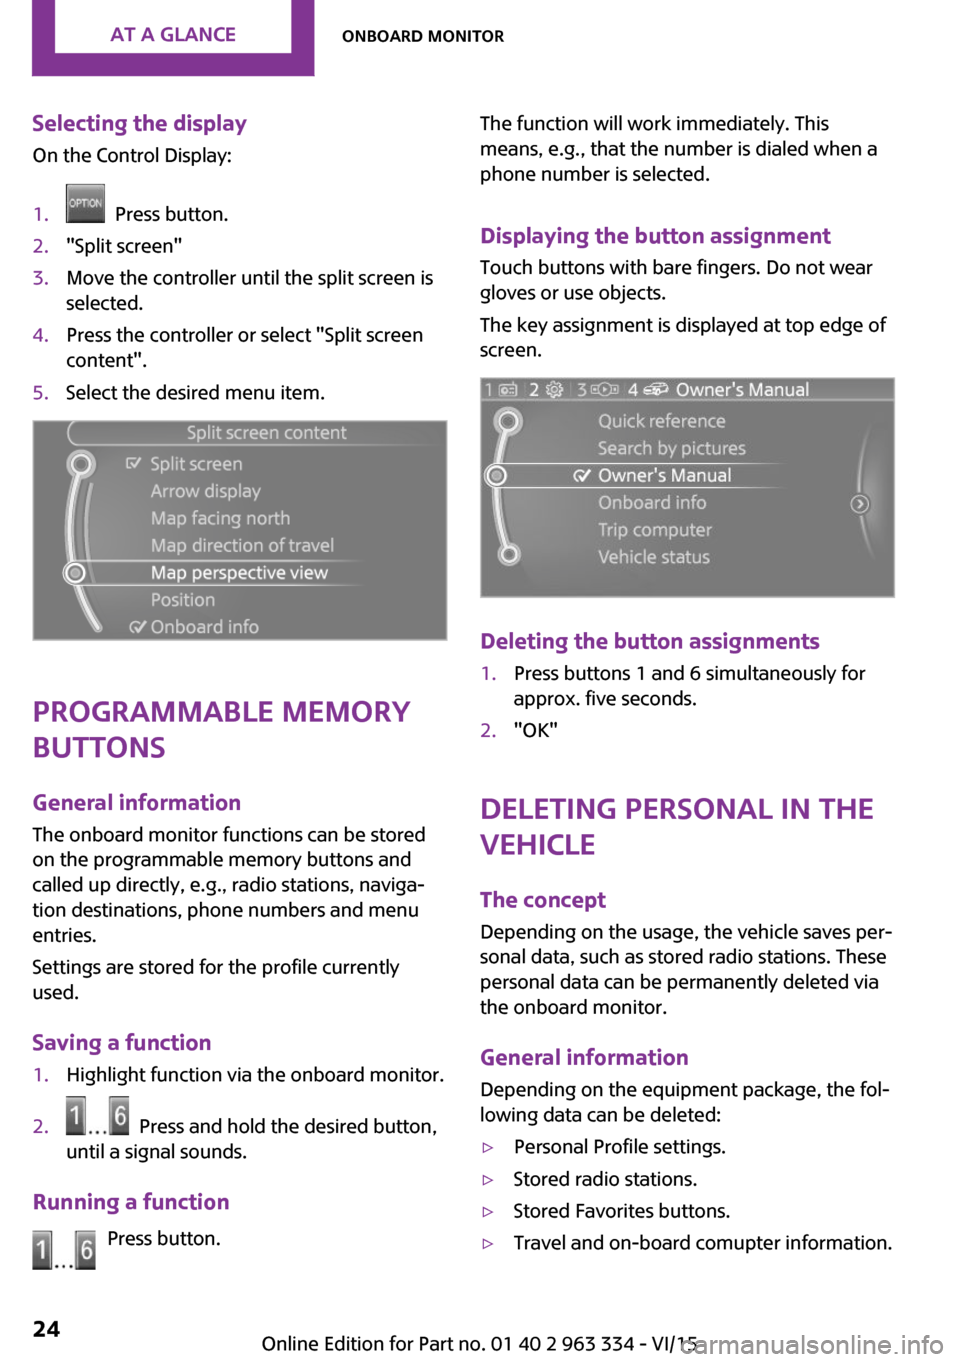
Selecting the displayOn the Control Display:1. Press button.2."Split screen"3.Move the controller until the split screen is
selected.4.Press the controller or select "Split screen
content".5.Select the desired menu item.
Programmable memory
buttons
General information
The onboard monitor functions can be stored
on the programmable memory buttons and
called up directly, e.g., radio stations, naviga‐
tion destinations, phone numbers and menu
entries.
Settings are stored for the profile currently
used.
Saving a function
1.Highlight function via the onboard monitor.2. Press and hold the desired button,
until a signal sounds.
Running a function
Press button.
The function will work immediately. This
means, e.g., that the number is dialed when a
phone number is selected.
Displaying the button assignmentTouch buttons with bare fingers. Do not wear
gloves or use objects.
The key assignment is displayed at top edge of
screen.
Deleting the button assignments
1.Press buttons 1 and 6 simultaneously for
approx. five seconds.2."OK"
Deleting personal in the
vehicle
The concept
Depending on the usage, the vehicle saves per‐
sonal data, such as stored radio stations. These
personal data can be permanently deleted via
the onboard monitor.
General information Depending on the equipment package, the fol‐
lowing data can be deleted:
▷Personal Profile settings.▷Stored radio stations.▷Stored Favorites buttons.▷Travel and on-board comupter information.Seite 24AT A GLANCEOnboard monitor24
Online Edition for Part no. 01 40 2 963 334 - VI/15
Page 30 of 246

Scroll forward.
Context help - Owner's Manual to the
temporarily selected function
You may open the relevant information di‐
rectly.
Opening via the onboard monitor To move directly from the application on theControl Display to the options menu:1. Press button or move the controller to
the right repeatedly until the "Options"
menu is displayed.2."Display Owner's Manual"
Opening when a Check Control
message is displayed
Directly from the Check Control message on the
Control Display:
"Display Owner's Manual"
Changing between a function and the
Owner's Manual
To switch from a function, e. g., radio, to the
Owner's Manual on the Control Display and to
alternate between the two displays:
1. Press button or move the controller to
the right repeatedly until the "Options"
menu is displayed.2."Display Owner's Manual"3.Select the desired page in the Owner's
Manual.4. Press button again to return to last
displayed function.5. Press button to return to the page of
the Owner's Manual displayed last.To alternate permanently between the last dis‐
played function and the Owner's Manual re‐
peat steps 4 & 5. Opens a new display every
time.
Programmable memory buttons
General information The Owner's Manual can be stored on the pro‐
grammable memory buttons and called up di‐
rectly.
Storing1.Select "Owner's Manual" via the onboard
monitor.2. Press and hold the desired button,
until a signal sounds.
Executing
Press button.
The Owner's Manual is displayed im‐
mediately.
Seite 30AT A GLANCEIntegrated Owner's Manual in the vehicle30
Online Edition for Part no. 01 40 2 963 334 - VI/15
Page 36 of 246
Personal Profile
The concept
Personal Profile provides three profiles, using
which personal vehicle settings can be stored.
Every remote control has one of these profiles
assigned.
If the vehicle is unlocked using a remote con‐
trol, the assigned personal profile will be acti‐
vated. All settings stored in the profile are auto‐
matically applied.
If several drivers use their own remote control,
the vehicle will adjust the personal settings dur‐
ing unlocking. These settings are also restored,
if the vehicle has been used in the meantime
by a person with a different remote control.
Changes to the settings are automatically saved
in the personal profile.
Three personal profiles and a guest profile can
be created.
Adjusting
The settings for the following systems and func‐
tions are saved in the active profile. The scope
of storable settings is country- and equipment-
dependable.▷Unlocking and locking.▷Lights.▷Radio.▷Instrument cluster.▷Programmable memory buttons.▷Volumes, tone.▷Control Display.▷Climate control.▷Navigation.▷Park Distance Control PDC.▷Rearview camera▷Head-up Display.▷Driving Dynamics Control.▷Cruise control.▷Intelligent Safety.
Profile management
Opening profiles
Regardless of the remote control in use a differ‐
ent profile may be activated.
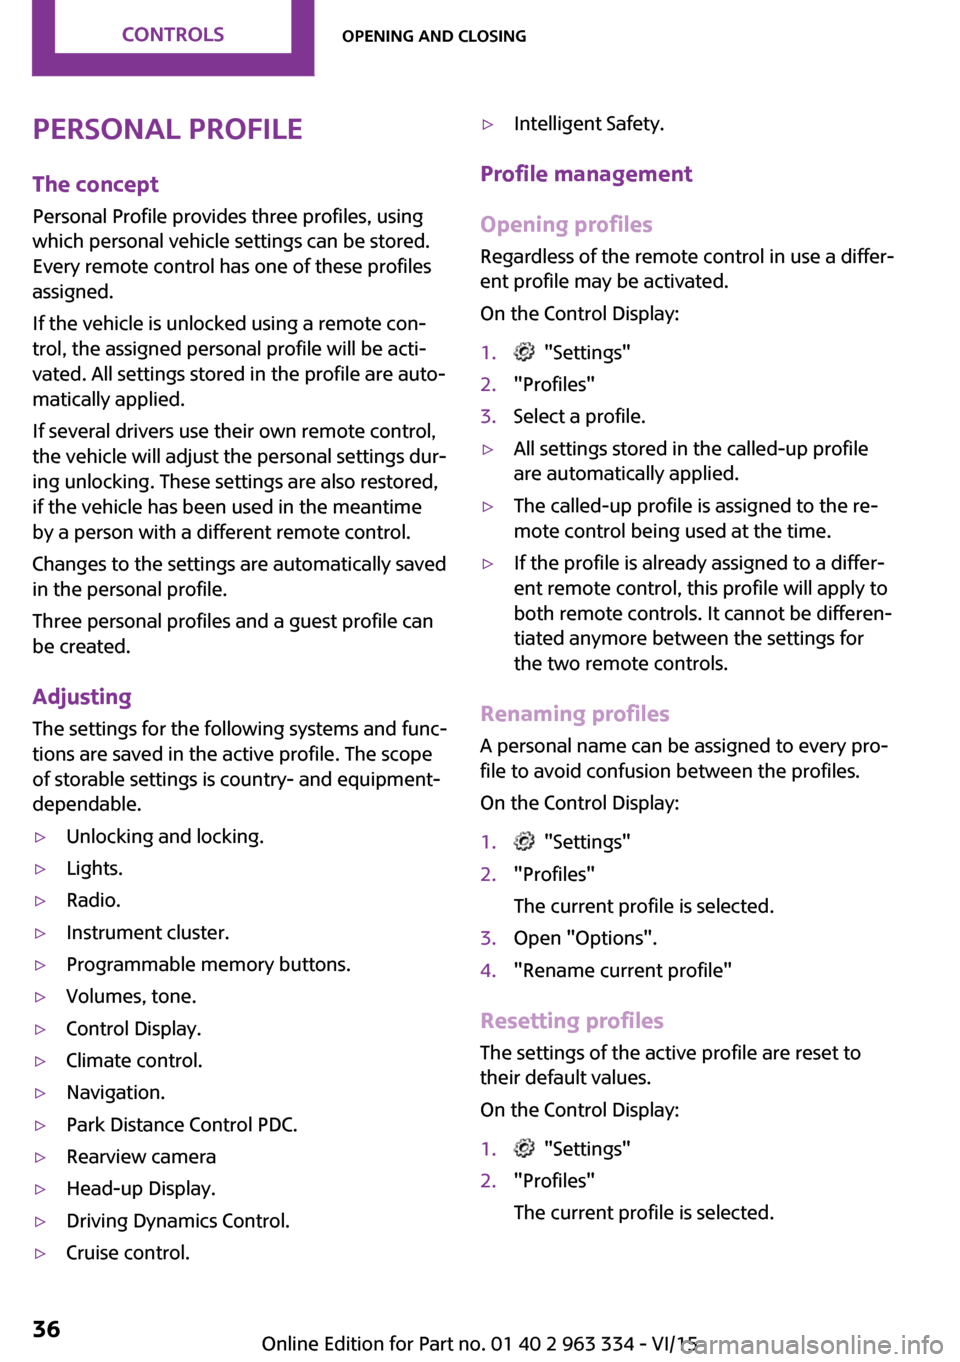
On the Control Display:
1. "Settings"2."Profiles"3.Select a profile.▷All settings stored in the called-up profile
are automatically applied.▷The called-up profile is assigned to the re‐
mote control being used at the time.▷If the profile is already assigned to a differ‐
ent remote control, this profile will apply to
both remote controls. It cannot be differen‐
tiated anymore between the settings for
the two remote controls.
Renaming profiles
A personal name can be assigned to every pro‐
file to avoid confusion between the profiles.
On the Control Display:
1. "Settings"2."Profiles"
The current profile is selected.3.Open "Options".4."Rename current profile"
Resetting profiles The settings of the active profile are reset to
their default values.
On the Control Display:
1. "Settings"2."Profiles"
The current profile is selected.Seite 36CONTROLSOpening and closing36
Online Edition for Part no. 01 40 2 963 334 - VI/15
Page 40 of 246
on the ignition, if needed, through emergency
detection of the remote control.
From the inside
Locking and unlocking
Press button.
Vehicle is locked.
Press button.
The vehicle is unlocked.
Pressing the buttons for the central locking sys‐
tem locks and unlocks the doors and the tail‐
gate when the front doors are closed, but they
are not secured against theft.
The fuel filler flap remains unlocked.
In the event of a severe accident, the vehicle is
automatically unlocked. The hazard warning
system and interior lights come on.
Unlocking and opening
Either unlock the doors together using the cen‐
tral locking system buttons and then pull the
door handle above the armrest or pull the door
handle on the door to open the door. The other
doors remain locked.
TailgateInformation
To avoid locking it into the vehicle, do not place
the remote control in the cargo area.
CAUTION
The tailgate swings back and up when it
opens. There is risk of property damage. Make
sure that the area of movement of the tailgate
is clear during opening and closing. ◀
WARNING
Body parts can be jammed when operat‐
ing the tailgate. There is risk of injuries. Make
sure that the area of movement of the tailgate
is clear during opening and closing. ◀
CAUTION
Sharp-edged or pointed objects can hit
the rear window and heat conductors while
driving. There is risk of property damage. Cover
the edges and ensure that pointed objects do
not hit the rear window. ◀
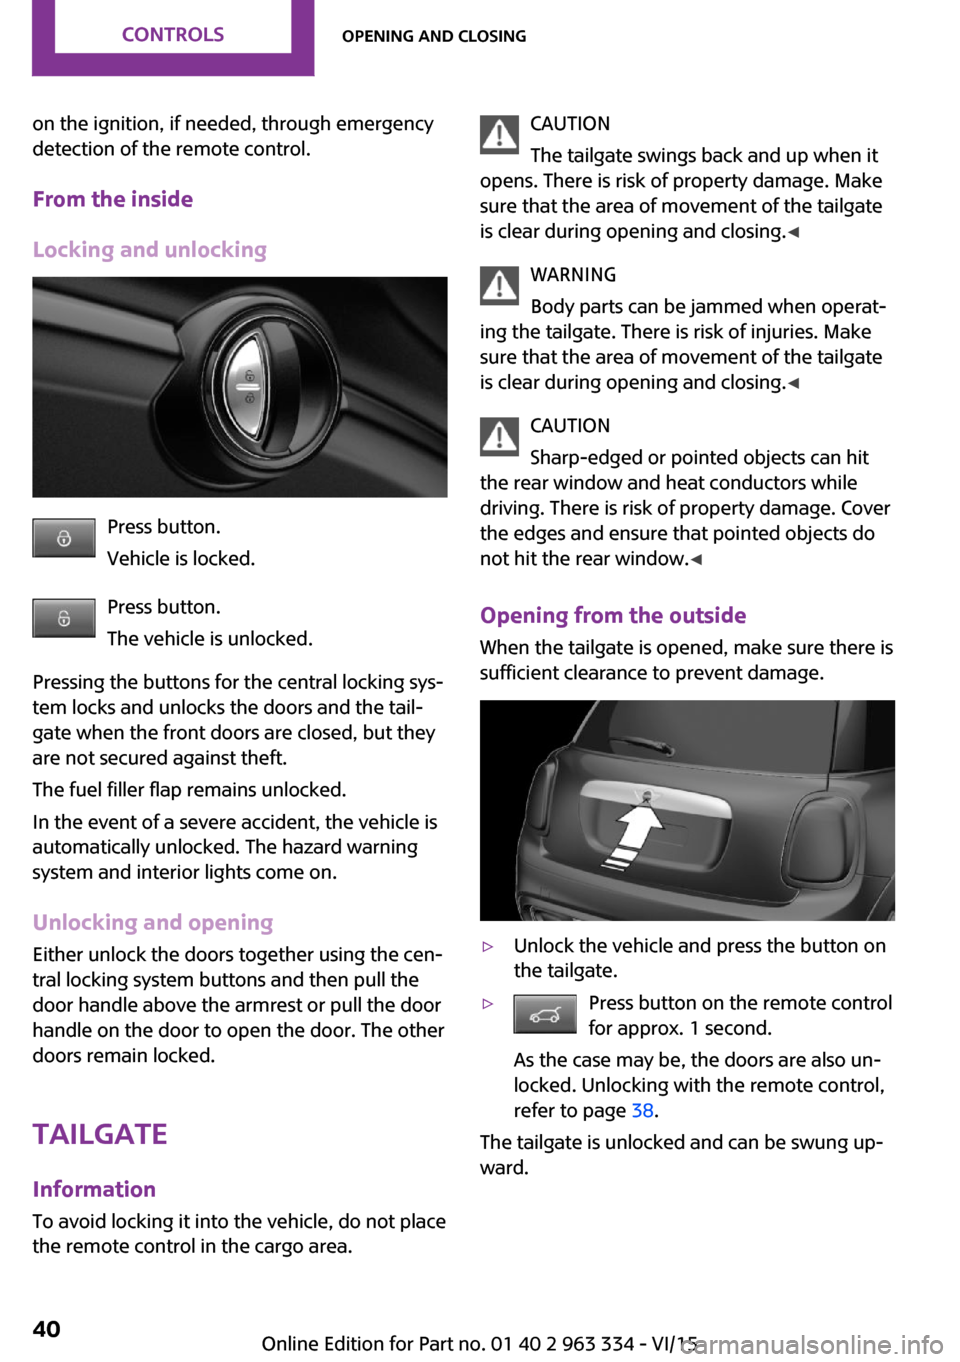
Opening from the outside
When the tailgate is opened, make sure there is
sufficient clearance to prevent damage.▷Unlock the vehicle and press the button on
the tailgate.▷Press button on the remote control
for approx. 1 second.
As the case may be, the doors are also un‐
locked. Unlocking with the remote control,
refer to page 38.
The tailgate is unlocked and can be swung up‐
ward.
Seite 40CONTROLSOpening and closing40
Online Edition for Part no. 01 40 2 963 334 - VI/15