buttons MINI Hardtop 4 Door 2016 User Guide
[x] Cancel search | Manufacturer: MINI, Model Year: 2016, Model line: Hardtop 4 Door, Model: MINI Hardtop 4 Door 2016Pages: 251, PDF Size: 6.71 MB
Page 104 of 251

the saved values. The selected distance is
briefly displayed in the info display.
In the following cases, the stored speed value is
deleted and cannot be called up again:▷When the system is switched off.▷When the ignition is switched off.
Changing between cruise control with/
without distance control
WARNING
The system does not react to traffic driv‐
ing ahead of you, but instead maintains the stored speed. There is risk of accidents or risk of
property damage. Adjust the desired speed to
the traffic conditions and brake as needed. ◀
Changing to Active Cruise Control without dis‐
tance control:
Press and hold this button, or
Press and hold this button.
The indicator lamp in the instrument
cluster lights up.
To switch back to cruise control, press one of
the buttons briefly.
After switching, a Check Control message is dis‐
played.
Displays in the instrument cluster
Desired speed In addition to the indicator lamp, the
desired speed is displayed in the central
information display.
▷The indicator lights up green: the system is
active.▷The indicator lights up orange: the system
has been interrupted.▷No display: system is switched off.If no speed is indicated, it is possible that the
conditions necessary for operation are not cur‐
rently fulfilled.
Distance to vehicle ahead of you
Selected distance from the vehicle driving
ahead is briefly displayed in the left hand por‐
tion of the info display.Distance displayDistance 1Distance 2Distance 3Distance 4
This value is set automatically after
the system is switched on.
Indicator/warning lights
Symbol lights up orange:
A vehicle has been detected ahead of
you.
Symbol flashes orange:
The conditions are not adequate for the
system to work.
The system was deactivated but applies the
brakes until you actively resume control by
pressing on the brake pedal or accelerator
pedal.
Symbol flashes red and a signal sounds:
You are requested to intervene by brak‐
ing or make an evasive maneuver.
The system has been interrupted or dis‐
tance control is temporarily suppressed
Seite 104CONTROLSDriving comfort104
Online Edition for Part no. 01 40 2 963 307 - VI/15
Page 107 of 251

▷On slippery roads, in fog, snow or rain, or
on a loose road surface.
There is risk of accidents or risk of property
damage. Only use the system if driving at con‐
stant speed is possible. ◀
General information Depending on the driving program, refer to
page 99, set, the characteristics of the cruise
control in particular areas can change.
Overview
Buttons on the steering wheel
Press buttonFunctionCruise control on/offStore speedPausing cruise control
Continue cruise control with the
last settingIncreasing, maintaining or storing
the speedReducing, maintaining or storing
the speed
Controls
Switching on Press button on the steering wheel.
The indicator lamp in the instrument
cluster lights up.
The current speed is adopted as the de‐
sired speed and is displayed with the
symbol in the instrument cluster.
Cruise control is active and maintains the set
speed.
DSC Dynamic Stability Control will be switched
on if needed.
Switch off WARNING
The system does not relieve from the per‐
sonal responsibility to correctly assess the traf‐
fic situation. Based on the limits of the system,
it cannot independently react to all traffic situa‐
tions. There is risk of an accident. Adjust the
driving style to the traffic conditions. Watch
traffic closely and actively interfere in the re‐
spective situations. ◀
Press button on the steering wheel.
The displays go out. The stored desired speed is
deleted.
Interrupting When active, press the button on the
steering wheel.
The system is automatically interrupted in the
following situations:▷When the brakes are applied.▷If the clutch pedal is depressed for a few
seconds or released while a gear is not en‐
gaged.▷If the gear engaged is too high for the cur‐
rent speed.▷If selector lever position N is set.▷If DTC Dynamic Traction Control is activated
or DSC is deactivated.▷When DSC is actively controlling stability.Seite 107Driving comfortCONTROLS107
Online Edition for Part no. 01 40 2 963 307 - VI/15
Page 122 of 251

on the interior rearview mirror flashes. This
erases all programming of the buttons on
the interior rearview mirror.3.Hold the hand-held transmitter for the sys‐
tem to be controlled approx. 1 to 3 in/2.5
to 8 cm away from the buttons of the inte‐
rior rearview mirror. The required distance
depends on the manual transmitter.4.Simultaneously press and hold the button
of the desired function on the hand-held
transmitter and the button to be program‐
med on the interior rearview mirror. The
LED on the interior rearview mirror will be‐
gin flashing slowly.5.Release both buttons as soon as the LED
flashes more rapidly. The LED flashing
faster indicates that the button on the inte‐
rior rearview mirror has been programmed.
If the LED does not flash faster after at least
60 seconds, change the distance between
the interior rearview mirror and the hand-
held transmitter and repeat the step. Sev‐
eral more attempts at different distances
may be necessary. Wait at least 15 seconds
between attempts.
Canada: if programming with the hand-
held transmitter was interrupted, hold
down the interior rearview mirror button
and repeatedly press and release the hand-
held transmitter button for 2 seconds.6.To program other functions on other but‐
tons, repeat steps 3 to 5.
The systems can be controlled using the interior
rearview mirror buttons.
Special feature of the alternating-code
wireless system
If you are unable to operate the system after
repeated programming, please check if the sys‐
tem to be controlled features an alternating-
code system.
Read the system's operating manual, or press
the programmed button on the interior rear‐
view mirror longer. If the LED on the interior
rearview mirror starts flashing rapidly and then
stays lit constantly for 2 seconds, the system
features an alternating-code system. Flashing
and continuous illumination of the LED will re‐
peat for approximately 20 seconds.
For systems with an alternating-code system,
the Universal Integrated Remote Control and
the system also have to be synchronized.
Please read the operating manual to find out
how to synchronize the system.
Synchronizing is easier with the aid of a second
person.
To synchronize:1.Park the vehicle within range of the re‐
mote-controlled system.2.Program the relevant button on the interior
rearview mirror as described.3.Locate and press the synchronizing button
on the system being programmed. You
have approx. 30 seconds for the next step.4.Hold down the programmed button on the
interior rearview mirror for approximately
3 seconds and then release it. If necessary,
repeat this step up to three times in order
to finish synchronization. Once synchroni‐
zation is complete, the programmed func‐
tion will be carried out.
Reprogramming individual buttons
1.Switch on the ignition.2.Press and hold the interior rearview mirror
button to be programmed.3.As soon as the interior rearview mirror LED
starts flashing slowly, hold the hand-held
transmitter for the system to be controlled
approx. 1 to 3 in/2.5 to 8 cm away from the
buttons of the interior rearview mirror. The
required distance depends on the manual
transmitter.Seite 122CONTROLSInterior equipment122
Online Edition for Part no. 01 40 2 963 307 - VI/15
Page 123 of 251

4.Likewise, press and hold the button of the
desired function on the hand-held trans‐
mitter.5.Release both buttons as soon as the interior
rearview mirror LED flashes more rapidly.
The LED flashing faster indicates that the
button on the interior rearview mirror has
been programmed. The system can then be
controlled by the button on the interior
rearview mirror.
If the LED does not flash faster after at least
60 seconds, change the distance and re‐
peat the step. Several more attempts at dif‐
ferent distances may be necessary. Wait at
least 15 seconds between attempts.
Canada: if programming with the hand-
held transmitter was interrupted, hold
down the interior rearview mirror button
and repeatedly press and release the hand-
held transmitter button for 2 seconds.
Controls
WARNING
Body parts can be jammed when operat‐
ing remote-controlled systems, e.g. the garage
door, using the universal garage door opener.
There is risk of injuries or risk of property dam‐
age. Make sure that the area of movement of
the respective system is clear during program‐
ming and operation. Also follow the safety in‐
structions of the hand-held transmitter. ◀
The system, such as the garage door, can be
operated using the button on the interior rear‐
view mirror while the engine is running or
when the ignition is started. To do this, hold
down the button within receiving range of the
system until the function is activated. The inte‐
rior rearview mirror LED stays lit while the wire‐
less signal is being transmitted.
Deleting stored functions
Press and hold the left and right button on the
interior rearview mirror simultaneously for ap‐
proximately 20 seconds until the LED flashes
rapidly. All stored functions are deleted. The
functions cannot be deleted individually.
Digital compass
Overview1Control button2Mirror display
Mirror display The point of the compass is displayed in the
mirror when driving straight.
Operating concept Various functions can be called up by pressing
the control button with a pointed object, such
as the tip of a ballpoint pen or similar object.
The following setting options are displayed in
succession, depending on how long the control
button is pressed:
▷Pressed briefly: turns display on/off.▷3 to 6 seconds: compass zone setting.▷6 to 9 seconds: compass calibration.▷9 to 12 seconds: left/right-hand steering
setting.▷12 to 15 seconds: language setting.
Setting the compass zones
Sets the particular compass zones on the vehi‐
cle so that the compass operates correctly; re‐
fer to World map with compass zones.
Seite 123Interior equipmentCONTROLS123
Online Edition for Part no. 01 40 2 963 307 - VI/15
Page 151 of 251
RadioVehicle features and op‐
tions
This chapter describes all standard, country-
specific and optional features offered with the
series. It also describes features that are not
necessarily available in your car, e. g., due to
the selected options or country versions. This
also applies to safety-related functions and sys‐
tems. The respectively applicable country provi‐
sions must be observed when using the respec‐
tive features and systems.
General information Settings are stored for the profile, refer to
page 24, currently used.
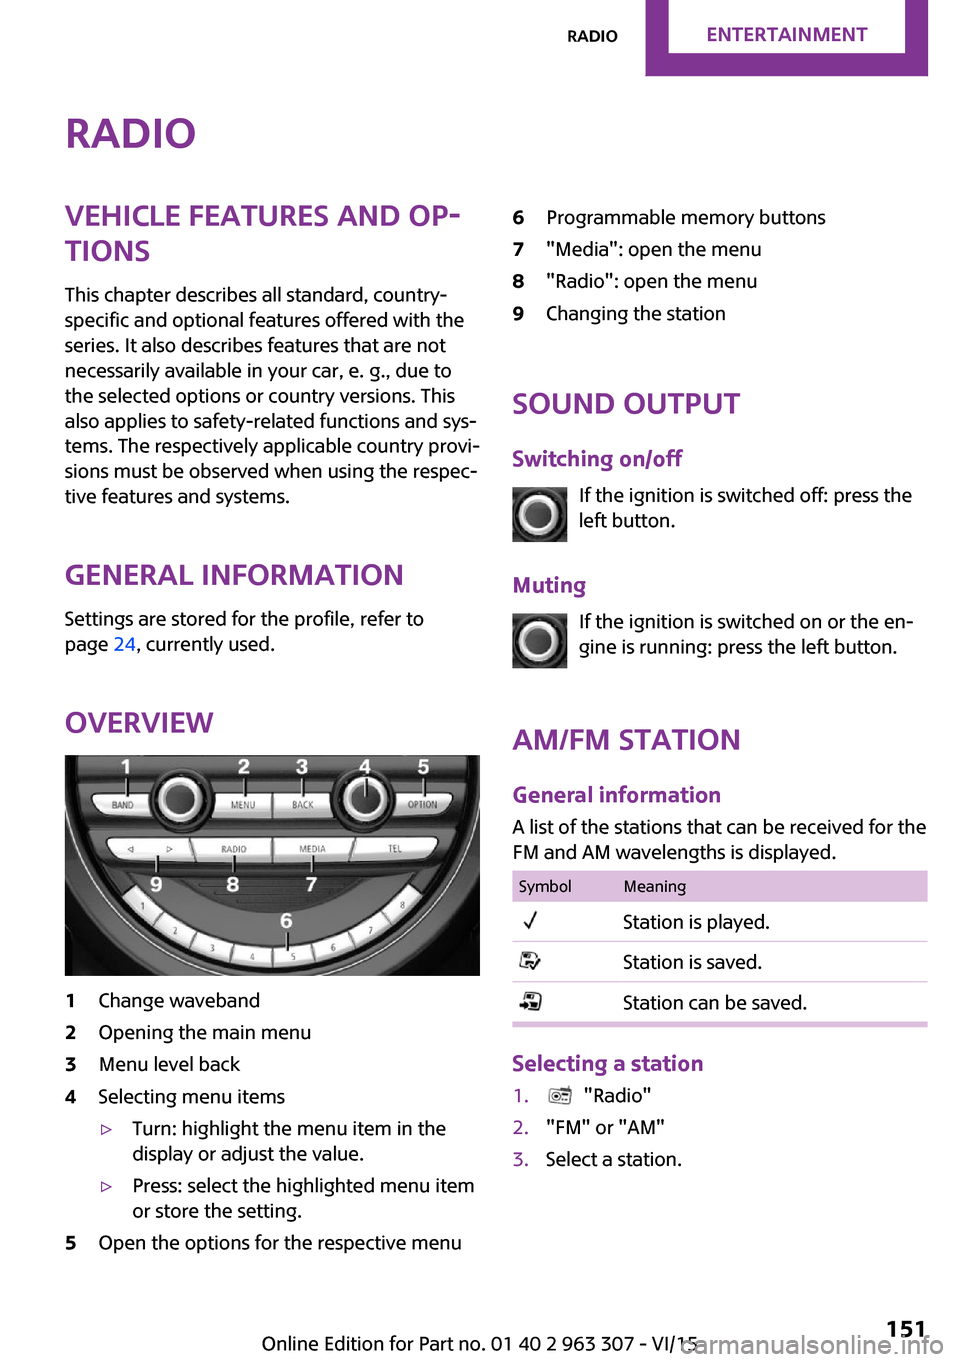
Overview1Change waveband2Opening the main menu3Menu level back4Selecting menu items▷Turn: highlight the menu item in the
display or adjust the value.▷Press: select the highlighted menu item
or store the setting.5Open the options for the respective menu6Programmable memory buttons7"Media": open the menu8"Radio": open the menu9Changing the station
Sound output
Switching on/off If the ignition is switched off: press the
left button.
Muting If the ignition is switched on or the en‐
gine is running: press the left button.
AM/FM station General information
A list of the stations that can be received for the
FM and AM wavelengths is displayed.
SymbolMeaningStation is played.Station is saved.Station can be saved.
Selecting a station
1. "Radio"2."FM" or "AM"3.Select a station.Seite 151RadioENTERTAINMENT151
Online Edition for Part no. 01 40 2 963 307 - VI/15
Page 152 of 251
Selecting a station manually1. "Radio"2."FM" or "AM"3."Manual search ( )"4.Turn the right-hand knob until the desired
frequency is displayed.
Changing the station
About the radio:
Press button.
Via the buttons on the steering wheel: Press button.
The next station with reception or stored sta‐
tion is played. If traffic bulletins are activated,
the next traffic information station is played.
About the radio:
Press and hold this button.
Via the buttons on the steering wheel: Press and hold this button.
The waveband is traversed. After the button is
released, the next station with reception is
played.
Storing a station
1. "Radio"2."FM" or "AM"3.Select a station.4.Press the right button.5.Select the memory location.
The stations can also be stored on the Favorites
buttons, refer to page 153.
Renaming a station
When storing a station with RDS signal, the RDS
information transferred during storing is ac‐
cepted as the station name. This name can be
changed.1.Select the station that is to be renamed.2. Press button.3."Rename to:"
If necessary, wait until the desired name
appears.4.Press the right-hand knob to store this
name.
Displaying additional information
If a radio station broadcasts radio text or radio
text plus, this information can be displayed,
e.g., the track or the performer of the music.
Availability, content and sequence are set by
the radio station.
1. "Radio"2."FM" or "AM"3. Press button.4."Station info"
RDS Radio Data System
The concept
RDS broadcasts additional information, such as
the station name, in the FM wave band.
When playing a station with multiple frequen‐
cies, the system automatically switches to the
frequency with the best reception, if needed.
Switching on/off It is recommended to switch on RDS
1. "Radio"2."FM"Seite 152ENTERTAINMENTRadio152
Online Edition for Part no. 01 40 2 963 307 - VI/15
Page 153 of 251
3. Press button.4."RDS"
HD Radio™ reception
Many stations broadcast both analog and digi‐
tal signals.
License conditions
HD Radio technology manufactured under li‐
cense from iBiquity Digital Corporation. U. S.
and Foreign Patents. HD Radio™ and the HD,
HD Radio, and “Arc” logos are proprietary
trademarks of iBiquity Digital Corp.
Activating/deactivating digital radio
reception
1. "Radio"2."FM" or "AM"3. Press button.4."HD Radio reception"
This symbol is displayed in the status line
when the audio signal is digital.
When setting a station with a digital signal, it
may take a few seconds before the station
plays in digital quality.
Information about HD Radio stations whose
station name ends with ...HD or with ...HD1:
In areas in which the station is not continuously
received in digital mode, the playback switches
between analog and digital reception. In this
case, switch off digital radio reception.
Information about HD Radio multicast stations
whose station name ends
with ...HD2, ...HD3, ...:
In areas in which the station is not continuously
received in digital mode, there may be inter‐
ruptions of the audible signal lasting several
seconds. This depends on the reception.
Displaying additional information
Some stations broadcast additional information
on the current track, such as the name of the
artist.1.Select the desired station.2. Press button.3."Station info"
Stored stations
General information
It is possible to store up to 40 stations.
SymbolMeaning1 ... 40Memory location.FMStations out of the FM waveband.AMStations out of the AM waveband.SATSatellite radio station.
Calling up a station
1. "Radio"2."Presets"3.Select the desired memory location.
Storing a station The station currently selected is stored.
1. "Radio"2."Presets"3."Store station ( )"4.Memory location to be selected.
The stations can also be stored on the Favorites
buttons, refer to page 153.
Programmable memory buttons The first eight locations in the station list corre‐
spond to the assignment of the Favorites keys.
Seite 153RadioENTERTAINMENT153
Online Edition for Part no. 01 40 2 963 307 - VI/15
Page 155 of 251
Selecting channelsYou can only listen to enabled channels.1. "Radio"2."Satellite radio"3.Select categories.4.Select the channel.
The selected channel is stored in the remote
control currently used.
Changing the channel Press button.
Storing a channel
1. "Radio"2."Satellite radio"3.Select the channel.4.Press the right button.5.Select the memory location.
The channels are stored for the remote control
currently used.
The channels can also be stored on the pro‐
grammable memory buttons.
Weather & Traffic jump Traffic and weather information for a selected
region is broadcast every few minutes.
Selecting a region
1. "Radio"2."Satellite radio"3. Press button.4."Set area:"5.Select region.
The region is stored in the remote control cur‐
rently used.
Activating/deactivating the jump
Reception must be guaranteed in order to acti‐
vate or deactivate.1. "Radio"2."Satellite radio"3. Press button.4."Weather & Traffic Jump"
Information for the selected region is broadcast
as soon as it is available.
Information
▷Reception may not be available in some sit‐
uations, such as under certain environmen‐
tal or topographic conditions.▷The signal may not be available in tunnels
or underground garages; next to tall build‐
ings; or near trees, mountains or powerful
sources of radio interference.Seite 155RadioENTERTAINMENT155
Online Edition for Part no. 01 40 2 963 307 - VI/15
Page 156 of 251
MultimediaExternal devices
The concept Various external devices can be connected to
the vehicle. Sound is played back through the
vehicle loudspeakers. The system can be oper‐
ated via the radio, depending on how the ex‐
ternal device is connected to the vehicle.SymbolMeaning AUX-IN port. USB audio interface.
Overview
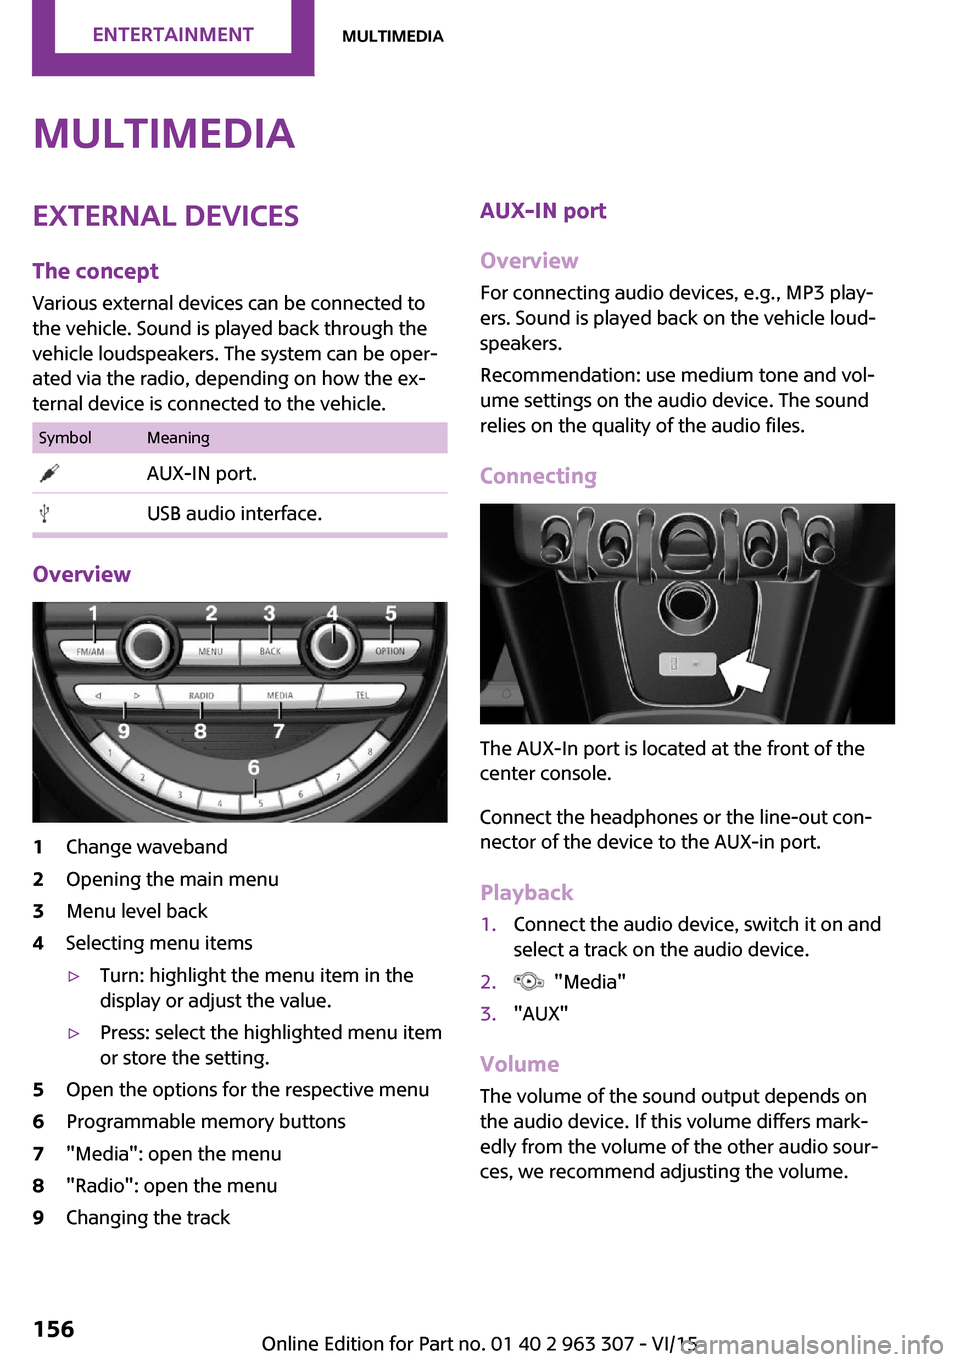
1Change waveband2Opening the main menu3Menu level back4Selecting menu items▷Turn: highlight the menu item in the
display or adjust the value.▷Press: select the highlighted menu item
or store the setting.5Open the options for the respective menu6Programmable memory buttons7"Media": open the menu8"Radio": open the menu9Changing the trackAUX-IN port
Overview
For connecting audio devices, e.g., MP3 play‐
ers. Sound is played back on the vehicle loud‐
speakers.
Recommendation: use medium tone and vol‐
ume settings on the audio device. The sound
relies on the quality of the audio files.
Connecting
The AUX-In port is located at the front of the
center console.
Connect the headphones or the line-out con‐
nector of the device to the AUX-in port.
Playback
1.Connect the audio device, switch it on and
select a track on the audio device.2. "Media"3."AUX"
Volume
The volume of the sound output depends on
the audio device. If this volume differs mark‐
edly from the volume of the other audio sour‐
ces, we recommend adjusting the volume.
Seite 156ENTERTAINMENTMultimedia156
Online Edition for Part no. 01 40 2 963 307 - VI/15
Page 159 of 251
Apple iPod/iPhone port
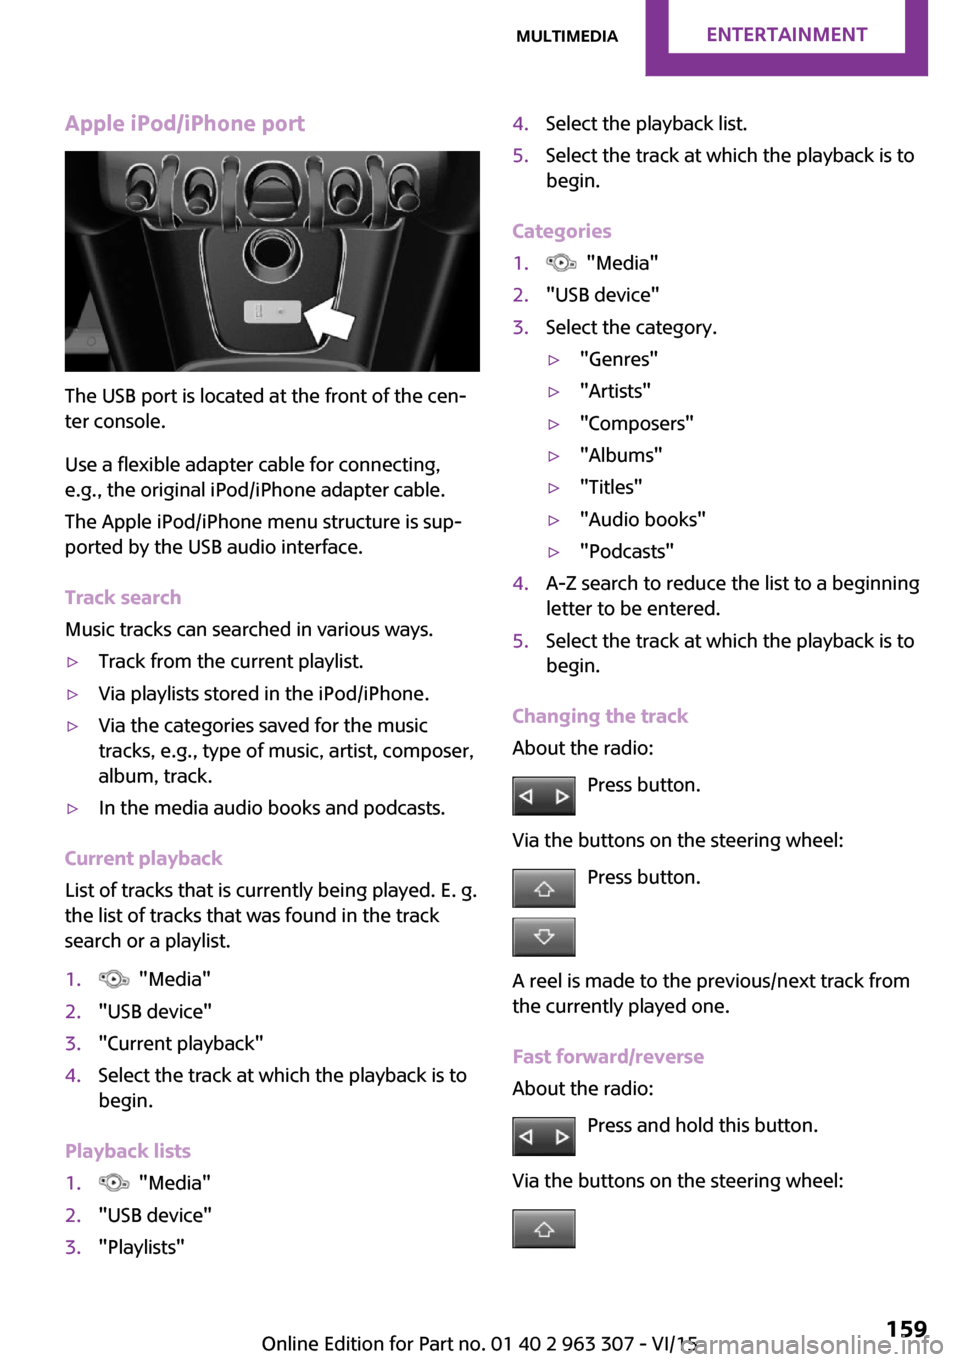
The USB port is located at the front of the cen‐
ter console.
Use a flexible adapter cable for connecting,
e.g., the original iPod/iPhone adapter cable.
The Apple iPod/iPhone menu structure is sup‐
ported by the USB audio interface.
Track search
Music tracks can searched in various ways.
▷Track from the current playlist.▷Via playlists stored in the iPod/iPhone.▷Via the categories saved for the music
tracks, e.g., type of music, artist, composer,
album, track.▷In the media audio books and podcasts.
Current playback
List of tracks that is currently being played. E. g.
the list of tracks that was found in the track
search or a playlist.
1. "Media"2."USB device"3."Current playback"4.Select the track at which the playback is to
begin.
Playback lists
1. "Media"2."USB device"3."Playlists"4.Select the playback list.5.Select the track at which the playback is to
begin.
Categories
1. "Media"2."USB device"3.Select the category.▷"Genres"▷"Artists"▷"Composers"▷"Albums"▷"Titles"▷"Audio books"▷"Podcasts"4.A-Z search to reduce the list to a beginning
letter to be entered.5.Select the track at which the playback is to
begin.
Changing the track
About the radio:
Press button.
Via the buttons on the steering wheel: Press button.
A reel is made to the previous/next track from
the currently played one.
Fast forward/reverse
About the radio:
Press and hold this button.
Via the buttons on the steering wheel:
Seite 159MultimediaENTERTAINMENT159
Online Edition for Part no. 01 40 2 963 307 - VI/15