ESP MINI Hardtop 4 Door 2016 Repair Manual
[x] Cancel search | Manufacturer: MINI, Model Year: 2016, Model line: Hardtop 4 Door, Model: MINI Hardtop 4 Door 2016Pages: 251, PDF Size: 6.71 MB
Page 139 of 251

LoadingVehicle features and op‐tions
This chapter describes all standard, country-
specific and optional features offered with the
series. It also describes features that are not
necessarily available in your car, e. g., due to
the selected options or country versions. This
also applies to safety-related functions and sys‐
tems. The respectively applicable country provi‐
sions must be observed when using the respec‐
tive features and systems.
Information WARNING
High gross weight can overheat the tires,
damage them internally, and cause a sudden
drop in tire inflation pressure. There is risk of an
accident. Pay attention to the permitted load
capacity of the tires and never exceed the per‐
mitted gross weight. ◀
CAUTION
Fluids in the cargo area can cause dam‐
age. There is risk of property damage. Make
sure that no fluids leak in the cargo area. ◀
WARNING
Loose objects in the car's interior can be
thrown into the car's interior while driving, e.g.
in the event of an accident or during braking
and evasive maneuvers. There is risk of injuries.
Secure loose objects in the car's interior. ◀Determining the load
limit1.Locate the following statement on your ve‐
hicle’s placard:▷The combined weight of occupants and
cargo should never exceed XXX kg or
YYY lbs. Otherwise, damage to the ve‐
hicle and unstable driving situations
may result.2.Determine the combined weight of the
driver and passengers that will be riding in
your vehicle.3.Subtract the combined weight of the driver
and passengers from XXX kilograms or YYY
pounds.4.The resulting figure equals the available
amount of cargo and luggage load ca‐
pacity.
For example, if the YYY amount equals
1,000 lbs and there will be four 150 lbs pas‐
sengers in your vehicle, the amount of
available cargo and luggage load capacity
is 400 lbs: 1,000 lbs minus 600 lbs =
400 lbs.5.Determine the combined weight of luggage
and cargo being loaded on the vehicle.
That weight may not safely exceed the
available cargo and luggage load capacity
calculated in Step 4.Seite 139LoadingDRIVING TIPS139
Online Edition for Part no. 01 40 2 963 307 - VI/15
Page 141 of 251
Securing
Follow the installation instructions of the roof
rack.
Loading Because roof racks raise the vehicle's center of
gravity when loaded, they have a major effect
on vehicle handling and steering response.
Therefore, note the following when loading and
driving:▷Do not exceed the approved roof/axle
loads and the approved gross vehicle
weight.▷Be sure that adequate clearance is main‐
tained for tilting and opening the glass sun‐
roof.▷Distribute the roof load uniformly.▷The roof load should not extend past the
loading area.▷Always place the heaviest pieces on the
bottom.▷Secure the roof luggage firmly, e.g., tie with
ratchet straps.▷Do not let objects project into the opening
path of the tailgate.▷Drive cautiously and avoid sudden acceler‐
ation and braking maneuvers. Take corners
gently.
Rear luggage rack
General information Installation only possible with rear luggage rack
preparation.
Rear racks are available as special accessories.
Information Follow the installation instructions of the rear
luggage rack.
Drive cautiously and avoid sudden acceleration
and braking maneuvers. Take corners gently.
SecuringCOOPER/COOPER D/ONE/ONE DCOOPER S/COOPER SD
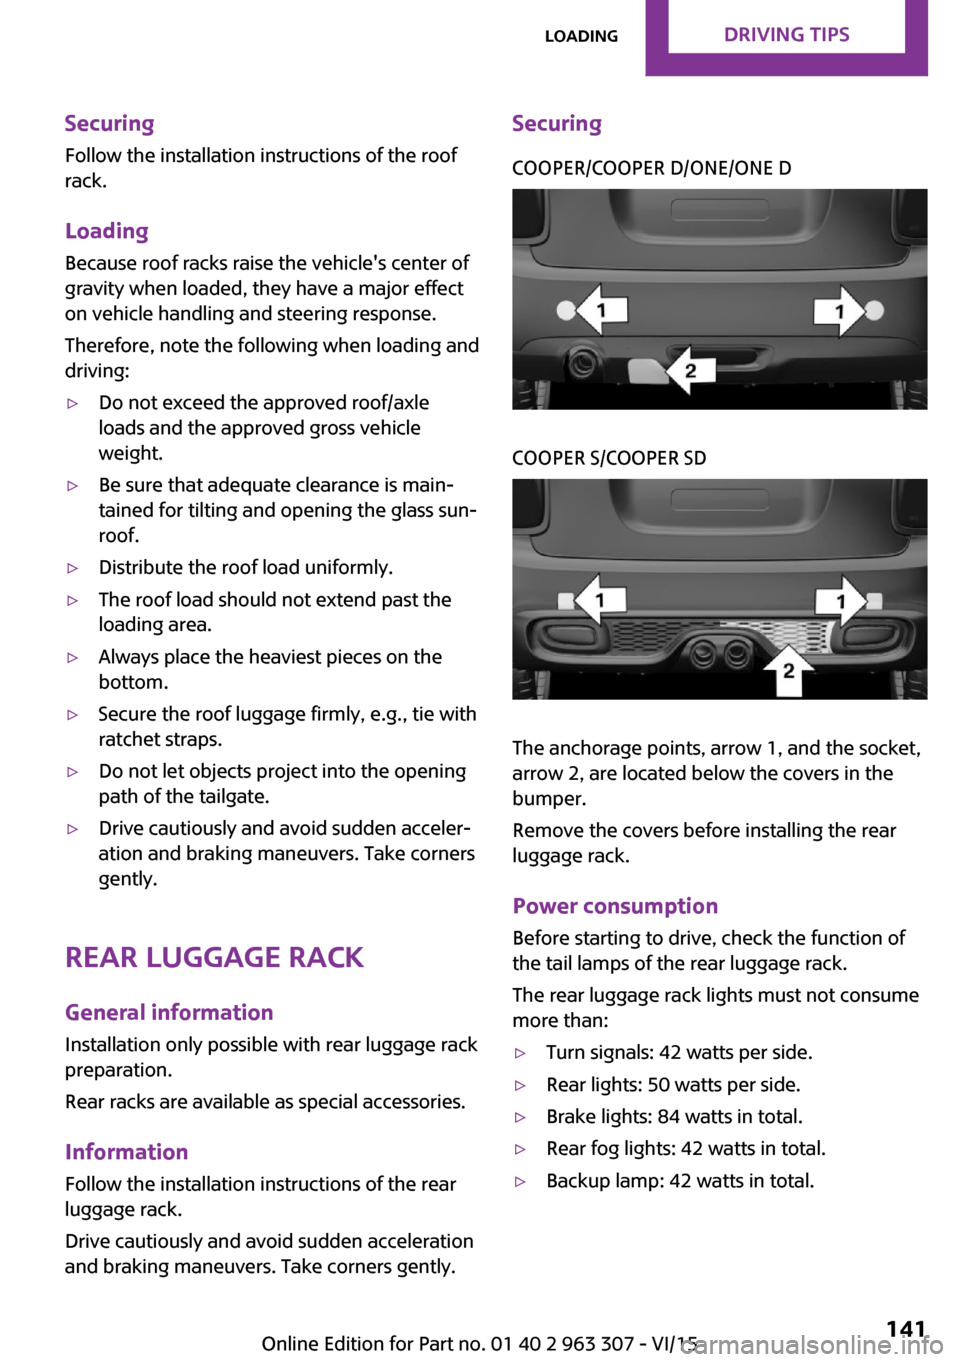
The anchorage points, arrow 1, and the socket,
arrow 2, are located below the covers in the
bumper.
Remove the covers before installing the rear
luggage rack.
Power consumption
Before starting to drive, check the function of
the tail lamps of the rear luggage rack.
The rear luggage rack lights must not consume
more than:
▷Turn signals: 42 watts per side.▷Rear lights: 50 watts per side.▷Brake lights: 84 watts in total.▷Rear fog lights: 42 watts in total.▷Backup lamp: 42 watts in total.Seite 141LoadingDRIVING TIPS141
Online Edition for Part no. 01 40 2 963 307 - VI/15
Page 142 of 251

Saving fuelVehicle features and op‐tions
This chapter describes all standard, country-
specific and optional features offered with the
series. It also describes features that are not necessarily available in your car, e. g., due to
the selected options or country versions. This
also applies to safety-related functions and sys‐
tems. The respectively applicable country provi‐
sions must be observed when using the respec‐
tive features and systems.
General information Your vehicle contains advanced technology for
the reduction of fuel consumption and emis‐
sions.
Fuel consumption depends on a number of dif‐
ferent factors.
The implementation of certain measures, driv‐
ing style and regular maintenance can influ‐
ence fuel consumption and environmental im‐
pact.
Remove unnecessary
cargo
Additional weight increases fuel consumption.
Remove attached parts
following use
Remove roof or rear luggage racks which are
no longer required following use.
Attached parts on the vehicle impair the aero‐
dynamics and increase the fuel consumption.Close the windows and
glass sunroof
Driving with the glass sunroof and windows
open results in increased air resistance and
raises fuel consumption.
Tires
General information Tires can affect fuel consumption in various
ways, e.g., tire size may influence fuel con‐
sumption.
Check the tire inflation pressure
regularly
Check and, if needed, correct the tire inflation
pressure at least twice a month and before
starting on a long trip.
Low tire inflation pressure increases rolling re‐
sistance and thus raises fuel consumption and
tire wear.
Drive away without de‐
lay
Do not wait for the engine to warm-up while
the vehicle remains stationary. Start driving
right away, but at moderate engine speeds.
This is the fastest way for the cold engine to
reach its operating temperature.
Look well ahead when
driving
Avoid unnecessary acceleration and braking.Seite 142DRIVING TIPSSaving fuel142
Online Edition for Part no. 01 40 2 963 307 - VI/15
Page 143 of 251

By maintaining a suitable distance to the vehi‐
cle driving ahead of you.
Driving smoothly and proactively reduces fuel
consumption.
Avoid high engine speeds
As a rule: driving at low engine speeds lowers
fuel consumption and reduces wear.
Use 1st gear to get the vehicle moving. Starting
with the 2nd gear, accelerate rapidly. When ac‐
celerating, shift up before reaching high engine
speeds.
When you reach the desired speed, shift into
the highest applicable gear and drive with the
engine speed as low as possible and at a con‐
stant speed.
The gear shift indicator, refer to page 68, of
your vehicle indicates the most fuel efficient gear.
Use coasting conditions When approaching a red light, take your foot
off the accelerator and let the vehicle coast to a
halt.
For going downhill take your foot off the accel‐
erator and let the vehicle roll.
The flow of fuel is interrupted while coasting.
Switch off the engine
during longer stops
Switch off the engine during longer stops, e.g.,
at traffic lights, railroad crossings or in traffic
congestion.
Auto Start/Stop function
The Auto Start/Stop function of your vehicle au‐
tomatically switches off the engine during a
stop.If the engine is switched off and then restarted
rather than leaving the engine running con‐
stantly, fuel consumption and emissions are re‐
duced. Savings can begin within a few seconds
of switching off the engine.
In addition, fuel consumption is also deter‐
mined by other factors, such as driving style,
road conditions, maintenance or environmental
factors.
Switch off any functions
that are not currently
needed
Functions such as seat heating and the rear
window defroster require a lot of energy and
consume additional fuel, especially in city and stop-and-go traffic.
Therefore, switch off these functions if they are
not actually needed.
Have maintenance car‐
ried out
Have vehicles maintained regularly to achieve
optimal vehicle efficiency and service life. MINI
recommends that maintenance work be per‐
formed by a MINI dealer’s service center.
For information on the MINI Maintenance Sys‐
tems, refer to page 200.
GREEN mode
The concept
The GREEN mode supports a driving style that
saves on fuel consumption. For this purpose,
the engine control and comfort features, e. g.
the climate control output, are adjusted.
For Steptronic transmission:Seite 143Saving fuelDRIVING TIPS143
Online Edition for Part no. 01 40 2 963 307 - VI/15
Page 150 of 251
ToneVehicle features and op‐
tions
This chapter describes all standard, country-
specific and optional features offered with the
series. It also describes features that are not
necessarily available in your car, e. g., due to
the selected options or country versions. This
also applies to safety-related functions and sys‐
tems. The respectively applicable country provi‐
sions must be observed when using the respec‐
tive features and systems.
General information Settings are stored for the profile, refer to
page 24, currently used.
Treble, bass, balance,
and fader
General information▷"Treble": treble adjustment.▷"Bass": depth adjustment.▷"Balance": left/right volume distribution.▷"Fader": front/rear volume distribution.
Adjusting treble, bass, balance, and
fader
1. "Settings", "Radio" or
"Media"2."Tone"3.Select the desired tone settings.4.Set the desired value.Volume
General information▷"Speed volume": speed-dependent volume
control.▷"PDC": volume of the PDC signal compared
to the entertainment sound output.▷"Gong": volume of the signal, such as the
safety belt reminder, compared to the en‐
tertainment sound output.▷"Microphone": volume of the microphone
during a phone call.▷"Loudspeak.": volume of the loudspeakers
during a phone call.
The following volumes are only stored for the
respective paired telephone:
"Microphone", "Loudspeak.".
Adjusting
1. "Settings", "Radio" or
"Media"2."Tone"3."Volume settings"4.Select the desired volume setting.5.Set the desired value.
Resetting the tone set‐
tings
1. "Settings", "Radio" or
"Media"2."Tone"3."Reset"Seite 150ENTERTAINMENTTone150
Online Edition for Part no. 01 40 2 963 307 - VI/15
Page 151 of 251
RadioVehicle features and op‐
tions
This chapter describes all standard, country-
specific and optional features offered with the
series. It also describes features that are not
necessarily available in your car, e. g., due to
the selected options or country versions. This
also applies to safety-related functions and sys‐
tems. The respectively applicable country provi‐
sions must be observed when using the respec‐
tive features and systems.
General information Settings are stored for the profile, refer to
page 24, currently used.
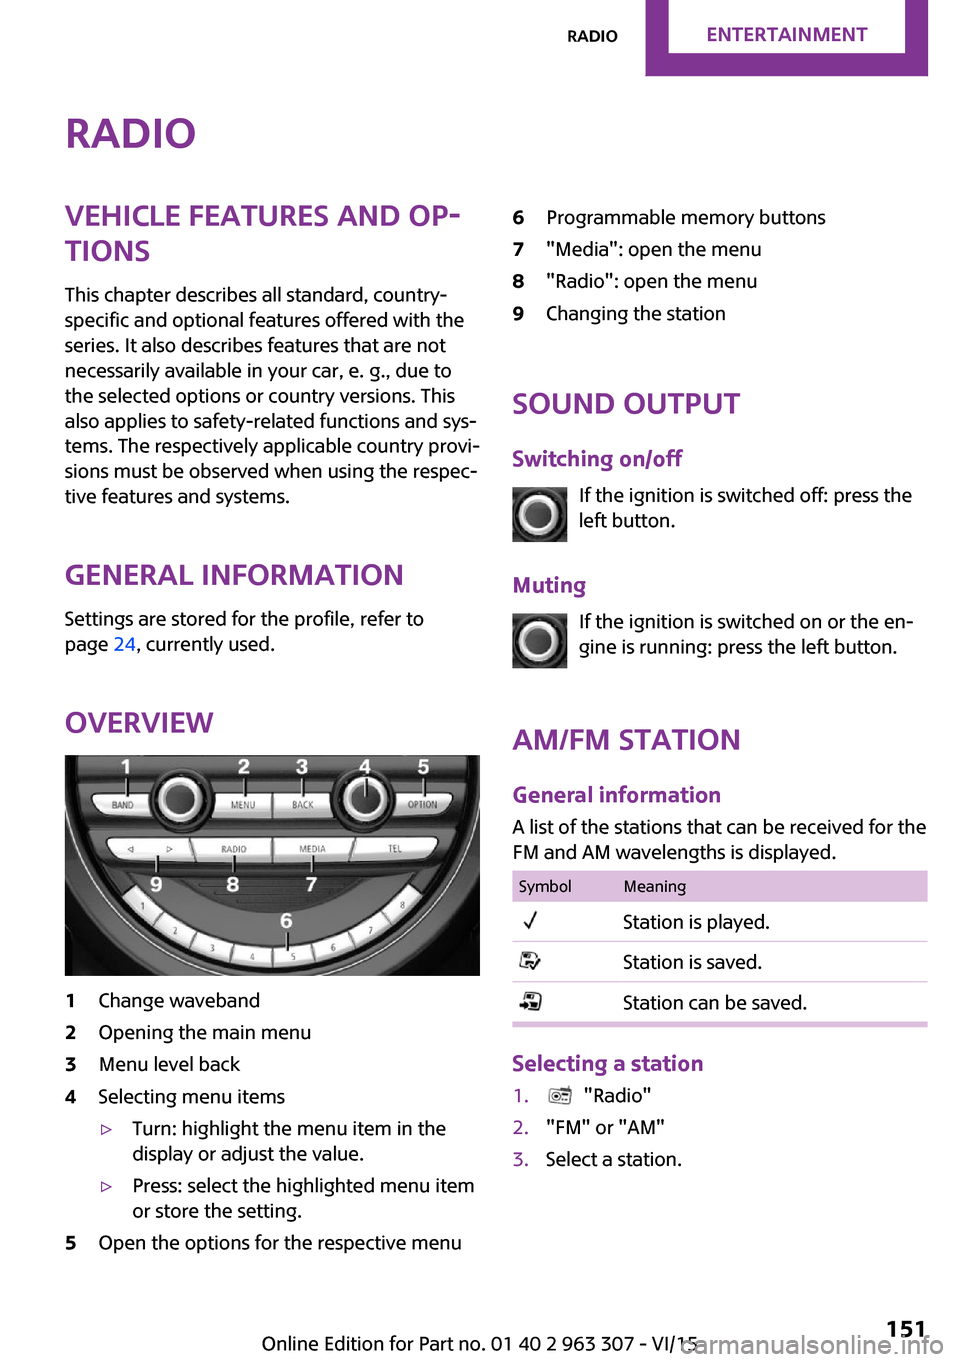
Overview1Change waveband2Opening the main menu3Menu level back4Selecting menu items▷Turn: highlight the menu item in the
display or adjust the value.▷Press: select the highlighted menu item
or store the setting.5Open the options for the respective menu6Programmable memory buttons7"Media": open the menu8"Radio": open the menu9Changing the station
Sound output
Switching on/off If the ignition is switched off: press the
left button.
Muting If the ignition is switched on or the en‐
gine is running: press the left button.
AM/FM station General information
A list of the stations that can be received for the
FM and AM wavelengths is displayed.
SymbolMeaningStation is played.Station is saved.Station can be saved.
Selecting a station
1. "Radio"2."FM" or "AM"3.Select a station.Seite 151RadioENTERTAINMENT151
Online Edition for Part no. 01 40 2 963 307 - VI/15
Page 156 of 251
MultimediaExternal devices
The concept Various external devices can be connected to
the vehicle. Sound is played back through the
vehicle loudspeakers. The system can be oper‐
ated via the radio, depending on how the ex‐
ternal device is connected to the vehicle.SymbolMeaning AUX-IN port. USB audio interface.
Overview
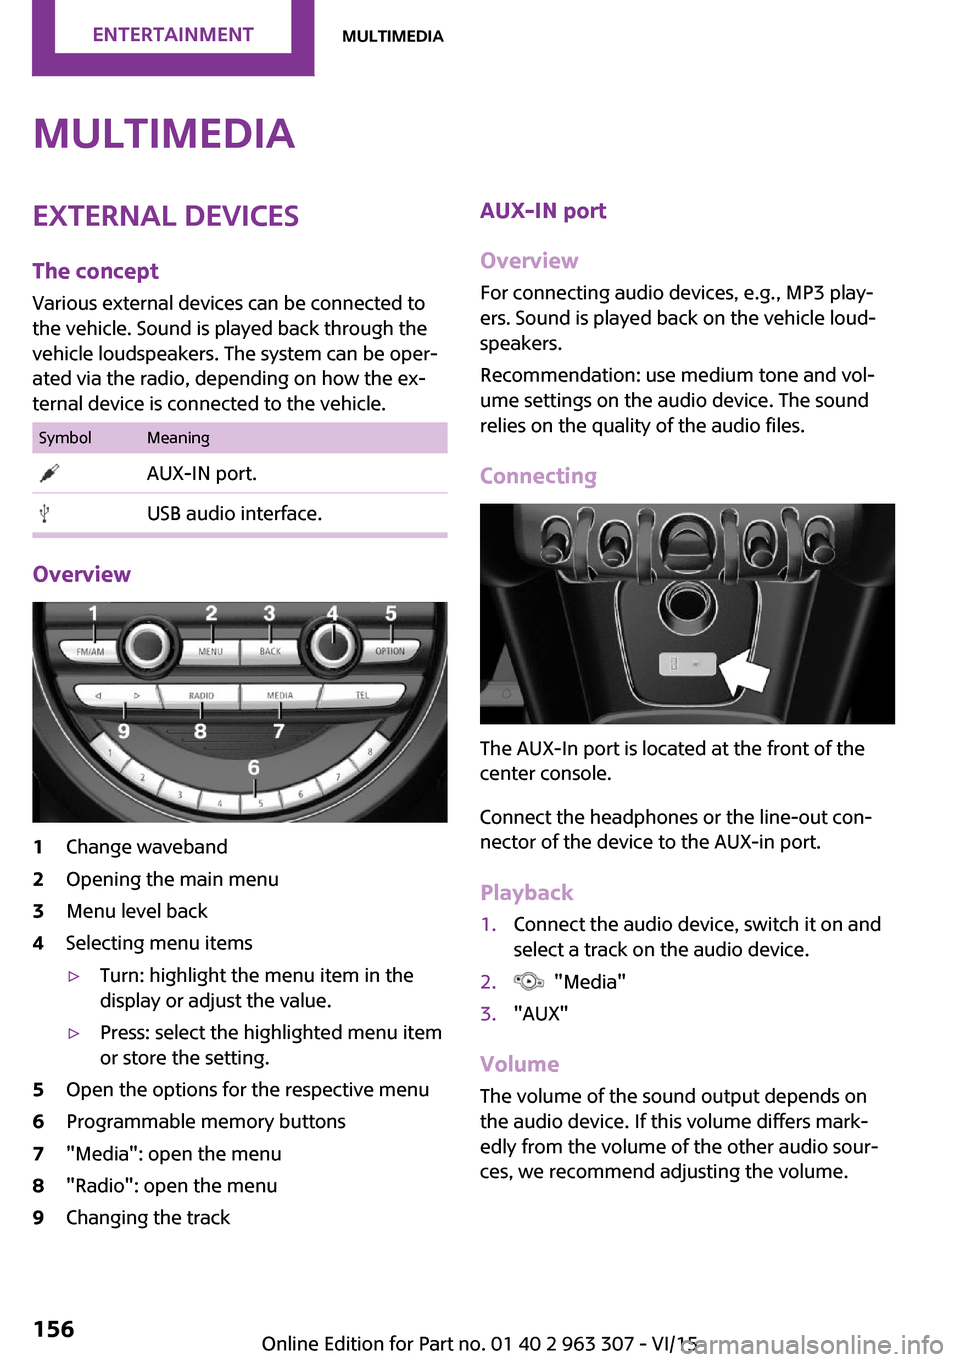
1Change waveband2Opening the main menu3Menu level back4Selecting menu items▷Turn: highlight the menu item in the
display or adjust the value.▷Press: select the highlighted menu item
or store the setting.5Open the options for the respective menu6Programmable memory buttons7"Media": open the menu8"Radio": open the menu9Changing the trackAUX-IN port
Overview
For connecting audio devices, e.g., MP3 play‐
ers. Sound is played back on the vehicle loud‐
speakers.
Recommendation: use medium tone and vol‐
ume settings on the audio device. The sound
relies on the quality of the audio files.
Connecting
The AUX-In port is located at the front of the
center console.
Connect the headphones or the line-out con‐
nector of the device to the AUX-in port.
Playback
1.Connect the audio device, switch it on and
select a track on the audio device.2. "Media"3."AUX"
Volume
The volume of the sound output depends on
the audio device. If this volume differs mark‐
edly from the volume of the other audio sour‐
ces, we recommend adjusting the volume.
Seite 156ENTERTAINMENTMultimedia156
Online Edition for Part no. 01 40 2 963 307 - VI/15
Page 164 of 251
Bluetooth hands-free systemVehicle features and op‐
tions
This chapter describes all standard, country-
specific and optional features offered with the
series. It also describes features that are not
necessarily available in your car, e. g., due to
the selected options or country versions. This
also applies to safety-related functions and sys‐
tems. The respectively applicable country provi‐
sions must be observed when using the respec‐
tive features and systems.
The concept Mobile phones can be connected to the vehicle
via Bluetooth. After the mobile phones are
paired once, they are recognized automatically
when the ignition is switched on. As soon as
they are inside the vehicle they can be oper‐
ated via the radio and via the buttons on the
steering wheel.
Information WARNING
Operating the integrated information sys‐
tem and communication devices while driving
can distract from traffic. It is possible to lose
control of the vehicle. There is risk of an acci‐
dent. Only use the systems or devices when the
traffic situation allows. If necessary stop and
use the systems and devices while the vehicle is
stationary. ◀
Certain functions may need to be enabled by
the mobile phone provider or service provider.
At high temperatures, the charge functions of
the mobile phone can be limited under certain
circumstances, and some functions are no lon‐
ger executed.Do not operate a mobile phone that is con‐
nected to the vehicle on the mobile phone key‐
pad, as this may lead to a malfunction.
When the mobile phone is used via the vehicle,
refer to the operating manual of the mobile
phone.
Compatible mobile
phones
Accurate information about which mobile
phones are supported with a Bluetooth inter‐
face is available at www.mini.com/connectivity.
These compatible mobile phones, with a cer‐
tain software version, support the vehicle func‐
tions described below.
Malfunctions may occur with other mobile
phones or software versions.
Displaying the vehicle identification
number and software part number
The vehicle identification number and software
part number are needed to determine which
mobile phones are supported by the mobile
phone installation package. The software ver‐
sion of the mobile phone may also be required.1. "Telephone"2. Press button.3."Bluetooth® info"4."System information"
Pairing/unpairing the
mobile phone
Requirements
▷The mobile phone is compatible.Seite 164COMMUNICATIONBluetooth hands-free system164
Online Edition for Part no. 01 40 2 963 307 - VI/15
Page 174 of 251
RefuelingVehicle features and op‐
tions
This chapter describes all standard, country-
specific and optional features offered with the
series. It also describes features that are not necessarily available in your car, e. g., due to
the selected options or country versions. This
also applies to safety-related functions and sys‐
tems. The respectively applicable country provi‐
sions must be observed when using the respec‐
tive features and systems.
Information Observe the fuel recommendation, refer to
page 176, prior to refueling.
CAUTION
With a range of less than 30 miles/50 km
it is possible that the engine will no longer have
sufficient fuel. Engine functions are no longer
ensured. There is risk of property damage. Re‐
fuel promptly. ◀
Fuel lid Opening1.Grasp the fuel filler flap at the rear edge
and open it.2.Turn the tank lid counterclockwise.3.Place the tank lid in the bracket attached to
the fuel filler flap.
Closing
1.Fit the lid and turn it clockwise until you
clearly hear a click.2.Close the fuel filler flap.
WARNING
The retaining strap of the fuel cap be
jammed and crushed during closing. In this
case, the lid cannot be correctly closed and fuel
vapors or fuel can escape. There is risk of inju‐
ries or risk of property damage. Pay attention
that the retaining strap is not jammed or
crushed when closing the lid. ◀
Manually unlocking fuel filler flap E. g. in the event of an electrical malfunction.
The release is located in the trunk.
Seite 174MOBILITYRefueling174
Online Edition for Part no. 01 40 2 963 307 - VI/15
Page 176 of 251
FuelVehicle features and op‐
tions
This chapter describes all standard, country-
specific and optional features offered with the
series. It also describes features that are not
necessarily available in your car, e. g., due to
the selected options or country versions. This
also applies to safety-related functions and sys‐
tems. The respectively applicable country provi‐
sions must be observed when using the respec‐
tive features and systems.
Fuel recommendation General information Depending on the region, many gas stations
sell fuel that has been customized to winter or
summer conditions. Fuel that is available in
winter helps make a cold start easier, e.g.
Information CAUTION
Even fuels that conform to the specifica‐
tions can be of low quality. This may cause en‐
gine problems, for instance poor engine start-
up behavior, poor handling and/or poor
performance. There is risk of property damage.
In case of engine problems, switch gas stations
or use a brand name fuel with a higher octane
rating. ◀
Gasoline For the best fuel efficiency, the gasoline should
be sulfur-free or very low in sulfur content.
Fuels that are marked on the gas pump as con‐
taining metal must not be used.CAUTION
Even small amounts of wrong fuel or
wrong fuel additives can damage the fuel sys‐
tem and the engine. Furthermore, the catalytic
converter is permanently damaged. There is
risk of property damage. Do not refuel or add
the following in the case of gasoline engines:▷Leaded gasoline.▷Metallic additives, e.g. manganese or iron.
Do not press the Start/Stop button after refuel‐
ing the wrong fuel. Contact a dealer’s service
center or another qualified service center or re‐
pair shop. ◀
Fuels with a maximum ethanol content of
25 %, i. e. E10 or E25, may be used for refuel‐
ing.
Ethanol should satisfy the following quality
standards:
US: ASTM 4806–xx
CAN: CGSB-3.511–xx
xx: comply with the current standard in each
case.
CAUTION
Wrong fuels can damage the fuel system
and the engine. There is risk of property dam‐
age. Do not use a fuel with a higher ethanol
percentage than recommended or one with
other types of alcohol, e.g. M5 to M100. ◀
Recommended fuel grade
MINI recommends AKI 91.
John Cooper Works:
MINI recommends AKI 93.
Minimum fuel grade MINI recommends AKI 89.
Seite 176MOBILITYFuel176
Online Edition for Part no. 01 40 2 963 307 - VI/15