turn signal MINI Hardtop 4 Door 2016 Owner's Manual
[x] Cancel search | Manufacturer: MINI, Model Year: 2016, Model line: Hardtop 4 Door, Model: MINI Hardtop 4 Door 2016Pages: 251, PDF Size: 6.71 MB
Page 15 of 251
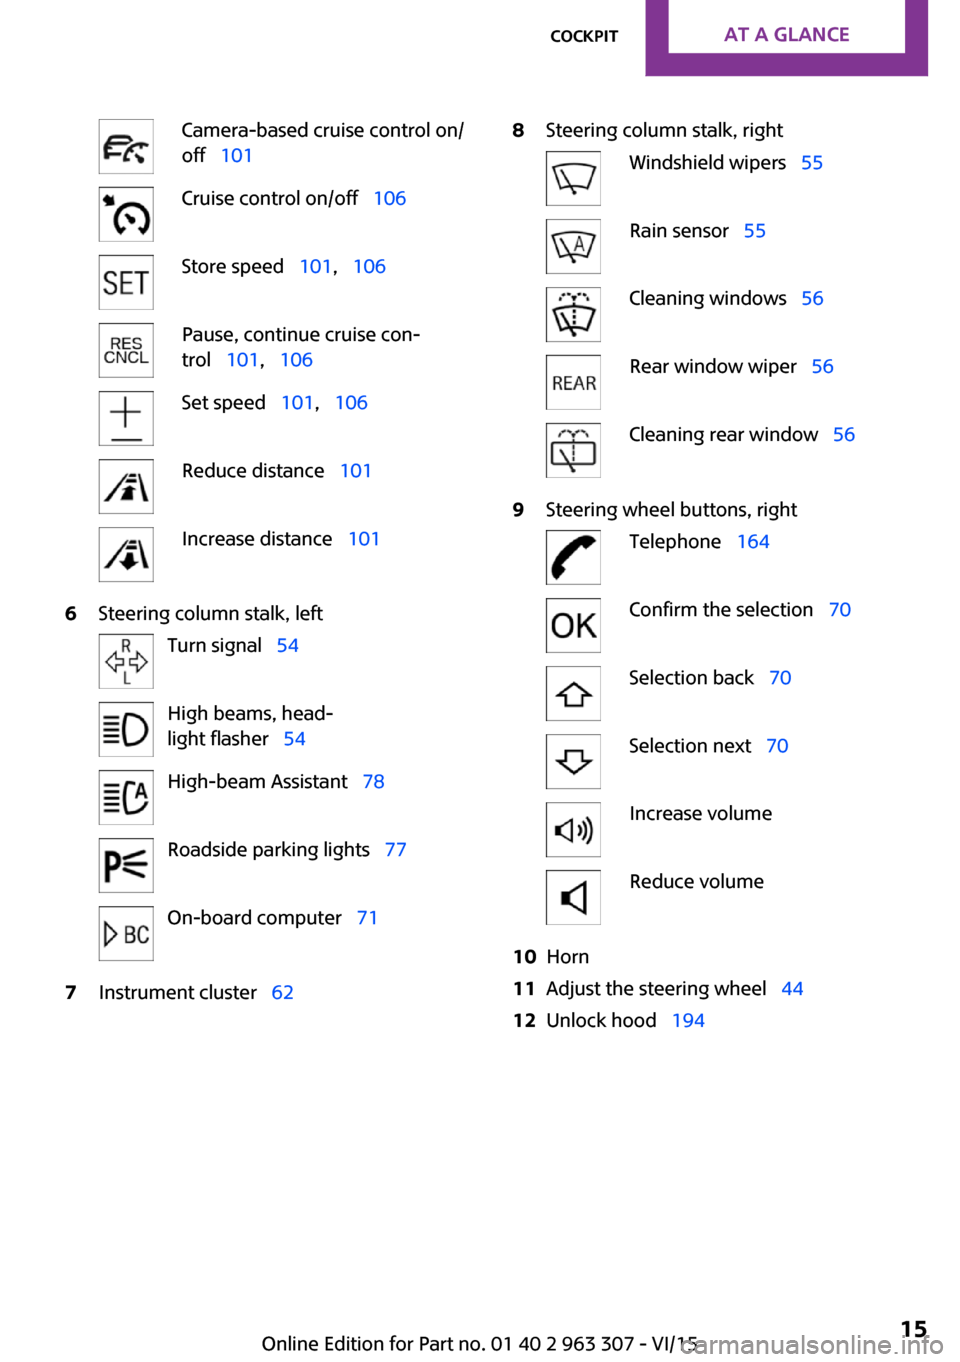
Camera-based cruise control on/
off 101Cruise control on/off 106Store speed 101, 106Pause, continue cruise con‐
trol 101, 106Set speed 101, 106Reduce distance 101Increase distance 1016Steering column stalk, leftTurn signal 54High beams, head‐
light flasher 54High-beam Assistant 78Roadside parking lights 77On-board computer 717Instrument cluster 628Steering column stalk, rightWindshield wipers 55Rain sensor 55Cleaning windows 56Rear window wiper 56Cleaning rear window 569Steering wheel buttons, rightTelephone 164Confirm the selection 70Selection back 70Selection next 70Increase volumeReduce volume10Horn11Adjust the steering wheel 4412Unlock hood 194Seite 15CockpitAT A GLANCE15
Online Edition for Part no. 01 40 2 963 307 - VI/15
Page 54 of 251
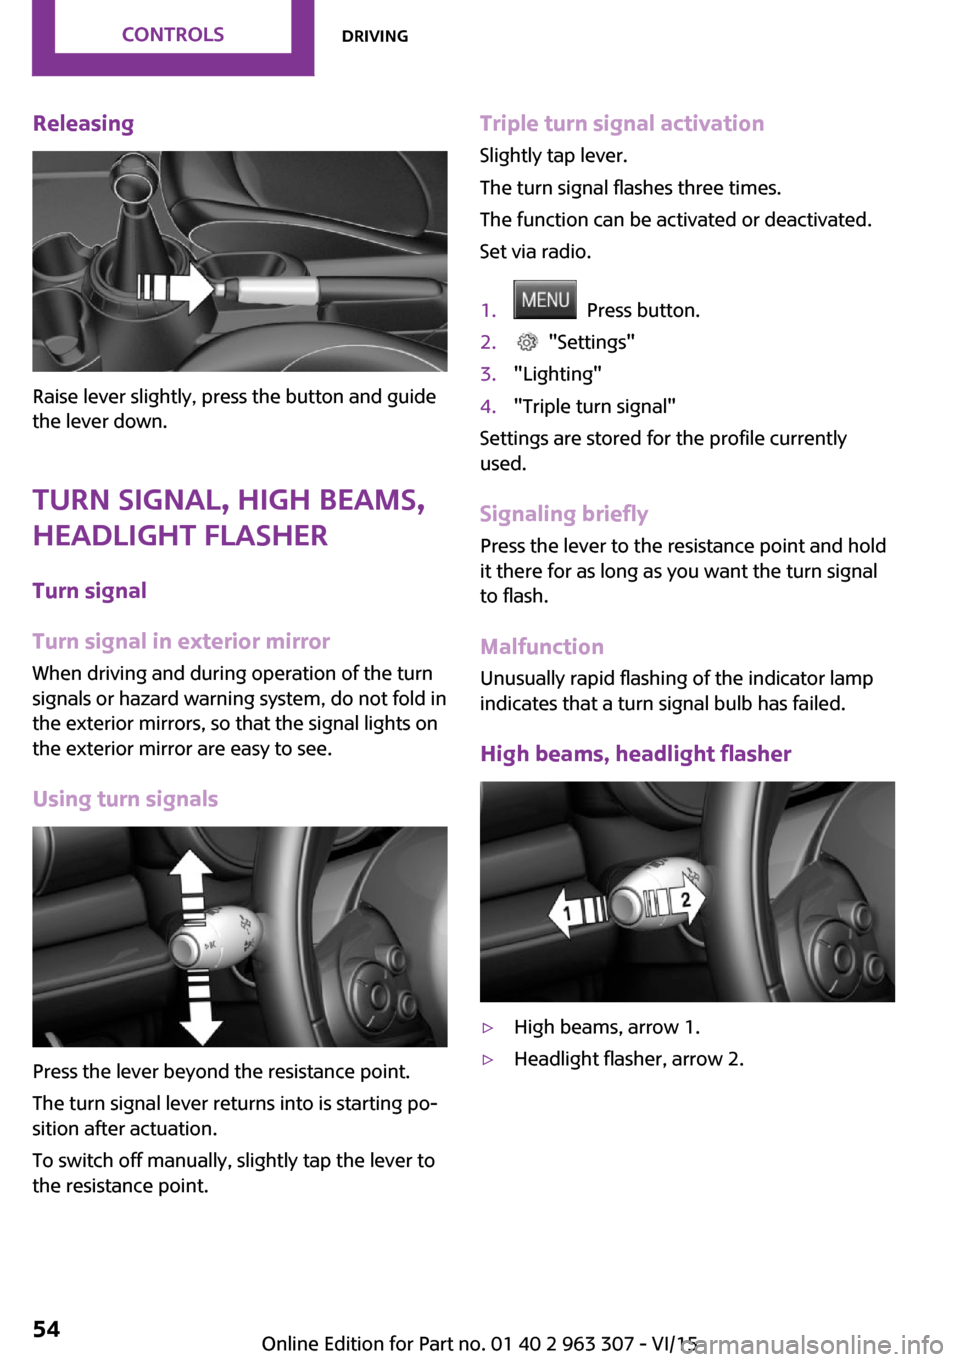
Releasing
Raise lever slightly, press the button and guide
the lever down.
Turn signal, high beams,
headlight flasher
Turn signal
Turn signal in exterior mirror When driving and during operation of the turn
signals or hazard warning system, do not fold in
the exterior mirrors, so that the signal lights on
the exterior mirror are easy to see.
Using turn signals
Press the lever beyond the resistance point.
The turn signal lever returns into is starting po‐
sition after actuation.
To switch off manually, slightly tap the lever to
the resistance point.
Triple turn signal activation
Slightly tap lever.
The turn signal flashes three times.
The function can be activated or deactivated.
Set via radio.1. Press button.2. "Settings"3."Lighting"4."Triple turn signal"
Settings are stored for the profile currently
used.
Signaling briefly Press the lever to the resistance point and hold
it there for as long as you want the turn signal
to flash.
Malfunction
Unusually rapid flashing of the indicator lamp
indicates that a turn signal bulb has failed.
High beams, headlight flasher
▷High beams, arrow 1.▷Headlight flasher, arrow 2.Seite 54CONTROLSDriving54
Online Edition for Part no. 01 40 2 963 307 - VI/15
Page 65 of 251

DSC Dynamic Stability Control is deactivated
or DTC Dynamic Traction Control is activated
Dynamic Stability Control DSC is
switched off or Dynamic Traction Con‐
trol DTC is switched on.
For additional information, refer to Dynamic
Stability Control DSC, refer to page 97, and
Dynamic Traction Control DTC, refer to
page 98.
Flat Tire Monitor FTM The Flat Tire Monitor signals a loss of
tire inflation pressure in a tire.
Reduce your speed and stop cautiously.
Avoid sudden braking and steering maneuvers.
For additional information, refer to Flat Tire
Monitor, refer to page 88.
Tire Pressure Monitor TPM Illuminated: the Tire Pressure Monitor
signals a loss of tire inflation pressure in
a tire.
Reduce your speed and stop cautiously. Avoid
sudden braking and steering maneuvers.
Flashing and then continuously illuminated: no
flat tire or loss of tire inflation pressure can be
detected.▷Interference through systems or devices
with the same radio frequency: After leav‐
ing the area of the interference, the system
automatically becomes active again.▷TPM could not conclude the reset: perform
the reset of the system again.▷A wheel without TPM electronics is
mounted: Have it checked by a dealer’s
service center or another qualified service
center or repair shop as needed.▷Malfunction: Have system checked by a
dealer’s service center or another qualified
service center or repair shop.For additional information, refer to Tire Pres‐
sure Monitor, refer to page 84.
Steering system Steering system in some cases not
working.
Have steering system checked immedi‐
ately by a dealer’s service center or another
qualified service center or repair shop.
Engine functions Have vehicle checked immediately by a
dealer’s service center or another quali‐
fied service center or repair shop.
For additional information, refer to On-board
Diagnostics socket, refer to page 201.
Green lights
Turn signal Turn signal switched on.
Unusually rapid flashing of the indicator
lamp indicates that a turn signal bulb
has failed.
For additional information, refer to Turn signal, refer to page 54.
Parking lights, headlight control Parking lights or headlights are acti‐
vated.
For additional information, refer to
Parking lights/low beams, headlight control, re‐
fer to page 76.
Front fog lights Front fog lights are activated.
For additional information, refer to
Front fog lights, refer to page 79.Seite 65DisplaysCONTROLS65
Online Edition for Part no. 01 40 2 963 307 - VI/15
Page 71 of 251
On-board computer
Calling up information on the info
display
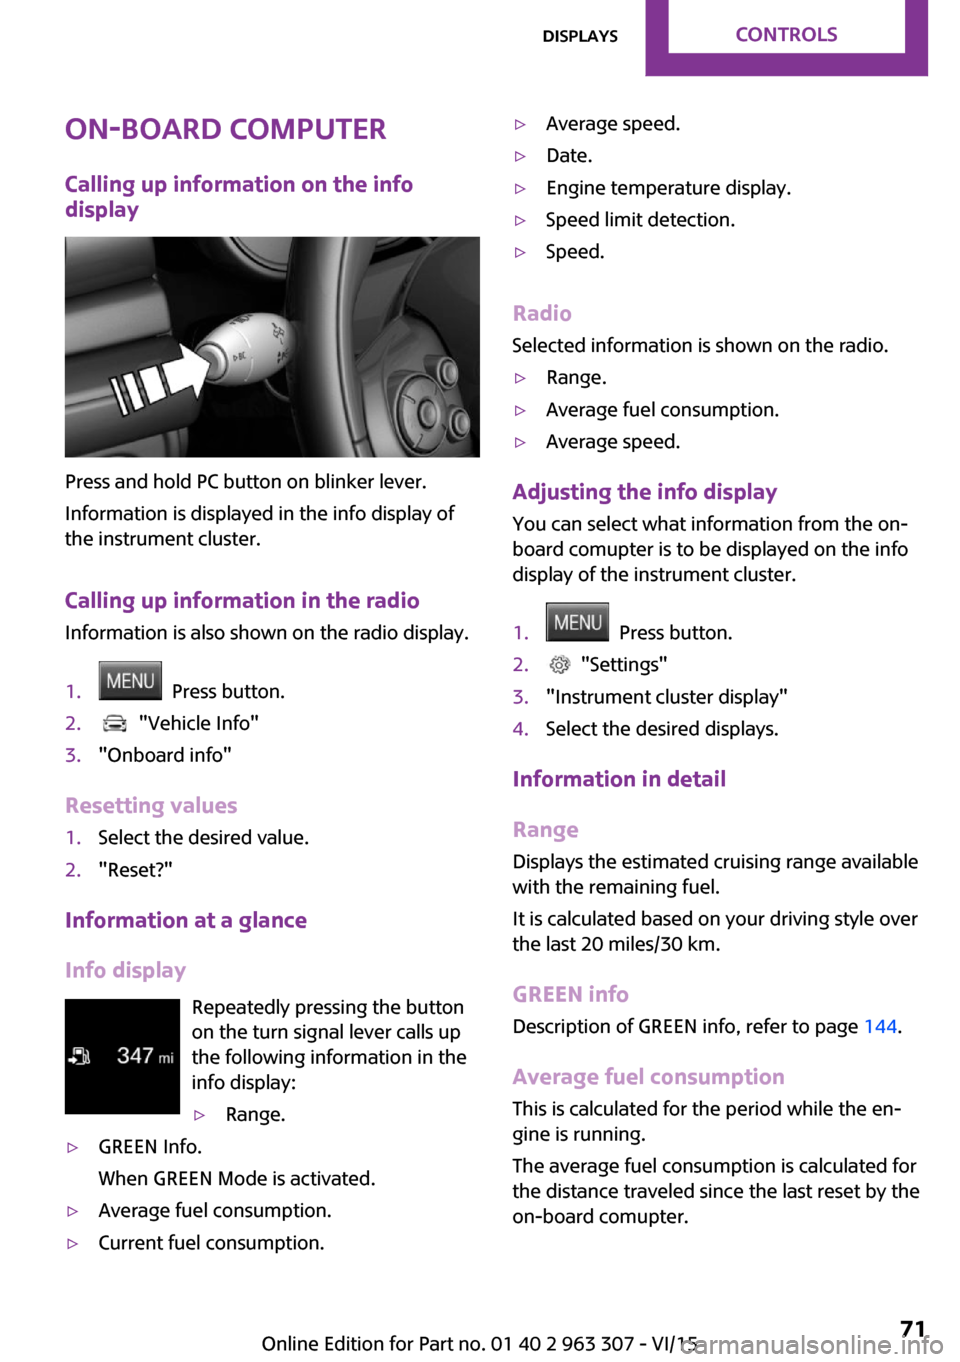
Press and hold PC button on blinker lever.
Information is displayed in the info display of
the instrument cluster.
Calling up information in the radio Information is also shown on the radio display.
1. Press button.2. "Vehicle Info"3."Onboard info"
Resetting values
1.Select the desired value.2."Reset?"
Information at a glance
Info display Repeatedly pressing the button
on the turn signal lever calls up the following information in the
info display:
▷Range.▷GREEN Info.
When GREEN Mode is activated.▷Average fuel consumption.▷Current fuel consumption.▷Average speed.▷Date.▷Engine temperature display.▷Speed limit detection.▷Speed.
Radio
Selected information is shown on the radio.
▷Range.▷Average fuel consumption.▷Average speed.
Adjusting the info display
You can select what information from the on-
board comupter is to be displayed on the info
display of the instrument cluster.
1. Press button.2. "Settings"3."Instrument cluster display"4.Select the desired displays.
Information in detail
Range
Displays the estimated cruising range available
with the remaining fuel.
It is calculated based on your driving style over
the last 20 miles/30 km.
GREEN info Description of GREEN info, refer to page 144.
Average fuel consumption
This is calculated for the period while the en‐
gine is running.
The average fuel consumption is calculated for
the distance traveled since the last reset by the
on-board comupter.
Seite 71DisplaysCONTROLS71
Online Edition for Part no. 01 40 2 963 307 - VI/15
Page 78 of 251
System limits
The automatic headlamp control cannot serve
as a substitute for your personal judgment of
lighting conditions.
E. g. the sensors are unable to detect fog or
hazy weather. To avoid safety risks under these
conditions, you should always switch on the
lights manually.
Daytime running lights Position of switch:
, ,
The daytime running lights light up when the
ignition is switched on. After the ignition is
switched off, the parking lights light up in posi‐
tion
.
Activating/deactivating
In some countries, daytime running lights are
mandatory, so it may not be possible to deacti‐ vate the daytime running lights.
Set via radio.
1. Press button.2. "Settings"3."Lighting"4."Daytime running lamps"
Settings are stored for the profile currently
used.
Cornering lamp
Position of switch:
When going around corners, the cornering light
also lights the interior area of the curve. Below
a speed of approx. 25 mph/40 km/h when the
turn signal is switched on and the steering an‐
gle is detected, there is automatic activation.
Malfunction A Check Control message is displayed.
Cornering light is disrupted or failed. Have the
system checked as soon as possible.
High-beam Assistant The concept
When the low beams are activated, this system automatically switches the high beams on and
off. The procedure is controlled by a camera on
the front of the interior rearview mirror. The as‐
sistant ensures that the high beams are acti‐
vated whenever the traffic situation allows. The
driver can intervene at any time and switch the
high beams on and off as usual. In the low
speed range, the high beams are not switched
on by the system.
Activating
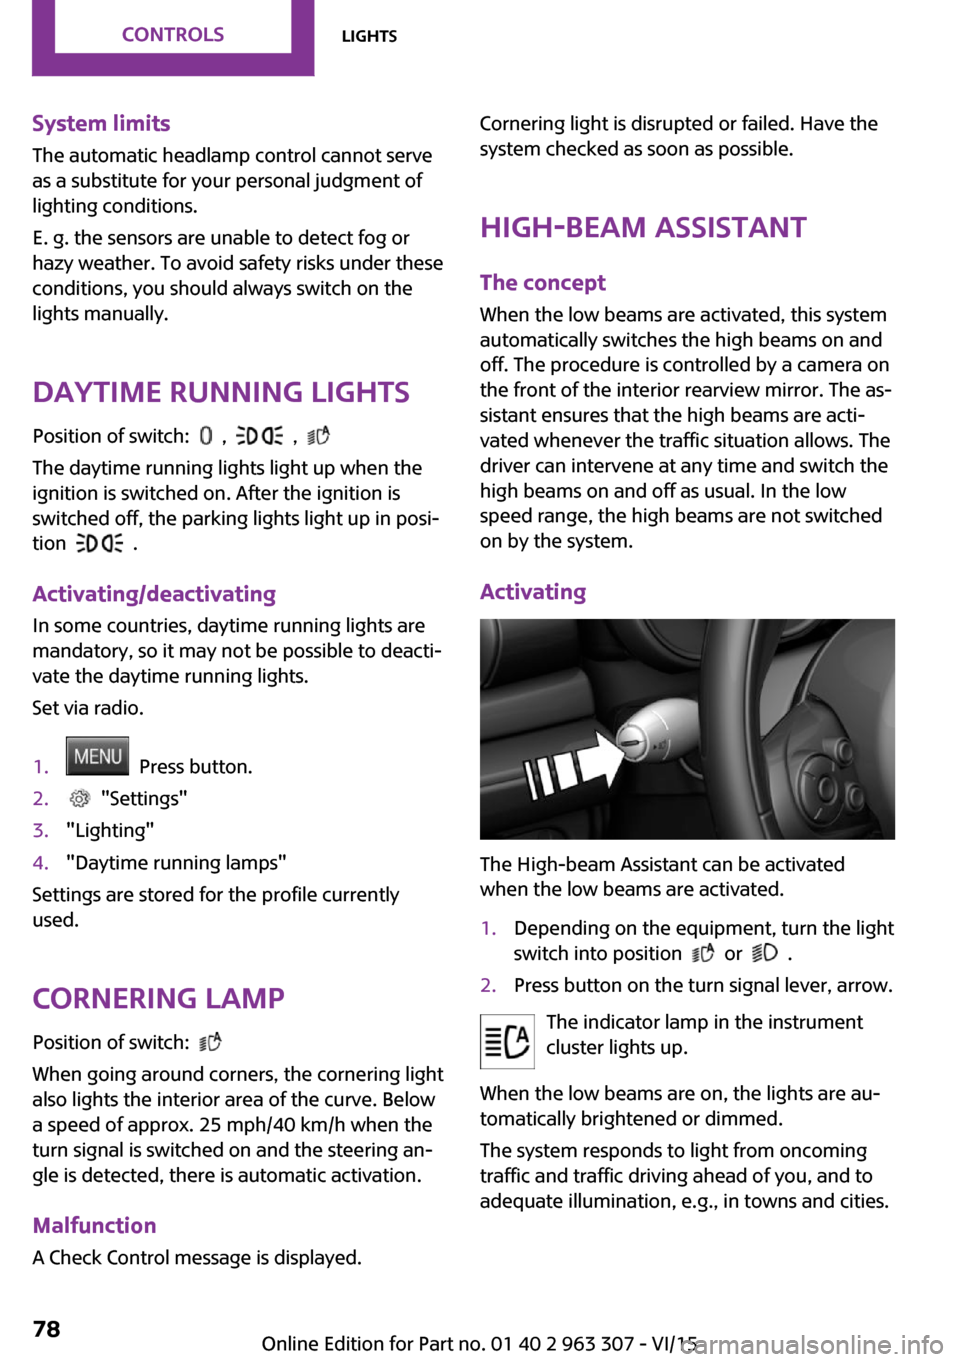
The High-beam Assistant can be activated
when the low beams are activated.
1.Depending on the equipment, turn the light
switch into position
or .
2.Press button on the turn signal lever, arrow.
The indicator lamp in the instrument
cluster lights up.
When the low beams are on, the lights are au‐
tomatically brightened or dimmed.
The system responds to light from oncoming
traffic and traffic driving ahead of you, and to
adequate illumination, e.g., in towns and cities.
Seite 78CONTROLSLights78
Online Edition for Part no. 01 40 2 963 307 - VI/15
Page 79 of 251
The blue indicator lamp in the instru‐
ment cluster lights up when the system
switches on the high beams.
Switching the high beams on and off
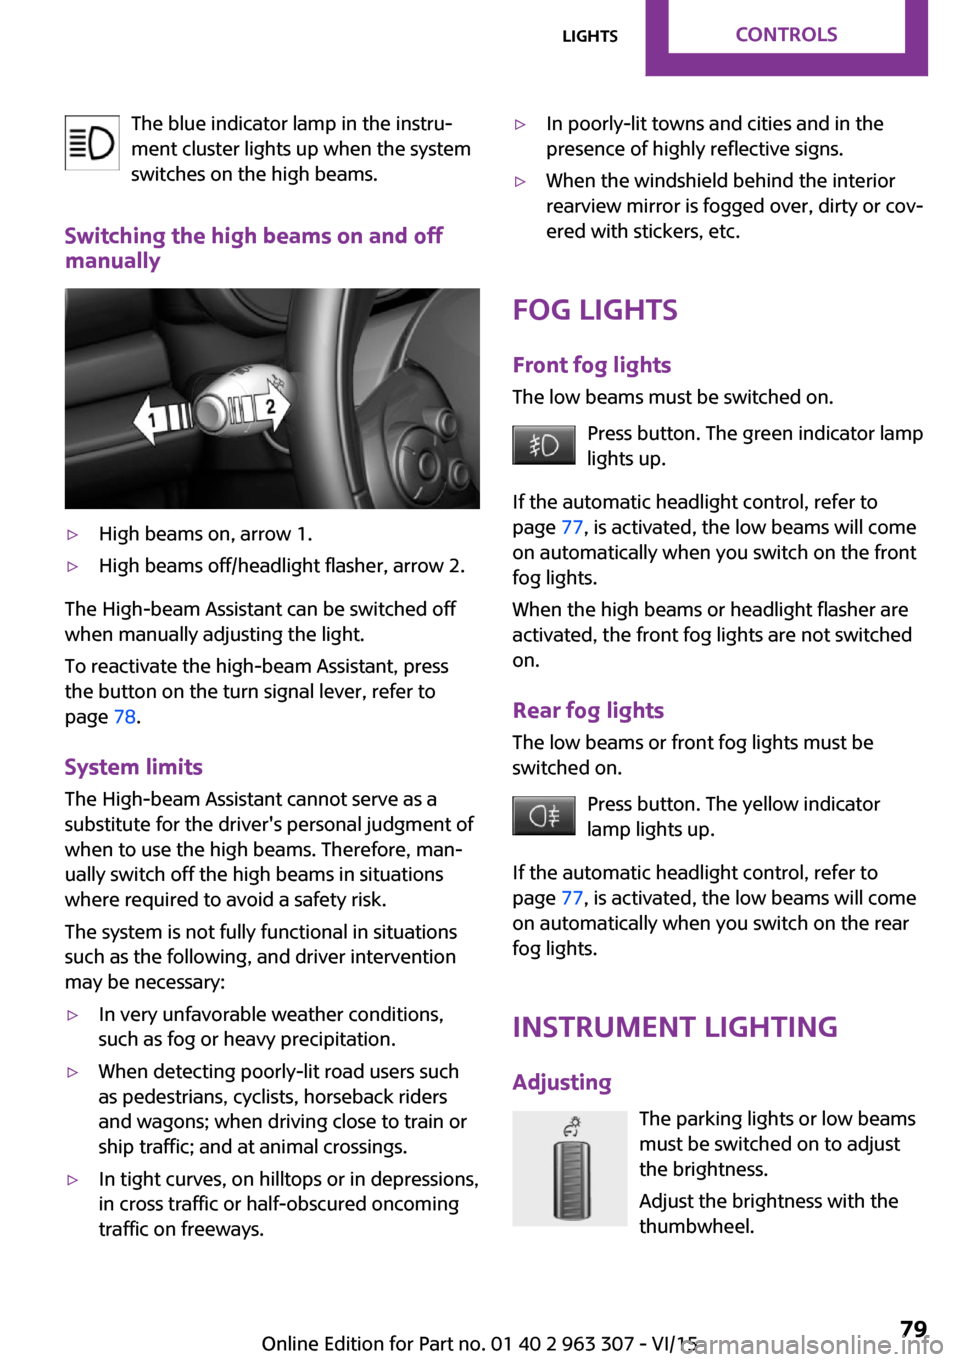
manually▷High beams on, arrow 1.▷High beams off/headlight flasher, arrow 2.
The High-beam Assistant can be switched off
when manually adjusting the light.
To reactivate the high-beam Assistant, press
the button on the turn signal lever, refer to
page 78.
System limits
The High-beam Assistant cannot serve as a
substitute for the driver's personal judgment of
when to use the high beams. Therefore, man‐
ually switch off the high beams in situations
where required to avoid a safety risk.
The system is not fully functional in situations such as the following, and driver intervention
may be necessary:
▷In very unfavorable weather conditions,
such as fog or heavy precipitation.▷When detecting poorly-lit road users such
as pedestrians, cyclists, horseback riders
and wagons; when driving close to train or
ship traffic; and at animal crossings.▷In tight curves, on hilltops or in depressions,
in cross traffic or half-obscured oncoming
traffic on freeways.▷In poorly-lit towns and cities and in the
presence of highly reflective signs.▷When the windshield behind the interior
rearview mirror is fogged over, dirty or cov‐
ered with stickers, etc.
Fog lights
Front fog lights
The low beams must be switched on.
Press button. The green indicator lamp
lights up.
If the automatic headlight control, refer to
page 77, is activated, the low beams will come
on automatically when you switch on the front
fog lights.
When the high beams or headlight flasher are
activated, the front fog lights are not switched
on.
Rear fog lights The low beams or front fog lights must be
switched on.
Press button. The yellow indicator
lamp lights up.
If the automatic headlight control, refer to
page 77, is activated, the low beams will come
on automatically when you switch on the rear
fog lights.
Instrument lighting Adjusting The parking lights or low beams
must be switched on to adjust
the brightness.
Adjust the brightness with the
thumbwheel.
Seite 79LightsCONTROLS79
Online Edition for Part no. 01 40 2 963 307 - VI/15
Page 92 of 251

Overview
Button in the vehicle
Intelligent Safety button
Camera
The camera is installed near the interior rear‐
view mirror.
Keep the windshield in the area behind the in‐
terior rearview mirror clean and clear.
Switching on/off
Switching on automatically
The system is automatically active after every
driving-off.
Switching on/off manually Press button briefly:
▷The menu for the intelligent safety
system is displayed. The systems
are individually switched off ac‐
cording to their respective settings.▷LED lights up orange or goes out respective
to their individual settings.
Adjust as needed. Individual settings are stored
for the profile currently used.
Press button again:
▷All Intelligent Safety systems are
activated.▷The LED lights up green.
Hold down button:
▷All Intelligent Safety systems are
turned off.▷The LED goes out.
Setting the warning time
The warning time can be set on the radio.
1.Intelligent Safety button
The intelligent safety menu is displayed for
a brief time on the radio display.2."Front. Coll. Warn."3."Warning time"4.Setting the desired warning time
The selected warning time is stored for the pro‐
file currently used.
Warning with braking function
Display
If a collision with a vehicle detected in this way
is imminent, a warning symbol appears on the
instrument cluster.
SymbolMeasureSymbol lights up red: prewarning.
Brake and increase distance.Symbol flashes red and an acoustic
signal sounds: acute warning.
You are requested to intervene by
braking or make an evasive maneu‐
ver.Seite 92CONTROLSSafety92
Online Edition for Part no. 01 40 2 963 307 - VI/15
Page 95 of 251

Camera
The camera is installed near the interior rear‐
view mirror.
Keep the windshield in the area behind the in‐
terior rearview mirror clean and clear.
Switching on/off
Switching on automatically
The system is automatically active after every
driving-off.
Switching on/off manually Press button briefly:
▷The menu for the intelligent safety
system is displayed. The systems
are individually switched off ac‐
cording to their respective settings.▷LED lights up orange or goes out respective
to their individual settings.
Adjust as needed. Individual settings are stored
for the profile currently used.
Press button again:
▷All Intelligent Safety systems are
activated.▷The LED lights up green.
Hold down button:
▷All Intelligent Safety systems are
turned off.▷The LED goes out.Warning with braking function
Display
If a collision with a person detected in this way
is imminent, a warning symbol appears on the
instrument cluster.
The red symbol is displayed and a signal
sounds.
Intervene immediately by braking or
make an evasive maneuver.
Braking intervention
The warning prompts the driver himself/herself
to react. During a warning, the maximum brak‐
ing force is used. Premise for the brake booster
is sufficiently quick and sufficiently hard step‐
ping on the brake pedal. The system can assist
with some braking intervention if there is risk of
a collision. At low speeds vehicles may thus come to a complete stop.
Manual transmission: During a braking inter‐
vention up to a complete stop, the engine may
be shut down.
The braking intervention is executed only if DSC
Dynamic Stability Control is switched on.
The braking intervention can be interrupted by
stepping on the accelerator pedal or by actively
moving the steering wheel.
Object detection can be restricted. Limitations
of the detection range and functional restric‐
tions are to be considered.
System limits
Detection range The detection potential of the camera is lim‐
ited.
Thus a warning might not be issued or be is‐
sued late.
E. g. the following situations may not be de‐
tected:▷Partially covered pedestrians.Seite 95SafetyCONTROLS95
Online Edition for Part no. 01 40 2 963 307 - VI/15
Page 110 of 251

You may turn off automatic activation via the
radio:1. Press button.2. "Settings"3."Parking"4."Auto PDC"5.Select setting.
Settings are stored for the profile currently
used.
Automatic deactivation during forward
travel
The system switches off when a certain driving
distance or speed is exceeded.
Switch the system back on if needed.
Switching on/off manually Press button.
▷On: the LED lights up.▷Off: the LED goes out.
Display
Signal tones
When approaching an object, an intermittent
sound indicates the position of the object. E. g.
if an object is detected to the left rear of the ve‐
hicle, a signal tone sounds from the left rear
speaker.
The shorter the distance to the object, the
shorter the intervals.
If the distance to a detected object is less than
approx. 10 in/25 cm, a continuous tone is
sounded.
If objects are located both in front of and to the
rear of the vehicle, an alternating continuous
signal is sounded.
The signal tone is switched off, when selector
lever position P is engaged on vehicles with
Steptronic transmission.
Volume
The ratio of the PDC signal tone volume to the
entertainment volume can be adjusted.1. "Multimedia", "Radio" or
"Settings"2."Tone"3."Volume settings"4."PDC"5.To adjust: turn the controller.6.To store: press the controller.
Settings are stored for the profile currently
used.
System limits
Limits of ultrasonic measurement Ultrasonic measuring might not function under
the following circumstances:
▷For small children and animals.▷For persons with certain clothing, e.g.
coats.▷With external interference of the ultra‐
sound, e.g. from passing vehicles or loud
machines.▷When sensors are dirty, iced over, damaged
or out of position.▷Under certain weather conditions such as
high relative humidity, rain, snowfall, ex‐
treme heat or strong wind.▷With tow bars and trailer couplings of other
vehicles.▷With thin or wedge-shaped objects.▷With moving objects.▷With elevated, protruding objects such as
ledges or cargo.▷With objects with corners and sharp edges.▷With objects with a fine surface structure
such as fences.▷For objects with porous surfaces.Seite 110CONTROLSDriving comfort110
Online Edition for Part no. 01 40 2 963 307 - VI/15
Page 112 of 251

An engine that has been switched off by the
Auto Start Stop function is restarted automati‐
cally when the parking assistant is activated.
Overview
Button in the vehicle
Parking assistant
Ultrasound sensors
The ultrasound sensors for measuring parking
spaces are located on the wheel housing.
To ensure full functionality:
▷Keep the sensors clean and free of ice.▷When using high-pressure washers, do not
spray the sensors for long periods and
maintain a distance of at least 12 in/30 cm.▷Do not put stickers over sensors.Requirements
For measuring parking spaces▷Maximum speed while driving forward ap‐
prox. 22 mph/35 km/h.▷Maximum distance to row of parked vehi‐
cles: 5 ft/1.5 m.
Suitable parking space
▷Gaps behind an object that has a min.
length of 5 ft/1.5 m.▷Gap between two objects with a minimum
length of approx. 5 ft/1.5 m.▷Min. length of gap between two objects:
your vehicle's length plus approx.
3.3 ft/1.0 m.▷Minimum depth: approx. 5 ft/1.5 m.
Regarding the parking procedure
▷Doors and tailgate closed.▷Parking brake released.▷When parking in parking spaces on the
driver's side, the corresponding turn signal
must be set.
Switching on/off
Switching on with the button Press button.
The LED lights up.
The current status of the parking space search
is indicated on the radio.
Parking assistant is activated automatically.
Switching on with reverse gear
Shift into reverse.
As soon as a suitable parking space is recog‐ nized by the system, the following query is dis‐
played on the radio display: "Start vehicle
parking?"
"OK": activate parking assistant.
Seite 112CONTROLSDriving comfort112
Online Edition for Part no. 01 40 2 963 307 - VI/15