turn signal MINI Hardtop 4 Door 2016 User Guide
[x] Cancel search | Manufacturer: MINI, Model Year: 2016, Model line: Hardtop 4 Door, Model: MINI Hardtop 4 Door 2016Pages: 251, PDF Size: 6.71 MB
Page 123 of 251

4.Likewise, press and hold the button of the
desired function on the hand-held trans‐
mitter.5.Release both buttons as soon as the interior
rearview mirror LED flashes more rapidly.
The LED flashing faster indicates that the
button on the interior rearview mirror has
been programmed. The system can then be
controlled by the button on the interior
rearview mirror.
If the LED does not flash faster after at least
60 seconds, change the distance and re‐
peat the step. Several more attempts at dif‐
ferent distances may be necessary. Wait at
least 15 seconds between attempts.
Canada: if programming with the hand-
held transmitter was interrupted, hold
down the interior rearview mirror button
and repeatedly press and release the hand-
held transmitter button for 2 seconds.
Controls
WARNING
Body parts can be jammed when operat‐
ing remote-controlled systems, e.g. the garage
door, using the universal garage door opener.
There is risk of injuries or risk of property dam‐
age. Make sure that the area of movement of
the respective system is clear during program‐
ming and operation. Also follow the safety in‐
structions of the hand-held transmitter. ◀
The system, such as the garage door, can be
operated using the button on the interior rear‐
view mirror while the engine is running or
when the ignition is started. To do this, hold
down the button within receiving range of the
system until the function is activated. The inte‐
rior rearview mirror LED stays lit while the wire‐
less signal is being transmitted.
Deleting stored functions
Press and hold the left and right button on the
interior rearview mirror simultaneously for ap‐
proximately 20 seconds until the LED flashes
rapidly. All stored functions are deleted. The
functions cannot be deleted individually.
Digital compass
Overview1Control button2Mirror display
Mirror display The point of the compass is displayed in the
mirror when driving straight.
Operating concept Various functions can be called up by pressing
the control button with a pointed object, such
as the tip of a ballpoint pen or similar object.
The following setting options are displayed in
succession, depending on how long the control
button is pressed:
▷Pressed briefly: turns display on/off.▷3 to 6 seconds: compass zone setting.▷6 to 9 seconds: compass calibration.▷9 to 12 seconds: left/right-hand steering
setting.▷12 to 15 seconds: language setting.
Setting the compass zones
Sets the particular compass zones on the vehi‐
cle so that the compass operates correctly; re‐
fer to World map with compass zones.
Seite 123Interior equipmentCONTROLS123
Online Edition for Part no. 01 40 2 963 307 - VI/15
Page 141 of 251
Securing
Follow the installation instructions of the roof
rack.
Loading Because roof racks raise the vehicle's center of
gravity when loaded, they have a major effect
on vehicle handling and steering response.
Therefore, note the following when loading and
driving:▷Do not exceed the approved roof/axle
loads and the approved gross vehicle
weight.▷Be sure that adequate clearance is main‐
tained for tilting and opening the glass sun‐
roof.▷Distribute the roof load uniformly.▷The roof load should not extend past the
loading area.▷Always place the heaviest pieces on the
bottom.▷Secure the roof luggage firmly, e.g., tie with
ratchet straps.▷Do not let objects project into the opening
path of the tailgate.▷Drive cautiously and avoid sudden acceler‐
ation and braking maneuvers. Take corners
gently.
Rear luggage rack
General information Installation only possible with rear luggage rack
preparation.
Rear racks are available as special accessories.
Information Follow the installation instructions of the rear
luggage rack.
Drive cautiously and avoid sudden acceleration
and braking maneuvers. Take corners gently.
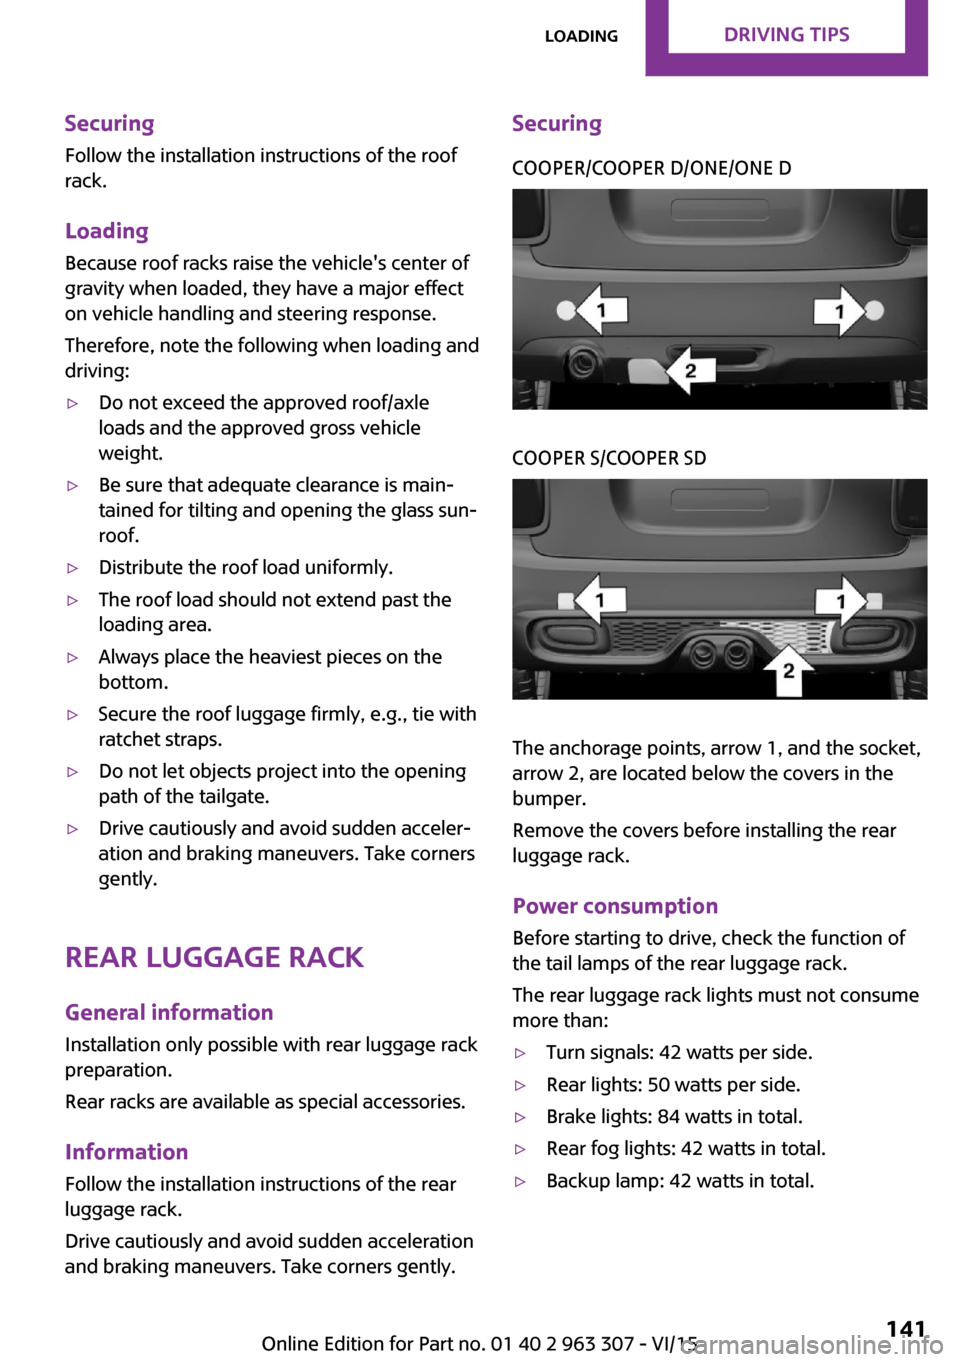
SecuringCOOPER/COOPER D/ONE/ONE DCOOPER S/COOPER SD
The anchorage points, arrow 1, and the socket,
arrow 2, are located below the covers in the
bumper.
Remove the covers before installing the rear
luggage rack.
Power consumption
Before starting to drive, check the function of
the tail lamps of the rear luggage rack.
The rear luggage rack lights must not consume
more than:
▷Turn signals: 42 watts per side.▷Rear lights: 50 watts per side.▷Brake lights: 84 watts in total.▷Rear fog lights: 42 watts in total.▷Backup lamp: 42 watts in total.Seite 141LoadingDRIVING TIPS141
Online Edition for Part no. 01 40 2 963 307 - VI/15
Page 152 of 251
Selecting a station manually1. "Radio"2."FM" or "AM"3."Manual search ( )"4.Turn the right-hand knob until the desired
frequency is displayed.
Changing the station
About the radio:
Press button.
Via the buttons on the steering wheel: Press button.
The next station with reception or stored sta‐
tion is played. If traffic bulletins are activated,
the next traffic information station is played.
About the radio:
Press and hold this button.
Via the buttons on the steering wheel: Press and hold this button.
The waveband is traversed. After the button is
released, the next station with reception is
played.
Storing a station
1. "Radio"2."FM" or "AM"3.Select a station.4.Press the right button.5.Select the memory location.
The stations can also be stored on the Favorites
buttons, refer to page 153.
Renaming a station
When storing a station with RDS signal, the RDS
information transferred during storing is ac‐
cepted as the station name. This name can be
changed.1.Select the station that is to be renamed.2. Press button.3."Rename to:"
If necessary, wait until the desired name
appears.4.Press the right-hand knob to store this
name.
Displaying additional information
If a radio station broadcasts radio text or radio
text plus, this information can be displayed,
e.g., the track or the performer of the music.
Availability, content and sequence are set by
the radio station.
1. "Radio"2."FM" or "AM"3. Press button.4."Station info"
RDS Radio Data System
The concept
RDS broadcasts additional information, such as
the station name, in the FM wave band.
When playing a station with multiple frequen‐
cies, the system automatically switches to the
frequency with the best reception, if needed.
Switching on/off It is recommended to switch on RDS
1. "Radio"2."FM"Seite 152ENTERTAINMENTRadio152
Online Edition for Part no. 01 40 2 963 307 - VI/15
Page 166 of 251
The mobile phone could not be paired or con‐
nected.▷Is Bluetooth activated in the vehicle and on
the mobile phone? Activate Bluetooth.▷Do the Bluetooth passkeys on the mobile
phone and the vehicle match? Enter the
same passkey on the mobile phone and on
the radio.▷Did it take longer than 30 seconds to enter
the passkey? Repeat the pairing procedure.▷Do the control numbers on the mobile
phone and vehicle match? Repeat the pair‐
ing procedure.▷Are too many Bluetooth devices connected
to the mobile phone? Delete connections to
other devices.▷Is the mobile phone in power-save mode or
does it have only a limited remaining bat‐
tery life? Charge the mobile phone.
The mobile phone no longer reacts?
▷Switch the mobile phone off and on again.▷Ambient temperature too high or too low?
Do not subject the mobile phone to ex‐
treme ambient temperatures.
No or not all phone book entries are displayed,
or they are incomplete.
▷Transmission of the entries is not yet com‐
plete.▷It is possible that only the phone book en‐
tries from the mobile phone or from the
SIM card are transmitted.▷It may not be possible to display phone
book entries with special characters.▷The number of phone book entries being
stored is too high.
The phone connection quality is poor.
▷It may be possible to adjust the strength of
the Bluetooth signal on the mobile phone.▷Adjust the volume of the microphone and
loudspeakers separately.If all points in this list have been checked and
the required function is still not available, con‐
tact the hotline, a dealer’s service center or an‐
other qualified service center or repair shop.
Controls Adjusting the volumeDuring an active call, turn the left knob on the
radio until the desired volume is selected.
Automatic volume control
The automatic volume control can only be ad‐
justed during an active conversation.1. "Settings"2."Tone"3."Volume settings"4.Select the desired setting: "Microphone" or
"Loudspeak."5.Adjusting: press and turn right button.6.Storing: press right button.
Incoming call
Receiving calls If the number of the caller is stored in the
phone book and is transmitted by the network,
the name of the contact is displayed. Other‐
wise, only the phone number or "Unknown
caller" s displayed.
Accepting a call
About the radio
"Accept"
Via the button on the steering wheel
Press button.
Via the instrument cluster
"Accept"
Seite 166COMMUNICATIONBluetooth hands-free system166
Online Edition for Part no. 01 40 2 963 307 - VI/15
Page 204 of 251
Headlight glass
Condensation can form on the inside of the ex‐
ternal lights in cool or humid weather. When
driving with the lights switched on, the conden‐
sation evaporates after a short time. The head‐
light glass does not need to be changed.
If despite driving with the lights switched on,
increasing humidity forms, e. g. water droplets
in the lamp, the manufacturer of your vehicle
recommends having it checked by a dealer’s
service center or another qualified service cen‐
ter or repair shop.
Front lights, bulb replacement
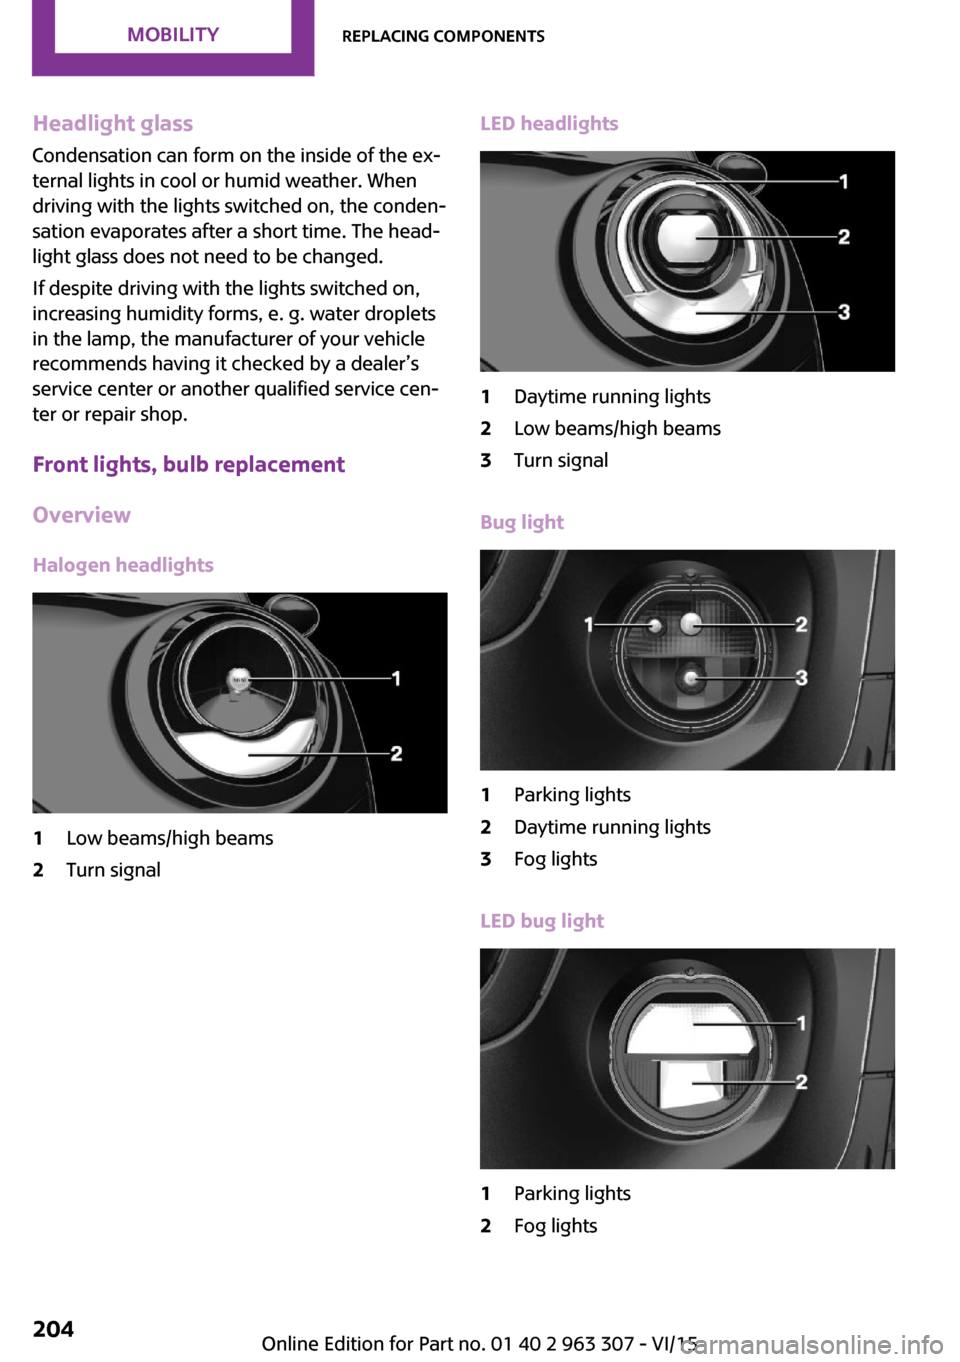
Overview Halogen headlights1Low beams/high beams2Turn signalLED headlights1Daytime running lights2Low beams/high beams3Turn signal
Bug light
1Parking lights2Daytime running lights3Fog lights
LED bug light
1Parking lights2Fog lightsSeite 204MOBILITYReplacing components204
Online Edition for Part no. 01 40 2 963 307 - VI/15
Page 205 of 251
LED low beams/LED high beamsFollow the general instructions on lights and
bulbs, refer to page 203.
The lights feature LED technology. Contact a
dealer’s service center or another qualified
service center or repair shop in the event of a
malfunction.
Halogen low beams/halogen high
beams
Follow the general instructions on lights and
bulbs, refer to page 203.
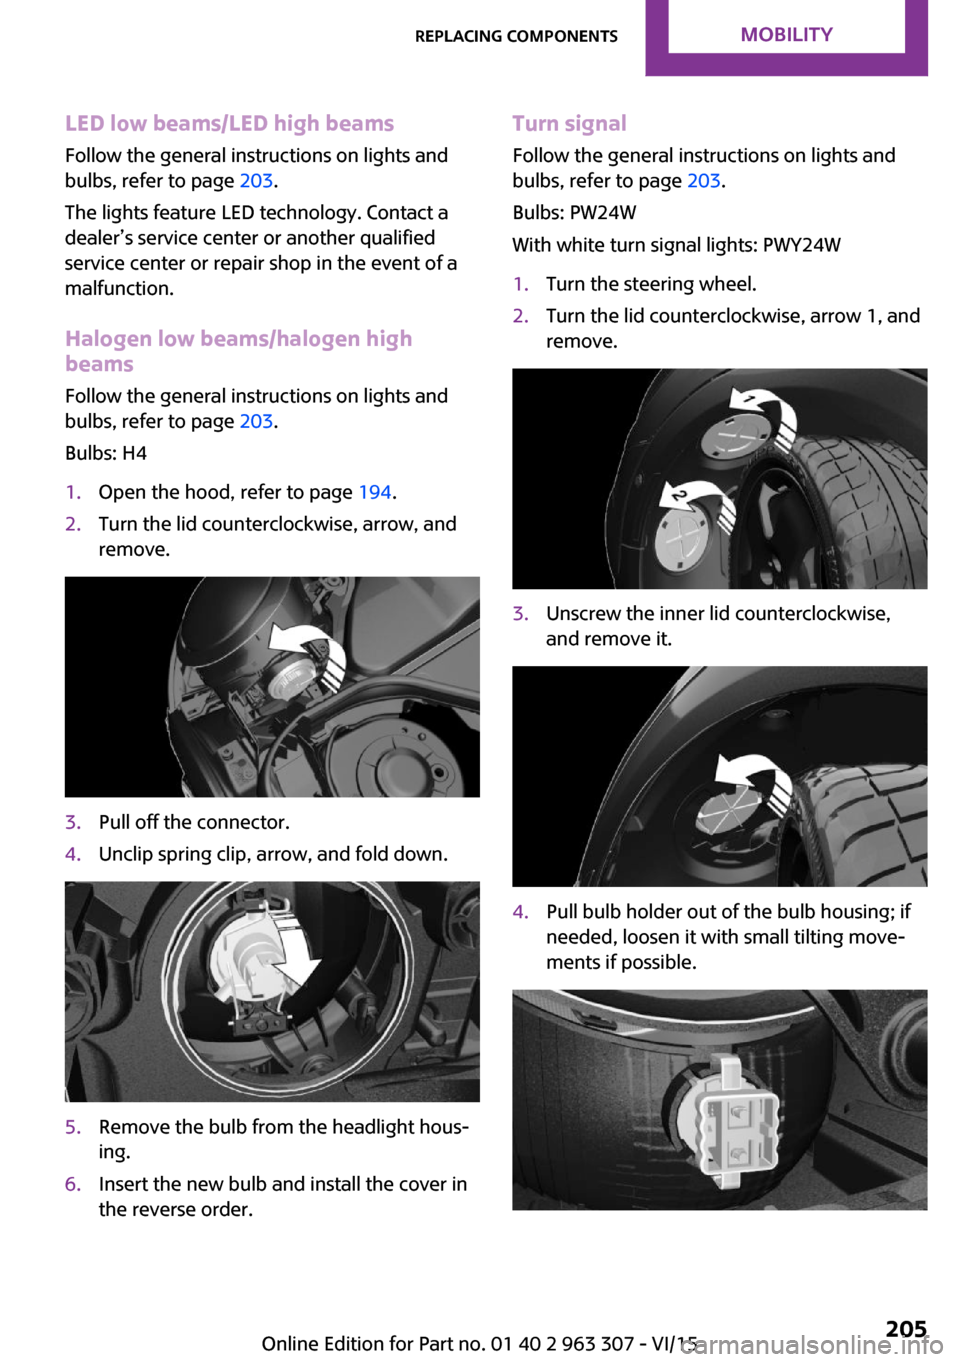
Bulbs: H41.Open the hood, refer to page 194.2.Turn the lid counterclockwise, arrow, and
remove.3.Pull off the connector.4.Unclip spring clip, arrow, and fold down.5.Remove the bulb from the headlight hous‐
ing.6.Insert the new bulb and install the cover in
the reverse order.Turn signal
Follow the general instructions on lights and
bulbs, refer to page 203.
Bulbs: PW24W
With white turn signal lights: PWY24W1.Turn the steering wheel.2.Turn the lid counterclockwise, arrow 1, and
remove.3.Unscrew the inner lid counterclockwise,
and remove it.4.Pull bulb holder out of the bulb housing; if
needed, loosen it with small tilting move‐
ments if possible.Seite 205Replacing componentsMOBILITY205
Online Edition for Part no. 01 40 2 963 307 - VI/15
Page 207 of 251

Vehicle with two rear fog lights1Side tail lights2Rear fog lights3License plate lamp4Center brake lamp
Side tail lights
1Brake lights/tail lights2Turn signal3Reversing lights
Side LED tail lights
1Tail lights2Turn signal3Brake light4Reversing lights
Side tail lights
Follow the general instructions on lights and
bulbs, refer to page 203.
Bulbs: P21W
1.Open tailgate, refer to page 27.2.Remove left or right cover.3.Through the opening, loosen the plug con‐
nector, arrow 2 on the bulb holder.
Press the latches together, arrows 1, and
remove the bulb holder.4.Remove the bulb holder from the opening.5.Press the nonworking bulb gently into the
socket, turn counterclockwise and remove.▷Arrow 1: brake lights/tail lights▷Arrow 2: turn signalSeite 207Replacing componentsMOBILITY207
Online Edition for Part no. 01 40 2 963 307 - VI/15
Page 209 of 251

The wire is long enough to guide the socket
down and through between any heat shield
that may be installed and the bumper.4.Replace nonworking bulb.5.To install the new bulb, proceed in reverse
order of removal.
Right fog lamp:
1.Turn the bulb socket counterclockwise and
remove.
The wire is long enough to guide the socket
down and through between any heat shield
that may be installed and the bumper.2.Replace nonworking bulb.3.To install the new bulb, proceed in reverse
order of removal.
Side turn signal, bulb replacement
Follow the general instructions on lights and
bulbs, refer to page 203.
Bulbs:
▷With orange lens: W5W▷With white lens: WY5W diadem1.Open the hood. The covers of the side turn
signal lights are on the left and right next to
the hinges of the hood.2.Loosen nuts of the cover by hand and re‐
move the cover.3.Turn the bulb holder counterclockwise and
remove.4.Replace the bulb.5.To insert the new bulb, proceed in reverse
order of removal. Insert the nuts of the
cover and press down.Seite 209Replacing componentsMOBILITY209
Online Edition for Part no. 01 40 2 963 307 - VI/15
Page 216 of 251

3.Let both engines run for several minutes.4.Disconnect the jumper cables in the reverse
order.
Check the battery and recharge if needed.
Tow-starting and towing
Information WARNING
Due to system limits, individual functions
can malfunction during tow-starting/towing
with the Intelligent Safety systems activated,
e.g. approach control warning with light brak‐
ing function. There is risk of an accident. Switch
all Intelligent Safety systems off prior to tow-
starting/towing. ◀
Switching off Intelligent Safety systems, refer to
page 90.
Steptronic transmission: transporting your vehicle
Information Your vehicle must not be towed if the front
wheels are touching the ground.
CAUTION
The vehicle can be damaged when tow‐
ing the vehicle with a lifted rear axle. There is
risk of property damage. Have vehicle trans‐
ported only with lifted front axle or on a load‐
ing platform. ◀
Tow truck
Have your vehicle transported with a tow truck
with a so-called lift bar or on a flat bed.
CAUTION
When lifting the vehicle by the tow fitting
or body and chassis parts; damage can occur
on vehicle parts. There is risk of property dam‐
age. Lift vehicle using suitable means. ◀
Use tow fitting located in the front only for po‐
sitioning the vehicle.
Manual transmission
Observe before towing your vehicle
Gearshift lever in neutral position.
Towing CAUTION
If manual unlocking of the parking brake
is not possible, the vehicle cannot be moved or
towed. There is risk of property damage. The
vehicle should only be transported on a loading
platform. ◀
Information the following instructions:
▷Make sure that the ignition is switched on;
otherwise, the low beams, tail lights, turn
signals, and wipers may be unavailable.▷Do not tow the vehicle with the rear axle
tilted, as the front wheels could turn.▷When the engine is stopped, there is no
power assist. Consequently, more forceSeite 216MOBILITYBreakdown assistance216
Online Edition for Part no. 01 40 2 963 307 - VI/15
Page 243 of 251
C
California Proposition 65 Warning 7
Camera-based cruise con‐ trol 101
Camera lenses, care 223
Can holder, see Cu‐ pholder 130
Car battery 212
Car care products 221
Care, displays 223
Care, vehicle 221
Cargo area 126
Cargo area, adapting size 131
Cargo area, enlarging 127
Cargo area lid 27
Cargo area, storage compart‐ ments 131
Cargo cover 126
Cargo, securing 140
Cargo straps, securing cargo 140
Car key, see Remote con‐ trol 22
Carpet, care 223
Car wash 220
Catalytic converter, see Hot exhaust system 137
CBS Condition Based Serv‐ ice 200
Center armrest 130
Center console 16
Central instrument cluster, LED ring 73
Central locking system 26
Changes, technical, refer to Own Safety 7
Changing parts 202
Changing the station 152
Changing wheels 210
Changing wheels/tires 186
Chassis number, see vehicle identification number 9
Check Control 63 Checking the oil level elec‐
tronically 195
Children, seating position 45
Children, transporting safely 45
Child restraint fixing sys‐ tem 45
Child restraint fixing system LATCH 47
Child restraint fixing systems, mounting 46
Child safety locks 48
Child seat, mounting 46
Child seats 45
Chrome parts, care 222
Chrono package, cockpit 74
Cigarette lighter 125
Cleaning, displays 223
Climate control 115, 117
Clock 67
Closing/opening via door lock 26
Closing/opening with remote control 24
Clothes hooks 131
Coasting 145
Coasting with engine decou‐ pled, coasting 145
Coasting with idling en‐ gine 145
Combination switch, see Turn signals 54
Combi switch, see wiper sys‐ tem 55
Comfort Access 28
Compartments in the doors 130
Compass 123
Compressor 188
Condensation on win‐ dows 119
Condensation under the vehi‐ cle 138
Condition Based Service CBS 200
Confirmation signal 30 Control systems, driving stabil‐
ity 97
Convenient opening 24
Coolant 198
Cooling function 116, 118
Cooling, maximum 118
Cooling system 198
Cornering lamp 78
Corrosion on brake discs 138
Cosmetic mirror 125
Courtesy lamps during unlock‐ ing 24
Courtesy lamps with the vehi‐ cle locked 25
Cruise control 106
Cruise control, active 101
Cruising range 67
Cupholder 130
Current fuel consumption 68
D
Damage, tires 186
Damping control, dynamic 99
Data, technical 226
Date 67
Date, radio 73
Date, setting on radio 73
Daytime running lights 78
Defrosting, refer to defrosting the windows 116
Defrosting, see Windows, de‐ frosting 119
Defrosting the windows 116
Dehumidifying, air 116, 118
Digital clock 67
Digital compass 123
Digital radio 153
Dimensions 226
Dimmable exterior mirrors 43
Dimmable interior rearview mirror 43
Direction indicator, see Turn signals 54
Display, electronic, instrument cluster 63 Seite 243Everything from A to ZREFERENCE243
Online Edition for Part no. 01 40 2 963 307 - VI/15