display MINI Paceman 2013 Owner's Manual
[x] Cancel search | Manufacturer: MINI, Model Year: 2013, Model line: Paceman, Model: MINI Paceman 2013Pages: 275, PDF Size: 4.23 MB
Page 5 of 275
Notes
4
Notes
Using this Owner's
Manual
We have tried to make all the information in this
Owner's Manual easy to find. The fastest way to
find specific topics is to refer to the detailed
index at the back of the manual. If you wish to
gain an initial overview of your vehicle, you will
find this in the first chapter.
Should you wish to sell yo ur MINI at some time in
the future, remember to hand over this Owner's
Manual to the new owner; it is an important part
of the vehicle.
Additional sources of information
Should you have any other questions, your MINI
dealer will be glad to advise you at any time.
You can find more information about the MINI,
for example on its technology, on the Internet at
www.MINI.com.
Symbols used
Indicates precautions that must be fol-
lowed precisely in order to avoid the pos-
sibility of personal inju ry and serious damage to
the vehicle.<
Indicates information that will assist you in
gaining the optimum benefit from your
vehicle and enable you to care more effectively
for your vehicle. <
Refers to measures that can be taken to
help protect the environment. <
< Marks the end of a specific item of informa-
tion.
"..." Identifies Control Display texts used to
select individual functions.
{ ... } Verbal instructions to use with the voice
activation system. {{
...}} Identifies the answers generated by the
voice activation system.
Symbols on vehicle components
Indicates that you should consult the rele-
vant section of this Owner's Manual for
information on a particular part or assembly.
Vehicle equipment
The manufacturer of your MINI is the Bayerische
Motoren Werke Aktien gesellschaft, BMW AG.
This Owner's Manual describes all models as well
as all production, country and special equip-
ment that is offered in the model range. Equip-
ment is also described that is not available
because of, for example, selected options or
country version. This also applies to safety
related functions and systems. For equipment
and models that are not described in this
Owner's Manual, please see the supplementary
Owner's Manuals that are provided.
Status of this Owner's
Manual at time of
printing
The high level of safety and quality of the MINI
vehicles is ensured through continuous develop-
ment. In rare cases, there may be differences
between the description and the vehicle.
For your safety
Maintenance and repair
Advanced technology, e.g. the use of
modern materials and high-performance
electronics, requires specially adapted mainte-
00320051004F004C00510048000300280047004C0057004C005200510003
Page 13 of 275
AT A GLANCECockpit
12
Displays
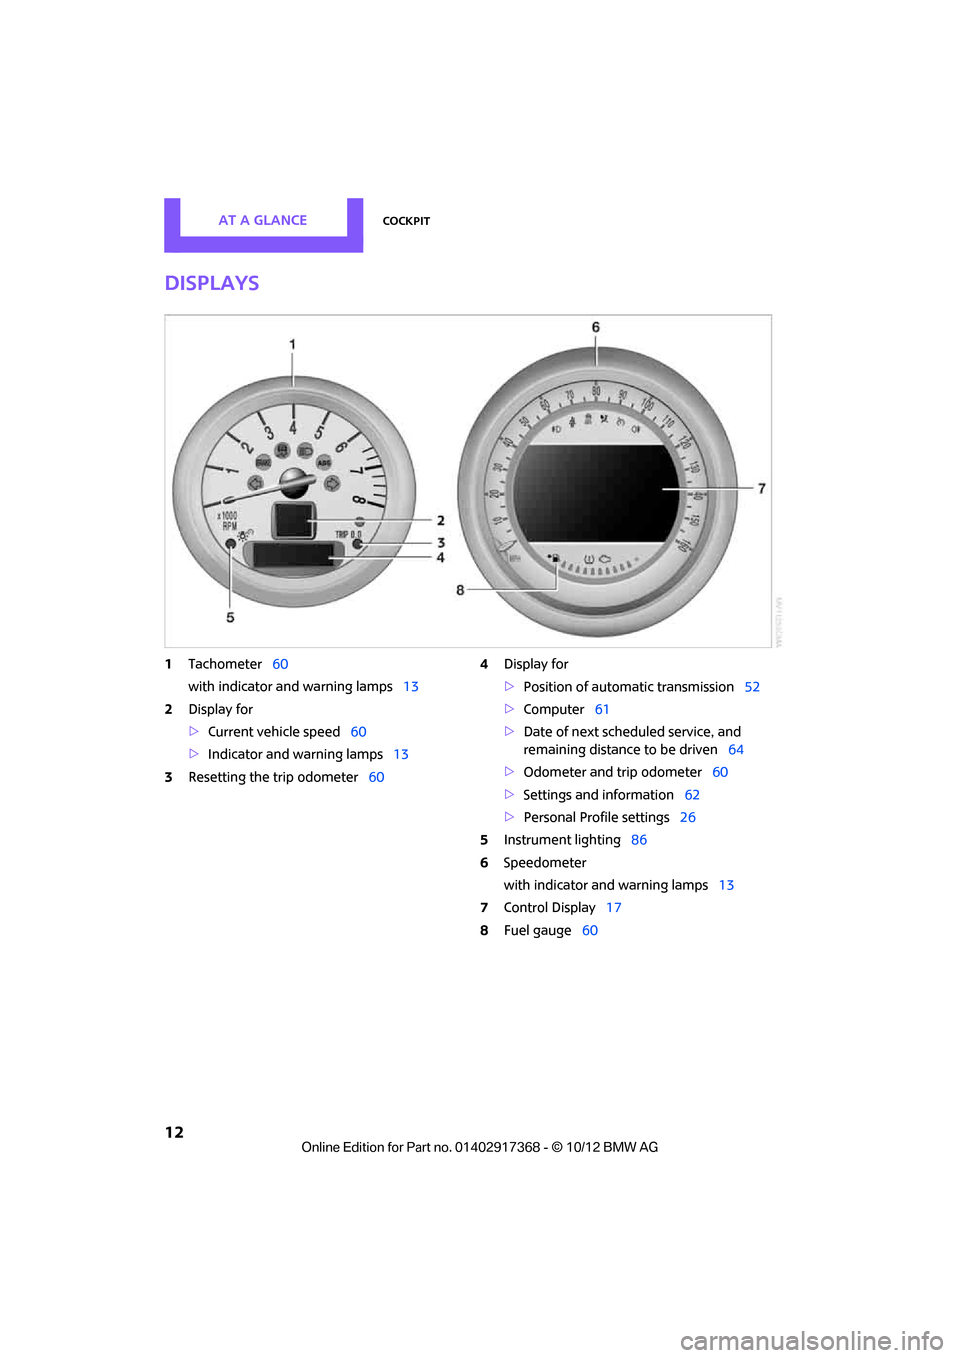
1Tachometer 60
with indicator and warning lamps 13
2 Display for
>Current vehicle speed 60
> Indicator and warning lamps 13
3 Resetting the trip odometer 604
Display for
>Position of automatic transmission 52
> Computer 61
> Date of next scheduled service, and
remaining distance to be driven 64
> Odometer and trip odometer 60
> Settings and information 62
> Personal Prof ile settings26
5 Instrument lighting 86
6 Speedometer
with indicator and warning lamps 13
7 Control Display 17
8 Fuel gauge 60
00320051004F004C00510048000300280047004C0057004C005200510003
Page 14 of 275
CockpitAT A GLANCE
13
Indicator and warning
lamps
The concept
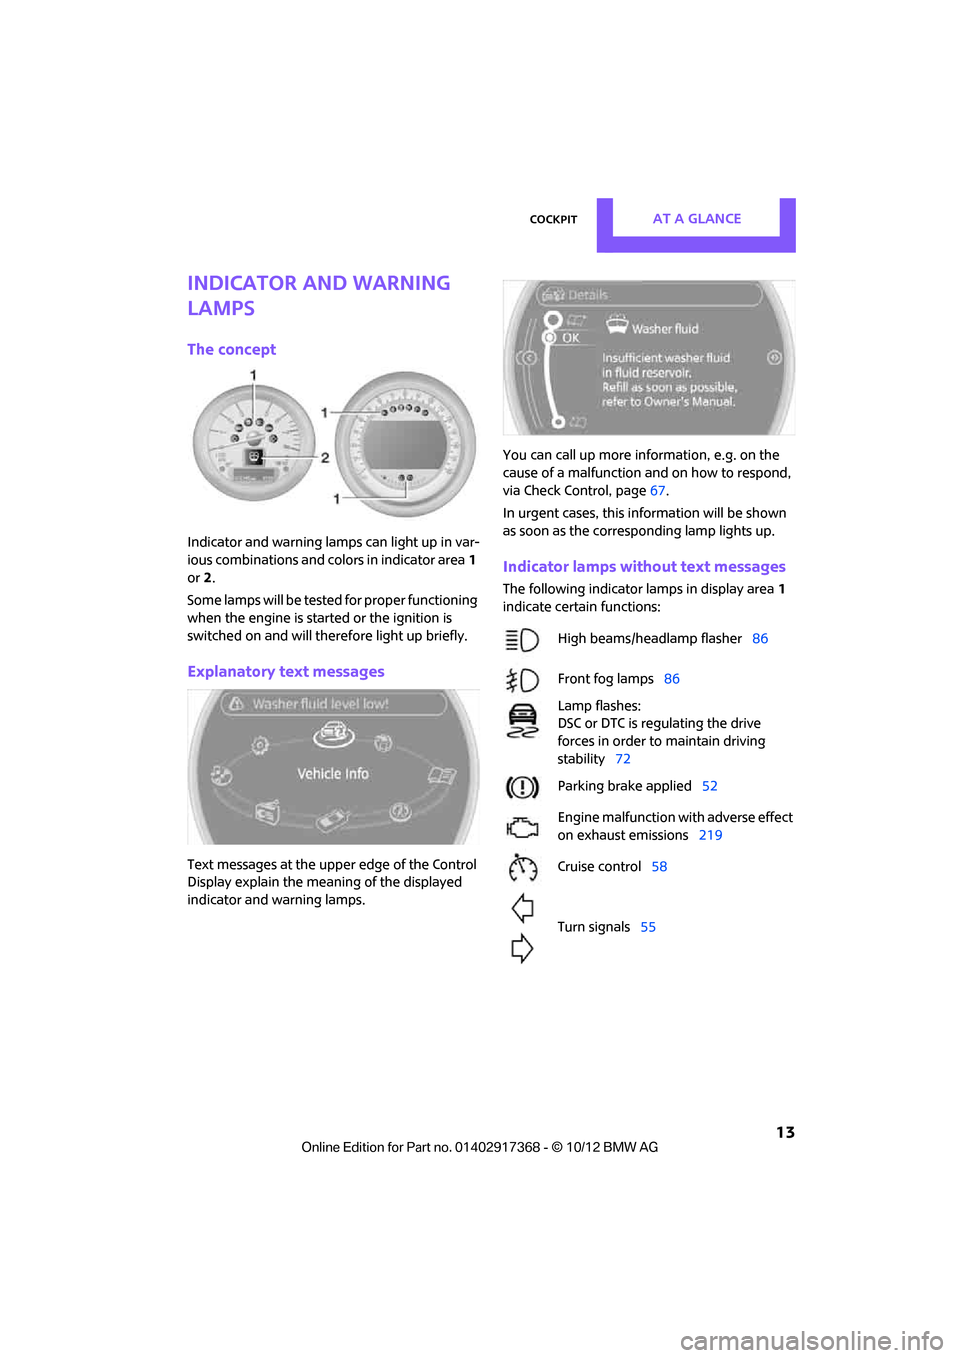
Indicator and warning lamps can light up in var-
ious combinations and colors in indicator area1
or 2.
Some lamps will be tested for proper functioning
when the engine is started or the ignition is
switched on and will therefore light up briefly.
Explanatory text messages
Text messages at the uppe r edge of the Control
Display explain the mean ing of the displayed
indicator and warning lamps. You can call up more information, e.g. on the
cause of a malfunction and on how to respond,
via Check Control, page
67.
In urgent cases, this information will be shown
as soon as the corresponding lamp lights up.
Indicator lamps without text messages
The following indicator lamps in display area 1
indicate certain functions:
High beams/headlamp flasher 86
Front fog lamps 86
Lamp flashes:
DSC or DTC is regulating the drive
forces in order to maintain driving
stability 72
Parking brake applied 52
Engine malfunction with adverse effect
on exhaust emissions 219
Cruise control 58
Turn signals 55
00320051004F004C00510048000300280047004C0057004C005200510003
Page 16 of 275
CockpitAT A GLANCE
15
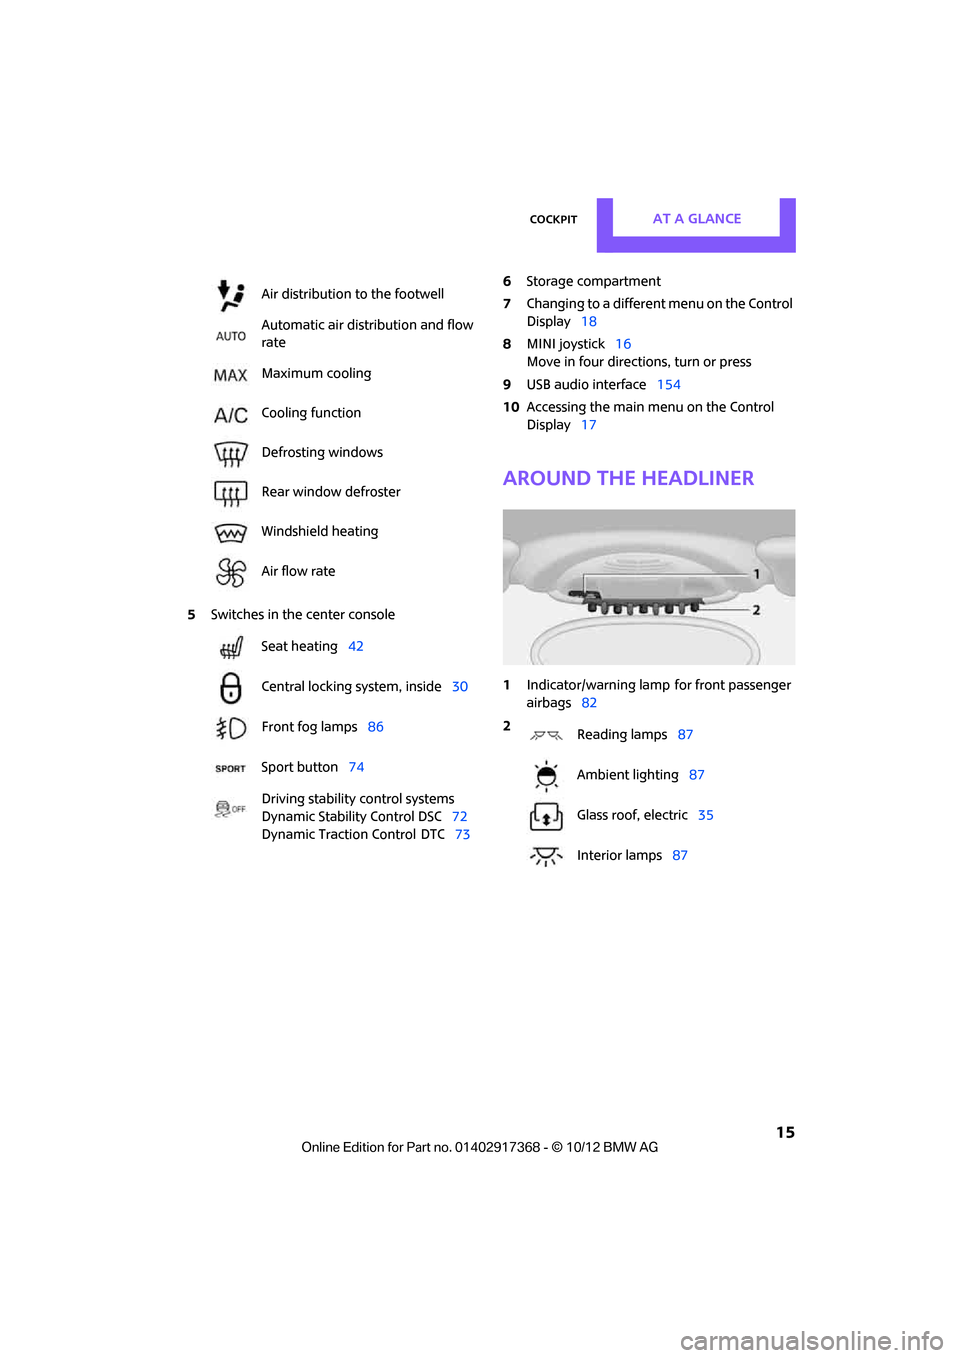
5Switches in the center console 6
Storage compartment
7 Changing to a differen t menu on the Control
Display 18
8 MINI joystick 16
Move in four directions, turn or press
9 USB audio interface 154
10 Accessing the main me nu on the Control
Display 17
Around the headliner
1Indicator/warning lamp for front passenger
airbags 82
Air distribution to the footwell
Automatic air distribution and flow
rate
Maximum cooling
Cooling function
Defrosting windows
Rear window defroster
Windshield heating
Air flow rate
Seat heating
42
Central locking system, inside 30
Front fog lamps 86
Sport button 74
Driving stability control systems
Dynamic Stability Control DSC 72
Dynamic Traction Control
DTC 73
2
Reading lamps 87
Ambient lighting 87
Glass roof, electric 35
Interior lamps 87
00320051004F004C00510048000300280047004C0057004C005200510003
Page 17 of 275
AT A GLANCEOnboard computer
16
Onboard computer
Vehicle equipment
In this chapter, all production, country, and
optional equipment that is offered in the model
range is described. Equipment is also described
that is not available because of, for example,
selected options or coun try version. This also
applies to safety relate d functions and systems.
The concept
The onboard computer integrates the functions
of a large number of switches. This allows these
functions to be operated from a single central
position. The following section provides an
introduction to basic me nu navigation. The con-
trol of the individual fu nctions is described in
connection with the relevant equipment.
Make entries only when traffic and road
conditions permit; otherwise, you may
endanger vehicle occupants and other road
users by being distracted. <
Overview of operating
elements
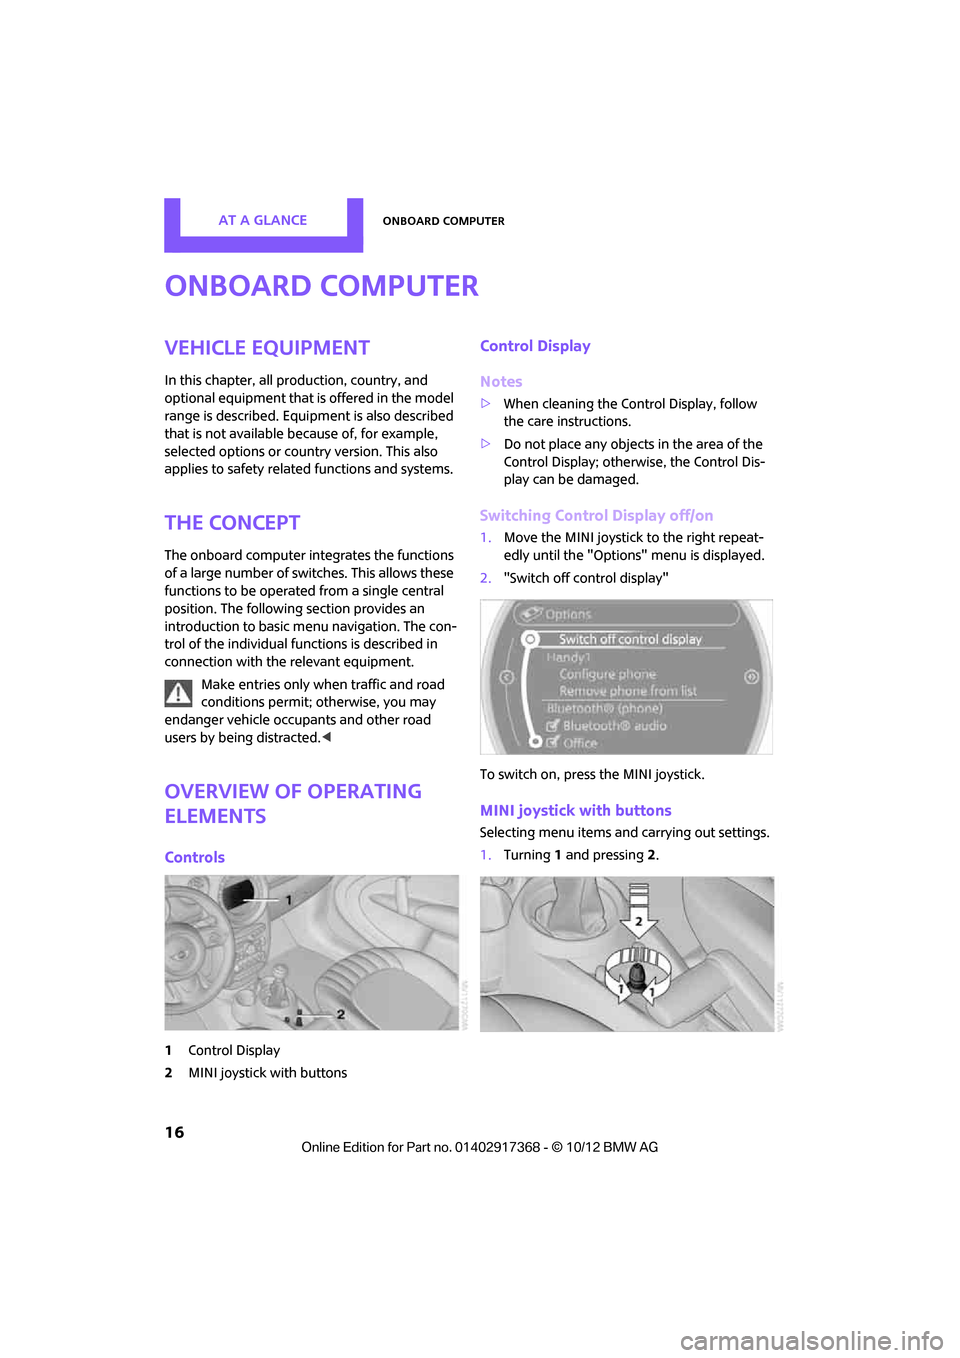
Controls
1Control Display
2 MINI joystick with buttons
Control Display
Notes
>When cleaning the Control Display, follow
the care instructions.
> Do not place any objects in the area of the
Control Display; otherwise, the Control Dis-
play can be damaged.
Switching Control Display off/on
1.Move the MINI joystick to the right repeat-
edly until the "Options" menu is displayed.
2. "Switch off control display"
To switch on, press the MINI joystick.
MINI joystick with buttons
Selecting menu items and carrying out settings.
1. Turning 1 and pressing 2.
00320051004F004C00510048000300280047004C0057004C005200510003
Page 18 of 275
Onboard computerAT A GLANCE
17
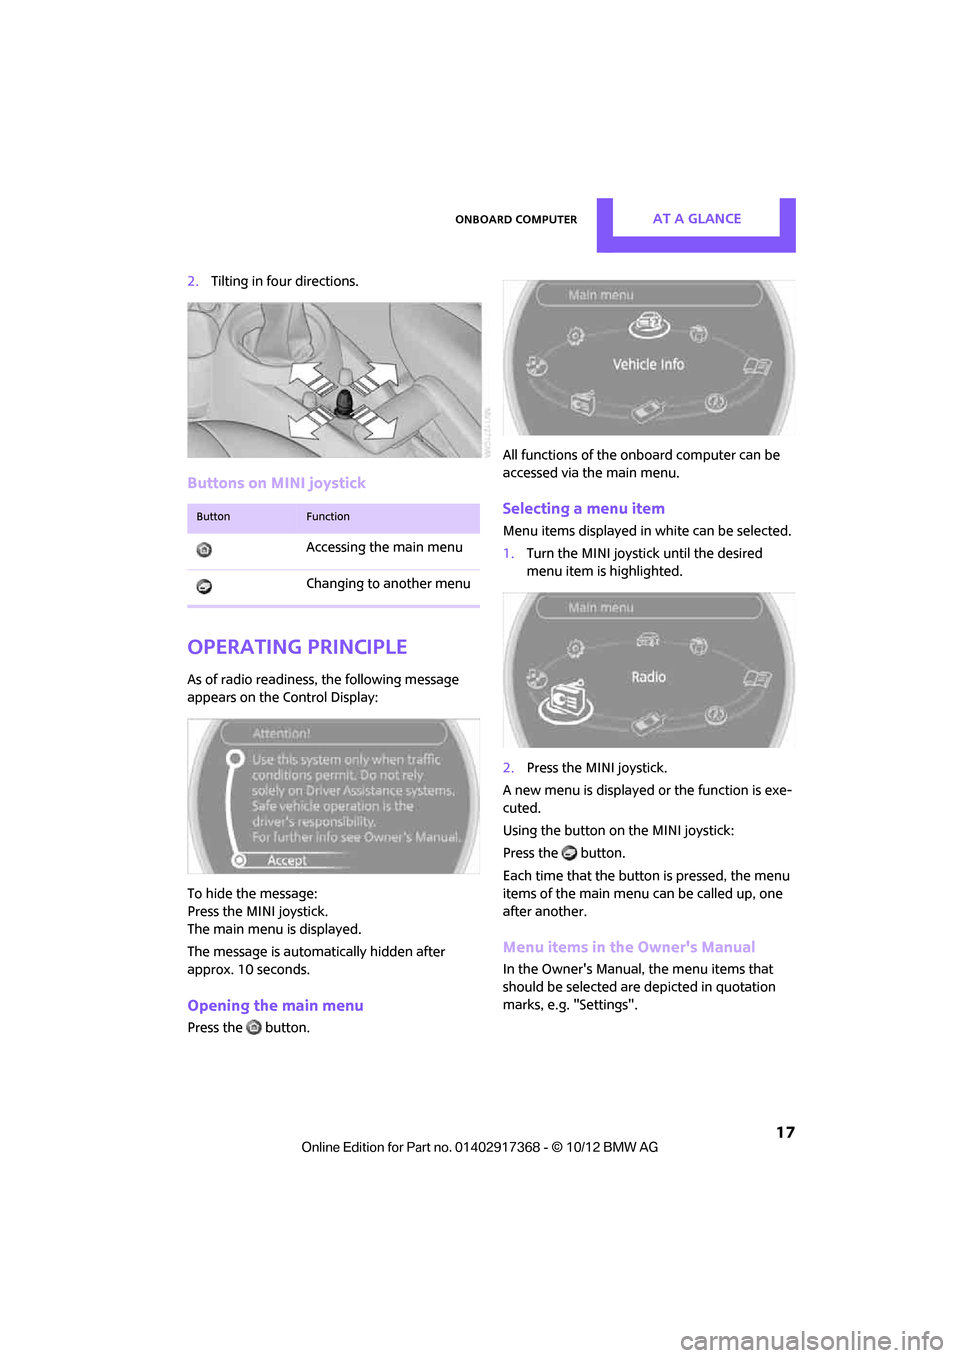
2.Tilting in four directions.
Buttons on MINI joystick
Operating principle
As of radio readiness, the following message
appears on the Control Display:
To hide the message:
Press the MINI joystick.
The main menu is displayed.
The message is automatically hidden after
approx. 10 seconds.
Opening the main menu
Press the button. All functions of the onboard computer can be
accessed via the main menu.
Selecting a menu item
Menu items displayed in
white can be selected.
1. Turn the MINI joystick until the desired
menu item is highlighted.
2. Press the MINI joystick.
A new menu is displayed or the function is exe-
cuted.
Using the button on the MINI joystick:
Press the button.
Each time that the button is pressed, the menu
items of the main menu can be called up, one
after another.
Menu items in the Owner's Manual
In the Owner's Manual, the menu items that
should be selected are depicted in quotation
marks, e.g. "Settings".
ButtonFunction
Accessing the main menu
Changing to another menu
00320051004F004C00510048000300280047004C0057004C005200510003
Page 19 of 275
AT A GLANCEOnboard computer
18
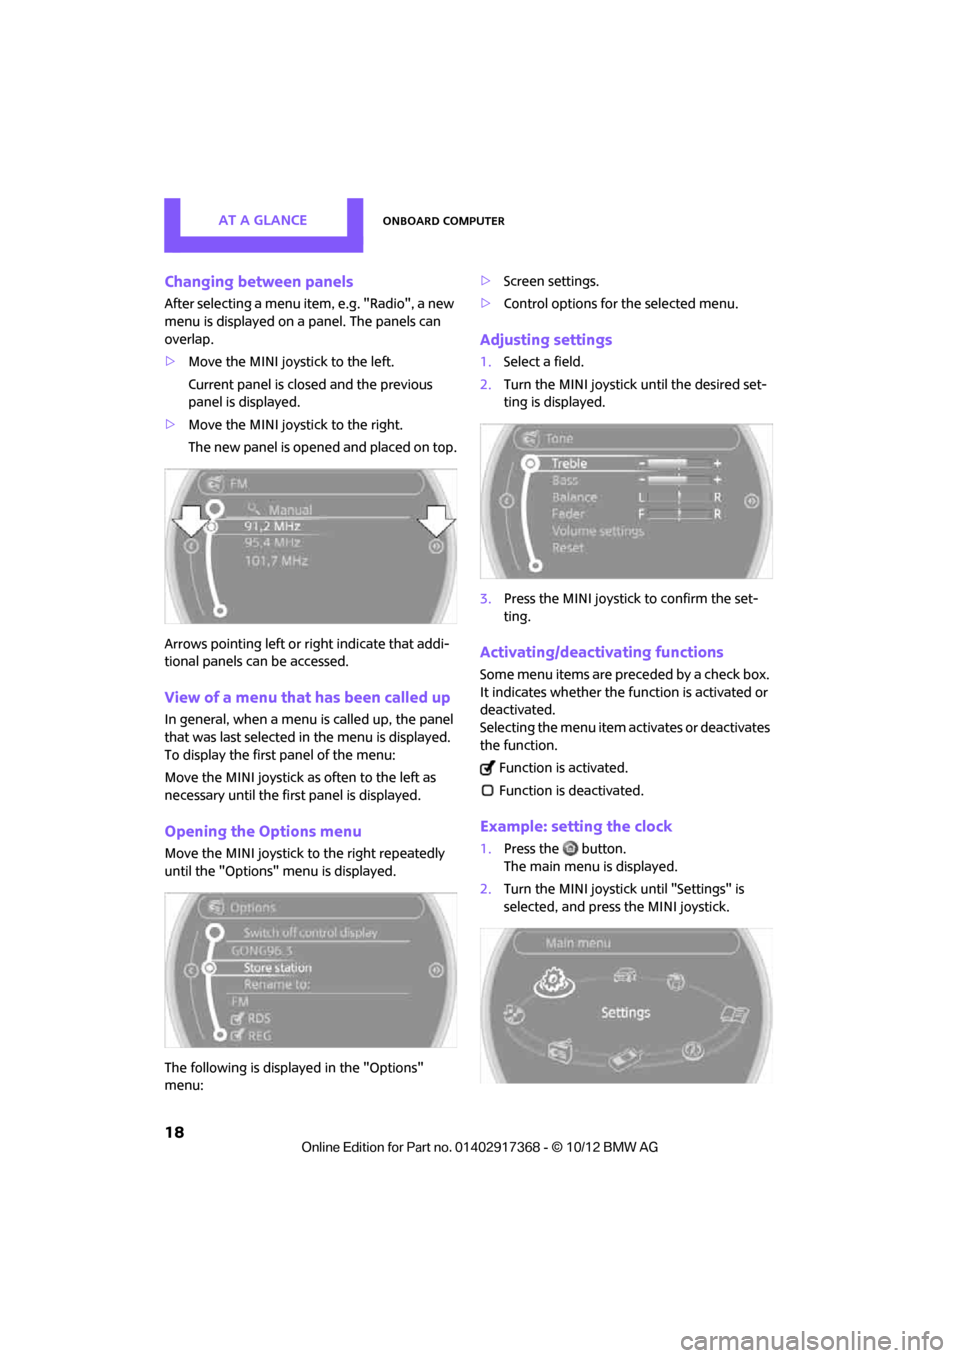
Changing between panels
After selecting a menu item, e.g. "Radio", a new
menu is displayed on a panel. The panels can
overlap.
>Move the MINI joystick to the left.
Current panel is closed and the previous
panel is displayed.
> Move the MINI joystick to the right.
The new panel is opened and placed on top.
Arrows pointing left or right indicate that addi-
tional panels can be accessed.
View of a menu that has been called up
In general, when a menu is called up, the panel
that was last selected in the menu is displayed.
To display the first panel of the menu:
Move the MINI joystick as often to the left as
necessary until the firs t panel is displayed.
Opening the Options menu
Move the MINI joystick to the right repeatedly
until the "Options" menu is displayed.
The following is displayed in the "Options"
menu: >
Screen settings.
> Control options for the selected menu.
Adjusting settings
1.Select a field.
2. Turn the MINI joystick until the desired set-
ting is displayed.
3. Press the MINI joystick to confirm the set-
ting.
Activating/deactivating functions
Some menu items are preceded by a check box.
It indicates whether the function is activated or
deactivated.
Selecting the menu item activates or deactivates
the function.
Function is activated.
Function is deactivated.
Example: setting the clock
1. Press the button.
The main menu is displayed.
2. Turn the MINI joystick until "Settings" is
selected, and press the MINI joystick.
00320051004F004C00510048000300280047004C0057004C005200510003
Page 20 of 275
Onboard computerAT A GLANCE
19
3.Turn the MINI joystick until "Time/Date" is
selected, and press the MINI joystick.
4. Turn the MINI joystick until "Time:" is
selected, and press the MINI joystick.
5. Turn the MINI joystick to set the hours and
press the MINI joystick.
6. Turn the MINI joystick to set the minutes and
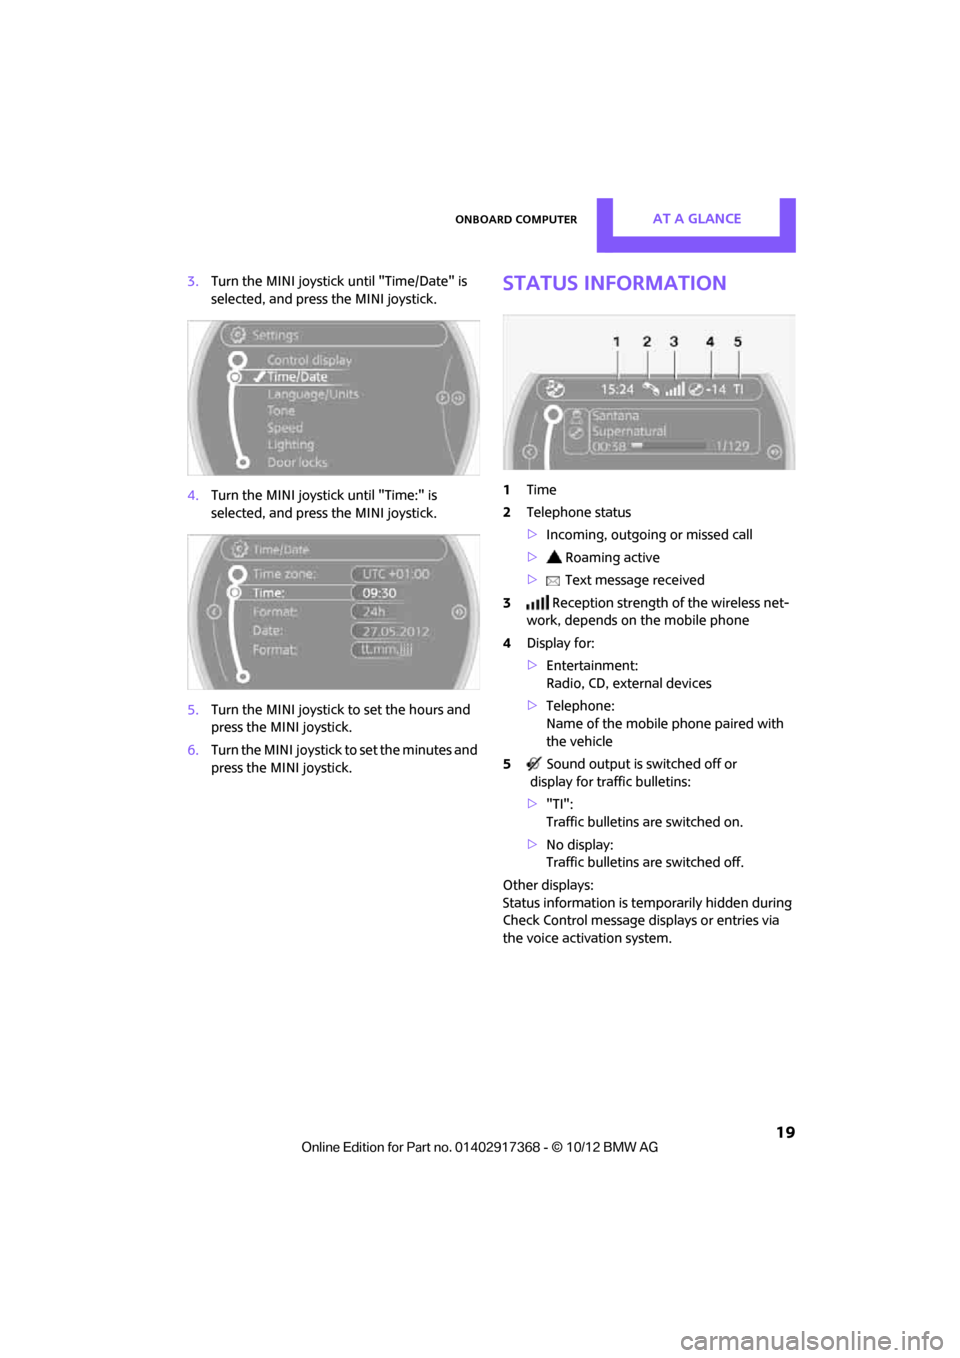
press the MINI joystick.Status information
1Time
2 Telephone status
>Incoming, outgoing or missed call
> Roaming active
> Text message received
3 Reception strength of the wireless net-
work, depends on the mobile phone
4 Display for:
>Entertainment:
Radio, CD, external devices
> Telephone:
Name of the mobile phone paired with
the vehicle
5 Sound output is switched off or
display for traffic bulletins:
> "TI":
Traffic bulletins are switched on.
> No display:
Traffic bulletins are switched off.
Other displays:
Status information is te mporarily hidden during
Check Control message displays or entries via
the voice activation system.
00320051004F004C00510048000300280047004C0057004C005200510003
Page 21 of 275
AT A GLANCELetters and numbers
20
Letters and numbers
Vehicle equipment
In this chapter, all production, country, and
optional equipment that is offered in the model
range is described. Equipment is also described
that is not available because of, for example,
selected options or coun try version. This also
applies to safety relate d functions and systems.
Entering letters and
numbers
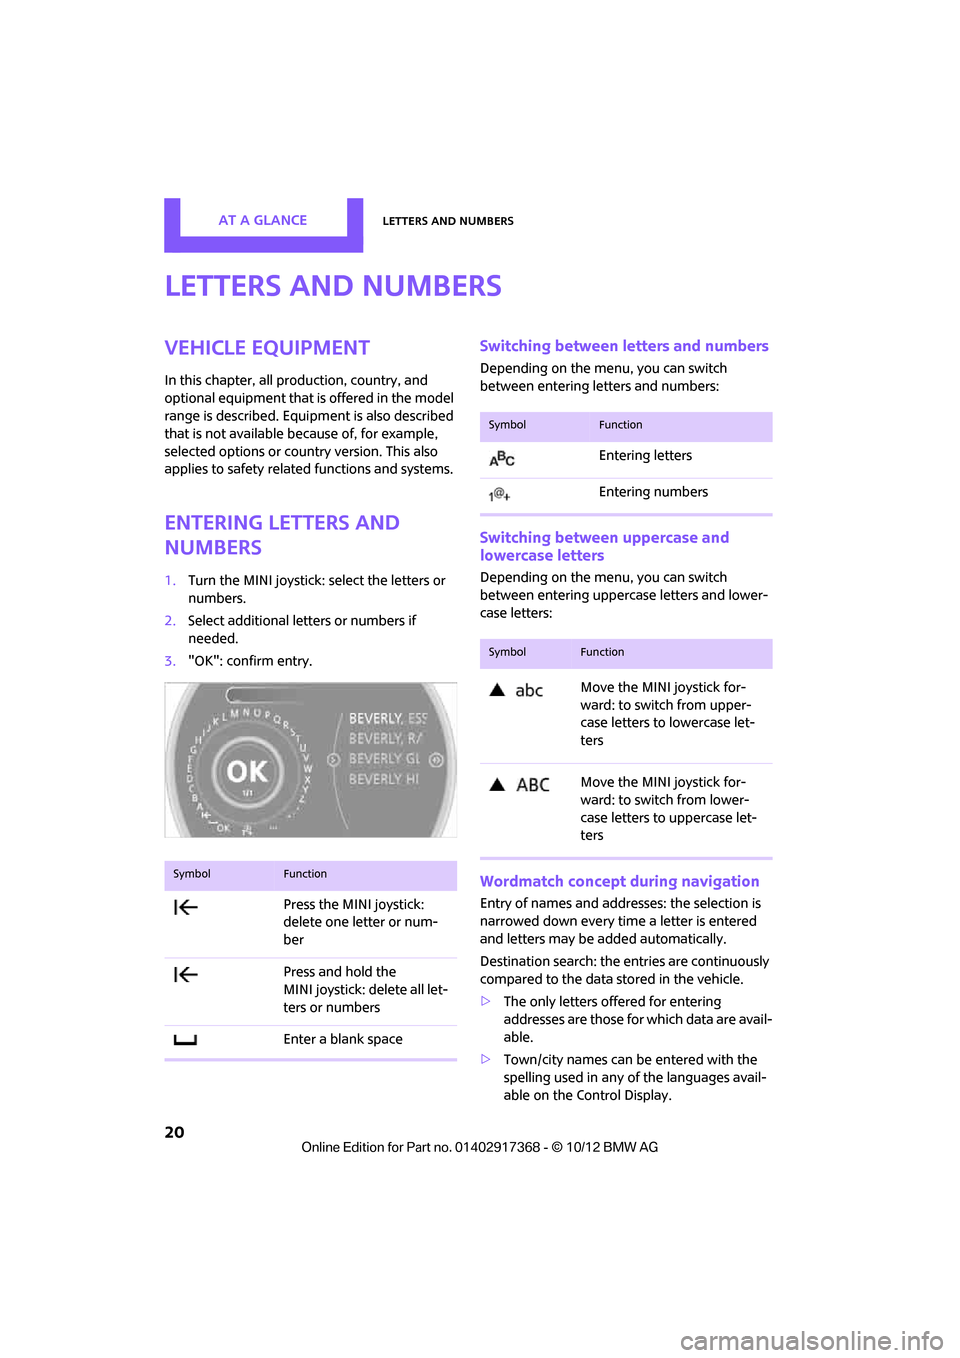
1.Turn the MINI joystick: select the letters or
numbers.
2. Select additional letters or numbers if
needed.
3. "OK": confirm entry.
Switching between letters and numbers
Depending on the menu, you can switch
between entering letters and numbers:
Switching between uppercase and
lowercase letters
Depending on the menu, you can switch
between entering uppercase letters and lower-
case letters:
Wordmatch concept during navigation
Entry of names and addre sses: the selection is
narrowed down every time a letter is entered
and letters may be added automatically.
Destination search: the en tries are continuously
compared to the data stored in the vehicle.
> The only letters of fered for entering
addresses are those for which data are avail-
able.
> Town/city names can be entered with the
spelling used in any of the languages avail-
able on the Control Display.
SymbolFunction
Press the MINI joystick:
delete one letter or num-
ber
Press and hold the
MINI joystick: delete all let-
ters or numbers
Enter a blank space
SymbolFunction
Entering letters
Entering numbers
SymbolFunction
Move the MINI joystick for-
ward: to switch from upper-
case letters to lowercase let-
ters
Move the MINI joystick for-
ward: to switch from lower-
case letters to uppercase let-
ters
00320051004F004C00510048000300280047004C0057004C005200510003
Page 22 of 275
Voice activation systemAT A GLANCE
21
Voice activation system
Vehicle equipment
In this chapter, all production, country, and
optional equipment that is offered in the model
range is described. Equipment is also described
that is not available because of, for example,
selected options or count ry version. This also
applies to safety related functions and systems.
The concept
> By using the voice activation system, most of
the functions that are displayed on the Con-
trol Display can be operated via voice com-
mands. The system supports the entry pro-
cess by means of announcements.
> Functions that can only be used while the
vehicle is not moving cannot be operated via
the voice activation system.
> The system includes a special microphone in
the roofliner on the driver's side.
Prerequisite
So that voice commands can be identified, set a
language on the Control Display that is sup-
ported by the voice activation system.
To set the language, see page 69.
Symbols in the Owner's Manual
Saying commands
Activating voice activation system
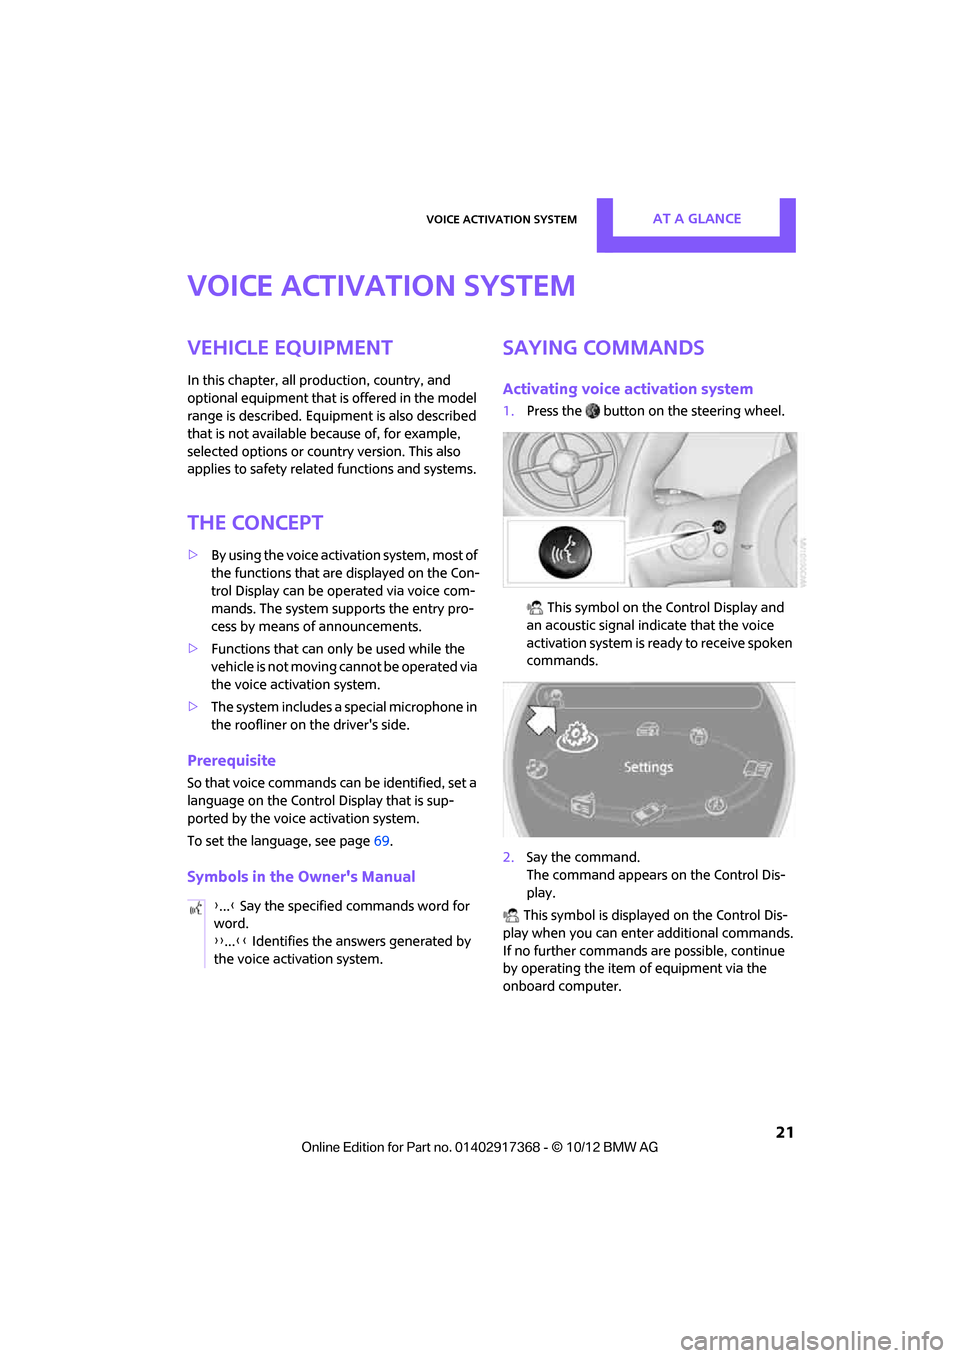
1.Press the button on the steering wheel.
This symbol on the Control Display and
an acoustic signal indicate that the voice
activation system is ready to receive spoken
commands.
2. Say the command.
The command appears on the Control Dis-
play.
This symbol is displayed on the Control Dis-
play when you can ente r additional commands.
If no further commands are possible, continue
by operating the item of equipment via the
onboard computer.
{
...} Say the specified commands word for
word.
{{ ...}} Identifies the answers generated by
the voice activation system.
00320051004F004C00510048000300280047004C0057004C005200510003