USB MINI Paceman 2013 Owner's Manual
[x] Cancel search | Manufacturer: MINI, Model Year: 2013, Model line: Paceman, Model: MINI Paceman 2013Pages: 275, PDF Size: 4.23 MB
Page 16 of 275
CockpitAT A GLANCE
15
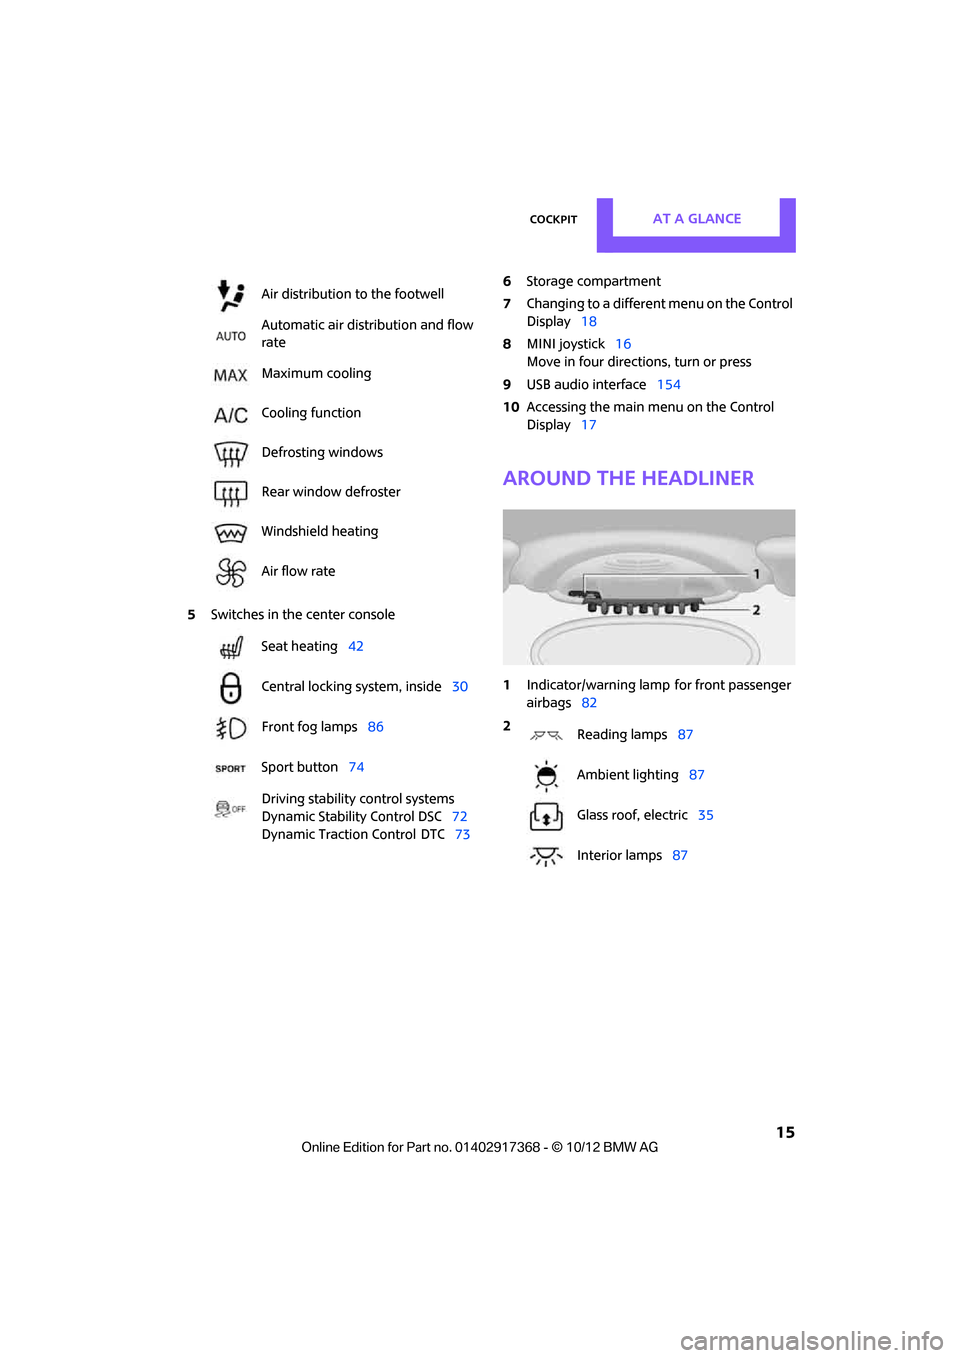
5Switches in the center console 6
Storage compartment
7 Changing to a differen t menu on the Control
Display 18
8 MINI joystick 16
Move in four directions, turn or press
9 USB audio interface 154
10 Accessing the main me nu on the Control
Display 17
Around the headliner
1Indicator/warning lamp for front passenger
airbags 82
Air distribution to the footwell
Automatic air distribution and flow
rate
Maximum cooling
Cooling function
Defrosting windows
Rear window defroster
Windshield heating
Air flow rate
Seat heating
42
Central locking system, inside 30
Front fog lamps 86
Sport button 74
Driving stability control systems
Dynamic Stability Control DSC 72
Dynamic Traction Control
DTC 73
2
Reading lamps 87
Ambient lighting 87
Glass roof, electric 35
Interior lamps 87
00320051004F004C00510048000300280047004C0057004C005200510003
Page 98 of 275
Practical interior accessoriesCONTROLS
97
Glove compartment
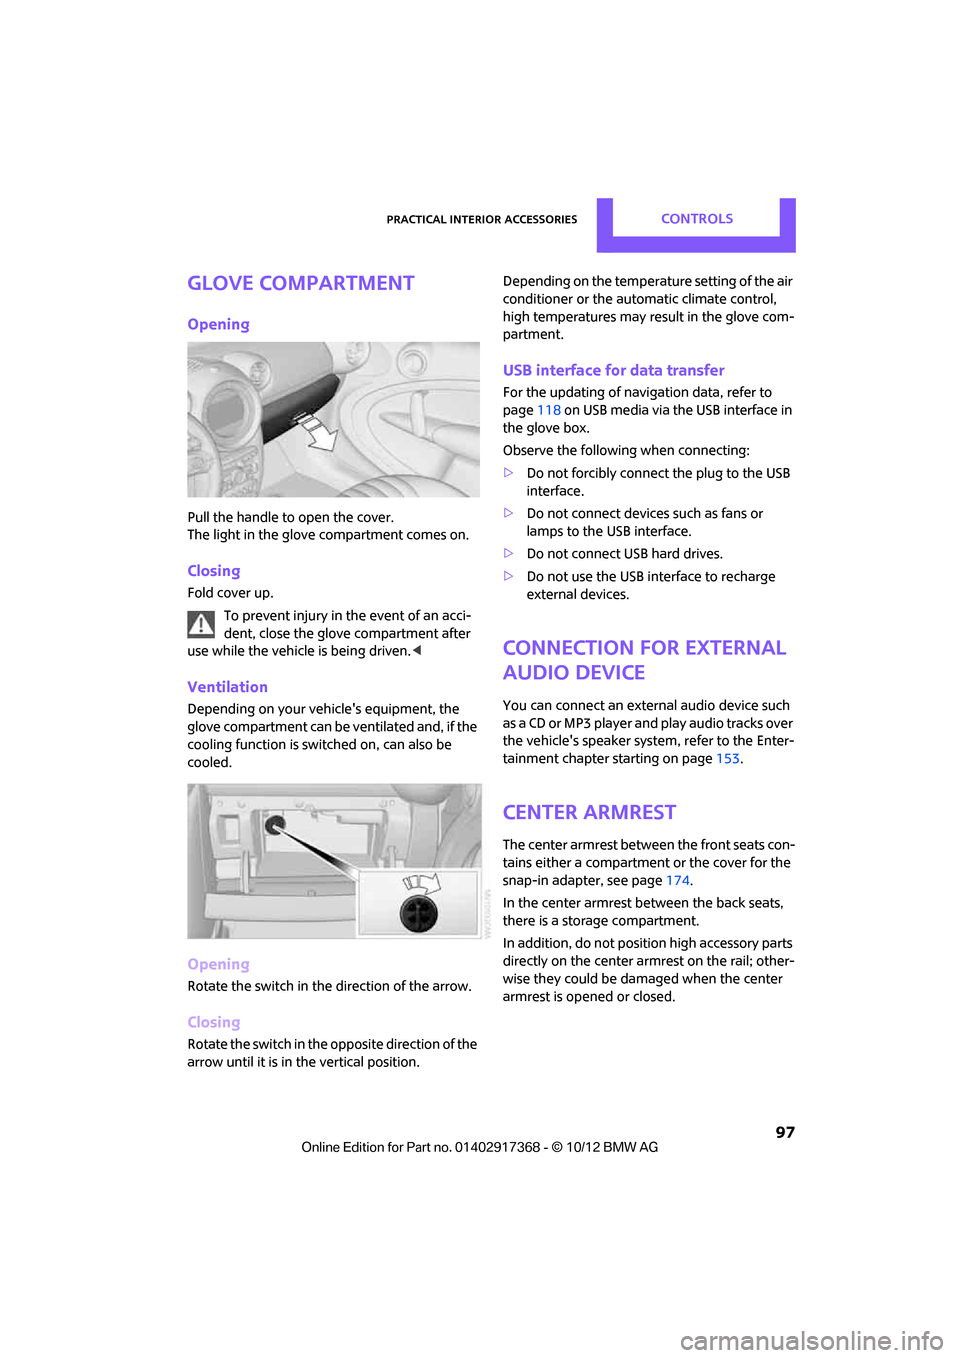
Opening
Pull the handle to open the cover.
The light in the glove compartment comes on.
Closing
Fold cover up.To prevent injury in the event of an acci-
dent, close the glove compartment after
use while the vehicle is being driven. <
Ventilation
Depending on your vehicle's equipment, the
glove compartment can be ventilated and, if the
cooling function is switched on, can also be
cooled.
Opening
Rotate the switch in the direction of the arrow.
Closing
Rotate the switch in the opposite direction of the
arrow until it is in the vertical position. Depending on the temperature setting of the air
conditioner or the automatic climate control,
high temperatures may result in the glove com-
partment.
USB interface for data transfer
For the updating of navi
gation data, refer to
page 118 on USB media via the USB interface in
the glove box.
Observe the following when connecting:
> Do not forcibly connect the plug to the USB
interface.
> Do not connect devices such as fans or
lamps to the USB interface.
> Do not connect USB hard drives.
> Do not use the USB interface to recharge
external devices.
Connection for external
audio device
You can connect an external audio device such
as a CD or MP3 player an d play audio tracks over
the vehicle's speaker system, refer to the Enter-
tainment chapter starting on page 153.
Center armrest
The center armrest between the front seats con-
tains either a compartment or the cover for the
snap-in adapter, see page 174.
In the center armrest between the back seats,
there is a storage compartment.
In addition, do not position high accessory parts
directly on the center armrest on the rail; other-
wise they could be damaged when the center
armrest is opened or closed.
00320051004F004C00510048000300280047004C0057004C005200510003
Page 100 of 275
Practical interior accessoriesCONTROLS
99
Center Rail
Various accessory parts can be attached to the
Center Rail and installe d in different positions.
Do not use accessory parts near the hand
brake; otherwise these could be damaged
when the hand brake lever is operated. <
Smartphone holder
The upper part of the smartphone holder can be
rotated by 360°.
When installing in the front of the rail, make sure
that there is sufficient space, e.g., away from the
seat; otherwise, damage may be caused when
rotating.
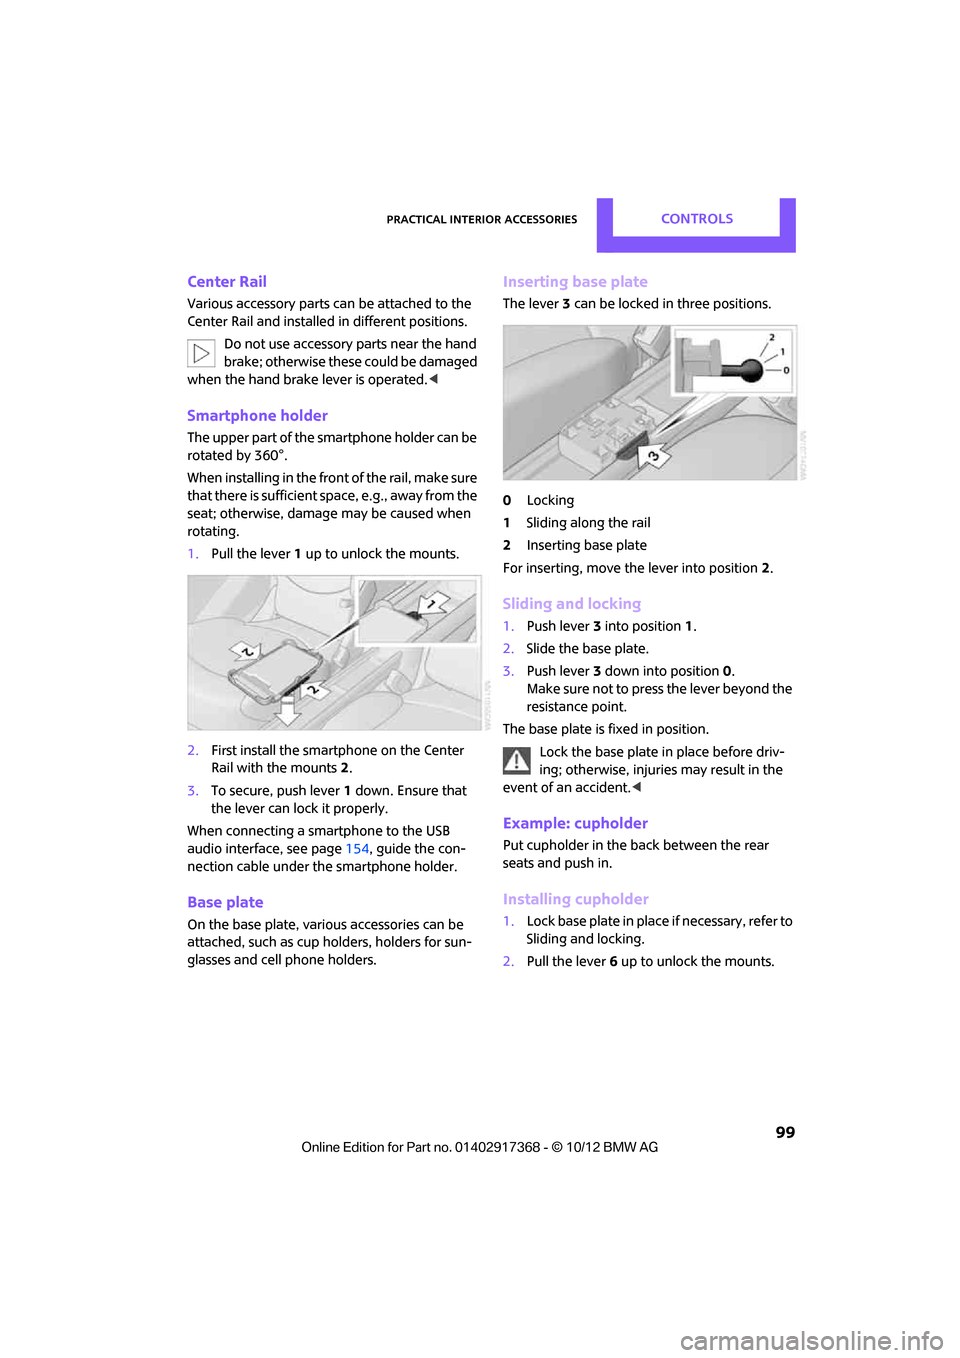
1. Pull the lever 1 up to unlock the mounts.
2. First install the smartp hone on the Center
Rail with the mounts 2.
3. To secure, push lever 1 down. Ensure that
the lever can lock it properly.
When connecting a smartphone to the USB
audio interface, see page 154, guide the con-
nection cable under the smartphone holder.
Base plate
On the base plate, vari ous accessories can be
attached, such as cup holders, holders for sun-
glasses and cell phone holders.
Inserting base plate
The lever 3 can be locked in three positions.
0 Locking
1 Sliding along the rail
2 Inserting base plate
For inserting, move th e lever into position2.
Sliding and locking
1. Push lever 3 into position 1.
2. Slide the base plate.
3. Push lever 3 down into position 0.
Make sure not to press the lever beyond the
resistance point.
The base plate is fixed in position.
Lock the base plate in place before driv-
ing; otherwise, injuries may result in the
event of an accident. <
Example: cupholder
Put cupholder in the back between the rear
seats and push in.
Installing cupholder
1.Lock base plate in plac e if necessary, refer to
Sliding and locking.
2. Pull the lever 6 up to unlock the mounts.
00320051004F004C00510048000300280047004C0057004C005200510003
Page 119 of 275

NAVIGATIONNavigation system
118
Navigation system
Vehicle equipment
In this chapter, all production, country, and
optional equipment that is offered in the model
range is described. Equipment is also described
that is not available because of, for example,
selected options or coun try version. This also
applies to safety relate d functions and systems.
General information
The navigation system can determine the pre-
cise position of the vehicle, with the aid of satel-
lites and vehicle sensors, and can reliably guide
you to every entered destination.
Enter data only with the vehicle station-
ary, and always give priority to the appli-
cable traffic regulations in the event of any con-
tradiction between traffic and road conditions
and the instructions issu ed by the navigation
system. Failure to take to this precaution can
place you in violation of the law and put vehicle
occupants and other ro ad users in danger.<
Selecting navigation
1."Navigation"
During route guidance, an arrow view or a map
view is displayed on the onboard computer.
Navigation data
Information on navigation data
1. "Navigation"
2. Open "Options".
3. "Navigation system version"
Information about the data version is displayed.
Updating the navigation data
General information
Navigation data are stored in the vehicle and
can be updated.
You may obtain current navigation data and the
enabling code at your MINI dealer.
Updating the data can take several hours,
depending on the volume of data.
> Update data while driving to reduce the
drain on the battery.
> The update is resumed automatically when
a trip is continued after an interruption.
> You can inquire as to the status of the
update.
> The data are stored in the vehicle.
> After the updating process is complete, the
system restarts.
> The medium with the na vigation data can be
removed after the update.
To update
1. Depending on equipment: insert USB stor-
age device with navigation data
>into the USB interface in the glove com-
partment
> into the USB audio interface, refer to
page 154.
2. Follow the instructions on the onboard com-
puter.
00320051004F004C00510048000300280047004C0057004C005200510003
Page 120 of 275

Navigation systemNAVIGATION
119
3.Enter the activation code of the USB storage
device.
4. Begin driving.
The update begins after the activation code is
entered. When the update is completed, the sys-
tem restarts.
00320051004F004C00510048000300280047004C0057004C005200510003
Page 154 of 275
External devicesEntertainment
153
External devices
Vehicle equipment
In this chapter, all production, country, and
optional equipment that is offered in the model
range is described. Equipment is also described
that is not available because of, for example,
selected options or count ry version. This also
applies to safety related functions and systems.
Overview
Different external devices can be connected to
the vehicle. Sound is output over the vehicle
speakers. Depending upon how the external
device is connected to the vehicle, the device
may be operated using the MINI joystick.
AUX-In connection
Overview
> It is possible to connect audio devices, e.g.
MP3 players. Sound is output over the vehi-
cle speakers.
> Recommended settings: mid-level tone and
volume settings on th e audio device. Tone
may depend on the quality of the audio files.
Connecting
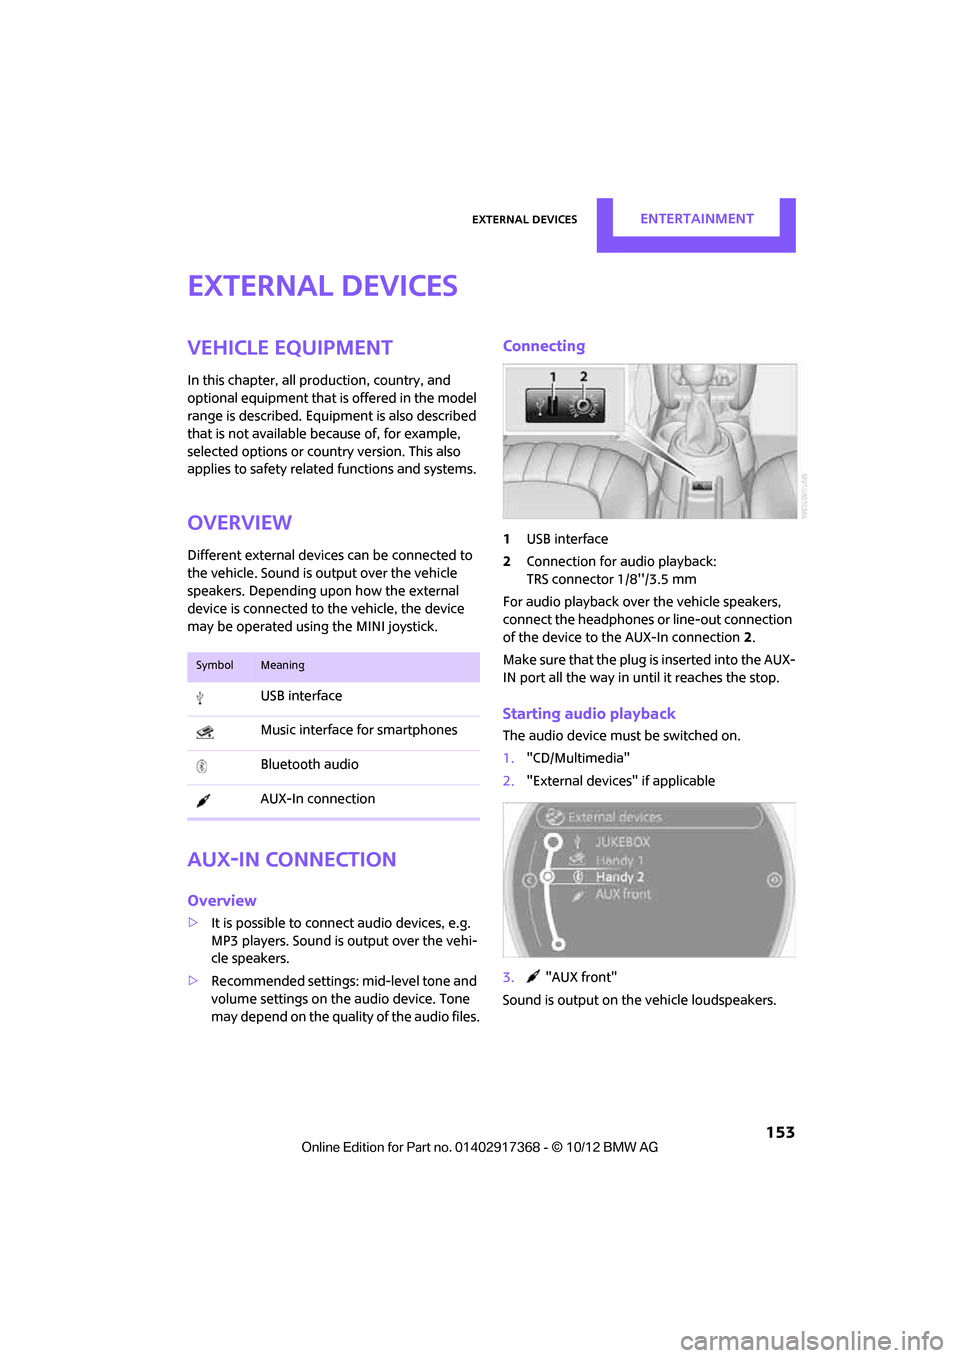
1 USB interface
2 Connection for audio playback:
TRS connector 1/8''/3.5 mm
For audio playback over the vehicle speakers,
connect the headphones or line-out connection
of the device to the AUX-In connection 2.
Make sure that the plug is inserted into the AUX-
IN port all the way in un til it reaches the stop.
Starting audio playback
The audio device must be switched on.
1."CD/Multimedia"
2. "External devices" if applicable
3. "AUX front"
Sound is output on the vehicle loudspeakers.
SymbolMeaning
USB interface
Music interface for smartphones
Bluetooth audio
AUX-In connection
00320051004F004C00510048000300280047004C0057004C005200510003
Page 155 of 275
EntertainmentExternal devices
154
Volume
The volume of the sound output depends on the
audio device. If this volume greatly deviates
from the other audio sources, then the volume
should be equalized.
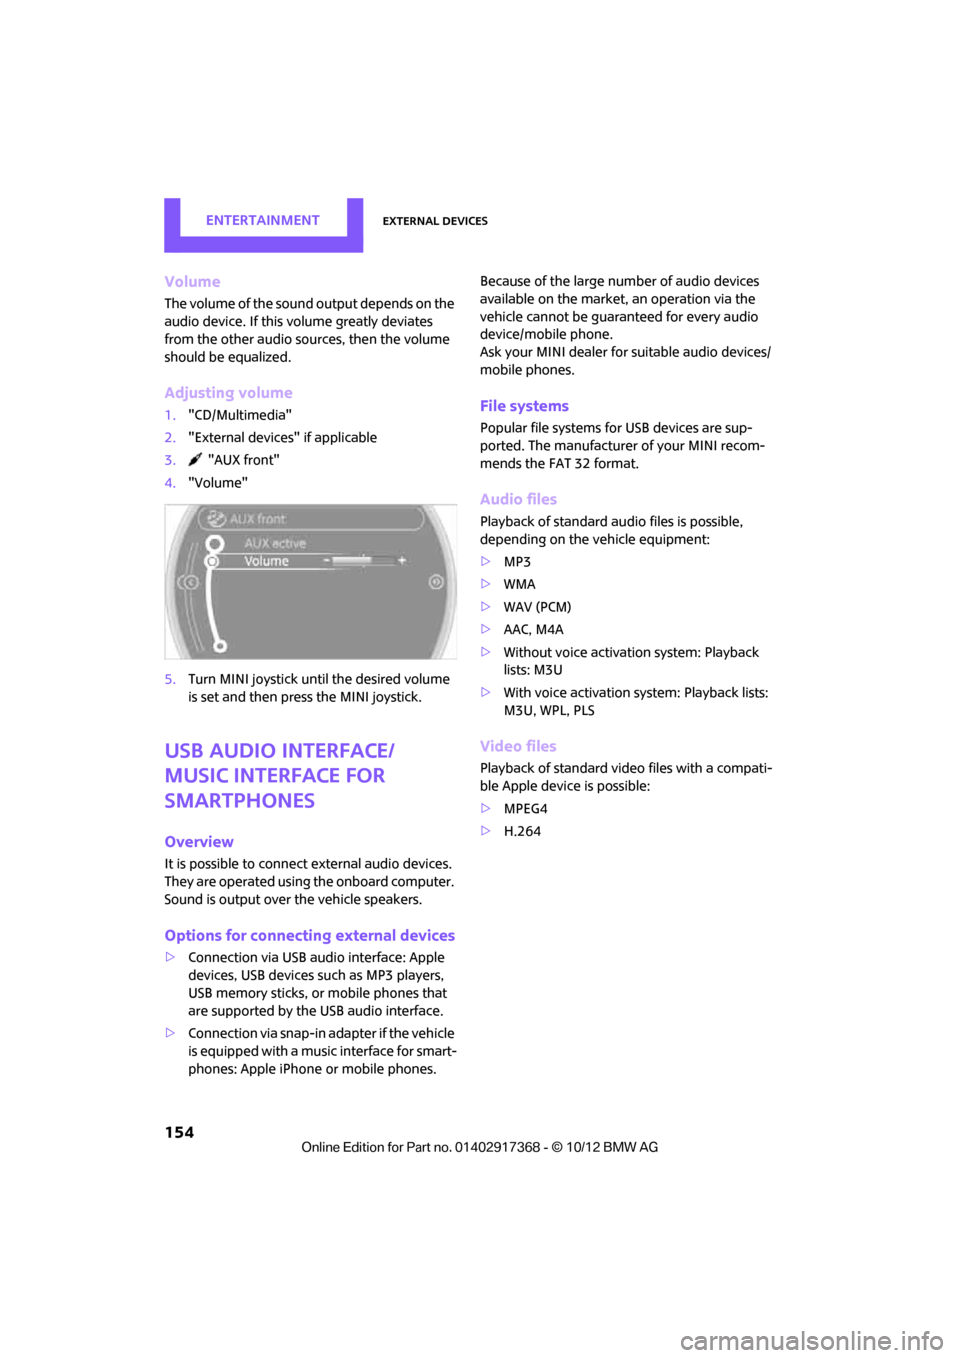
Adjusting volume
1."CD/Multimedia"
2. "External devices" if applicable
3. "AUX front"
4. "Volume"
5. Turn MINI joystick until the desired volume
is set and then press the MINI joystick.
USB audio interface/
Music interface for
smartphones
Overview
It is possible to connect external audio devices.
They are operated using the onboard computer.
Sound is output over the vehicle speakers.
Options for connecting external devices
>Connection via USB audio interface: Apple
devices, USB devices such as MP3 players,
USB memory sticks, or mobile phones that
are supported by the USB audio interface.
> Connection via snap-in adapter if the vehicle
is equipped with a music interface for smart-
phones: Apple iPhone or mobile phones. Because of the large number of audio devices
available on the market, an operation via the
vehicle cannot be guaranteed for every audio
device/mobile phone.
Ask your MINI dealer for suitable audio devices/
mobile phones.
File systems
Popular file systems fo
r USB devices are sup-
ported. The manufacturer of your MINI recom-
mends the FAT 32 format.
Audio files
Playback of standard au dio files is possible,
depending on the vehicle equipment:
> MP3
> WMA
> WAV (PCM)
> AAC, M4A
> Without voice activation system: Playback
lists: M3U
> With voice activation sy stem: Playback lists:
M3U, WPL, PLS
Video files
Playback of standard video files with a compati-
ble Apple device is possible:
> MPEG4
> H.264
00320051004F004C00510048000300280047004C0057004C005200510003
Page 156 of 275
External devicesEntertainment
155
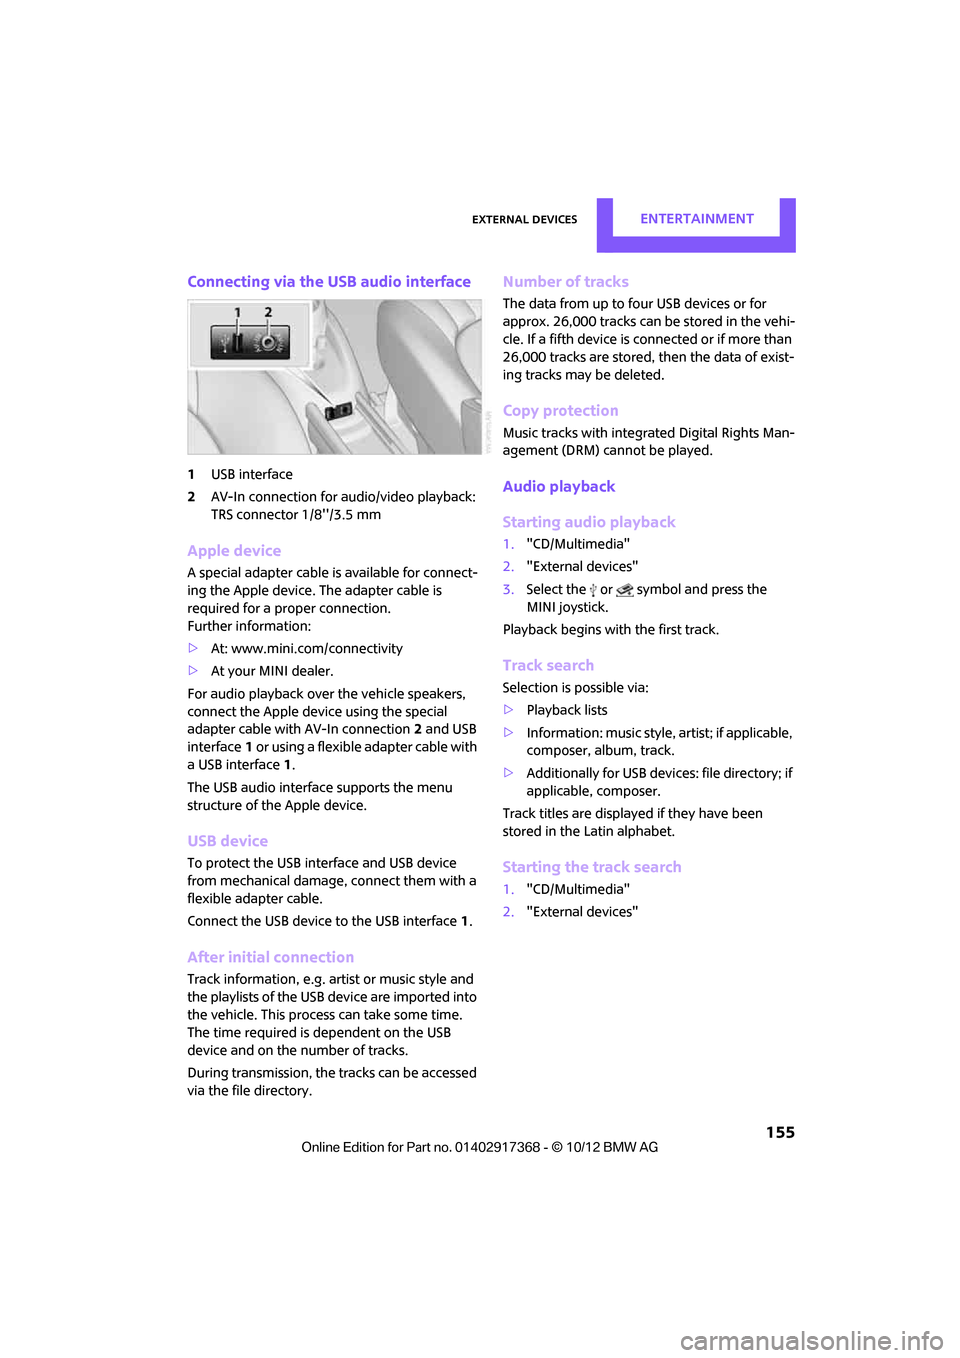
Connecting via the USB audio interface
1USB interface
2 AV-In connection for audio/video playback:
TRS connector 1/8''/3.5 mm
Apple device
A special adapter cable is available for connect-
ing the Apple device. The adapter cable is
required for a proper connection.
Further information:
>At: www.mini.com/connectivity
> At your MINI dealer.
For audio playback over the vehicle speakers,
connect the Apple device using the special
adapter cable with AV-In connection 2 and USB
interface 1 or using a flexible adapter cable with
a USB interface 1.
The USB audio interface supports the menu
structure of the Apple device.
USB device
To protect the USB interface and USB device
from mechanical damage, connect them with a
flexible adapter cable.
Connect the USB device to the USB interface 1.
After initial connection
Track information, e.g. ar tist or music style and
the playlists of the USB device are imported into
the vehicle. This process can take some time.
The time required is dependent on the USB
device and on the number of tracks.
During transmission, the tracks can be accessed
via the file directory.
Number of tracks
The data from up to four USB devices or for
approx. 26,000 tracks can be stored in the vehi-
cle. If a fifth device is connected or if more than
26,000 tracks are stored, then the data of exist-
ing tracks may be deleted.
Copy protection
Music tracks with integrated Digital Rights Man-
agement (DRM) cannot be played.
Audio playback
Starting audio playback
1. "CD/Multimedia"
2. "External devices"
3. Select the or symbol and press the
MINI joystick.
Playback begins with the first track.
Track search
Selection is possible via:
> Playback lists
> Information: musi c style, artist; if applicable,
composer, album, track.
> Additionally for USB device s: file directory; if
applicable, composer.
Track titles are displayed if they have been
stored in the Latin alphabet.
Starting the track search
1. "CD/Multimedia"
2. "External devices"
00320051004F004C00510048000300280047004C0057004C005200510003
Page 158 of 275
External devicesEntertainment
157
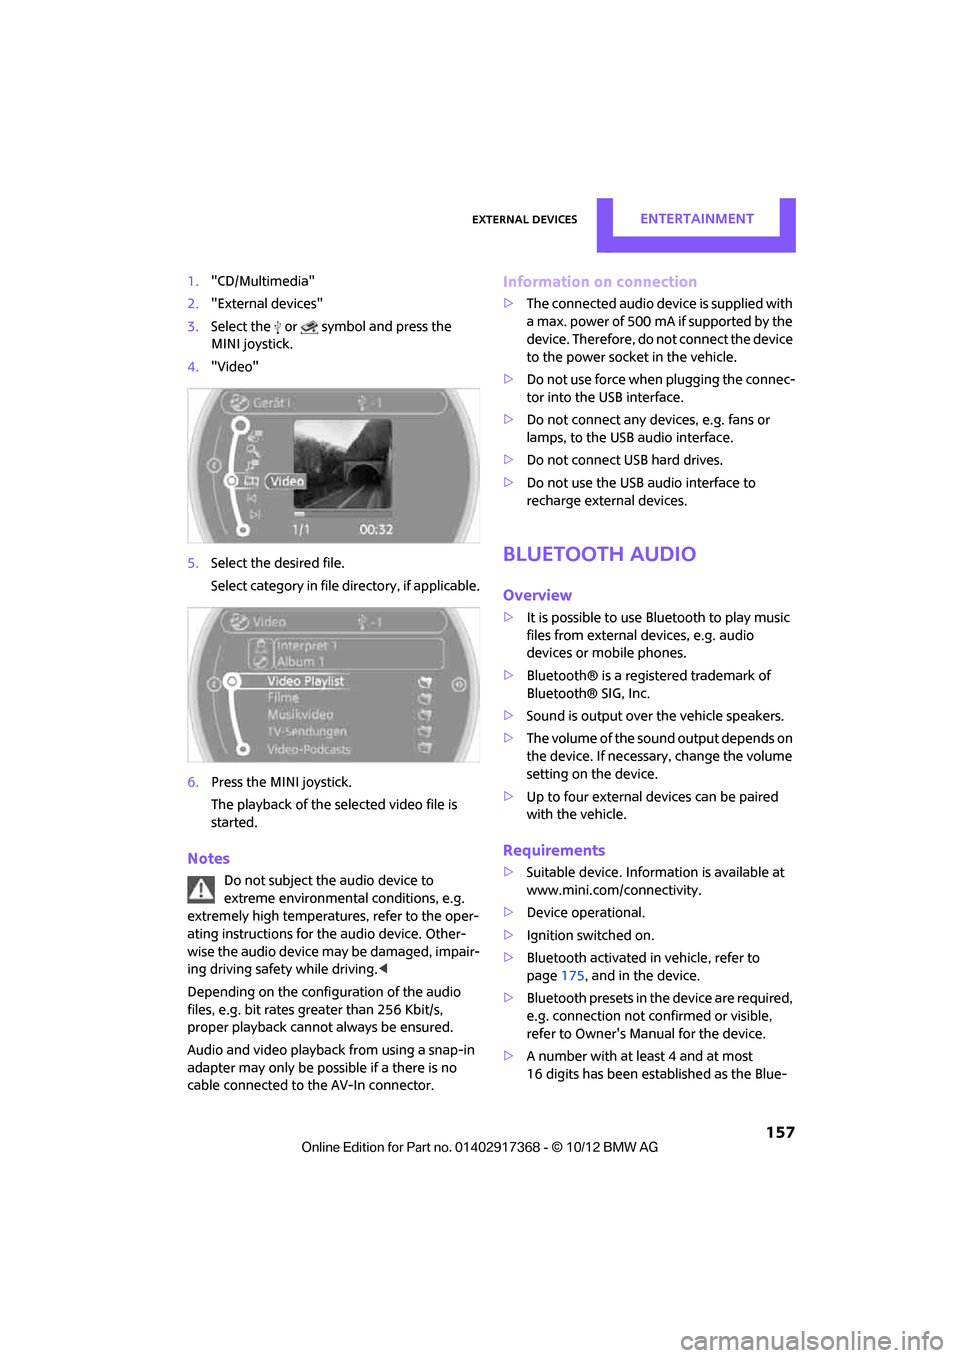
1."CD/Multimedia"
2. "External devices"
3. Select the or symbol and press the
MINI joystick.
4. "Video"
5. Select the desired file.
Select category in file directory, if applicable.
6. Press the MINI joystick.
The playback of the selected video file is
started.
Notes
Do not subject the audio device to
extreme environmental conditions, e.g.
extremely high temperatures, refer to the oper-
ating instructions for the audio device. Other-
wise the audio device may be damaged, impair-
ing driving safety while driving. <
Depending on the config uration of the audio
files, e.g. bit rates greater than 256 Kbit/s,
proper playback cannot always be ensured.
Audio and video playback from using a snap-in
adapter may only be possible if a there is no
cable connected to the AV-In connector.
Information on connection
> The connected audio device is supplied with
a max. power of 500 mA if supported by the
device. Therefore, do not connect the device
to the power socket in the vehicle.
> Do not use force when plugging the connec-
tor into the USB interface.
> Do not connect any devices, e.g. fans or
lamps, to the USB audio interface.
> Do not connect USB hard drives.
> Do not use the USB audio interface to
recharge external devices.
Bluetooth audio
Overview
>It is possible to use Bluetooth to play music
files from external devices, e.g. audio
devices or mobile phones.
> Bluetooth® is a registered trademark of
Bluetooth® SIG, Inc.
> Sound is output over the vehicle speakers.
> The volume of the sound output depends on
the device. If necessary, change the volume
setting on the device.
> Up to four external devices can be paired
with the vehicle.
Requirements
>Suitable device. Information is available at
www.mini.com/connectivity.
> Device operational.
> Ignition switched on.
> Bluetooth activated in vehicle, refer to
page 175, and in the device.
> Bluetooth presets in the device are required,
e.g. connection not confirmed or visible,
refer to Owner's Ma nual for the device.
> A number with at least 4 and at most
16 digits has been established as the Blue-
00320051004F004C00510048000300280047004C0057004C005200510003
Page 162 of 275
External devicesEntertainment
161
Videos cannot be played or can only be played
with a delayed audio output.
> Check the device compatibility. Information
is available at www.mini.com/connectivity.
Playback is interrupted by the press of a button
or other messages on the device.
> Switch off key tones an d other acoustic sig-
nal on the device.
Playback is interrupted by a phone call or traffic
report and does not automatically continue.
> Activate and deactivate the radio mute on
the radio control panel.
Playback is not possible when the mobile phone
is connected via Bluetooth audio and at the
same time via the music interface for smart-
phones at the snap-in adapter.
> Disconnect one of the two connections, e.g.
the audio connection, refer to page 160,
and start playback again.
If you have gone through all items in the list and
still cannot activate the desired function please
contact the Hotline or your MINI dealer.
Software update
The vehicle supports various external devices,
depending on the software it is currently using.
A software update can enable the vehicle to
support, for example, new mobile phones or
new external devices.
Software updates and associated, up-to-date
instructions are availa ble on the web page
www.mini.com/connectivity.
Displaying current version
The currently installed software is displayed.
1. "Settings"
2. "Software update"
3. "Show current version"
Updating software
The software update can only be performed
when stopped.
1.Save the file for the software update in the
main directory of a USB data storage device.
2. Connect the USB data storage device to the
USB port in the center console, refer to
page 154. Updating using the USB port in
the glove compartment is not possible.
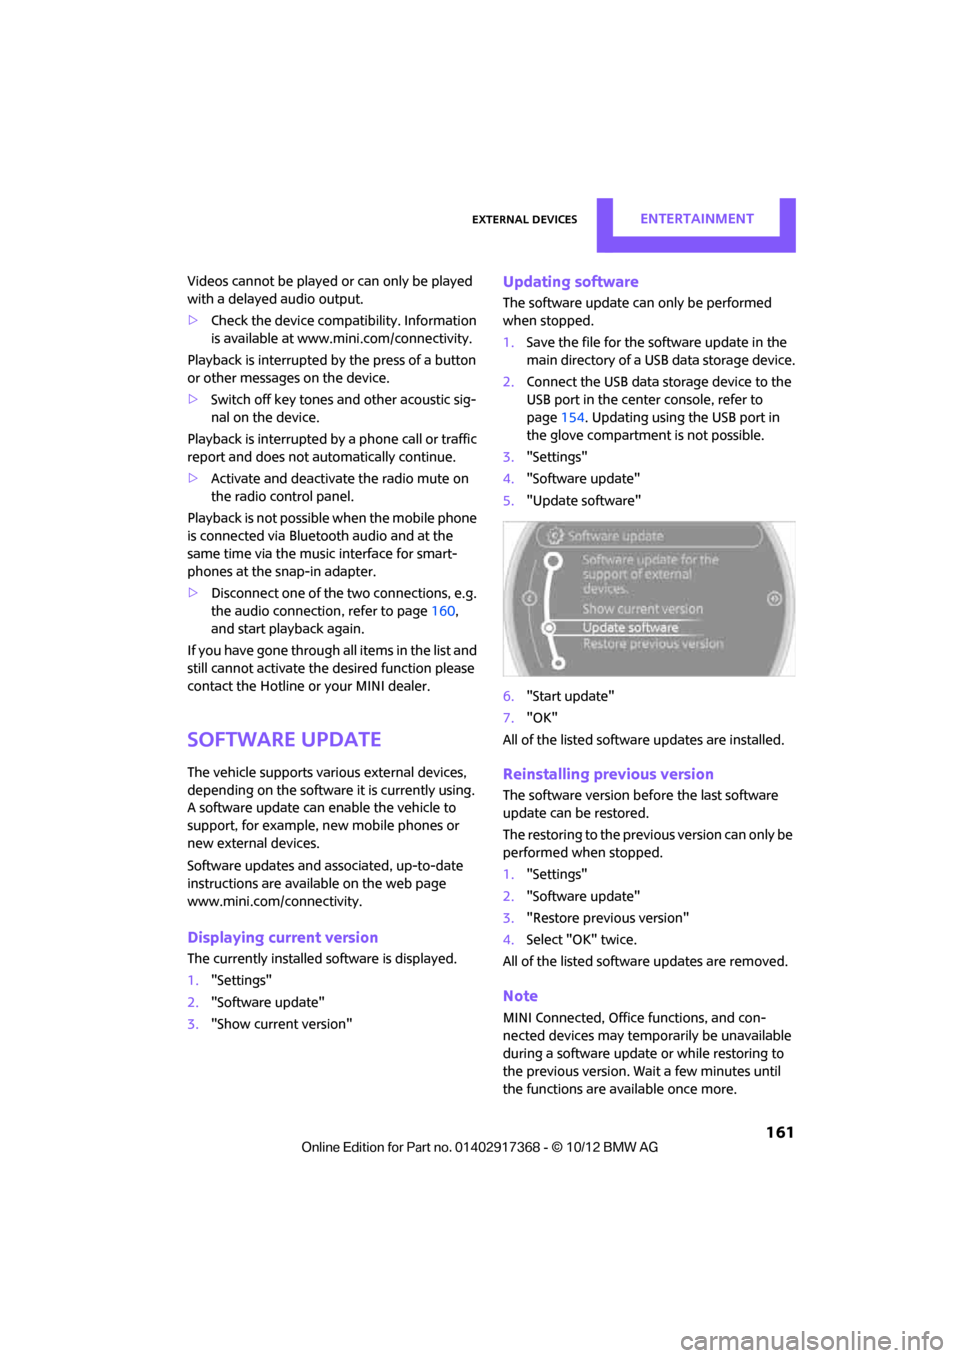
3. "Settings"
4. "Software update"
5. "Update software"
6. "Start update"
7. "OK"
All of the listed softwa re updates are installed.
Reinstalling previous version
The software version befo re the last software
update can be restored.
The restoring to the previous version can only be
performed when stopped.
1. "Settings"
2. "Software update"
3. "Restore previous version"
4. Select "OK" twice.
All of the listed softwa re updates are removed.
Note
MINI Connected, Office functions, and con-
nected devices may temporarily be unavailable
during a software update or while restoring to
the previous version. Wait a few minutes until
the functions are available once more.
00320051004F004C00510048000300280047004C0057004C005200510003