child lock MINI Paceman 2014 Owner's Manual (Mini Connected)
[x] Cancel search | Manufacturer: MINI, Model Year: 2014, Model line: Paceman, Model: MINI Paceman 2014Pages: 282, PDF Size: 6.76 MB
Page 41 of 282
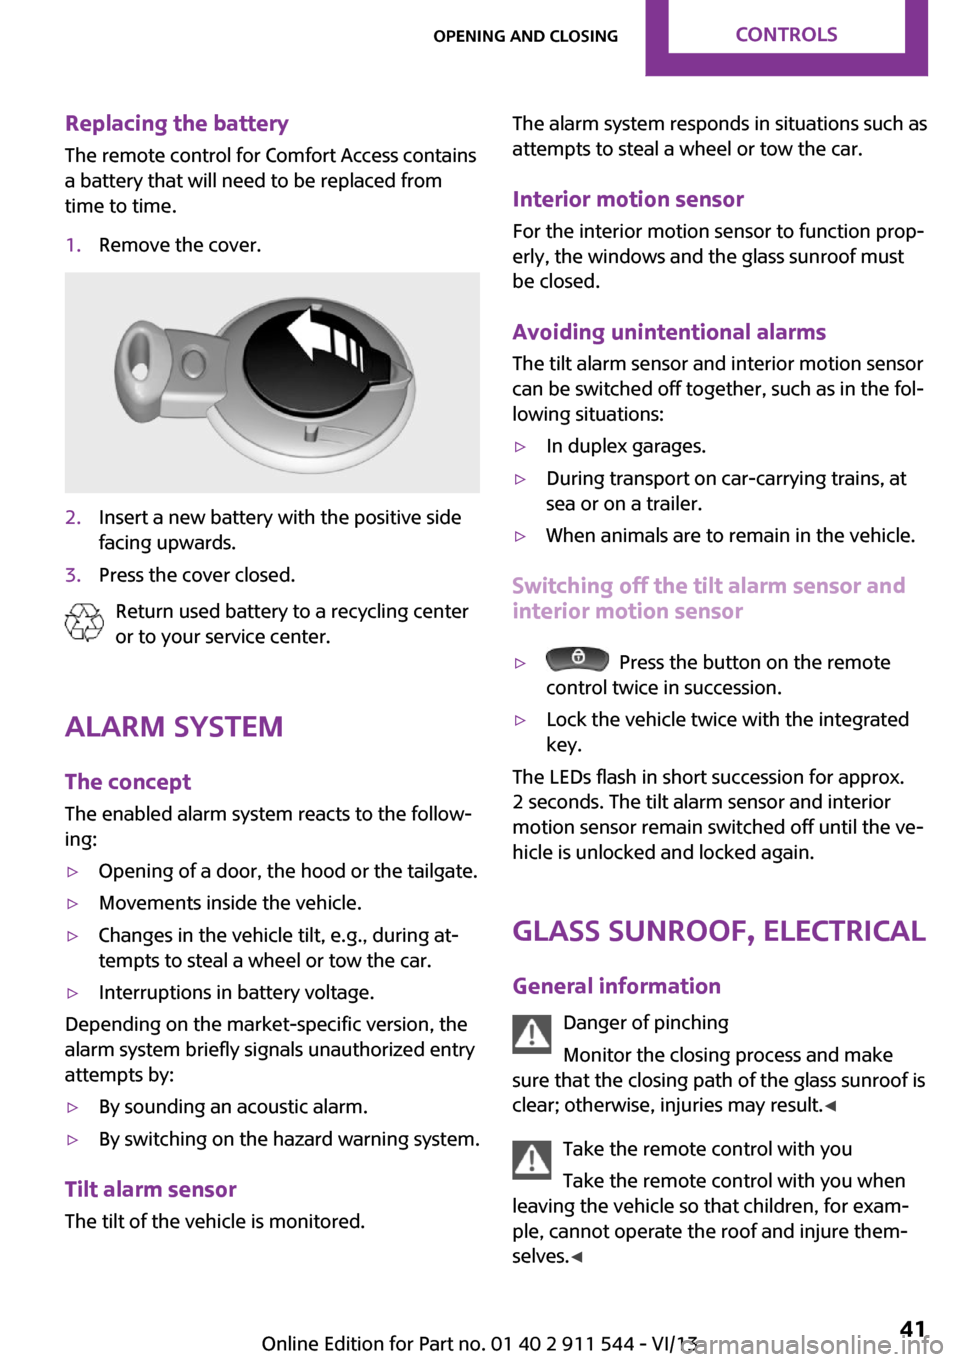
Replacing the battery
The remote control for Comfort Access contains
a battery that will need to be replaced from
time to time.1.Remove the cover.2.Insert a new battery with the positive side
facing upwards.3.Press the cover closed.
Return used battery to a recycling center
or to your service center.
Alarm system
The concept
The enabled alarm system reacts to the follow‐
ing:
▷Opening of a door, the hood or the tailgate.▷Movements inside the vehicle.▷Changes in the vehicle tilt, e.g., during at‐
tempts to steal a wheel or tow the car.▷Interruptions in battery voltage.
Depending on the market-specific version, the
alarm system briefly signals unauthorized entry
attempts by:
▷By sounding an acoustic alarm.▷By switching on the hazard warning system.
Tilt alarm sensor
The tilt of the vehicle is monitored.
The alarm system responds in situations such as
attempts to steal a wheel or tow the car.
Interior motion sensor For the interior motion sensor to function prop‐
erly, the windows and the glass sunroof must
be closed.
Avoiding unintentional alarms
The tilt alarm sensor and interior motion sensor
can be switched off together, such as in the fol‐
lowing situations:▷In duplex garages.▷During transport on car-carrying trains, at
sea or on a trailer.▷When animals are to remain in the vehicle.
Switching off the tilt alarm sensor and
interior motion sensor
▷ Press the button on the remote
control twice in succession.▷Lock the vehicle twice with the integrated
key.
The LEDs flash in short succession for approx.
2 seconds. The tilt alarm sensor and interior
motion sensor remain switched off until the ve‐
hicle is unlocked and locked again.
Glass sunroof, electrical
General information Danger of pinching
Monitor the closing process and make
sure that the closing path of the glass sunroof is
clear; otherwise, injuries may result. ◀
Take the remote control with you
Take the remote control with you when
leaving the vehicle so that children, for exam‐
ple, cannot operate the roof and injure them‐
selves. ◀
Seite 41Opening and closingControls41
Online Edition for Part no. 01 40 2 911 544 - VI/13
Page 48 of 282

The shoulder strap's anchorage point will be
correct for adult seat occupants of every build if
the seat is correctly adjusted.
One person per safety belt
Never allow more than one person to
wear a single safety belt. Never allow infants or
small children to ride on a passenger's lap. ◀
Putting on the belt
Lay the belt, without twisting, snugly
across the lap and shoulders, as close to the
body as possible. Make sure that the belt lies
low around the hips in the lap area and does
not press on the abdomen. Otherwise, the belt
can slip over the hips in the lap area in a frontal
impact and injure the abdomen.
The safety belt must not lie across the neck, rub
on sharp edges, be routed over solid or breaka‐
ble objects, or be pinched. ◀
Reduction of restraining effect
Avoid wearing clothing that prevents the
belt from fitting properly, and pull the shoulder
belt periodically to readjust the tension across
your lap; otherwise, the retention effect of the
safety belt may be reduced. ◀
Buckling the belt MINI Countryman:
MINI Paceman:
Make sure you hear the latch plate engage in
the belt buckle.
The shoulder strap's anchorage point will be
correct for adult seat occupants of every build if
the seat is correctly adjusted, refer to page 45.
Unbuckling the belt
1.Hold the belt firmly.2.Press the red button in the belt buckle.3.Guide the belt back into its reel.
Fastening the rear buckle tongues When the outer rear seats are not occupied, thebuckle tongues of the rear seats can be slid up
to the cargo area trim with the clip.
This helps avoid annoying noises when driving.
MINI Countryman: center safety belt of
rear seat
The belt buckle embossed with the word CEN‐
TER is intended exclusively for use by passen‐
gers riding in the center position.
If the center safety belt in the rear is used, the
backrests must be locked, refer to page 111.
The safety belt will not have a restraining effect
if the backrest is not locked.
Belt holder in the headliner The holder for the safety belt is located in the
headliner.
Seite 48ControlsAdjusting48
Online Edition for Part no. 01 40 2 911 544 - VI/13
Page 54 of 282
NotesManufacturer's information for child re‐
straint fixing systems
To select, mount and use child restraint fixing
systems, observe the information provided by
the system manufacturer; otherwise, the pro‐
tective effect can be impaired. ◀
On the front passenger seat
Deactivating the airbags After installing a child restraint fixing system on
the front passenger seat, ensure that the front,
side, and knee airbags on the front passenger
side are deactivated.
Deactivating the front passenger airbags
If a child restraint fixing system is used in
the front passenger seat, the front passenger
airbags must be deactivated; otherwise, there
is an increased risk of injury to the child when
the airbags are triggered, even with a child re‐
straint fixing system. ◀
Seat position and height
Before installing a child restraint fixing system,
move the front passenger seat as far back as
possible and adjust its height to the highest po‐
sition to obtain the best possible position for
the belt and to offer optimal protection in the
event of an accident.
Do not change this seat position once it has
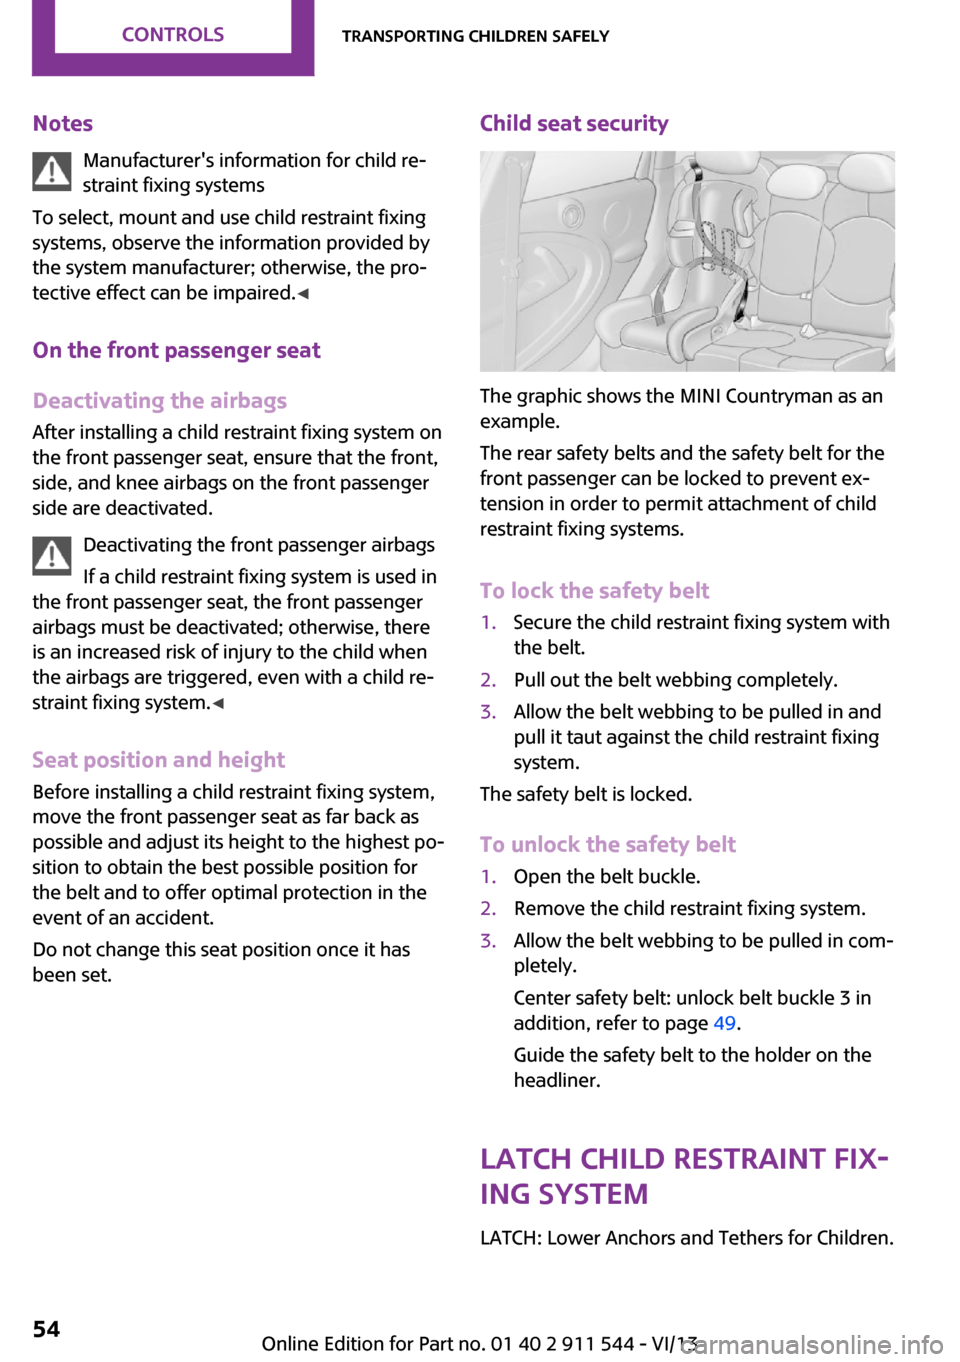
been set.Child seat security
The graphic shows the MINI Countryman as an
example.
The rear safety belts and the safety belt for the
front passenger can be locked to prevent ex‐
tension in order to permit attachment of child
restraint fixing systems.
To lock the safety belt
1.Secure the child restraint fixing system with
the belt.2.Pull out the belt webbing completely.3.Allow the belt webbing to be pulled in and
pull it taut against the child restraint fixing
system.
The safety belt is locked.
To unlock the safety belt
1.Open the belt buckle.2.Remove the child restraint fixing system.3.Allow the belt webbing to be pulled in com‐
pletely.
Center safety belt: unlock belt buckle 3 in
addition, refer to page 49.
Guide the safety belt to the holder on the
headliner.
LATCH child restraint fix‐
ing system
LATCH: Lower Anchors and Tethers for Children.
Seite 54ControlsTransporting children safely54
Online Edition for Part no. 01 40 2 911 544 - VI/13
Page 57 of 282

Attaching the upper retaining strap to
the mounting point1.Slide the head restraint upward.2.Center seat: fold the cargo area floor for‐
ward.3.Guide the upper retaining strap between
the supports of the head restraint.4.Attach the upper retaining strap to the
mounting point with the hook.5.Slide the head restraint into the bottom po‐
sition.6.Pull the upper retaining strap taut.
MINI Countryman: lock‐
ing doors and windows
Rear doors
Push the locking lever on the rear doors down.
The door can now be opened from the outside
only.
Safety switch for power window This locks the rear window switches so that the
windows cannot be operated from the rear.
Press the safety switch, refer to page 44.
Seite 57Transporting children safelyControls57
Online Edition for Part no. 01 40 2 911 544 - VI/13
Page 60 of 282
Engine stop
General information Take the remote control with you
Take the remote control with you when
leaving the vehicle so that children, for exam‐
ple, cannot operate the windows and injure
themselves. ◀
Set the handbrake and further secure the
vehicle as required
Set the handbrake firmly when parking; other‐
wise, the vehicle may roll. On steep upward
and downward inclines, further secure the ve‐
hicle, for example, by turning the steering
wheel in the direction of the curb. ◀
Before driving into a car wash
To make it possible for the vehicle to roll in an
automatic car wash, follow the information on
Washing in automatic car washes, refer to
page 254.
Switching off the engine
Manual transmission1.With the vehicle at a standstill, press the
Start/Stop button.2.Shift into first gear or reverse.3.Set the handbrake firmly.4.Remove the remote control from the igni‐
tion lock.
Automatic transmission
1.Engage transmission position P with the ve‐
hicle stopped.2.Press the Start/Stop button.3.Set the handbrake firmly.4.Remove the remote control from the igni‐
tion lock.Handbrake
The concept
The handbrake is primarily intended to prevent
the vehicle from rolling while parked; it brakes
the rear wheels.
Also follow the instructions under Switching off
the engine, refer to page 60.
Setting
The lever engages automatically.
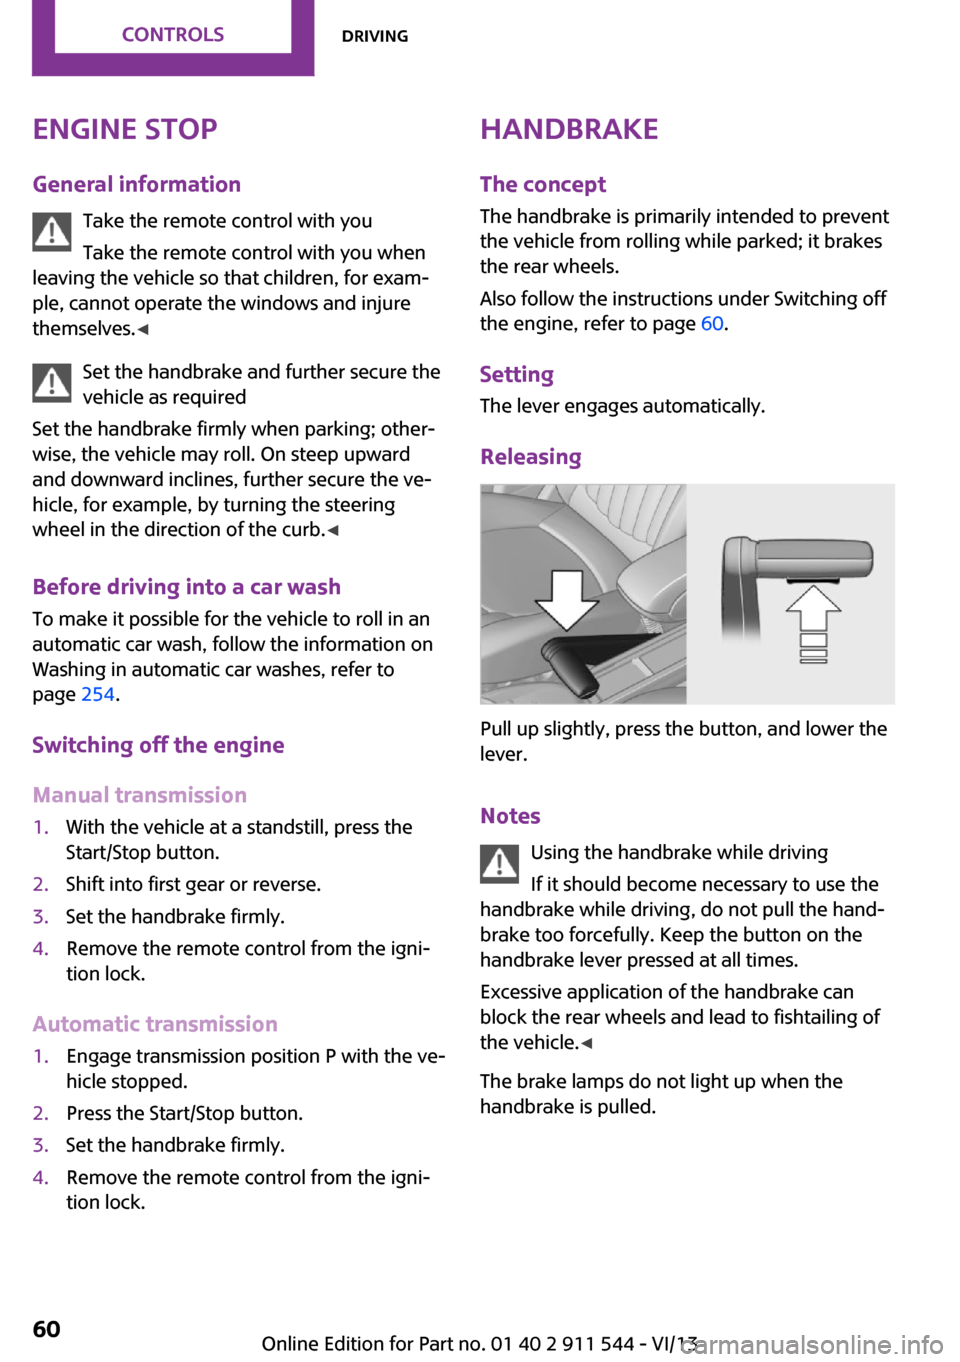
Releasing
Pull up slightly, press the button, and lower the
lever.
Notes Using the handbrake while driving
If it should become necessary to use the
handbrake while driving, do not pull the hand‐
brake too forcefully. Keep the button on the
handbrake lever pressed at all times.
Excessive application of the handbrake can
block the rear wheels and lead to fishtailing of
the vehicle. ◀
The brake lamps do not light up when the
handbrake is pulled.
Seite 60ControlsDriving60
Online Edition for Part no. 01 40 2 911 544 - VI/13
Page 111 of 282

Before beginning with the mounting of a child
restraint fixing system, note the instructions,
refer to page 53.1.Hold the top of the backrest, for example
the head restraint, and pull on the loop, ar‐
row.2.Engage the backrest in the desired position
or fold it down.
Folding the backrests back up
Locking the backrest
When folding back, ensure that the locks
engage properly; otherwise, cargo could be
catapulted forward into the passenger com‐
partment during braking maneuvers and
swerving, endangering the occupants. ◀
No child restraint fixing systems
Do not mount child restraint fixing sys‐
tems in the rear when the rear seat backrests
are adjusted to a more vertical position; other‐
wise, the protection provided by these systems
may be reduced. ◀
When the backrests are folded back up, they
engage in the transport position.
To set the desired backrest inclination or com‐
fort position, hold the backrest, pull the loop
forward, and adjust the backrest.
MINI Paceman: rear seat backrests
Danger of pinching
Before folding down the rear seat back‐
rests, ensure that path of movement of the
backrests is clear; otherwise, injuries or damage
may result. ◀1.Pull on the respective loop, arrow.
The backrest is unlocked.2.Fold the backrest forward.
Folding the backrests back up Hold the top of the backrest, for example the
head restraint, and fold it back.
Locking the backrest
When folding back, ensure that the locks
engage properly; otherwise, cargo could be
catapulted forward into the passenger com‐
partment during braking maneuvers and
swerving, endangering the occupants. ◀
Flat loading floor Maximum load
Do not exceed the maximum load of
330 lbs, 150 kg, on the loading floor; otherwise,
damage may result. ◀
Access to storage area A storage area for items like the partition net is
found under the loading floor.
1.Reach into the recess, arrow 1, on the rear
edge of the loading floor.Seite 111Interior equipmentControls111
Online Edition for Part no. 01 40 2 911 544 - VI/13
Page 271 of 282
Bluetooth connection, activat‐ing/deactivating 181, 191
Bluetooth hands-free sys‐ tem 180
Brake assistant 93
Brake discs, breaking in 122
Brake fluid, refer to Service re‐ quirements 74
Brake force distribution, elec‐ tronic 93
Brake pads, breaking in 122
Brakes– Handbrake 60
Brakes, MINI maintenance
system 237
Brakes, service require‐ ments 74
Brake system, MINI mainte‐ nance system 237
Braking, notes 123
Breakdown assistance, Road‐ side Assistance 248
Breaking in 122
Brightness on the Control Dis‐ play 74
Buckle tongue, rear
– Height adjustment 48
Button for starting the engine,
refer to Start/Stop button 58
C
Calendar 206
California Proposition 65 Warning 7
Car battery, refer to Vehicle battery 246
Car care products 255
Care, displays 257
Care, vehicle 255
Cargo area
– Comfort Access 39– Flat loading floor 111– Multi-function hook 113– Opening from the out‐
side 37– Partition net 112Cargo area, enlarging– Cargo cover 110
Cargo area lamp, refer to Inte‐
rior lamps 81
Cargo area tailgate, refer to Tailgate 37
Car horn, refer to Horn 14
Carpet, care 257
Car phone, refer to Tele‐ phone 180, 190
Car wash 254
CBC, Cornering Brake Con‐
trol 93
CBS Condition Based Serv‐ ice 237
CD 166
CD/DVD drives, care 257
CD player 166
Center armrest 115
Center console, refer to Around the center con‐
sole 18
Center rail 116
Center rail, refer to Storage compartments 116
Central locking
– Comfort Access 38– From the inside 36– From the outside 34
Central locking system
– Concept 33– From the outside 33
Central screen, see Control
Display 20
Changes, technical, refer to Safety 7
Changing wheels/tires 227
Check Control 75
Children, transporting 53
Child restraint fixing system LATCH 54
Child restraint fixing sys‐ tems 53
Child restraint fixing systems, mounting 53
Child seat, mounting 53
Child seats, refer to Transport‐
ing children safely 53
Chrome parts, care 257
Circulation of air, refer to Re‐ circulated air
mode 100, 102
Cleaning, displays 257
Cleaning, refer to Care 254
Climate 99
Climate mode– Ventilation 103
Clock 68
Clock
– 12h/24h format 72– Setting the time and date 72
Closing
– From the inside 36– From the outside 34
Clutch, breaking in 122
Cockpit 14
Cold start, refer to Starting the engine 59
Combination instrument, refer to Displays 16
Combination switch, refer to Turn signal/high beams/
headlamp flasher 61
Combination switch, refer to Washer/wiper system 61
Comfort Access
– In the car wash 40– Replacing the battery 41
Comfort area, refer to Around
the center console 18
Compartment for remote con‐ trol, refer to Ignition lock 58
Compass, digital 106
Computer 69
Computer, displaying informa‐ tion 69
Condition Based Service CBS 237
Confirmation signals for vehi‐ cle locking/unlocking 35
Connecting, mobile phone, re‐ fer to Pairing the mobile
phone 180, 191
Seite 271Everything from A to ZReference271
Online Edition for Part no. 01 40 2 911 544 - VI/13
Page 275 of 282
Internet page 6
Intersection, entering for navi‐ gation 137
J
Jump-starting 248
K Keyless Go, refer to Comfort Access 38
Keyless opening and closing, refer to Comfort Access 38
Key Memory, refer to Personal Profile 32
Key, refer to Remote control with integrated key 32
Kickdown– Automatic transmission with
Steptronic 66
Knee airbag 82
Knocking control 218
L Lamp and bulb replacement, bulb replacement 240
Lamp, replacing, refer to Lamp and bulb replace‐
ment 240
Lamps 78
Lamps, automatic headlamp control 78
Lamps, parking lamps/low beams 78
Language, changing on the Control Display 73
Lap-and-shoulder belt, refer to Safety belts 47
LATCH child restraint fixing system 54
Leather, care 256
Leather care 256
LEDs, light-emitting di‐ odes 240
Letters and numbers, enter‐
ing 24
License plate lamp, bulb re‐ placement 243
Light-alloy wheels, care 257
Light-emitting diodes, LEDs 240
Lighter– Socket 108
Lighting
– Instruments 80
Lighting, lamp and bulb re‐
placement 240
Lighting, vehicle, refer to Lamps 78
Light switch 78
Limit, refer to Speed limit 91
Lock buttons on doors, refer to Locking 37
Locking
– From the inside 37– From the outside 34– Setting the confirmation sig‐
nal 35– Without remote control, re‐
fer to Comfort Access 38
Locking, vehicle
– From the inside 36– From the outside 34
Longlife oils, alternative oil
types 235
Longlife oils, refer to Ap‐ proved engine oils 235
Low beams 78
Low beams
– Automatic 78
Low beams, automatic 78
Low beams, bulb replace‐ ment 241
Lower back support, refer to Lumbar support 46
Lumbar support 46
M
Main inspection, refer to Serv‐ ice requirements 74
Maintenance, refer to Service
booklet
Maintenance, refer to Service requirements 74
Maintenance require‐ ments 237
Maintenance system MINI 237
Malfunction– Automatic transmission with
Steptronic 67– Door lock 36– Fuel filler flap 216
Malfunction warnings, refer to
Check Control 75
Manual air distribu‐ tion 100, 102
Manual mode, automatic transmission with Step‐
tronic 66
Manual operation
– Door lock 36– Selector lever lock, auto‐
matic transmission 67
Manual operation, fuel filler
flap 216
Manual transmission 64
Map, destination entry 141
Map display in black and white 150
Map view 148
Marking on approved tires 227
Maximum cooling 102
Maximum speed, winter tires 228
Menu operation, onboard monitor 20
Menus, refer to Onboard monitor operating con‐
cept 21
Message list, traffic bulle‐ tins 149
Messages 205
Microfilter 101
Seite 275Everything from A to ZReference275
Online Edition for Part no. 01 40 2 911 544 - VI/13
Page 276 of 282
Microfilter– With automatic climate con‐
trol 103
MINI Connected 210
MINI Homepage 6
MINI Internet page 6
MINI maintenance sys‐ tem 237
MINI Mobility System 229
Minimum tread, tires 226
Mirrors 51
Mirrors, folding in and out 51
Mirrors, interior mirror 52
Mobile communication devi‐ ces in the vehicle 123
Mobile phone, refer to Tele‐ phone 180, 190
Mobility System 229
Modifications, technical, refer to Safety 7
Monitor, see Control Dis‐ play 20
Mounting of child restraint fix‐ ing systems 53
MP3 player 169
N
Navigation 134
Navigation data 134
Navigation data, updat‐ ing 134
Navigation system
– Destination entry by
voice 142
Neck restraints, refer to Head
restraints 50
New wheels and tires 227
Notes 6, 207
Nozzles, refer to Ventila‐ tion 103
O
OBD Onboard Diagnos‐ tics 238
OBD socket, refer to Socket
for OBD Onboard Diagno‐
sis 238
Octane number, refer to Fuel quality 218
Octane rating, refer to Gaso‐ line quality 218
Odometer 68
Office 202
Oil additives 235
Oil level 234
Oil types, alternative 235
Oil types, approved 235
Onboard Diagnostics OBD 238
Onboard monitor 20
Opening and closing– Comfort Access 38– From the inside 36– From the outside 34– Using the door lock 35– Via the remote control 34
Opening and unlocking
– From the inside 37
Operating concept of the on‐
board monitor 20
Outside air mode
– Automatic climate con‐
trol 102
Outside air, refer to Recircu‐
lated air mode 100, 102
Overheating of engine, refer to Coolant temperature 69
P Pairing, mobile phone 180, 191
Park Distance Control PDC 97
Parking aid, refer to Park Dis‐ tance Control PDC 97
Parking assistant, refer to Park Distance Control PDC 97
Parking brake, refer to Hand‐ brake 60
Parking lamp, bulb replace‐ ment 241
Parking lamps 78
Parking lamps/low beams 78
PDC Park Distance Control 97
Personal information 202
Personal Profile 32
Pinch protection– Windows 43
Plastic, care 256
Pollen
– Refer to Microfilter 101– Refer to Microfilter/acti‐
vated-charcoal filter 101– Refer to Microfilter/acti‐
vated-charcoal filter with
automatic climate con‐
trol 103
Poor road operation 125
Position, storing 138
Postal code, entering in navi‐ gation 137
Power, refer to Engine data 260
Power windows 43
Power windows, refer to Win‐ dows 42
Prescribed engine oils, refer to Approved engine oils 235
Pressure monitoring of tires, refer to Tire Pressure Monitor
TPM 87
Pressure, tires 220
Pressure warning, tires 85
Profile depth, refer to Mini‐ mum tread depth 226
Profile, tires 225
Protective function, refer to
Pinch protection
– Windows 43
R
Radio 158
Radio-operated key, refer to Remote control with
integrated key 32
Radio ready state 58
Seite 276ReferenceEverything from A to Z276
Online Edition for Part no. 01 40 2 911 544 - VI/13
Page 279 of 282
Tires– Flat tire 86– Inflation pressure 220– Inflation pressure loss 89– Pressure monitoring, refer to
Tire Pressure Monitor
TPM 87
Tires, breaking in 122
Tires, changing 227
Tires, condition 225
Tires, damage 226
Tire size 224
Tires, minimum tread 226
Tires, retreaded tires 227
Tires, storage 228
Tire tread 225
Toll roads, route 145
Tone 156
Torque, refer to Engine data 260
Towing another vehicle 250
Towing, being towed 250
Town/city, navigation 136
Tow-starting 250
TPM, refer to Tire Pressure Monitor 87
Traction control 94
Traffic bulletins, naviga‐ tion 149
Transmission
– Overriding selector lever
lock in case of automatic
transmission with Step‐
tronic 67
Transmission lock
– Refer to Changing selector
lever positions 65
Transmission, manual 64
Transporting children safely 53
Treble, tone 156
Trip-distance counter, refer to Trip odometer 68
Triple turn signal activa‐ tion 61
Trip odometer 68
Trips, planning 143
Trunk lid, refer to Tailgate 37
Trunk, refer to Cargo area 37
Turning lamps, refer to Adap‐ tive Light Control 80
Turn signal– Indicator lamp 16
Turn signal, bulb replace‐
ment 241
Turn signals 61
Turn signals, triple turn signal activation 61
U
Uniform Tire Quality Grading/ UTQG 224
Unintentional alarms, avoid‐ ing 41
Units
– Average fuel consump‐
tion 72– Temperature 72
Units of measure, changing on
Control Display 72
Universal remote control 104
Unlocking
– From the inside 37– From the outside 34– Tailgate 39– Without remote control, re‐
fer to Comfort Access 38
Update, software 176
Upholstery care 256
Upholstery material care 256
V
Vehicle
– Identification num‐
ber 180, 190
Vehicle battery 246
Vehicle, breaking in 122
Vehicle care 255
Vehicle care, refer to Care 254
Vehicle equipment 6
Vehicle paintwork, care 256
Vehicle storage 257
Vehicle, switching off 60
Vehicle wash 254
Ventilation– Air conditioning 103
Version of the navigation
data 134
Video playback, iPhone 172
Video playback, snap-in adapter 172
Voice activation
– Navigation 142
Voice activation, short com‐
mands 264
Voice activation system 26
Volume, setting 156
W Warning and indicator lamps 17
Warning messages, refer to Check Control 75
Warning signal volumes 156
Warning triangle 248
Washer/wiper system 61
Washer/wiper system, rain sensor 62
Washer/wiper system, washer fluid 64
Washer fluid 64
Washer fluid reservoir 64
Washing, vehicle 254
Welcome lamps 79
Wheel change 245
Wheels and tires 220
Wheels, changing 227
Wheels, Flat Tire Monitor FTM 85
Windows
– Closing 43– Convenient operation 34– Opening 43
Windows, care 255
Windows, defrosting and de‐ fogging 100
Windows, pinch protection 43
Seite 279Everything from A to ZReference279
Online Edition for Part no. 01 40 2 911 544 - VI/13