USB MINI Paceman 2014 Owner's Manual
[x] Cancel search | Manufacturer: MINI, Model Year: 2014, Model line: Paceman, Model: MINI Paceman 2014Pages: 218, PDF Size: 5.5 MB
Page 18 of 218
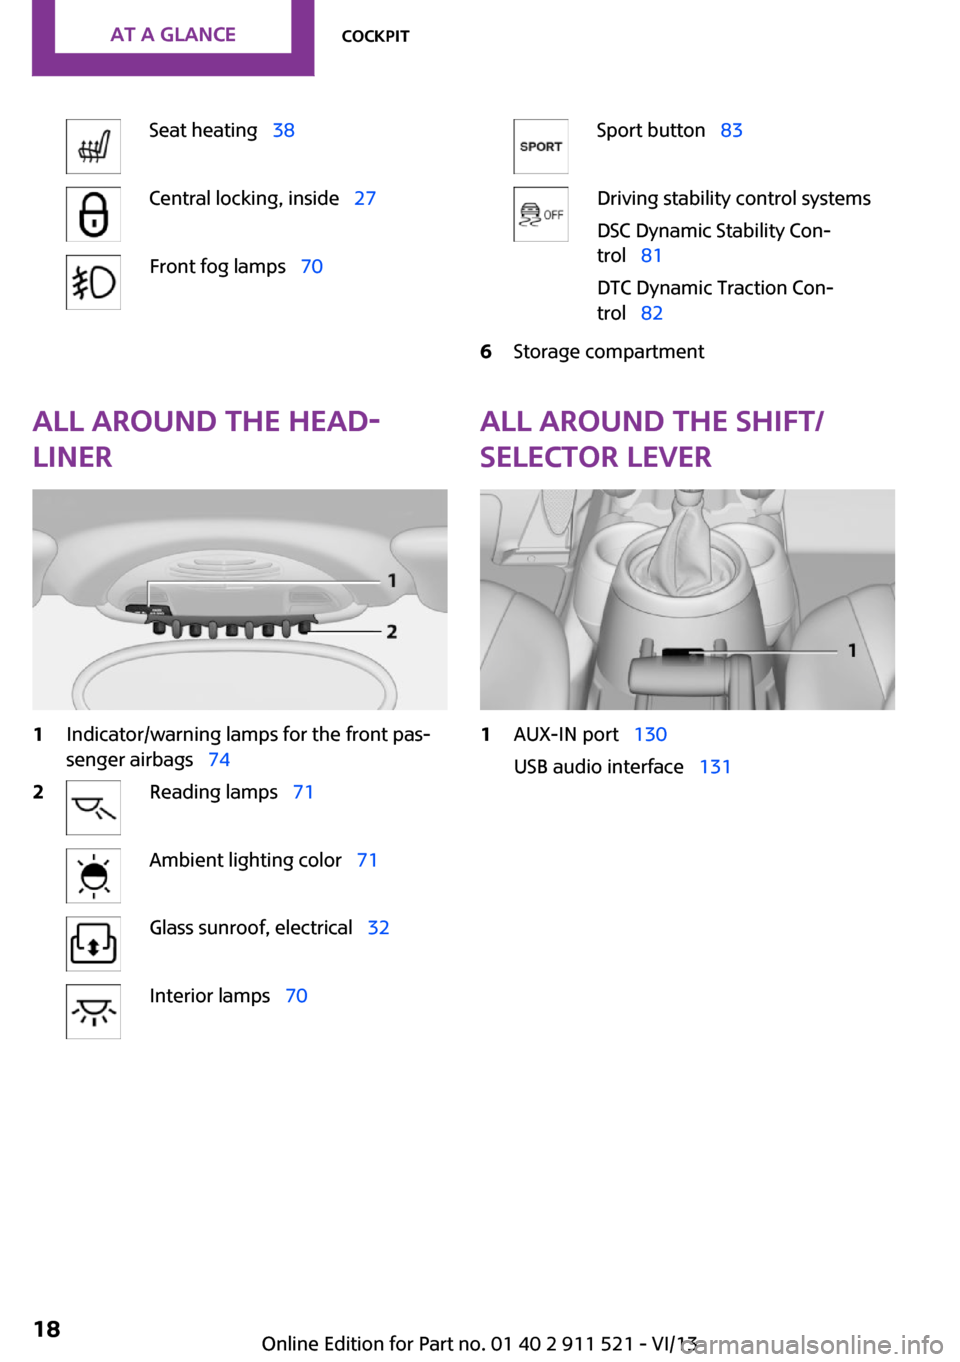
Seat heating 38Central locking, inside 27Front fog lamps 70Sport button 83Driving stability control systems
DSC Dynamic Stability Con‐
trol 81
DTC Dynamic Traction Con‐
trol 826Storage compartmentAll around the head‐
liner1Indicator/warning lamps for the front pas‐
senger airbags 742Reading lamps 71Ambient lighting color 71Glass sunroof, electrical 32Interior lamps 70All around the shift/
selector lever1AUX-IN port 130
USB audio interface 131Seite 18At a glanceCockpit18
Online Edition for Part no. 01 40 2 911 521 - VI/13
Page 104 of 218
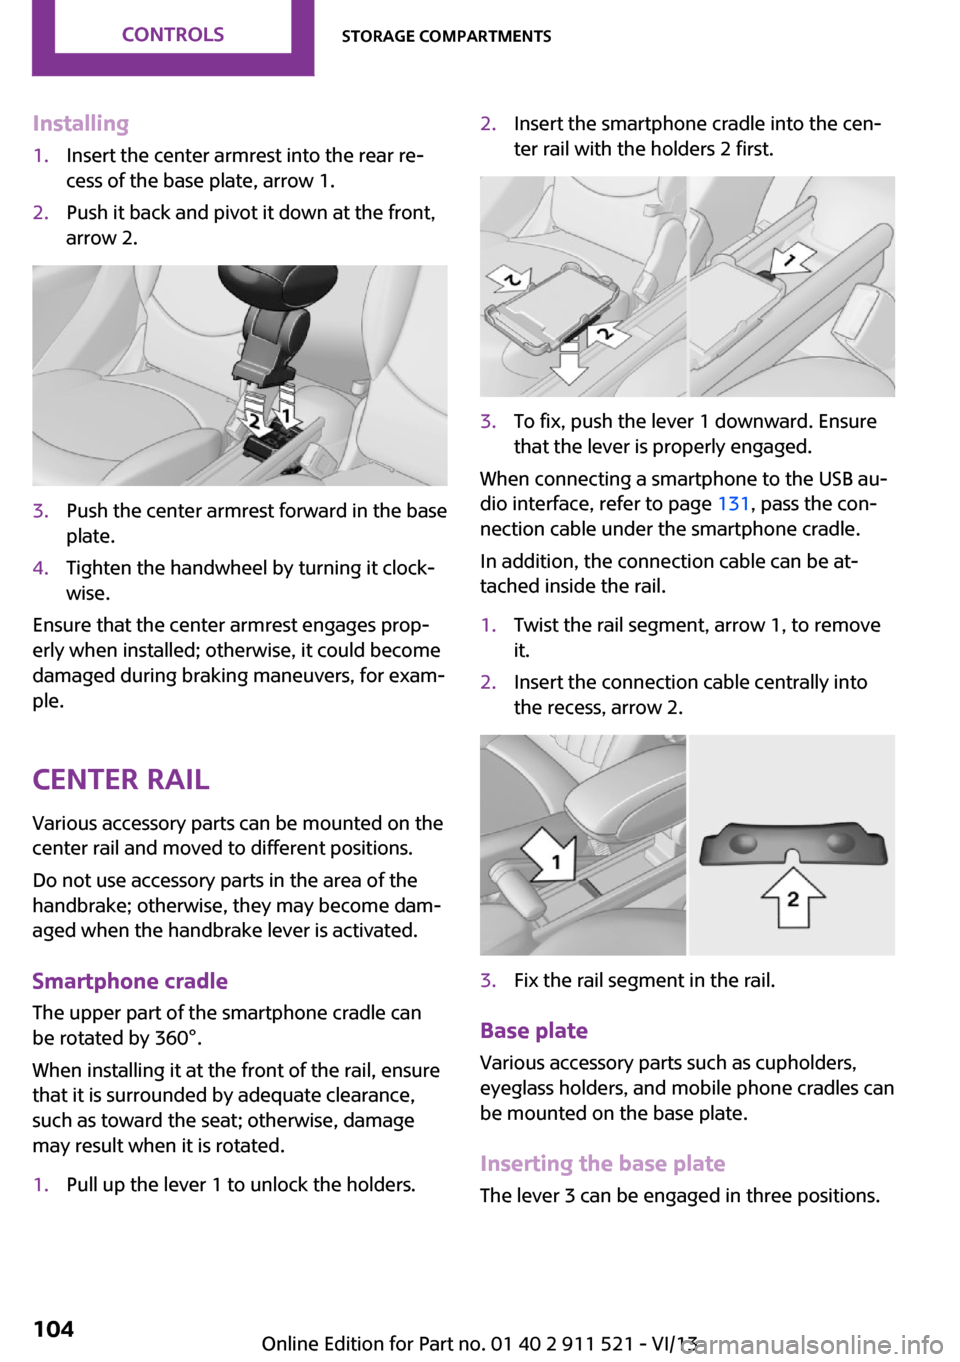
Installing1.Insert the center armrest into the rear re‐
cess of the base plate, arrow 1.2.Push it back and pivot it down at the front,
arrow 2.3.Push the center armrest forward in the base
plate.4.Tighten the handwheel by turning it clock‐
wise.
Ensure that the center armrest engages prop‐
erly when installed; otherwise, it could become
damaged during braking maneuvers, for exam‐
ple.
Center rail Various accessory parts can be mounted on the
center rail and moved to different positions.
Do not use accessory parts in the area of the
handbrake; otherwise, they may become dam‐
aged when the handbrake lever is activated.
Smartphone cradle The upper part of the smartphone cradle can
be rotated by 360°.
When installing it at the front of the rail, ensure
that it is surrounded by adequate clearance,
such as toward the seat; otherwise, damage
may result when it is rotated.
1.Pull up the lever 1 to unlock the holders.2.Insert the smartphone cradle into the cen‐
ter rail with the holders 2 first.3.To fix, push the lever 1 downward. Ensure
that the lever is properly engaged.
When connecting a smartphone to the USB au‐
dio interface, refer to page 131, pass the con‐
nection cable under the smartphone cradle.
In addition, the connection cable can be at‐
tached inside the rail.
1.Twist the rail segment, arrow 1, to remove
it.2.Insert the connection cable centrally into
the recess, arrow 2.3.Fix the rail segment in the rail.
Base plate
Various accessory parts such as cupholders,
eyeglass holders, and mobile phone cradles can
be mounted on the base plate.
Inserting the base plate
The lever 3 can be engaged in three positions.
Seite 104ControlsStorage compartments104
Online Edition for Part no. 01 40 2 911 521 - VI/13
Page 123 of 218
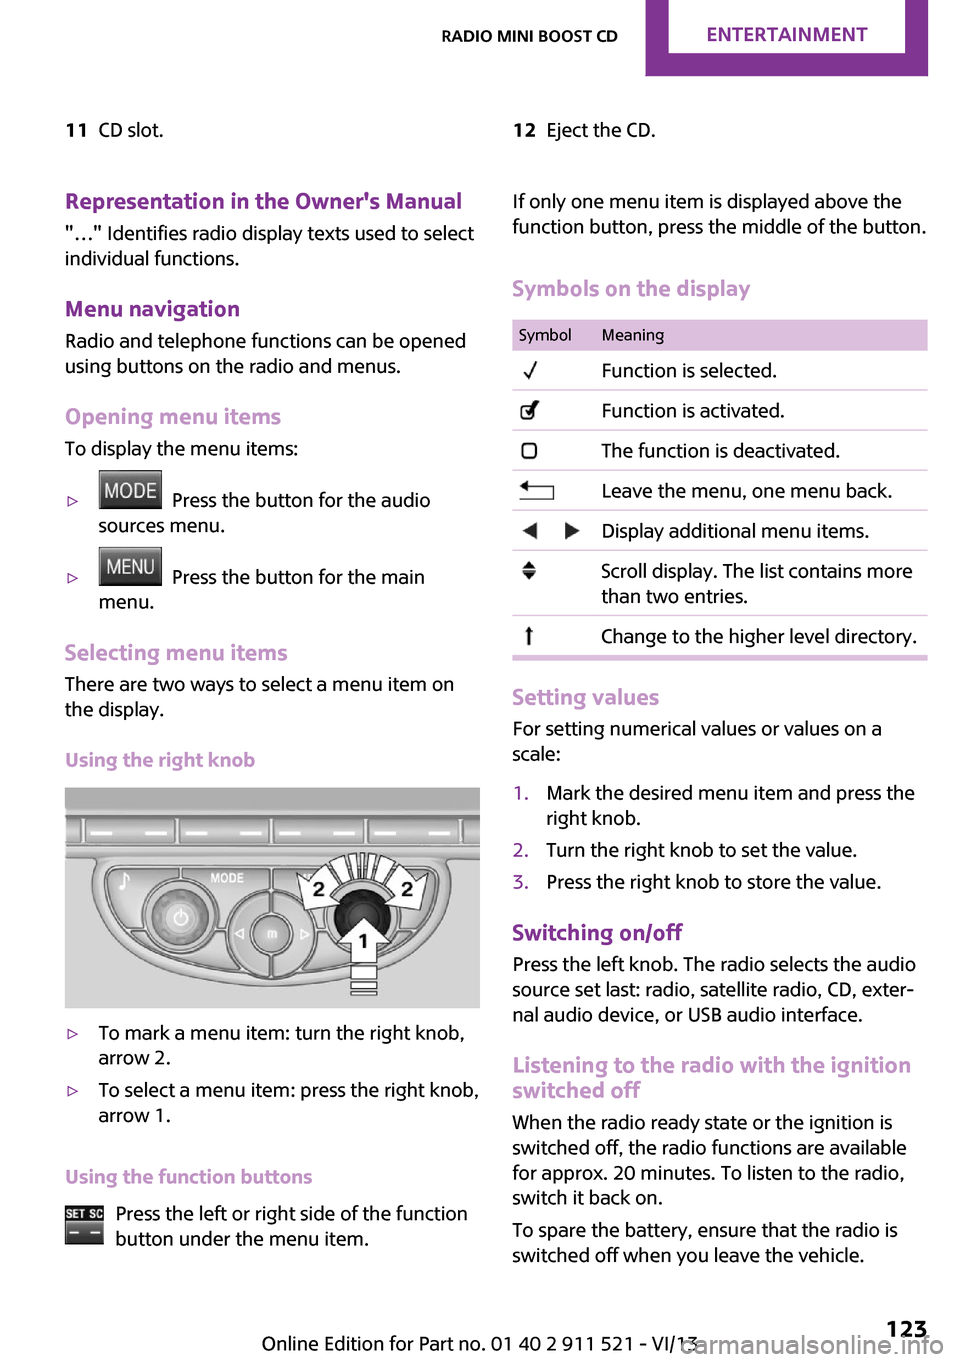
11CD slot.12Eject the CD.Representation in the Owner's Manual
"…" Identifies radio display texts used to select individual functions.
Menu navigation Radio and telephone functions can be opened
using buttons on the radio and menus.
Opening menu items
To display the menu items:▷ Press the button for the audio
sources menu.▷ Press the button for the main
menu.
Selecting menu items
There are two ways to select a menu item on
the display.
Using the right knob
▷To mark a menu item: turn the right knob,
arrow 2.▷To select a menu item: press the right knob,
arrow 1.
Using the function buttons
Press the left or right side of the function
button under the menu item.
If only one menu item is displayed above the
function button, press the middle of the button.
Symbols on the displaySymbolMeaning Function is selected. Function is activated. The function is deactivated. Leave the menu, one menu back. Display additional menu items. Scroll display. The list contains more
than two entries. Change to the higher level directory.
Setting values
For setting numerical values or values on a
scale:
1.Mark the desired menu item and press the
right knob.2.Turn the right knob to set the value.3.Press the right knob to store the value.
Switching on/off
Press the left knob. The radio selects the audio
source set last: radio, satellite radio, CD, exter‐
nal audio device, or USB audio interface.
Listening to the radio with the ignition
switched off
When the radio ready state or the ignition is
switched off, the radio functions are available for approx. 20 minutes. To listen to the radio,
switch it back on.
To spare the battery, ensure that the radio is
switched off when you leave the vehicle.
Seite 123Radio MINI Boost CDEntertainment123
Online Edition for Part no. 01 40 2 911 521 - VI/13
Page 131 of 218
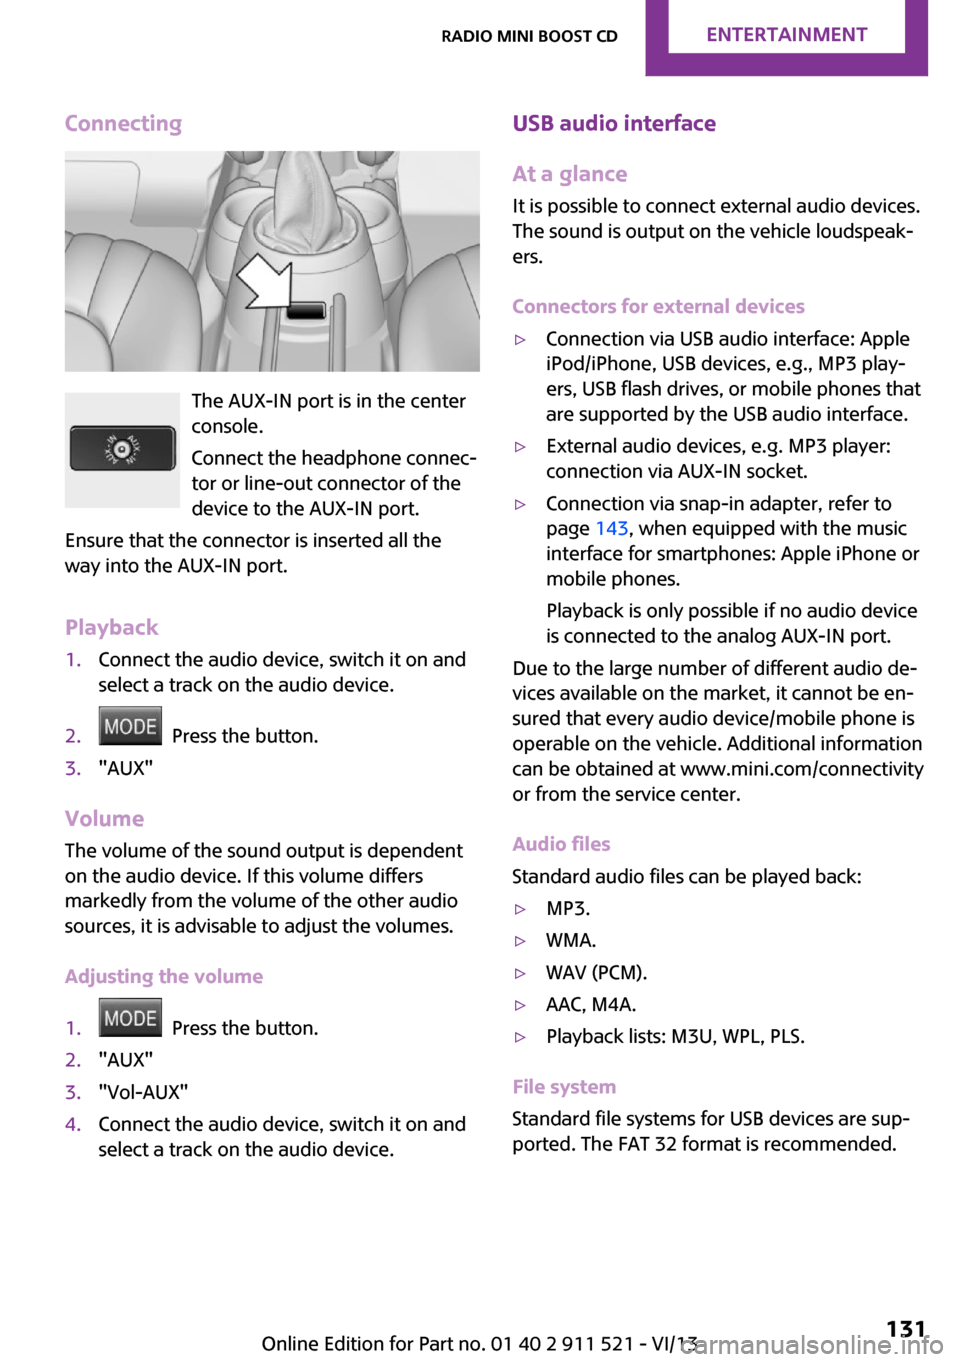
Connecting
The AUX-IN port is in the center
console.
Connect the headphone connec‐
tor or line-out connector of the
device to the AUX-IN port.
Ensure that the connector is inserted all the
way into the AUX-IN port.
Playback
1.Connect the audio device, switch it on and
select a track on the audio device.2. Press the button.3."AUX"
Volume
The volume of the sound output is dependent
on the audio device. If this volume differs
markedly from the volume of the other audio
sources, it is advisable to adjust the volumes.
Adjusting the volume
1. Press the button.2."AUX"3."Vol-AUX"4.Connect the audio device, switch it on and
select a track on the audio device.USB audio interface
At a glance
It is possible to connect external audio devices.
The sound is output on the vehicle loudspeak‐
ers.
Connectors for external devices▷Connection via USB audio interface: Apple
iPod/iPhone, USB devices, e.g., MP3 play‐
ers, USB flash drives, or mobile phones that
are supported by the USB audio interface.▷External audio devices, e.g. MP3 player:
connection via AUX-IN socket.▷Connection via snap-in adapter, refer to
page 143, when equipped with the music
interface for smartphones: Apple iPhone or
mobile phones.
Playback is only possible if no audio device
is connected to the analog AUX-IN port.
Due to the large number of different audio de‐
vices available on the market, it cannot be en‐
sured that every audio device/mobile phone is
operable on the vehicle. Additional information
can be obtained at www.mini.com/connectivity
or from the service center.
Audio files
Standard audio files can be played back:
▷MP3.▷WMA.▷WAV (PCM).▷AAC, M4A.▷Playback lists: M3U, WPL, PLS.
File system
Standard file systems for USB devices are sup‐
ported. The FAT 32 format is recommended.
Seite 131Radio MINI Boost CDEntertainment131
Online Edition for Part no. 01 40 2 911 521 - VI/13
Page 132 of 218
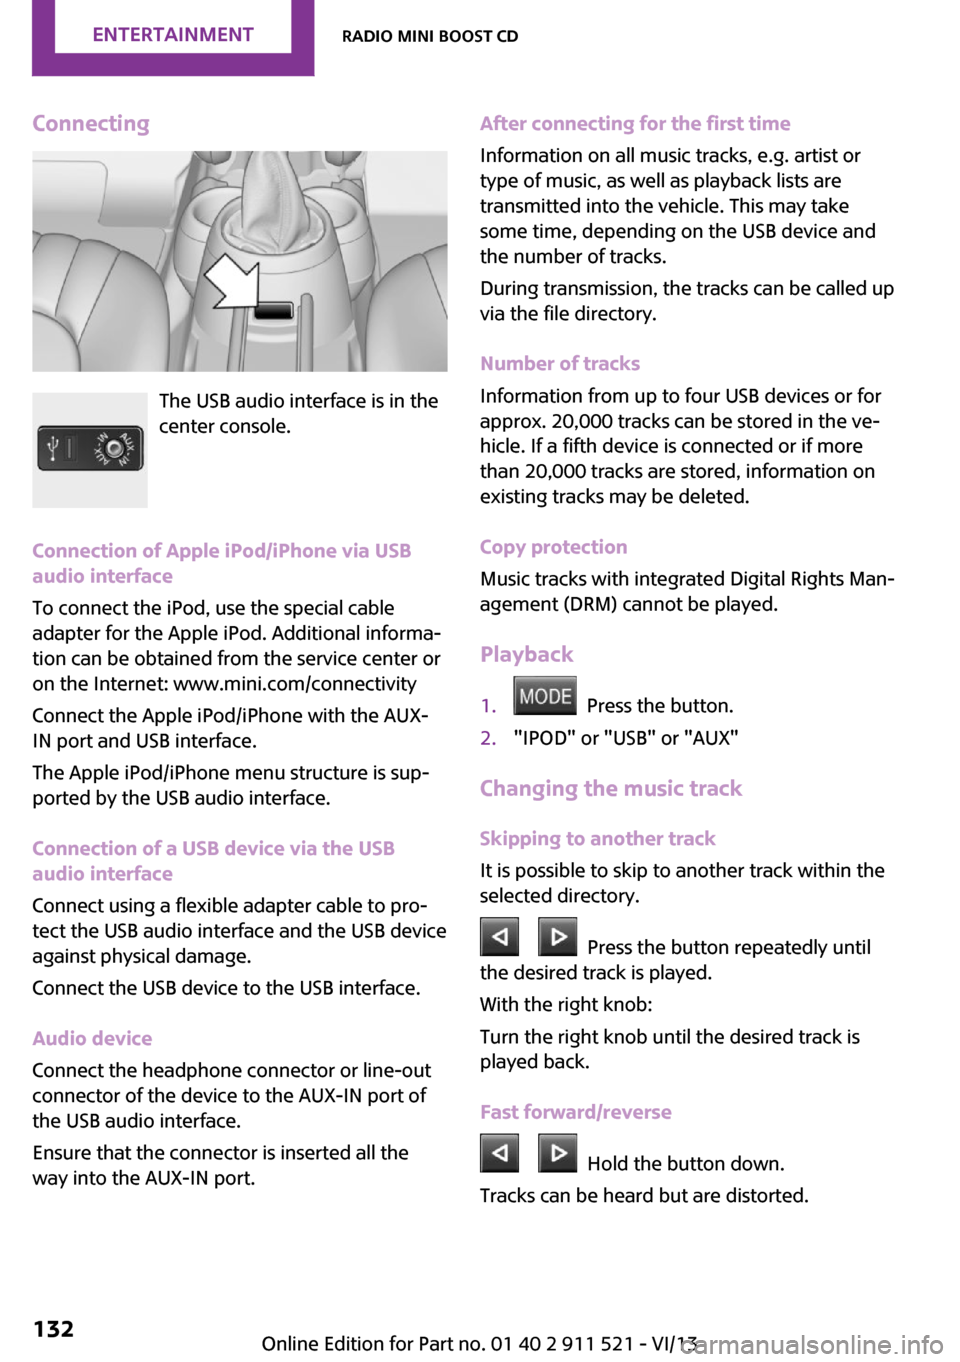
Connecting
The USB audio interface is in the
center console.
Connection of Apple iPod/iPhone via USB
audio interface
To connect the iPod, use the special cable
adapter for the Apple iPod. Additional informa‐
tion can be obtained from the service center or
on the Internet: www.mini.com/connectivity
Connect the Apple iPod/iPhone with the AUX-
IN port and USB interface.
The Apple iPod/iPhone menu structure is sup‐
ported by the USB audio interface.
Connection of a USB device via the USB
audio interface
Connect using a flexible adapter cable to pro‐
tect the USB audio interface and the USB device
against physical damage.
Connect the USB device to the USB interface.
Audio device
Connect the headphone connector or line-out
connector of the device to the AUX-IN port of
the USB audio interface.
Ensure that the connector is inserted all the
way into the AUX-IN port.
After connecting for the first time
Information on all music tracks, e.g. artist or
type of music, as well as playback lists are
transmitted into the vehicle. This may take
some time, depending on the USB device and
the number of tracks.
During transmission, the tracks can be called up
via the file directory.
Number of tracks
Information from up to four USB devices or for
approx. 20,000 tracks can be stored in the ve‐
hicle. If a fifth device is connected or if more
than 20,000 tracks are stored, information on
existing tracks may be deleted.
Copy protection
Music tracks with integrated Digital Rights Man‐
agement (DRM) cannot be played.
Playback1. Press the button.2."IPOD" or "USB" or "AUX"
Changing the music track
Skipping to another track
It is possible to skip to another track within the
selected directory.
Press the button repeatedly until
the desired track is played.
With the right knob:
Turn the right knob until the desired track is
played back.
Fast forward/reverse
Hold the button down.
Tracks can be heard but are distorted.
Seite 132EntertainmentRadio MINI Boost CD132
Online Edition for Part no. 01 40 2 911 521 - VI/13
Page 133 of 218
Random playback
"RND"
To end random playback: "RND"
Selecting a track
Depending on the connected device, the track
can be selected via the following category:▷"LIST": playback lists.▷"GEN": musical genre.▷"ART": artist.▷"ALB": album.1.Select the desired category.2.If necessary, select the desired directory us‐
ing the right knob.▷ : press the right knob to open a di‐
rectory.▷ : press the right knob to close a di‐
rectory.3.Select other directories if you wish.4.Highlight the desired track and press the
right knob.
You can scroll through the directories during
playback.
To change to the current track:
"CURR"
Displaying information on the track
Any information stored on the currently se‐
lected track can be displayed.
"TRACK"
Adjusting the volumeThe volume of the sound output is dependent
on the audio device. If this volume differs
markedly from the volume of the other audio
sources, it is advisable to adjust the volumes.
1."LEV"2.Turn the right knob until the desired vol‐
ume is set and press the knob.Notes
Do not expose the audio device to extreme en‐
vironmental conditions, such as very high tem‐
peratures; refer to the audio device operating
instructions.
Depending on the configuration of the audio
files, e.g., bit rates greater than 256 kbit/s, the
files may not play back correctly in each case.
Information on connection▷It is only possible to connect one iPod/
iPhone to the vehicle at a time.▷Playback from the iPod/iPhone is only pos‐
sible via the USB audio interface if a snap-in
adapter is not used.▷The connected audio device is supplied
with a max. power of 500 mA if supported
by the device. Therefore, do not addition‐
ally connect the device to a socket in the
vehicle; otherwise, playback may be com‐
promised.▷Do not use force when plugging the con‐
nector into the USB interface.▷Do not connect devices such as fans or
lamps to the USB audio interface.▷Do not connect USB hard drives.▷Do not use the USB audio interface to re‐
charge external devices.Seite 133Radio MINI Boost CDEntertainment133
Online Edition for Part no. 01 40 2 911 521 - VI/13
Page 143 of 218
Snap-in adapter
General information More information on compatible snap-in
adapters that support the functions of the mo‐
bile phone is available at the service center.
Notes At high temperatures, the charging function of
the mobile phone may be limited and functions
may not be executed.
When using the mobile phone via the vehicle,
note the operating instructions of the mobile
phone.
Installation position In the center armrest.
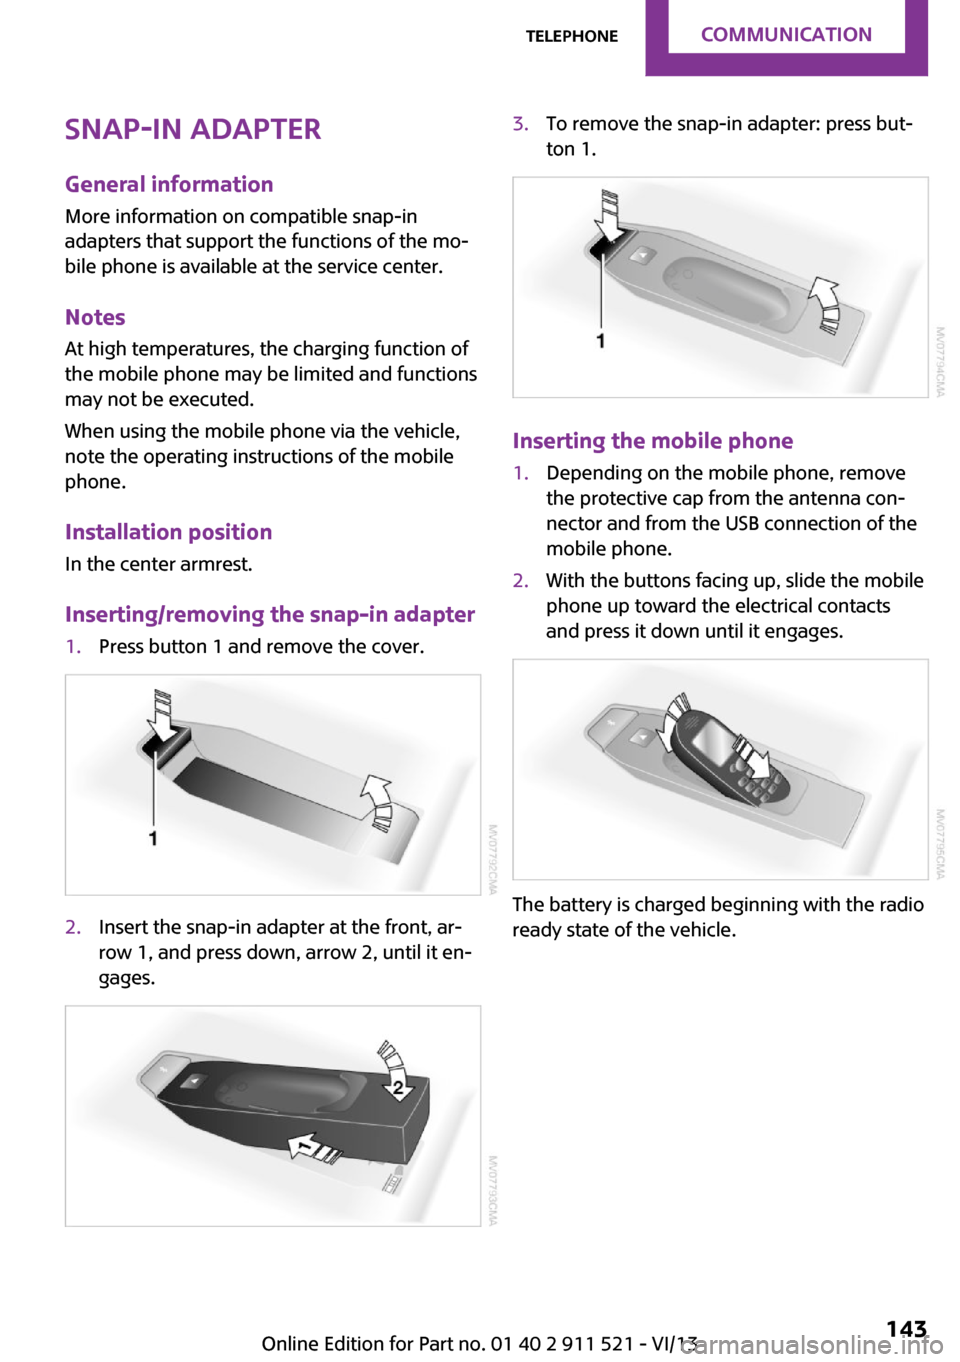
Inserting/removing the snap-in adapter1.Press button 1 and remove the cover.2.Insert the snap-in adapter at the front, ar‐
row 1, and press down, arrow 2, until it en‐
gages.3.To remove the snap-in adapter: press but‐
ton 1.
Inserting the mobile phone
1.Depending on the mobile phone, remove
the protective cap from the antenna con‐
nector and from the USB connection of the
mobile phone.2.With the buttons facing up, slide the mobile
phone up toward the electrical contacts
and press it down until it engages.
The battery is charged beginning with the radio
ready state of the vehicle.
Seite 143TelephoneCommunication143
Online Edition for Part no. 01 40 2 911 521 - VI/13
Page 216 of 218
Trip-distance counter, refer toTrip odometer 59
Triple turn signal activa‐ tion 52
Trip odometer 59
Trunk lid, refer to Tailgate 28
Trunk, refer to Cargo area 28
Turning lamps, refer to Adap‐ tive Light Control 69
Turn signal– Indicator lamp 16
Turn signal, bulb replace‐
ment 173
Turn signals 52
Turn signals, triple turn signal activation 52
U
Uniform Tire Quality Grading/ UTQG 156
Unintentional alarms, avoid‐ ing 32
Units
– Average fuel consump‐
tion 62– Temperature 62
Universal remote control 92
Unlocking
– From the inside 27– From the outside 24– Tailgate 30– Without remote control, re‐
fer to Comfort Access 30
Upholstery care 188
Upholstery material care 188
USB audio interface 131
V Vehicle battery 178
Vehicle, breaking in 110
Vehicle care 187
Vehicle care, refer to Care 186
Vehicle equipment 6
Vehicle paintwork, care 188
Vehicle storage 189
Vehicle, switching off 51
Vehicle wash 186
Ventilation– Air conditioning 91
W
Warning and indicator lamps 17
Warning and indicator lamps, overview 190
Warning messages, refer to Check Control 65
Warning triangle 180
Washer/wiper system 53
Washer/wiper system, rain sensor 53
Washer/wiper system, washer fluid 55
Washer fluid 55
Washer fluid reservoir 55
Washing, vehicle 186
Welcome lamps 69
Wheel change 177
Wheels and tires 152
Wheels, changing 159
Wheels, Flat Tire Monitor FTM 75
Windows
– Closing 34– Convenient operation 25– Opening 34
Windows, care 187
Windows, defrosting and de‐ fogging 88
Windows, pinch protection 34
Windshield
– Defrosting and defogging 88
Windshield, defrosting, refer
to Defrosting windows 88
Windshield wash 53
Windshield washer fluid 55
Windshield wash, rear win‐ dow 55
Windshield wash, reservoir for washer fluid 55
Windshield wash, washer
fluid 55
Windshield wiper blades, changing 171
Windshield wiper, refer to Washer/wiper system 53
Winter storage, care 189
Winter tires 159
Winter tires, tread 157
Wiper blades, care 187
Wiper blades, changing 171
Wiper fluid 55
Y
Your individual vehicle– Settings, refer to Personal
Profile 22Seite 216ReferenceEverything from A to Z216
Online Edition for Part no. 01 40 2 911 521 - VI/13