fuse MINI Paceman 2014 Owner's Manual
[x] Cancel search | Manufacturer: MINI, Model Year: 2014, Model line: Paceman, Model: MINI Paceman 2014Pages: 218, PDF Size: 5.5 MB
Page 164 of 218

Engine compartmentVehicle equipment
This chapter describes all series equipment as
well as country-specific and special equipment
offered for this model series.Therefore, it alsodescribes equipment that may not be found in
your vehicle, for instance due to the selected
special equipment or the country version. This
also applies to safety-related functions and sys‐
tems.
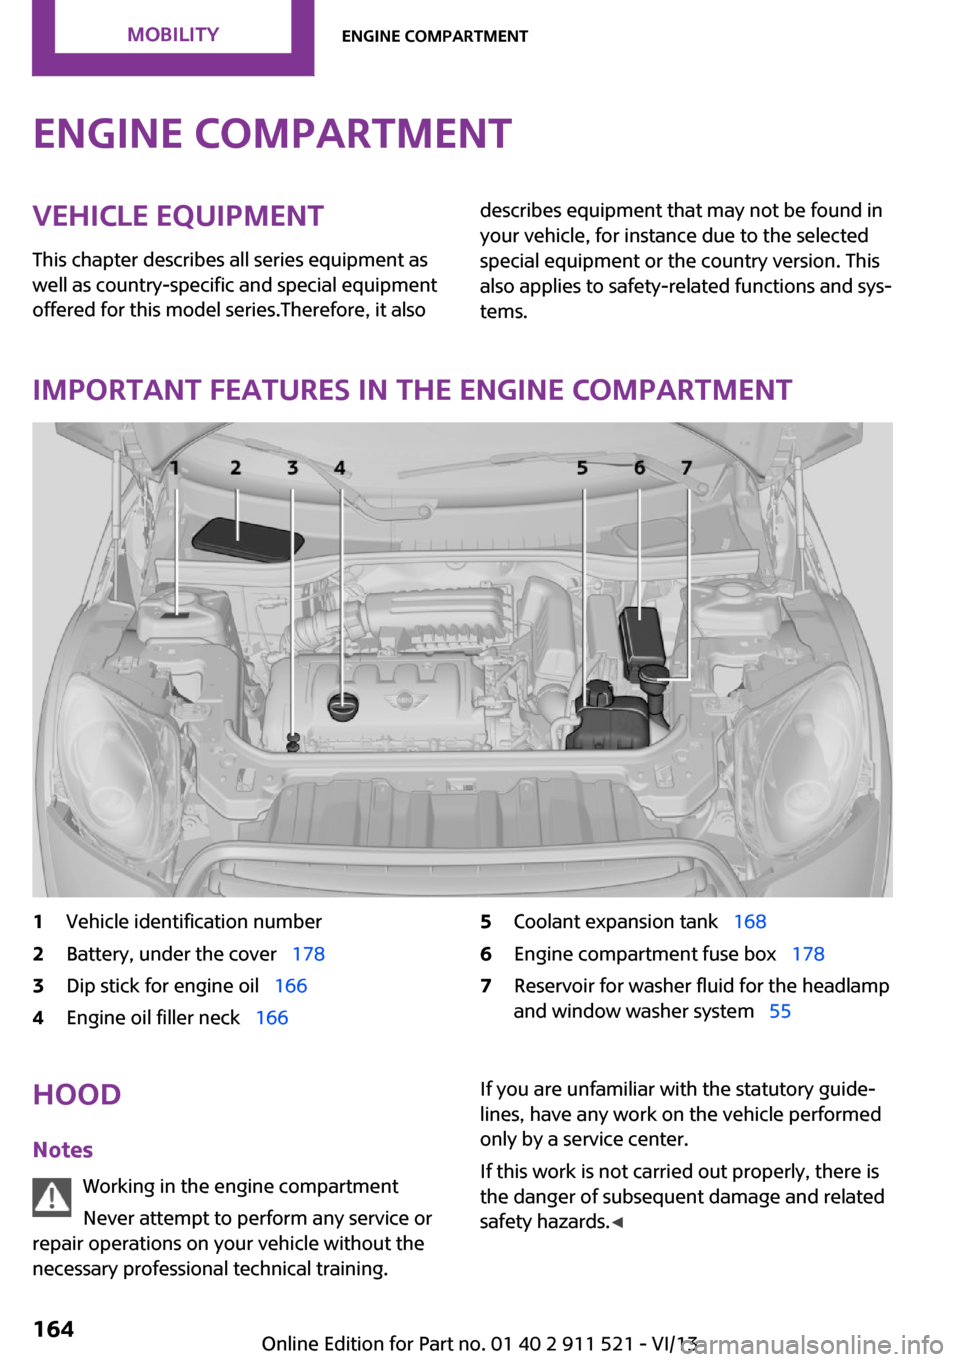
Important features in the engine compartment
1Vehicle identification number2Battery, under the cover 1783Dip stick for engine oil 1664Engine oil filler neck 1665Coolant expansion tank 1686Engine compartment fuse box 1787Reservoir for washer fluid for the headlamp
and window washer system 55Hood
Notes Working in the engine compartment
Never attempt to perform any service or
repair operations on your vehicle without the
necessary professional technical training.If you are unfamiliar with the statutory guide‐
lines, have any work on the vehicle performed
only by a service center.
If this work is not carried out properly, there is
the danger of subsequent damage and related
safety hazards. ◀Seite 164MobilityEngine compartment164
Online Edition for Part no. 01 40 2 911 521 - VI/13
Page 178 of 218

Vehicle batteryMaintenance
The battery is maintenance-free, i.e., the elec‐
trolyte will last for the life of the battery in tem‐
perate climate conditions.
The service center will be happy to answer any
questions on the battery.
Battery replacement Use approved vehicle batteries
Only use vehicle batteries that have been
approved for your vehicle by the manufacturer;
otherwise, the vehicle could be damaged and
systems or functions may not be fully availa‐
ble. ◀
Have the vehicle battery registered by the serv‐
ice center after it is replaced to ensure that all
comfort functions are available without restric‐
tions and that any associated Check Control
messages are no longer displayed.
Charging the battery
Note Do not connect the charger to the socket
Do not connect the battery charger to the
socket installed in the vehicle at the factory as
this could damage the battery. ◀
Only charge the battery in the vehicle when the engine is switched off. Connections, refer to
page 180.
General information Ensure that the battery is sufficiently charged to
achieve the full battery life.
It may be necessary to charge the battery in
the following cases:▷When the vehicle is frequently used to
travel short distances.▷When the vehicle has not been driven for
more than one month.Power failure
After a temporary power failure, some equip‐
ment will be restricted in its use and will need
to be reinitialized. In addition, certain individual
settings will be lost and must be updated:▷Time and date: the values must be up‐
dated, refer to page 63.▷Radio: the stations need to be stored again,
refer to page 126.▷Glass sunroof, electrical: it may only be pos‐
sible to tilt the roof. The system needs to be
initialized. Contact the service center.
Disposing of old batteries
Have used batteries disposed of by the
service center after they are replaced or
take them to a recycling center.
Maintain the battery in an upright position for
transport and storage. Secure the battery so
that it does not tip over during transport.
Fuses Replacing fuses
Never attempt to repair a blown fuse and
do not replace a defective fuse with a substi‐
tute of another color or amperage rating; this
could lead to a circuit overload, ultimately re‐
sulting in a fire in the vehicle. ◀
Fuses should be replaced by the service center.
Information on the fuses can be found on the
inside of the covers.
Seite 178MobilityReplacing components178
Online Edition for Part no. 01 40 2 911 521 - VI/13
Page 191 of 218

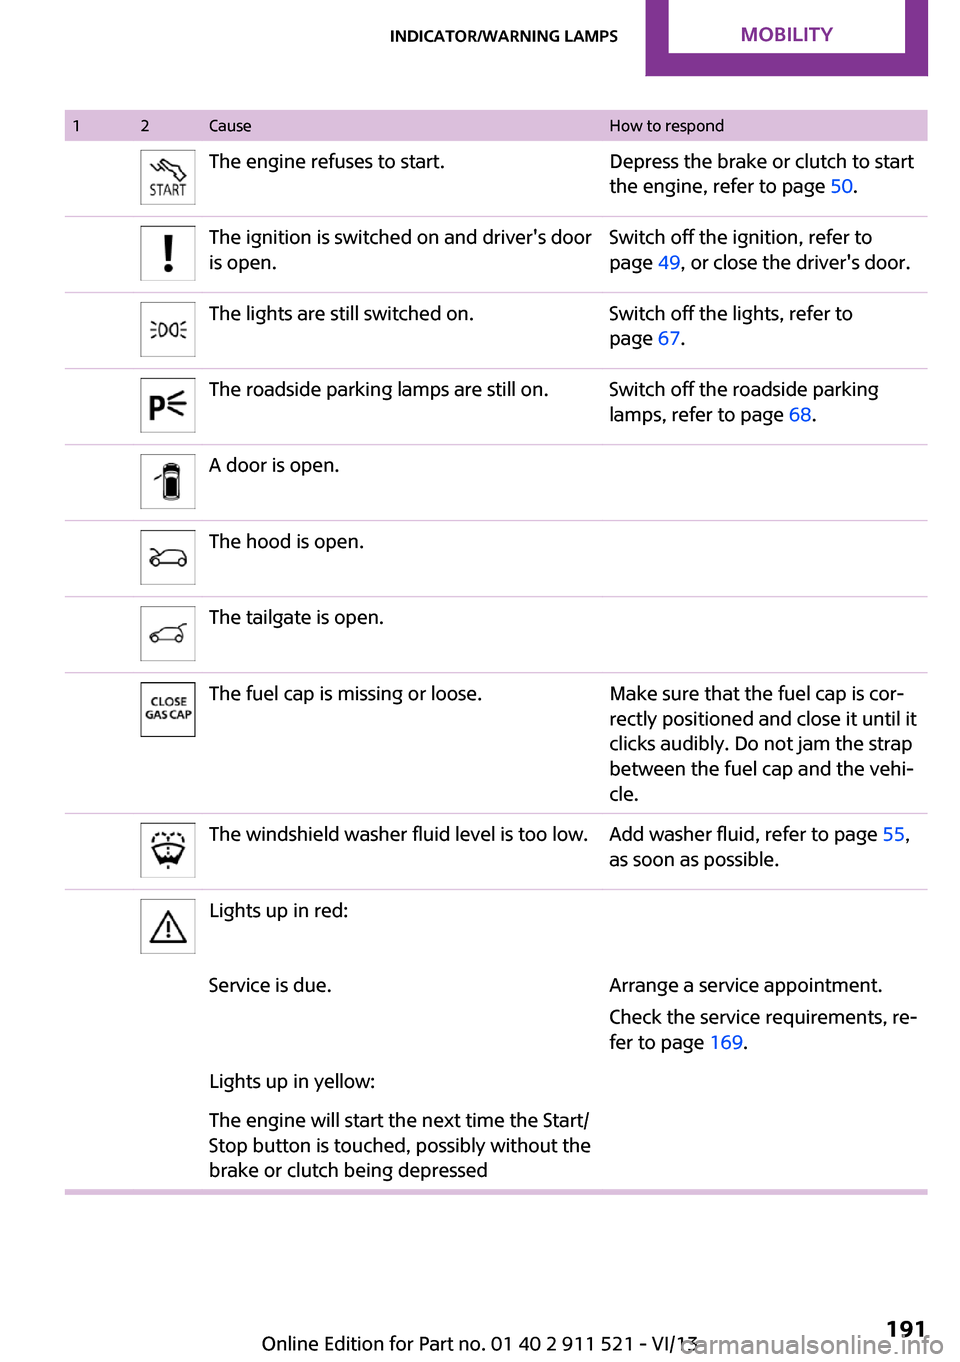
12CauseHow to respondThe engine refuses to start.Depress the brake or clutch to start
the engine, refer to page 50.The ignition is switched on and driver's door
is open.Switch off the ignition, refer to
page 49, or close the driver's door.The lights are still switched on.Switch off the lights, refer to
page 67.The roadside parking lamps are still on.Switch off the roadside parking
lamps, refer to page 68.A door is open.The hood is open.The tailgate is open.The fuel cap is missing or loose.Make sure that the fuel cap is cor‐
rectly positioned and close it until it
clicks audibly. Do not jam the strap
between the fuel cap and the vehi‐
cle.The windshield washer fluid level is too low.Add washer fluid, refer to page 55,
as soon as possible.Lights up in red:Service is due.Arrange a service appointment.
Check the service requirements, re‐
fer to page 169.Lights up in yellow:The engine will start the next time the Start/
Stop button is touched, possibly without the
brake or clutch being depressedSeite 191Indicator/warning lampsMobility191
Online Edition for Part no. 01 40 2 911 521 - VI/13
Page 211 of 218

FFailure messages, refer to Check Control 65
False alarm, refer to Avoiding unintentional alarms 32
Fastening safety belts, refer to Safety belts 38
Fault messages, refer to Check Control 65
Filling capacities 207
Filter– Refer to Activated-charcoal
filter 89– Refer to Microfilter 89– Refer to Microfilter/acti‐
vated-charcoal filter with
automatic climate control 91
First aid kit 180
First aid, refer to First aid kit 180
Flashing when locking/unlock‐ ing 25
Flat tire
– Flat Tire Monitor 76– Indicator/warning lamp 76– Run-flat tire 76– Tire Pressure Monitor
TPM 77
Flat Tire Monitor FTM 75
Flat Tire Monitor FTM
– Flat tire message 76– Initializing the system 75– Limits of the system 75– Snow chains 75
Flat tire, wheel change 177
Floor mats, care 189
Fog lamps 70
Foot brake 111
Footwell lamps, refer to Inte‐ rior lamps 70
Four-wheel drive, refer to ALL4 83
Front airbags 72
Front fog lamp, bulb replace‐ ment 173
Front fog lamps 70
Front lamps, bulb replace‐
ment 173
Front passenger airbags, de‐ activating 73
FTM Flat Tire Monitor 75
Fuel 150
Fuel– Refer to Average fuel con‐
sumption 61
Fuel, additives 150
Fuel, average consump‐ tion 61
Fuel cap, closing 148
Fuel consumption display
– Average fuel consump‐
tion 61
Fuel filler flap, closing 148
Fuel filler flap, opening 148
Fuel filler flap, unlocking in case of an electrical malfunc‐
tion 148
Fuel gauge 60
Fuel, saving 118
Fuel tank capacity, refer to Filling capacities 207
Fuel tank contents, refer to Filling capacities 207
Fuel tank, refer to Filling ca‐ pacities 207
Fuse 178
G Garage door opener, refer to Universal garage door
opener 92
Gasoline 150
Gasoline gauge, refer to Fuel gauge 60
Gasoline quality 150
Gear change
– Automatic transmission with
Steptronic 57
Gear display, automatic trans‐
mission with Steptronic 56
Glass sunroof, electrical 32
Glass sunroof, electrical– Convenient operation 25– Opening, closing 33– Raising 33– Remote control 25
H
Halogen headlamps, bulb re‐ placement 173
Hand car wash, care 187
Hand-held transmitter, alter‐ nating code 93
Hands-free microphone 17
Hazard warning system 17
Head airbags 72
Headlamp control, auto‐ matic 67
Headlamp courtesy delay fea‐ ture 69
Headlamp flasher 52, 68
Headlamps 67
Headlamps, care 187
Headlamps, cleaning, washer fluid 55
Head restraints 41
Head restraints
– Adjusting the height 41– Removing 41
Heatable
– Windshield 91
Heating
– Rear window 88, 91– Seats 38– Windshield 91
Height adjustment
– Seats 36
High beams 68
High beams, bulb replace‐ ment 173
Hill drive-off assistant 83
Hills 112
Holder for remote control, re‐ fer to Ignition lock 49
Homepage 6
Hood 164
Hood, closing 165
Seite 211Everything from A to ZReference211
Online Edition for Part no. 01 40 2 911 521 - VI/13