light MINI Paceman 2015 Workshop Manual
[x] Cancel search | Manufacturer: MINI, Model Year: 2015, Model line: Paceman, Model: MINI Paceman 2015Pages: 223, PDF Size: 5.51 MB
Page 118 of 223
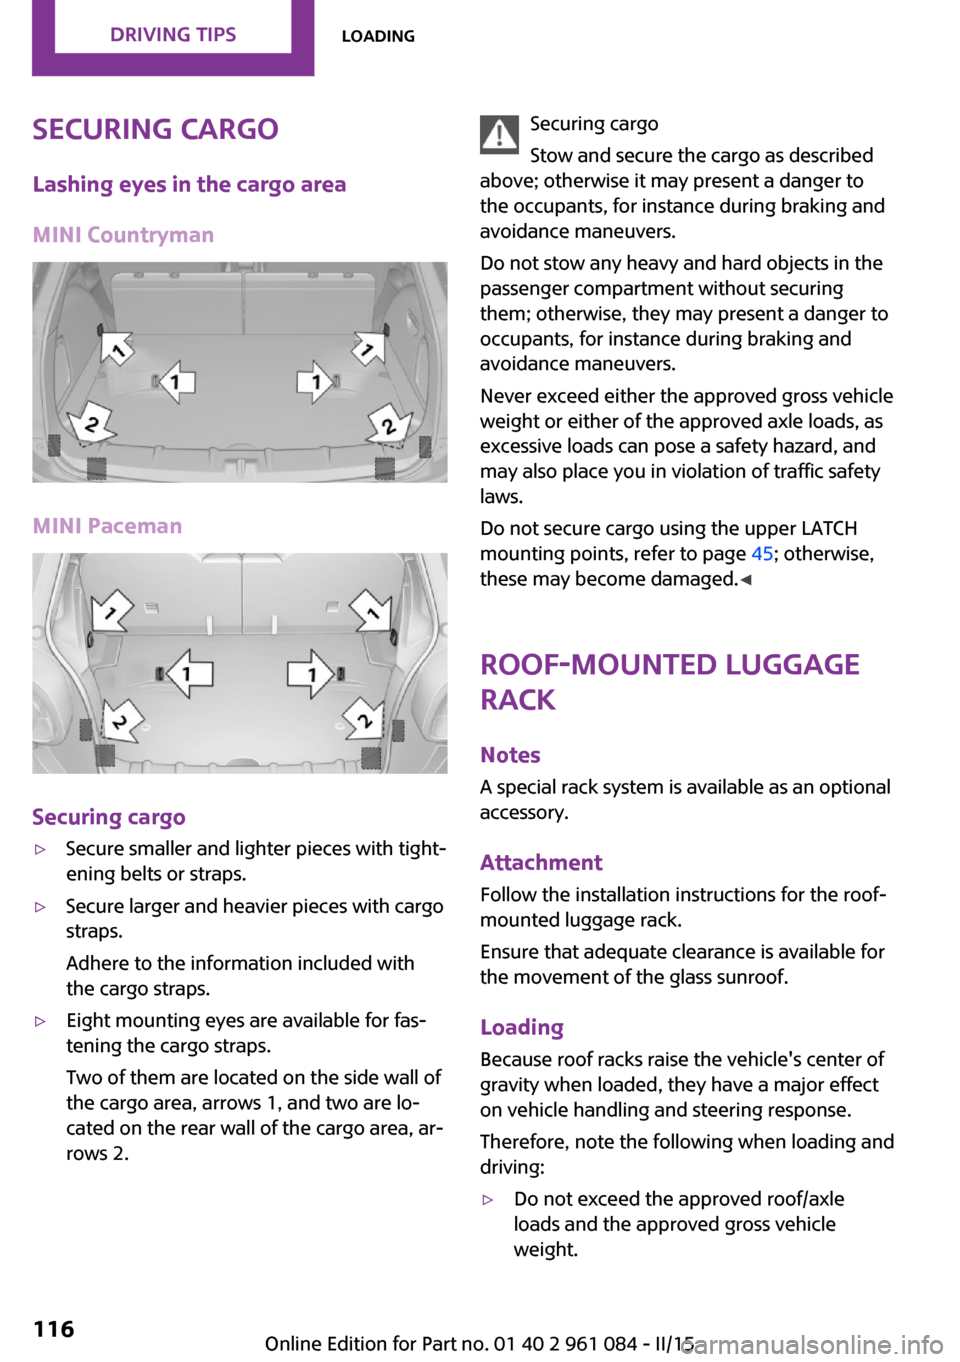
Securing cargoLashing eyes in the cargo area
MINI Countryman
MINI Paceman
Securing cargo
▷Secure smaller and lighter pieces with tight‐
ening belts or straps.▷Secure larger and heavier pieces with cargo
straps.
Adhere to the information included with
the cargo straps.▷Eight mounting eyes are available for fas‐
tening the cargo straps.
Two of them are located on the side wall of
the cargo area, arrows 1, and two are lo‐
cated on the rear wall of the cargo area, ar‐
rows 2.Securing cargo
Stow and secure the cargo as described
above; otherwise it may present a danger to
the occupants, for instance during braking and
avoidance maneuvers.
Do not stow any heavy and hard objects in the
passenger compartment without securing
them; otherwise, they may present a danger to
occupants, for instance during braking and
avoidance maneuvers.
Never exceed either the approved gross vehicle
weight or either of the approved axle loads, as
excessive loads can pose a safety hazard, and
may also place you in violation of traffic safety
laws.
Do not secure cargo using the upper LATCH
mounting points, refer to page 45; otherwise,
these may become damaged. ◀
Roof-mounted luggage
rack
NotesA special rack system is available as an optionalaccessory.
Attachment Follow the installation instructions for the roof-
mounted luggage rack.
Ensure that adequate clearance is available for
the movement of the glass sunroof.
Loading Because roof racks raise the vehicle's center of
gravity when loaded, they have a major effect
on vehicle handling and steering response.
Therefore, note the following when loading and
driving:▷Do not exceed the approved roof/axle
loads and the approved gross vehicle
weight.Seite 116DRIVING TIPSLoading116
Online Edition for Part no. 01 40 2 961 084 - II/15
Page 120 of 223
Saving fuelVehicle equipment
This chapter describes all series equipment as
well as country-specific and special equipment
offered for this model series. Therefore, it also
describes equipment that may not be found in
your vehicle, for instance due to the selected
special equipment or the country version. This
also applies to safety-related functions and sys‐
tems.
When using the features and systems described
here, adhere to local regulations.
General information
Your vehicle contains advanced technology for
the reduction of fuel consumption and emis‐
sions.
Fuel consumption depends on a number of dif‐
ferent factors. The implementation of certain measures, driving style and regular mainte‐nance can have an influence on fuel consump‐
tion and on the environmental impact.
Remove unnecessary cargo Additional weight increases fuel consumption.
Remove attached parts following use Remove unneeded auxiliary mirrors, roof or
rear luggage racks after use.
Attached parts on the vehicle impair the aero‐
dynamics and increase the fuel consumption.
Close both windows Open windows causes higher air resistance and
thus increases fuel consumption.Check the tire inflation pressure
regularly
Check and, if necessary, correct the tire infla‐
tion pressure, refer to page 152, at least twice
a month and before starting on a long trip.
Low tire inflation pressure increases rolling re‐
sistance and thus raises fuel consumption and
tire wear.
Drive away without delay
Do not wait for the engine to warm-up while
the vehicle remains stationary. Start driving
right away, but at moderate engine speeds.
This is the fastest way for the cold engine to
reach its operating temperature.
Look well ahead when drivingAvoid unnecessary acceleration and braking. To
achieve this, maintain a suitable distance to the
vehicle driving ahead of you.
Driving smoothly and looking ahead reduces
fuel consumption.
Avoid high engine speeds Use 1st gear to get the vehicle in motion. Be‐
ginning with 2nd gear, accelerate rapidly. When
accelerating, shift up before reaching high en‐
gine speeds.
When you reach the desired speed, shift into
the highest applicable gear and drive with the
engine speed as low as possible and at a con‐
stant speed.
As a rule: driving at low engine speeds lowers
fuel consumption and reduces wear.
Use coasting conditions
When approaching a red light, take your foot
off the accelerator and coast to a halt in the
highest applicable gear.Seite 118DRIVING TIPSSaving fuel118
Online Edition for Part no. 01 40 2 961 084 - II/15
Page 121 of 223
On a downhill slope, take your foot off the ac‐
celerator and coast in a suitable gear.
The flow of fuel is interrupted while coasting.
Switch off the engine during longer
stops
Switch off the engine during longer stops, e.g.,
at traffic lights, railroad crossings or in traffic
congestion.
Fuel savings are already achieved after the en‐
gine is turned off for as little as 4 seconds.
Switch off any functions that are not
currently needed
Functions such as seat heating and the rear
window defroster require a lot of energy and
consume additional fuel, especially in city and
stop-and-go traffic.
Therefore, switch off these functions if they are
not actually needed.
Have maintenance carried out
Have vehicles maintained regularly to achieve
optimal vehicle economy and operating life.
Have the maintenance carried out by the serv‐
ice center.
Please also note the MINI maintenance system,
refer to page 169.Seite 119Saving fuelDRIVING TIPS119
Online Edition for Part no. 01 40 2 961 084 - II/15
Page 124 of 223
Radio MINI Boost CDVehicle equipment
This chapter describes all series equipment as
well as country-specific and special equipment
offered for this model series. Therefore, it also
describes equipment that may not be found in
your vehicle, for instance due to the selectedspecial equipment or the country version. This
also applies to safety-related functions and sys‐
tems.
When using the features and systems described
here, adhere to local regulations.
General information
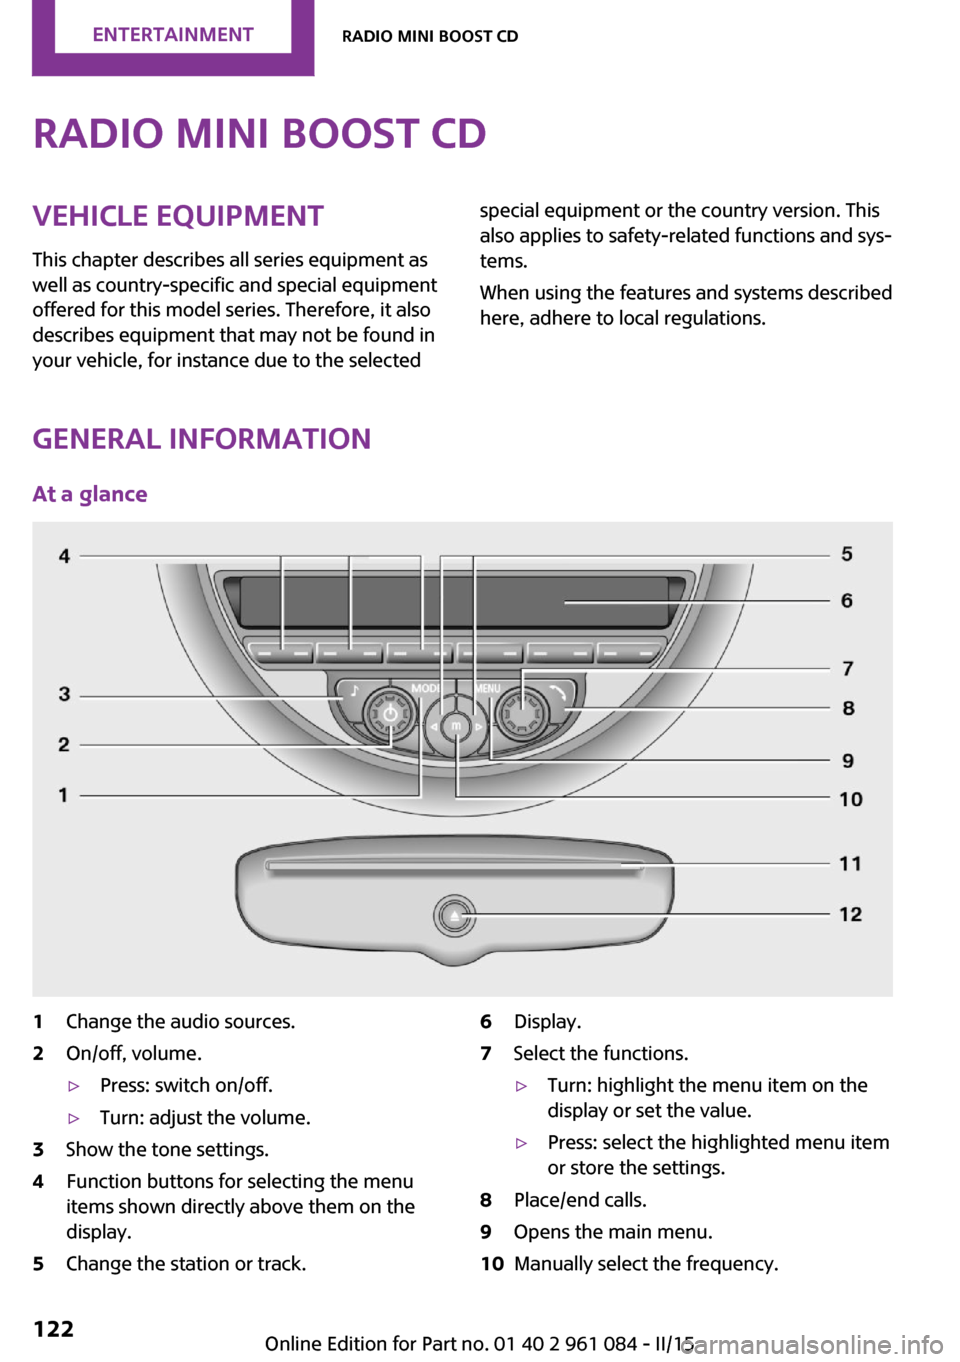
At a glance
1Change the audio sources.2On/off, volume.▷Press: switch on/off.▷Turn: adjust the volume.3Show the tone settings.4Function buttons for selecting the menu
items shown directly above them on the
display.5Change the station or track.6Display.7Select the functions.▷Turn: highlight the menu item on the
display or set the value.▷Press: select the highlighted menu item
or store the settings.8Place/end calls.9Opens the main menu.10Manually select the frequency.Seite 122ENTERTAINMENTRadio MINI Boost CD122
Online Edition for Part no. 01 40 2 961 084 - II/15
Page 126 of 223
for approx. 20 minutes. To listen to the radio,
switch it back on.
To spare the battery, ensure that the radio is
switched off when you leave the vehicle.
Adjusting the volume Turn the left knob. The setting is stored for the
remote control currently in use.
When a call is placed using the hands-free sys‐
tem, the audio sources are muted.
Speed-dependent volume and volumes
of PDC signal tone and gong▷"PDC": volume of the PDC signal tone com‐
pared to the audio sources.▷"GONG": volume of the gong compared to
the audio sources.▷"S-VOL": speed-dependent volume control.
Set the audio sources to a high volume to be
able to adjust the volume of the signal tones
more easily.
1. Press the button.2. Select the symbol if necessary.3.Select the desired volume setting.4.Set the desired volume and press the right
knob.
Volume of external audio devices
An external audio device such as an MP3 player
can be connected via the AUX-IN port in the
center console and the audio tracks can be
played over the car's loudspeaker system.
The volume of the external audio device can be
adjusted to the car radio.
1. Press the button.2."AUX"3."Vol-AUX"4.Set the desired volume and press the right
knob.Tone settings▷"BASS": depth adjustment.▷"TREBLE": treble adjustment.▷"FADER": front/rear volume distribution.▷"BAL": left/right volume distribution.
The sound settings are set globally for all audio
sources.
Setting the treble, bass, and volume distribution
1. Press the button.2.Highlight the desired tone setting and press
the right knob.3.Create the desired setting and press the
right knob.
Resetting the tone settings
The tone settings are reset to medium values.
1. Press the button.2."RESET"
Time
Setting the time, date, and time format
1.Switch on the radio ready state or the igni‐
tion.2. Press the button.3."CONFIG"4."TIME"5.Select the desired category.6.Create the settings and press the right
knob.Seite 124ENTERTAINMENTRadio MINI Boost CD124
Online Edition for Part no. 01 40 2 961 084 - II/15
Page 127 of 223
Setting the units of measure of the
computer and the language1.Switch on the radio ready state or the igni‐
tion.2. Press the button.3."CONFIG"4.▷"DIST": change the unit of measure for
the range.▷"LANG": select the language of the dis‐
play texts.▷"CONSMP": change the unit of measure
for the average fuel consumption.▷"TEMP": change the unit of measure for
the external temperature.5.Highlight the desired menu item and press
the button.6.Create the desired setting.
Computer
The following vehicle information can be call up
via the computer:
▷Average fuel consumption▷Average speed▷Range
Displaying information
1.Switch on the radio ready state or the igni‐
tion.2. Press the button.3."COMP"
Average fuel consumption
The average fuel consumption is calculated for
the time during which the engine is running.
To start calculation of the average fuel con‐
sumption:
1."CONSMP"2."RESET"The previous display is set to zero and the sys‐
tem begins recalculating the average fuel con‐
sumption.
Average speed
The average speed is calculated for the time
during which the engine is running.
To start calculation of the average speed:1."SPEED"2."RESET"
Estimated range
"RANGE"
The display shows the estimated distance that
can be still be driven on the remaining fuel,
taking into consideration the driving style over
the last 18 miles/30 km.
Radio
Listening to the radio
The radio is designed for reception in the FM
and AM wavebands.
1.Switch on the radio, refer to page 123.2. Press this button if necessary.3."TUNER"4."FM" or"AM"
Press the corresponding button repeatedly
until the desired waveband is displayed.▷FM: FM1, FM2, FMA▷AM: AM, AMA
Selecting a station
The setting is stored for the remote control cur‐
rently in use.
Next station
Press the button.
Seite 125Radio MINI Boost CDENTERTAINMENT125
Online Edition for Part no. 01 40 2 961 084 - II/15
Page 131 of 223
Playback begins automatically.
Reading can take a few minutes with com‐
pressed audio files.
Starting the CD player
A CD is contained in the CD player.1.Switch on the car radio if necessary.2. Press the button.3."CD"
Skipping to another track
Press the button repeatedly until
the desired track is played.
With the right knob:
Turn the right knob until the desired track is
played back.
Fast forward/reverse
Hold the button down.
Tracks can be heard but are distorted.
Briefly playing and selecting a track
"SC"
All tracks are played briefly one after the other.
To interrupt the function and select a track:
"SC"
Random playback "RND"
To end random playback:
"RND"
Compressed audio files CD players can play back CDs with compressed
audio data: MP3 and WMA.
Selecting a track1."LIST"2.Select the desired directory using the right
knob.▷ : press the right knob to open a di‐
rectory.▷ : press the right knob to close a di‐
rectory.3.Select other directories if you wish.4.Highlight the desired track and press the
right knob.
You can scroll through the directories during
playback.
To change to the current track:
"CURR"
Displaying information on the track
Any information stored on the currently se‐
lected track can be displayed.
1."LIST"2."TRACK"
Ejecting a CD from the CD player
Press the button.
The CD emerges slightly from the CD drive.
Operational displays
▷"Insert CD"
The CD slot is empty.▷"Error CD"
The CD cannot be read or is defective.▷"Temp. CD"
Operating temperature is too high.Seite 129Radio MINI Boost CDENTERTAINMENT129
Online Edition for Part no. 01 40 2 961 084 - II/15
Page 132 of 223
Notes
CD player Do not remove the cover
The CD players are officially designated
Class 1 laser products. Do not operate if the
cover is damaged; otherwise, severe eye dam‐
age can result. ◀
CDs Using CDs▷Do not use self-recorded CDs with la‐
bels applied, as these can become
detached during playback due to
heat buildup and can cause irrepara‐
ble damage to the device.▷Only use round CDs with a standard diame‐
ter of 4.7 in/12 cm and do not play CDs
with an adapter, e.g., single CDs; otherwise,
the CDs or the adapter may jam and no lon‐
ger eject. ◀
General malfunctions
▷The CD players have been optimized for
performance in vehicles. In some instances
they may be more sensitive to faulty CDs
than stationary devices would be.▷If a CD cannot be played, first check if it has
been inserted correctly.
Humidity
High levels of humidity can lead to condensa‐
tion on the CD or the laser's scan lens, and tem‐
porarily prevent playback.
Malfunctions with particular CDs If malfunctions occur only with particular CDs,
this can be due to one of the following causes:
Self-recorded CDs
▷Possible reasons for malfunctions with self-
recorded CDs are inconsistent data creationor recording processes, or poor quality or
old age of the blank CD.▷Only label CDs on the upper side with a pen
intended for this purpose.
Damage
▷Avoid fingerprints, dust, scratches and
moisture.▷Store CDs in a sleeve.▷Do not subject CDs to temperatures over
50 ℃/122 ℉, high humidity, or direct sun‐
light.
CDs with copy protection
CDs are often provided with a copy protection
feature by the manufacturer. This can mean
that some CDs cannot be played or can only be
played to a limited extent.
MACROVISION
This product contains copyrighted technology
that is based on multiple registered US patents
and the intellectual property of the Macrovision
Corporation and other manufacturers. The use
of this copy protection must be approved by
Macrovision. Media protected by this product -
unless otherwise agreed with Macrovision -
may only be used for private purposes. Copying
of this technology is prohibited.
External devices AUX-IN port
At a glance
▷For connecting audio devices, e.g., MP3
player. The sound is output on the vehicle
loudspeakers.▷Recommendation: use medium tone and
volume settings on the audio device. The
tone depends on the quality of the audio
files.Seite 130ENTERTAINMENTRadio MINI Boost CD130
Online Edition for Part no. 01 40 2 961 084 - II/15
Page 135 of 223
Random playback
"RND"
To end random playback: "RND"
Selecting a track
Depending on the connected device, the track
can be selected via the following category:▷"LIST": playback lists.▷"GEN": musical genre.▷"ART": artist.▷"ALB": album.1.Select the desired category.2.If necessary, select the desired directory us‐
ing the right knob.▷ : press the right knob to open a di‐
rectory.▷ : press the right knob to close a di‐
rectory.3.Select other directories if you wish.4.Highlight the desired track and press the
right knob.
You can scroll through the directories during
playback.
To change to the current track:
"CURR"
Displaying information on the track
Any information stored on the currently se‐
lected track can be displayed.
"TRACK"
Adjusting the volumeThe volume of the sound output is dependent
on the audio device. If this volume differs
markedly from the volume of the other audio
sources, it is advisable to adjust the volumes.
1."LEV"2.Turn the right knob until the desired vol‐
ume is set and press the knob.Notes
Do not expose the audio device to extreme en‐
vironmental conditions, such as very high tem‐
peratures; refer to the audio device operating
instructions.
Depending on the configuration of the audio
files, e.g., bit rates greater than 256 kbit/s, the
files may not play back correctly in each case.
Information on connection▷It is only possible to connect one iPod/
iPhone to the vehicle at a time.▷Playback from the iPod/iPhone is only pos‐
sible via the USB audio interface if a snap-in
adapter is not used.▷The connected audio device is supplied
with a max. power of 500 mA if supported
by the device. Therefore, do not addition‐
ally connect the device to a socket in the
vehicle; otherwise, playback may be com‐
promised.▷Do not use force when plugging the con‐
nector into the USB interface.▷Do not connect devices such as fans or
lamps to the USB audio interface.▷Do not connect USB hard drives.▷Do not use the USB audio interface to re‐
charge external devices.Seite 133Radio MINI Boost CDENTERTAINMENT133
Online Edition for Part no. 01 40 2 961 084 - II/15
Page 138 of 223
TelephoneVehicle equipment
This chapter describes all series equipment as
well as country-specific and special equipment
offered for this model series. Therefore, it also
describes equipment that may not be found in
your vehicle, for instance due to the selected
special equipment or the country version. This
also applies to safety-related functions and sys‐
tems.
When using the features and systems described
here, adhere to local regulations.
At a glance
The concept
Mobile phones can be connected with the vehi‐
cle via Bluetooth.
After a suitable mobile phone is paired with the
vehicle once, you can operate the mobile
phone via the radio, the buttons on the steer‐
ing wheel, and via voice activation.
Bluetooth® is a registered trademark of Blue‐
tooth® SIG, Inc.
Certain functions may need to be enabled by
the mobile phone provider or service provider.
Using the mobile phone while driving
Make entries only when traffic and road
conditions allow. Do not hold the mobile phone
in your hand while you are driving; use the
hands-free system instead. If you do not ob‐
serve this precaution, you can endanger the ve‐
hicle occupants and other road users. ◀
Snap-in adapter
The snap-in adapter is used to:▷Hold the mobile phone.▷Recharge the battery.▷Connect the mobile phone to an outside
antenna of the vehicle.
This provides for better network reception
and consistent sound quality.
Do not operate a mobile phone that is con‐
nected to the vehicle on the mobile phone key‐
pad, as this may lead to a malfunction.
Approved mobile phones
Details on which mobile phones with a Blue‐
tooth interface are supported by the mobile
phone preparation package can be obtained at
www.mini.com/connectivity.
Notes At high temperatures, the charging function of
the mobile phone may be limited and functions
may not be executed.
Controls
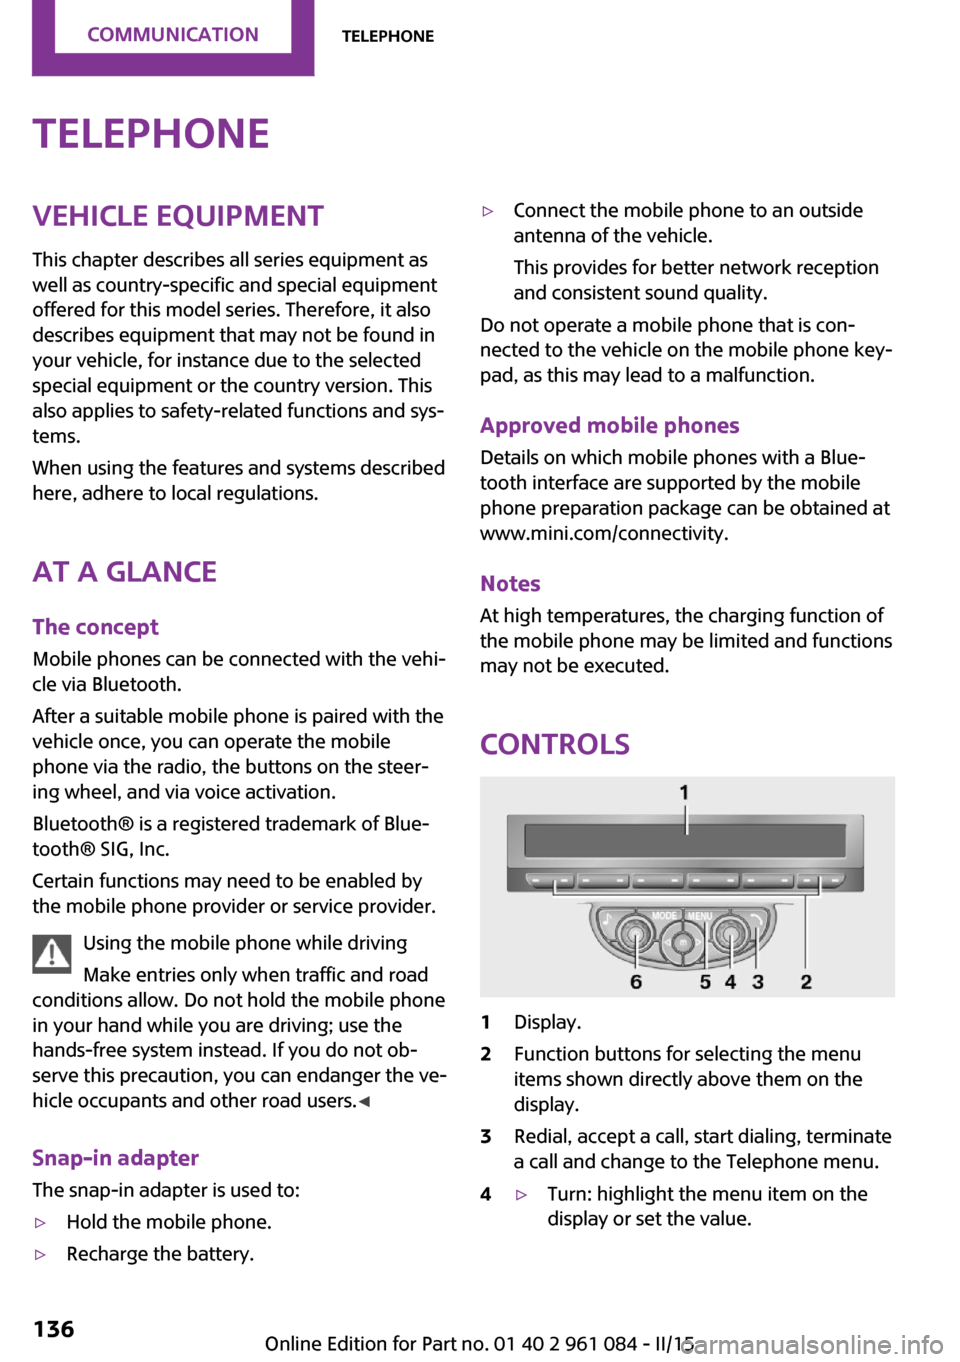
1Display.2Function buttons for selecting the menu
items shown directly above them on the
display.3Redial, accept a call, start dialing, terminate
a call and change to the Telephone menu.4▷Turn: highlight the menu item on the
display or set the value.Seite 136COMMUNICATIONTelephone136
Online Edition for Part no. 01 40 2 961 084 - II/15