warning MINI Paceman 2016 (Mini Connected) Repair Manual
[x] Cancel search | Manufacturer: MINI, Model Year: 2016, Model line: Paceman, Model: MINI Paceman 2016Pages: 223, PDF Size: 5.52 MB
Page 108 of 223
from the hooks, ensure that they will not ob‐
struct the driver's view. ◀
WARNING
Improper use of the clothes hooks can
lead to a danger of objects flying about during
braking and evasive maneuvers. There is risk of
injuries and risk of property damage. Only hang
lightweight objects, e.g. clothing articles, from
the clothes hooks. ◀
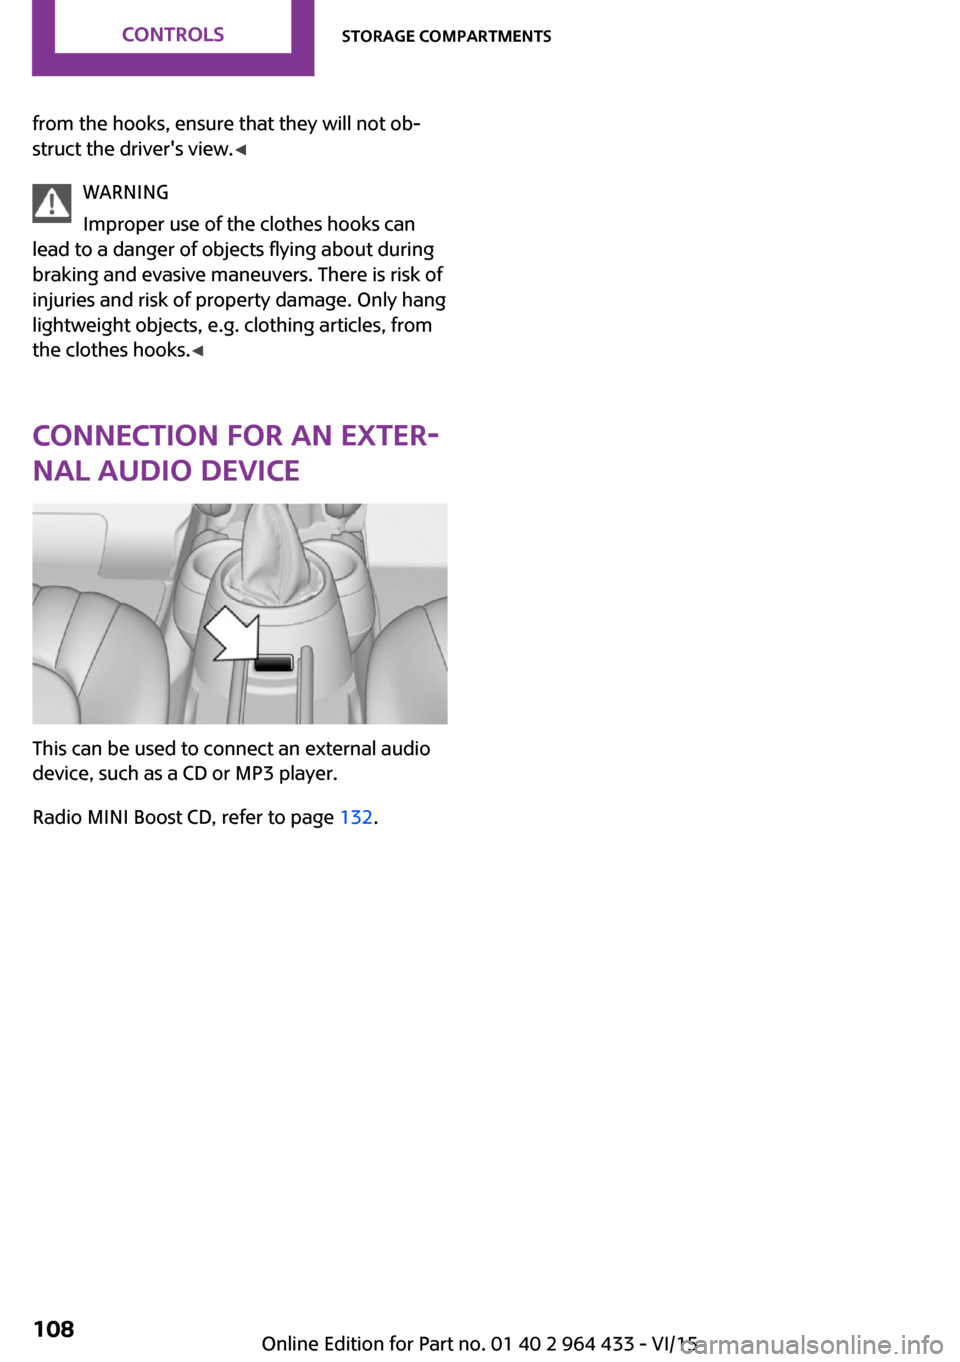
Connection for an exter‐
nal audio device
This can be used to connect an external audio
device, such as a CD or MP3 player.
Radio MINI Boost CD, refer to page 132.
Seite 108CONTROLSStorage compartments108
Online Edition for Part no. 01 40 2 964 433 - VI/15
Page 113 of 223
Closing the tailgateWARNING
An open tailgate protrudes from the vehi‐
cle and can endanger occupants and other traf‐
fic participants or damage the vehicle in the
event of an accident, braking or evasive ma‐
neuvers. In addition, exhaust fumes may enter
the vehicle interior. There is risk of injuries or
risk of property damage. Do not drive with the
tailgate open. ◀
If, despite this, the vehicle must be driven with
the tailgate open:▷Drive moderately.▷Close all windows and the glass sunroof.▷Switch off recirculated air mode and greatly
increase the blower speed.
Hot exhaust system
WARNING
During driving operation, high tempera‐
tures can occur underneath the body, e.g.
caused by the exhaust gas system. If combusti‐
ble materials, such as leaves or grass, come in
contact with hot parts of the exhaust gas sys‐
tem, these materials can ignite. There is risk of
injuries or risk of property damage.
Do not remove the heat shields installed and
never apply undercoating to them. Make sure
that no combustible materials can come in con‐
tact with hot vehicle parts in driving operation,
idle or during parking. Do not touch the hot ex‐
haust system. ◀
Mobile communication devices in the vehicle
WARNING
The vehicle's performance may be af‐
fected by interference from high frequency
radio signals. These signals are emitted by a
series of transmission systems, such as from air
traffic beacons or relay stations for mobile tele‐
communications.
If you have problems of this nature, we recom‐
mend that you consult your dealer’s service
center or another qualified service center or re‐
pair shop. ◀
Hydroplaning On wet or slushy roads, a wedge of water can
form between the tires and road surface.
This phenomenon is referred to as hydroplan‐
ing. It is characterized by a partial or complete
loss of contact between the tires and the road
surface, ultimately undermining your ability to
steer and brake the vehicle.
The risk of hydroplaning increases as the tire
tread depth decreases. Minimum tread depth,
refer to page 160.
Driving through water Drive though calm water only if it is not deeper
than 12 inches/30 cm and at this height, no
faster than walking speed, up to
6 mph/10 km/h.
Using the parking brake on inclines On inclines, do not hold the vehicle stationary
with a slipping clutch for extended period; use
the parking brake instead. Otherwise, the
clutch will be subject to increased wear.
Support from the hill drive-off assistant, refer to
page 86.
Braking safely The vehicle is equipped with ABS as a standardfeature.
Applying the brakes fully is the most effective
way of braking in situations when this is neces‐
sary.
The vehicle maintains steering responsiveness.
You can still avoid any obstacles with a mini‐
mum of steering effort.
Pulsation of the brake pedal and sounds from
the hydraulic circuits indicate that ABS is in its
active mode.Seite 113Things to remember when drivingDRIVING TIPS113
Online Edition for Part no. 01 40 2 964 433 - VI/15
Page 114 of 223

Objects in the area around the pedalsWARNING
Objects in the driver's floor area can limit
the pedal distance or block a depressed pedal.
There is risk of an accident. Stow objects in the
vehicle such that they are secured and cannot
enter into the driver's floor area. Use floor mats
that are suitable for the vehicle and can be
safely attached to the floor. Do not use loose
floor mats and do not layer several floor mats.
Make sure that there is sufficient clearance for
the pedals. Ensure that the floor mats are se‐
curely fastened again after they were removed,
e.g. for cleaning. ◀
Driving in wet conditions When roads are wet or there is heavy rain,
briefly exert gentle pressure on the brake pedal
every few miles.
Ensure that this action does not endanger other
road users.
The heat generated in this process helps dry
the brake discs and pads.
In this way braking efficiency will be available
when you need it.
Hills
Drive long or steep downhill gradients in the
gear in which the least braking is required. Oth‐
erwise, the brake system may overheat, result‐
ing in a reduction in the brake system effi‐
ciency.
You can increase the engine's braking effect by
shifting down, going all the way to first gear, if
necessary.
Downshifting in manual mode of the Steptronic
transmission, refer to page 58.
WARNING
Light but consistent brake pressure can
lead to high temperatures, brakes wearing out
and possibly even brake failure. There is risk ofan accident. Avoid placing excessive load on
the brake system. ◀
WARNING
In idle or with the engine switched off,
safety-relevant functions are restricted or not
available anymore, e.g. braking effect of the
engine or braking force and steering support.
There is risk of an accident. Do not drive in idle
or with the engine switched off. ◀
Brake disc corrosion Corrosion on the brake discs and contamina‐
tion on the brake pads are furthered by:▷Low mileage.▷Extended periods when the vehicle is not
used at all.▷Infrequent use of the brakes.
Corrosion occurs when the minimum pressure
that must be exerted by the pads during brake
applications to clean the discs is not reached.
Should corrosion form on the brake discs, the
brakes will tend to respond with a pulsating ef‐
fect that generally cannot be corrected.
When the vehicle is parked
When using the automatic climate control, con‐
densation water develops that exits under‐
neath the vehicle.
Therefore, traces of condensed water under the
vehicle are normal.
After the engine is switched off, the coolant
pump may continue running for some time in
the MINI Cooper S. This causes noises in the en‐
gine compartment.
Driving on poor roadsYour MINI with ALL4 all-wheel drive feels com‐
fortable on all streets and roads. It combines an
all-wheel drive system with the advantages of a
normal passenger car.
Seite 114DRIVING TIPSThings to remember when driving114
Online Edition for Part no. 01 40 2 964 433 - VI/15
Page 116 of 223
LoadingVehicle features and op‐tions
This chapter describes all standard, country-
specific and optional features offered with the
series. It also describes features that are not
necessarily available in your car, e. g., due to
the selected options or country versions. This
also applies to safety-related functions and sys‐
tems.
When using the features and systems described
here, adhere to local regulations.
General information WARNING
High gross weight can overheat the tires,
damage them internally, and cause a sudden drop in tire inflation pressure. There is risk of an
accident. Pay attention to the permitted load
capacity of the tires and never exceed the per‐
mitted gross weight. ◀
CAUTION
Fluids in the cargo area can cause dam‐
age. There is risk of property damage. Make sure that no fluids leak in the cargo area. ◀
WARNING Loose objects in the car's interior can be
thrown into the car's interior while driving, e.g.
in the event of an accident or during braking
and evasive maneuvers. There is risk of injuries.
Secure loose objects in the car's interior. ◀Determining the load
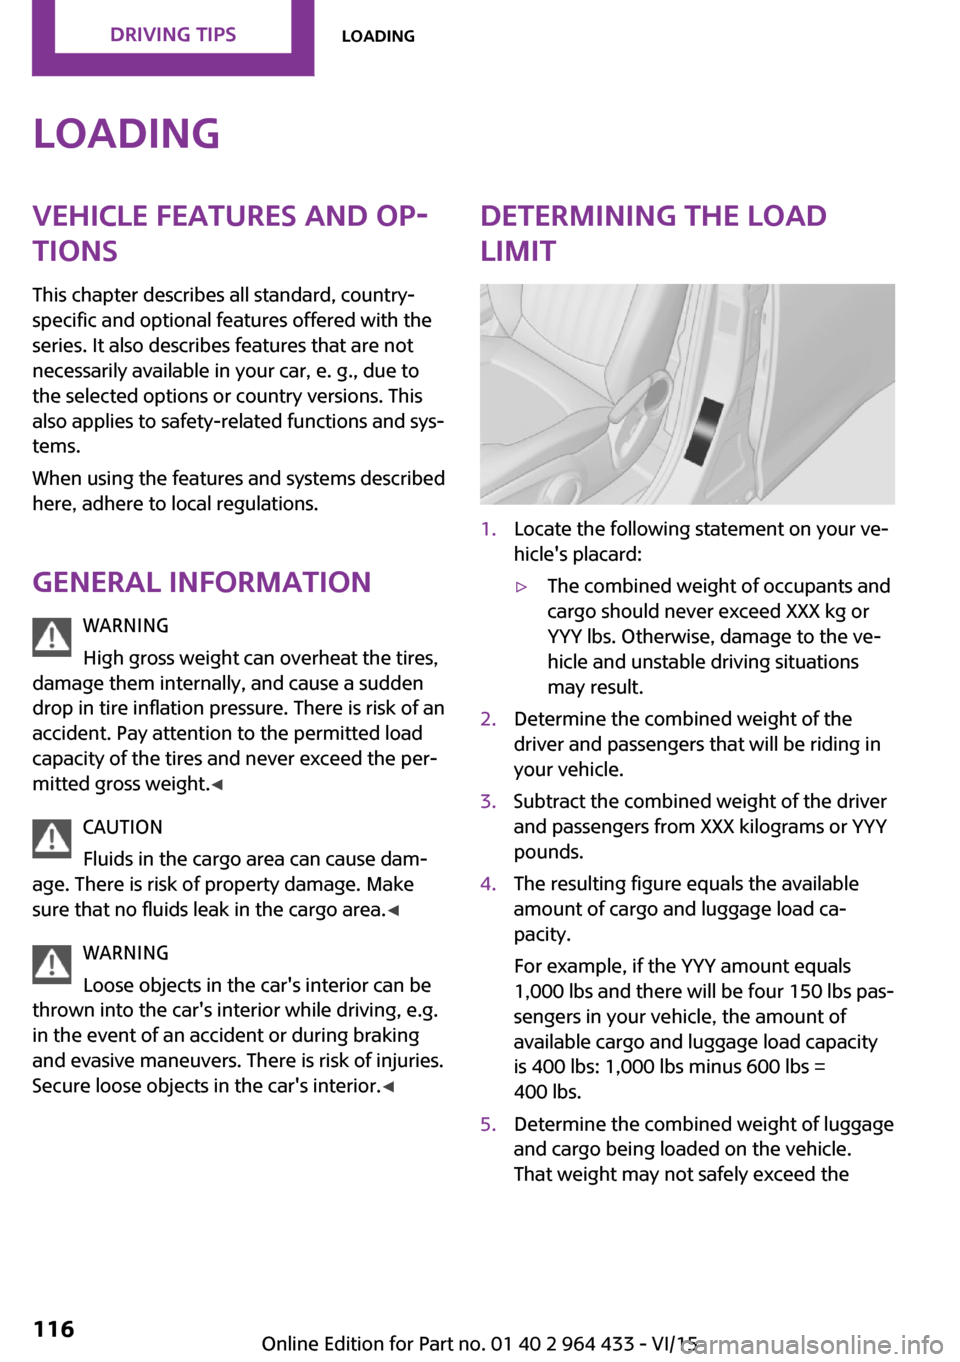
limit1.Locate the following statement on your ve‐
hicle's placard:▷The combined weight of occupants and
cargo should never exceed XXX kg or
YYY lbs. Otherwise, damage to the ve‐
hicle and unstable driving situations
may result.2.Determine the combined weight of the
driver and passengers that will be riding in
your vehicle.3.Subtract the combined weight of the driver
and passengers from XXX kilograms or YYY
pounds.4.The resulting figure equals the available
amount of cargo and luggage load ca‐
pacity.
For example, if the YYY amount equals
1,000 lbs and there will be four 150 lbs pas‐
sengers in your vehicle, the amount of
available cargo and luggage load capacity
is 400 lbs: 1,000 lbs minus 600 lbs =
400 lbs.5.Determine the combined weight of luggage
and cargo being loaded on the vehicle.
That weight may not safely exceed theSeite 116DRIVING TIPSLoading116
Online Edition for Part no. 01 40 2 964 433 - VI/15
Page 118 of 223

Securing cargoLashing eyes in the cargo area
MINI Countryman
MINI Paceman
Securing cargo
▷Secure smaller and lighter pieces with tight‐
ening belts or straps.▷Secure larger and heavier pieces with cargo
straps.
Adhere to the information included with
the cargo straps.▷Eight mounting eyes are available for fas‐
tening the cargo straps.
Two of them are located on the side wall of
the cargo area, arrows 1, and two are lo‐
cated on the rear wall of the cargo area, ar‐
rows 2.
WARNING
Improperly stowed objects can shift and
be thrown into the car's interior, e.g. in the
event of an accident or during braking and eva‐
sive maneuvers. Vehicle occupants can be hit
and injured. There is risk of injuries. Stow and
secure objects and cargo properly.
Do not secure cargo using the upper LATCH
mounting points, refer to page 48; otherwise,
these may become damaged. ◀
Roof-mounted luggage
rack
InformationA special rack system is available as an optional
accessory.
Securing
Follow the installation instructions of the roof
rack.
Ensure that adequate clearance is available for
the movement of the glass sunroof.
Loading Because roof racks raise the vehicle's center ofgravity when loaded, they have a major effect
on vehicle handling and steering response.
Therefore, note the following when loading and driving:▷Do not exceed the approved roof/axle
loads and the approved gross vehicle
weight.▷Distribute the roof load uniformly.▷The roof load should not extend past the
loading area.▷Always load the heaviest pieces on the bot‐
tom.▷Secure the roof luggage firmly, e.g., tie with
ratchet straps.▷Do not let objects project into the opening
path of the tailgate.▷Drive smoothly. Avoid sudden acceleration
and braking maneuvers. Take corners gen‐
tly.Seite 118DRIVING TIPSLoading118
Online Edition for Part no. 01 40 2 964 433 - VI/15
Page 132 of 223
Information
CD player WARNING
CD/DVD players and changers are offi‐
cially designated Class 1 laser products. Lasers
can damage the retina of the eye. There is risk
of injuries. Do not use the CD/DVD player or
changer, if the cover is damaged. ◀
CDs CAUTION
With use of non-compatible CD sizes, the
CD can get jammed and it may not be possible
to pull it out again. Labels applied after the fact
can loosen during playback. There is risk of
property damage.▷Do not use any CDs with labels applied after
the fact.▷Only use round CDs with a standard diame‐
ter of 4.7 inches/12 cm and do not play
back any CDs with adapters, e.g. single CDs.▷Do not use any combined CD/DVDs, e. g.
DVD Plus. ◀
General malfunctions
▷The CD players have been optimized for
performance in vehicles. In some instances
they may be more sensitive to faulty CDs
than stationary devices would be.▷If a CD cannot be played, first check if it has
been inserted correctly.
Humidity
High levels of humidity can lead to condensa‐
tion on the CD or the laser's scan lens, and tem‐
porarily prevent playback.
Malfunctions with particular CDs If malfunctions occur only with particular CDs,
this can be due to one of the following causes:
Self-recorded CDs▷Possible reasons for malfunctions with self-
recorded CDs are inconsistent data creation
or recording processes, or poor quality or
old age of the blank CD.▷Only label CDs on the upper side with a pen
intended for this purpose.
Damage
▷Avoid fingerprints, dust, scratches and
moisture.▷Store CDs in a sleeve.▷Do not subject CDs to temperatures over
50 ℃/122 ℉, high humidity, or direct sun‐
light.
CDs with copy protection
CDs are often provided with a copy protection
feature by the manufacturer. This can mean
that some CDs cannot be played or can only be
played to a limited extent.
MACROVISION
This product contains copyrighted technology
that is based on multiple registered US patents
and the intellectual property of the Macrovision
Corporation and other manufacturers. The use
of this copy protection must be approved by
Macrovision. Media protected by this product -
unless otherwise agreed with Macrovision -
may only be used for private purposes. Copying
of this technology is prohibited.
External devices AUX-IN port
Overview
▷For connecting audio devices, e.g., MP3
player. The sound is output on the vehicle
loudspeakers.Seite 132ENTERTAINMENTRadio MINI Boost CD132
Online Edition for Part no. 01 40 2 964 433 - VI/15
Page 138 of 223
TelephoneVehicle features and op‐
tions
This chapter describes all standard, country-
specific and optional features offered with the
series. It also describes features that are not
necessarily available in your car, e. g., due to
the selected options or country versions. This
also applies to safety-related functions and sys‐
tems.
When using the features and systems described
here, adhere to local regulations.
Overview
The concept
Mobile phones can be connected with the vehi‐
cle via Bluetooth.
After a compatible mobile phone is paired with
the vehicle once, you can operate the mobile phone via the radio, the buttons on the steer‐
ing wheel, and via voice activation.
Bluetooth® is a registered trademark of Blue‐
tooth® SIG, Inc.
Certain functions may need to be enabled by
the mobile phone provider or service provider.
WARNING
Operating the integrated information sys‐
tems and communication devices while driving can distract from traffic. It is possible to lose
control of the vehicle. There is risk of an acci‐
dent. Only use the systems or devices when the
traffic situation allows. If necessary stop and
use the systems and devices while the vehicle is
stationary. ◀
Snap-in adapter
The snap-in adapter is used to:▷Hold the mobile phone.▷Recharge the battery.▷Connect the mobile phone to an outside
antenna of the vehicle.
This provides for better network reception
and consistent sound quality.
Do not operate a mobile phone that is con‐
nected to the vehicle on the mobile phone key‐
pad, as this may lead to a malfunction.
Compatible mobile phones
Details on which mobile phones with a Blue‐
tooth interface are supported by the mobile
phone preparation package can be obtained at
www.mini.com/connectivity.
InformationAt high temperatures, the charging function of
the mobile phone may be limited and functions
may not be executed.
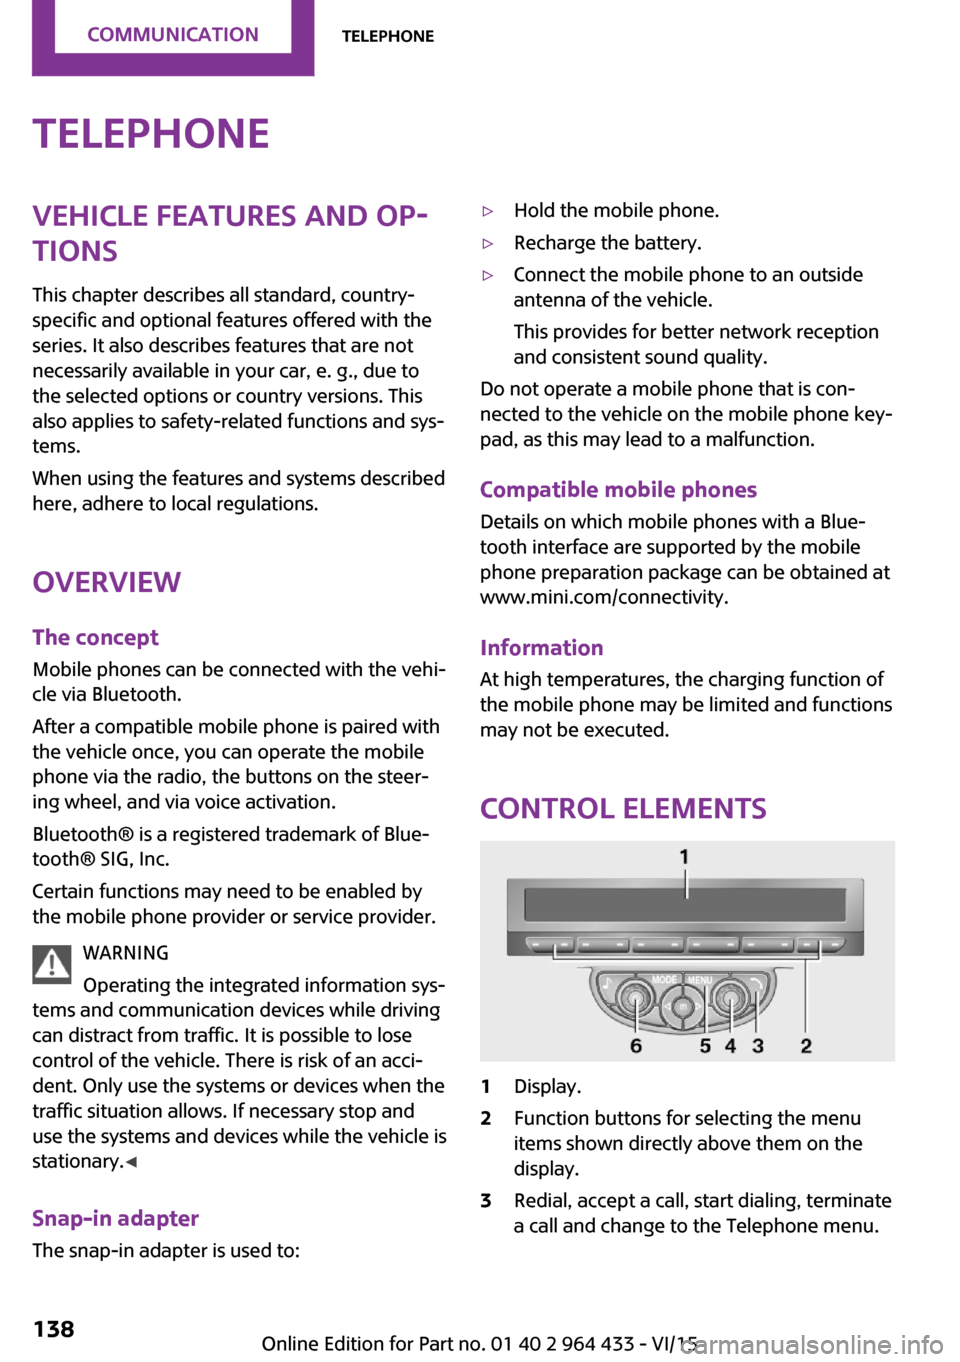
Control elements
1Display.2Function buttons for selecting the menu
items shown directly above them on the
display.3Redial, accept a call, start dialing, terminate
a call and change to the Telephone menu.Seite 138COMMUNICATIONTelephone138
Online Edition for Part no. 01 40 2 964 433 - VI/15
Page 140 of 223
To activate the connection:1.Switch on the radio ready state or the igni‐
tion.2. Press the button.3."PHONE"4."BT-ON"
To deactivate the connection again:
1."BT"2."BT-OFF"3."YES"
Pairing and connecting
WARNING
Operating the integrated information sys‐
tems and communication devices while driving
can distract from traffic. It is possible to lose
control of the vehicle. There is risk of an acci‐
dent.
Only use the systems or devices when the traf‐
fic situation allows. If necessary stop and use
the systems and devices while the vehicle is
stationary. ◀
1.Switch on the radio ready state or the igni‐
tion.2. Press the button.3."PHONE"4."BT"5."PAIR"
Turn the right knob to display the Bluetooth
name of your vehicle.6.To perform additional steps on the mobile
phone, refer to the mobile phone operating
instructions: for instance, search for or con‐
nect the Bluetooth device or a new device.
The Bluetooth name of the vehicle appears
on the mobile phone display.7.Select the Bluetooth name of the vehicle on
the mobile phone display.You are prompted by the radio or mobile
phone to enter the same Bluetooth pass‐
key.8.Enter the passkey on the mobile phone and
confirm it.9."ADD"10.Enter the same passkey on the radio using
the function buttons and confirm it.
To delete the last digit: "DELETE"11."OK"
Press twice if necessary.
If pairing was successful, the mobile phone ap‐
pears on the radio display.
Four mobile phones can be paired with the ve‐
hicle at once.
If pairing was unsuccessful: What to do if..., re‐
fer to page 141.
Repeating the pairing procedure/help If pairing failed:
1."REPEAT"2.Repeat steps 6 to 10.
To display the Customer Relations phone num‐
ber: "CALLS"
Turn the right knob to display the Customer Re‐
lations phone number and information needed
for pairing.
Following the initial pairing
▷The mobile phone is detected/connected in
the vehicle within a short period of time
when the engine is running or the ignition
is switched on.▷The phone book entries of the telephone
stored on the SIM card or mobile phone are
transmitted to the vehicle after detection,
depending on the mobile phone.▷Specific settings may be necessary in some
mobile phones, e.g., authorization or a se‐
cure connection; refer to the mobile phone
operating instructions.Seite 140COMMUNICATIONTelephone140
Online Edition for Part no. 01 40 2 964 433 - VI/15
Page 150 of 223
RefuelingVehicle features and op‐
tions
This chapter describes all standard, country-
specific and optional features offered with the
series. It also describes features that are not necessarily available in your car, e. g., due to
the selected options or country versions. This
also applies to safety-related functions and sys‐
tems.
When using the features and systems described
here, adhere to local regulations.
General information CAUTION
With a range of less than 30 miles/50 km
it is possible that the engine will no longer have
sufficient fuel. Engine functions are no longer
ensured. There is risk of property damage. Re‐
fuel promptly. ◀
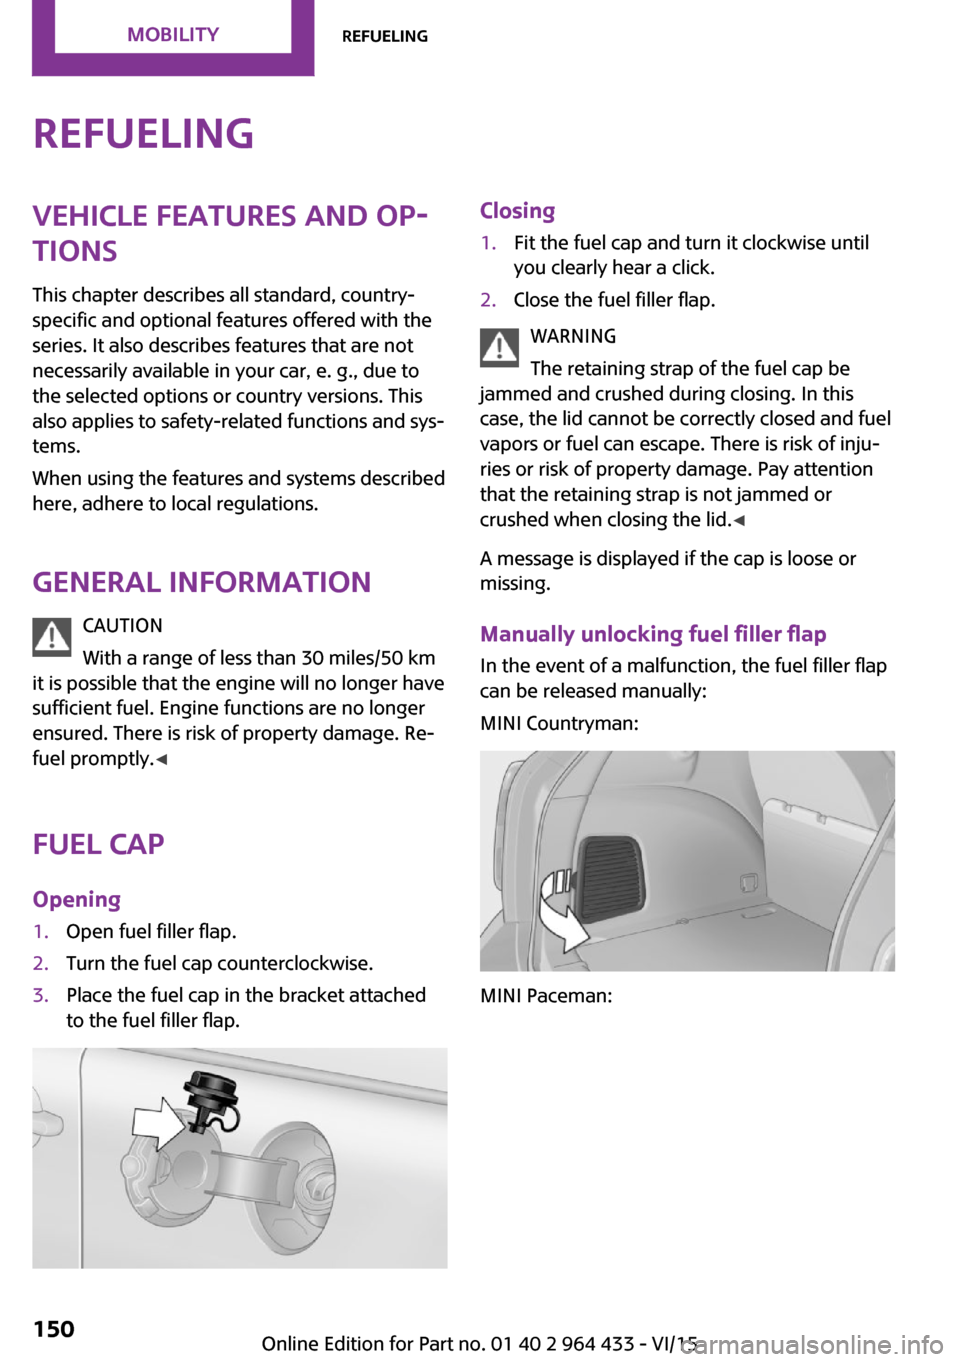
Fuel cap
Opening1.Open fuel filler flap.2.Turn the fuel cap counterclockwise.3.Place the fuel cap in the bracket attached
to the fuel filler flap.Closing1.Fit the fuel cap and turn it clockwise until
you clearly hear a click.2.Close the fuel filler flap.
WARNING
The retaining strap of the fuel cap be
jammed and crushed during closing. In this
case, the lid cannot be correctly closed and fuel
vapors or fuel can escape. There is risk of inju‐
ries or risk of property damage. Pay attention
that the retaining strap is not jammed or
crushed when closing the lid. ◀
A message is displayed if the cap is loose or
missing.
Manually unlocking fuel filler flap In the event of a malfunction, the fuel filler flap
can be released manually:
MINI Countryman:
MINI Paceman:
Seite 150MOBILITYRefueling150
Online Edition for Part no. 01 40 2 964 433 - VI/15
Page 154 of 223
Wheels and tiresVehicle features and op‐
tions
This chapter describes all standard, country-
specific and optional features offered with the
series. It also describes features that are not
necessarily available in your car, e. g., due to
the selected options or country versions. This
also applies to safety-related functions and sys‐
tems.
When using the features and systems described
here, adhere to local regulations.
Tire inflation pressure
Safety information It is not merely the tires' service life, but also
driving comfort and, to a great extent, driving
safety that depend on the condition of the tires
and the maintenance of the specified tire pres‐
sure.
Checking the pressure
Tires naturally lose pressure uniformly across all
four tires.
WARNING
A tire with low or missing tire inflation
pressure impacts handling, such as steering
and braking response. There is risk of an acci‐
dent. Regularly check the tire inflation pressure,
and correct it as needed, e.g. twice a month
and before a long trip. ◀
Tires heat up while driving, and the tire inflation
pressure increases along with the tire's temper‐
ature. The tire inflation pressure specifications
apply to cold tires or tires at ambient tempera‐
ture.
Only check the tire inflation pressure when the
tires are cold. This means after a maximum of1.25 miles/2 km driving or when the vehicle
has been parked for at least 2 hours. When the
tires are warm, the tire inflation pressure is
higher.
After correcting the tire inflation pressure, reset
the Tire Pressure Monitor, refer to page 80
or reinitialize the Flat Tire Monitor, refer to
page 78.
Pressure specifications
The tire inflation pressure table contains all tire
inflation pressure specifications for the speci‐
fied tire sizes at the ambient temperature. The
tire inflation pressure values apply to tire sizes
approved by the manufacturer of the vehicle
for the vehicle type.
For correct identification of the right tire infla‐
tion pressures, observe the following:▷Tire sizes of your vehicle▷Maximum allowable driving speed
Tire inflation pressures for driving up to
100 mph or 160 km/h
For normal driving up to 100 mph/160 km/h,
adjust pressures to the respective tire inflation
pressures listed on the following pages in the
column for traveling speeds up to 100 mph/
160 km/h to achieve optimum driving comfort.
These tire inflation pressures can also be found
on the driver's side door pillar when the driver's
door is open.
MINI Countryman:
Seite 154MOBILITYWheels and tires154
Online Edition for Part no. 01 40 2 964 433 - VI/15