manual transmission MINI Roadster 2014 Owner's Manual (Mini Connected)
[x] Cancel search | Manufacturer: MINI, Model Year: 2014, Model line: Roadster, Model: MINI Roadster 2014Pages: 288, PDF Size: 6.72 MB
Page 65 of 288
DrivingVehicle equipmentThis chapter describes all series equipment as
well as country-specific and special equipment
offered for this model series.Therefore, it also
describes equipment that may not be found in
your vehicle, for instance due to the selected
special equipment or the country version. This
also applies to safety-related functions and sys‐
tems.
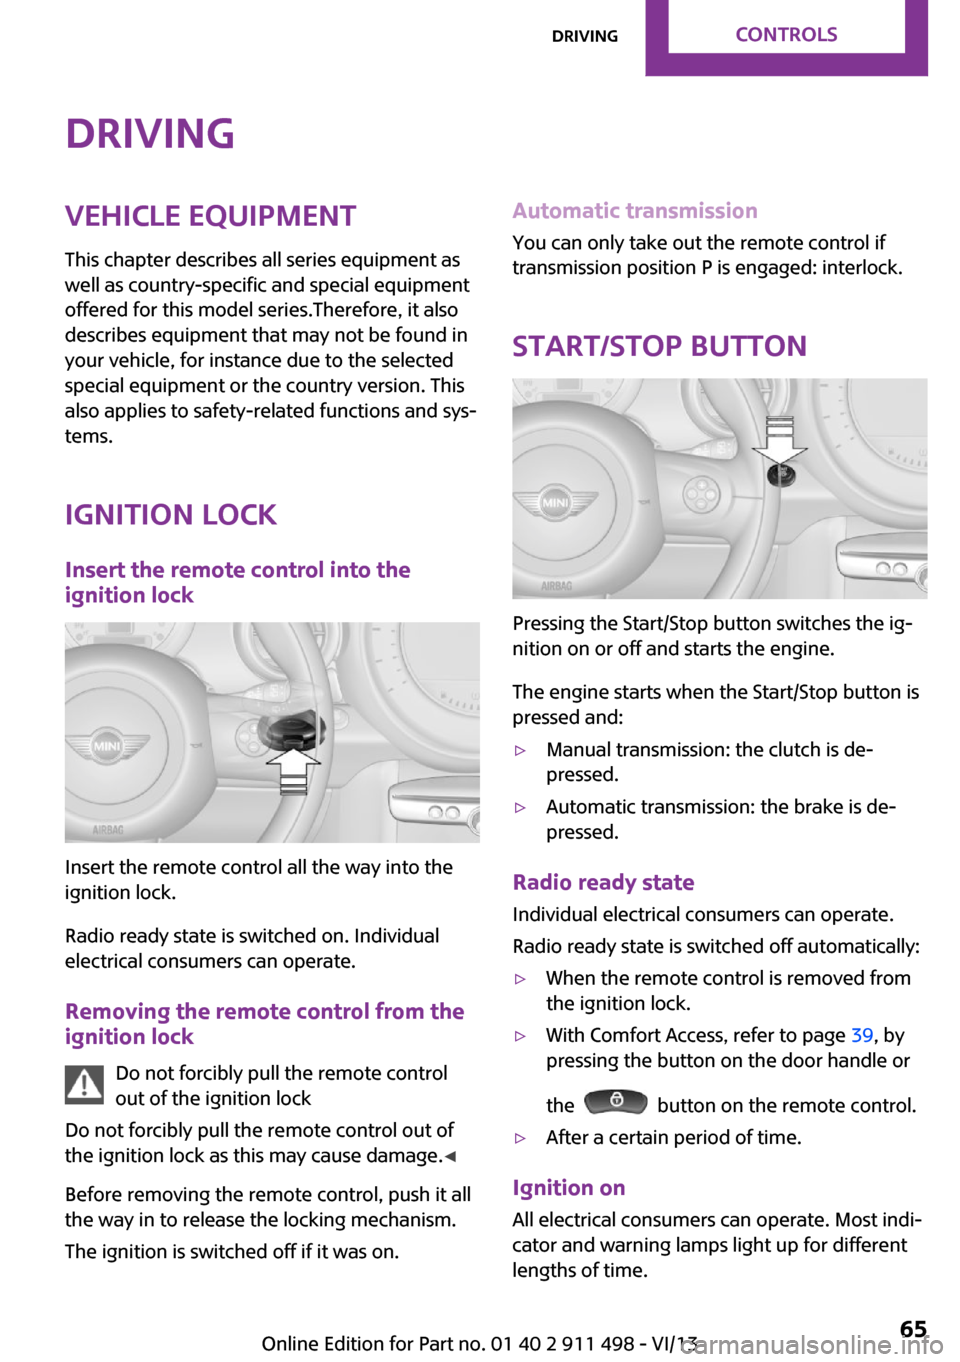
Ignition lock Insert the remote control into the
ignition lock
Insert the remote control all the way into the
ignition lock.
Radio ready state is switched on. Individual
electrical consumers can operate.
Removing the remote control from the
ignition lock
Do not forcibly pull the remote control
out of the ignition lock
Do not forcibly pull the remote control out of
the ignition lock as this may cause damage. ◀
Before removing the remote control, push it all
the way in to release the locking mechanism.
The ignition is switched off if it was on.
Automatic transmission
You can only take out the remote control if
transmission position P is engaged: interlock.
Start/Stop button
Pressing the Start/Stop button switches the ig‐
nition on or off and starts the engine.
The engine starts when the Start/Stop button is
pressed and:
▷Manual transmission: the clutch is de‐
pressed.▷Automatic transmission: the brake is de‐
pressed.
Radio ready state
Individual electrical consumers can operate.
Radio ready state is switched off automatically:
▷When the remote control is removed from
the ignition lock.▷With Comfort Access, refer to page 39, by
pressing the button on the door handle or
the
button on the remote control.
▷After a certain period of time.
Ignition on All electrical consumers can operate. Most indi‐
cator and warning lamps light up for different
lengths of time.
Seite 65DrivingControls65
Online Edition for Part no. 01 40 2 911 498 - VI/13
Page 66 of 288
To save battery power when the engine is off,
switch off the ignition and any unnecessary
electronic systems/power consumers.
Radio ready state and ignition off All indicator and warning lamps in the displays
go out.
The ignition switches off automatically when
the driver's door is opened. Pressing the Start/
Stop button again switches the ignition back
on.
For example, the ignition is not switched off in
the following situations:▷Depress the clutch or brake pedal.▷The low beams are switched on
Starting the engine
General information Enclosed areas
Do not let the engine run in enclosed
areas; otherwise, breathing of exhaust fumes
may lead to loss of consciousness and death.
The exhaust gases contain carbon monoxide,
an odorless and colorless but highly toxic gas. ◀
Unattended vehicle
Do not leave the car unattended with the
engine running; otherwise, it presents a poten‐
tial source of danger.
Before leaving the car with the engine running,
shift to neutral or engage transmission posi‐
tion P and set the handbrake firmly; otherwise,
the vehicle may begin to roll. ◀
Frequent starting in quick succession
Avoid repeated futile attempts at starting
the car and avoid starting the car frequently in
quick succession. Otherwise, the fuel is not
burned or is inadequately burned, and there is
the danger of overheating and damaging the
catalytic converter. ◀
Do not wait for the engine to warm-up while
the vehicle remains stationary; start driving
right away, but at moderate engine speeds.
Do not depress the accelerator when starting
the engine.
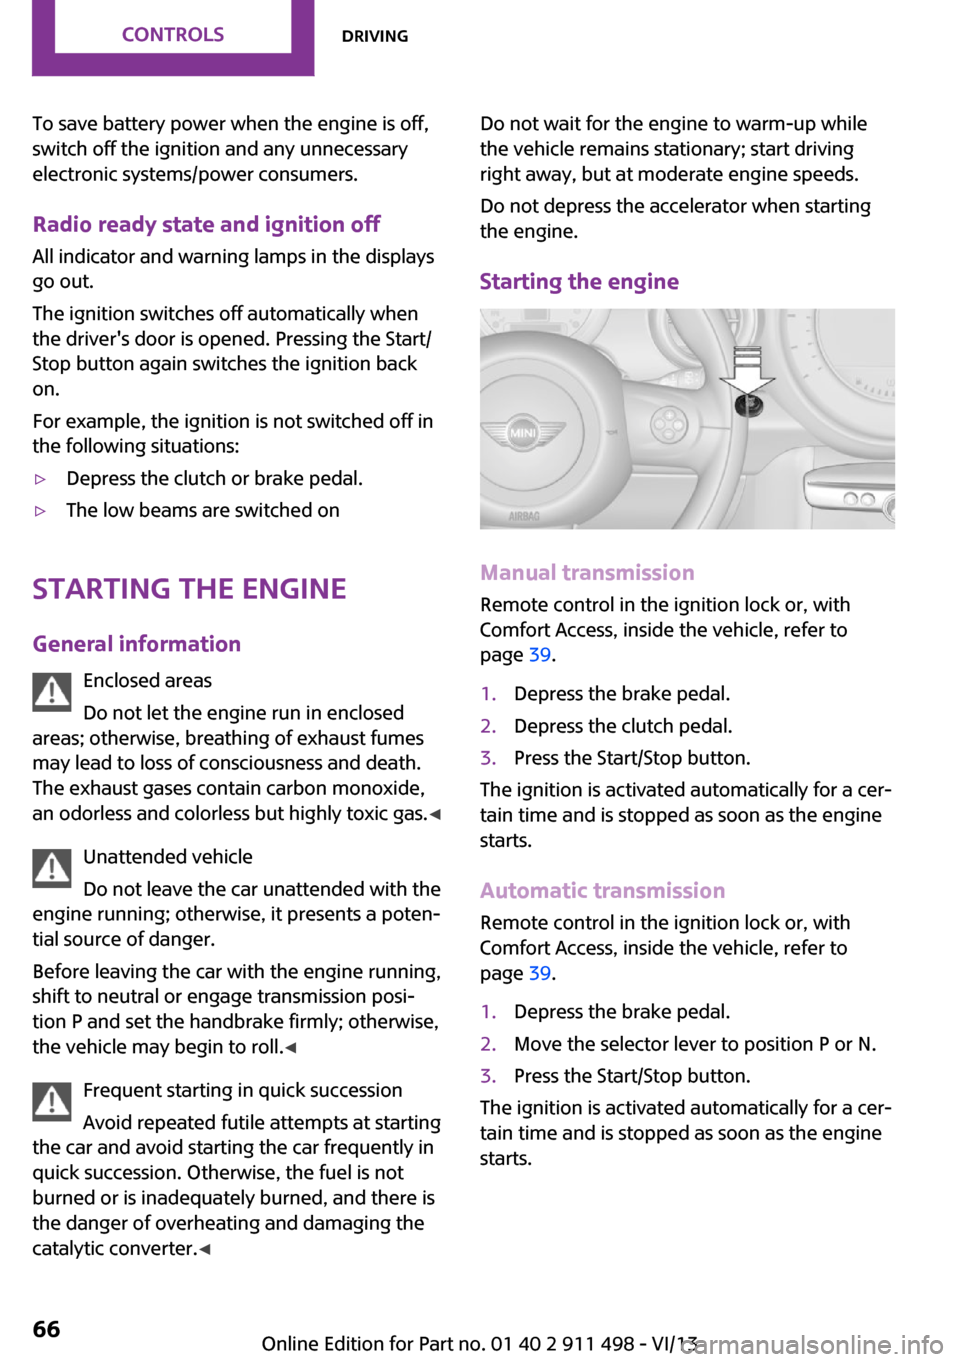
Starting the engine
Manual transmission
Remote control in the ignition lock or, with
Comfort Access, inside the vehicle, refer to
page 39.
1.Depress the brake pedal.2.Depress the clutch pedal.3.Press the Start/Stop button.
The ignition is activated automatically for a cer‐
tain time and is stopped as soon as the engine
starts.
Automatic transmission
Remote control in the ignition lock or, with
Comfort Access, inside the vehicle, refer to
page 39.
1.Depress the brake pedal.2.Move the selector lever to position P or N.3.Press the Start/Stop button.
The ignition is activated automatically for a cer‐
tain time and is stopped as soon as the engine
starts.
Seite 66ControlsDriving66
Online Edition for Part no. 01 40 2 911 498 - VI/13
Page 67 of 288
Engine stop
General information Take the remote control with you
Take the remote control with you when
leaving the vehicle so that children, for exam‐
ple, cannot operate the windows and injure
themselves. ◀
Set the handbrake and further secure the
vehicle as required
Set the handbrake firmly when parking; other‐
wise, the vehicle may roll. On steep upward
and downward inclines, further secure the ve‐
hicle, for example, by turning the steering
wheel in the direction of the curb. ◀
Before driving into a car wash
To make it possible for the vehicle to roll in an
automatic car wash, follow the information on
Washing in automatic car washes, refer to
page 259.
Switching off the engine
Manual transmission1.With the vehicle at a standstill, press the
Start/Stop button.2.Shift into first gear or reverse.3.Set the handbrake firmly.4.Remove the remote control from the igni‐
tion lock.
Automatic transmission
1.Engage transmission position P with the ve‐
hicle stopped.2.Press the Start/Stop button.3.Set the handbrake firmly.4.Remove the remote control from the igni‐
tion lock.Handbrake
The concept
The handbrake is primarily intended to prevent
the vehicle from rolling while parked; it brakes
the rear wheels.
Also follow the instructions under Switching off
the engine, refer to page 67.
Setting
The lever engages automatically.
Releasing
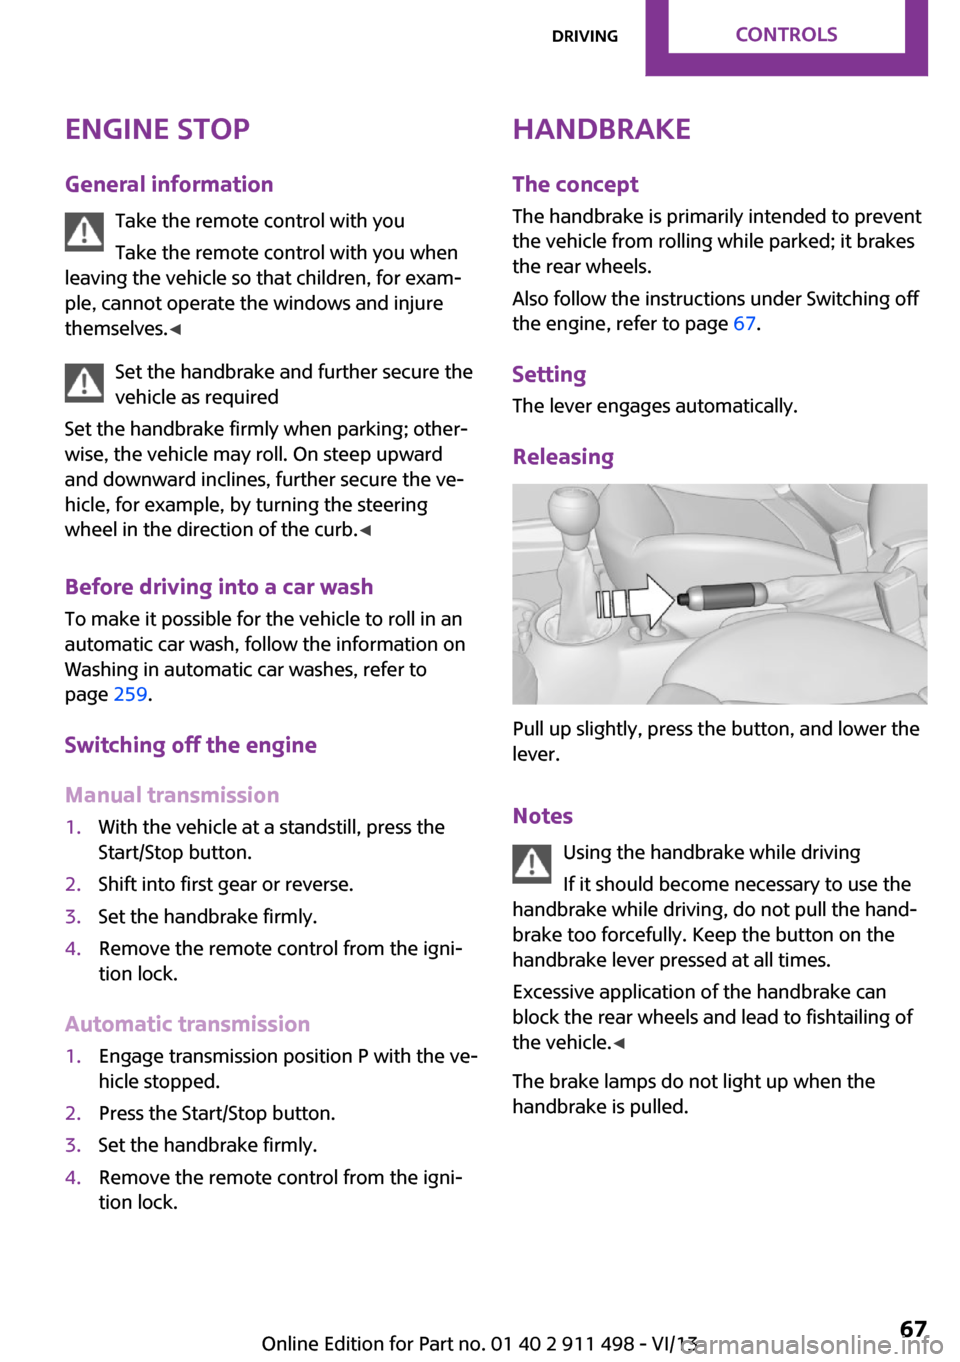
Pull up slightly, press the button, and lower the
lever.
Notes Using the handbrake while driving
If it should become necessary to use the
handbrake while driving, do not pull the hand‐
brake too forcefully. Keep the button on the
handbrake lever pressed at all times.
Excessive application of the handbrake can
block the rear wheels and lead to fishtailing of
the vehicle. ◀
The brake lamps do not light up when the
handbrake is pulled.
Seite 67DrivingControls67
Online Edition for Part no. 01 40 2 911 498 - VI/13
Page 71 of 288
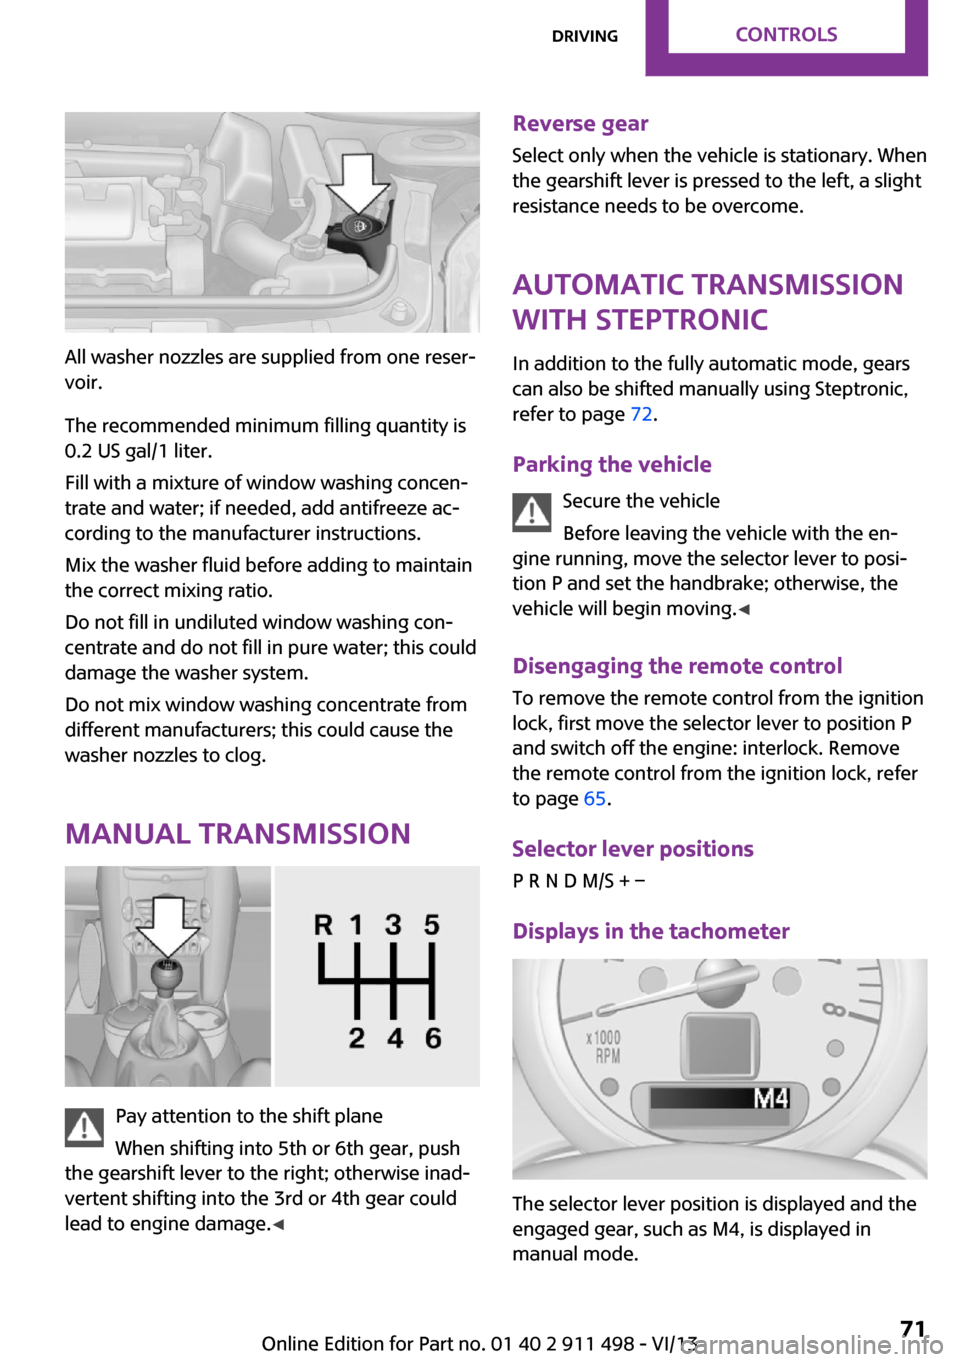
All washer nozzles are supplied from one reser‐
voir.
The recommended minimum filling quantity is
0.2 US gal/1 liter.
Fill with a mixture of window washing concen‐
trate and water; if needed, add antifreeze ac‐
cording to the manufacturer instructions.
Mix the washer fluid before adding to maintain
the correct mixing ratio.
Do not fill in undiluted window washing con‐
centrate and do not fill in pure water; this could
damage the washer system.
Do not mix window washing concentrate from
different manufacturers; this could cause the
washer nozzles to clog.
Manual transmission
Pay attention to the shift plane
When shifting into 5th or 6th gear, push
the gearshift lever to the right; otherwise inad‐
vertent shifting into the 3rd or 4th gear could
lead to engine damage. ◀
Reverse gear
Select only when the vehicle is stationary. When
the gearshift lever is pressed to the left, a slight
resistance needs to be overcome.
Automatic transmission
with Steptronic
In addition to the fully automatic mode, gears
can also be shifted manually using Steptronic,
refer to page 72.
Parking the vehicle Secure the vehicle
Before leaving the vehicle with the en‐
gine running, move the selector lever to posi‐
tion P and set the handbrake; otherwise, the
vehicle will begin moving. ◀
Disengaging the remote control
To remove the remote control from the ignition
lock, first move the selector lever to position P
and switch off the engine: interlock. Remove
the remote control from the ignition lock, refer
to page 65.
Selector lever positions
P R N D M/S + –
Displays in the tachometer
The selector lever position is displayed and the
engaged gear, such as M4, is displayed in
manual mode.
Seite 71DrivingControls71
Online Edition for Part no. 01 40 2 911 498 - VI/13
Page 73 of 288
The vehicle only shifts up or down at appropri‐
ate engine and road speeds, e.g., it does not
shift down if the engine speed is too high. The
selected gear is briefly displayed in the instru‐
ment panel, followed by the current gear.
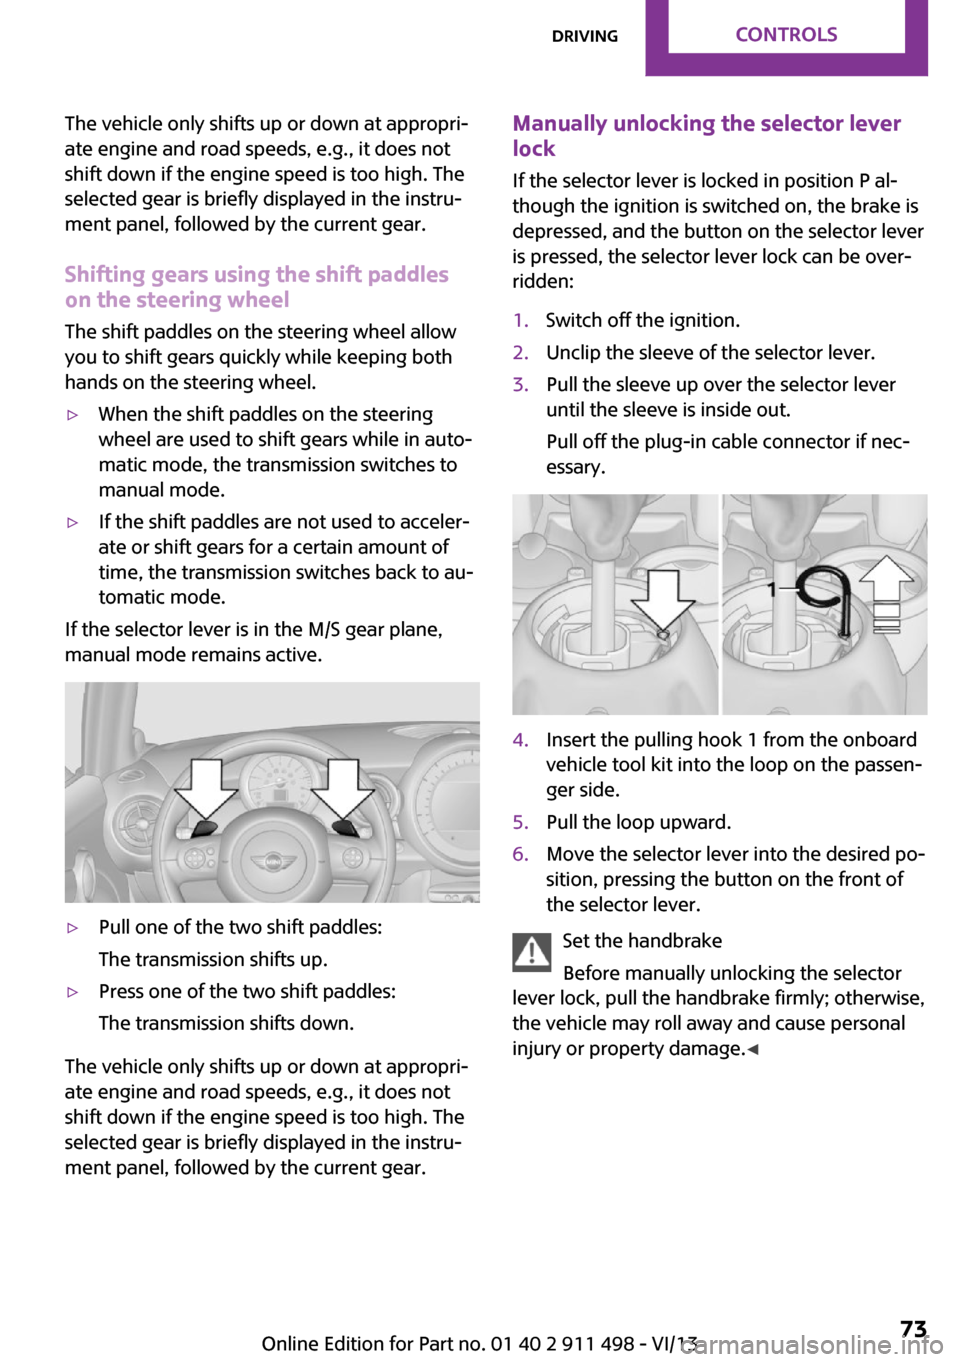
Shifting gears using the shift paddleson the steering wheel
The shift paddles on the steering wheel allow
you to shift gears quickly while keeping both hands on the steering wheel.▷When the shift paddles on the steering
wheel are used to shift gears while in auto‐
matic mode, the transmission switches to
manual mode.▷If the shift paddles are not used to acceler‐
ate or shift gears for a certain amount of
time, the transmission switches back to au‐
tomatic mode.
If the selector lever is in the M/S gear plane,
manual mode remains active.
▷Pull one of the two shift paddles:
The transmission shifts up.▷Press one of the two shift paddles:
The transmission shifts down.
The vehicle only shifts up or down at appropri‐
ate engine and road speeds, e.g., it does not
shift down if the engine speed is too high. The
selected gear is briefly displayed in the instru‐
ment panel, followed by the current gear.
Manually unlocking the selector lever
lock
If the selector lever is locked in position P al‐
though the ignition is switched on, the brake is
depressed, and the button on the selector lever
is pressed, the selector lever lock can be over‐
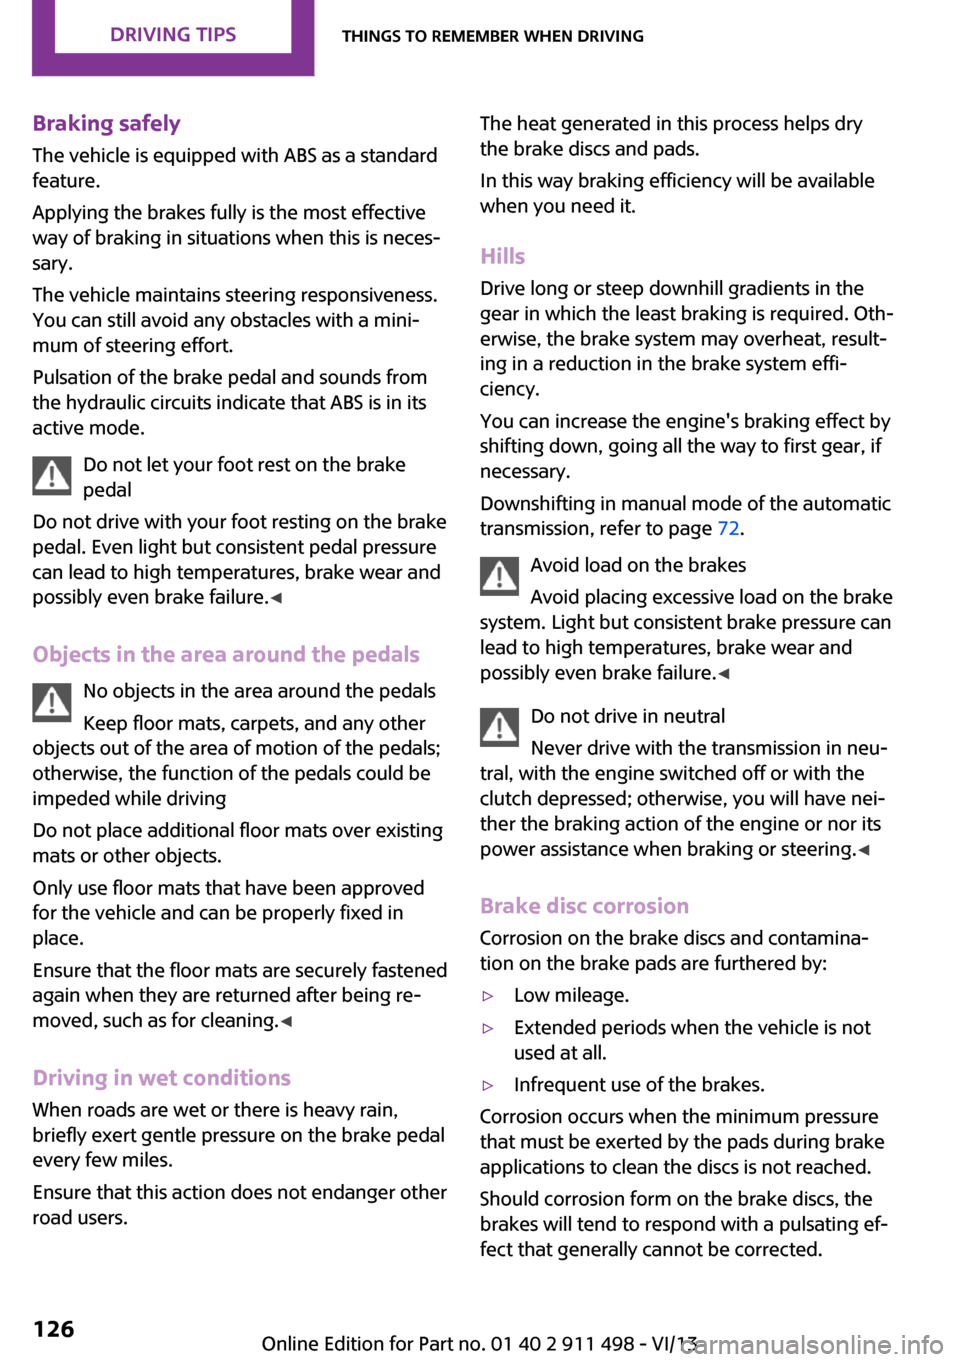
ridden:1.Switch off the ignition.2.Unclip the sleeve of the selector lever.3.Pull the sleeve up over the selector lever
until the sleeve is inside out.
Pull off the plug-in cable connector if nec‐
essary.4.Insert the pulling hook 1 from the onboard
vehicle tool kit into the loop on the passen‐
ger side.5.Pull the loop upward.6.Move the selector lever into the desired po‐
sition, pressing the button on the front of
the selector lever.
Set the handbrake
Before manually unlocking the selector
lever lock, pull the handbrake firmly; otherwise,
the vehicle may roll away and cause personal
injury or property damage. ◀
Seite 73DrivingControls73
Online Edition for Part no. 01 40 2 911 498 - VI/13
Page 126 of 288
Braking safelyThe vehicle is equipped with ABS as a standardfeature.
Applying the brakes fully is the most effective
way of braking in situations when this is neces‐
sary.
The vehicle maintains steering responsiveness.
You can still avoid any obstacles with a mini‐
mum of steering effort.
Pulsation of the brake pedal and sounds from
the hydraulic circuits indicate that ABS is in its
active mode.
Do not let your foot rest on the brake
pedal
Do not drive with your foot resting on the brake
pedal. Even light but consistent pedal pressure
can lead to high temperatures, brake wear and
possibly even brake failure. ◀
Objects in the area around the pedals No objects in the area around the pedals
Keep floor mats, carpets, and any other
objects out of the area of motion of the pedals;
otherwise, the function of the pedals could be
impeded while driving
Do not place additional floor mats over existing
mats or other objects.
Only use floor mats that have been approved
for the vehicle and can be properly fixed in
place.
Ensure that the floor mats are securely fastened
again when they are returned after being re‐
moved, such as for cleaning. ◀
Driving in wet conditions When roads are wet or there is heavy rain,
briefly exert gentle pressure on the brake pedal
every few miles.
Ensure that this action does not endanger other
road users.The heat generated in this process helps dry
the brake discs and pads.
In this way braking efficiency will be available
when you need it.
HillsDrive long or steep downhill gradients in the
gear in which the least braking is required. Oth‐
erwise, the brake system may overheat, result‐
ing in a reduction in the brake system effi‐
ciency.
You can increase the engine's braking effect by
shifting down, going all the way to first gear, if
necessary.
Downshifting in manual mode of the automatic
transmission, refer to page 72.
Avoid load on the brakes
Avoid placing excessive load on the brake
system. Light but consistent brake pressure can
lead to high temperatures, brake wear and
possibly even brake failure. ◀
Do not drive in neutral
Never drive with the transmission in neu‐
tral, with the engine switched off or with the
clutch depressed; otherwise, you will have nei‐
ther the braking action of the engine or nor its
power assistance when braking or steering. ◀
Brake disc corrosion
Corrosion on the brake discs and contamina‐
tion on the brake pads are furthered by:▷Low mileage.▷Extended periods when the vehicle is not
used at all.▷Infrequent use of the brakes.
Corrosion occurs when the minimum pressure
that must be exerted by the pads during brake
applications to clean the discs is not reached.
Should corrosion form on the brake discs, the
brakes will tend to respond with a pulsating ef‐
fect that generally cannot be corrected.
Seite 126Driving tipsThings to remember when driving126
Online Edition for Part no. 01 40 2 911 498 - VI/13
Page 257 of 288
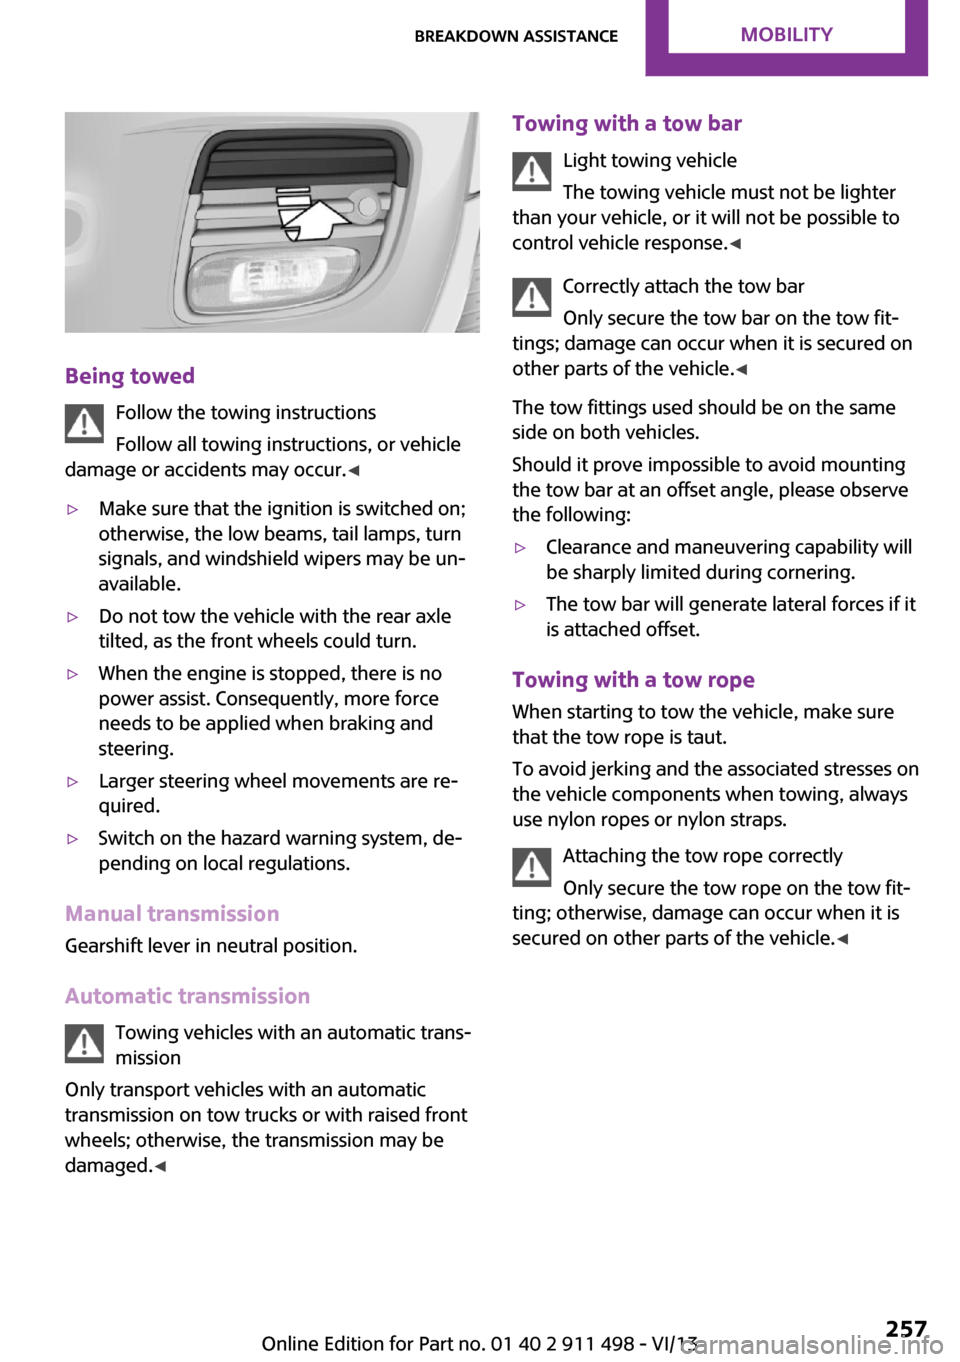
Being towedFollow the towing instructions
Follow all towing instructions, or vehicle
damage or accidents may occur. ◀
▷Make sure that the ignition is switched on;
otherwise, the low beams, tail lamps, turn
signals, and windshield wipers may be un‐
available.▷Do not tow the vehicle with the rear axle
tilted, as the front wheels could turn.▷When the engine is stopped, there is no
power assist. Consequently, more force
needs to be applied when braking and
steering.▷Larger steering wheel movements are re‐
quired.▷Switch on the hazard warning system, de‐
pending on local regulations.
Manual transmission
Gearshift lever in neutral position.
Automatic transmission Towing vehicles with an automatic trans‐
mission
Only transport vehicles with an automatic
transmission on tow trucks or with raised front
wheels; otherwise, the transmission may be
damaged. ◀
Towing with a tow bar
Light towing vehicle
The towing vehicle must not be lighter
than your vehicle, or it will not be possible to
control vehicle response. ◀
Correctly attach the tow bar
Only secure the tow bar on the tow fit‐
tings; damage can occur when it is secured on
other parts of the vehicle. ◀
The tow fittings used should be on the same
side on both vehicles.
Should it prove impossible to avoid mounting
the tow bar at an offset angle, please observe
the following:▷Clearance and maneuvering capability will
be sharply limited during cornering.▷The tow bar will generate lateral forces if it
is attached offset.
Towing with a tow rope
When starting to tow the vehicle, make sure
that the tow rope is taut.
To avoid jerking and the associated stresses on
the vehicle components when towing, always
use nylon ropes or nylon straps.
Attaching the tow rope correctly
Only secure the tow rope on the tow fit‐
ting; otherwise, damage can occur when it is
secured on other parts of the vehicle. ◀
Seite 257Breakdown assistanceMobility257
Online Edition for Part no. 01 40 2 911 498 - VI/13
Page 268 of 288

MINI Coupe
CooperCooper SJohn Cooper WorksCurb weight, road ready, with maximum special equipmentManual transmissionlbs/kg2,557/1,1602,679/1,2152,712/1,230Automatic transmissionlbs/kg2,635/1,1952,734/1,2402,767/1,255Approved gross vehicle weightManual transmissionlbs/kg3,175/1,4403,252/1,4753,263/1,480Automatic transmissionlbs/kg3,252/1,4753,307/1,5003,318/1,505Approved front axle loadManual transmissionlbs/kg1,786/8101,885/8551,896/860Automatic transmissionlbs/kg1,863/8451,940/8801,951/885Approved rear axle loadlbs/kg1,411/6401,411/6401,411/640Cargo area capacitycu ft/
liter9.9/2809.9/2809.9/280
MINI Roadster
CooperCooper SJohn Cooper WorksCurb weight, road ready, with maximum special equipmentManual transmissionlbs/kg2,635/1,1952,745/1,2452,778/1,260Automatic transmissionlbs/kg2,712/1,2302,800/1,2702,833/1,285Approved gross vehicle weightManual transmissionlbs/kg3,241/1,4703,329/1,5103,340/1,515Automatic transmissionlbs/kg3,318/1,5053,373/1,5303,395/1,540Approved front axle loadManual transmissionlbs/kg1,786/8101,896/8601,907/865Automatic transmissionlbs/kg1,863/8451,951/8851,962/890Approved rear axle loadlbs/kg1,488/6751,466/6651,488/675Cargo area capacitycu ft/
liter8.5/2408.5/2408.5/240Seite 268ReferenceTechnical data268
Online Edition for Part no. 01 40 2 911 498 - VI/13
Page 269 of 288
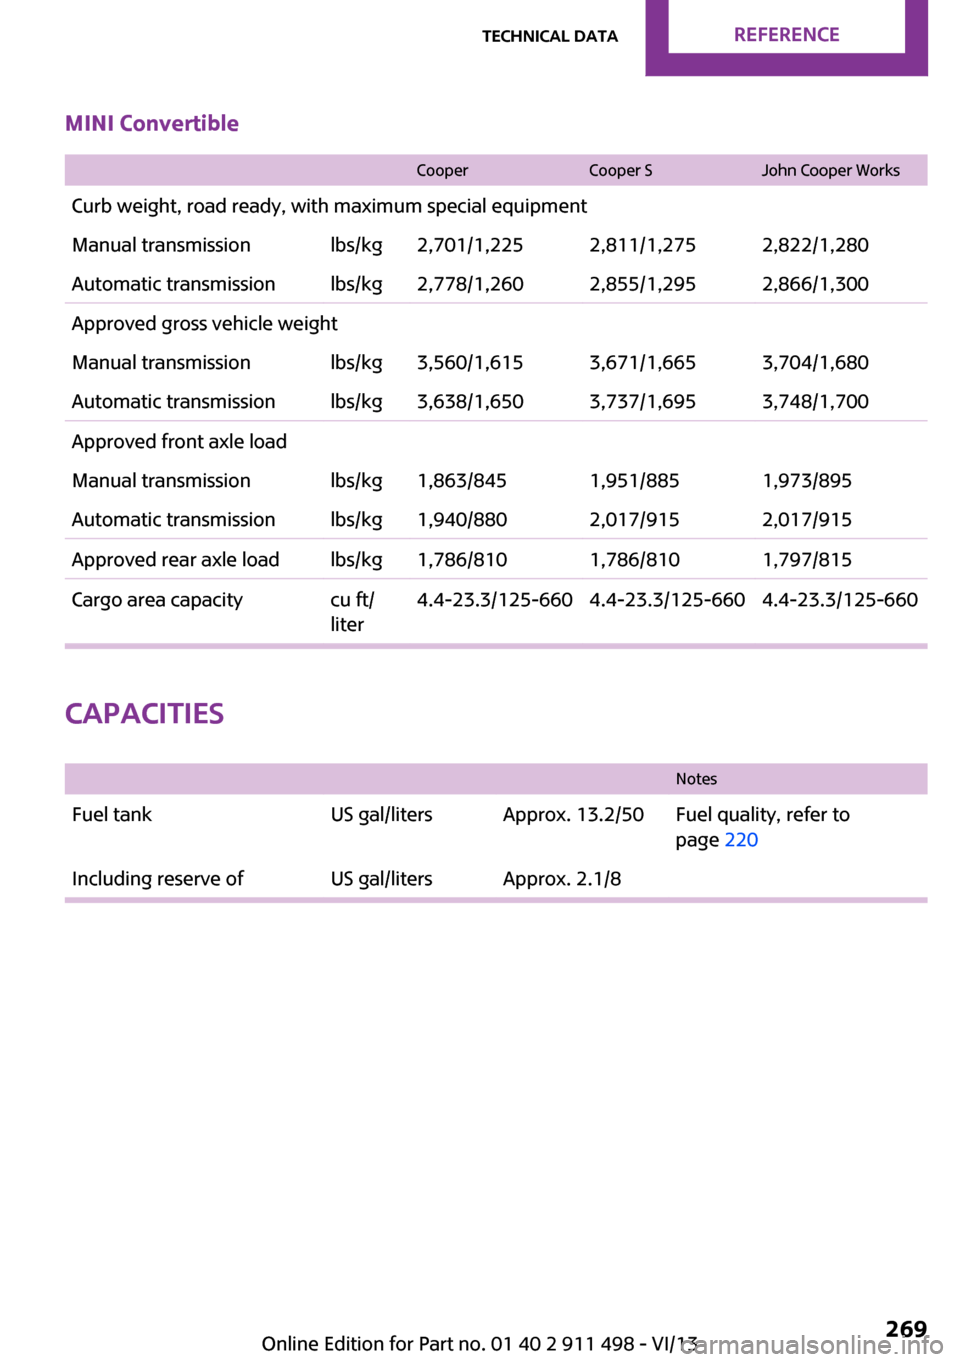
MINI Convertible CooperCooper SJohn Cooper WorksCurb weight, road ready, with maximum special equipmentManual transmissionlbs/kg2,701/1,2252,811/1,2752,822/1,280Automatic transmissionlbs/kg2,778/1,2602,855/1,2952,866/1,300Approved gross vehicle weightManual transmissionlbs/kg3,560/1,6153,671/1,6653,704/1,680Automatic transmissionlbs/kg3,638/1,6503,737/1,6953,748/1,700Approved front axle loadManual transmissionlbs/kg1,863/8451,951/8851,973/895Automatic transmissionlbs/kg1,940/8802,017/9152,017/915Approved rear axle loadlbs/kg1,786/8101,786/8101,797/815Cargo area capacitycu ft/
liter4.4-23.3/125-6604.4-23.3/125-6604.4-23.3/125-660
Capacities
NotesFuel tankUS gal/litersApprox. 13.2/50Fuel quality, refer to
page 220Including reserve ofUS gal/litersApprox. 2.1/8Seite 269Technical dataReference269
Online Edition for Part no. 01 40 2 911 498 - VI/13
Page 276 of 288
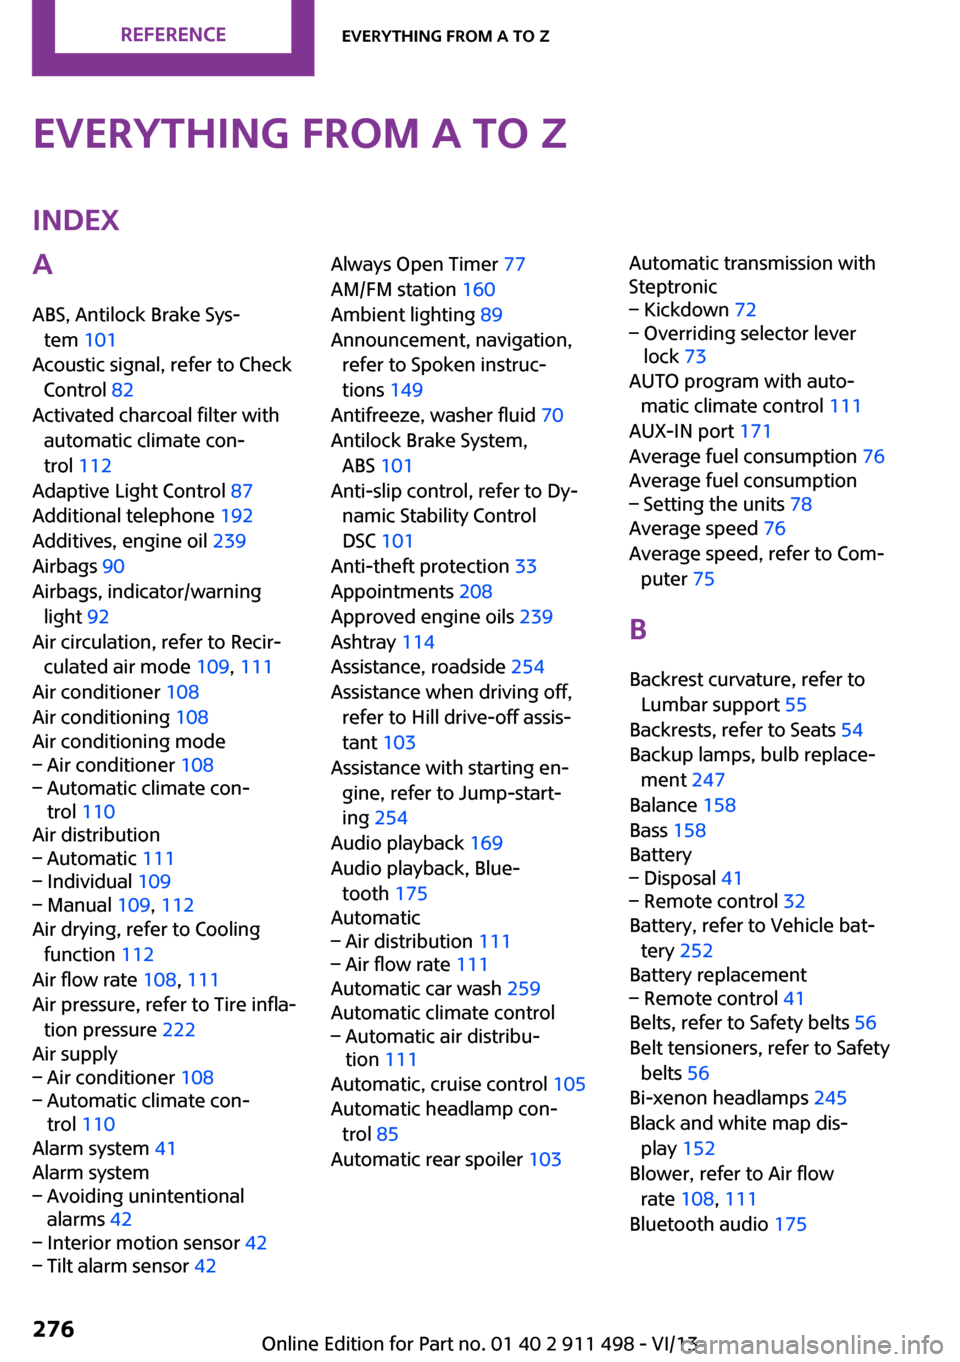
Everything from A to ZIndexA
ABS, Antilock Brake Sys‐ tem 101
Acoustic signal, refer to Check Control 82
Activated charcoal filter with automatic climate con‐
trol 112
Adaptive Light Control 87
Additional telephone 192
Additives, engine oil 239
Airbags 90
Airbags, indicator/warning light 92
Air circulation, refer to Recir‐ culated air mode 109, 111
Air conditioner 108
Air conditioning 108
Air conditioning mode– Air conditioner 108– Automatic climate con‐
trol 110
Air distribution
– Automatic 111– Individual 109– Manual 109, 112
Air drying, refer to Cooling
function 112
Air flow rate 108, 111
Air pressure, refer to Tire infla‐ tion pressure 222
Air supply
– Air conditioner 108– Automatic climate con‐
trol 110
Alarm system 41
Alarm system
– Avoiding unintentional
alarms 42– Interior motion sensor 42– Tilt alarm sensor 42Always Open Timer 77
AM/FM station 160
Ambient lighting 89
Announcement, navigation, refer to Spoken instruc‐
tions 149
Antifreeze, washer fluid 70
Antilock Brake System, ABS 101
Anti-slip control, refer to Dy‐ namic Stability Control
DSC 101
Anti-theft protection 33
Appointments 208
Approved engine oils 239
Ashtray 114
Assistance, roadside 254
Assistance when driving off, refer to Hill drive-off assis‐
tant 103
Assistance with starting en‐ gine, refer to Jump-start‐
ing 254
Audio playback 169
Audio playback, Blue‐ tooth 175
Automatic– Air distribution 111– Air flow rate 111
Automatic car wash 259
Automatic climate control
– Automatic air distribu‐
tion 111
Automatic, cruise control 105
Automatic headlamp con‐ trol 85
Automatic rear spoiler 103
Automatic transmission with
Steptronic– Kickdown 72– Overriding selector lever
lock 73
AUTO program with auto‐
matic climate control 111
AUX-IN port 171
Average fuel consumption 76
Average fuel consumption
– Setting the units 78
Average speed 76
Average speed, refer to Com‐ puter 75
B Backrest curvature, refer to Lumbar support 55
Backrests, refer to Seats 54
Backup lamps, bulb replace‐ ment 247
Balance 158
Bass 158
Battery
– Disposal 41– Remote control 32
Battery, refer to Vehicle bat‐
tery 252
Battery replacement
– Remote control 41
Belts, refer to Safety belts 56
Belt tensioners, refer to Safety belts 56
Bi-xenon headlamps 245
Black and white map dis‐ play 152
Blower, refer to Air flow rate 108, 111
Bluetooth audio 175
Seite 276ReferenceEverything from A to Z276
Online Edition for Part no. 01 40 2 911 498 - VI/13