relay MITSUBISHI 3000GT 1992 2.G Workshop Manual
[x] Cancel search | Manufacturer: MITSUBISHI, Model Year: 1992, Model line: 3000GT, Model: MITSUBISHI 3000GT 1992 2.GPages: 738, PDF Size: 35.06 MB
Page 3 of 738
Downloaded from www.Manualslib.com manuals search engine
i Service Manual
3000~l-
1992-l 996
Volume
2
Electrical
FOREWORD
i
L
This Service Manual has been prepared with the latest service information available at the time of
publication. It is subdivided into various group
categories and each section contains diagnossis,
disassembly, repair, and installation procedures
along with complete specifications and tightening
references. Use of this manual will aid in properly
performing any servicing necessary to maintain or
restore the high levels of performance and reliability
designed into these outstanding vehicles.
@
A
.
.,
WESUF’FORTVOLUNTARY TECHNICIAN
CERTiFiCATlON THROUGH
National lnaltute forAUTOMOTIV ESERVICEEXCELLENC E
Mitsubishi Motors Corporation reserves the right to make changesin design or to make additions to or improvements in its products withou\
timposing any obligations upon itself to install them on its productspreviously manufactured.
L
--
GROUP / SECTION INDEX
General. . . . . . . . . . . . . . . . . . . . . . . .
Fusible Link, Fuse an d IOD or
Storage Connector Locatio n
. . . . . . . . . .w
Inspection Terminal Location . . . . . . . . .
Grounding Location . . . . . . . . . . . . . . . . . .w
m
Relay Location . . . . . . . . . . . . . . . . . . . . . -m
Sensor Locatio
n. . . . . . . . . . . . . -. . . . . . .w
Control Unit Location . . . . . . . . . . . . . . . . .m
Solenoid, Solenoid Valve Location . . . . .d
Diode Location . . . . . . . . . . . . . . -. . . . . . .w
Junction Block . . . . . . . . . . . . . . . . . . . . . . .II
Centralized Junction . . . . . . . . . #. . . . . . .w
Harness Connector Inspectio n. I . . . . . .w
How to Diagnose . . . . . . . . . . . . . -. . . . . . .
111
Configuration Diagrams . . . . . . . . . . . - . .m;
Circuit Diagrams . . . ..*.............
Engine Electrical ...............
ChassisElectrical
............ .
Alphabetical Index .............
NOTE:
For information concerning all compo-
nents other than the electrical system and
on-vehicle service procedures for engines
and transmissions, refer to Volume 1
“Chassis & Body” of this paired Service
Manual.
For overhaul procedures of engines or
transmission, refer to the separately is-
sued Engine Service Manual or Manual/
Automatic Transmission Service Manual.
@ 1995 Mitsubishi Motors CorporationReprinted in USA
Page 8 of 738
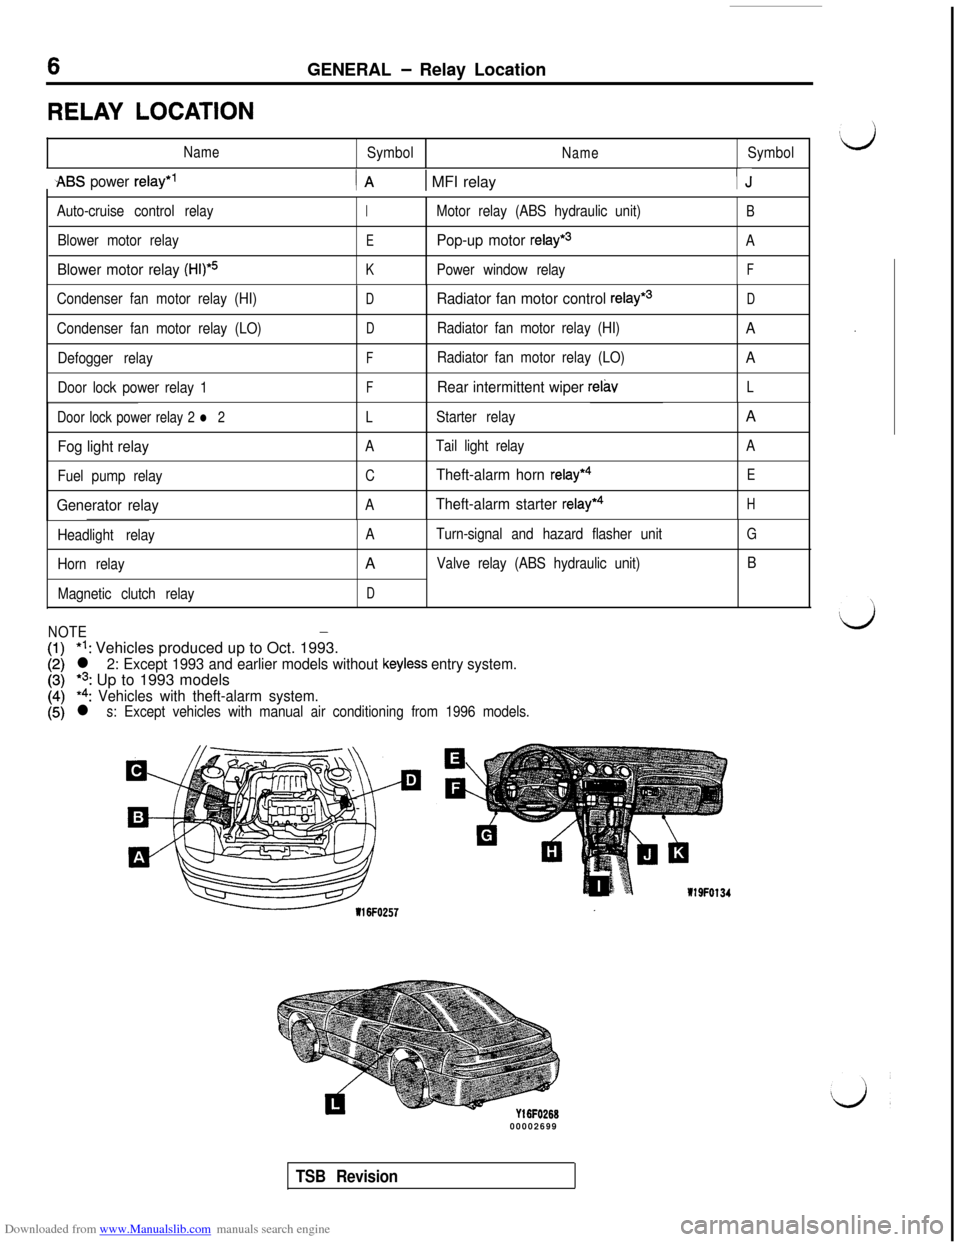
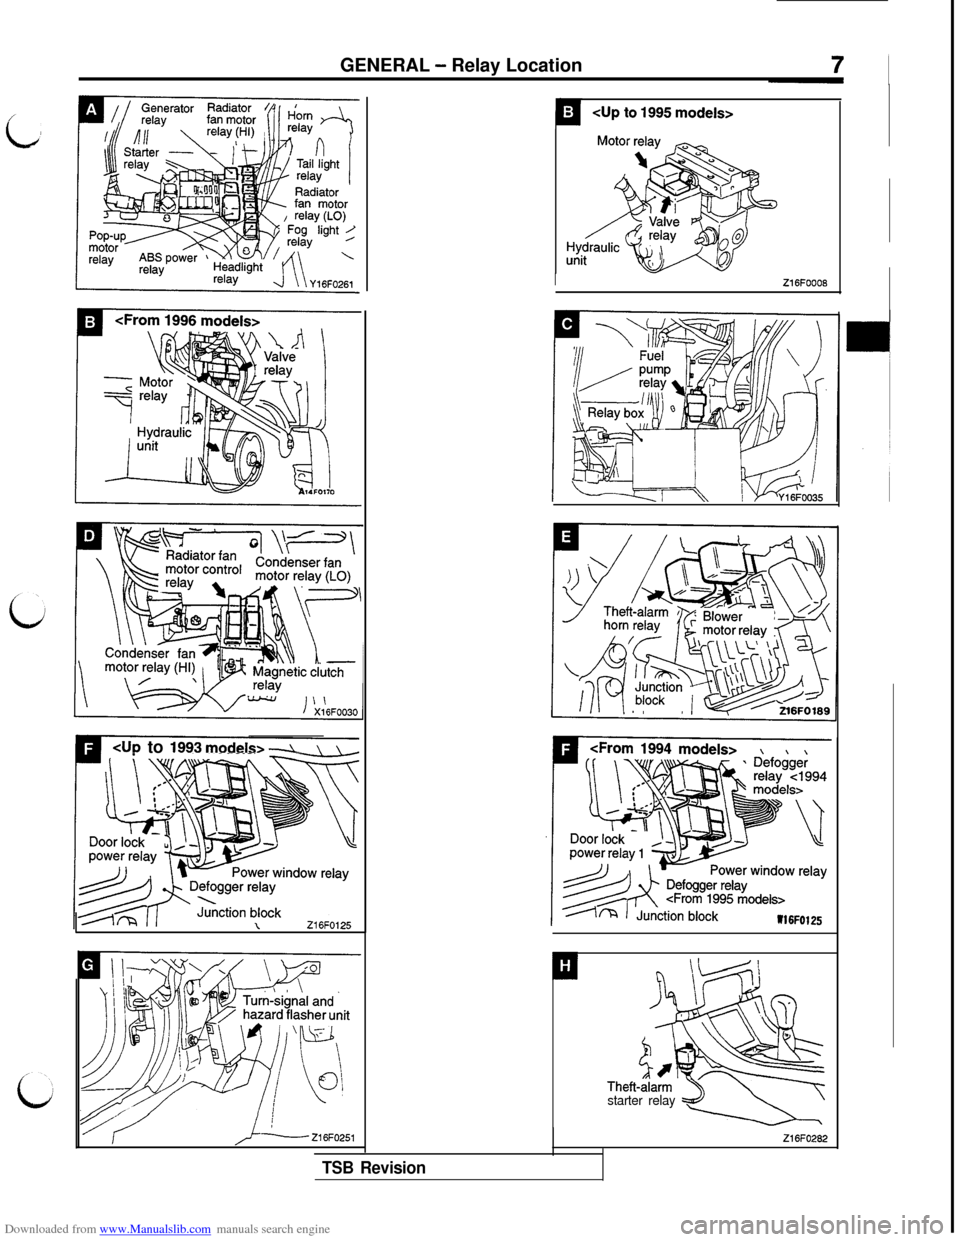
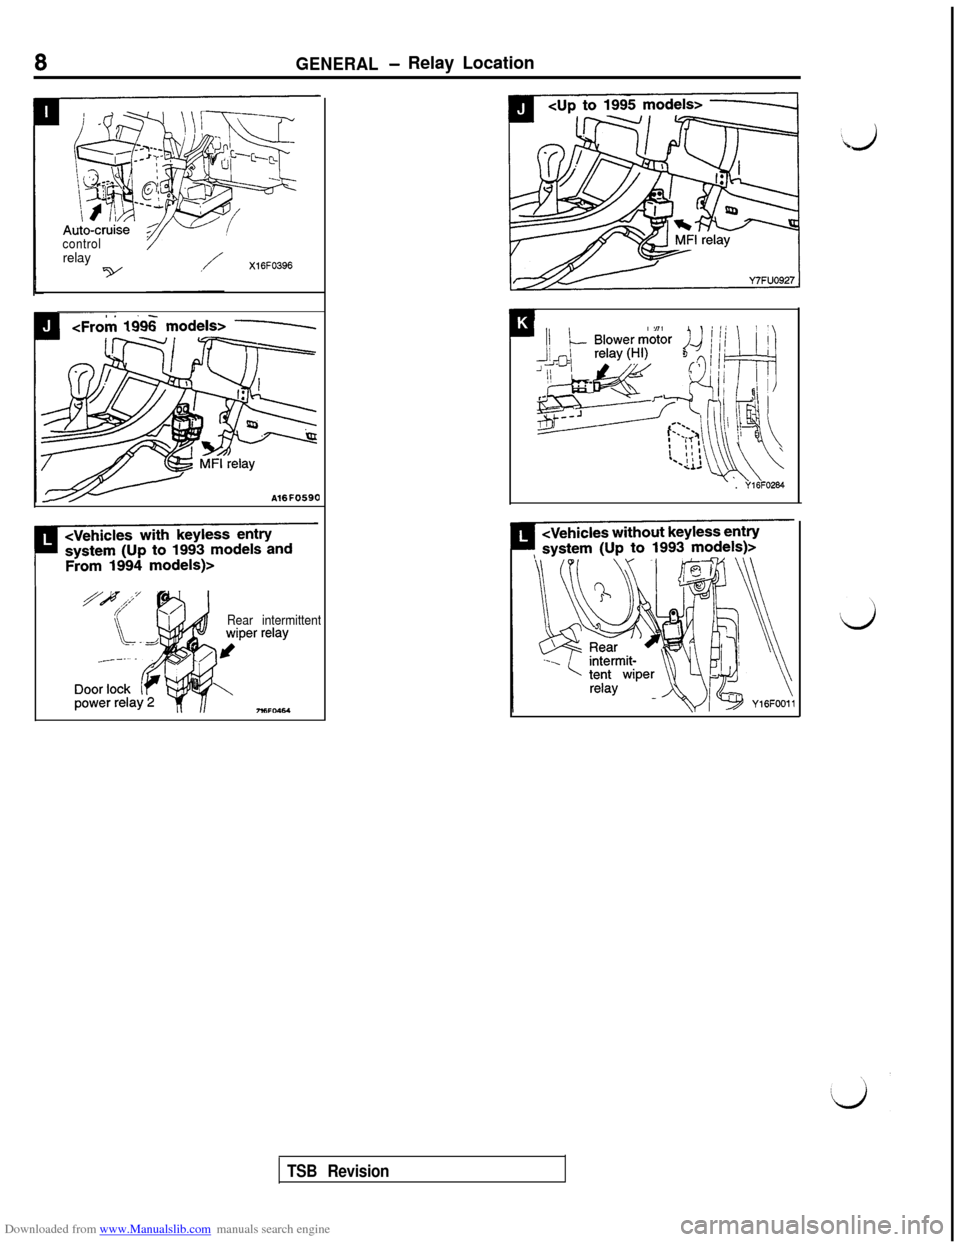
Downloaded from www.Manualslib.com manuals search engine 6GENERAL - Relay Location
RELAY LOCATION
NameSymbolNameSymbol
-ABS power relay*’/A1 MFI relayTJ
Auto-cruise control relay
Blower motor relay
Blower motor relay (Hl)*5
IMotor relay (ABS hydraulic unit)B
EPop-up motor relay*3A
KPower window relayF
Condenser fan motor relay (HI)
Condenser fan motor relay (LO)
Defogger relay
Door lock power relay 1DRadiator fan motor control relay*3D
D
Radiator fan motor relay (HI)A
FRadiator fan motor relay (LO)A
FRear intermittent wiper relavL
Door lock power relay 2
l 2
Fog light relay
Fuel pump relay
Generator relay
LStarter relayA
ATail light relayA
CTheft-alarm horn relay*4E
ATheft-alarm starter relay*4H
Headlight relayATurn-signal and hazard flasher unit
Horn relayA
Valve relay (ABS hydraulic unit)
Magnetic clutch relay
D
NOTE-
(1)*l: Vehicles produced up to Oct. 1993.
I:;
l 2: Except 1993 and earlier models without keyless entry system.
*3: Up to 1993 models
(4)*4: Vehicles with theft-alarm system.
(5)l s: Except vehicles with manual air conditioning from 1996 models.
G
B
00002699
TSB Revision
Page 9 of 738
Downloaded from www.Manualslib.com manuals search engine GENERAL - Relay Location
4~ to 1993 models> 4
P:
IZ16FOOO8
L-7
\\ .
%I
\_
H?ic\-
YTheft-z2 5:\starter relay
--
Z16FO282
TSB Revision
Page 10 of 738
Downloaded from www.Manualslib.com manuals search engine GENERAL- Relay Location
controlrelayvX16FO396
EA 169s models> L
?I -
p!
Rear intermittent
“i ”
(1: iI/ il
‘jH$iy
I ‘1&@IId---~::~~~ \ i (j ” (
III:I. II-Cd\.\' . ‘yliFO264
TSB Revision
Page 21 of 738
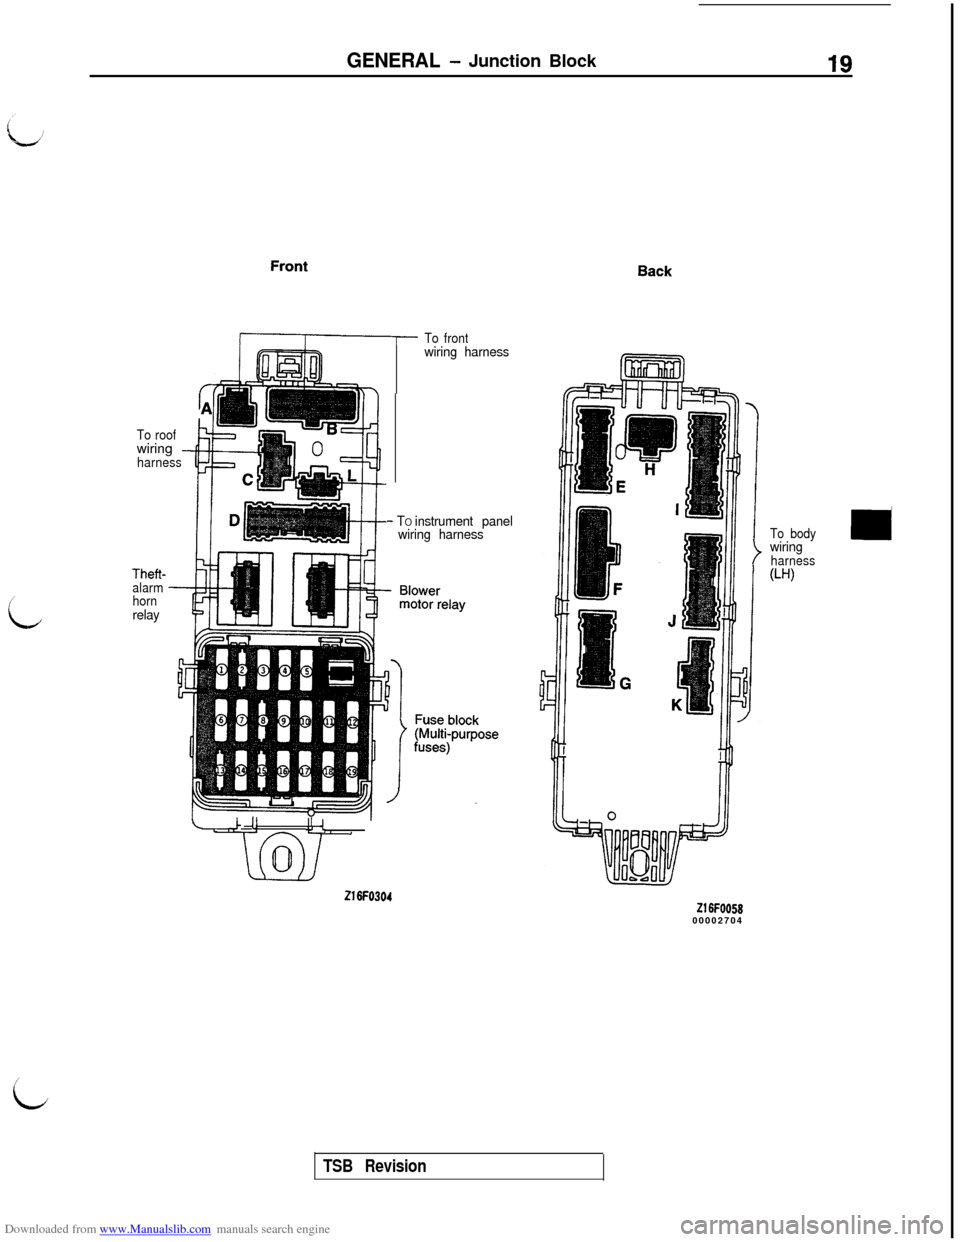
Downloaded from www.Manualslib.com manuals search engine GENERAL - Junction Block19
/
L
To roofwiring -harness
Front
/ITo frontwiring harness
- TO instrument panel
wiring harness
Theft-
alarm
horn
relay
L ,.c !!II {+J . ,i/11
\oi
Z16FO304
Back
To bodywiringharness
W-9
Z16FOO5800002704
/
id
TSB Revision
Page 22 of 738
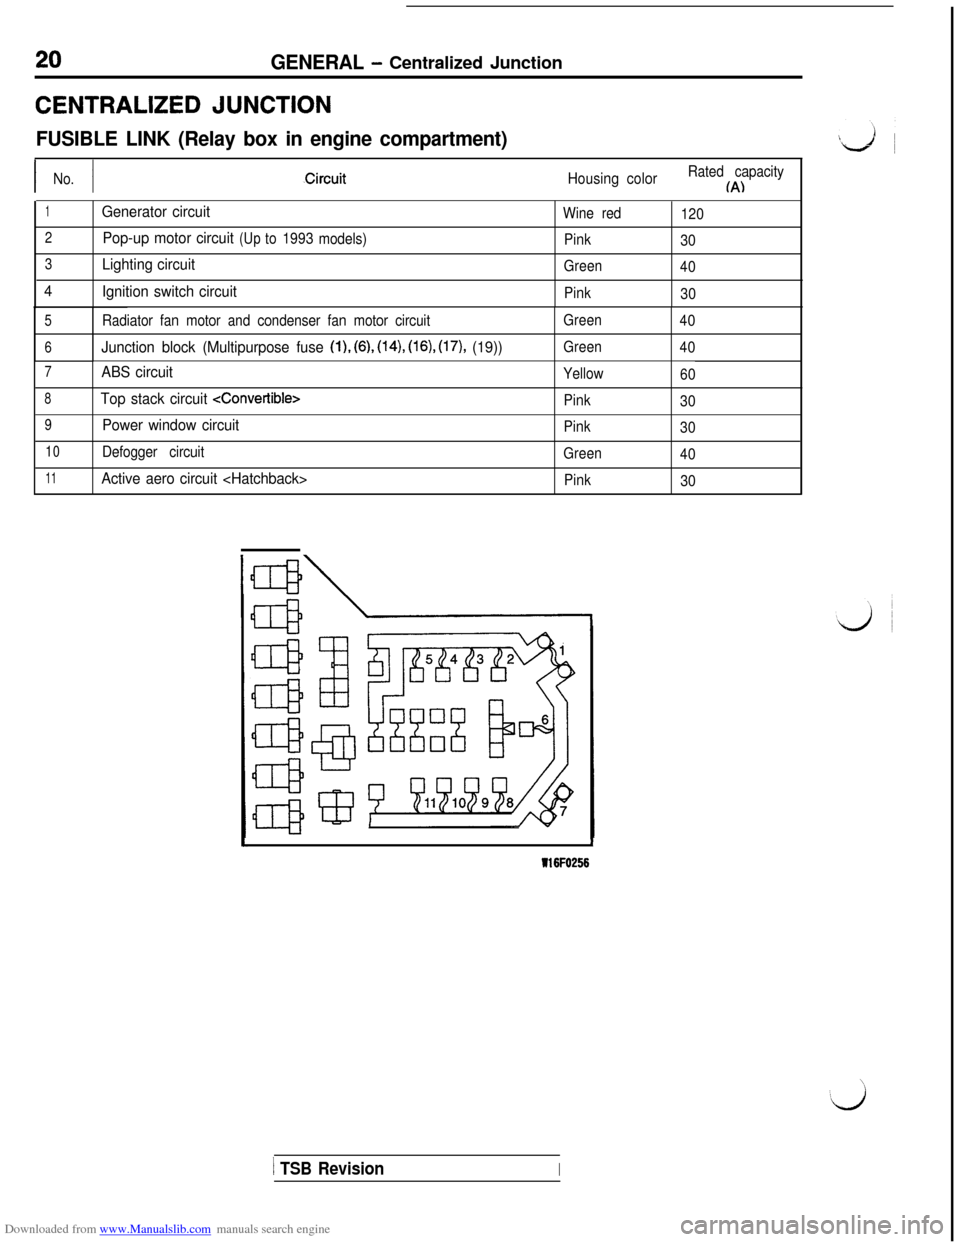
Downloaded from www.Manualslib.com manuals search engine GENERAL - Centralized JunctionCENTRALIZED
JUNCTION
FUSIBLE LINK (Relay box in engine compartment)
I INo.Housing colorRated capacityIA)
1Generator circuitWine red
120
2Pop-up motor circuit(Upto1993
models)
Pink
30
3Lighting circuitGreen
40
4
Ignition switch circuitPink
30
5Radiator fan motor and condenser fan motor circuitGreen
40
6Junction block (Multipurpose fuse (l), (6), (14), (16), (17), (19))Green
40
7ABS circuitYellow
60
8Top stack circuit
Pink
30
9Power window circuitPink
30
10Defogger circuit
Green
40
11Active aero circuit
301I
116FO256
1 TSB RevisionI
Page 23 of 738
Downloaded from www.Manualslib.com manuals search engine L
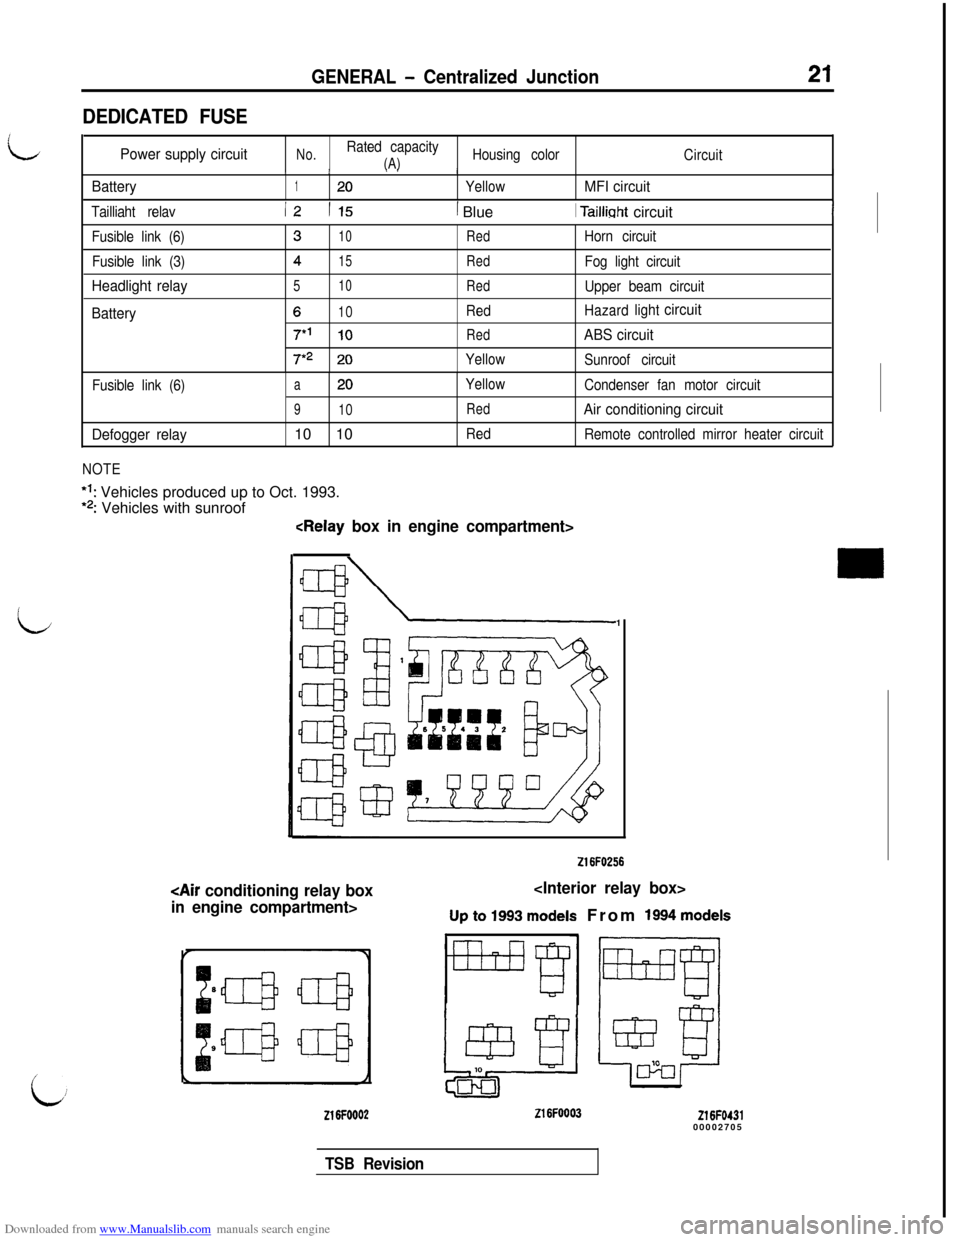
DEDICATED FUSE
GENERAL - Centralized Junction21
Power supply circuitNo.Rated capacity
(A)Housing color
Circuit
Battery
,!. I/
120YellowMFI circuit
Tailliaht relavI2 1151 Blue1 Tailliaht circuitI
Fusible link (6)
Fusible link (3)
Headlight relay
Battery
310RedHorn circuit
415RedFog light circuit
510RedUpper beam circuit
610RedHazardlightcircuit
7*’10RedABS circuit
7*220Yellow
Sunroof circuit
Fusible link (6)
a20
910
Defogger relay10 10
NOTE*l: Vehicles produced up to Oct. 1993.
*2: Vehicles with sunroof
Yellow
Red
RedCondenser fan motor circuit
Air conditioning circuit
Remote controlled mirror heater circuit
L
216FO256
Up to 1993 models From 1994 models
Z16FOOO2Z16FOOO3Z16FO43100002705
TSB Revision
Page 25 of 738
Downloaded from www.Manualslib.com manuals search engine GENERAL - Centralized Junction
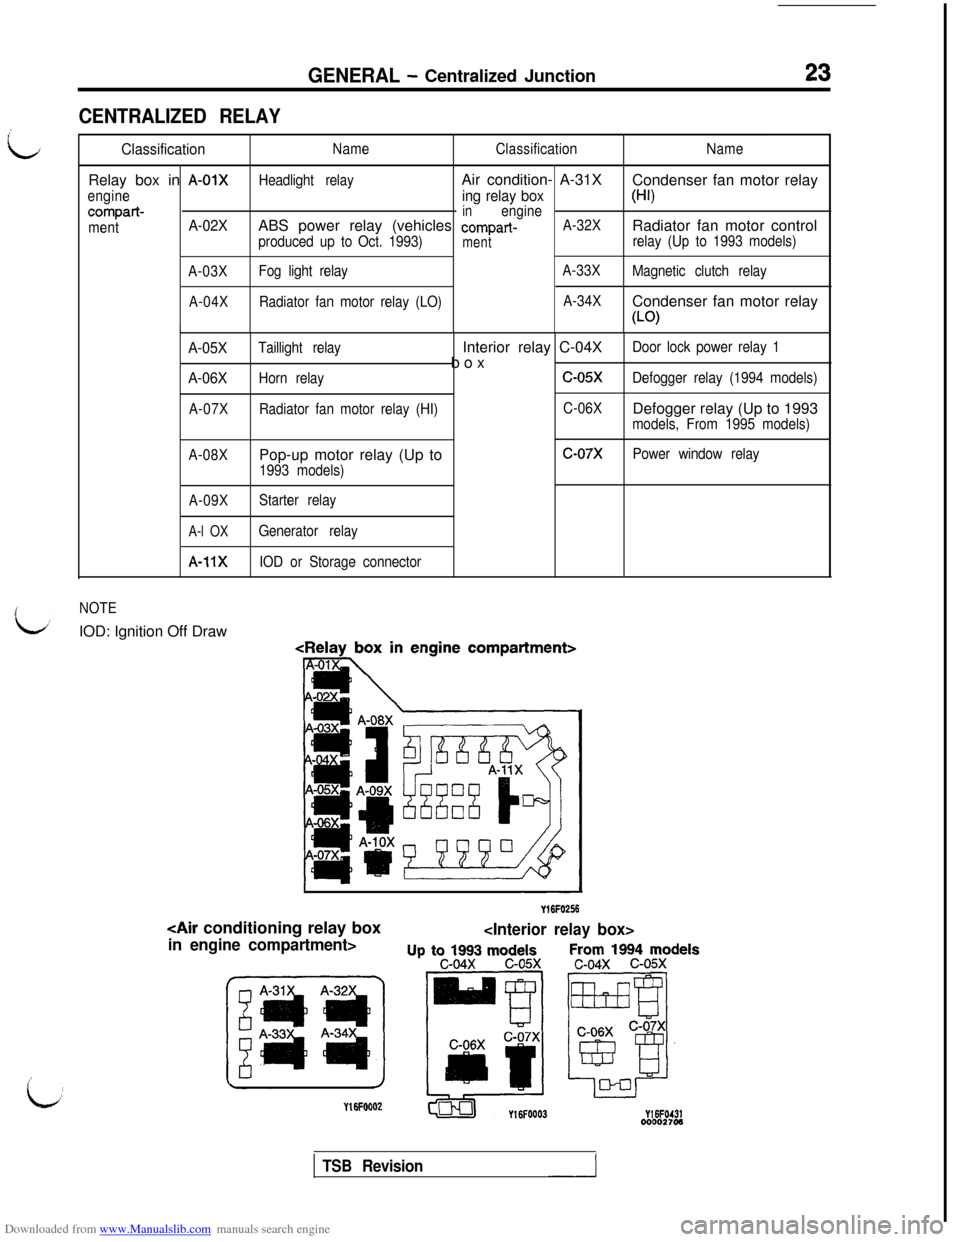
CENTRALIZED RELAY
i
L
ClassificationRelay box in
A-01X
engine
compart-
mentA-02X
A-03X
A-04XNameClassification
Headlight relayAir condition- A-31X
ing relay boxinengineABS power relay (vehicles compart-A-32X
produced up to Oct. 1993)
ment
Fog light relayA-33X
Radiator fan motor relay (LO)A-34XNameCondenser fan motor relay
(HI)Radiator fan motor control
relay (Up to 1993 models)
Magnetic clutch relayCondenser fan motor relay
(LO)
A-05X
A-06X
A-07XTaillight relayInterior relay C-04X
Door lock power relay 1box
Horn relayc-05-xDefogger relay (1994 models)
Radiator fan motor relay (HI)C-06XDefogger relay (Up to 1993
models, From 1995 models)
A-08X
A-09X
A-l OX
A-11XPop-up motor relay (Up to
1993 models)
Starter relay
Generator relay
IOD or Storage connector
c-07xPower window relay
NOTEIOD: Ignition Off Draw
Y16FO256
Up t;-;t;3 modelsFrom 1994 modelsc-05xc-04x c-05x
TSB Revision
Page 29 of 738
Downloaded from www.Manualslib.com manuals search engine GENERAL - How to Diagnose27
HOW TO DIAGNOSE
L;The most important point in troubleshooting is to determine “Probable Causes”. Once the probable causes
are determined, parts to be checked can be limited to those associated with such probable causes. Thereforeunnecessary checks can be eliminated. The determination of the probable causes must be based
ona theory and be supported by facts and must not be based on intuition only.
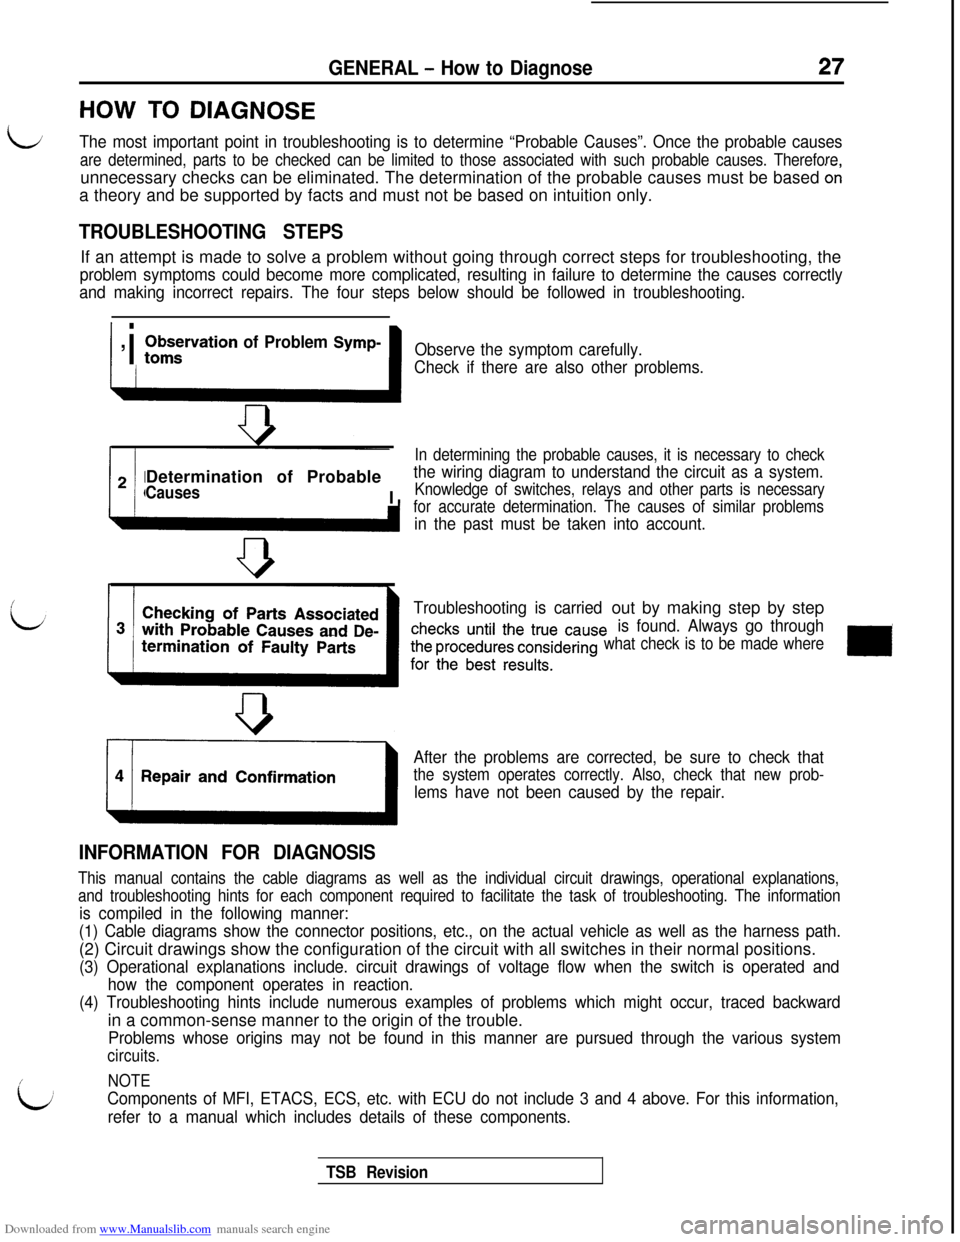
TROUBLESHOOTING STEPSIf an attempt is made to solve a problem without going through correct steps for troubleshooting, the
problem symptoms could become more complicated, resulting in failure to determine the causes correctly
and making incorrect repairs. The four steps below should be followed in troubleshooting.
I i
,;zirvation of Problem Symp-Determination of Probable
CausesI
Observe the symptom carefully.
Check if there are also other problems.
In determining the probable causes, it is necessary to check
the wiring diagram to understand the circuit as a system.
Knowledge of switches, relays and other parts is necessary
for accurate determination. The causes of similar problems
in the past must be taken into account.
After the problems are corrected, be sure to check that
the system operates correctly. Also, check that new prob-
lems have not been caused by the repair.
INFORMATION FOR DIAGNOSIS
Troubleshooting is carriedout by making step by step
is found. Always go through
what check is to be made where
/
b
This manual contains the cable diagrams as well as the individual circuit drawings, operational explanations,
and troubleshooting hints for each component required to facilitate the task of troubleshooting. The information
is compiled in the following manner:
(1) Cable diagrams show the connector positions, etc., on the actual vehicle as well as the harness path.(2) Circuit drawings show the configuration of the circuit with all switches in their normal positions.
(3) Operational explanations include. circuit drawings of voltage flow when the switch is operated and
how the component operates in reaction.
(4) Troubleshooting hints include numerous examples of problems which might occur, traced backwardin a common-sense manner to the origin of the trouble.
Problems whose origins may not be found in this manner are pursued through the various system
circuits.
NOTE
Components of MFI, ETACS, ECS, etc. with ECU do not include 3 and 4 above. For this information,
refer to a manual which includes details of these components.
TSB Revision
Page 30 of 738
Downloaded from www.Manualslib.com manuals search engine GENERAL - How to Diagnose
Changeover k&bZ1680224
Z1680225
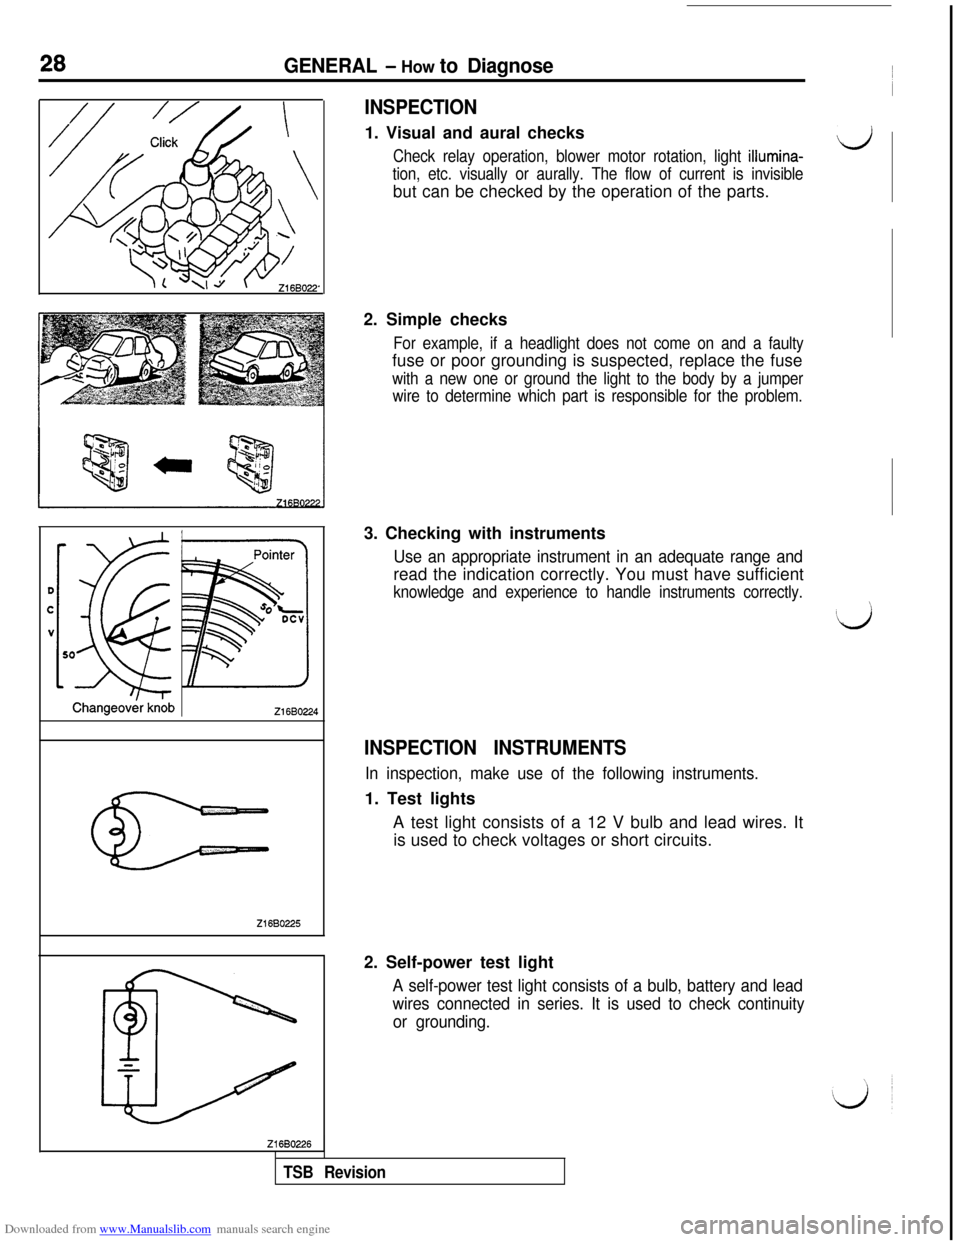
INSPECTION1. Visual and aural checks
Check relay operation, blower motor rotation, light illumina-d
tion, etc. visually or aurally. The flow of current is invisiblebut can be checked by the operation of the parts.
2. Simple checks
For example, if a headlight does not come on and a faultyfuse or poor grounding is suspected, replace the fuse
with a new one or ground the light to the body by a jumper
wire to determine which part is responsible for the problem.3. Checking with instruments
Use an appropriate instrument in an adequate range andread the indication correctly. You must have sufficient
knowledge and experience to handle instruments correctly.
INSPECTION INSTRUMENTS
In inspection, make use of the following instruments.1. Test lights
A test light consists of a 12 V bulb and lead wires. It
is used to check voltages or short circuits.
2. Self-power test light
A self-power test light consists of a bulb, battery and lead
wires connected in series. It is used to check continuity
or grounding.
TSB Revision