engine MITSUBISHI 3000GT 1992 2.G Workshop Manual
[x] Cancel search | Manufacturer: MITSUBISHI, Model Year: 1992, Model line: 3000GT, Model: MITSUBISHI 3000GT 1992 2.GPages: 738, PDF Size: 35.06 MB
Page 471 of 738
Downloaded from www.Manualslib.com manuals search engine ENGINE ELECTRICAL - Starting System16-25
L
Field coil wire27EL0021216Fo264
00002526
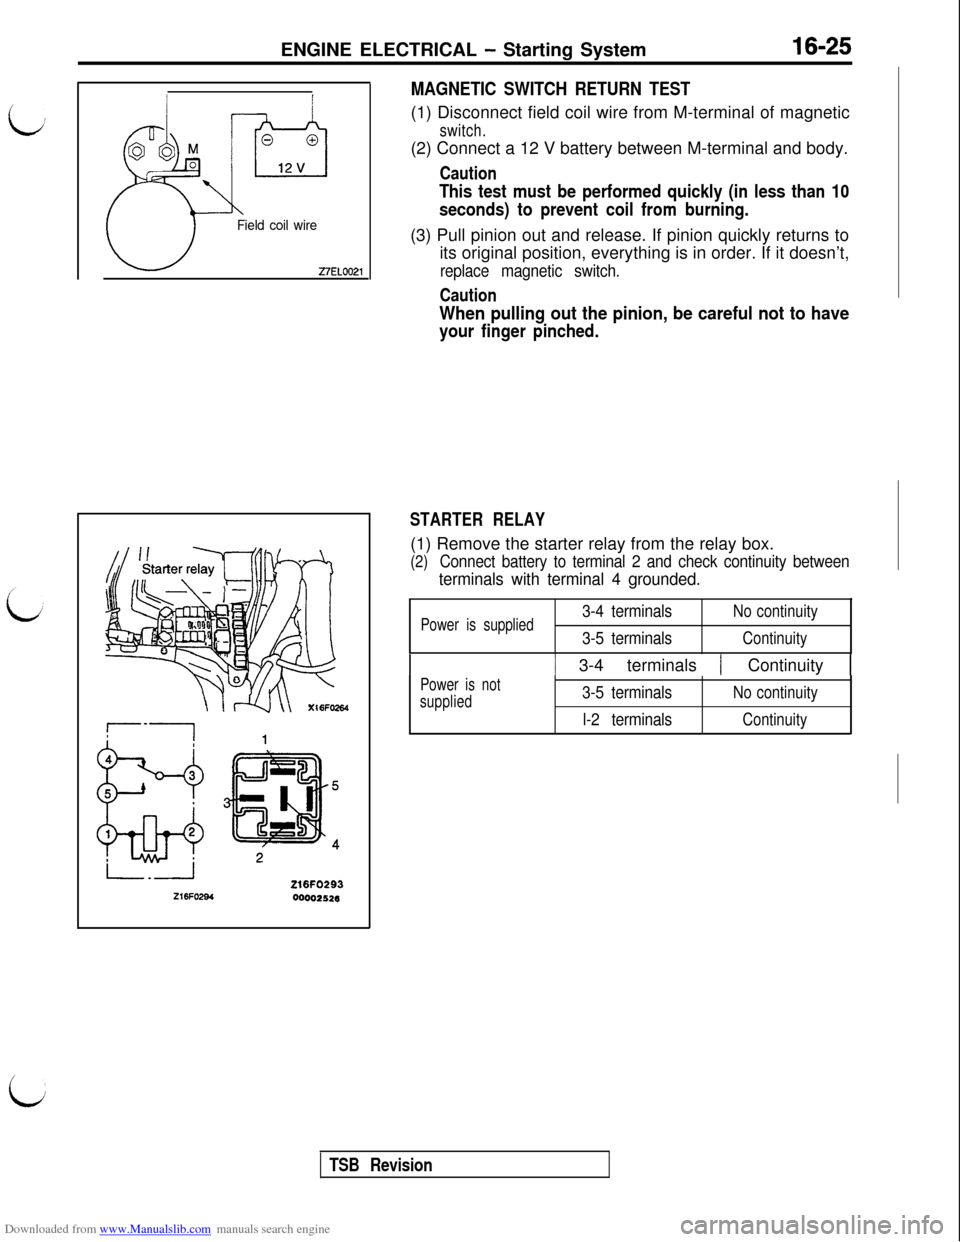
MAGNETIC SWITCH RETURN TEST(1) Disconnect field coil wire from M-terminal of magnetic
switch.(2) Connect a 12 V battery between M-terminal and body.
Caution
This test must be performed quickly (in less than 10
seconds) to prevent coil from burning.(3) Pull pinion out and release. If pinion quickly returns to
its original position, everything is in order. If it doesn’t,
replace magnetic switch.
Caution
When pulling out the pinion, be careful not to have
your finger pinched.
STARTER RELAY(1) Remove the starter relay from the relay box.
(2)Connect battery to terminal 2 and check continuity between
terminals with terminal 4 grounded.
Power is supplied3-4 terminals
3-5 terminalsNo continuity
Continuity
/ 3-4 terminals / Continuity 1
Power is not
supplied3-5 terminals
l-2 terminalsNo continuity
Continuity
i
TSB Revision
Page 472 of 738
Downloaded from www.Manualslib.com manuals search engine 16-26ENGINE ELECTRICAL - Starting System
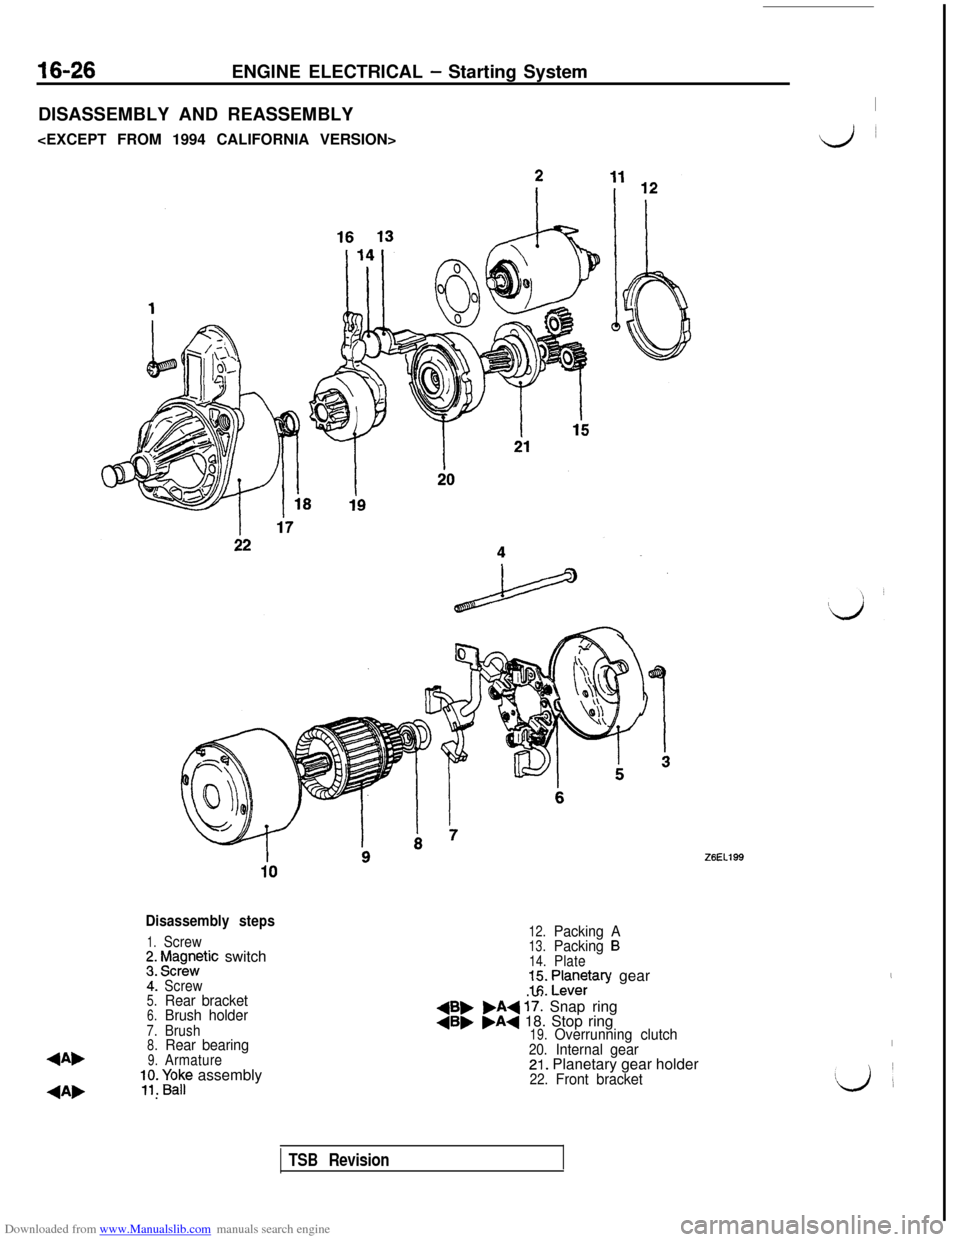
DISASSEMBLY AND REASSEMBLY
I
Lj~
Disassembly steps
1.Screw;. f$gnntic switch
4:Screw5.Rear bracket6.Brush holder7.Brush8.Rear bearing
4Ab9.Armature;;. paF assembly
4A, .
12.Packing A13.Packing B14.Plate=I:. ;an$ary gear
+B, .A+ 17: Snap ring4B, .A+ 18. Stop ring19.Overrunning clutch20.Internal gear21. Planetary gear holder22.Front bracket
,
I!Lj
’
TSB Revision
Page 473 of 738
Downloaded from www.Manualslib.com manuals search engine ENGINE ELECTRICAL - Starting System16-27
27EN0628
1'0
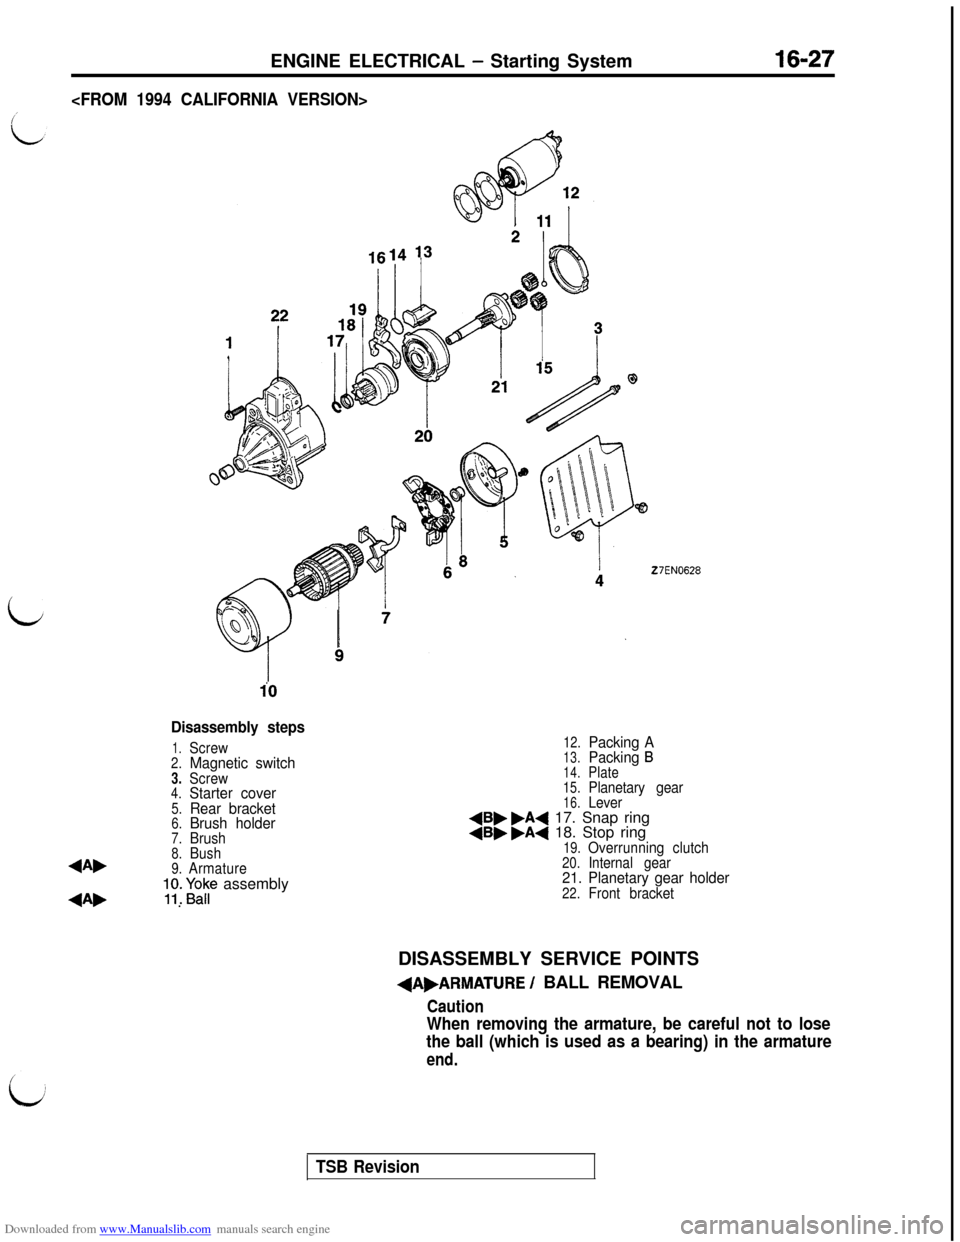
Disassembly steps
1.Screw2.Magnetic switch3.Screw4.Starter cover5.Rear bracket6.Brush holder7.Brush8.Bush4A,9.Armature;y. Fap assembly
4A, .
12.Packing A13.Packing B
14.Plate
15.Planetary gear16.Lever4B, .A4 17. Snap ring4B, .A4 18. Stop ring19.Overrunning clutch20.Internal gear21. Planetary gear holder22.Front bracketDISASSEMBLY SERVICE POINTS
+A,ARMATURE / BALL REMOVAL
Caution
When removing the armature, be careful not to lose
the ball (which is used as a bearing) in the armature
end.
TSB Revision
Page 474 of 738
Downloaded from www.Manualslib.com manuals search engine 16-28ENGINE ELECTRICAL - Starting System
Stop ringZ6EL0097
Z6ELOO96+B,SNAP
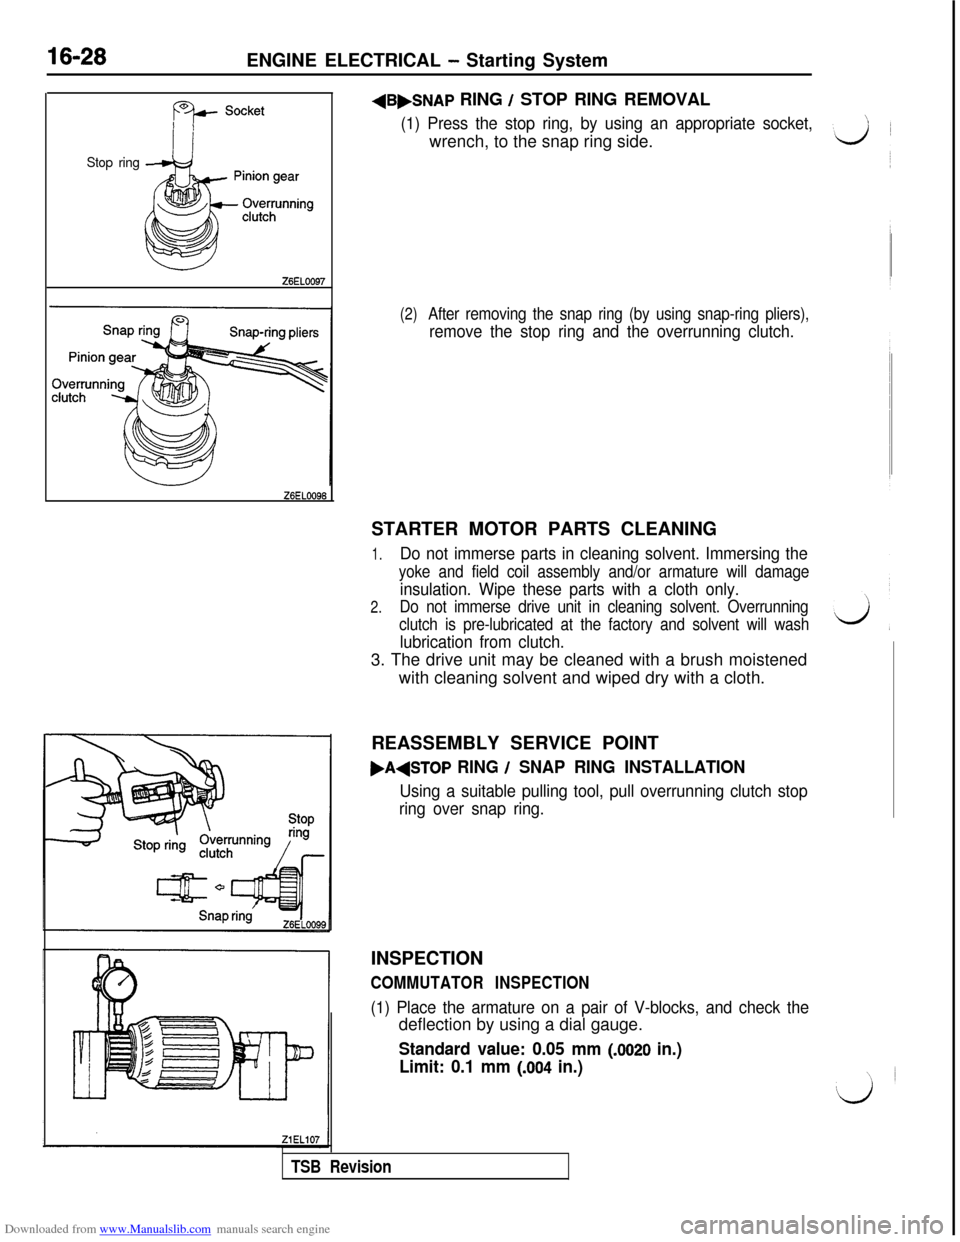
RING / STOP RING REMOVAL
(1) Press the stop ring, by using an appropriate socket,wrench, to the snap ring side.
(2)After removing the snap ring (by using snap-ring pliers),
remove the stop ring and the overrunning clutch.STARTER MOTOR PARTS CLEANING
1.Do not immerse parts in cleaning solvent. Immersing the
yoke and field coil assembly and/or armature will damage
insulation. Wipe these parts with a cloth only.
2.Do not immerse drive unit in cleaning solvent. Overrunning
clutch is pre-lubricated at the factory and solvent will wash
lubrication from clutch.3. The drive unit may be cleaned with a brush moistened
with cleaning solvent and wiped dry with a cloth.
REASSEMBLY SERVICE POINT
,A+TOP RING / SNAP RING INSTALLATION
Using a suitable pulling tool, pull overrunning clutch stop
ring over snap ring.INSPECTION
COMMUTATOR INSPECTION
(1) Place the armature on a pair of V-blocks, and check thedeflection by using a dial gauge.
Standard value: 0.05 mm (JO20 in.)
Limit: 0.1 mm
(.004 in.)
TSB Revision
Page 475 of 738
Downloaded from www.Manualslib.com manuals search engine ENGINE ELECTRICAL - Starting System16-29
ZiELllS
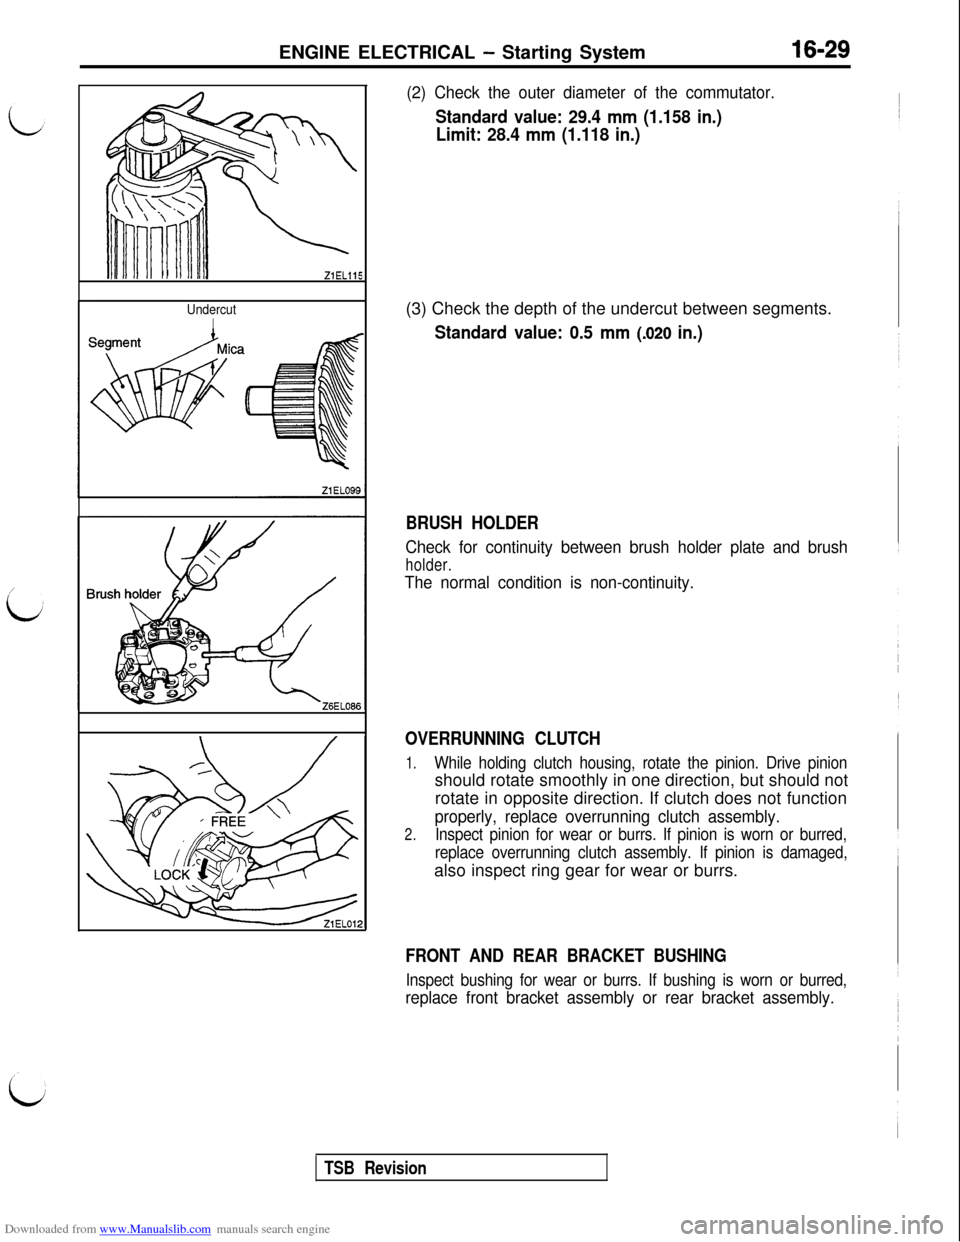
UndercutI
(2) Check the outer diameter of the commutator.
Standard value: 29.4 mm (1.158 in.)
Limit: 28.4 mm (1.118 in.)(3) Check the depth of the undercut between segments.
Standard value: 0.5 mm (.020 in.)
BRUSH HOLDER
Check for continuity between brush holder plate and brush
holder.
The normal condition is non-continuity.
OVERRUNNING CLUTCH
1.While holding clutch housing, rotate the pinion. Drive pinionshould rotate smoothly in one direction, but should not
rotate in opposite direction. If clutch does not function
properly, replace overrunning clutch assembly.
2.Inspect pinion for wear or burrs. If pinion is worn or burred,
replace overrunning clutch assembly. If pinion is damaged,also inspect ring gear for wear or burrs.
FRONT AND REAR BRACKET BUSHING
Inspect bushing for wear or burrs. If bushing is worn or burred,
replace front bracket assembly or rear bracket assembly.
TSB Revision
Page 476 of 738
Downloaded from www.Manualslib.com manuals search engine 16-30ENGINE ELECTRICAL - Starting System
Eq
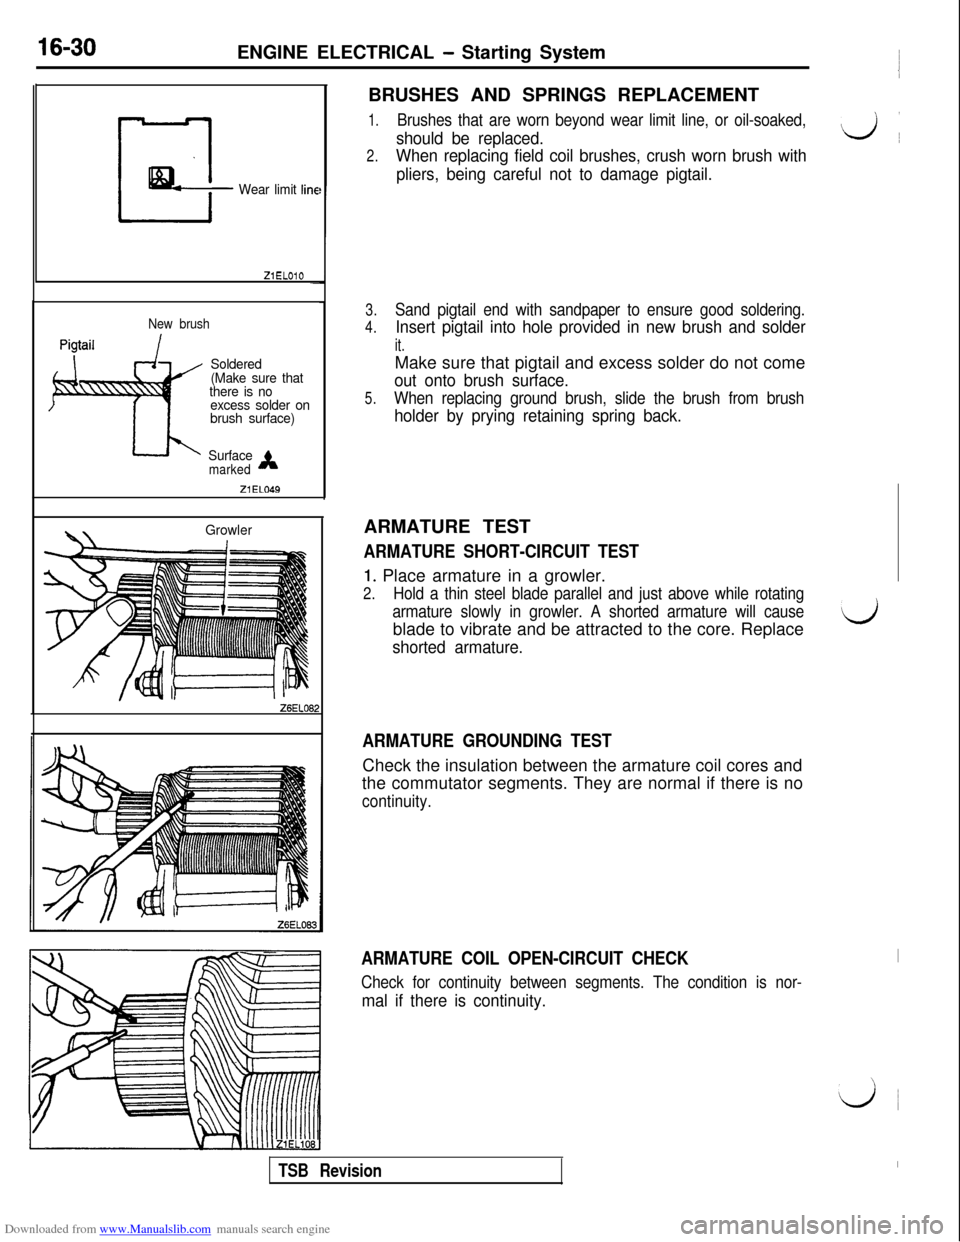
C-- Wear limit line
-
New brush
Soldered
(Make sure that
there is no
excess solder on
brush surface)
Surface
Amarked
Zl EL049
GrowlerBRUSHES AND SPRINGS REPLACEMENT
1.Brushes that are worn beyond wear limit line, or oil-soaked,
should be replaced.do
2.When replacing field coil brushes, crush worn brush with
pliers, being careful not to damage pigtail.
3.
4.Sand pigtail end with sandpaper to ensure good soldering.
Insert pigtail into hole provided in new brush and solder
it.Make sure that pigtail and excess solder do not come
out onto brush surface.
5.When replacing ground brush, slide the brush from brush
holder by prying retaining spring back.ARMATURE TEST
ARMATURE SHORT-CIRCUIT TEST
1. Place armature in a growler.
2.Hold a thin steel blade parallel and just above while rotating
armature slowly in growler. A shorted armature will causeblade to vibrate and be attracted to the core. Replace
shorted armature.
ARMATURE GROUNDING TESTCheck the insulation between the armature coil cores and
the commutator segments. They are normal if there is no
continuity.
ARMATURE COIL OPEN-CIRCUIT CHECK
Check for continuity between segments. The condition is nor-
mal if there is continuity.
TSB Revision
Page 477 of 738
Downloaded from www.Manualslib.com manuals search engine i/ENGINE ELECTRICAL
- Ignition System
IGNITION SYSTEM
16-31
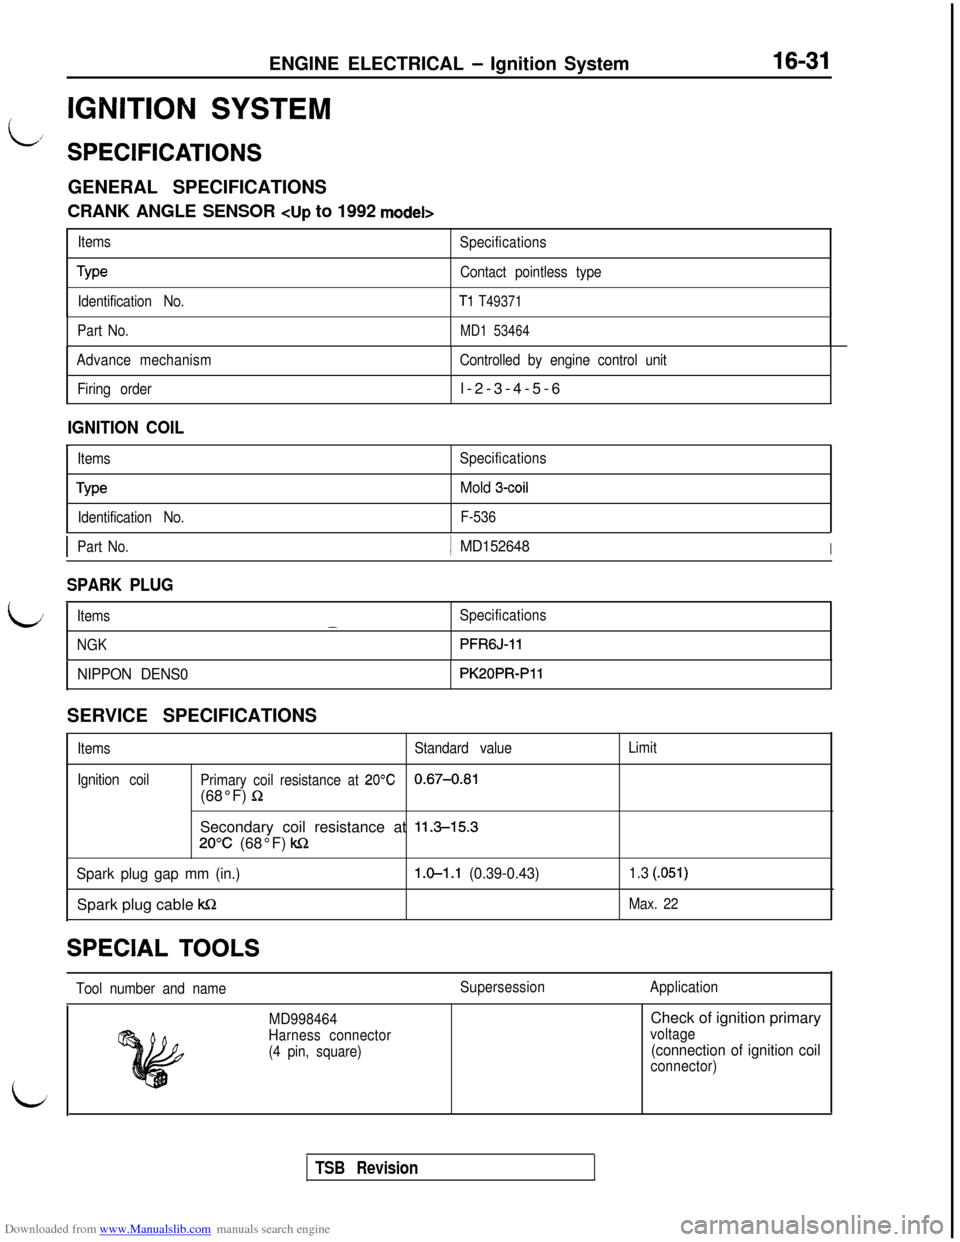
SPECIFICATIONSGENERAL SPECIFICATIONS
CRANK ANGLE SENSOR cup to 1992 model>
Items
Specifications
TypeContact pointless type
Identification No.
Tl T49371
Part No.MD1 53464
Advance mechanism
Firing orderControlled by engine control unitl-2-3-4-5-6
IGNITION COILrItems
Type
Identification No.SpecificationsMold 3-coil
F-536
L
IPart No.j MD152648I
SPARK PLUG
Items
NGK-Specifications
PFRGJ-11
NIPPON DENS0PK20PRPllSERVICE SPECIFICATIONS
Items
Ignition coilStandard valueLimit
Primary coil resistance at
20°C0.67-0.81(68°F)
RSecondary coil resistance at
11.3-15.3
20°C (68°F) kc2
Spark plug gap mm (in.)1.0-l .l (0.39-0.43)Spark plug cable
kQ
1.3 (.051)
Max. 22SPECIAL
TOOLS
Tool number and nameSupersessionApplication
i
MD998464
Harness connector
(4 pin, square)Check of ignition primaryvoltage
(connection of ignition coil
connector)
i
TSB Revision
Page 478 of 738
Downloaded from www.Manualslib.com manuals search engine ENGINE ELECTRICAL - lanition Svstem
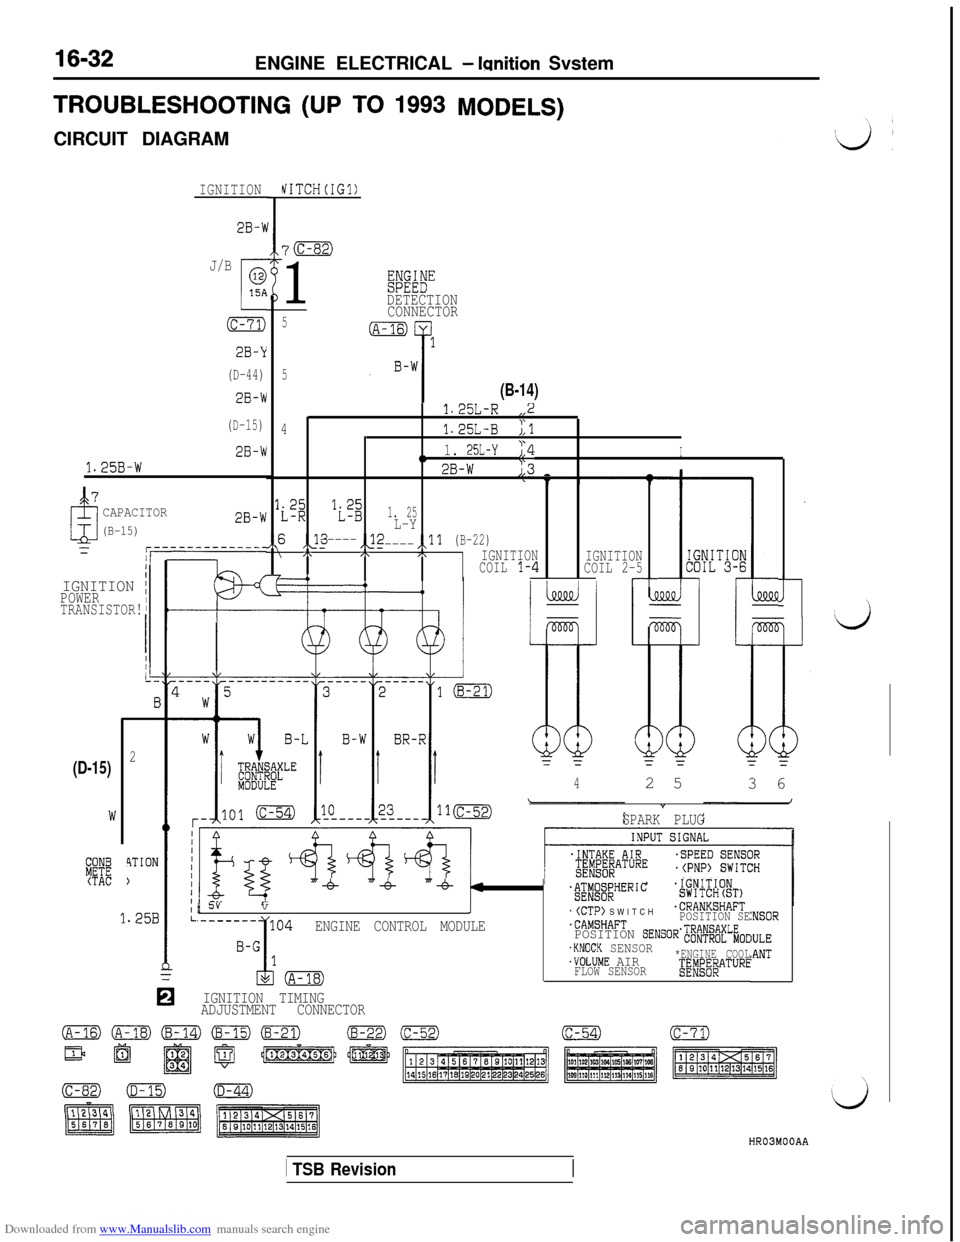
TROUBLESHOOTING (UP TO 1993MODELS)CIRCUIT DIAGRAM
IGNITIONhiITCH(IG1)
2B-X
7m
1
J/B
c
015A
(c-71)
2B-Y
(D-44)
2B-W
(D-15)
2B-W
1.25B-W
@%t”DETECTION
CONNECTOR
5
5
(B-14)
1.25L-R,,2
41.25L-B;,l
,,1. 25L-Y;,4I
2B-W23_
y;'$1. 25L-Y
A6 ,P-----,\22-----,,ll(B-22) /\,h,\IGNITION
IGNITIONCOIL1-4COIL2-5-r--
CAPACITOR
(B-15)2B-W
1/IGNITION IPOWERTRANSISTOR!rl
2
4TION
)
(D-15)
3%(TAC
42 5
3 6
”
SPARK PLUG
1.25B
IIIIIIII1IL
“-6% “-6 “-4%4;ig;f;HERIC.IGNITIONSWITCHtST)/ 5vv.(CTP) SWITCH.CRANKSHAFT
.CAMSHAFTPOSITION SEENGINE CONTROL MODULEPOSITION SENSOR';#$;~L;oc.KNOCK SENSOR.VOLUME AIR*ENGINE COOL
FLOW SENSOR;ED&f$AT"RE
:NSOR
IULE:ANT
IGNITION TIMING
ADJUSTMENT CONNECTOR
HR03MOOAA
1 TSB Revision
Page 479 of 738
Downloaded from www.Manualslib.com manuals search engine ENGINE ELECTRICAL - Ignition Svstem
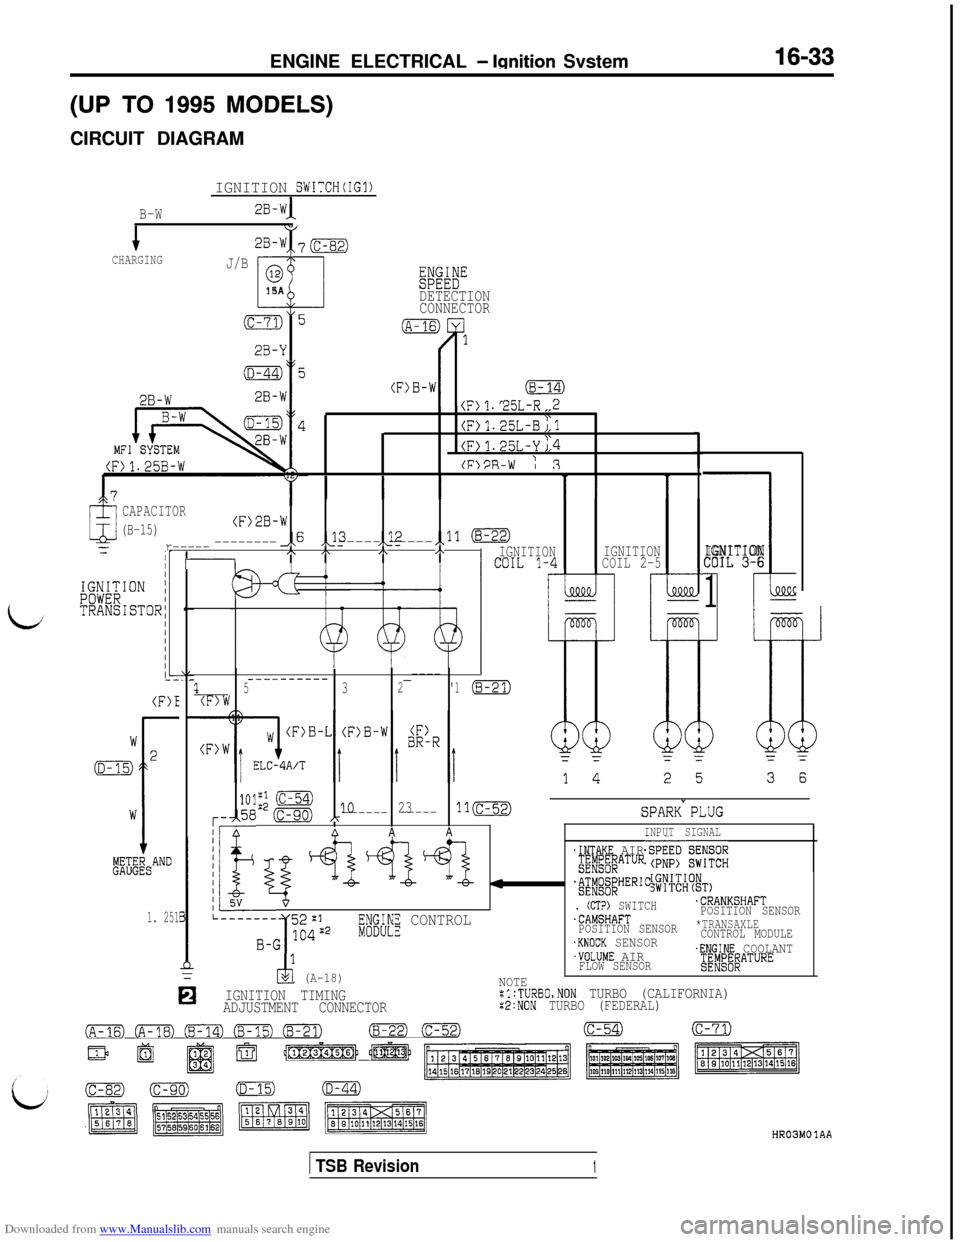
(UP TO 1995 MODELS)CIRCUIT DIAGRAM
IGNITION SWITCH(IG1)
B-W
1CHARGING33-W 70
J/B0
t15A
(c-71)5
2B-Y
2B-W
WEDETECTION
CONNECTOR
\I/1. c5L-R,,2
(F)1.25L-B;,lI'(F>1.25L-Y J,4
(FlPR-W : 3
CAPACITOR
(B-15)(F)2B-W
,x6 ,J3,_12=r------------------ -----,,ll (B-22)
iI -,\ I\,\,\IGNITION' ""TL 1-4IGNITION
COIL 2-5
i
IGNITION
COIL 3-6
1
(F)E_________-----------_----1532'1(8-21)(F)W
101;; (C-54)
r-,58 (c-90) A
1o23-----------ll(c-52)
I/ AAAA
SPARK"PLUG
INPUT SIGNAL
&i&AND
1. 251
!I
~~$yqppQ.INTAKE AIRgE;g;EATUREsiKz&G
'&$AT~~;HER'C
k-_""_---- 52~1. (CTP) SWITCH.CRANKSHAFT
3.CAMSHAFTPOSITION SENSOR
B-G 104g2
I
if;INE CONTROLPOSITION SENSOR*TRANSAXLE
.KNOCK SENSORCONTROL MODULE
2 (A-18)
.VOLUME AIR.ENGINE COOLANT
FLOW SENSOR$~~~~~ATURE
0
NOTEIGNITION TIMING:l:TURBO,NON TURBO (CALIFORNIA)ADJUSTMENT CONNECTORx2:NON TURBO (FEDERAL)
FE) CFm) (B-14) Em3 EFZTJ(B-22)-(c-54)(c-71)
/$J$mb @f-@
ok4 Oh,
( TSB Revision1
HR03MO 1AA
Page 480 of 738
Downloaded from www.Manualslib.com manuals search engine 16-34ENGINE ELECTRICAL - Ignition System
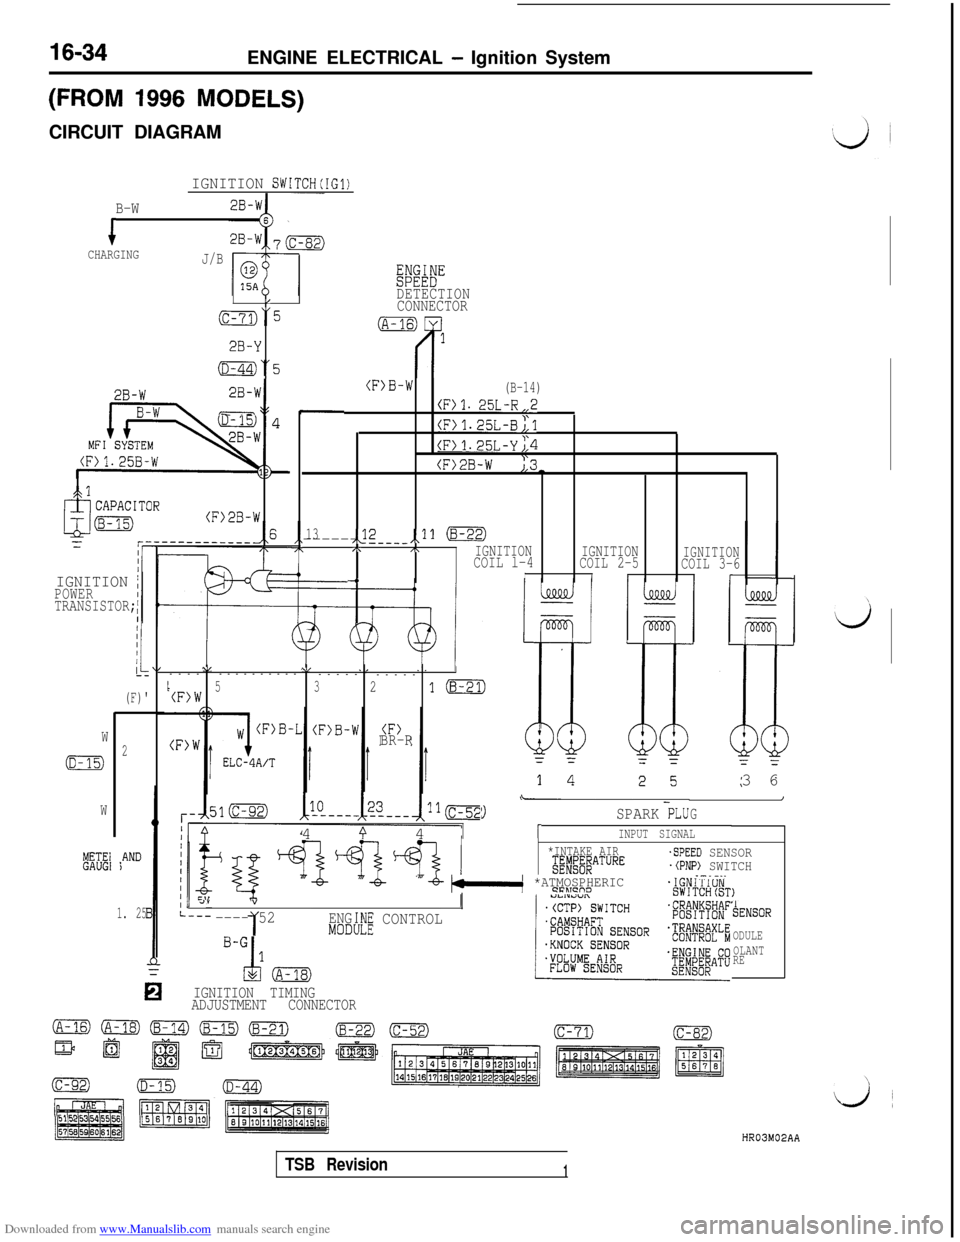
(FROM 1996 MODELS)CIRCUIT DIAGRAM
IGNITION SWITCH(IG1)
B-W
iCHARGINGJ/B
Eiwi"
/DETECTION
(c-73)“5CONNECTOR
2B-Y
(D-44)“5
2B-W-I
2B-W
MFILS - --
(F>B-W(B-14)
(F)l. 25L-R,,2
(F)1.25L-B;,l
(F>1.25L-Yj,4
(F>2B-W ),3-
.
13,<2------ ---__,,11 (8-22),\,\IGNITIONCOIL l-4IGNITION
COIL 2-5IGNITIONCOIL 3-6-4III(r
,cl
(F>2B-W
IGNITION /POWER
TRANSISTOR;
I
(F)'
\I\/,I--------------
-----
-----
I5(F)W321m
BR-RW
(D-15)2
W
METE1GAUGI*AND)3 6
\-I
G9SPARK PLU4
9 41INPUT SIGNAL
*INTAKE AIRg;#j#ATURE
"-b- bkl *ATMOSPHERIC9FLTcno
-SPEED SENSOR.(PNP) SWITCH.-.-..
, 4””
---- 521ENG:h!E CONTROLMODI
TENSOR
ODULE
OLANT
RE
IGNITION TIMING
ADJUSTMENT CONNECTOR
1. 25
HR03M02AA
TSB Revision1