engine MITSUBISHI 3000GT 1992 2.G Workshop Manual
[x] Cancel search | Manufacturer: MITSUBISHI, Model Year: 1992, Model line: 3000GT, Model: MITSUBISHI 3000GT 1992 2.GPages: 738, PDF Size: 35.06 MB
Page 491 of 738
Downloaded from www.Manualslib.com manuals search engine ENGINE ELECTRICAL - Ignition System16-45 l
IGNITION SYSTEM
LREMOVAL AND INSTALLATIONI
i
27EN0520
413 NmIlOft.lbs.
d
12 Nm
9 ft.lbs.
22 Nm16ftAbs.B678
W1
,A4
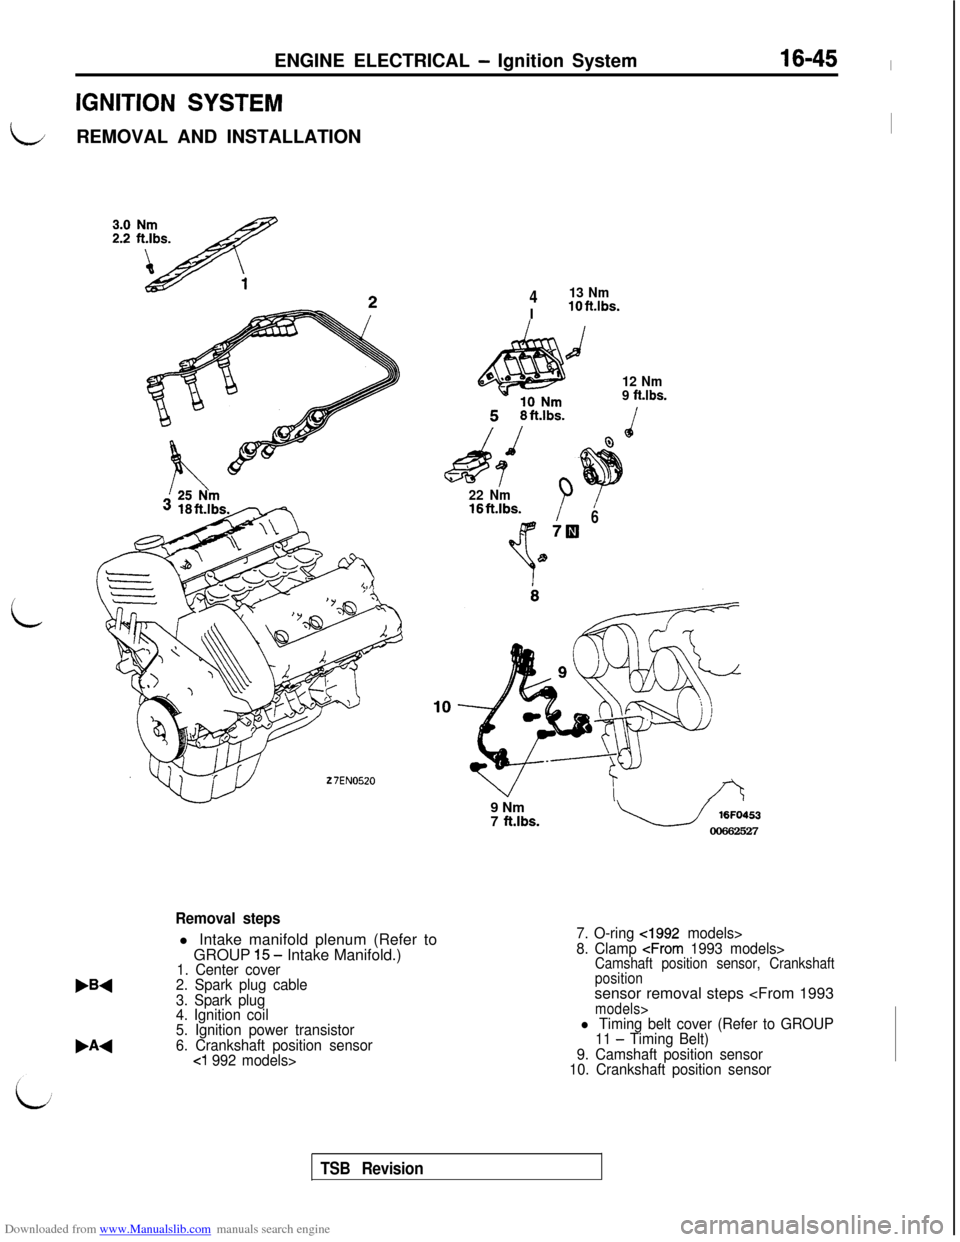
Removal stepsl Intake manifold plenum (Refer to
GROUP
1.5 - Intake Manifold.)1. Center cover
2. Spark plug cable
3. Spark plug
4. Ignition coil
5. Ignition power transistor
6. Crankshaft position sensor
cl 992 models>9 Nm
7
ft.lbs.u 16FO453
00662527
7. O-ring cl992 models>
8. Clamp
positionsensor removal steps
11 - Timing Belt)
9. Camshaft position sensor
10. Crankshaft position sensor
TSB Revision
Page 492 of 738
Downloaded from www.Manualslib.com manuals search engine 16-46ENGINE ELECTRICAL - Ignition Svstem
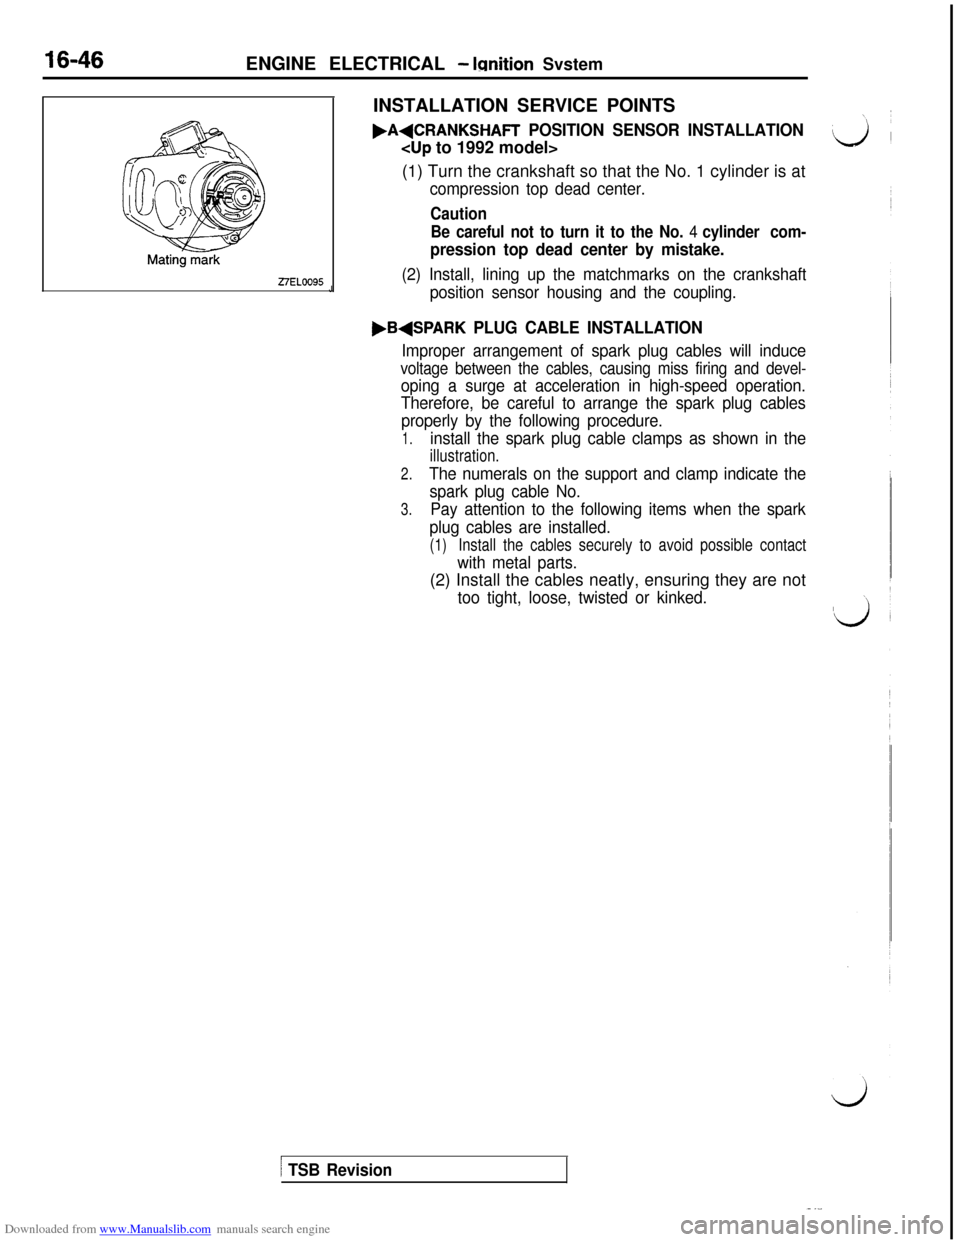
27ELOO95JINSTALLATION SERVICE POINTS.A+CRANKSHAFT
POSITION SENSOR INSTALLATION
(1) Turn the crankshaft so that the No. 1 cylinder is at
compression top dead center.
Caution
Be careful not to turn it to the No.
4 cylinder com-
pression top dead center by mistake.
(2) Install, lining up the matchmarks on the crankshaft
position sensor housing and the coupling.
,B+SPARK PLUG CABLE INSTALLATION
Improper arrangement of spark plug cables will induce
voltage between the cables, causing miss firing and devel-
oping a surge at acceleration in high-speed operation.
Therefore, be careful to arrange the spark plug cables
properly by the following procedure.
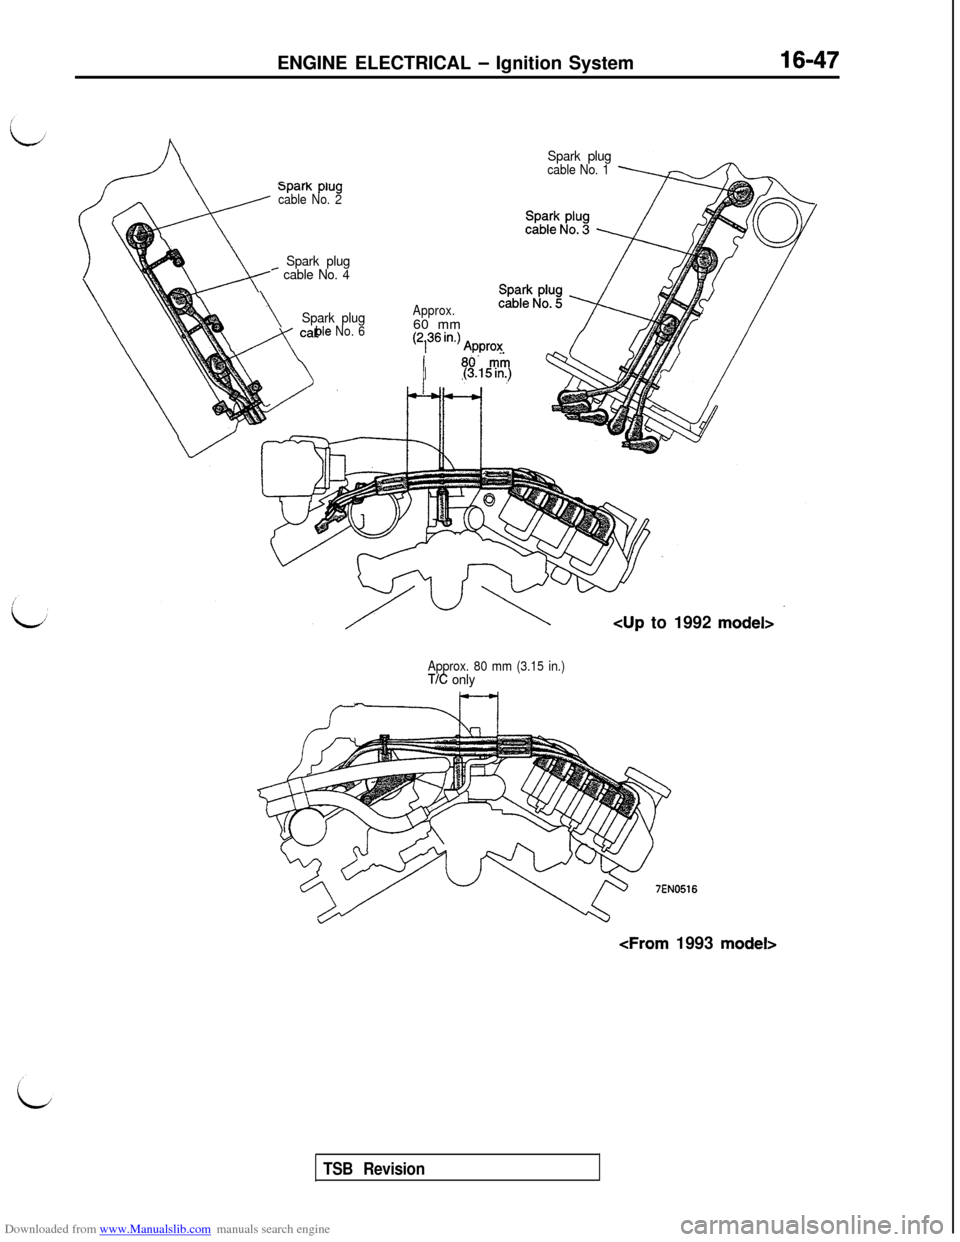
1.install the spark plug cable clamps as shown in the
illustration.
2.The numerals on the support and clamp indicate the
spark plug cable No.
3.Pay attention to the following items when the spark
plug cables are installed.
(1)Install the cables securely to avoid possible contact
with metal parts.(2) Install the cables neatly, ensuring they are not
too tight, loose, twisted or kinked.
/ TSB Revision
Page 493 of 738
Downloaded from www.Manualslib.com manuals search engine ENGINE ELECTRICAL - Ignition System16-47
Spark plugcable No. 1
Spark plugr cable No. 4
\Spark plug‘de No. 6
sparK piug
cable No. 2
Approx.60 mm
(2,36in.) Approx
I(3.15in.)cup to 1992
model>
Approx. 80 mm (3.15 in.)TIC only
TSB Revision
Page 494 of 738
Downloaded from www.Manualslib.com manuals search engine 16-48ENGINE ELECTRICAL - lanition Svstem
\/27EL0086
/DEL0087INSPECTION
SPARK PLUGCheck the plug gap and replace if the limit is exceeded.
Standard value:
1.0-l .l mm (.039-.043 in.)
Limit: 1.3 mm
(.051 in.)
Caution
1.Do not attempt to adjust the gap of the platinum plug.
2.Cleaning of the platinum plug may damage the plati-num tip. Therefore, if carbon deposits must be re-
moved, use a plug cleaner and complete cleaning with-
in 20 seconds for protection of the electrode. Do not
use wire brushes.
SPARK PLUG CABLE(1) Check cap and coating for cracks.
(2) Measure resistance.Limit: Max. 22
ksZ
IGNITION POWER TRANSISTOR
NOTE
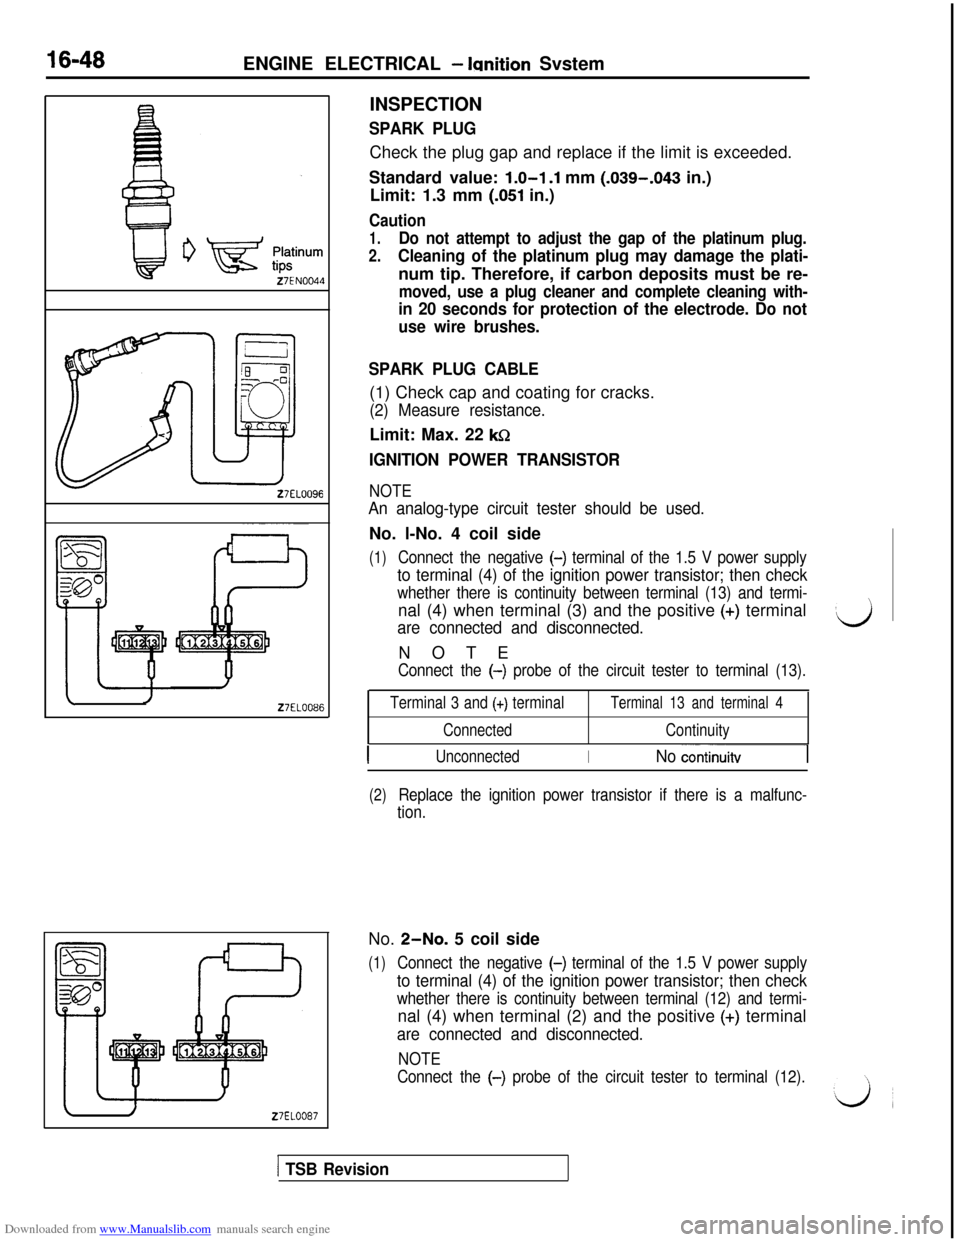
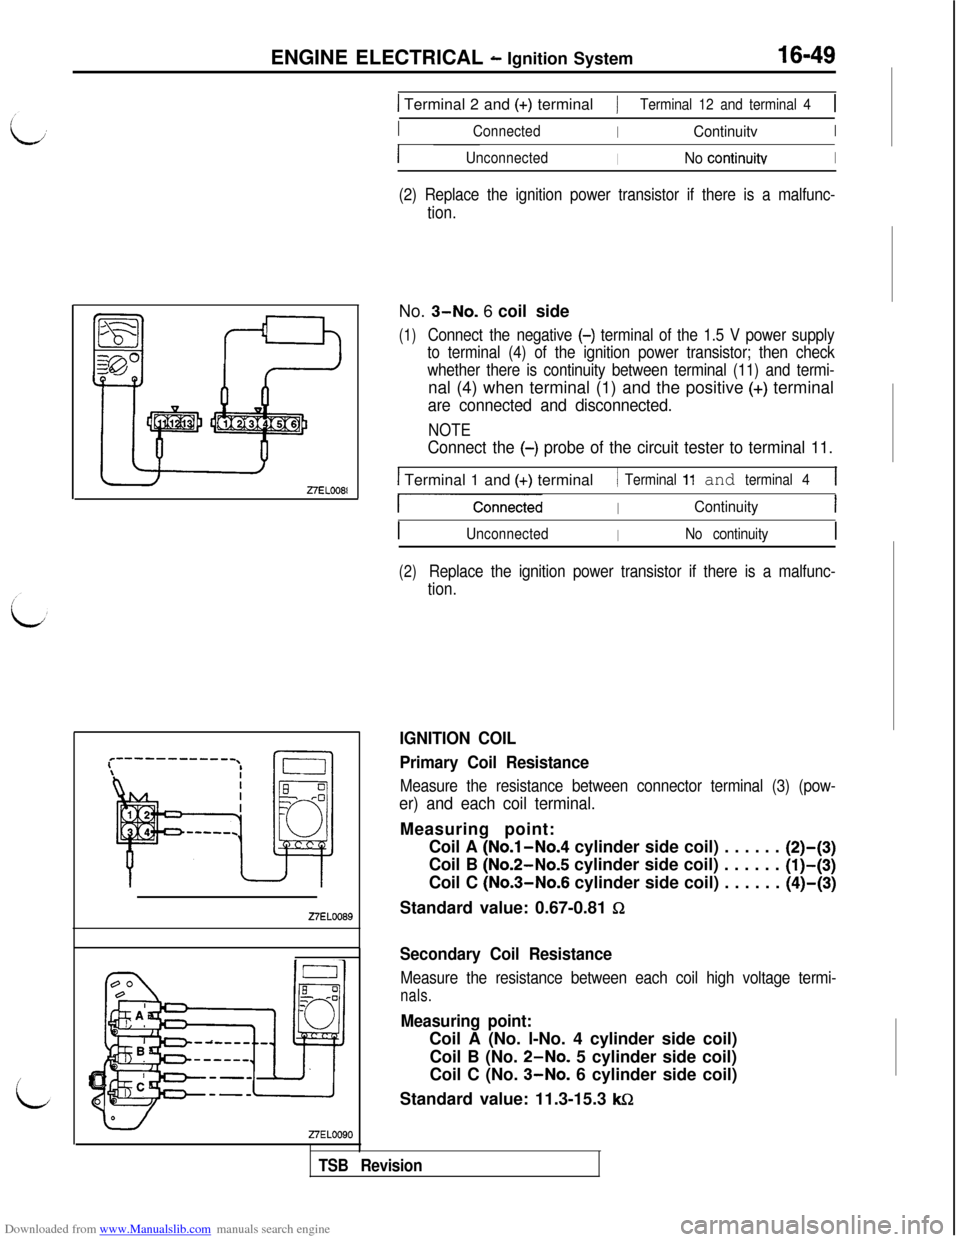
An analog-type circuit tester should be used.No. l-No. 4 coil side
(1)Connect the negative (-) terminal of the 1.5 V power supply
to terminal (4) of the ignition power transistor; then check
whether there is continuity between terminal (13) and termi-nal (4) when terminal (3) and the positive
(+) terminal
are connected and disconnected.NOTE
Connect the (-) probe of the circuit tester to terminal (13).
Terminal 3 and (+) terminal
ConnectedTerminal 13 and terminal 4
Continuity
IUnconnectedINo continuitv
(2)Replace the ignition power transistor if there is a malfunc-
tion.No. ~-NO. 5 coil side
(1)Connect the negative (-) terminal of the 1.5 V power supply
to terminal (4) of the ignition power transistor; then check
whether there is continuity between terminal (12) and termi-nal (4) when terminal (2) and the positive
(+) terminal
are connected and disconnected.
NOTE
Connect the (-)
probe of the circuit tester to terminal (12).
[ TSB Revision
Page 495 of 738
Downloaded from www.Manualslib.com manuals search engine ENGINE ELECTRICAL b Ignition System16-49
27EL0089
Z7ELOOQO
1 Terminal 2 and (+) terminal/Terminal 12 and terminal 41
IConnectedIContinuitvI
IUnconnectedINo continuitvI
(2) Replace the ignition power transistor if there is a malfunc-
tion.No. ~-NO. 6 coil side
(1)Connect the negative (-) terminal of the 1.5 V power supply
to terminal (4) of the ignition power transistor; then check
whether there is continuity between terminal (11) and termi-nal (4) when terminal (1) and the positive
(+) terminal
are connected and disconnected.
NOTE
Connect the (-) probe of the circuit tester to terminal 11.
I Terminal 1 and (+) terminal/ Terminal 11 and terminal 41
-ConnectedIContinuityI
IUnconnectedINo continuityI
(2)Replace the ignition power transistor if there is a malfunc-
tion.
IGNITION COIL
Primary Coil Resistance
Measure the resistance between connector terminal (3) (pow-
er) and each coil terminal.Measuring point:
Coil A
(No.l-No.4 cylinder side coil) . . . . . . (2)-(3)Coil B (No.2-No.5 cylinder side coil) . . . . . .
(l)-(3)Coil C (No.3-No.6 cylinder side coil) . . . . . .
(4)-(3)Standard value: 0.67-0.81
Sz
TSB Revision
Secondary Coil Resistance
Measure the resistance between each coil high voltage termi-
nals.
Measuring point:Coil A (No. l-No. 4 cylinder side coil)
Coil B (No. ~-NO. 5 cylinder side coil)
Coil C (No. ~-NO. 6 cylinder side coil)
Standard value: 11.3-15.3
Wz
Page 496 of 738
Downloaded from www.Manualslib.com manuals search engine NOTES
Page 497 of 738
Downloaded from www.Manualslib.com manuals search engine 54-1
CHASSIS
ELECTRICAL
CONTENTS
AERO PARTS (ACTIVE AERO).....Refer to GROUP 51
ANTI-LOCK BRAKING SYSTEM....
Refer to GROUP 35
BATTERY...........................................-3
ON-VEHICLE SERVICE............................3
Battery Charging.................................4Battery Inspection................................3Battery Testing Procedure........................5
SPECIFICATIONS................................-3
General Specifications............................3
CIGARETTE LIGHTER.............................119
CIGARETTE LIGHTER..........................123
SPECIFICATIONS..............................
119
General Specifications............I...........119
TROUBLESHOOTING............................120
COLUMN SWITCH.................................
.lll
COLUMN SWITCH*............................112
SPECIAL TOOL.................................111
SPECIFICATIONS...............................111
General Specifications..........................111
CRUISE CONTROL SYSTEM . . . . . . . Refer to GROUP 17
DOOR GLASS AND REGULATOR
(POWER WINDOWS) . . . . . . . . . . . . . .Refer to GROUP 42
DOOR HANDLE AND LATCH
(CENTRAL DOOR LOCKING) . . . . . . Refer to GROUP 42
DOOR MIRROR (ELECTRONIC
CONTROLLED MIRROR). . . . . . . . . . .Refer to GROUP 51
ELECTRONIC CONTROL
SUSPENSION . . . . . . . . . . . . . . . . . . . . Refer to GROUP
338
FRONT SEAT (POWER SEAT) . . . . Refer to GROUP 52A
HEATER AND AIR CONDITIONING . Refer to GROUP 55
HORN. . . . . . . . . . . . . . . . . . . . . . . . . . . . . . . . . . . . . . . . . . . .
115
HORN SWITCH* . . . . . . . . . . . . . . . . . . . . . . . . . . . . . . .118
RELAY. . . . . . . . . . . . . . . . . . . . . . . . . . . . . . . . . . . . . . . .
118
SPECIFICATIONS. . . . . . . . . . . . . . . . . . . . . . . . . . . . . .
115
General Specifications . . . . . . . . . . . . . . . . . . . . . . . .115
TROUBLESHOOTING . . . . . . . . . . . . . . . . . . . . . . . . . . .115
KEYLESS ENTRY SYSTEM
(CENTRAL DOOR LOCKING) . . . . . . Refer to GROUP 42
CONTINUED ON NEXT PAGE
WARNINGS REGARDING SERVICING OF SUPPLEMENTAL RESTRAINT SYSTEM (SRS) EQUIPPED VEHICLES
WARNING!
(1) Improper service or maintenance of any component of the
SRS, or any SRS-related component, can lead to personal
injury or death to service personnel (from inadvertent firing of the air bag) or to the driver and passenger (from render-
ing the SRS inoperative).
(2) Service or maintenance of any SRS component or
SRS-related component must be performed only at an authorized
MITSUBISHI dealer.
(3)MITSUBISHI dealer personnel must thoroughly review this manual, and especially its GROUP 52B
TSupplemental Re-
straint System (SRS) and GROUP 00 -Maintenance Service before beginning any service or maintenance of any com-
ponent of the SRS or any
SRS-related component.
NOTE
The SRS includes the following components: impact sensors, SRS diagnosis unit, SRS warning light, air bag module, clock spring
and interconnecting wiring. Other SRS-related components (that may
h,a”” to be removed/installed in connection with SRS serviceor maintenance) are indicated in the table of contents by an asterisk ( ).
Page 498 of 738
Downloaded from www.Manualslib.com manuals search engine 54-2
IGNITION SWITCH*..................................6
IGNITION SWITCH.................................
SPECIAL TOOL...................................6
LIGHTING SYSTEM................................35
FOG LIGHT....................................105
FRONT COMBINATION LIGHT AND
OPTICAL HORN LENS.........................106
HAZARD SWITCH..............................
110
HEADLIGHT...................................103
HIGH MOUNTED STOP LIGHT..................107
ON-VEHICLE SERVICE.........................100
POP-UP SWITCH AND FOG LIGHT SWITCH....109
REAR COMBINATION LIGHT AND
LICENSE PLATE LIGHT........................106
RELAY........................................108
RHEOSTAT....................................
110
SPECIAL TOOLS................................36
SPECIFICATIONS...............................
35
General Specifications..........................35Service Specifications..........................35
TROUBLESHOOTING............................37
METERS AND GAUGES..............................9
COMBINATION GAUGES........................33
COMBINATION METERS.........................31
ON-VEHICLE SERVICE...........................26
SPECIFICATIONS.................................
9
General Specifications............................9Sealant........................................ll
Service Specifications...........................11
TROUBLESHOOTING............................12
RADIO AND TAPE PLAYER.......................124
CD AUTO CHANGER..........................191
RADIO AND TAPE PLAYER WITH ANTI-THEFTSYSTEM.......................................156
MOTOR ANTENNA/ANTENNA FEEDERCABLE/AMPLIFIER.............................188
RADIO AND TAPE PLAYER....................186
RADIO REMOTE-CONTROL*...................186
SPEAKER.....................................
187
TROUBLESHOOTING...........................
124
REAR WINDOW DEFOGGER. . . . . . . . . . . . . . . . . . . . . .192
DEFOGGER RELAY. . . . . . . . . . . . . . . . . . . . . . . . . . . .204
ON-VEHICLE SERVICE. . . . . . . . . . . . . . . . . ~ ~. . . . . .203
REAR WINDOW DEFOGGER SWITCH . . . . . . -. . . 203
SPECIAL TOOLS.. . . s.. . . . . . . . . . . . . . . . . . . . . . . . .192
TROUBLESHOOTING
. . . . . . . . . . . . . . . . . . . . . . . . . . .193
REAR WIPER AND WASHER . . ~ *. . Refer to GROUP 51
SEAT BELT (BUZZER). . . . . . . . . . . . Refer to GROUP 52A
SEAT BELT (TENSION-REDUCERTYPE SEAT BELT) . . . . . . . . . . . . . . . Refer to GROUP 52A
SUPPLEMENTAL RESTRAINTSYSTEM (SRS)..-...............Refer to GROUP 52B
THEFT-ALARM SYSTEM . . . . . . . . . . . . . . . . . e . . . . . m.. s205
SPECIAL TOOLS.. . . . . . . . . . . . . . . . . . . .
m . . . . . . . .e205
TROUBLESHOOTING . . . . . . . . . . . . . . . . . . . . . . . . . . .206
WINDSHIELD WIPER ANDWASHER. . . . . . . . . . . . . . . . . . . . . ~. . .Refer to GROUP 51
Page 499 of 738
Downloaded from www.Manualslib.com manuals search engine CHASSIS ELECTRICAL - Battery54-3
BATTERY
LSPECIFICATIONSGENERAL SPECIFICATIONS
ItemsUp to 1993 modelsFrom 1994 models
Type75D26R-MF75D23R-MF
Ampere hours
(5HR) Ah5252
Cranking rating [at -18°C (O’F)] A490520
Reserve capacity min.123118
NOTES
1.CRANKING RATING is the current a battery can deliver for 30 seconds and maintain a terminal voltage of
7.2 volts or greater at a specified temperature.
2.RESERVE CAPACITY RATING is the amount of time a battery can deliver 25A and maintain a minimum terminal
voltage of 10.5 at
27% (80°F).
L
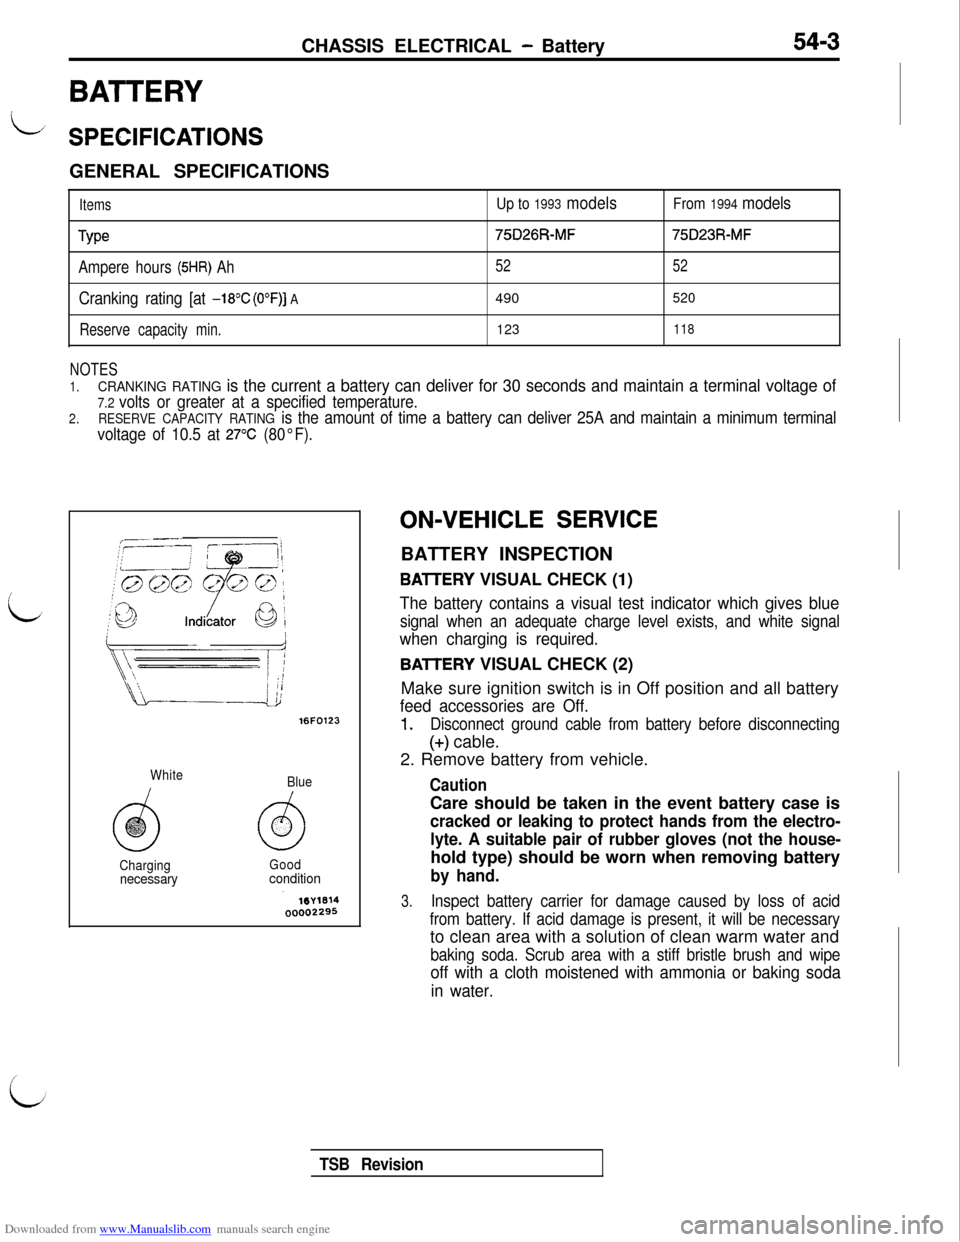
16FO123
White
Blue
ChargingGood
necessaryconditionON-VEHICLE
SERVICE
BATTERY INSPECTION
BAlTERY VISUAL CHECK (1)
The battery contains a visual test indicator which gives blue
signal when an adequate charge level exists, and white signal
when charging is required.
BAlTERY VISUAL CHECK (2)
Make sure ignition switch is in Off position and all battery
feed accessories are Off.
1.Disconnect ground cable from battery before disconnecting
(+) cable.
2. Remove battery from vehicle.
CautionCare should be taken in the event battery case is
cracked or leaking to protect hands from the electro-
lyte. A suitable pair of rubber gloves (not the house-hold type) should be worn when removing battery
by hand.
3.Inspect battery carrier for damage caused by loss of acid
from battery. If acid damage is present, it will be necessaryto clean area with a solution of clean warm water and
baking soda. Scrub area with a stiff bristle brush and wipe
off with a cloth moistened with ammonia or baking soda
in water.
TSB Revision
Page 500 of 738
Downloaded from www.Manualslib.com manuals search engine 54-4CHASSIS ELECTRICAL - Battery
4. Clean top of battery with same solutions as described
in step (3).
5.Inspect battery case and cover for cracks. If cracks are
present, battery must be replaced.
6.Clean the battery post with a suitable battery post cleaning
tool.7. Clean the inside surfaces of the terminal clamps with a
suitable battery terminal cleaning tool. Replace damaged
or frayed cables and broken terminals clamps.8. Install the battery in vehicle.
9.Connect (+) and (-) cables to battery in the order of men-
tion.
10. Tighten the clamp nut securely.BATTERY
CHARGLNG
Caution
When batteries are being charged, an explosive gas forms
beneath the cover of each cell. Do not smoke near batteries
on charge or which have recently been charged. Do notbreak live circuits at the terminals of the batteries on
charge. A spark will occur where the live circuit is broken.
Keep all open flames away from the battery.
Battery electrolyte temperature may temporarily be allowed
to rise to 55°C (131°F). Increase of electrolyte temperature
above 55°C (131 OF) is harmful to the battery, causing deforma-tion of battery cell, decrease in life of battery, etc.
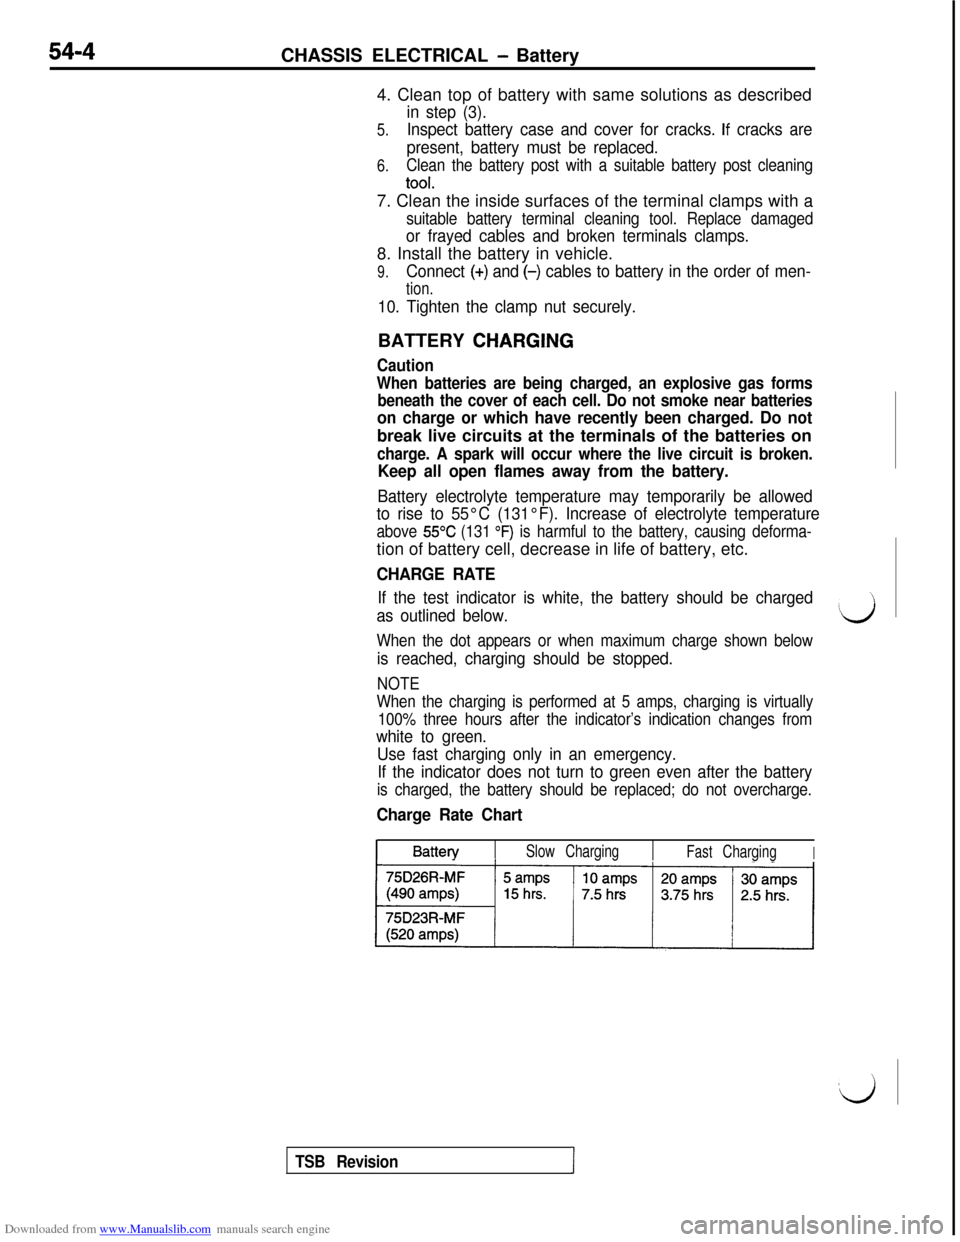
CHARGE RATE
If the test indicator is white, the battery should be charged
as outlined below.
When the dot appears or when maximum charge shown below
is reached, charging should be stopped.
NOTE
When the charging is performed at 5 amps, charging is virtually
100% three hours after the indicator’s indication changes from
white to green.
Use fast charging only in an emergency.
If the indicator does not turn to green even after the battery
is charged, the battery should be replaced; do not overcharge.
Charge Rate Chart
Batten/Slow Charging
Fast ChargingI
TSB RevisionI