ECU MITSUBISHI 380 2005 Workshop Manual
[x] Cancel search | Manufacturer: MITSUBISHI, Model Year: 2005, Model line: 380, Model: MITSUBISHI 380 2005Pages: 1500, PDF Size: 47.87 MB
Page 594 of 1500

CENTRALISED JUNCTION
CIRCUIT DIAGRAMS90-17
CENTRALISED RELAY
NOTE: The triangle mark on the relay housing should face that on the relay box.CONNECTOR NO. NAME CONNECTOR NO. NAME
A-05X Fog lamp relay A-16X
A-06X Horn relay B-11X
A-07XB-12X
A-08XB-13X
A-09XB-14X
A-10X Fan control relay B-15X
A-11X Front-ECU B-16X A/T control relay
A-12X Front-ECU B-17X
MPI relay
A-15X
B-18X A/C compressor clutch relay
Page 702 of 1500
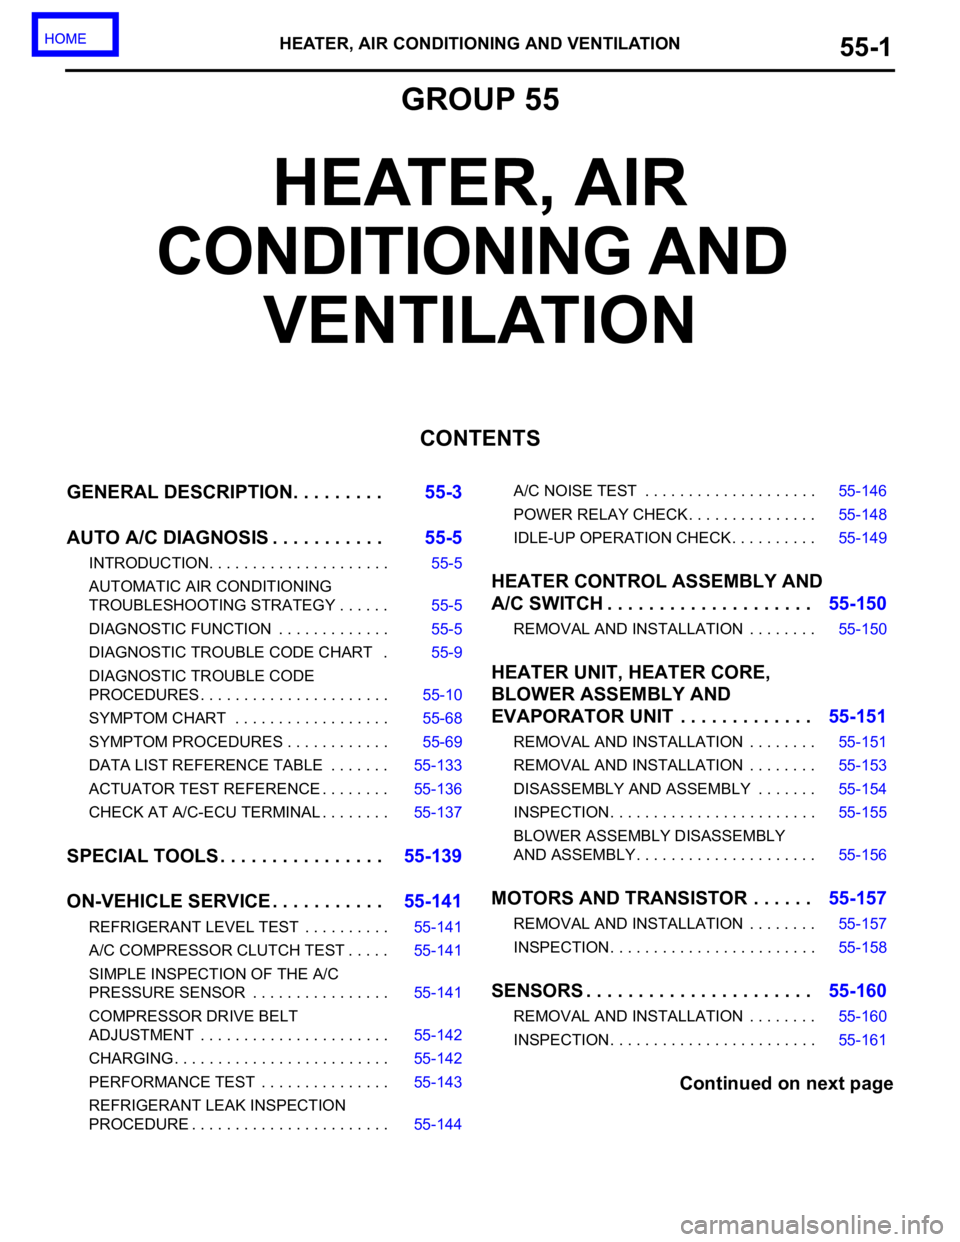
HEATER, AIR CONDITIONING AND VENTILATION55-1
GROUP 55
HEATER, AIR
CONDITIONING AND
VENTILATION
CONTENTS
GENERAL DESCRIPTION. . . . . . . . .55-3
AUTO A/C DIAGNOSIS . . . . . . . . . . .55-5
INTRODUCTION. . . . . . . . . . . . . . . . . . . . . 55-5
AUTOMATIC AIR CONDITIONING
TROUBLESHOOTING STRATEGY . . . . . . 55-5
DIAGNOSTIC FUNCTION . . . . . . . . . . . . . 55-5
DIAGNOSTIC TROUBLE CODE CHART . 55-9
DIAGNOSTIC TROUBLE CODE
PROCEDURES . . . . . . . . . . . . . . . . . . . . . . 55-10
SYMPTOM CHART . . . . . . . . . . . . . . . . . . 55-68
SYMPTOM PROCEDURES . . . . . . . . . . . . 55-69
DATA LIST REFERENCE TABLE . . . . . . . 55-133
ACTUATOR TEST REFERENCE . . . . . . . . 55-136
CHECK AT A/C-ECU TERMINAL . . . . . . . . 55-137
SPECIAL TOOLS . . . . . . . . . . . . . . . .55-139
ON-VEHICLE SERVICE . . . . . . . . . . .55-141
REFRIGERANT LEVEL TEST . . . . . . . . . . 55-141
A/C COMPRESSOR CLUTCH TEST . . . . . 55-141
SIMPLE INSPECTION OF THE A/C
PRESSURE SENSOR . . . . . . . . . . . . . . . . 55-141
COMPRESSOR DRIVE BELT
ADJUSTMENT . . . . . . . . . . . . . . . . . . . . . . 55-142
CHARGING . . . . . . . . . . . . . . . . . . . . . . . . . 55-142
PERFORMANCE TEST . . . . . . . . . . . . . . . 55-143
REFRIGERANT LEAK INSPECTION
PROCEDURE . . . . . . . . . . . . . . . . . . . . . . . 55-144A/C NOISE TEST . . . . . . . . . . . . . . . . . . . . 55-146
POWER RELAY CHECK . . . . . . . . . . . . . . . 55-148
IDLE-UP OPERATION CHECK . . . . . . . . . . 55-149
HEATER CONTROL ASSEMBLY AND
A/C SWITCH . . . . . . . . . . . . . . . . . . . .55-150
REMOVAL AND INSTALLATION . . . . . . . . 55-150
HEATER UNIT, HEATER CORE,
BLOWER ASSEMBLY AND
EVAPORATOR UNIT . . . . . . . . . . . . .55-151
REMOVAL AND INSTALLATION . . . . . . . . 55-151
REMOVAL AND INSTALLATION . . . . . . . . 55-153
DISASSEMBLY AND ASSEMBLY . . . . . . . 55-154
INSPECTION. . . . . . . . . . . . . . . . . . . . . . . . 55-155
BLOWER ASSEMBLY DISASSEMBLY
AND ASSEMBLY . . . . . . . . . . . . . . . . . . . . . 55-156
MOTORS AND TRANSISTOR . . . . . .55-157
REMOVAL AND INSTALLATION . . . . . . . . 55-157
INSPECTION. . . . . . . . . . . . . . . . . . . . . . . . 55-158
SENSORS . . . . . . . . . . . . . . . . . . . . . .55-160
REMOVAL AND INSTALLATION . . . . . . . . 55-160
INSPECTION. . . . . . . . . . . . . . . . . . . . . . . . 55-161
Continued on next page
Page 705 of 1500

GENERAL DESCRIPTION
HEATER, AIR CONDITIONING AND VENTILATION55-4
OPERATION
.
CONDENSER FAN AND RADIATOR FAN
CONTROL
The ECU judges the required revolution speed of
radiator fan motor and condenser fan motor using
the input signals transmitted from A/C switch, output
shaft speed sensor and engine coolant temperature
sensor. The ECU activates the fan control relays to
drive the radiator fan motor and condenser fan
motor.
.
COMPRESSOR CONTROL
When operating the air conditioning switch
The air thermo sensor, which senses the temper-
ature of the air flowing out of the evaporator,
deactivates the compressor at 3
C (37.4F) or
below.
The dual pressure switch turns OFF when the
refrigerant pressure becomes excessively high or
low, thus protecting the compressor circuit (See
Table below).
When the air thermo sensor is activated, and the
ignition switch, blower switch, and air condition-
ing switch are ON, the A/C compressor clutch
relay is energized.
When operating the mode selection dial
The air conditioning will work when the mode
selection dial is set to the "Defroster" or
"Defroster/foot" position, or the temperature con-
trol dial is set to the "MAX A/C" position. In other
dial positions, when the air conditioning switch is
turned on, the air conditioning will work.
A/C Compressor Clutch Relay ON Conditions
Ignition switch (IG2) ONNOTE: A/C compressor clutch relay is
de-energized when any one switch, sensor
or control unit shown on the left turns off.
NOTE: The components marked by
*
communicate with the ECU. If the air thermo
sensor detects a temperature of 3
C
(37.4
F), the A/C-ECU will turn off the A/C
compressor clutch relay. Blower switch ON
Air conditioning switch, mode selection dial
defroster, defroster/foot position or temperature
control MAX A/CON
Air thermo sensor*
Pressure detected
by A/C pressure
sensor2940 kPa or less (If the
refrigerant pressure exceeds
2940 kPa, A/C compressor
clutch relay is not ON
condition until the refrigerant
pressure has been measured
up to 2350 kPa or less.)ON
190 kPa or more (If the
refrigerant pressure falls short
of 190 kPa, A/C compressor
clutch relay is not ON
condition until the refrigerant
pressure has been measured
up to 220 kPa or more.)
A/C compressor clutch relay driving transistor (within
ecu)ON
Page 711 of 1500
AUTO A/C DIAGNOSIS
HEATER, AIR CONDITIONING AND VENTILATION55-10
DIAGNOSTIC TROUBLE CODE PROCEDURES
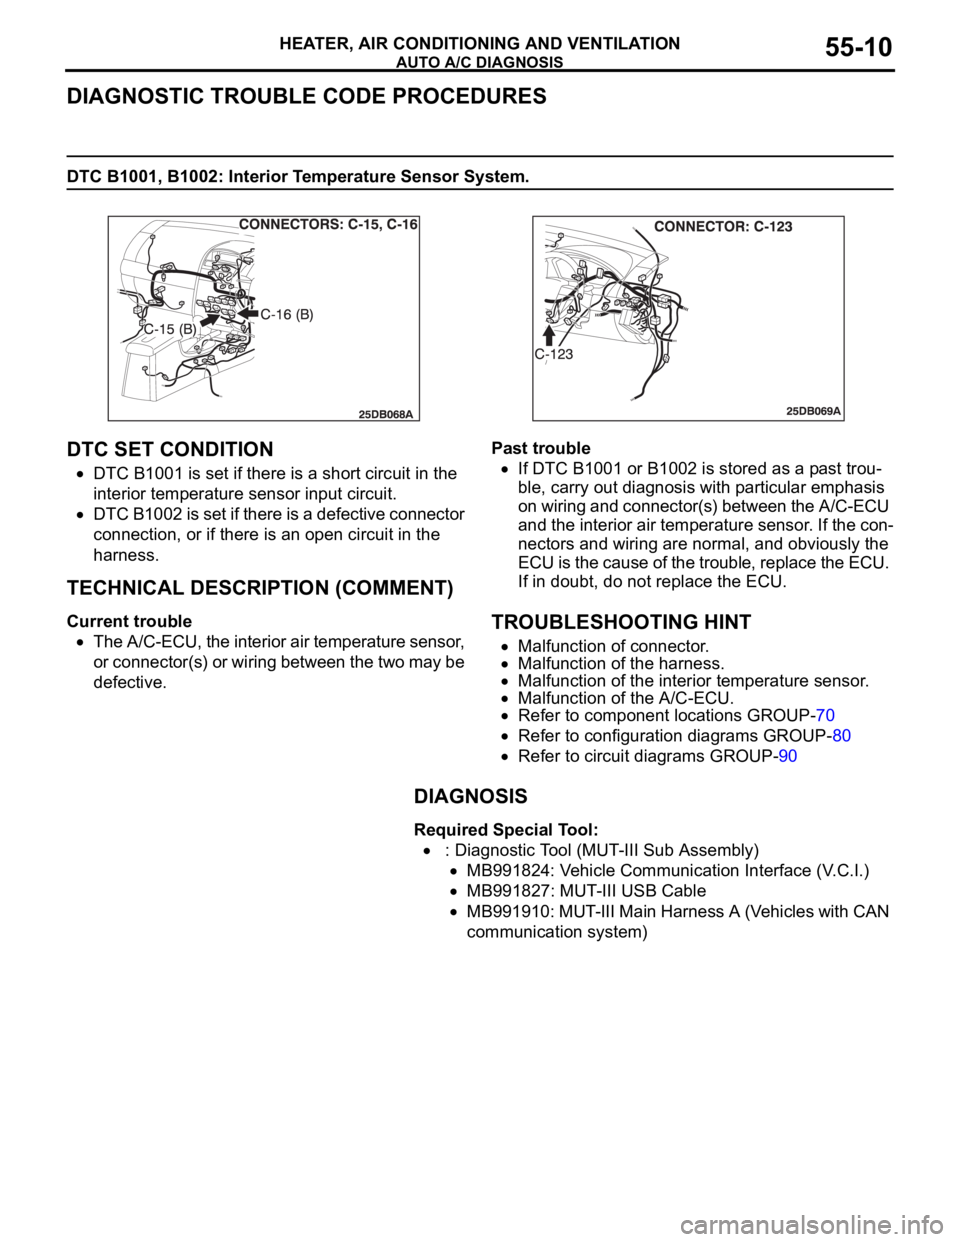
DTC B1001, B1002: Interior Temperature Sensor System.
DTC SET CONDITION
DTC B1001 is set if there is a short circuit in the
interior temperature sensor input circuit.
DTC B1002 is set if there is a defective connector
connection, or if there is an open circuit in the
harness.
.
TECHNICAL DESCRIPTION (COMMENT)
Current trouble
The A/C-ECU, the interior air temperature sensor,
or connector(s) or wiring between the two may be
defective.Past trouble
If DTC B1001 or B1002 is stored as a past trou-
ble, carry out diagnosis with particular emphasis
on wiring and connector(s) between the A/C-ECU
and the interior air temperature sensor. If the con-
nectors and wiring are normal, and obviously the
ECU is the cause of the trouble, replace the ECU.
If in doubt, do not replace the ECU.
.
TROUBLESHOOTING HINT
Malfunction of connector.
Malfunction of the harness.
Malfunction of the interior temperature sensor.
Malfunction of the A/C-ECU.
Refer to component locations GROUP-70
Refer to configuration diagrams GROUP-80
Refer to circuit diagrams GROUP-90
DIAGNOSIS
Required Special Tool:
: Diagnostic Tool (MUT-III Sub Assembly)
MB991824: Vehicle Communication Interface (V.C.I.)
MB991827: MUT-III USB Cable
MB991910: MUT-III Main Harness A (Vehicles with CAN
communication system)
Page 713 of 1500
AUTO A/C DIAGNOSIS
HEATER, AIR CONDITIONING AND VENTILATION55-12
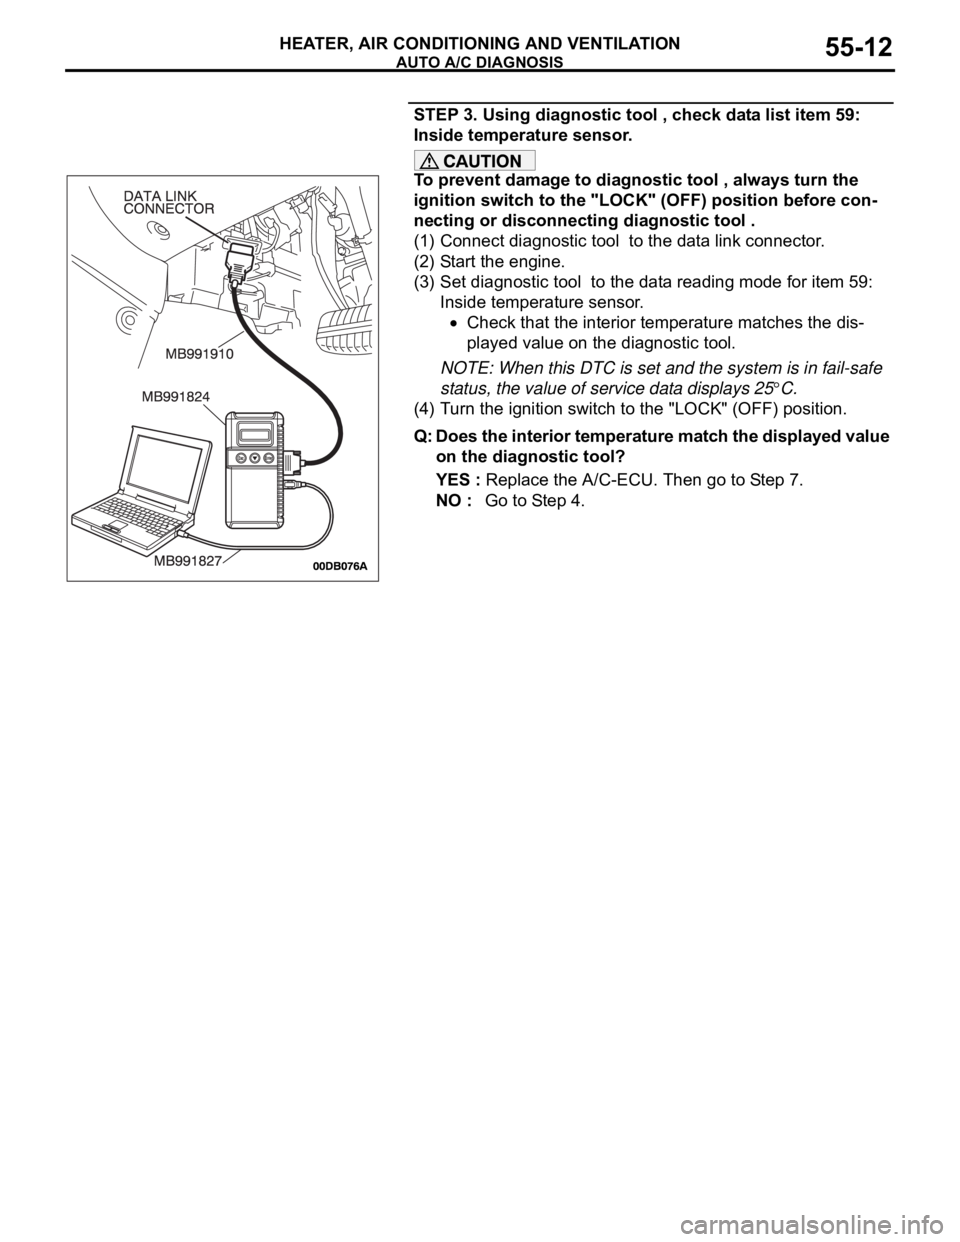
STEP 3. Using diagnostic tool , check data list item 59:
Inside temperature sensor.
To prevent damage to diagnostic tool , always turn the
ignition switch to the "LOCK" (OFF) position before con-
necting or disconnecting diagnostic tool .
(1) Connect diagnostic tool to the data link connector.
(2) Start the engine.
(3) Set diagnostic tool to the data reading mode for item 59:
Inside temperature sensor.
Check that the interior temperature matches the dis-
played value on the diagnostic tool.
NOTE: When this DTC is set and the system is in fail-safe
status, the value of service data displays 25
C.
(4) Turn the ignition switch to the "LOCK" (OFF) position.
Q: Does the interior temperature match the displayed value
on the diagnostic tool?
YES : Replace the A/C-ECU. Then go to Step 7.
NO : Go to Step 4.
Page 714 of 1500
AUTO A/C DIAGNOSIS
HEATER, AIR CONDITIONING AND VENTILATION55-13
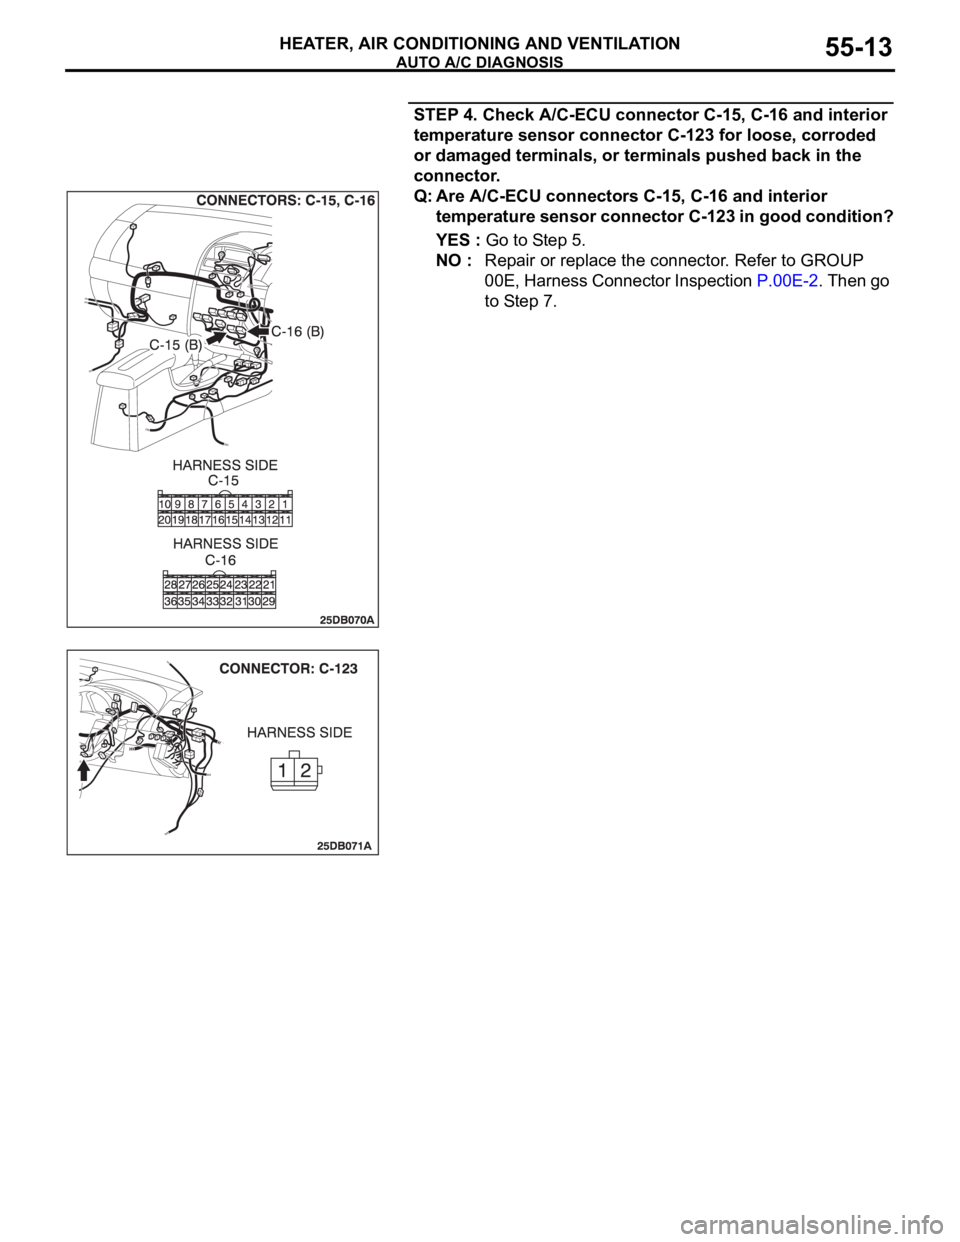
STEP 4. Check A/C-ECU connector C-15, C-16 and interior
temperature sensor connector C-123 for loose, corroded
or damaged terminals, or terminals pushed back in the
connector.
Q: Are A/C-ECU connectors C-15, C-16 and interior
temperature sensor connector C-123 in good condition?
YES : Go to Step 5.
NO : Repair or replace the connector. Refer to GROUP
00E, Harness Connector Inspection P.00E-2. Then go
to Step 7.
Page 715 of 1500
AUTO A/C DIAGNOSIS
HEATER, AIR CONDITIONING AND VENTILATION55-14
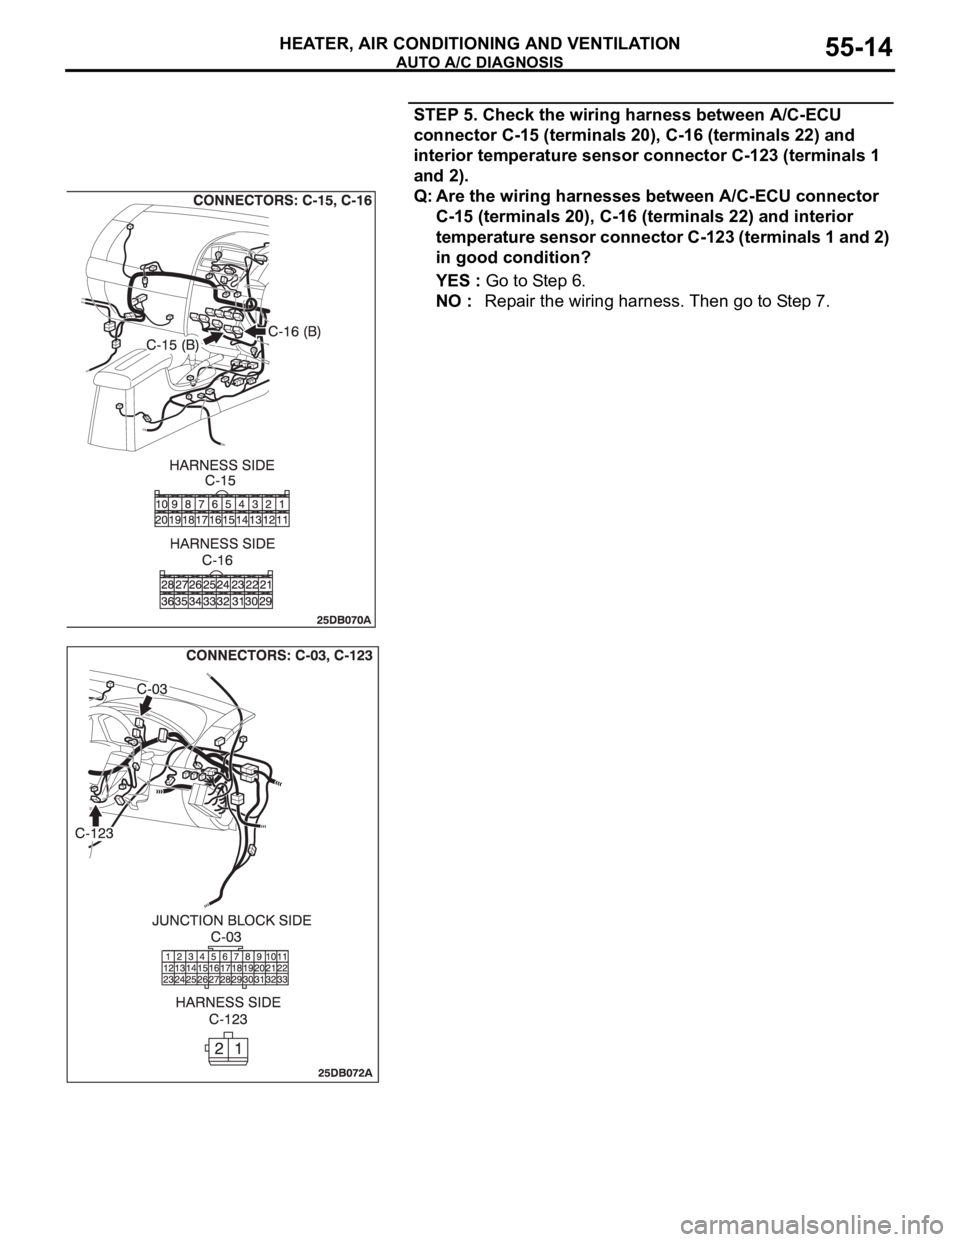
STEP 5. Check the wiring harness between A/C-ECU
connector C-15 (terminals 20), C-16 (terminals 22) and
interior temperature sensor connector C-123 (terminals 1
and 2).
Q: Are the wiring harnesses between A/C-ECU connector
C-15 (terminals 20), C-16 (terminals 22) and interior
temperature sensor connector C-123 (terminals 1 and 2)
in good condition?
YES : Go to Step 6.
NO : Repair the wiring harness. Then go to Step 7.
Page 716 of 1500
AUTO A/C DIAGNOSIS
HEATER, AIR CONDITIONING AND VENTILATION55-15
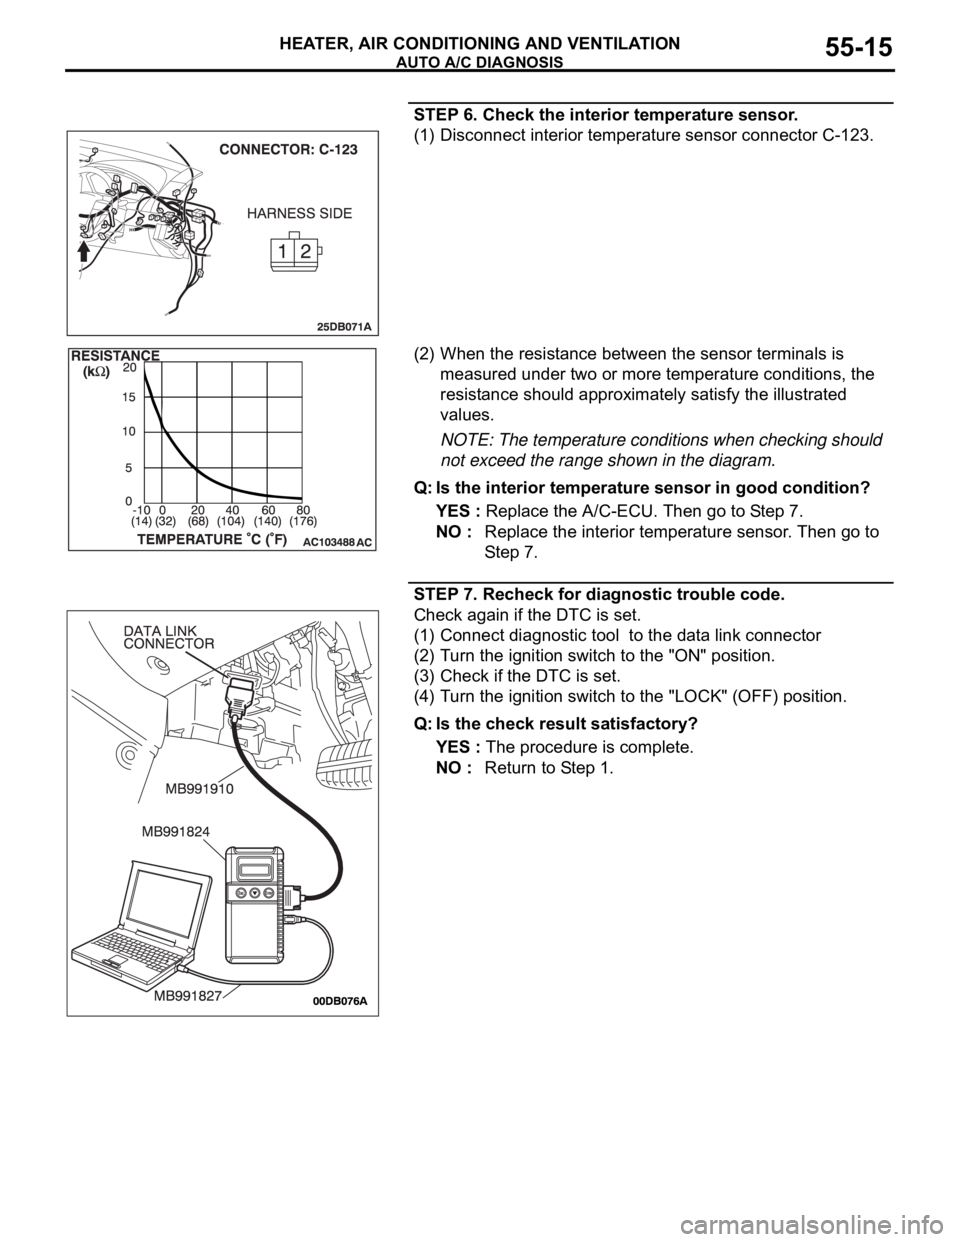
STEP 6. Check the interior temperature sensor.
(1) Disconnect interior temperature sensor connector C-123.
(2) When the resistance between the sensor terminals is
measured under two or more temperature conditions, the
resistance should approximately satisfy the illustrated
values.
NOTE: The temperature conditions when checking should
not exceed the range shown in the diagram.
Q: Is the interior temperature sensor in good condition?
YES : Replace the A/C-ECU. Then go to Step 7.
NO : Replace the interior temperature sensor. Then go to
St e p 7 .
STEP 7. Recheck for diagnostic trouble code.
Check again if the DTC is set.
(1) Connect diagnostic tool to the data link connector
(2) Turn the ignition switch to the "ON" position.
(3) Check if the DTC is set.
(4) Turn the ignition switch to the "LOCK" (OFF) position.
Q: Is the check result satisfactory?
YES : The procedure is complete.
NO : Return to Step 1.
Page 717 of 1500
AUTO A/C DIAGNOSIS
HEATER, AIR CONDITIONING AND VENTILATION55-16
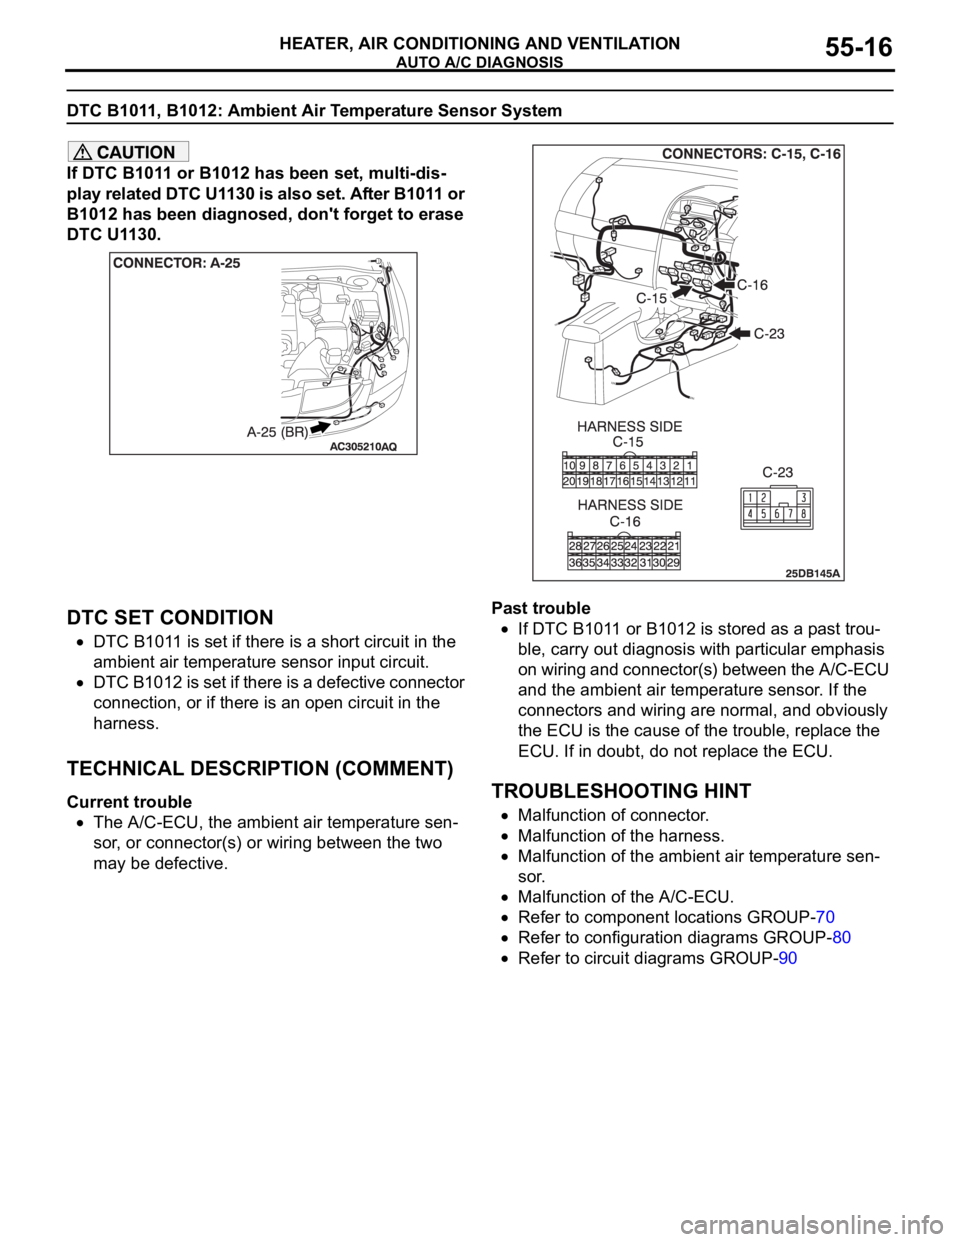
DTC B1011, B1012: Ambient Air Temperature Sensor System
If DTC B1011 or B1012 has been set, multi-dis-
play related DTC U1130 is also set. After B1011 or
B1012 has been diagnosed, don't forget to erase
DTC U1130.
.
DTC SET CONDITION
DTC B1011 is set if there is a short circuit in the
ambient air temperature sensor input circuit.
DTC B1012 is set if there is a defective connector
connection, or if there is an open circuit in the
harness.
.
TECHNICAL DESCRIPTION (COMMENT)
Current trouble
The A/C-ECU, the ambient air temperature sen-
sor, or connector(s) or wiring between the two
may be defective.Past trouble
If DTC B1011 or B1012 is stored as a past trou-
ble, carry out diagnosis with particular emphasis
on wiring and connector(s) between the A/C-ECU
and the ambient air temperature sensor. If the
connectors and wiring are normal, and obviously
the ECU is the cause of the trouble, replace the
ECU. If in doubt, do not replace the ECU.
TROUBLESHOOTING HINT
Malfunction of connector.
Malfunction of the harness.
Malfunction of the ambient air temperature sen-
sor.
Malfunction of the A/C-ECU.
Refer to component locations GROUP-70
Refer to configuration diagrams GROUP-80
Refer to circuit diagrams GROUP-90
Page 719 of 1500
AUTO A/C DIAGNOSIS
HEATER, AIR CONDITIONING AND VENTILATION55-18
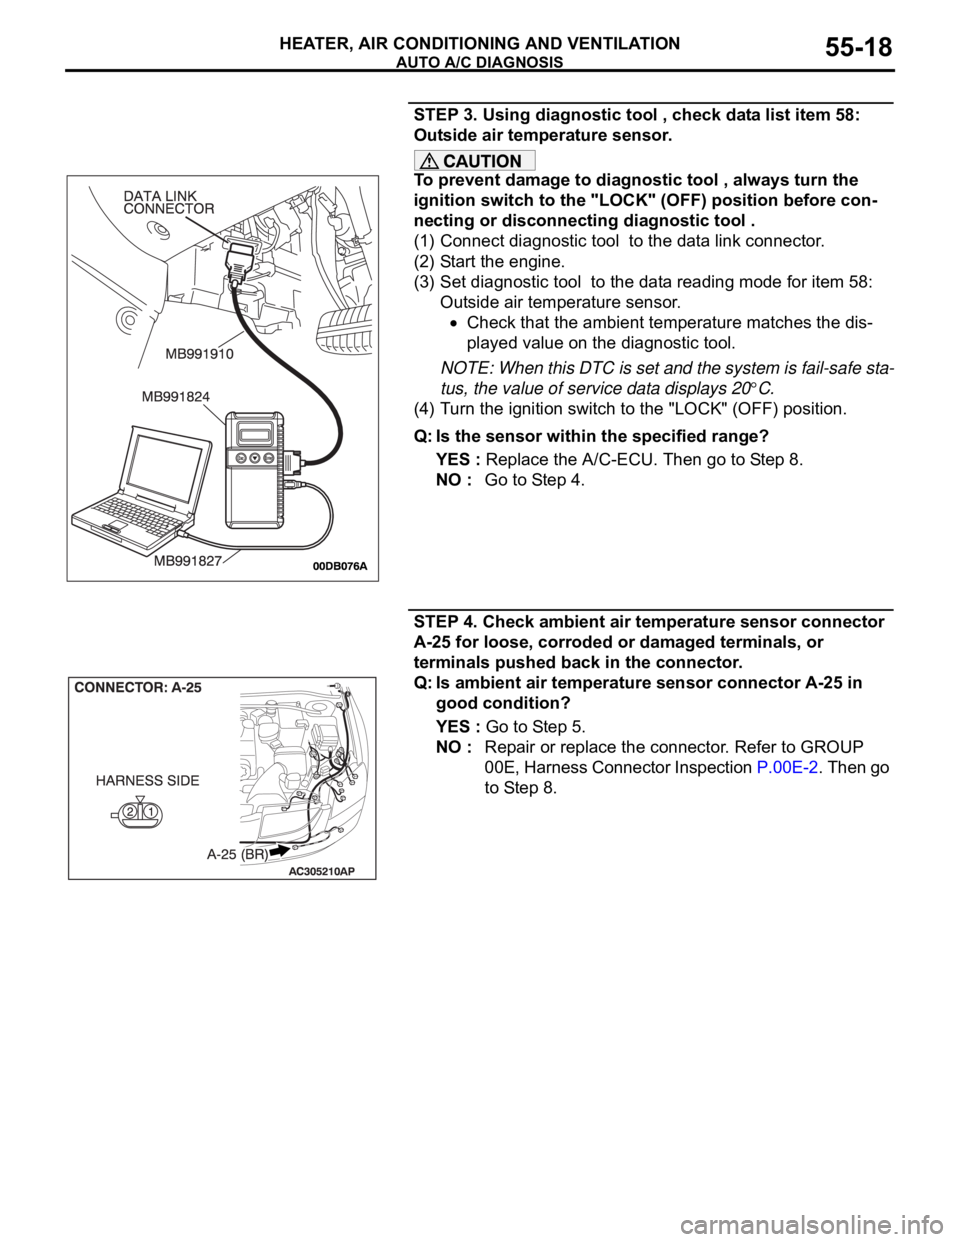
STEP 3. Using diagnostic tool , check data list item 58:
Outside air temperature sensor.
To prevent damage to diagnostic tool , always turn the
ignition switch to the "LOCK" (OFF) position before con-
necting or disconnecting diagnostic tool .
(1) Connect diagnostic tool to the data link connector.
(2) Start the engine.
(3) Set diagnostic tool to the data reading mode for item 58:
Outside air temperature sensor.
Check that the ambient temperature matches the dis-
played value on the diagnostic tool.
NOTE: When this DTC is set and the system is fail-safe sta-
tus, the value of service data displays 20
C.
(4) Turn the ignition switch to the "LOCK" (OFF) position.
Q: Is the sensor within the specified range?
YES : Replace the A/C-ECU. Then go to Step 8.
NO : Go to Step 4.
STEP 4. Check ambient air temperature sensor connector
A-25 for loose, corroded or damaged terminals, or
terminals pushed back in the connector.
Q: Is ambient air temperature sensor connector A-25 in
good condition?
YES : Go to Step 5.
NO : Repair or replace the connector. Refer to GROUP
00E, Harness Connector Inspection P.00E-2. Then go
to Step 8.