spare wheel MITSUBISHI ASX 2009 1.G Owners Manual
[x] Cancel search | Manufacturer: MITSUBISHI, Model Year: 2009, Model line: ASX, Model: MITSUBISHI ASX 2009 1.GPages: 368, PDF Size: 8.13 MB
Page 11 of 368
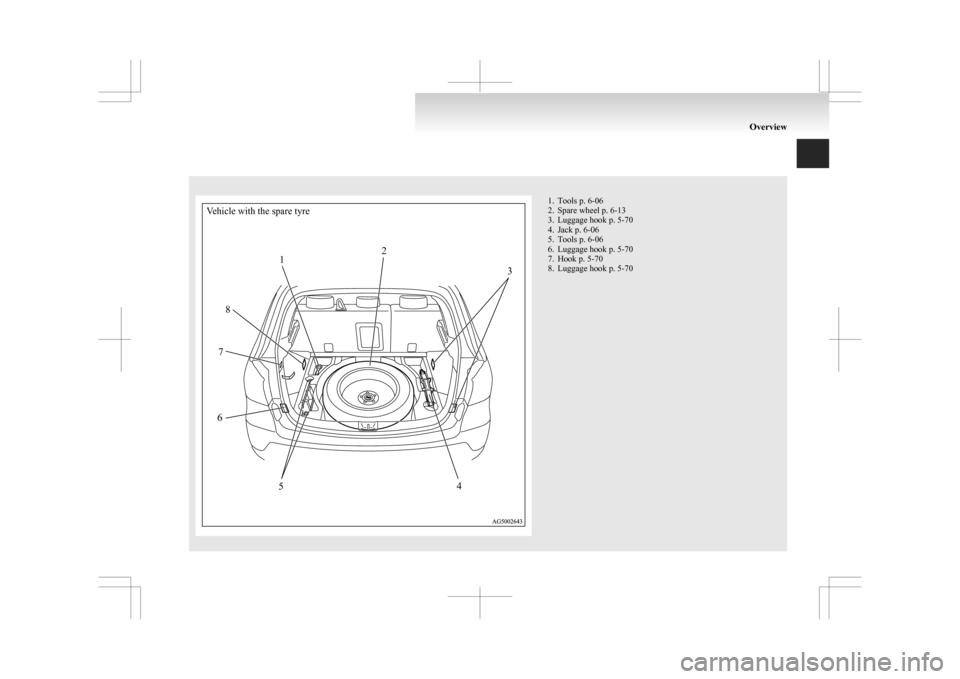
Vehicle with the spare tyre1 2
3
4
5
6
7
8 1. Tools p. 6-06
2.
Spare wheel p. 6-13
3. Luggage hook p. 5-70
4. Jack p. 6-06
5. Tools p. 6-06
6. Luggage hook p. 5-70
7. Hook p. 5-70
8. Luggage hook p. 5-70 Overview
Page 194 of 368
NOTE
l The
combination of items shown on the dis-
play varies depending on the vehicle model. CAUTION
l
When display/indicator blinks, ASC is
operating,
which means that the road is
slippery or that your vehicle’s wheels are
beginning to slip. If this happens, drive
slower with less accelerator input.
l If the temperature in the braking system
continues to increase due to continuous
brake control on a slippery road surface,
the display/indicator will blink. To pre-
vent
the brake system from overheating,
the brake control of the traction control
function will be temporarily suspended.
The engine control of the traction control
function and normal brake operation will
not be affected. Park your vehicle in a
safe place. When the temperature in the
braking system has come down, the dis-
play/indicator
will be turned off and the
traction control function will start operat-
ing again.
NOTE l The display/indicator may turn on when
you
start the engine. This means that the bat-
tery voltage momentarily dropped when the
engine was started. It does not indicate a mal-
function, provided that the display goes out
immediately. l
When
a compact spare tyre has been put on
your vehicle, the gripping ability of the tyre
will be lower, making it more likely that the display/indicator will blink.
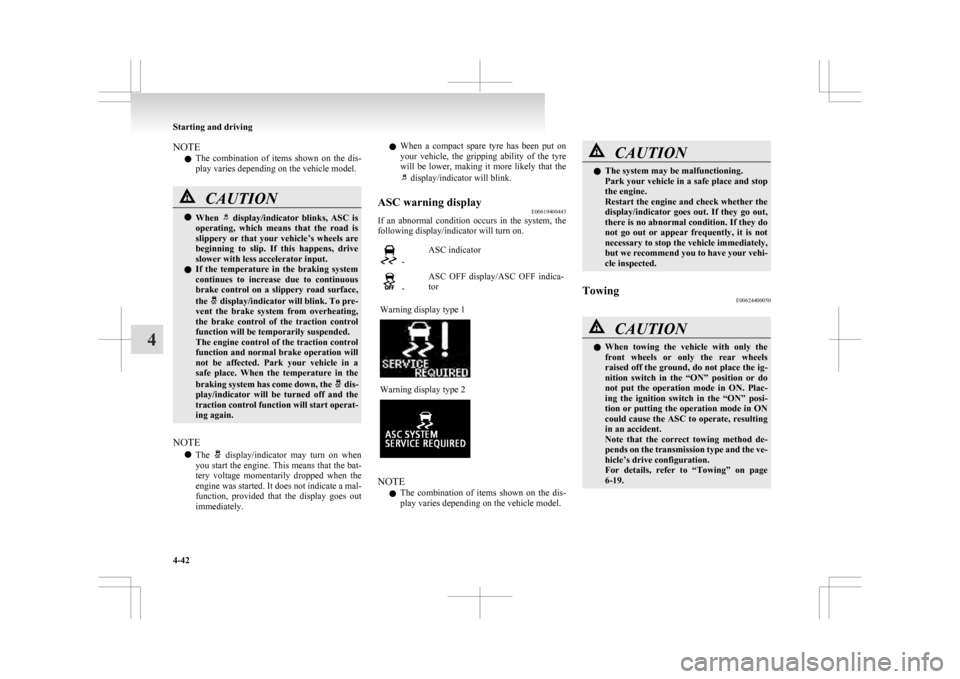
ASC warning display E00619400443
If an abnormal condition occurs in the system, the
following display/indicator will turn on. -
ASC indicator -
ASC OFF display/ASC OFF indica-
tor
Warning display type 1 Warning display type 2
NOTE
l The
combination of items shown on the dis-
play varies depending on the vehicle model. CAUTION
l
The system may be malfunctioning.
Park
your vehicle in a safe place and stop
the engine.
Restart the engine and check whether the
display/indicator goes out. If they go out,
there is no abnormal condition. If they do
not go out or appear frequently, it is not
necessary to stop the vehicle immediately,
but we recommend you to have your vehi-
cle inspected.
Towing E00624400050 CAUTION
l
When
towing the vehicle with only the
front wheels or only the rear wheels
raised off the ground, do not place the ig-
nition switch in the “ON” position or do
not put the operation mode in ON. Plac-
ing the ignition switch in the “ON” posi-
tion or putting the operation mode in ON
could cause the ASC to operate, resulting
in an accident.
Note that the correct towing method de-
pends on the transmission type and the ve-
hicle’s drive configuration.
For details, refer to “Towing” on page
6-19. Starting and driving
4-42
4
Page 284 of 368
Tools, jack and tyre repair kit
E00800901278
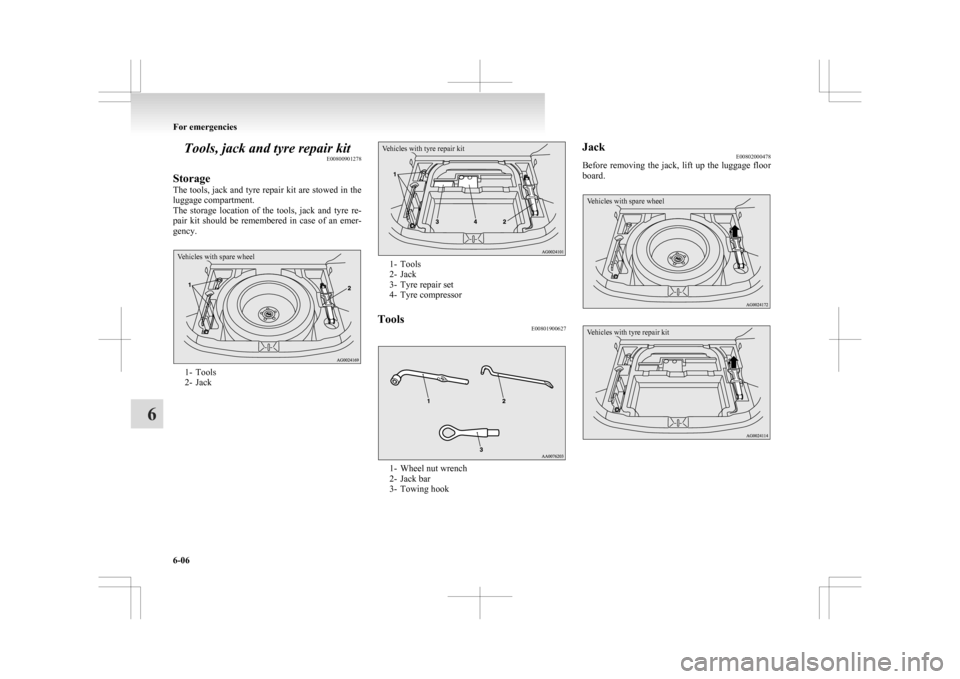
Storage
The
tools, jack and tyre repair kit are stowed in the
luggage compartment.
The storage location of the tools, jack and tyre re-
pair kit should be remembered in case of an emer-
gency.
Vehicles with spare wheel 1- Tools
2-
Jack
Vehicles with tyre repair kit 1- Tools
2-
Jack
3- Tyre repair set
4- Tyre compressor
Tools E00801900627 1- Wheel nut wrench
2-
Jack bar
3- Towing hook Jack
E00802000478
Before
removing the jack, lift up the luggage floor
board.
Vehicles with spare wheel
Vehicles with tyre repair kit For emergencies
6-06
6
Page 285 of 368
Tyre repair kit*
E00802200265
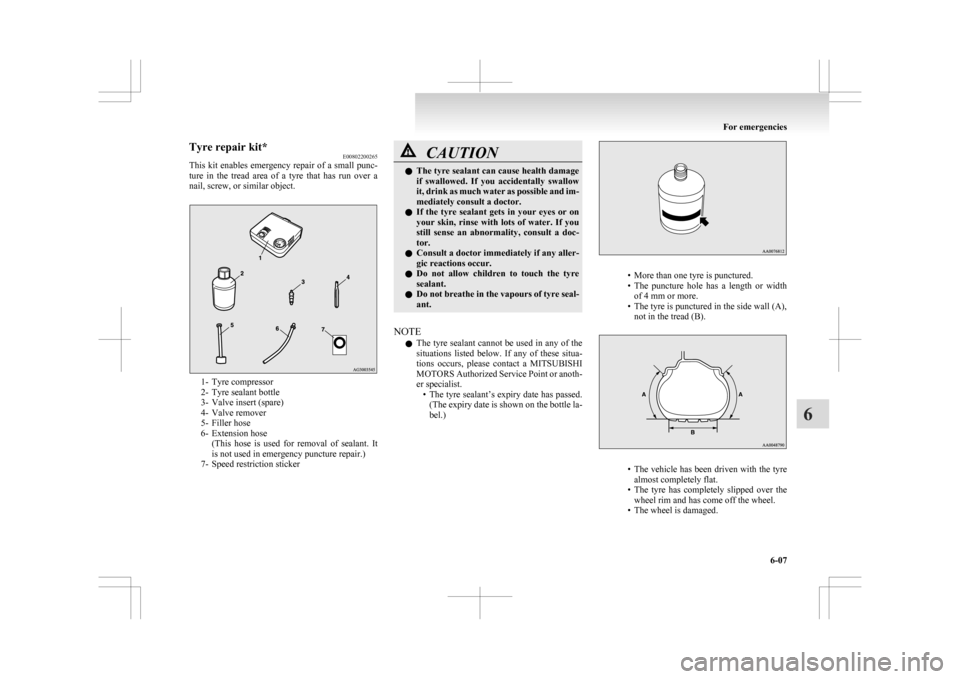
This
kit enables emergency repair of a small punc-
ture in the tread area of a tyre that has run over a
nail, screw, or similar object. 1- Tyre compressor
2-
Tyre sealant bottle
3- Valve insert (spare)
4- Valve remover
5- Filler hose
6- Extension hose (This hose is used for removal of sealant. It
is not used in emergency puncture repair.)
7- Speed restriction sticker CAUTION
l
The
tyre sealant can cause health damage
if swallowed. If you accidentally swallow
it, drink as much water as possible and im-
mediately consult a doctor.
l If the tyre sealant gets in your eyes or on
your skin, rinse with lots of water. If you
still sense an abnormality, consult a doc-
tor.
l Consult a doctor immediately if any aller-
gic reactions occur.
l Do not allow children to touch the tyre
sealant.
l Do not breathe in the vapours of tyre seal-
ant.
NOTE l The
tyre sealant cannot be used in any of the
situations listed below. If any of these situa-
tions occurs, please contact a MITSUBISHI
MOTORS Authorized Service Point or anoth-
er specialist. • The tyre sealant’s expiry date has passed.(The expiry date is shown on the bottle la-
bel.) • More than one tyre is punctured.
• The
puncture hole has a length or width
of 4 mm or more.
• The tyre is punctured in the side wall (A), not in the tread (B). • The
vehicle has been driven with the tyre
almost completely flat.
• The tyre has completely slipped over the wheel rim and has come off the wheel.
• The wheel is damaged. For emergencies
6-07 6
Page 291 of 368
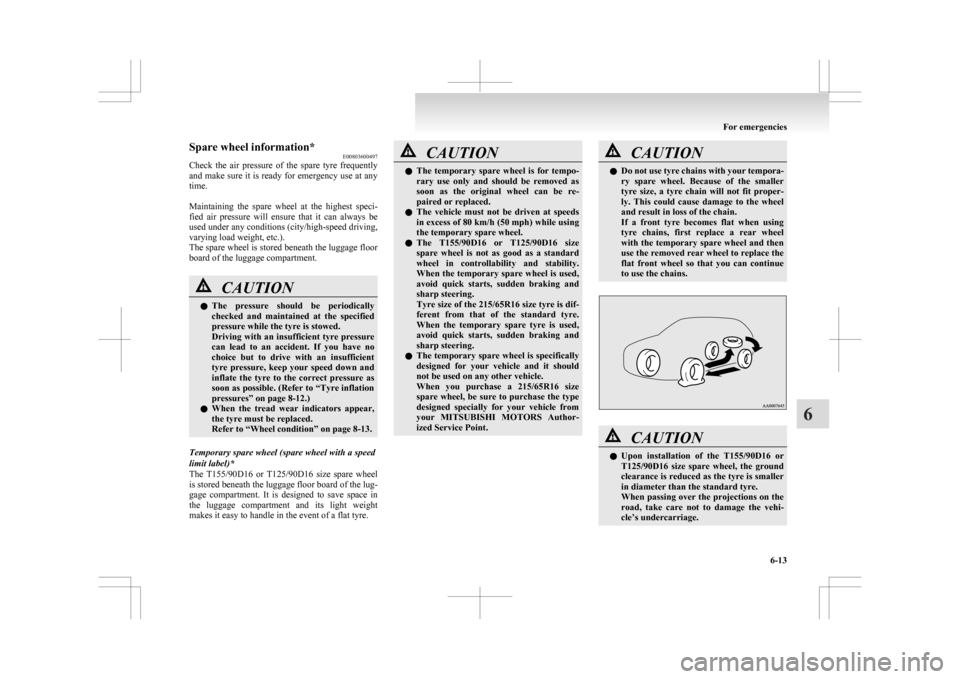
Spare wheel information*
E00803600497
Check
the air pressure of the spare tyre frequently
and make sure it is ready for emergency use at any
time.
Maintaining the spare wheel at the highest speci-
fied air pressure will ensure that it can always be
used under any conditions (city/high-speed driving,
varying load weight, etc.).
The spare wheel is stored beneath the luggage floor
board of the luggage compartment. CAUTION
l
The
pressure should be periodically
checked and maintained at the specified
pressure while the tyre is stowed.
Driving with an insufficient tyre pressure
can lead to an accident. If you have no
choice but to drive with an insufficient
tyre pressure, keep your speed down and
inflate the tyre to the correct pressure as
soon as possible. (Refer to “Tyre inflation
pressures” on page 8-12.)
l When the tread wear indicators appear,
the tyre must be replaced.
Refer to “Wheel condition” on page 8-13.
Temporary spare wheel (spare wheel with a speed
limit label)*
The T155/90D16
or T125/90D16 size spare wheel
is stored beneath the luggage floor board of the lug-
gage compartment. It is designed to save space in
the luggage compartment and its light weight
makes it easy to handle in the event of a flat tyre. CAUTION
l
The
temporary spare wheel is for tempo-
rary use only and should be removed as
soon as the original wheel can be re-
paired or replaced.
l The vehicle must not be driven at speeds
in excess of 80 km/h (50 mph) while using
the temporary spare wheel.
l The T155/90D16 or T125/90D16 size
spare wheel is not as good as a standard
wheel in controllability and stability.
When the temporary spare wheel is used,
avoid quick starts, sudden braking and
sharp steering.
Tyre size of the 215/65R16 size tyre is dif-
ferent from that of the standard tyre.
When the temporary spare tyre is used,
avoid quick starts, sudden braking and
sharp steering.
l The temporary spare wheel is specifically
designed for your vehicle and it should
not be used on any other vehicle.
When you purchase a 215/65R16 size
spare wheel, be sure to purchase the type
designed specially for your vehicle from
your MITSUBISHI MOTORS Author-
ized Service Point. CAUTION
l
Do not use tyre chains with your tempora-
ry spare wheel. Because of the smaller
tyre size, a tyre chain will not fit proper-
ly. This could cause damage to the wheel
and result in loss of the chain.
If a front tyre becomes flat when using
tyre chains, first replace a rear wheel
with the temporary spare wheel and then
use the removed rear wheel to replace the
flat front wheel so that you can continue
to use the chains. CAUTION
l
Upon
installation of the T155/90D16 or
T125/90D16 size spare wheel, the ground
clearance is reduced as the tyre is smaller
in diameter than the standard tyre.
When passing over the projections on the
road, take care not to damage the vehi-
cle’s undercarriage. For emergencies
6-13 6
Page 292 of 368
CAUTION
l
Do not install more than one temporary
spare wheel at the same time.
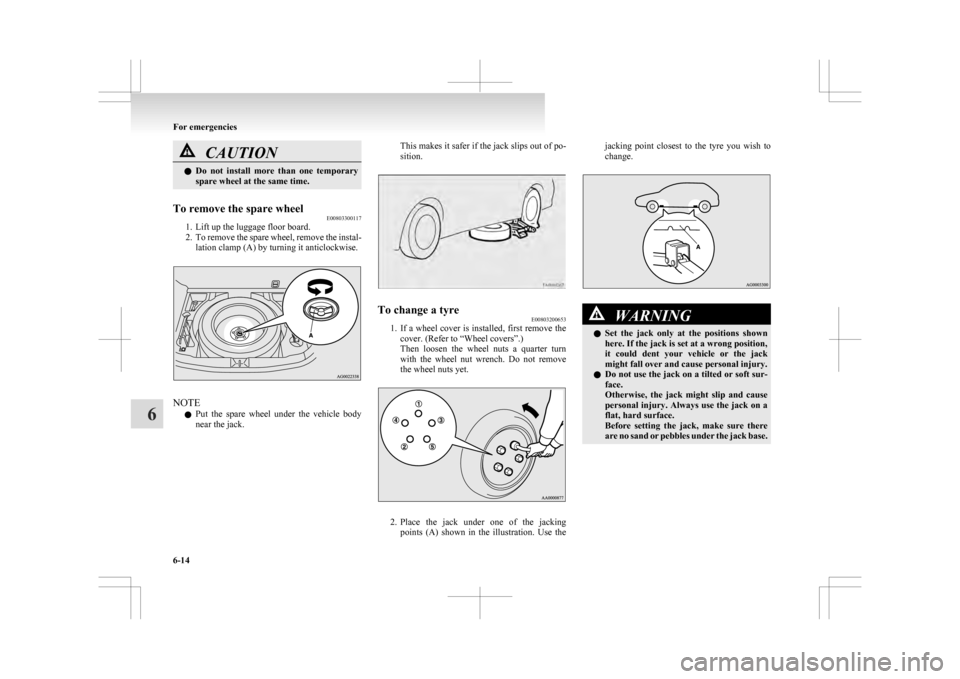
To remove the spare wheel E00803300117
1. Lift up the luggage floor board.
2. To
remove the spare wheel, remove the instal-
lation clamp (A) by turning it anticlockwise. NOTE
l Put
the spare wheel under the vehicle body
near the jack. This makes it safer if the jack slips out of po-
sition.
To change a tyre
E00803200653
1. If
a wheel cover is installed, first remove the
cover. (Refer to “Wheel covers”.)
Then loosen the wheel nuts a quarter turn
with the wheel nut wrench. Do not remove
the wheel nuts yet. 2. Place
the jack under one of the jacking
points (A) shown in the illustration. Use the jacking point closest to the tyre you wish to
change.
WARNING
l Set
the jack only at the positions shown
here. If the jack is set at a wrong position,
it could dent your vehicle or the jack
might fall over and cause personal injury.
l Do not use the jack on a tilted or soft sur-
face.
Otherwise, the jack might slip and cause
personal injury. Always use the jack on a
flat, hard surface.
Before setting the jack, make sure there
are no sand or pebbles under the jack base. For emergencies
6-14
6
Page 293 of 368
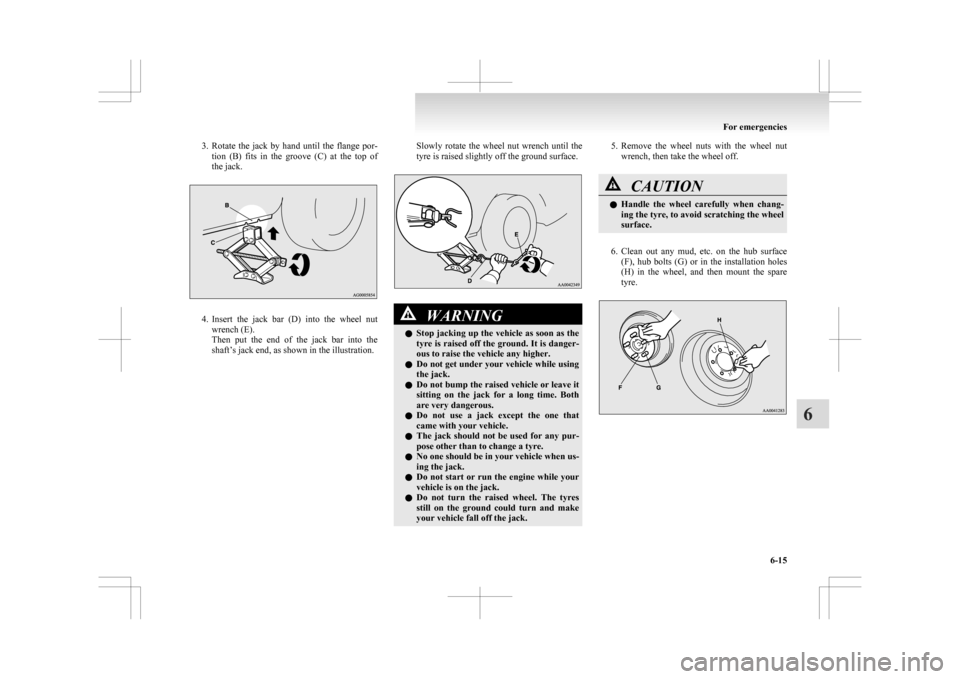
3. Rotate the jack by hand until the flange por-
tion (B) fits in the groove (C) at the top of
the jack. 4. Insert
the jack bar (D) into the wheel nut
wrench (E).
Then put the end of the jack bar into the
shaft’s jack end, as shown in the illustration. Slowly rotate the wheel nut wrench until the
tyre is raised slightly off the ground surface. WARNING
l Stop
jacking up the vehicle as soon as the
tyre is raised off the ground. It is danger-
ous to raise the vehicle any higher.
l Do not get under your vehicle while using
the jack.
l Do not bump the raised vehicle or leave it
sitting on the jack for a long time. Both
are very dangerous.
l Do not use a jack except the one that
came with your vehicle.
l The jack should not be used for any pur-
pose other than to change a tyre.
l No one should be in your vehicle when us-
ing the jack.
l Do not start or run the engine while your
vehicle is on the jack.
l Do not turn the raised wheel. The tyres
still on the ground could turn and make
your vehicle fall off the jack. 5. Remove
the wheel nuts with the wheel nut
wrench, then take the wheel off. CAUTION
l
Handle
the wheel carefully when chang-
ing the tyre, to avoid scratching the wheel
surface.
6. Clean
out any mud, etc. on the hub surface (F), hub bolts (G) or in the installation holes
(H) in the wheel, and then mount the spare
tyre. For emergencies
6-15 6
Page 295 of 368
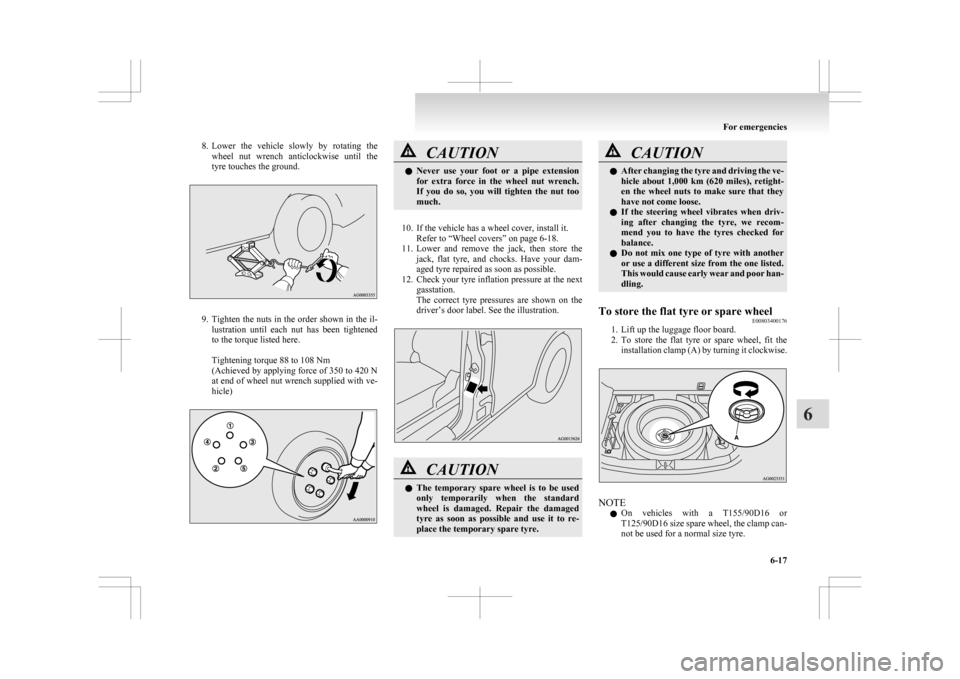
8. Lower the vehicle slowly by rotating the
wheel nut wrench anticlockwise until the
tyre touches the ground. 9. Tighten
the nuts in the order shown in the il-
lustration until each nut has been tightened
to the torque listed here.
Tightening torque 88 to 108 Nm
(Achieved by applying force of 350 to 420 N
at end of wheel nut wrench supplied with ve-
hicle) CAUTION
l
Never
use your foot or a pipe extension
for extra force in the wheel nut wrench.
If you do so, you will tighten the nut too
much.
10. If the vehicle has a wheel cover, install it. Refer to “Wheel covers” on page
6-18.
11. Lower and remove the jack, then store the jack, flat tyre, and chocks. Have your dam-
aged tyre repaired as soon as possible.
12. Check your tyre inflation pressure at the next gasstation.
The correct tyre pressures are shown on the
driver’s door label. See the illustration. CAUTION
l
The
temporary spare wheel is to be used
only temporarily when the standard
wheel is damaged. Repair the damaged
tyre as soon as possible and use it to re-
place the temporary spare tyre. CAUTION
l
After
changing the tyre and driving the ve-
hicle about 1,000 km (620 miles), retight-
en the wheel nuts to make sure that they
have not come loose.
l If the steering wheel vibrates when driv-
ing after changing the tyre, we recom-
mend you to have the tyres checked for
balance.
l Do not mix one type of tyre with another
or use a different size from the one listed.
This would cause early wear and poor han-
dling.
To store the flat tyre or spare wheel E00803400176
1. Lift up the luggage floor board.
2. To
store the flat tyre or spare wheel, fit the
installation clamp (A) by turning it clockwise. NOTE
l On
vehicles with a T155/90D16 or
T125/90D16 size spare wheel, the clamp can-
not be used for a normal size tyre. For emergencies
6-17 6
Page 305 of 368
CAUTION
l
Do not use a scrubbing brush or other
hard tools as they may damage the plastic
part surface.
l Do not use wax containing compound (pol-
ishing powder) which may damage the
plastic part surface.
l Do not bring the plastic parts into contact
with petrol, light oil, brake fluids, engine
oils, greases, paint thinners, and sulphu-
ric acid (battery electrolyte) which may
crack, stain or discolour the plastic parts.
If they touch the plastic parts, wipe them
off with soft cloth, chamois or the like
and an aqueous solution of neutral deter-
gent then immediately rinse the affected
parts with water.
Chrome parts E00901400098
In order to prevent spots and corrosion of chrome
parts,
wash with water, dry thoroughly, and apply a
special protective coating. This should be done
more frequently in winter.
Aluminium wheels* E00901500347
1. Remove
dirt using a sponge while sprinkling
water on the vehicle.
2. Use neutral detergent on any dirt that cannot be removed easily with water.
Rinse off the neutral detergent after washing
the vehicle.
3. Dry the vehicle thoroughly using a chamois leather or a soft cloth. CAUTION
l
Do
not use a brush or other hard imple-
ment on the wheels.
Doing so could scratch the wheels.
l Do not use any cleaner that contains an
abrasive substance or is acidic or alka-
line. Doing so could cause the coating on
the wheels to peel or become discoloured
or stained.
l Do not directly apply hot water using a
steam cleaner or by any other means.
l Contact with seawater and road deicer
can cause corrosion. Rinse off such sub-
stances as soon as possible.
Window glass E00901600117
The window glass can normally be cleaned using
only a sponge and water.
Glass
cleaner can be used to remove oil, grease,
dead insects, etc. After washing the glass, wipe dry
with a clean, dry, soft cloth. Never use a cloth that
is used for cleaning a painted surface to clean a win-
dow. Wax from the painted surface could get on
the glass and lower glass transparency and visibility.
NOTE
l To clean the inside of the rear window, al-
ways use a soft cloth and wipe the window
glass along the demister heater element so as
not to cause damage. Wiper blades
E00901700062
Use a soft cloth and glass cleaner to remove grease,
dead
insects, etc., from the wiper blades. Replace
the wiper blades when they no longer wipe proper-
ly. (Refer to page 8-15.)
Engine compartment E00902100308
Clean the engine compartment at the beginning and
end
of winter. Pay particular attention to flanges,
crevices and peripheral parts where dust containing
road chemicals and other corrosive materials might
collect.
If salt and other chemicals are used on the roads in
your area, clean the engine compartment at least ev-
ery three months.
Never spray or splash water on the electrical com-
ponents in the engine compartment, as this may
cause damage.
Do not bring the nearby parts, the plastic parts and
so on into contact with sulphuric acid (battery elec-
trolyte) which may crack, stain or discolour them.
If they are in contact, wipe off with soft cloth, cha-
mois or the like and an aqueous solution of neutral
detergent then immediately rinse the affected parts
with plenty of water. Vehicle care
7-05 7
Page 319 of 368
Wheel condition
E010018008851- Location of the tread wear indicator
2-
Tread wear indicator
Check the tyres for cuts, cracks and other damage.
Replace the tyres if there are deep cuts or cracks.
Also check each tyre for pieces of metal or pebbles.
The use of worn tyres can be very dangerous be-
cause of the greater chance of skidding or hydro-
planing. The tread depth of the tyres must exceed
1.6 mm in order for the tyres to meet the minimum
requirement for use.
Tread wear indicators will appear on the surface of
the tyre as the tyre wears, thereby indicating that
the tyre no longer meets the minimum requirement
for use. When these wear indicators appear, the
tyres must be replaced with new ones.
On 4-wheel drive vehicles, when replacement of
any of the tyres is necessary, replace all of them. CAUTION
l
Always
use tyres of the same size, same
type, and same brand, and which have no
wear differences.
Using tyres of different size, type, brands
or degree of wear, will increase the differ-
ential oil temperature, resulting in possi-
ble damage to the driving system. Fur-
ther, the drive train will be subjected to
excessive loading, possibly leading to oil
leakage, component seizure, or other seri-
ous faults.
Replacing tyres and wheels E01007200243 CAUTION
l
Avoid
using different size tyres from the
one listed and the combined use of differ-
ent types of tyres, as this can affect driv-
ing safety.
Refer to “Tyres and wheels” on page
9-12.
l Even if a wheel has the same rim size and
offset as the specified type of wheel, its
shape may prevent it from being fitted cor-
rectly. We recommend you to consult a
specialist before using wheels that you
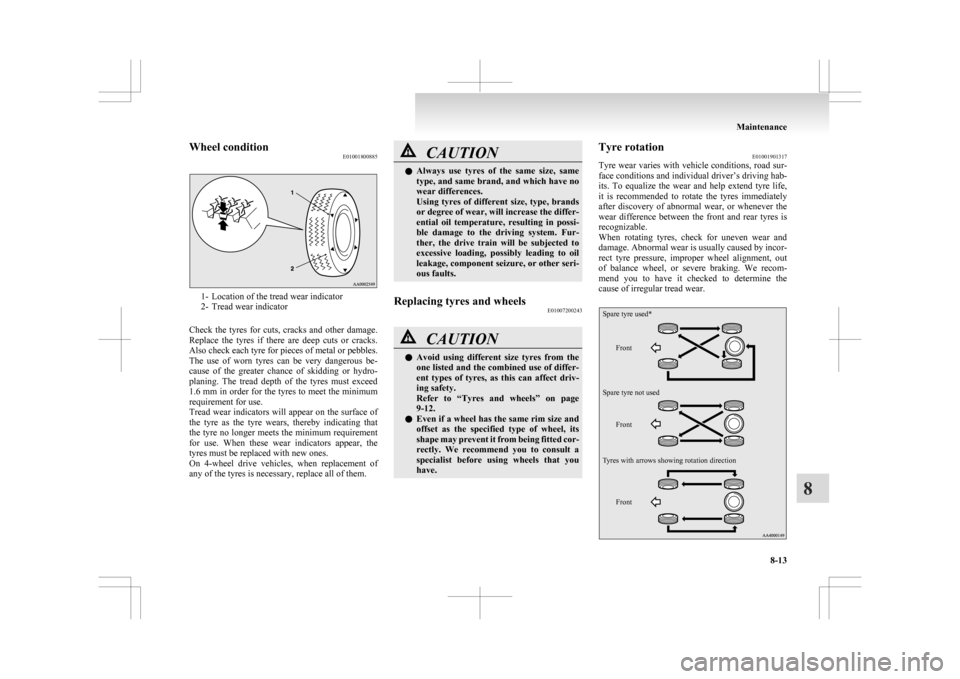
have. Tyre rotation
E01001901317
Tyre
wear varies with vehicle conditions, road sur-
face conditions and individual driver’s driving hab-
its. To equalize the wear and help extend tyre life,
it is recommended to rotate the tyres immediately
after discovery of abnormal wear, or whenever the
wear difference between the front and rear tyres is
recognizable.
When rotating tyres, check for uneven wear and
damage. Abnormal wear is usually caused by incor-
rect tyre pressure, improper wheel alignment, out
of balance wheel, or severe braking. We recom-
mend you to have it checked to determine the
cause of irregular tread wear.
Front Front Front
Spare tyre used*
Spare tyre not used
Tyres with arrows showing rotation direction Maintenance
8-13 8