bluetooth MITSUBISHI ASX 2012 (in English) User Guide
[x] Cancel search | Manufacturer: MITSUBISHI, Model Year: 2012, Model line: ASX, Model: MITSUBISHI ASX 2012Pages: 378, PDF Size: 18.2 MB
Page 239 of 378
NOTE
l If
the confirmation function is active, the
voice guide confirms if the genre is correct.
If the genre is correct, say “Yes”. If not, say
“No”. After the voice guide says “Genre not
found, please try again,” the system returns
to step 2.
Refer to “Confirmation function setting” on
page 5-44.
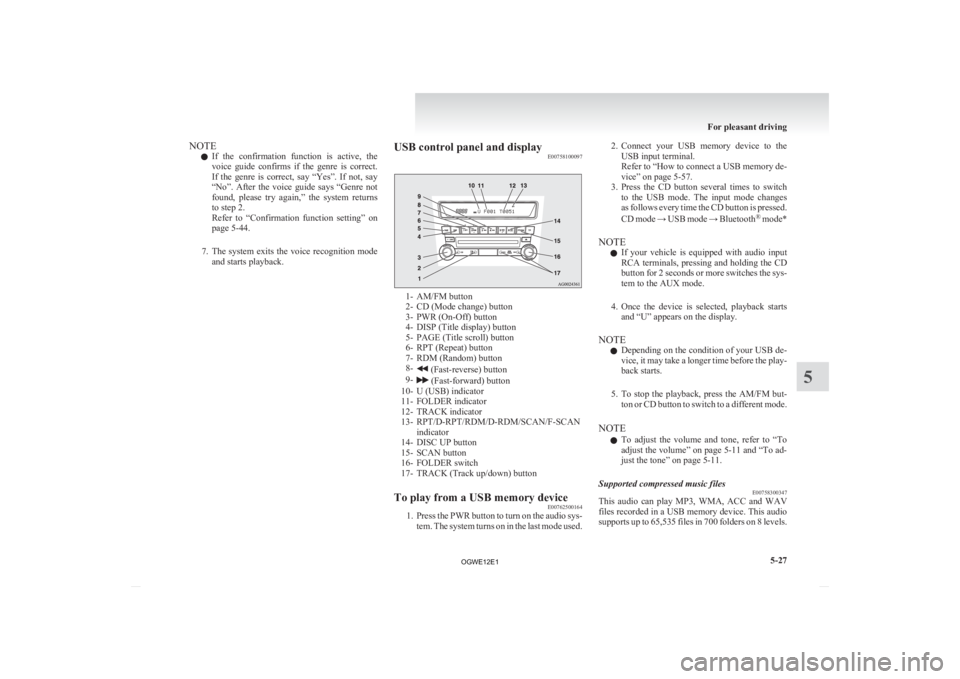
7. The system exits the voice recognition mode and starts playback. USB control panel and display
E00758100097 1- AM/FM button
2-
CD (Mode change) button
3- PWR (On-Off) button
4- DISP (Title display) button
5- PAGE (Title scroll) button
6- RPT (Repeat) button
7- RDM (Random) button
8- (Fast-reverse) button
9- (Fast-forward) button
10-
U (USB) indicator
11- FOLDER indicator
12- TRACK indicator
13- RPT/D-RPT/RDM/D-RDM/SCAN/F-SCAN indicator
14- DISC UP button
15- SCAN button
16- FOLDER switch
17- TRACK (Track up/down) button
To play from a USB memory device E00762500164
1. Press
the PWR button to turn on the audio sys-
tem. The system turns on in the last mode used. 2. Connect
your USB memory device to the
USB input terminal.
Refer to “How to connect a USB memory de-
vice” on page 5-57.
3. Press the CD button several times to switch to the USB mode. The input mode changes
as follows every time the CD button is pressed.
CD mode → USB mode → Bluetooth ®
mode*
NOTE l If your vehicle is equipped with audio input
RCA terminals, pressing and holding the CD
button for 2 seconds or more switches the sys-
tem to the AUX mode.
4. Once the device is selected, playback starts and “U” appears on the display.
NOTE l Depending on the condition of your USB de-
vice, it may take a longer time before the play-
back starts.
5. To stop the playback, press the AM/FM but- ton or CD button to switch to a different mode.
NOTE l To adjust the volume and tone, refer to “To
adjust the volume” on page 5-11 and “To ad-
just the tone” on page 5-11.
Supported compressed music files E00758300347
This audio can play MP3, WMA, ACC and WAV
files
recorded in a USB memory device. This audio
supports up to 65,535 files in 700 folders on 8 levels. For pleasant driving
5-27 5
OGWE12E1
Page 241 of 378
To play the same file repeatedly
E00758700064
Press
the RPT button to show “RPT” in the dis-
play. To cancel this mode, press the button again.
To play the files in the same folder repeatedly E00758800065
Press and hold the RPT button until you hear a
beep to show “D-RPT” in the display.
All
tracks in the current folder are played repeatedly.
To exit this mode, press the button again.
To play a folder in random order E00758900066
Press the RDM button to show “RDM” in the dis-
play.
The
audio randomly selects tracks from the current
folder and plays the selected tracks.
To exit this mode, press the button again.
To play all folders in random order E00759000064
Press and hold the RDM button until you hear a
beep to show “D-RDM” in the display.
The
audio randomly selects tracks from all folders
and plays the selected tracks.
To exit this mode, press the button again.
To find the start of each track in a folder for play-
back (vehicles without Bluetooth ®
2.0 interface)
E00759100140
Press the SCAN button. “SCAN” is shown in the
display
and the tracks in the current folder are
played for several seconds from the beginning.
The file number will blink while the scan mode is
selected.
To exit this mode, press the button again. NOTE
l Once
all tracks in the folder have been cued
playback will restart from the beginning of
the track that was playing when cueing started.
To find the start of each track in all folders for
playback (vehicles with Bluetooth ®
2.0 interface)
E00765800054
Press the SCAN button. “SCAN” is shown in the
display
and all tracks in all folders are played for
several seconds from the beginning.
The file number will blink while the scan mode is
selected.
To exit this mode, press the button again.
To find the start of first tracks in all folders for
playback E00759200138
Press and hold the SCAN button until you hear a
beep to show “F-SCAN” in the display.
The
first tracks in all folders are played for several
seconds from the beginning.
Playback starts from the folder next to the one cur-
rently playing.
The folder number will blink while the scan mode
is selected.
To exit this mode, press the button again.
NOTE
l Once the cueing playback ends, playback
will start from the track at the beginning of
the folder next to the one that was playing
when the cueing started.
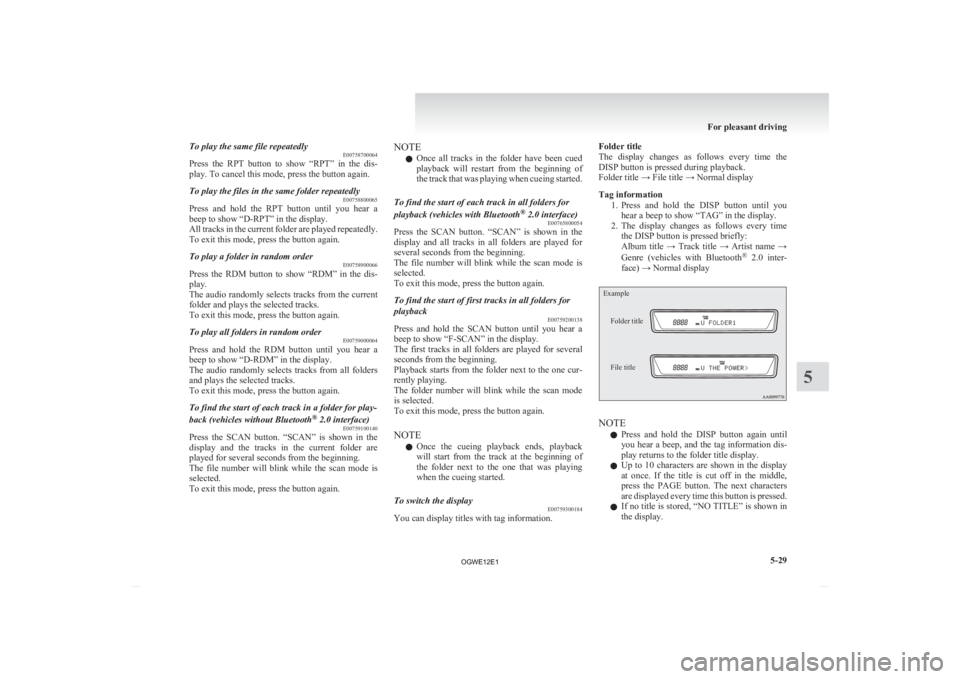
To switch the display E00759300184
You can display titles with tag information. Folder title
The
display changes as follows every time the
DISP button is pressed during playback.
Folder title → File title → Normal display
Tag information
1. Press and hold the DISP button until youhear a beep to show “TAG” in the display.
2. The display changes as follows every time the DISP button is pressed briefly:
Album title → Track title → Artist name →
Genre (vehicles with Bluetooth ®
2.0 inter-
face) → Normal display
Example
Folder title
File title NOTE
l Press
and hold the DISP button again until
you hear a beep, and the tag information dis-
play returns to the folder title display.
l Up to 10 characters are shown in the display
at once. If the title is cut off in the middle,
press the PAGE button. The next characters
are displayed every time this button is pressed.
l If no title is stored, “NO TITLE” is shown in
the display. For pleasant driving
5-29 5
OGWE12E1
Page 242 of 378
l
Characters that cannot be displayed are sub-
stituted by “•”.
To play USB memory device tracks
via
voice operation (vehicles with Blue-
tooth ®
2.0 interface)
E00759400055
Desired tracks can be selected and played from
your
USB memory device by “Artist”, “Album”,
“Playlist” and “Genre” using voice commands.
For information concerning the voice recognition
function or speaker registration function, refer to
“Bluetooth ®
2.0 interface” on page 5-41.
The playback sequence of tracks is the same as
when an iPod is connected. Refer to “To play iPod
tracks via voice operation” on page 5-24.
Preparation for voice operation
To use the voice operation, press the SPEECH but-
ton (1) first. To play tracks from a Bluetooth
®
device (vehicles with Bluetooth ®
2.0 interface) E00759700159
You
can wirelessly connect a digital audio player
or cellular phone supporting Bluetooth ®
to listen to
the tracks on the connected device.
Refer to “Bluetooth ®
2.0 interface” on page 5-41
for the connecting method, etc.
The following explains the basic playback method.
NOTE
l According to the connected device, it is not
to operate correctly or the limitation might
be provided in available function.
l The protected file by copyright might not be
able to start playback.
l It is recommended to adjust the equalizer of
the connected device is flat.
l The voice operation is not available to access
music files on the connected Bluetooth ®
de-
vice. Bluetooth
®
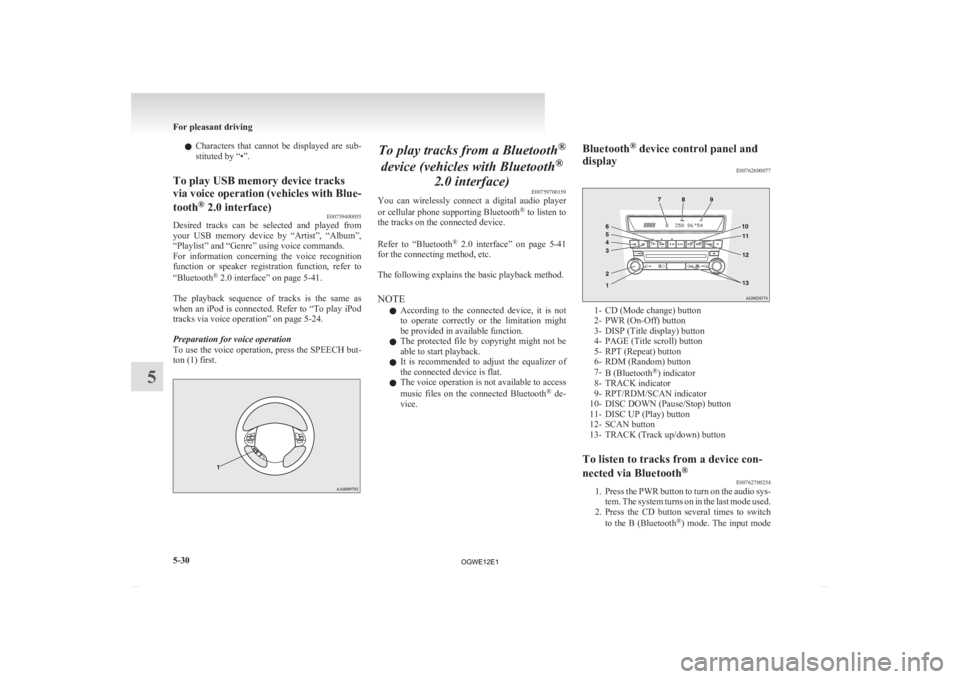
device control panel and
display E00762600077 1- CD (Mode change) button
2-
PWR (On-Off) button
3- DISP (Title display) button
4- PAGE (Title scroll) button
5- RPT (Repeat) button
6- RDM (Random) button
7- B (Bluetooth ®
) indicator
8- TRACK indicator
9- RPT/RDM/SCAN indicator
10- DISC DOWN (Pause/Stop) button
11- DISC UP (Play) button
12- SCAN button
13- TRACK (Track up/down) button
To listen to tracks from a device con-
nected via Bluetooth ®
E00762700254
1. Press
the PWR button to turn on the audio sys-
tem. The system turns on in the last mode used.
2. Press the CD button several times to switch
to the B (Bluetooth ®
) mode. The input mode For pleasant driving
5-30
5
OGWE12E1
Page 243 of 378
changes as follows every time the CD button
is pressed.
CD
mode → USB (iPod) mode → Blue-
tooth ®
mode
NOTE l For vehicles equipped with audio input RCA
terminals, pressing and holding the CD but-
ton for 2 seconds or more switches the sys-
tem to the AUX mode.
3. Connect your Bluetooth ®
device.
Refer to “Connecting the Bluetooth® 2.0 in-
terface and Bluetooth® device” on page
5-46.
4. Playback starts automatically.
NOTE l Depending on the connected device, the play-
back may not start automatically.
In this case, operate the connected device to
start the playback.
To stop the playback (if supported by the device) E00762800040
To stop the playback, press the DISC DOWN button.
To restart the playback, press the DISC UP button.
To pause the playback (if supported by the device) E00762900054
To pause the playback, press the DISC DOWN but-
ton.
To restart the playback, press the DISC UP button.
To select a track (if supported by the device) E00763000052
Press the TRACK button to select the desired track
number. Press : The track number increases by
one.
Press : The track number decreases by
one.
Press for a
long period
(approx. 2 sec-
onds or more) : The track number increases
continuously while the button
is pressed.
Press for a
long period
(approx. 2 sec-
onds or more) : The track number decreases
continuouslywhile the button
is pressed.
If the side of the button is pressed once while a
track
is playing, playback returns to the start of that
track.
NOTE
l Every time the track selection button is press-
ed, the track number in the display changes.
To play the same track repeatedly (if supported by
the device) E00763100053
Press the RPT button during playback to show
“RPT” in the display.
To exit this mode, press the button again.
To play tracks in random order (if supported by
the device) E00763200054
Press the RDM button to show “RDM” in the dis-
play.
The
system randomly selects and plays tracks from
all tracks in the Bluetooth ®
device.
To exit this mode, press the button again. To find the start of each track for playback (if sup-
ported by the device)
E00763300101
Press
the SCAN button. “SCAN” is shown in the
display and all tracks in the Bluetooth ®
device are
played for several seconds from the beginning.
To exit this mode, press the button again.
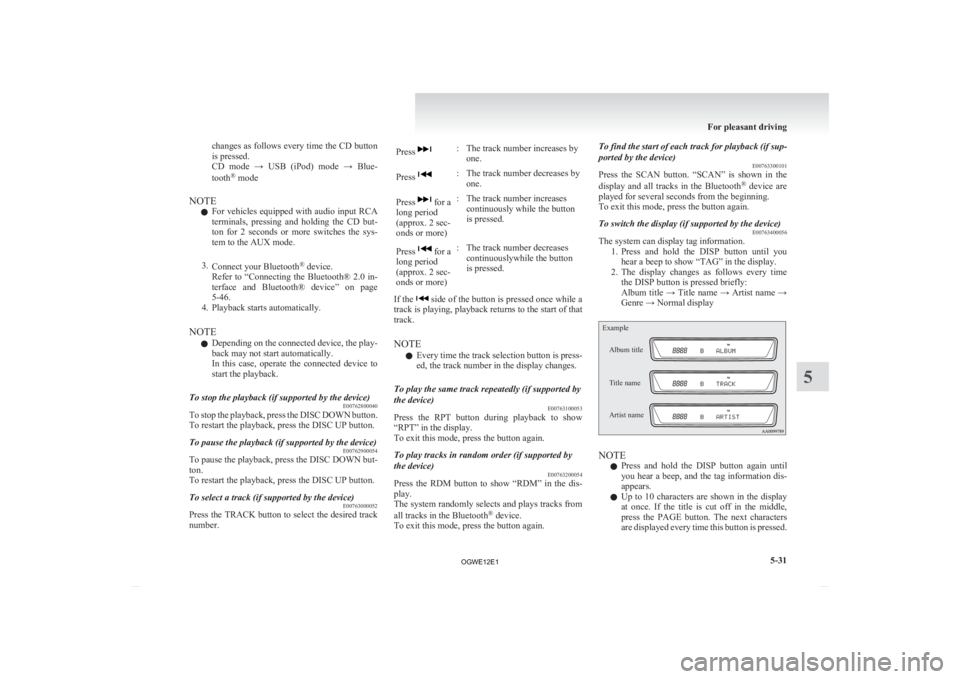
To switch the display (if supported by the device) E00763400056
The system can display tag information.
1. Press
and hold the DISP button until you
hear a beep to show “TAG” in the display.
2. The display changes as follows every time the DISP button is pressed briefly:
Album title → Title name → Artist name →
Genre → Normal display
Example
Album title
Title name
Artist name NOTE
l Press
and hold the DISP button again until
you hear a beep, and the tag information dis-
appears.
l Up to 10 characters are shown in the display
at once. If the title is cut off in the middle,
press the PAGE button. The next characters
are displayed every time this button is pressed. For pleasant driving
5-31 5
OGWE12E1
Page 245 of 378
NOTE
l The
connected audio equipment cannot be op-
erated with the vehicle’s audio system.
l For information on how to connect and oper-
ate the audio equipment, refer to the owner’s
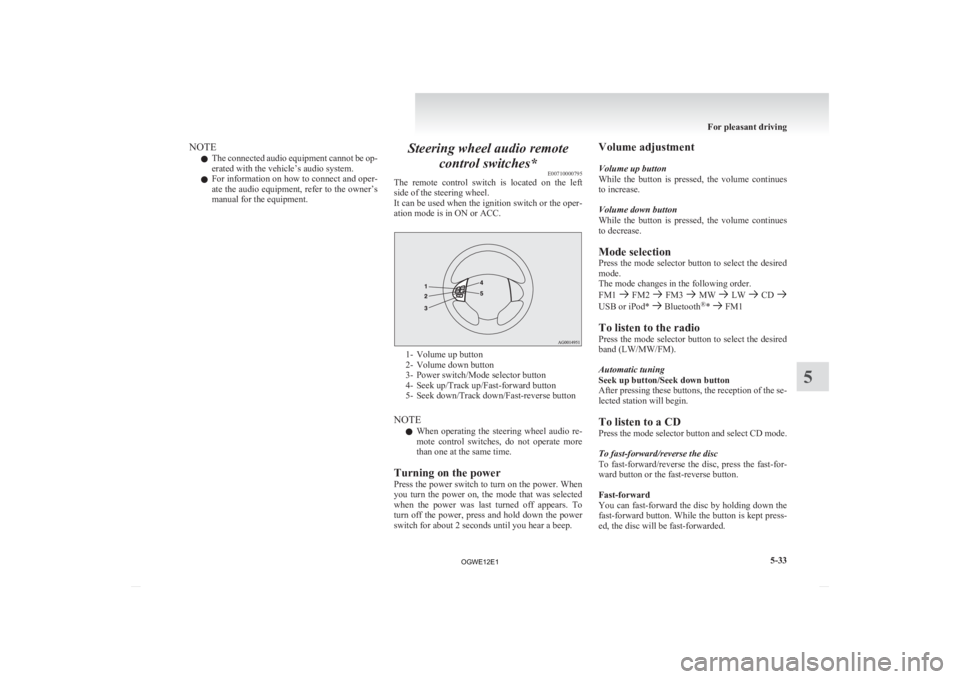
manual for the equipment. Steering wheel audio remote
control switches* E00710000795
The
remote control switch is located on the left
side of the steering wheel.
It can be used when the ignition switch or the oper-
ation mode is in ON or ACC. 1- Volume up button
2-
Volume down button
3- Power switch/Mode selector button
4- Seek up/Track up/Fast-forward button
5- Seek down/Track down/Fast-reverse button
NOTE l When operating the steering wheel audio re-
mote control switches, do not operate more
than one at the same time.
Turning on the power
Press the power switch to turn on the power. When
you turn the power on, the mode that was selected
when the power was last turned off appears. To
turn off the power, press and hold down the power
switch for about 2 seconds until you hear a beep. Volume adjustment
Volume up button
While
the button is pressed, the volume continues
to increase.
Volume down button
While the button is pressed, the volume continues
to decrease.
Mode selection
Press the mode selector button to select the desired
mode.
The mode changes in the following order.
FM1 FM2 FM3 MW LW CD
USB or iPod* Bluetooth
®
* FM1
To listen to the radio
Press
the mode selector button to select the desired
band (LW/MW/FM).
Automatic tuning
Seek up button/Seek down button
After pressing these buttons, the reception of the se-
lected station will begin.
To listen to a CD
Press the mode selector button and select CD mode.
To fast-forward/reverse the disc
To fast-forward/reverse the disc, press the fast-for-
ward button or the fast-reverse button.
Fast-forward
You can fast-forward the disc by holding down the
fast-forward button. While the button is kept press-
ed, the disc will be fast-forwarded.
For pleasant driving
5-33 5
OGWE12E1
Page 253 of 378
NOTE
l If
the battery cables are disconnected during
repairs or for any other reason, reset the
clock to the correct time after they are recon-
nected.
l The digital clock does not have a second dis-
play. When the “minute” display is adjusted
and reset to zero, the clock begins at zero sec-
onds for the selected minute. Link System*
E00764500012
The
Link System takes overall control of the devi-
ces connected via the USB input terminal or the
Bluetooth ®
2.0 interface allowing the connected de-
vices to be operated by using the switches in the ve-
hicle or voice commands.
See the following section for details on how to op-
erate.
Refer to “Bluetooth ®
2.0 interface” on page 5-41.
Refer to “USB input terminal” on page 5-57.
Refer to “To play tracks from USB device” on
page 5-22.
Refer to “To play tracks from a Bluetooth ®
device”
on page 5-30.
Refer to “To use the external audio input function”
on page 5-32.
Bluetooth ®
is a registered trademark of BLUE-
TOOTH SIG, INC.
Link System End User Licence Agree-
ment E00764600013
You have acquired a device that includes software
licensed
by MITSUBISHI MOTORS CORPORA-
TION from JOHNSON CONTROLS Inc (the auto-
motive experience business unit), and their subse-
quent 3 rd
party suppliers. For a complete list of
these 3 rd
party products and their end user licence
agreements, please go to the following website.
http://www.jciblueconnect.com/faq/fulldisclo-
sure.pdf Bluetooth
®
2.0 interface*
E00726000615
The Bluetooth ®
2.0 interface allows for making/re-
ceiving hands-free calls in the vehicle using a Blue-
tooth ®
compatible cellular phone based on the wire-
less communication technology commonly known
as Bluetooth ®
. It also allows the user to play mu-
sic, saved in a Bluetooth ®
music player, from the
vehicle’s speakers.
The system is equipped with a voice recognition
function, which allows you to make hands-free
calls by simple switch operations and voice com-
mand operations using a defined voice tree.
The Bluetooth ®
2.0 interface can be used when the
ignition switch or the operation mode is in ON or
ACC.
Before you can use the Bluetooth ®
2.0 interface,
you must pair the Bluetooth ®
device and Blue-
tooth ®
2.0 interface. Refer to “Connecting the Blue-
tooth® 2.0 interface and Bluetooth® device” on
page 5-46.
Bluetooth ®
is a registered trademark of BLUE-
TOOTH SIG, INC. For pleasant driving
5-41 5
OGWE12E1
Page 254 of 378
WARNING
l Although the Bluetooth ®
2.0 interface al-
lows you to make hands-free calls, if you
choose to use the cellular phone while driv-
ing, you must not allow yourself to be dis-
tracted from the safe operation of your ve-
hicle. Anything, including cellular phone
usage, that distracts you from the safe op-
eration of your vehicle increases your
risk of an accident.
l Refer to and comply with all state and lo-
cal laws in your area regarding cellular
phone usage while driving.
NOTE l If
the ignition switch or the operation mode
is left in ACC, the accessory power will auto-
matically turn off after a certain period of
time and you will no longer be able to use
the Bluetooth ®
2.0 interface. The accessory
power comes on again if the ignition switch
or the engine switch is operated.
Refer to “ACC power auto-cutout function”
on page 4-13.
l The Bluetooth ®
2.0 interface cannot be used
if the Bluetooth ®
device has a flat battery or
the device power is turned off.
l Hands-free calls will not be possible if your
phone does not have service available.
l If you place the Bluetooth ®
device in the lug-
gage compartment, you may not be able to
use the Bluetooth ®
2.0 interface.
l Some Bluetooth ®
devices are not compatible
with the Bluetooth ®
2.0 interface. l
For
details on the Bluetooth ®
2.0 interface,
you can see them by accessing the
MITSUBISHI MOTORS website.
Please read and agree on the “Warning about
Links to the Web Sites of Other Companies”
because it connects to other than
MITSUBISHI MOTORS website.
http://www.mitsubishi-motors.com/en/prod-
ucts/index.html
Steering control switch ® p. 5-42
Voice recognition function ® p. 5-43
Useful voice commands ® p. 5-43
Speaker enrollment function ® p. 5-45
Connecting the Bluetooth® 2.0 interface and Blue-
tooth® device ® p. 5-46
Operating a music player connected via Blue-
tooth® ® p. 5-48
How to make or receive hands-free
calls ® p. 5-48
Phone book function ® p. 5-50
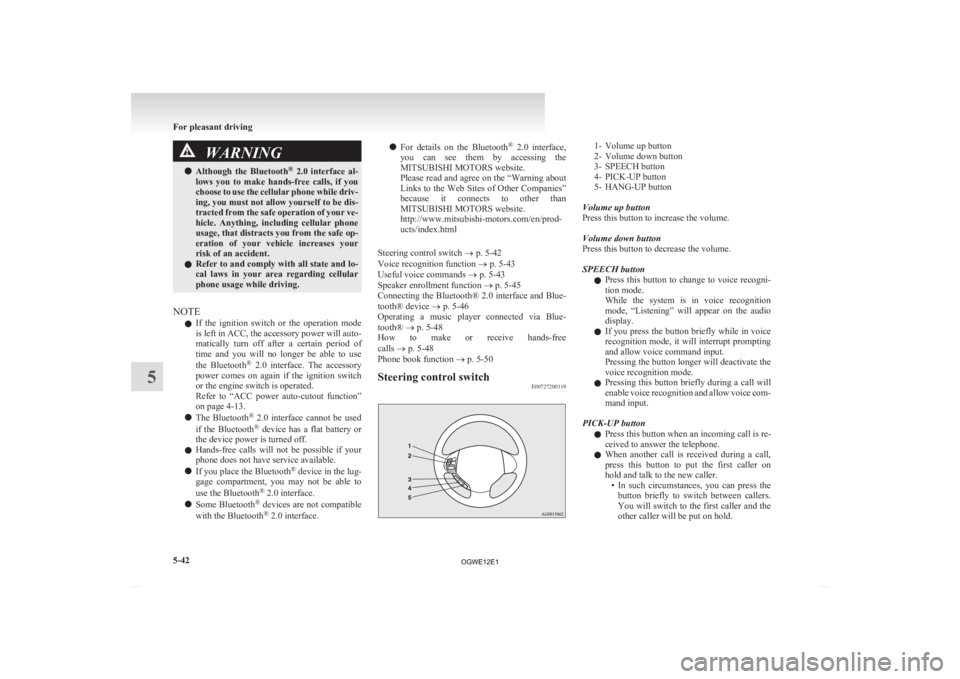
Steering control switch E00727200119 1- Volume up button
2-
Volume down button
3- SPEECH button
4- PICK-UP button
5- HANG-UP button
Volume up button
Press this button to increase the volume.
Volume down button
Press this button to decrease the volume.
SPEECH button l Press this button to change to voice recogni-
tion mode.
While the system is in voice recognition
mode, “Listening” will appear on the audio
display.
l If you press the button briefly while in voice
recognition mode, it will interrupt prompting
and allow voice command input.
Pressing the button longer will deactivate the
voice recognition mode.
l Pressing this button briefly during a call will
enable voice recognition and allow voice com-
mand input.
PICK-UP button l Press this button when an incoming call is re-
ceived to answer the telephone.
l When another call is received during a call,
press this button to put the first caller on
hold and talk to the new caller.
• In such circumstances, you can press thebutton briefly to switch between callers.
You will switch to the first caller and the
other caller will be put on hold. For pleasant driving
5-42
5
OGWE12E1
Page 255 of 378
• To establish a three-way call in such sit-
uations, press the SPEECH button to en-
ter voice recognition mode and then say
“Join calls”.
HANG-UP button l Press this button when an incoming call is re-
ceived to refuse the call.
l Press this button during a call to end the cur-
rent call.
When another call is on hold, you will
switch to that call.
l If this button is pressed in the voice recogni-
tion mode, the voice recognition mode will
be deactivated.
NOTE l When you press the SPEECH button to enter
voice recognition mode with a cellular phone
paired to the system, current information on
the cellular phone, such as “remaining bat-
tery life,” “signal strength” or “roaming,”
will be displayed on the audio display.*
*: Some cellular phones will not send this in-
formation to Bluetooth ®
2.0 interface.
l Call waiting and three-way calls can be used
by the Bluetooth ®
2.0 interface, only if it is
possible to use those services with your cellu-
lar phone.
Voice recognition function E00727300312
The Bluetooth ®
2.0 interface is equipped with a
voice recognition function.
Simply say voice commands and you can perform
various operations and make or receive hands-free
calls.
With the Bluetooth
®
2.0 interface, voice recogni-
tion is possible for English, French, Spanish, Ital-
ian, German, Dutch, Portuguese and Russian. The
factory setting is English.
NOTE
l If the voice command that you say differs
from the predefined command or cannot be
recognised due to ambient noise or some oth-
er reason, the Bluetooth ®
2.0 interface will
ask you for the voice command again up to 3
times.
l For best performance and further reduction
of ambient noise, the vehicle windows
should be closed while engaging the voice rec-
ognition function.
l Some voice commands have alternative com-
mands.
l Depending on the selected language, some
functions may not be available.
Selecting the Language 1. Press the SPEECH button.
2. Say “Setup”.
3. Say “Language.”
4. The voice guide will say “Select a language:English, French, Spanish, Italian, German,
Dutch, Portuguese or Russian” Say the de-
sired language. (Example: Say “English.”)
5. The voice guide will say “English (French, Spanish, Italian, German, Dutch, Portuguese
or Russian) selected. Is this correct?” Say
“Yes.”
Answer “No” to return to Step 4. NOTE
l The
voice guide will repeat the same mes-
sage twice. The first message is in the cur-
rent language, and the second message is in
the selected language.
l If many entries are registered in the vehicle
phone book, changing the language will take
longer.
l Changing the language deletes the mobile
phone book imported to the Bluetooth ®
2.0
interface. If you wish to use it, you will have
to import it again.
6. When the voice guide says “English (French, Spanish, Italian, German, Dutch, Portuguese
or Russian) selected,” the language change
process will be completed and the system
will return to the main menu.
Useful voice commands E00760000019
Help function E00760100010
The Bluetooth ®
2.0 interface is equipped with a
help function.
If you say “Help” when the system is waiting for a
voice command input, the system will tell you a list
of the commands that can be used under the circum-
stances.
Cancelling E00760200011
There are two cancel functions.
If
you are at the main menu, say “Cancel” to exit
from the Bluetooth ®
2.0 interface.
If you are anywhere else within the system, say
“Cancel” to return to the main menu. For pleasant driving
5-43 5
OGWE12E1
Page 256 of 378
Confirmation function setting
E00760400013
The
Bluetooth ®
2.0 interface is equipped with a con-
firmation function.
With the confirmation function activated, you are
given more opportunities than normal to confirm a
command when making various settings to Blue-
tooth ®
2.0 interface. This allows you to decrease
the possibility that a setting is accidentally changed.
The confirmation function can be turned on or off
by following the steps below. 1. Press the SPEECH button.
2. Say “Setup”.
3. Say “Confirmation prompts”.
4. The voice guide will say “Confirmationprompts are
confirmation prompts
Answer “Yes” to change the setting or an-
swer “No” to keep the current setting.
5. The voice guide will say “Confirmation prompts are
will return to the main menu.
Security function E00760500043
It is possible to use a password as a security func-
tion
by setting a password of your choice for the
Bluetooth ®
2.0 interface.
When the security function is turned on, it is neces-
sary to make a voice input of a 4-digit password in
order to use all functions of the Bluetooth ®
2.0 in-
terface, except for reception.
Setting the password
Use the following procedure to turn on the security
function by setting a password. 1. Press the SPEECH button.
2. Say “Setup”.
3. Say “Password.” 4. The
voice guide will say “Password is disa-
bled. Would you like to enable it?” Answer
“Yes.”
Answer “No” to cancel the setting of the pass-
word and return to the main menu.
5. The voice guide will say “Please say a 4-dig- it password. Remember this password. It will
be required to use this system”.
Say a 4-digit number which you want to set
as a password.
6. For confirmation purposes, the voice guide will say “Password <4-digit password>. Is
this correct?” Answer “Yes.”
Answer “No” to return to the password input
in Step 5.
7. When the registration of the password is com- pleted, the voice guide will say “Password is
enabled” and the system will return to the
main menu.
NOTE l Password will be required to access the sys-
tem after the next ignition cycle.
l It is required for a little time after engine
stop that the entered password is actually re-
corded in the system.
If the ignition switch or the operation mode
is made to ACC or ON or the engine is star-
ted immediately after engine stop, there is a
case when the entered password is not recor-
ded in the system. At this time, please try to
enter the password again. Entering the password
If
a password has been set and the security function
is enabled, the voice guide will say “Hands-free sys-
tem is locked. State the password to continue”
when the SPEECH button is pressed to enter voice
recognition mode. Say the 4-digit password num-
ber to enter the password.
If the entered password is wrong, the voice guide
will say “<4- digit password>, Incorrect password.
Please try again”. Enter the correct password.
NOTE
l You can re-enter the password as many times
as you want.
l If you have forgotten your password, say
“Cancel” to quit the voice input mode and
then check with a MITSUBISHI MOTORS
Authorized Service Point.
Disabling the password
Use the following procedure to turn off the security
function by disabling the password.
NOTE l System must be unlocked to disable the pass-
word.
1. Press the SPEECH button.
2. Say “Setup”.
3. Say “Password.”
4. The voice guide will say “Password is en- abled. Would you like to disable it?” An-
swer “Yes.”
Answer “No” to cancel the disabling of
the password and return to the main menu. For pleasant driving
5-44
5
OGWE12E1
Page 257 of 378
5. When the disabling of the password is
completed, the voice guide will say “Pass-
word is disabled” and the system will re-
turn to the main menu.
Speaker enrollment function E00727400238
The Bluetooth ®
2.0 interface can use the speaker en-
rollment function to create a voice model for one
person per language.
This makes it easier for the Bluetooth ®
2.0 inter-
face to recognise voice commands said by you.
You can turn a voice model registered with the
speaker enrollment function on and off whenever
you want.
Speaker enrollment E00727500200
It takes about 2 to 3 minutes to complete the speak-
er enrollment process.
To
ensure the best results, run through the process
while in the driver’s seat, in an environment that is
as quiet as possible (when there is no rain or strong
winds and the vehicle windows are closed). Please
turn off your phone while in speaker enrollment to
prevent interruption of the process.
Use the following procedure for speaker enrollment. 1. Stop your vehicle in a safe area, put the gear-shift lever in the “N” (Neutral) position
(M/T), or the selector lever in the “P”
(PARK) position (CVT), and pull the park-
ing brake lever.
NOTE l Speaker enrollment is not possible unless the
vehicle is parked. Make sure you park the ve-
hicle in a safe area before attempting speaker
enrollment. 2. Press the SPEECH button.
3.
Say “Voice training”.
4. The voice guide will say “This operation must be performed in a quiet environment
while the vehicle is stopped. See the owner’s
manual for the list of required training phra-
ses. Press and release the SPEECH button
when you are ready to begin. Press the HANG-
UP button to cancel at any time”.
Press the SPEECH button to start the speaker
enrollment process.
NOTE l If you do not start the speaker enrollment proc-
ess within 3 minutes of pressing the
SPEECH button, the speaker enrollment func-
tion will time out.
The voice guide will say “Speaker Enroll-
ment has timed out”. The system will then
beep and the voice recognition mode will be
deactivated.
5. The voice guide will prompt for phrase 1. Re- peat the corresponding phrase listed in table
“Enrollment commands” on page 5-56.
The system will register your voice and then
move on to the registration of the next com-
mand. Continue the process until all phrases
have been registered.
NOTE l To repeat the most recent voice training com-
mand, press and release the SPEECH button.
l If you press the HANG-UP button anytime
during the process, the system will beep and
stop the speaker enrollment process. 6. When all enrollment commands have been
read out, the voice guide will say “Speaker
enrollment is complete”.
The system will then end the speaker enroll-
ment process and return to the main menu.
NOTE l Completing the speaker enrollment process
will turn on the voice model automatically.
l The commands “Help” and “Cancel” will not
work in this mode.
Enabling and disabling the voice model and re-
training E00727600100
You can turn a voice model registered with the
speaker
enrollment function on and off whenever
you want.
You can also retrain the system.
Use the following procedure to perform these ac-
tions. 1. Press the SPEECH button.
2. Say “Voice training”.
3. If you have completed a speaker enrollmentprocess once already, the voice guide will
say either “Enrollment is enabled. Would
you like to disable or retrain?” or “Enroll-
ment is disabled. Would you like to enable
or retrain?”
4. When enrollment is “enabled”, the voice mod- el is on; when enrollment is “disabled”, the
voice model is off. Say the command that
fits your needs.
Say “Retrain” to start the speaker enrollment
process and recreate a new voice model. (Re-
fer to “Speaker enrollment” on page 5-45.) For pleasant driving
5-45 5
OGWE12E1