fog lamp MITSUBISHI ASX 2015 (in English) User Guide
[x] Cancel search | Manufacturer: MITSUBISHI, Model Year: 2015, Model line: ASX, Model: MITSUBISHI ASX 2015Pages: 452, PDF Size: 20.1 MB
Page 160 of 452
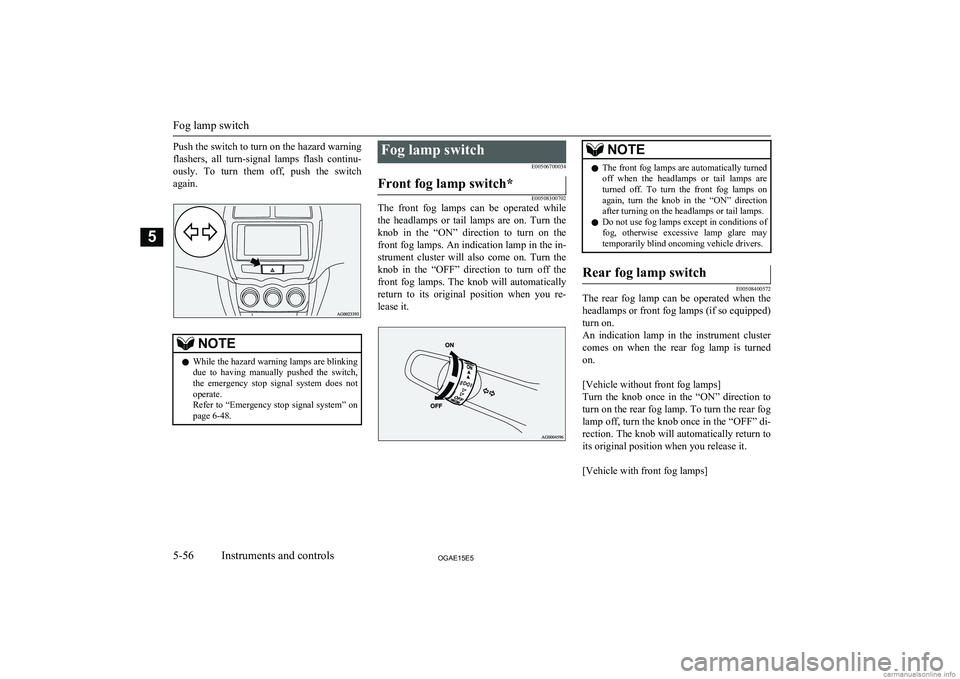
Push the switch to turn on the hazard warningflashers, all turn-signal lamps flash continu-
ously. To turn them off, push the switch
again.NOTEl While the hazard warning lamps are blinking
due to having manually pushed the switch, the emergency stop signal system does not
operate.
Refer to “Emergency stop signal system” on page 6-48.Fog lamp switch
E00506700034Front fog lamp switch*
E00508300702
The front fog lamps can be operated while
the headlamps or tail lamps are on. Turn the knob in the “ON” direction to turn on the
front fog lamps. An indication lamp in the in- strument cluster will also come on. Turn theknob in the “OFF” direction to turn off the front fog lamps. The knob will automatically
return to its original position when you re- lease it.
NOTEl The front fog lamps are automatically turned
off when the headlamps or tail lamps are turned off. To turn the front fog lamps on again, turn the knob in the “ON” directionafter turning on the headlamps or tail lamps.
l Do not use fog lamps except in conditions of
fog, otherwise excessive lamp glare maytemporarily blind oncoming vehicle drivers.Rear fog lamp switch
E00508400572
The rear fog lamp can be operated when the
headlamps or front fog lamps (if so equipped)turn on.
An indication lamp in the instrument cluster
comes on when the rear fog lamp is turned on.
[Vehicle without front fog lamps]
Turn the knob once in the “ON” direction to
turn on the rear fog lamp. To turn the rear fog
lamp off, turn the knob once in the “OFF” di- rection. The knob will automatically return toits original position when you release it.
[Vehicle with front fog lamps]
Fog lamp switch
5-56OGAE15E5Instruments and controls5
Page 161 of 452
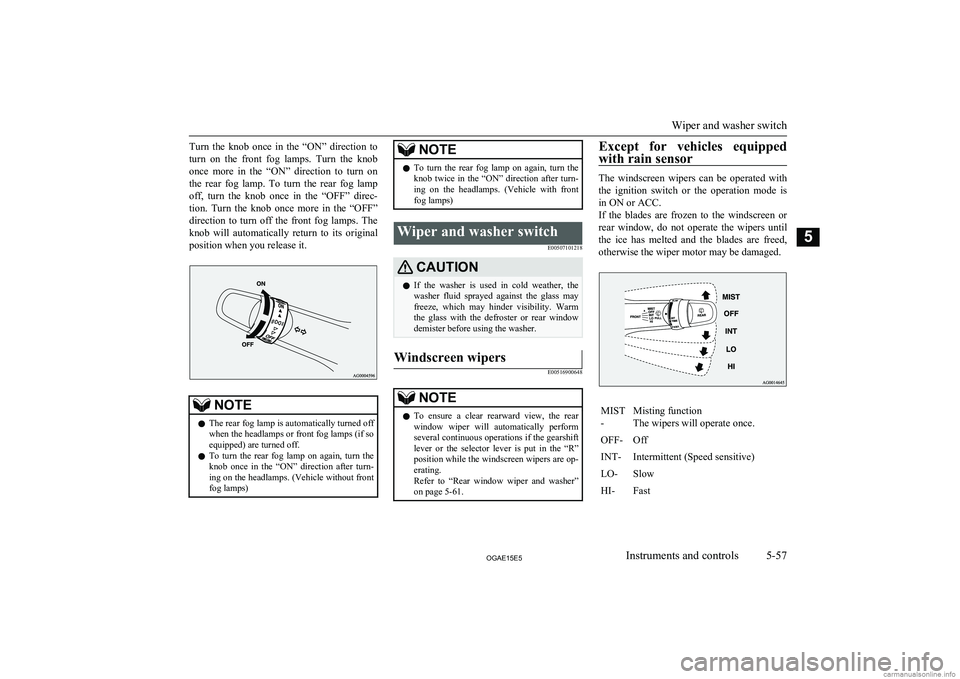
Turn the knob once in the “ON” direction to
turn on the front fog lamps. Turn the knob once more in the “ON” direction to turn on
the rear fog lamp. To turn the rear fog lamp off, turn the knob once in the “OFF” direc- tion. Turn the knob once more in the “OFF”
direction to turn off the front fog lamps. The
knob will automatically return to its original
position when you release it.NOTEl The rear fog lamp is automatically turned off
when the headlamps or front fog lamps (if so
equipped) are turned off.
l To turn the rear fog lamp on again, turn the
knob once in the “ON” direction after turn-ing on the headlamps. (Vehicle without front
fog lamps)NOTEl To turn the rear fog lamp on again, turn the
knob twice in the “ON” direction after turn-ing on the headlamps. (Vehicle with frontfog lamps)Wiper and washer switch
E00507101218CAUTIONlIf the washer is used in cold weather, the
washer fluid sprayed against the glass may
freeze, which may hinder visibility. Warm the glass with the defroster or rear window
demister before using the washer.Windscreen wipers
E00516900648NOTEl To ensure a clear rearward view, the rear
window wiper will automatically perform several continuous operations if the gearshiftlever or the selector lever is put in the “R”
position while the windscreen wipers are op- erating.
Refer to “Rear window wiper and washer” on page 5-61.Except for vehicles equipped
with rain sensor
The windscreen wipers can be operated with
the ignition switch or the operation mode is in ON or ACC.
If the blades are frozen to the windscreen or
rear window, do not operate the wipers until the ice has melted and the blades are freed,
otherwise the wiper motor may be damaged.
MIST
-Misting function
The wipers will operate once.OFF-OffINT-Intermittent (Speed sensitive)LO-SlowHI-Fast
Wiper and washer switch
5-57OGAE15E5Instruments and controls5
Page 167 of 452
lPeriodically check the level of washer
fluid in the reservoir and refill if re-quired.
During cold weather, add a recommen-
ded washer solution that will not freeze
in the washer reservoir. Failure to do so could result in loss of washer functionand frost damage to the system compo-
nents.Rear window demister
switch E00507901186
The rear window demister switch can be op-erated when the engine is running.
Push the switch to turn on the rear window
demister. It will be turned off automatically
in about 20 minutes. To turn off the demister
within about 20 minutes, push the switch again.
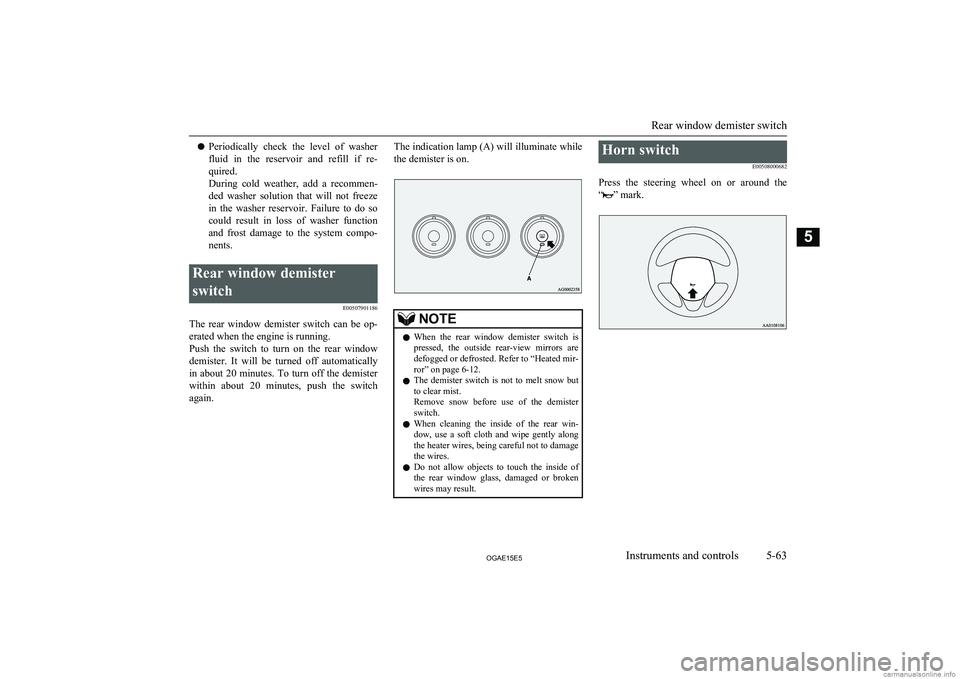
The indication lamp (A) will illuminate while
the demister is on.NOTEl When the rear window demister switch is
pressed, the outside rear-view mirrors are
defogged or defrosted. Refer to “Heated mir-
ror” on page 6-12.
l The demister switch is not to melt snow but
to clear mist.
Remove snow before use of the demister
switch.
l When cleaning the inside of the rear win-
dow, use a soft cloth and wipe gently along
the heater wires, being careful not to damage the wires.
l Do not allow objects to touch the inside of
the rear window glass, damaged or broken wires may result.Horn switch
E00508000682
Press the steering wheel on or around the
“
” mark.
Rear window demister switch
5-63OGAE15E5Instruments and controls5
Page 247 of 452
NOTElWhile the engine coolant temperature is low,
the temperature of the air from the heaterwill be cool/cold until the engine warms up, even if you have selected warm air with the
dial.
l On vehicles with the automatic air condi-
tioning, when the temperature is set to the highest or the lowest setting under the AU-
TO operation, the air selection and the air
conditioning will be automatically changed as follows.
• Quick Heating (When the temperature is
set to the highest setting)
Outside air will be introduced and the air
conditioning will stop.
• Quick Cooling (When the temperature is
set to the lowest setting)
Inside air will be recirculated and the air
conditioning will operate.
The settings described above are the factory
settings. The air selection and air condition-
ing switches can be customized (function set-
ting changed), and the automatic switching of outside air and the air conditioning according
to operating conditions can be changed as de- sired.
For further information, we recommend you to consult a MITSUBISHI MOTORS Au-
thorized Service Point.
Refer to “Customizing the air conditioning
switch (Automatic air conditioning)” on page 7-07.
Refer to “Customizing the air selection” on
page 7-06.Air selection switch
E00701300721
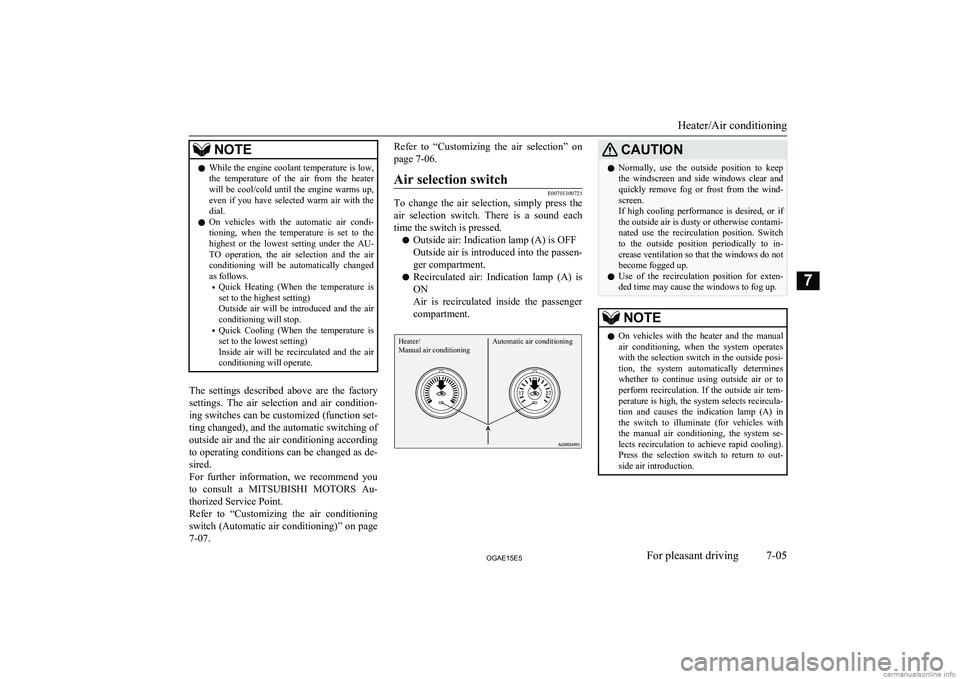
To change the air selection, simply press theair selection switch. There is a sound each
time the switch is pressed.
l Outside air: Indication lamp (A) is OFF
Outside air is introduced into the passen-
ger compartment.
l Recirculated air: Indication lamp (A) is
ON
Air is recirculated inside the passenger
compartment.
Heater/
Manual air conditioningAutomatic air conditioning
CAUTIONl Normally, use the outside position to keep
the windscreen and side windows clear and quickly remove fog or frost from the wind- screen.
If high cooling performance is desired, or if
the outside air is dusty or otherwise contami- nated use the recirculation position. Switch
to the outside position periodically to in- crease ventilation so that the windows do notbecome fogged up.
l Use of the recirculation position for exten-
ded time may cause the windows to fog up.NOTEl On vehicles with the heater and the manual
air conditioning, when the system operateswith the selection switch in the outside posi- tion, the system automatically determines
whether to continue using outside air or to
perform recirculation. If the outside air tem-
perature is high, the system selects recircula- tion and causes the indication lamp (A) in
the switch to illuminate (for vehicles with the manual air conditioning, the system se-
lects recirculation to achieve rapid cooling). Press the selection switch to return to out-
side air introduction.
Heater/Air conditioning
7-05OGAE15E5For pleasant driving7
Page 250 of 452
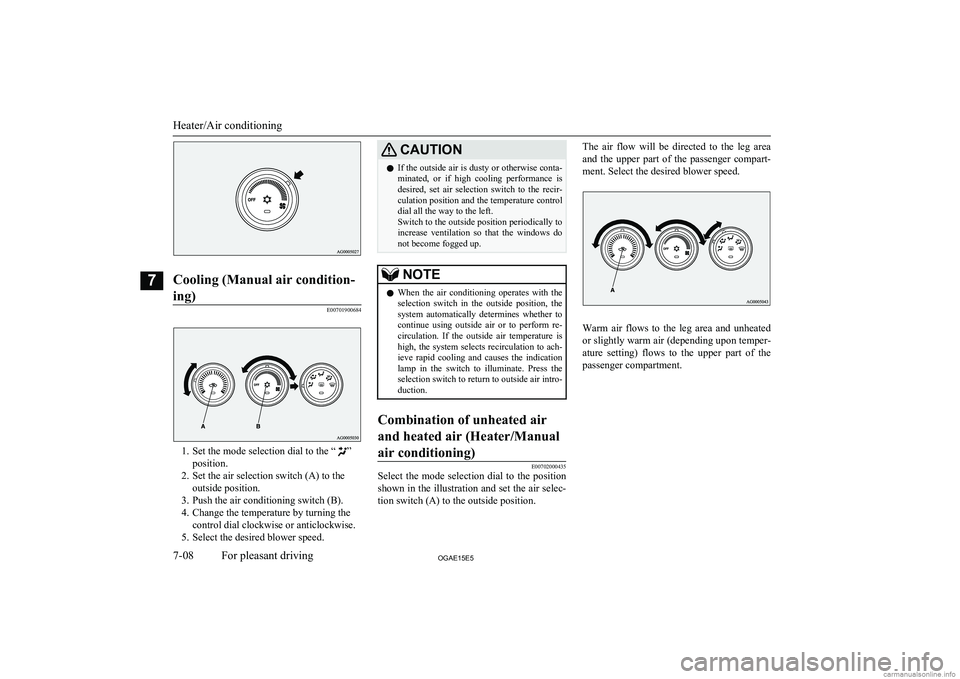
Cooling (Manual air condition-ing)
E00701900684
1. Set the mode selection dial to the “”
position.
2. Set the air selection switch (A) to the outside position.
3. Push the air conditioning switch (B).
4. Change the temperature by turning the control dial clockwise or anticlockwise.
5. Select the desired blower speed.
CAUTIONl If the outside air is dusty or otherwise conta-
minated, or if high cooling performance is
desired, set air selection switch to the recir- culation position and the temperature control
dial all the way to the left.
Switch to the outside position periodically to increase ventilation so that the windows donot become fogged up.NOTEl When the air conditioning operates with the
selection switch in the outside position, the
system automatically determines whether to continue using outside air or to perform re-
circulation. If the outside air temperature is high, the system selects recirculation to ach- ieve rapid cooling and causes the indication
lamp in the switch to illuminate. Press the
selection switch to return to outside air intro- duction.Combination of unheated air
and heated air (Heater/Manual air conditioning)
E00702000435
Select the mode selection dial to the position shown in the illustration and set the air selec- tion switch (A) to the outside position.
The air flow will be directed to the leg area
and the upper part of the passenger compart-
ment. Select the desired blower speed.
Warm air flows to the leg area and unheated or slightly warm air (depending upon temper-
ature setting) flows to the upper part of the
passenger compartment.
Heater/Air conditioning
7-08OGAE15E5For pleasant driving7
Page 380 of 452
Engine compartment
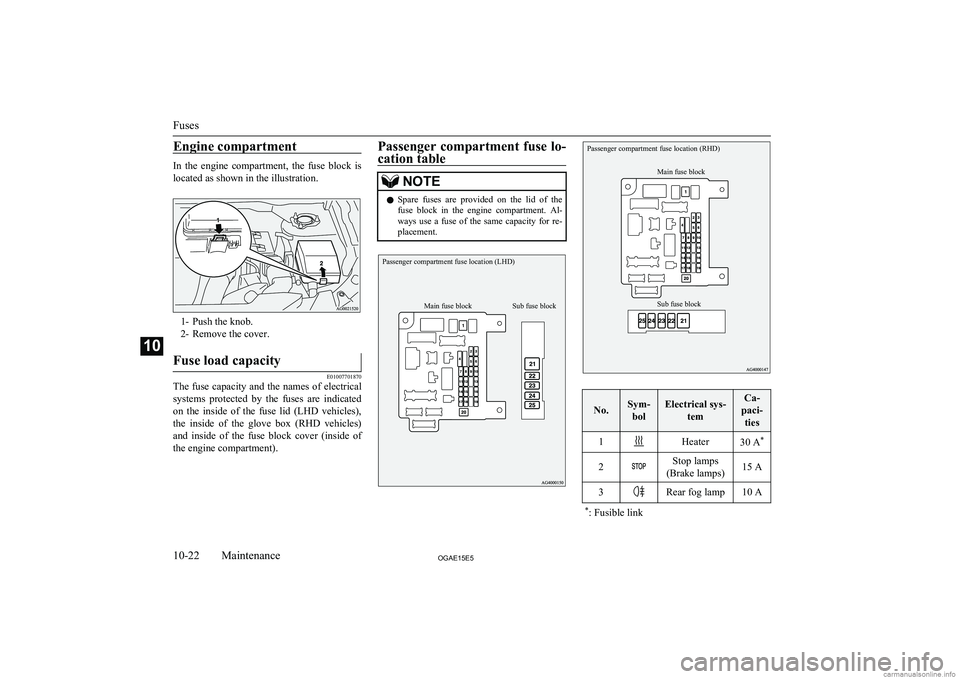
In the engine compartment, the fuse block islocated as shown in the illustration.
1- Push the knob.
2- Remove the cover.
Fuse load capacity
E01007701870
The fuse capacity and the names of electrical systems protected by the fuses are indicated
on the inside of the fuse lid (LHD vehicles), the inside of the glove box (RHD vehicles)
and inside of the fuse block cover (inside of the engine compartment).
Passenger compartment fuse lo-
cation tableNOTEl Spare fuses are provided on the lid of the
fuse block in the engine compartment. Al-ways use a fuse of the same capacity for re-
placement.Passenger compartment fuse location (LHD)Main fuse blockSub fuse blockPassenger compartment fuse location (RHD)Sub fuse blockMain fuse block
No.Sym-
bolElectrical sys- temCa-
paci- ties1Heater30 A *2Stop lamps
(Brake lamps)15 A3Rear fog lamp10 A* : Fusible link
Fuses
10-22OGAE15E5Maintenance10
Page 381 of 452
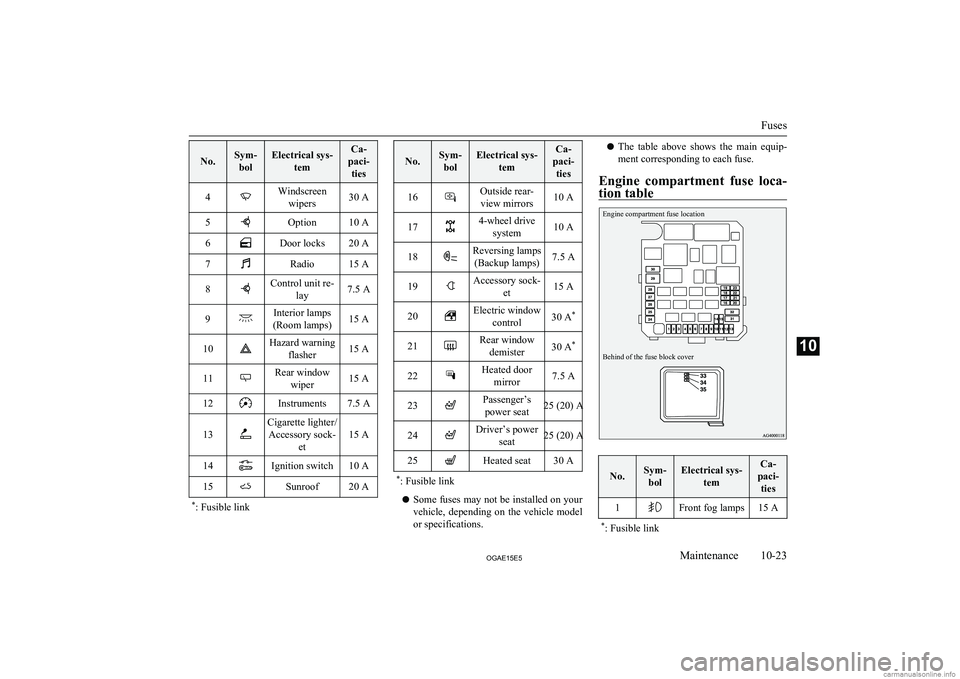
No.Sym-bolElectrical sys- temCa-
paci- ties4Windscreen wipers30 A5Option10 A6Door locks20 A7Radio15 A8Control unit re- lay7.5 A9Interior lamps
(Room lamps)15 A10Hazard warning flasher15 A11Rear windowwiper15 A12Instruments7.5 A13
Cigarette lighter/Accessory sock- et
15 A14Ignition switch10 A15Sunroof20 A*: Fusible link
No.Sym-
bolElectrical sys- temCa-
paci- ties16Outside rear-view mirrors10 A174-wheel drive system10 A18Reversing lamps(Backup lamps)7.5 A19Accessory sock- et15 A20Electric windowcontrol30 A *21Rear window
demister30 A *22Heated door
mirror7.5 A23Passenger’spower seat25 (20) A24Driver’s power seat25 (20) A25Heated seat30 A*: Fusible link
l Some fuses may not be installed on your
vehicle, depending on the vehicle model
or specifications.
l The table above shows the main equip-
ment corresponding to each fuse.
Engine compartment fuse loca-
tion tableEngine compartment fuse locationBehind of the fuse block cover
No.Sym- bolElectrical sys- temCa-
paci- ties1Front fog lamps15 A* : Fusible link
Fuses
10-23OGAE15E5Maintenance10
Page 384 of 452
CAUTIONlIf the newly inserted fuse blows again after a
short time, we recommend you to have the electrical system checked to find the causeand rectify it.
l Never use a fuse with a larger capacity than
specified or a substitute (such as a cable or
foil). Doing so could cause the circuit wires
to overheat and create a fire.Replacement of lamp bulbs
E01003100488
Before replacing a bulb, ensure the lamp isoff. Do not touch the glass part of the new
bulb with your bare fingers; the skin oil left
on the glass will evaporate when the bulb gets hot and the vapour will condense on the
reflector and dim the surface.
CAUTIONl Bulbs are extremely hot immediately after
being turned off.
When replacing a bulb, wait for it to cool
sufficiently before touching it. You could otherwise be burnt.NOTEl If you are unsure of how to carry out the
work as required, we recommend you to consult a specialist.
l Be careful not to scratch the vehicle body
when removing a lamp or lens.
l When it rains or when the vehicle has been
washed, the inside of the lens sometimes be-
comes foggy. This is the same phenomenon as when window glass mists up on a humid
day, and does not indicate a functional prob- lem.
When the lamp is switched on, the heat will
remove the fog. However, if water gathers inside the lamp, we recommend you to havethe lamp checked.Bulb capacity
E01003200290
When replacing a bulb, use a new bulb with
the same wattage and colour.
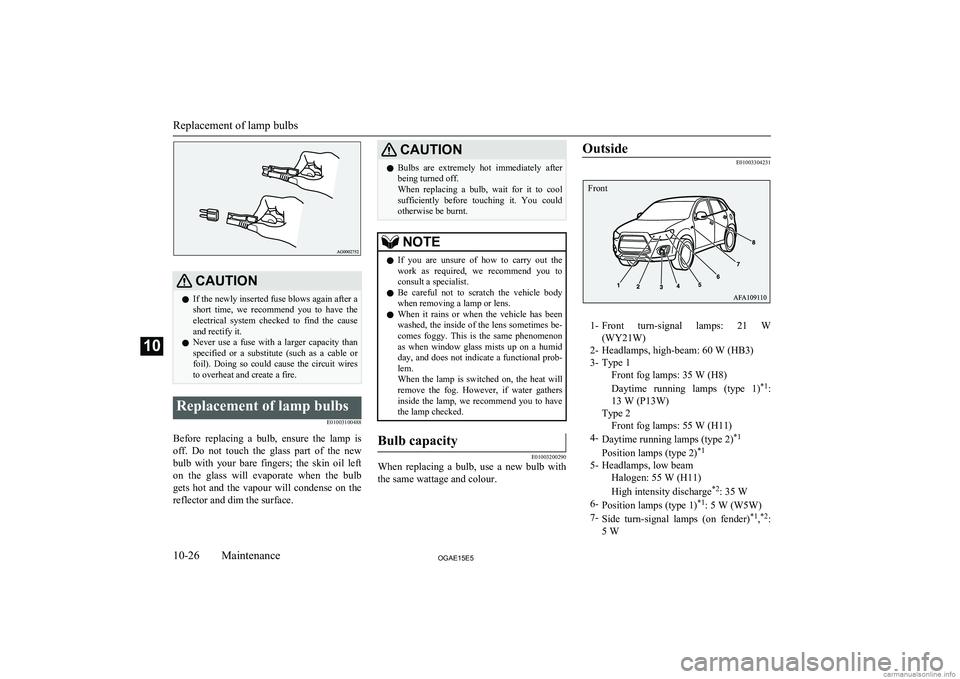
Outside
E01003304231
1- Front turn-signal lamps: 21 W
(WY21W)
2- Headlamps, high-beam: 60 W (HB3) 3- Type 1 Front fog lamps: 35 W (H8)
Daytime running lamps (type 1) *1
:
13 W (P13W)
Type 2 Front fog lamps: 55 W (H11)
4- Daytime running lamps (type 2) *1
Position lamps (type 2) *1
5- Headlamps, low beam Halogen: 55 W (H11)
High intensity discharge *2
: 35 W
6- Position lamps (type 1) *1
: 5 W (W5W)
7- Side turn-signal lamps (on fender) *1
,*2
:
5 W
Replacement of lamp bulbs
10-26OGAE15E5Maintenance10 Front
Page 385 of 452
8-Side turn-signal lamps (on outside rear-
view mirror) *1*1
:if so equipped*2:Have the lamps bulbs replaced at a
MITSUBISHI MOTORS Author-
ized Service Point.
Codes in parentheses indicate bulb types.
WARNINGl Always consult a specialist when repair-
ing or replacing the bulbs of high intensi- ty discharge headlamps.
This is because the power circuit, bulbs
and electrodes generate a high voltage
that could cause an electric shock.NOTEl An LED, not a bulb, is used in the side turn-
signal lamp (on outside rear-view mirror,
daytime running lamp (type 2), and position lamp (type 2)).
Contact a MITSUBISHI MOTORS Author-
ized Service Point when there is a need for
repair or replacement.NOTEl For the side turn-signal lamp (on fender), it
is not possible to repair or replace just the
bulb.
Contact a MITSUBISHI MOTORS Author-
ized Service Point when there is a need for
repair or replacement.
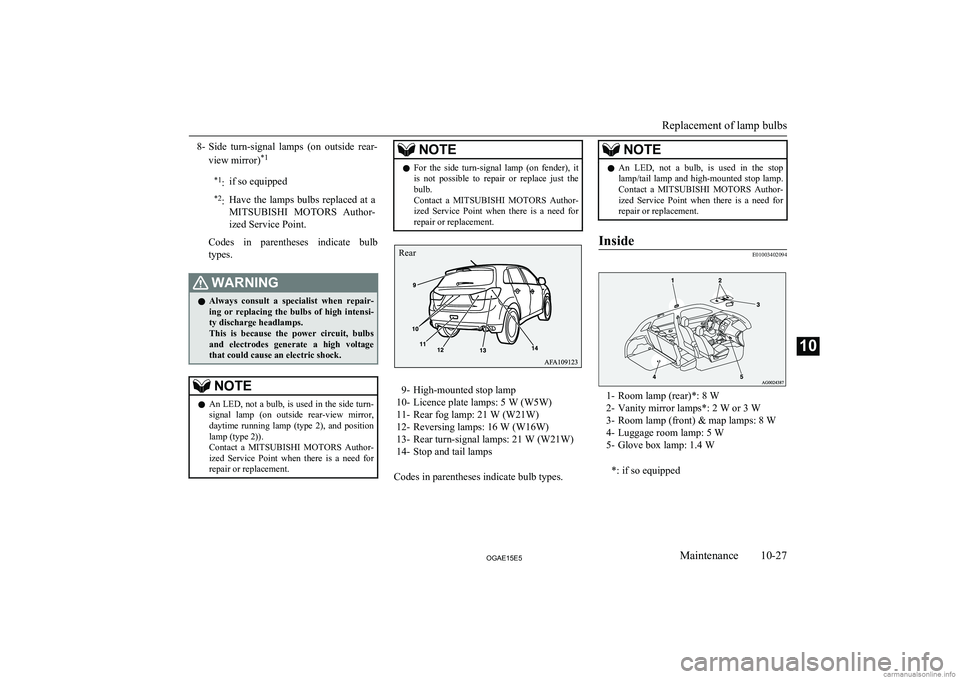
9- High-mounted stop lamp
10- Licence plate lamps: 5 W (W5W)
11- Rear fog lamp: 21 W (W21W)
12- Reversing lamps: 16 W (W16W)
13- Rear turn-signal lamps: 21 W (W21W) 14- Stop and tail lamps
Codes in parentheses indicate bulb types.
NOTEl An LED, not a bulb, is used in the stop
lamp/tail lamp and high-mounted stop lamp.
Contact a MITSUBISHI MOTORS Author-
ized Service Point when there is a need for
repair or replacement.Inside
E01003402094
1- Room lamp (rear)*: 8 W
2- Vanity mirror lamps*: 2 W or 3 W
3- Room lamp (front) & map lamps: 8 W
4- Luggage room lamp: 5 W
5- Glove box lamp: 1.4 W
*: if so equipped
Replacement of lamp bulbs
10-27OGAE15E5Maintenance10 Rear
Page 390 of 452
2. Install the upper cover.For information regarding how to install
the upper cover, refer to “Removing and
installing the upper cover and duct” on page 10-10.Side turn-signal lamps (on
fender)*
E01003900516
NOTEl For the side turn-signal lamps (on fender), it
is not possible to repair or replace just thebulb.
Contact a MITSUBISHI MOTORS Author-
ized Service Point when there is a need for
repair or replacement.Side turn-signal lamps (on out-
side rear-view mirror)*
E01003900529
NOTEl An LED, not a bulb, is used in the side turn-
signal lamps (on outside rear-view mirror).
Contact a MITSUBISHI MOTORS Author-
ized Service Point when there is a need for
repair or replacement.Front fog lamps*
E01004002941
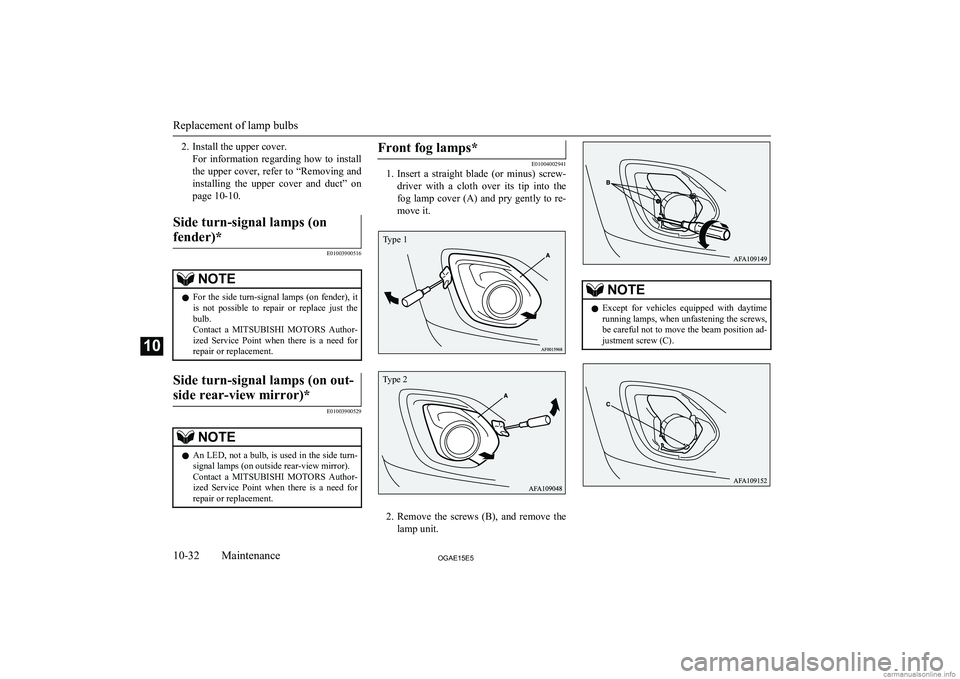
1. Insert a straight blade (or minus) screw-
driver with a cloth over its tip into the
fog lamp cover (A) and pry gently to re- move it.
2. Remove the screws (B), and remove the
lamp unit.
NOTEl Except for vehicles equipped with daytime
running lamps, when unfastening the screws,be careful not to move the beam position ad-
justment screw (C).
Replacement of lamp bulbs
10-32OGAE15E5Maintenance10 Type 1 Type 2