warning light MITSUBISHI ASX 2015 (in English) Owner's Guide
[x] Cancel search | Manufacturer: MITSUBISHI, Model Year: 2015, Model line: ASX, Model: MITSUBISHI ASX 2015Pages: 452, PDF Size: 20.1 MB
Page 342 of 452
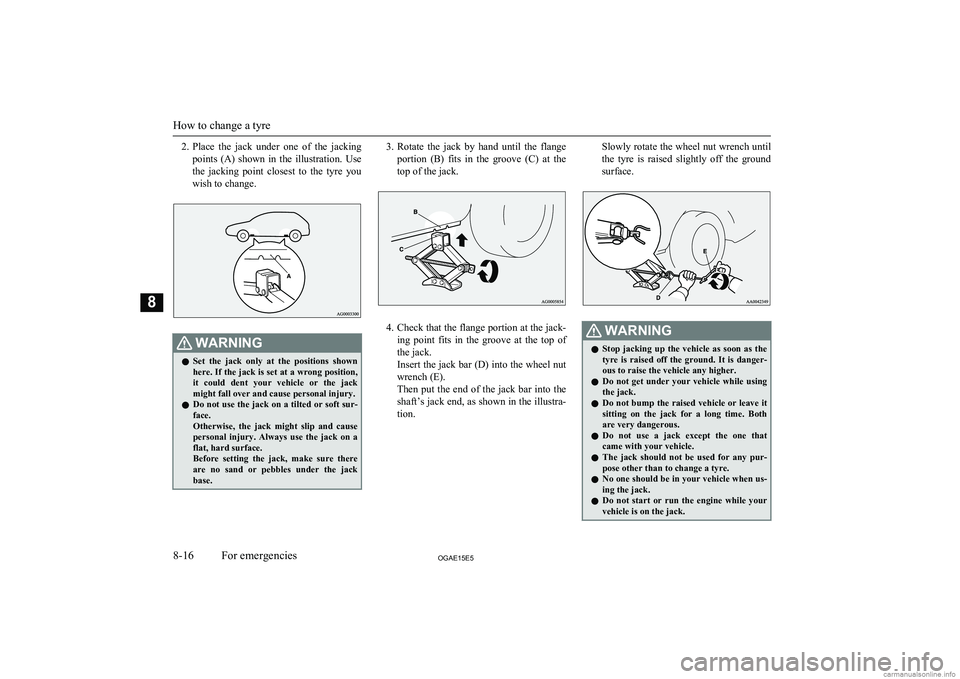
2.Place the jack under one of the jacking
points (A) shown in the illustration. Use
the jacking point closest to the tyre you wish to change.WARNINGl Set the jack only at the positions shown
here. If the jack is set at a wrong position, it could dent your vehicle or the jack
might fall over and cause personal injury.
l Do not use the jack on a tilted or soft sur-
face.
Otherwise, the jack might slip and cause
personal injury. Always use the jack on a flat, hard surface.
Before setting the jack, make sure there
are no sand or pebbles under the jack base.3. Rotate the jack by hand until the flange
portion (B) fits in the groove (C) at the
top of the jack.
4. Check that the flange portion at the jack-
ing point fits in the groove at the top of the jack.
Insert the jack bar (D) into the wheel nut
wrench (E).
Then put the end of the jack bar into the
shaft’s jack end, as shown in the illustra- tion.
Slowly rotate the wheel nut wrench until
the tyre is raised slightly off the ground
surface.WARNINGl Stop jacking up the vehicle as soon as the
tyre is raised off the ground. It is danger-
ous to raise the vehicle any higher.
l Do not get under your vehicle while using
the jack.
l Do not bump the raised vehicle or leave it
sitting on the jack for a long time. Both are very dangerous.
l Do not use a jack except the one that
came with your vehicle.
l The jack should not be used for any pur-
pose other than to change a tyre.
l No one should be in your vehicle when us-
ing the jack.
l Do not start or run the engine while your
vehicle is on the jack.
How to change a tyre
8-16OGAE15E5For emergencies8
Page 343 of 452
WARNINGlDo not turn the raised wheel. The tyres
still on the ground could turn and make
your vehicle fall off the jack.
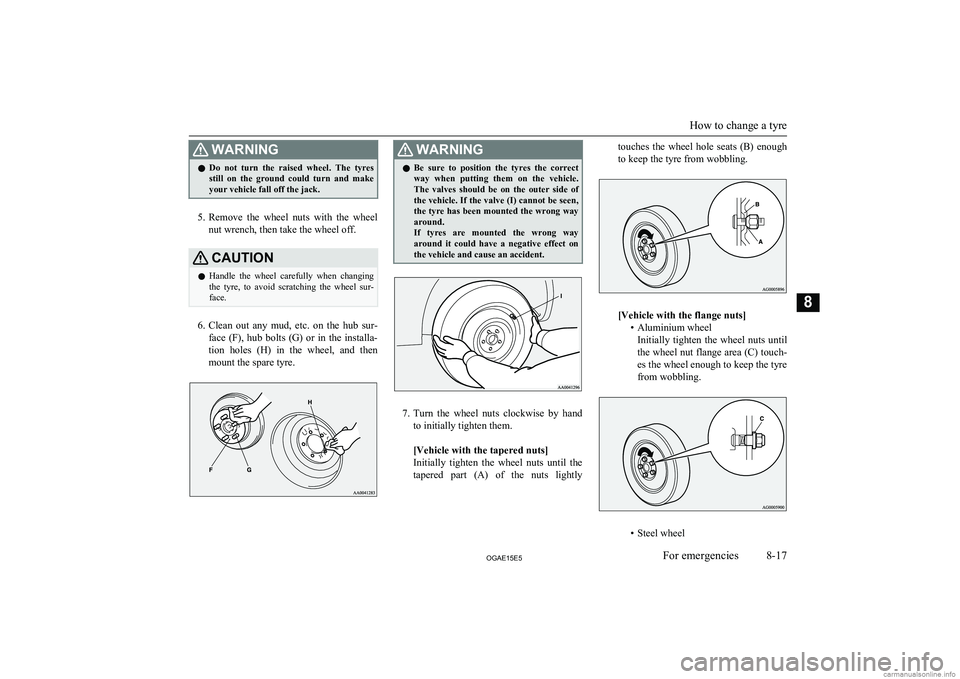
5. Remove the wheel nuts with the wheel
nut wrench, then take the wheel off.
CAUTIONl Handle the wheel carefully when changing
the tyre, to avoid scratching the wheel sur- face.
6. Clean out any mud, etc. on the hub sur-
face (F), hub bolts (G) or in the installa- tion holes (H) in the wheel, and then
mount the spare tyre.
WARNINGl Be sure to position the tyres the correct
way when putting them on the vehicle.
The valves should be on the outer side of
the vehicle. If the valve (I) cannot be seen, the tyre has been mounted the wrong wayaround.
If tyres are mounted the wrong way
around it could have a negative effect on the vehicle and cause an accident.
7. Turn the wheel nuts clockwise by hand
to initially tighten them.
[Vehicle with the tapered nuts]
Initially tighten the wheel nuts until the tapered part (A) of the nuts lightly
touches the wheel hole seats (B) enough
to keep the tyre from wobbling.
[Vehicle with the flange nuts] • Aluminium wheelInitially tighten the wheel nuts until
the wheel nut flange area (C) touch-
es the wheel enough to keep the tyre
from wobbling.
• Steel wheel
How to change a tyre
8-17OGAE15E5For emergencies8
Page 362 of 452
CAUTIONlNote that the support bar may disengage the
bonnet if the open bonnet is lifted by astrong wind.
l After inserting the support bar into the slot,
make sure the bar supports the bonnet se-
curely from falling down on to your head or body.
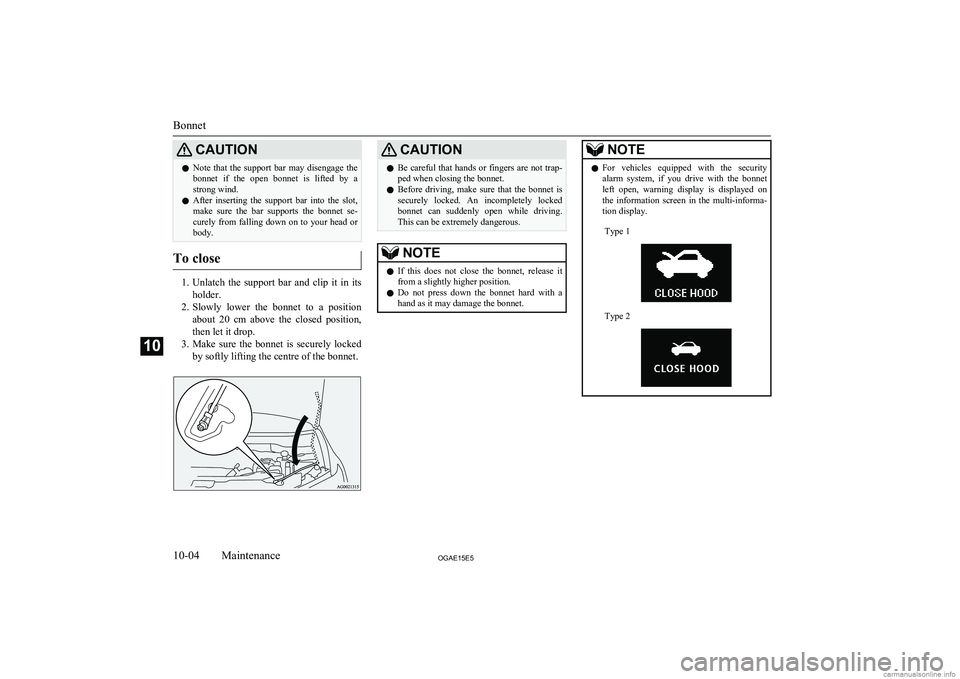
To close
1. Unlatch the support bar and clip it in its
holder.
2. Slowly lower the bonnet to a position
about 20 cm above the closed position,
then let it drop.
3. Make sure the bonnet is securely locked
by softly lifting the centre of the bonnet.
CAUTIONl Be careful that hands or fingers are not trap-
ped when closing the bonnet.
l Before driving, make sure that the bonnet is
securely locked. An incompletely locked bonnet can suddenly open while driving.
This can be extremely dangerous.NOTEl If this does not close the bonnet, release it
from a slightly higher position.
l Do not press down the bonnet hard with a
hand as it may damage the bonnet.NOTEl For vehicles equipped with the security
alarm system, if you drive with the bonnetleft open, warning display is displayed on
the information screen in the multi-informa- tion display.Type 1Type 2
Bonnet
10-04OGAE15E5Maintenance10
Page 365 of 452
lUse engine oil conforming to the follow-
ing classification: • ACEA classification: “For service C1, C2, C3 or C4”
• JASO classification: “For service DL-1”
If those classifications are not available,
contact a MITSUBISHI MOTORS Au-
thorized Service Point.NOTEl Use of additives is not recommended since
they may reduce the effectiveness of addi-
tives already included in the engine oil. It may result in failure of the mechanical as-
sembly.Engine coolant
E01000503437
To check the coolant level
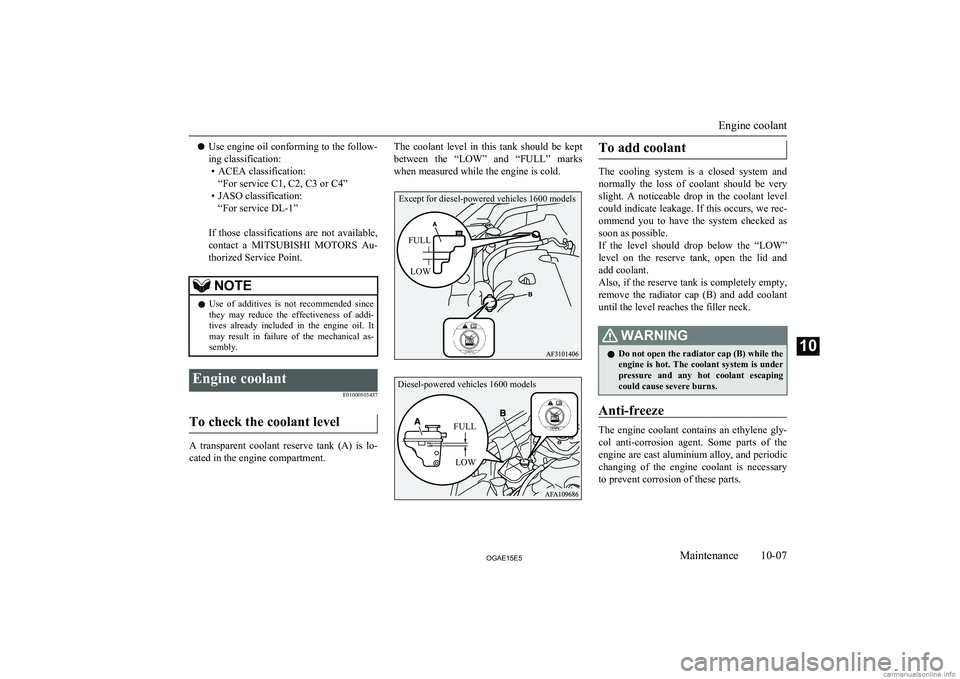
A transparent coolant reserve tank (A) is lo-cated in the engine compartment.
The coolant level in this tank should be kept
between the “LOW” and “FULL” marks when measured while the engine is cold.To add coolant
The cooling system is a closed system andnormally the loss of coolant should be very
slight. A noticeable drop in the coolant level
could indicate leakage. If this occurs, we rec- ommend you to have the system checked as
soon as possible.
If the level should drop below the “LOW” level on the reserve tank, open the lid and
add coolant.
Also, if the reserve tank is completely empty, remove the radiator cap (B) and add coolant until the level reaches the filler neck.
WARNINGl Do not open the radiator cap (B) while the
engine is hot. The coolant system is under
pressure and any hot coolant escaping
could cause severe burns.
Anti-freeze
The engine coolant contains an ethylene gly-
col anti-corrosion agent. Some parts of the engine are cast aluminium alloy, and periodic
changing of the engine coolant is necessary to prevent corrosion of these parts.
Engine coolant
10-07OGAE15E5Maintenance10 Except for diesel-powered vehicles 1600 models
FULLLOW Diesel-powered vehicles 1600 modelsFULLLOW
Page 367 of 452
NOTElThe washer fluid container serves the wind-
screen, rear window and headlamps (if soequipped).
During cold weather
To ensure proper operation of the washers at
low temperatures, use a fluid containing ananti-freezing agent.
Brake fluid/Clutch fluid*
E01000800631
The brake fluid and the clutch fluid share thereservoir tank.
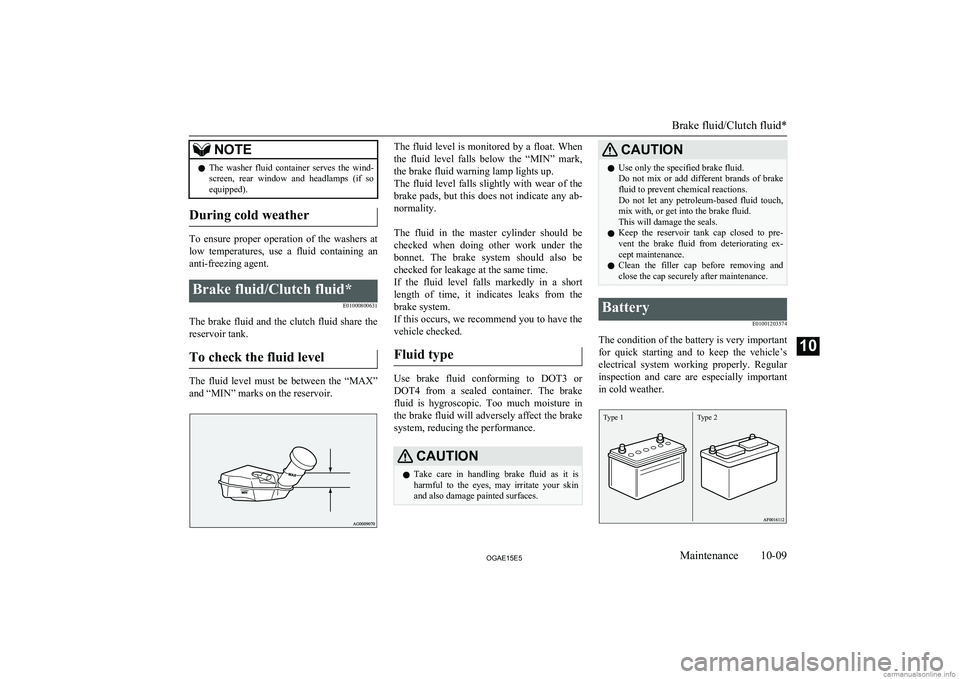
To check the fluid level
The fluid level must be between the “MAX” and “MIN” marks on the reservoir.
The fluid level is monitored by a float. When
the fluid level falls below the “MIN” mark, the brake fluid warning lamp lights up.The fluid level falls slightly with wear of the brake pads, but this does not indicate any ab-
normality.
The fluid in the master cylinder should be checked when doing other work under thebonnet. The brake system should also be checked for leakage at the same time.
If the fluid level falls markedly in a short length of time, it indicates leaks from the
brake system.
If this occurs, we recommend you to have the
vehicle checked.
Fluid type
Use brake fluid conforming to DOT3 or DOT4 from a sealed container. The brake
fluid is hygroscopic. Too much moisture in the brake fluid will adversely affect the brake
system, reducing the performance.
CAUTIONl Take care in handling brake fluid as it is
harmful to the eyes, may irritate your skin
and also damage painted surfaces.CAUTIONl Use only the specified brake fluid.
Do not mix or add different brands of brake fluid to prevent chemical reactions.
Do not let any petroleum-based fluid touch, mix with, or get into the brake fluid.
This will damage the seals.
l Keep the reservoir tank cap closed to pre-
vent the brake fluid from deteriorating ex- cept maintenance.
l Clean the filler cap before removing and
close the cap securely after maintenance.Battery
E01001203574
The condition of the battery is very important
for quick starting and to keep the vehicle’s electrical system working properly. Regularinspection and care are especially importantin cold weather.
Type 1Type 2
Brake fluid/Clutch fluid*
10-09OGAE15E5Maintenance10
Page 381 of 452
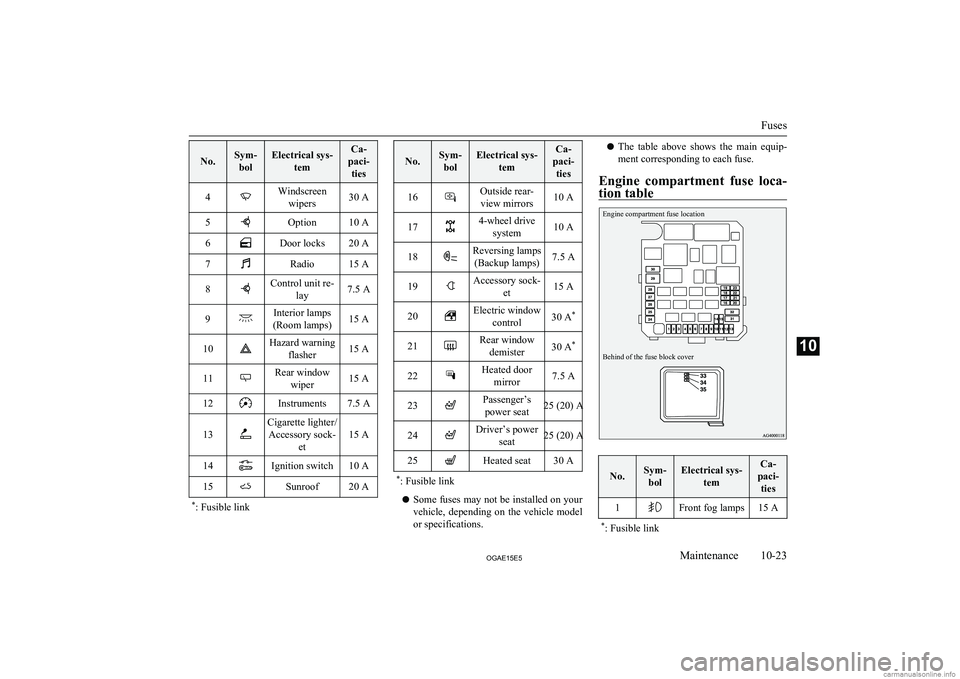
No.Sym-bolElectrical sys- temCa-
paci- ties4Windscreen wipers30 A5Option10 A6Door locks20 A7Radio15 A8Control unit re- lay7.5 A9Interior lamps
(Room lamps)15 A10Hazard warning flasher15 A11Rear windowwiper15 A12Instruments7.5 A13
Cigarette lighter/Accessory sock- et
15 A14Ignition switch10 A15Sunroof20 A*: Fusible link
No.Sym-
bolElectrical sys- temCa-
paci- ties16Outside rear-view mirrors10 A174-wheel drive system10 A18Reversing lamps(Backup lamps)7.5 A19Accessory sock- et15 A20Electric windowcontrol30 A *21Rear window
demister30 A *22Heated door
mirror7.5 A23Passenger’spower seat25 (20) A24Driver’s power seat25 (20) A25Heated seat30 A*: Fusible link
l Some fuses may not be installed on your
vehicle, depending on the vehicle model
or specifications.
l The table above shows the main equip-
ment corresponding to each fuse.
Engine compartment fuse loca-
tion tableEngine compartment fuse locationBehind of the fuse block cover
No.Sym- bolElectrical sys- temCa-
paci- ties1Front fog lamps15 A* : Fusible link
Fuses
10-23OGAE15E5Maintenance10
Page 417 of 452
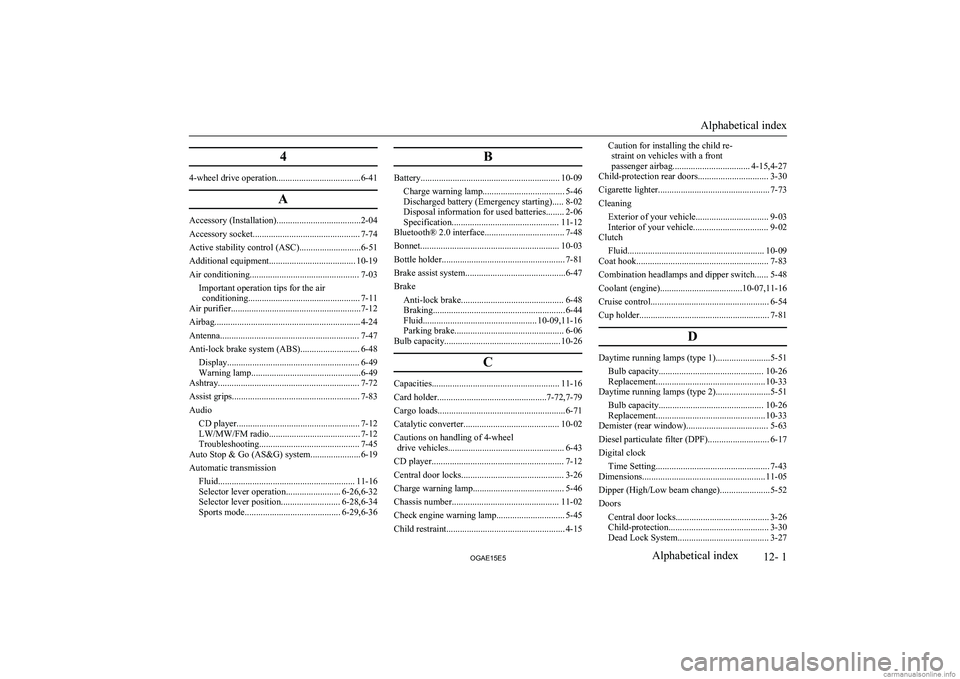
4
4-wheel drive operation.....................................6-41A
Accessory (Installation).....................................2-04
Accessory socket............................................... 7-74
Active stability control (ASC)...........................6-51
Additional equipment...................................... 10-19
Air conditioning................................................ 7-03 Important operation tips for the airconditioning................................................. 7-11
Air purifier.........................................................7-12
Airbag................................................................ 4-24
Antenna............................................................. 7-47
Anti-lock brake system (ABS).......................... 6-48 Display.......................................................... 6-49
Warning lamp................................................6-49
Ashtray.............................................................. 7-72
Assist grips........................................................ 7-83
Audio CD player...................................................... 7-12
LW/MW/FM radio........................................ 7-12
Troubleshooting............................................ 7-45
Auto Stop & Go (AS&G) system......................6-19
Automatic transmission Fluid............................................................ 11-16
Selector lever operation........................ 6-26,6-32
Selector lever position.......................... 6-28,6-34
Sports mode.......................................... 6-29,6-36
B
Battery............................................................. 10-09
Charge warning lamp.................................... 5-46
Discharged battery (Emergency starting)..... 8-02
Disposal information for used batteries........ 2-06
Specification............................................... 11-12
Bluetooth® 2.0 interface................................... 7-48
Bonnet............................................................. 10-03
Bottle holder...................................................... 7-81
Brake assist system............................................6-47
Brake Anti-lock brake............................................. 6-48
Braking.......................................................... 6-44
Fluid.................................................. 10-09,11-16
Parking brake................................................ 6-06
Bulb capacity................................................... 10-26
C
Capacities........................................................ 11-16
Card holder................................................7-72,7-79
Cargo loads........................................................6-71
Catalytic converter.......................................... 10-02
Cautions on handling of 4-wheel drive vehicles................................................... 6-43
CD player.......................................................... 7-12
Central door locks............................................. 3-26
Charge warning lamp........................................ 5-46
Chassis number............................................... 11-02
Check engine warning lamp.............................. 5-45
Child restraint.................................................... 4-15
Caution for installing the child re- straint on vehicles with a front
passenger airbag.................................. 4-15,4-27
Child-protection rear doors............................... 3-30
Cigarette lighter................................................. 7-73
Cleaning
Exterior of your vehicle................................ 9-03
Interior of your vehicle................................. 9-02
Clutch
Fluid............................................................ 10-09
Coat hook.......................................................... 7-83
Combination headlamps and dipper switch...... 5-48
Coolant (engine)....................................10-07,11-16
Cruise control.................................................... 6-54
Cup holder......................................................... 7-81
D
Daytime running lamps (type 1)........................5-51Bulb capacity.............................................. 10-26
Replacement................................................ 10-33
Daytime running lamps (type 2)........................5-51
Bulb capacity.............................................. 10-26
Replacement................................................ 10-33
Demister (rear window).................................... 5-63
Diesel particulate filter (DPF)........................... 6-17Digital clock Time Setting.................................................. 7-43
Dimensions...................................................... 11-05
Dipper (High/Low beam change)......................5-52
Doors Central door locks......................................... 3-26Child-protection............................................ 3-30 Dead Lock System........................................ 3-27
Alphabetical index
12- 1
OGAE15E5Alphabetical index