rear view mirror MITSUBISHI ASX 2017 (in English) User Guide
[x] Cancel search | Manufacturer: MITSUBISHI, Model Year: 2017, Model line: ASX, Model: MITSUBISHI ASX 2017Pages: 458, PDF Size: 22.98 MB
Page 45 of 458
To operate without using thekeyless operation function
E00306000123
Emergency keyE00307200278
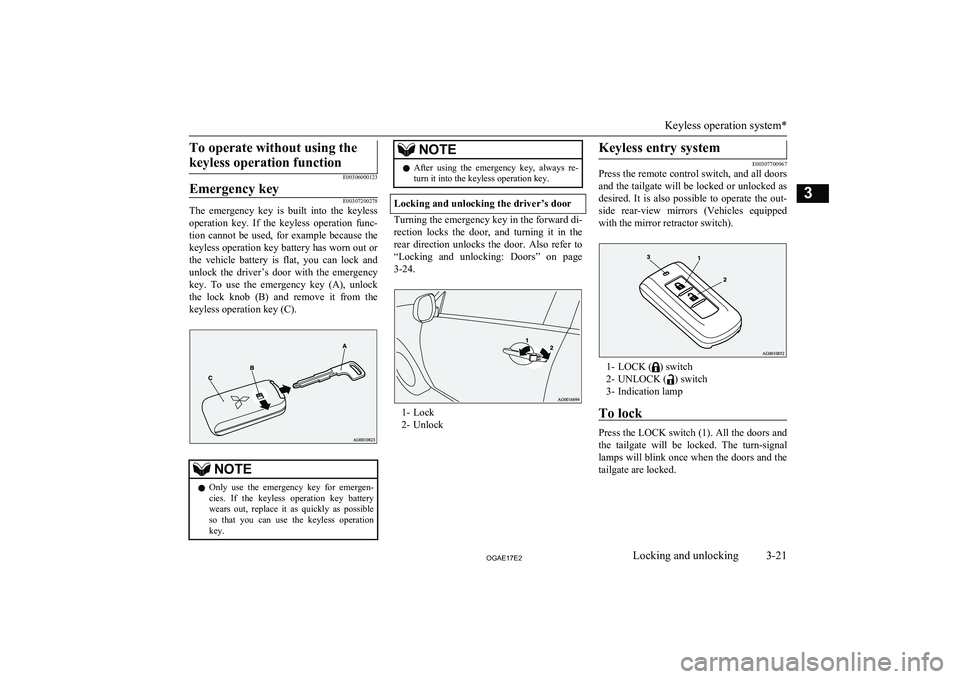
The emergency key is built into the keyless operation key. If the keyless operation func-
tion cannot be used, for example because the keyless operation key battery has worn out or the vehicle battery is flat, you can lock and
unlock the driver’s door with the emergency
key. To use the emergency key (A), unlock the lock knob (B) and remove it from the
keyless operation key (C).
NOTEl Only use the emergency key for emergen-
cies. If the keyless operation key batterywears out, replace it as quickly as possible
so that you can use the keyless operation
key.NOTEl After using the emergency key, always re-
turn it into the keyless operation key.
Locking and unlocking the driver’s door
Turning the emergency key in the forward di-
rection locks the door, and turning it in the rear direction unlocks the door. Also refer to
“Locking and unlocking: Doors” on page 3-24.
1- Lock
2- Unlock
Keyless entry system
E00307700967
Press the remote control switch, and all doors
and the tailgate will be locked or unlocked as
desired. It is also possible to operate the out-
side rear-view mirrors (Vehicles equipped with the mirror retractor switch).
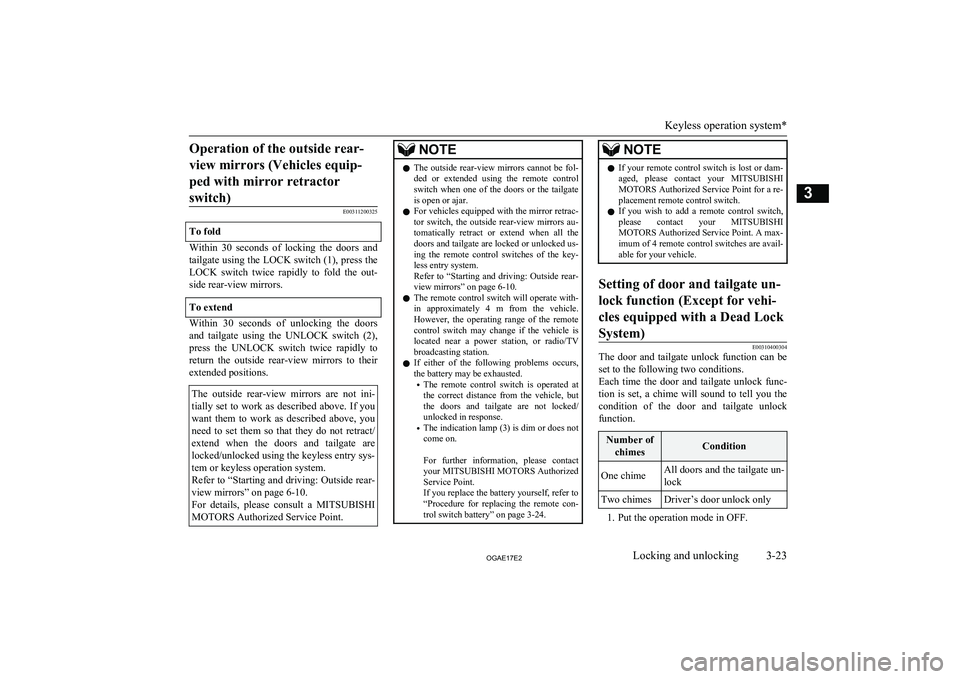
1- LOCK () switch
2- UNLOCK (
) switch
3- Indication lamp
To lock
Press the LOCK switch (1). All the doors and the tailgate will be locked. The turn-signal
lamps will blink once when the doors and the
tailgate are locked.
Keyless operation system*
3-21OGAE17E2Locking and unlocking3
Page 47 of 458
Operation of the outside rear-view mirrors (Vehicles equip- ped with mirror retractorswitch)
E00311200325
To fold
Within 30 seconds of locking the doors and tailgate using the LOCK switch (1), press the LOCK switch twice rapidly to fold the out-
side rear-view mirrors.
To extend
Within 30 seconds of unlocking the doors
and tailgate using the UNLOCK switch (2),
press the UNLOCK switch twice rapidly to return the outside rear-view mirrors to their
extended positions.
The outside rear-view mirrors are not ini-
tially set to work as described above. If you want them to work as described above, youneed to set them so that they do not retract/
extend when the doors and tailgate are
locked/unlocked using the keyless entry sys-
tem or keyless operation system.
Refer to “Starting and driving: Outside rear-
view mirrors” on page 6-10.
For details, please consult a MITSUBISHI
MOTORS Authorized Service Point.NOTEl The outside rear-view mirrors cannot be fol-
ded or extended using the remote control
switch when one of the doors or the tailgate
is open or ajar.
l For vehicles equipped with the mirror retrac-
tor switch, the outside rear-view mirrors au- tomatically retract or extend when all the
doors and tailgate are locked or unlocked us- ing the remote control switches of the key- less entry system.
Refer to “Starting and driving: Outside rear- view mirrors” on page 6-10.
l The remote control switch will operate with-
in approximately 4 m from the vehicle. However, the operating range of the remote
control switch may change if the vehicle is located near a power station, or radio/TVbroadcasting station.
l If either of the following problems occurs,
the battery may be exhausted.
• The remote control switch is operated at
the correct distance from the vehicle, but
the doors and tailgate are not locked/
unlocked in response.
• The indication lamp (3) is dim or does not
come on.
For further information, please contact your MITSUBISHI MOTORS Authorized
Service Point.
If you replace the battery yourself, refer to
“Procedure for replacing the remote con- trol switch battery” on page 3-24.NOTEl If your remote control switch is lost or dam-
aged, please contact your MITSUBISHI
MOTORS Authorized Service Point for a re-
placement remote control switch.
l If you wish to add a remote control switch,
please contact your MITSUBISHI
MOTORS Authorized Service Point. A max-
imum of 4 remote control switches are avail- able for your vehicle.Setting of door and tailgate un-
lock function (Except for vehi- cles equipped with a Dead LockSystem)
E00310400304
The door and tailgate unlock function can be set to the following two conditions.
Each time the door and tailgate unlock func-
tion is set, a chime will sound to tell you the
condition of the door and tailgate unlock function.
Number of
chimesConditionOne chimeAll doors and the tailgate un-lockTwo chimesDriver’s door unlock only
1. Put the operation mode in OFF.
Keyless operation system*
3-23OGAE17E2Locking and unlocking3
Page 166 of 458

Precautions to observe whenusing wipers and washers
E00507601444
l If the moving wipers become blocked
partway through a sweep by ice or other deposits on the glass, the wipers maytemporarily stop operating to prevent the
motor from overheating. In this case,
park the vehicle in a safe place, turn the ignition switch to the “LOCK” position
or put the operation mode in OFF, and
then remove the ice or other deposits.The wipers will start operating again af- ter the wiper motor cools down, so
check that the wipers operate before us-
ing them.
l Do not use the wipers when the glass is
dry.
They may scratch the glass surface and the blades wear out prematurely.
l Before using the wipers in cold weather,
check that the wiper blades are not fro-zen onto the glass. The motor may burn
out if the wipers are used with the blades
frozen onto the glass.
l Avoid using the washer continuously for
more than 20 seconds. Do not operate the washer when the fluid reservoir isempty.
Otherwise, the motor may burn out.
l Periodically check the level of washer
fluid in the reservoir and refill if re-
quired.
During cold weather, add a recommen- ded washer solution that will not freeze
in the washer reservoir. Failure to do so
could result in loss of washer function and frost damage to the system compo- nents.Rear window demister
switch E00507901186
The rear window demister switch can be op-erated when the engine is running.
Push the switch to turn on the rear window
demister. It will be turned off automatically
in about 20 minutes. To turn off the demister
within about 20 minutes, push the switch again.
The indication lamp (A) will illuminate while
the demister is on.NOTEl When the rear window demister switch is
pressed, the outside rear-view mirrors are
defogged or defrosted. Refer to “Heated mir-
ror” on page 6-12.
l The demister switch is not to melt snow but
to clear mist.
Remove snow before use of the demister
switch.
l When cleaning the inside of the rear win-
dow, use a soft cloth and wipe gently along
the heater wires, being careful not to damage the wires.
l Do not allow objects to touch the inside of
the rear window glass, damaged or broken wires may result.
Rear window demister switch
5-62OGAE17E2Instruments and controls5
Page 169 of 458
Economical driving............................................................................. 6-02
Driving, alcohol and drugs.................................................................. 6-03
Safe driving techniques....................................................................... 6-03
Running-in recommendations............................................................. 6-04 Parking brake...................................................................................... 6-06
Parking................................................................................................ 6-07
Steering wheel height and reach adjustment....................................... 6-08
Inside rear-view mirror....................................................................... 6-08 Outside rear-view mirrors................................................................... 6-10
Ignition switch.....................................................................................6-12 Steering wheel lock............................................................................. 6-13
Starting................................................................................................ 6-14 Diesel particulate filter (DPF)*........................................................... 6-17Turbocharger operation*..................................................................... 6-18Auto Stop & Go (AS&G) system*..................................................... 6-19
Manual transmission*......................................................................... 6-23 Automatic transmission INVECS-II Sports Mode 6A/T (Intelligent & Innovative Vehicle Electronic Control
System II)*......................................................................................6-26
Automatic transmission INVECS-III Sports Mode 6CVT (Intelligent & Innovative Vehicle Electronic Control
System III)*.................................................................................... 6-32
Electronically controlled 4WD system*............................................. 6-39 4-wheel drive operation...................................................................... 6-41
Inspection and maintenance following rough road operation............. 6-43
Cautions on handling of 4-wheel drive vehicles................................. 6-43
Braking................................................................................................ 6-44
Hill start assist*................................................................................... 6-45
Brake assist system............................................................................. 6-47Emergency stop signal system*.......................................................... 6-48
Anti-lock brake system (ABS)............................................................ 6-48
Electric power steering system (EPS)................................................. 6-50 Active stability control (ASC)*.......................................................... 6-51Cruise control*.................................................................................... 6-54
Tyre pressure monitoring system (TPMS)*........................................ 6-59 Reversing sensor system*................................................................... 6-65
Rear-view camera*............................................................................. 6-69 Cargo loads......................................................................................... 6-71Trailer towing......................................................................................6-73Starting and driving
OGAE17E26
Page 176 of 458
Parking with the engine run-ning
Never leave the engine running while you
take a short sleep/rest. Also, never leave the engine running in a closed or poorly ventila-
ted place.
WARNINGl Leaving the engine running carries the
riskof injury or death from accidentally
moving the gearshift lever ( M/T) or the
selector lever ( A/T or CVT) or the accu-
mulation of toxic exhaust fumes in the
passenger compartment.
Where you park
WARNINGl Do not park your vehicle in areas where
combustible materials such as dry grass
or leaves can come in contact with a hot exhaust, since a fire could occur.
Do not keep the steering wheel
fully turned for a long time
More effort could be required to turn the
steering wheel.
Refer to “Electric power steering system (EPS)” on page 6-50.
When leaving the vehicle
Always carry the key and lock all doors and
the tailgate when leaving the vehicle unatten-
ded.
Always try to park your vehicle in a well lit
area.
Steering wheel height and
reach adjustment E00600700512
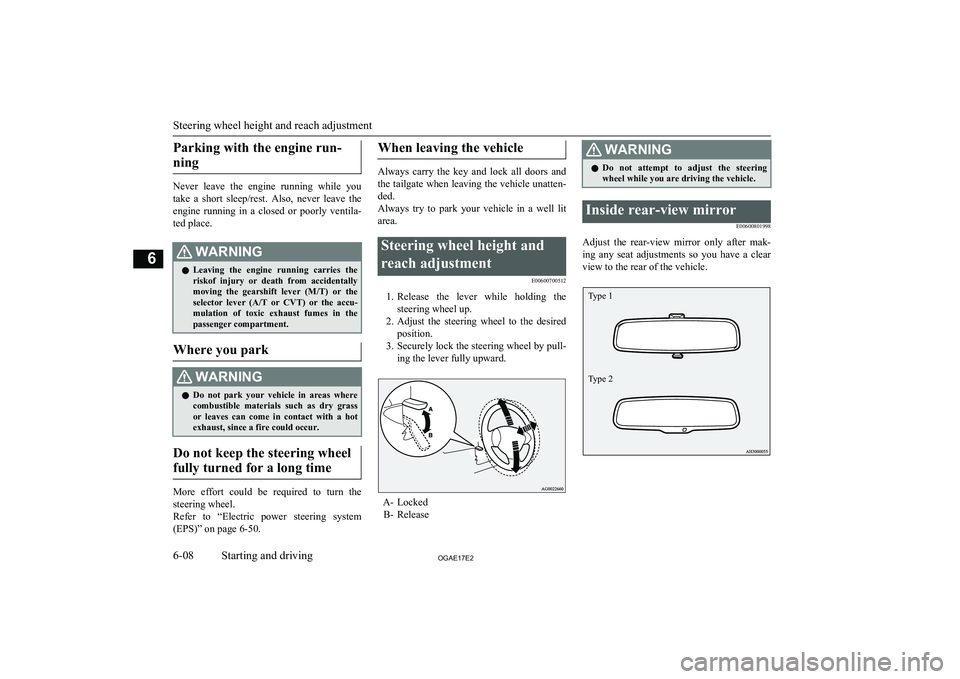
1.Release the lever while holding the
steering wheel up.
2. Adjust the steering wheel to the desired
position.
3. Securely lock the steering wheel by pull-
ing the lever fully upward.
A- Locked B- Release
WARNINGl Do not attempt to adjust the steering
wheel while you are driving the vehicle.Inside rear-view mirror
E00600801998
Adjust the rear-view mirror only after mak-
ing any seat adjustments so you have a clear
view to the rear of the vehicle.
Steering wheel height and reach adjustment
6-08OGAE17E2Starting and driving6 Type 1
Type 2
Page 177 of 458
WARNINGlDo not attempt to adjust the rear-view
mirror while driving. This can be danger-
ous.
Always adjust the mirror before driving.
Adjust the rear-view mirror to maximize the
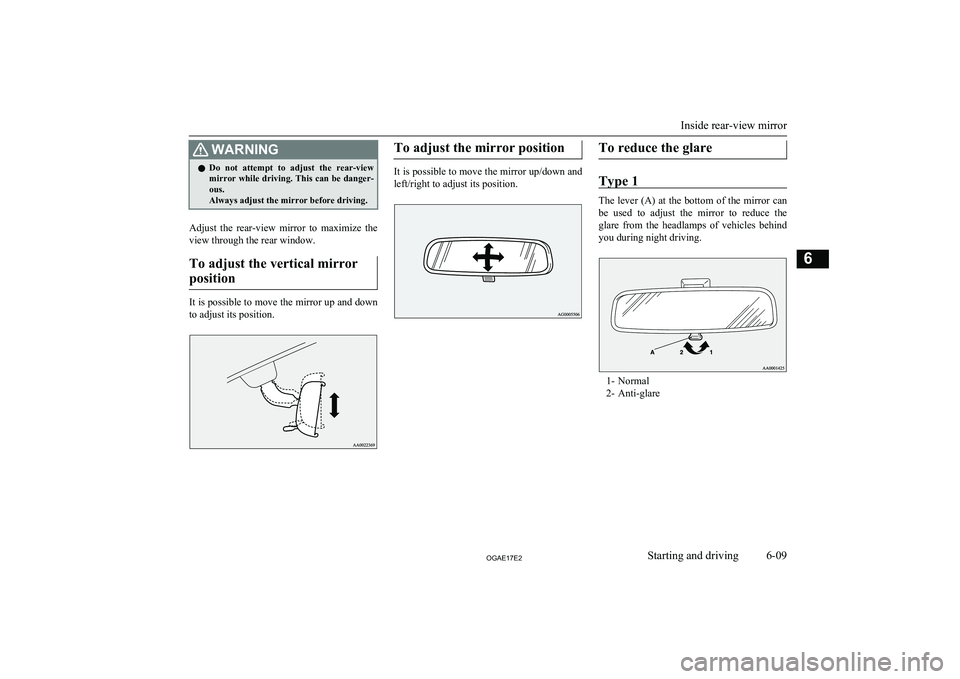
view through the rear window.
To adjust the vertical mirror position
It is possible to move the mirror up and down
to adjust its position.
To adjust the mirror position
It is possible to move the mirror up/down and
left/right to adjust its position.
To reduce the glare
Type 1
The lever (A) at the bottom of the mirror can
be used to adjust the mirror to reduce the
glare from the headlamps of vehicles behind you during night driving.
1- Normal
2- Anti-glare
Inside rear-view mirror
6-09OGAE17E2Starting and driving6
Page 178 of 458
Type 2
When the headlamps of the vehicles behind
you are very bright, the reflection factor of the rear-view mirror is automatically changed
to reduce the glare.
When the ignition switch is turned to the
“ON” position or the operation mode is put in
ON, the reflection factor of the mirror is au- tomatically changed.
NOTEl Do not hang items on, or spray glass cleaner
on the sensor (1), as reduced sensitivitycould result.Outside rear-view mirrors
E00600900628To adjust the mirror position
E00601000642
The outside rear-view mirrors can be operat-
ed when the ignition switch or the operation
mode is in ON or ACC.
WARNINGl Do not attempt to adjust the rear-view
mirrors while driving. This can be dan- gerous.
Always adjust the mirrors before driving.
l Your vehicle is equipped with convex type
mirrors.
Please take into consideration, that ob-
jects you see in the mirror will look small- er and farther away compared to a nor-mal flat mirror.
Do not use this mirror to estimate dis- tance of following vehicles when changing
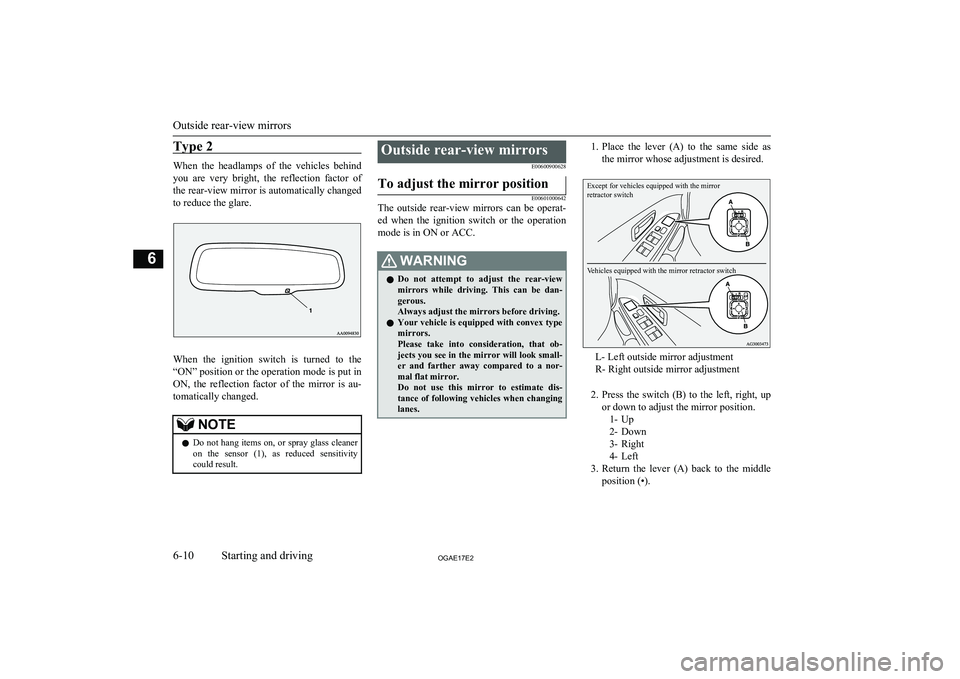
lanes.1. Place the lever (A) to the same side as
the mirror whose adjustment is desired.Except for vehicles equipped with the mirror
retractor switchVehicles equipped with the mirror retractor switch
L- Left outside mirror adjustment
R- Right outside mirror adjustment
2. Press the switch (B) to the left, right, up
or down to adjust the mirror position. 1- Up
2- Down
3- Right
4- Left
3. Return the lever (A) back to the middle
position (•).
Outside rear-view mirrors
6-10OGAE17E2Starting and driving6
Page 179 of 458
Retracting and extending theoutside mirrors
E00601100715
The outside mirror can be folded in towards
the side window to prevent damage when
parking in narrow areas.
CAUTIONl Do not drive the vehicle with the mirror fol-
ded in.
The lack of rearward visibility normally pro-
vided by the mirror could lead to an acci- dent.
[Except for vehicles equipped with the
mirror retractor switch]
Push the mirror towards the back of the vehi- cle with your hand to retract it in. When ex-
tending the mirror, pull it out towards the
front of the vehicle until it clicks to lock in
place.
[For vehicles equipped with the mirror re-
tractor switch]
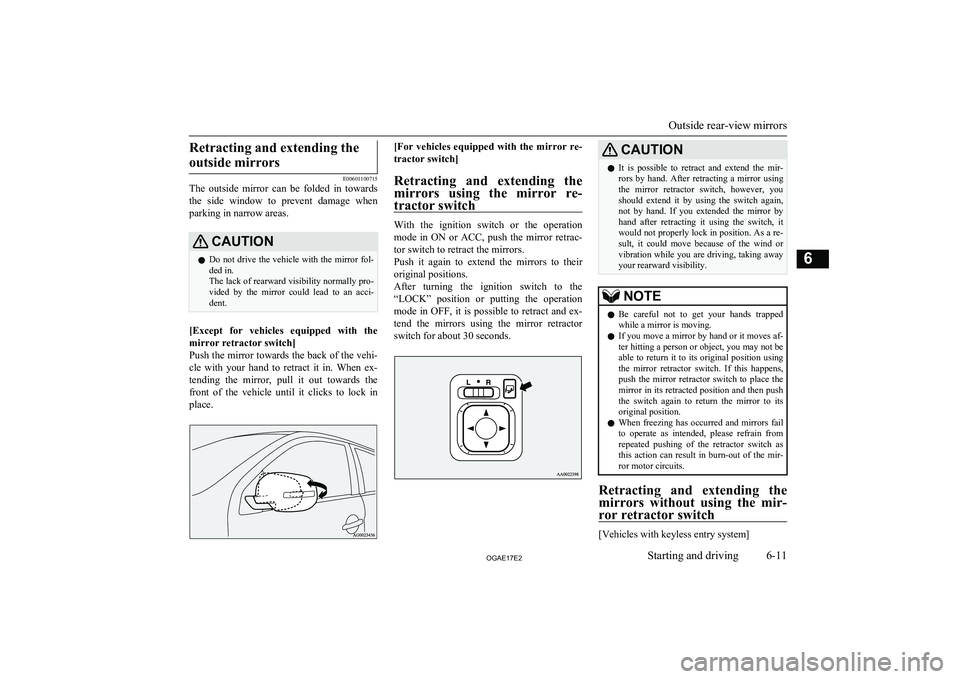
Retracting and extending the
mirrors using the mirror re- tractor switch
With the ignition switch or the operation
mode in ON or ACC, push the mirror retrac- tor switch to retract the mirrors.
Push it again to extend the mirrors to their
original positions.
After turning the ignition switch to the
“LOCK” position or putting the operation
mode in OFF, it is possible to retract and ex- tend the mirrors using the mirror retractor
switch for about 30 seconds.
CAUTIONl It is possible to retract and extend the mir-
rors by hand. After retracting a mirror using
the mirror retractor switch, however, you should extend it by using the switch again,
not by hand. If you extended the mirror by
hand after retracting it using the switch, it would not properly lock in position. As a re-
sult, it could move because of the wind or
vibration while you are driving, taking away your rearward visibility.NOTEl Be careful not to get your hands trapped
while a mirror is moving.
l If you move a mirror by hand or it moves af-
ter hitting a person or object, you may not be
able to return it to its original position using the mirror retractor switch. If this happens,
push the mirror retractor switch to place the mirror in its retracted position and then push
the switch again to return the mirror to its original position.
l When freezing has occurred and mirrors fail
to operate as intended, please refrain from repeated pushing of the retractor switch as
this action can result in burn-out of the mir- ror motor circuits.
Retracting and extending the
mirrors without using the mir- ror retractor switch
[Vehicles with keyless entry system]
Outside rear-view mirrors
6-11OGAE17E2Starting and driving6
Page 180 of 458
The mirrors automatically retract or extendwhen the doors are locked or unlocked using the remote control switches of the keyless en-
try system.
Refer to “Keyless entry system” on page 3-04.
[Vehicles equipped with keyless operation
system]
The mirrors automatically retract or extend when the doors are locked or unlocked using the remote control switches or the keyless op-eration function of the keyless operation sys-
tem.
Refer to “Keyless operation system: To oper- ate using the keyless operation function, Key-
less entry system” on pages 3-10 and 3-21.NOTEl Functions can be modified as stated below.
Consult a MITSUBISHI MOTORS Author-
ized Service Point.
• Automatically extend when the following
operation is performed.
[Except vehicles equipped with keyless operation system]
Turn the ignition switch to the “ON” or
“ACC” position.
[Vehicles equipped with keyless operation
system]
Put the operation mode in ON or ACC.NOTE• Automatically retract when the driver’s
door is opened after turning the ignition switch to the “LOCK” position or putting the operation mode in OFF.
• Automatically extend when the vehicle
speed reaches 30 km/h (19 mph).
• Deactivate the automatic extension func-
tion.Heated mirror
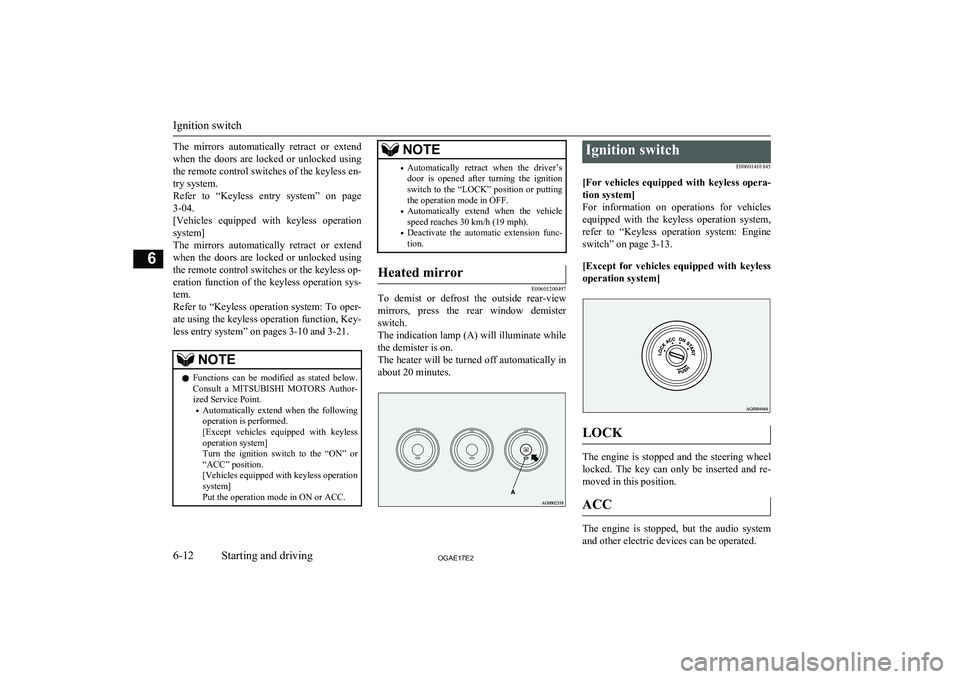
E00601200497
To demist or defrost the outside rear-view
mirrors, press the rear window demister
switch.
The indication lamp (A) will illuminate while the demister is on.
The heater will be turned off automatically in
about 20 minutes.
Ignition switch
E00601401845
[For vehicles equipped with keyless opera- tion system]
For information on operations for vehicles equipped with the keyless operation system,
refer to “Keyless operation system: Engine
switch” on page 3-13.
[Except for vehicles equipped with keyless operation system]
LOCK
The engine is stopped and the steering wheel
locked. The key can only be inserted and re- moved in this position.
ACC
The engine is stopped, but the audio system
and other electric devices can be operated.
Ignition switch
6-12OGAE17E2Starting and driving6
Page 383 of 458
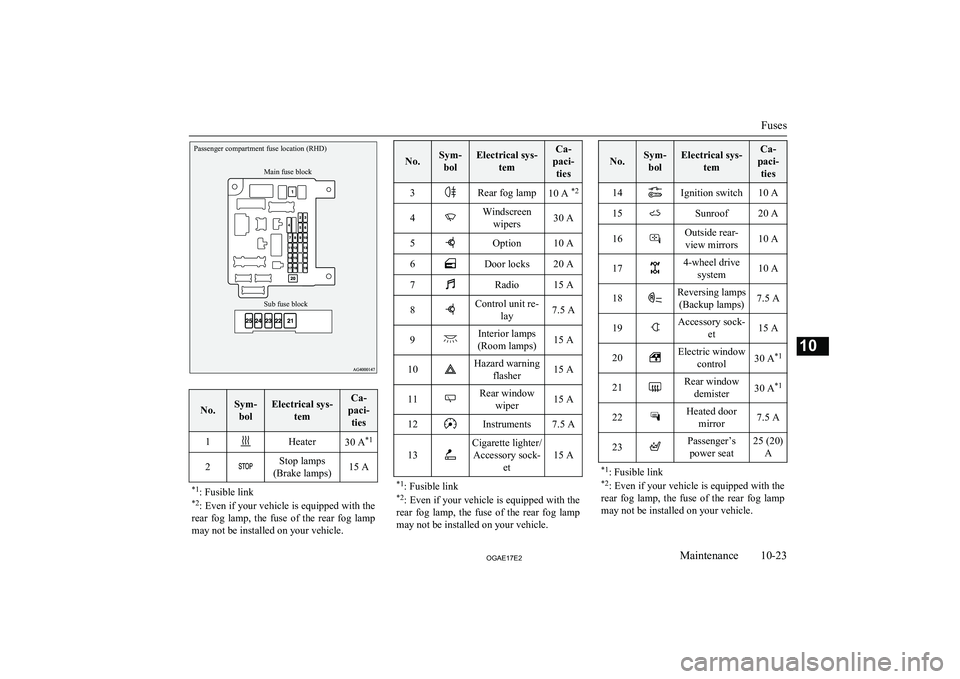
Passenger compartment fuse location (RHD)Sub fuse blockMain fuse block
No.Sym-bolElectrical sys- temCa-
paci- ties1Heater30 A *12Stop lamps
(Brake lamps)15 A*1 : Fusible link
*2 : Even if your vehicle is equipped with the
rear fog lamp, the fuse of the rear fog lamp
may not be installed on your vehicle.
No.Sym- bolElectrical sys- temCa-
paci- ties3Rear fog lamp10 A *24Windscreen
wipers30 A5Option10 A6Door locks20 A7Radio15 A8Control unit re- lay7.5 A9Interior lamps
(Room lamps)15 A10Hazard warning flasher15 A11Rear windowwiper15 A12Instruments7.5 A13
Cigarette lighter/Accessory sock- et
15 A
*1: Fusible link
*2 : Even if your vehicle is equipped with the
rear fog lamp, the fuse of the rear fog lamp
may not be installed on your vehicle.
No.Sym- bolElectrical sys- temCa-
paci- ties14Ignition switch10 A15Sunroof20 A16Outside rear-view mirrors10 A174-wheel drive system10 A18Reversing lamps(Backup lamps)7.5 A19Accessory sock- et15 A20Electric windowcontrol30 A *121Rear window
demister30 A *122Heated door
mirror7.5 A23Passenger’spower seat25 (20) A*1: Fusible link
*2 : Even if your vehicle is equipped with the
rear fog lamp, the fuse of the rear fog lamp
may not be installed on your vehicle.
Fuses
10-23OGAE17E2Maintenance10