check engine MITSUBISHI ASX 2017 (in English) Owner's Guide
[x] Cancel search | Manufacturer: MITSUBISHI, Model Year: 2017, Model line: ASX, Model: MITSUBISHI ASX 2017Pages: 458, PDF Size: 22.98 MB
Page 222 of 458
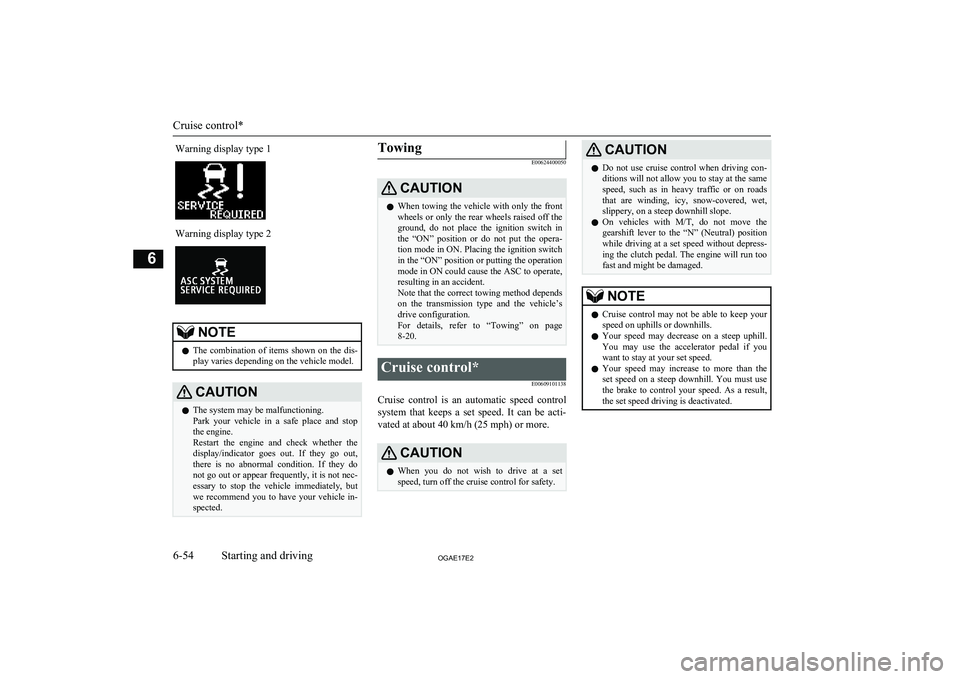
Warning display type 1Warning display type 2NOTElThe combination of items shown on the dis-
play varies depending on the vehicle model.CAUTIONl The system may be malfunctioning.
Park your vehicle in a safe place and stop
the engine.
Restart the engine and check whether the display/indicator goes out. If they go out,
there is no abnormal condition. If they do not go out or appear frequently, it is not nec- essary to stop the vehicle immediately, but
we recommend you to have your vehicle in- spected.Towing
E00624400050CAUTIONl When towing the vehicle with only the front
wheels or only the rear wheels raised off the
ground, do not place the ignition switch in the “ON” position or do not put the opera- tion mode in ON. Placing the ignition switchin the “ON” position or putting the operation
mode in ON could cause the ASC to operate, resulting in an accident.
Note that the correct towing method depends
on the transmission type and the vehicle’s drive configuration.
For details, refer to “Towing” on page 8-20.Cruise control*
E00609101138
Cruise control is an automatic speed controlsystem that keeps a set speed. It can be acti-vated at about 40 km/h (25 mph) or more.
CAUTIONl When you do not wish to drive at a set
speed, turn off the cruise control for safety.CAUTIONl Do not use cruise control when driving con-
ditions will not allow you to stay at the same speed, such as in heavy traffic or on roads
that are winding, icy, snow-covered, wet, slippery, on a steep downhill slope.
l On vehicles with
M/T, do not move the
gearshift lever to the “N” (Neutral) position
while driving at a set speed without depress- ing the clutch pedal. The engine will run too
fast and might be damaged.NOTEl Cruise control may not be able to keep your
speed on uphills or downhills.
l Your speed may decrease on a steep uphill.
You may use the accelerator pedal if you
want to stay at your set speed.
l Your speed may increase to more than the
set speed on a steep downhill. You must use the brake to control your speed. As a result, the set speed driving is deactivated.
Cruise control*
6-54OGAE17E2Starting and driving6
Page 229 of 458
NOTEType 2CAUTIONlIf the warning lamp does not illuminate
when the ignition switch is turned to the
“ON” position or the operation mode is put
in ON, it means that the tyre pressure moni-
toring system (TPMS) is not working prop- erly. Have the system inspected by a
MITSUBISHI MOTORS Authorized Serv-
ice Point.
In such situations, a malfunctioning of the system may prevent the monitoring of the tyre pressure. Avoid sudden braking, sharp
turning and high-speed driving.CAUTIONl If a malfunction is detected in the tyre pres-
sure monitoring system (TPMS), the warn- ing lamp will blink for approximately 1 mi-
nute and then remain continuously illumina-
ted.
The warning lamp will issue further warn- ings each time the engine is restarted as long
as the malfunction exists.
Check to see whether the warning lamp goes
off after few minutes driving.
If it then goes off during driving, there is no
problem.
However, if the warning lamp does not go off, or if it blinks again when the engine is
restarted, have the vehicle inspected by a MITSUBISHI MOTORS Authorized Serv-
ice Point.
In such situations, a malfunctioning of the system may be preventing the monitoring of the tyre pressure. For safety reasons, when
the warning lamp appears while driving,
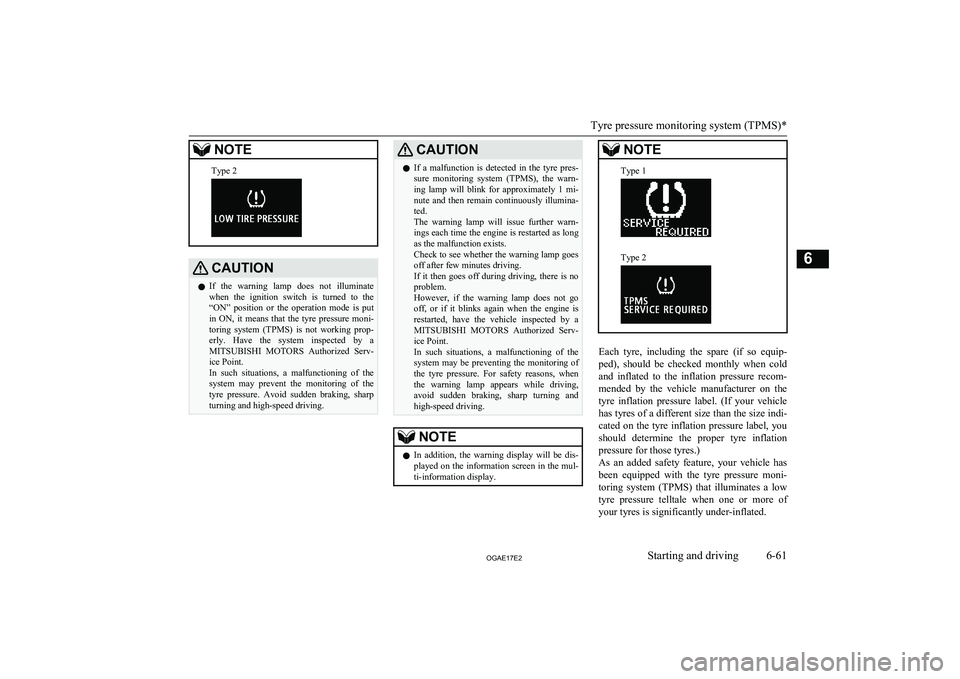
avoid sudden braking, sharp turning and high-speed driving.NOTEl In addition, the warning display will be dis-
played on the information screen in the mul-
ti-information display.NOTEType 1Type 2
Each tyre, including the spare (if so equip-
ped), should be checked monthly when cold and inflated to the inflation pressure recom-
mended by the vehicle manufacturer on the tyre inflation pressure label. (If your vehiclehas tyres of a different size than the size indi-
cated on the tyre inflation pressure label, you
should determine the proper tyre inflationpressure for those tyres.)
As an added safety feature, your vehicle has
been equipped with the tyre pressure moni- toring system (TPMS) that illuminates a low
tyre pressure telltale when one or more of
your tyres is significantly under-inflated.
Tyre pressure monitoring system (TPMS)*
6-61OGAE17E2Starting and driving6
Page 241 of 458
CAUTIONlWhen luggage is loaded onto the vehicle,
please make sure to drive slowly and avoid
excessive manoeuvres such as sudden brak- ing or quick turning.
In addition, place the luggage on the carrier
so that its weight is distributed evenly with the heaviest items on the bottom. Do not load items that are wider than the roof carri-
er.
The additional weight on the roof could raise
the vehicle’s centre of gravity and affect ve-
hicle handling characteristics.
As a result, driving errors or emergency ma- noeuvres could lead to a loss of control and
result in an accident.
l Before driving and after travelling a short
distance, always check the load to make sure
it is securely fastened to the roof carrier.
Check periodically during your travel that the load remains secure.NOTEl To prevent wind noise or reduction in fuel
economy, remove the roof carrier when not
in use.
l Remove the roof carrier before using an au-
tomatic car wash.
l Be sure that adequate clearance is main-
tained for raising the tailgate when installing a roof carrier.Trailer towing
E00610001919
In order to tow a trailer with your vehicle,
have a trailer towing device mounted that
meets all relevant regulations in your area, consult a MITSUBISHI MOTORS Author-
ized Service Point.
The regulations concerning the towing of a
trailer may differ from country to country. You are advised to obey the regulations in
each area.CAUTIONl Danger of Accident!
A towing bar should be fitted according to MITSUBISHI MOTORS guidelines.
Maximum towable weight with
brake and maximum trailer- nose weight
Never exceed the maximum towable weight
with brake and the maximum trailer-nose weight as listed in the specifications.
(Refer to page 11-07.)
If you tow a trailer at an altitude of more than
1,000 m above sea-level, reduce your weight by 10 % of the gross combination weight for
every increase of 1,000 m above sea-level, as
the engine output is lowered owing to de-
crease in atmospheric pressure.
Towing bar mounting specifi-
cations
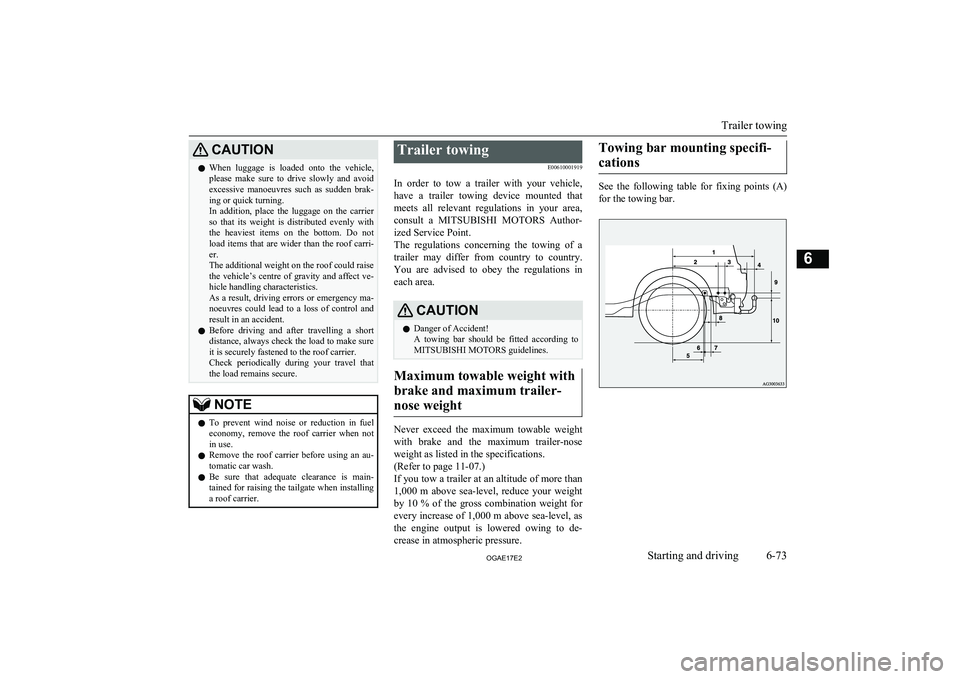
See the following table for fixing points (A) for the towing bar.
Trailer towing
6-73OGAE17E2Starting and driving6
Page 242 of 458
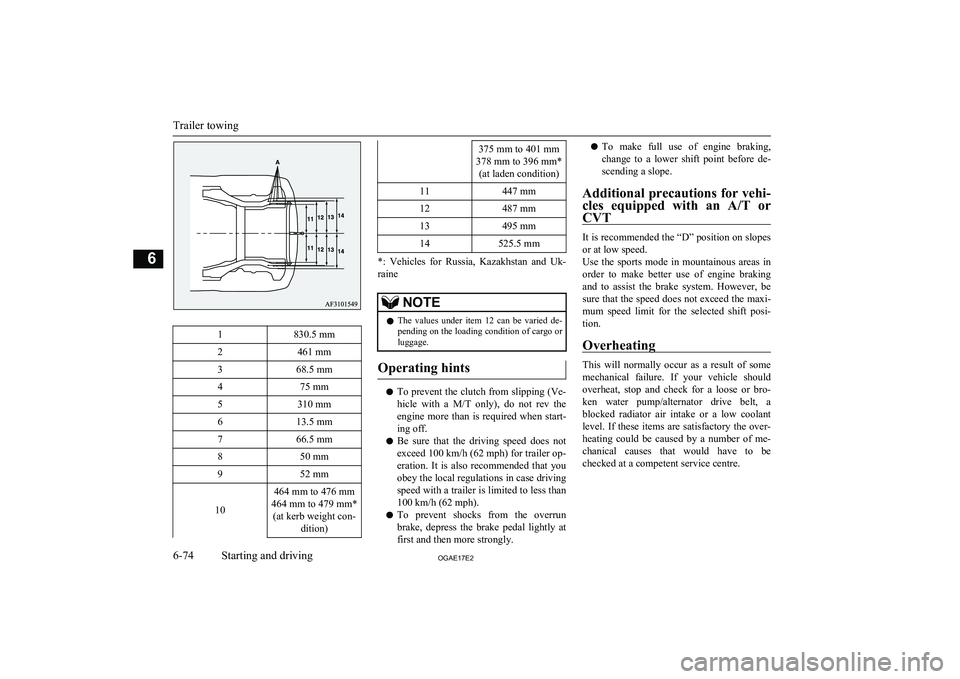
1830.5 mm2461 mm368.5 mm475 mm5310 mm613.5 mm766.5 mm850 mm952 mm
10
464 mm to 476 mm
464 mm to 479 mm* (at kerb weight con- dition)375 mm to 401 mm
378 mm to 396 mm* (at laden condition)11447 mm12487 mm13495 mm14525.5 mm
*: Vehicles for Russia, Kazakhstan and Uk-
raine
NOTEl The values under item 12 can be varied de-
pending on the loading condition of cargo orluggage.
Operating hints
l To prevent the clutch from slipping (Ve-
hicle with a M/T only), do not rev the
engine more than is required when start- ing off.
l Be sure that the driving speed does not
exceed 100 km/h (62 mph) for trailer op-
eration. It is also recommended that you obey the local regulations in case driving
speed with a trailer is limited to less than
100 km/h (62 mph).
l To prevent shocks from the overrun
brake, depress the brake pedal lightly at first and then more strongly.
l To make full use of engine braking,
change to a lower shift point before de- scending a slope.
Additional precautions for vehi- cles equipped with an A/T or
CVT
It is recommended the “D” position on slopes
or at low speed.
Use the sports mode in mountainous areas in order to make better use of engine braking
and to assist the brake system. However, be
sure that the speed does not exceed the maxi- mum speed limit for the selected shift posi- tion.
Overheating
This will normally occur as a result of some
mechanical failure. If your vehicle should
overheat, stop and check for a loose or bro- ken water pump/alternator drive belt, a blocked radiator air intake or a low coolant
level. If these items are satisfactory the over-
heating could be caused by a number of me-
chanical causes that would have to be
checked at a competent service centre.
Trailer towing
6-74OGAE17E2Starting and driving6
Page 250 of 458
NOTElOn vehicles with the automatic air condi-
tioning, when the mode selection dial or the
blower speed selection dial is set to the “AUTO” position again after manual opera-tion, the air selection dial will also be auto- matically controlled.
l On vehicles with the automatic air condi-
tioning, when the engine coolant tempera-
ture rises to a certain level, the air selection is automatically switched to the recirculation
position and the indication lamp (A) comes on. At this time, the system will not switch
to the outside position even if the air selec-
tion switch is pushed.Customizing the air selection
E00732500107
Functions can be changed as desired, as sta-
ted below.
l Enable automatic air control
• Heater/Manual air conditioning: When the system operates, the air se-
lection switch will be automatically controlled.
• Automatic air conditioning: When the mode selection dial or
blower speed selection dial is turned
to the “AUTO” position, the air selec-
tion switch is also controlled automat- ically.
l Disable automatic air control
• Heater/Manual air conditioning:
Even when the system operates, theair selection switch will not be auto-
matically controlled.
• Automatic air conditioning: Even when the mode selection dial orblower speed selection dial is turned
to the “AUTO” position, the air selec-
tion switch is not controlled automati- cally.
l Setting change method
Hold down the air selection switch for about 10 seconds or more.
When the setting is changed, a sound is
emitted and the indication lamp flashes. • When the setting is changed from ena-
ble to disable 3 sounds are emitted and
the indication lamp flashes 3 times.
• When the setting is changed from dis-
able to enable 2 sounds are emitted and the indication lamp flashes 3times.NOTEl The factory setting is “Enable automatic air
control.”
l When the mode selection dial is turned to
“
”, in order to prevent misting of the
windows the ventilator automatically switches to outside air even if “Disable auto-matic air control” is set.
Air conditioning switch (Air
conditioning)
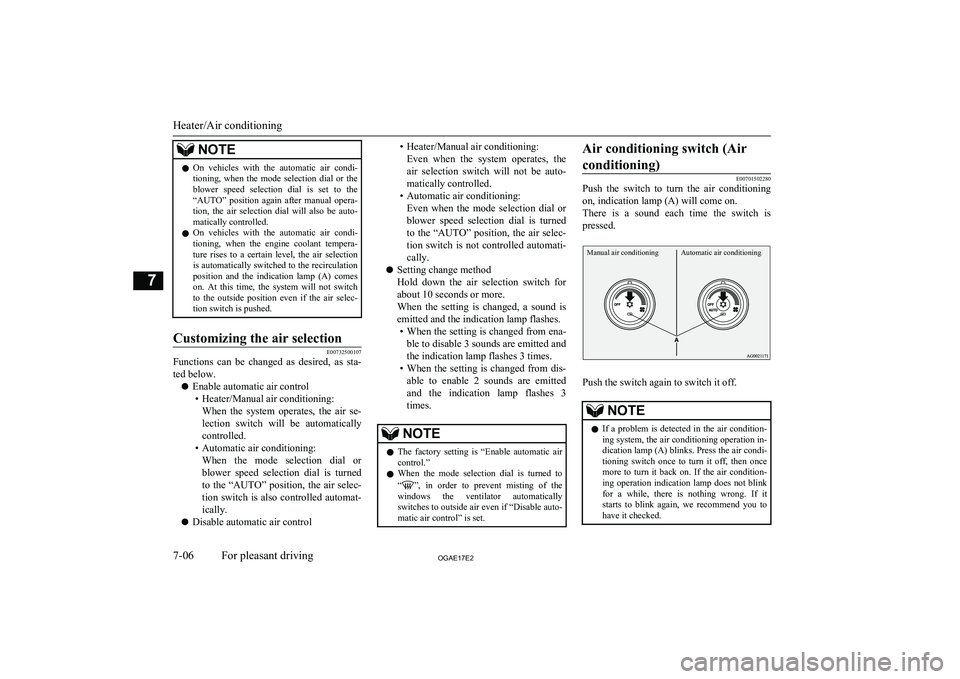
E00701502280
Push the switch to turn the air conditioning
on, indication lamp (A) will come on.
There is a sound each time the switch is pressed.
Manual air conditioningAutomatic air conditioning
Push the switch again to switch it off.
NOTEl If a problem is detected in the air condition-
ing system, the air conditioning operation in- dication lamp (A) blinks. Press the air condi-
tioning switch once to turn it off, then once more to turn it back on. If the air condition-
ing operation indication lamp does not blink for a while, there is nothing wrong. If it
starts to blink again, we recommend you to have it checked.
Heater/Air conditioning
7-06OGAE17E2For pleasant driving7
Page 256 of 458
NOTElTo listen to the audio system while the en-
gine is not running, turn the ignition switch
to the “ACC” position or put the operation mode in ACC.
If the ignition switch or the operation mode is left in ACC, the accessory power will au-
tomatically turn off after a certain period of time and you will no longer be able to usethe audio system. The accessory power
comes on again if the ignition switch or the engine switch is operated with it in the“ACC” position. Refer to “ACC power auto-
cutout function” on pages 3-14 and 6-13.
l If a cellular phone is used inside the vehicle,
it may create noise from the audio equip-
ment. This does not mean that anything is wrong with your audio equipment. In such acase, use the cellular phone at a place as far
away as possible from the audio equipment.
l If foreign objects or water get into the audio
equipment, or if smoke or a strange odour comes from it, immediately turn off the au-
dio system. We recommend you to have it checked. Never try to repair it by yourself.
Avoid continuous usage without inspection
by a qualified person.Important Points on Usage
E00735500023
iPod/iPhone Playback Func- tion*
l This product supports audio playback
from iPod/iPhone devices, however dif-fering versions mean that playback can-
not be guaranteed.
l Please be aware that depending on the
iPod/iPhone model or version, operation
may differ.
How to Clean
E00735700025
l If the product becomes dirty, wipe with
a soft cloth.
l If very dirty, use a soft cloth dipped in
neutral detergent diluted in water, and then wrung out. Do not use benzene,
thinners, or other chemical wipes. This
may harm the surface.
Trademarks
E00735801153
l Product names and other proper names
are the trademarks or registered trade- marks of their respective owners.
l Furthermore, even if there is no specific
denotation of trademarks or registered
trademarks, these are to be observed in
their entirety.
“Made for iPod,” “Made for iPhone”
mean that an electronic accessory has
been designed to connect specifically to iPod or iPhone, respectively, and has
been certified by the developer to meet Apple performance standards.
iPhone, iPod, iPod classic, iPod nano,
and iPod touch are trademarks of Apple
Inc., registered in the U.S. and other countries.
Apple is not responsible for the opera- tion of this device or its compliance with
safety and regulatory standards.
NOTEl iPod and iTunes licensing allows individual
users to privately reproduce and play back
non- copyrighted material as well as material
that may be legally copied and reproduced.
Infringement of copyright is prohibited.
LW/MW/FM radio/CD player*
7-12OGAE17E2For pleasant driving7
Page 295 of 458
Security function
E00760500043
It is possible to use a password as a security
function by setting a password of your choice
for the Bluetooth ®
2.0 interface.
When the security function is turned on, it is
necessary to make a voice input of a 4-digit password in order to use all functions of the
Bluetooth ®
2.0 interface, except for recep-
tion.
Setting the password
Use the following procedure to turn on the security function by setting a password. 1. Press the SPEECH button.
2. Say “Setup”.
3. Say “Password.”
4. The voice guide will say “Password is
disabled. Would you like to enable it?”
Answer “Yes.”
Answer “No” to cancel the setting of the
password and return to the main menu.
5. The voice guide will say “Please say a 4-
digit password. Remember this pass-
word. It will be required to use this sys-
tem”.
Say a 4-digit number which you want to set as a password.
6. For confirmation purposes, the voice
guide will say “Password <4-digit pass-
word>. Is this correct?” Answer “Yes.”
Answer “No” to return to the password input in Step 5.
7. When the registration of the password is
completed, the voice guide will say “Password is enabled” and the systemwill return to the main menu.NOTEl Password will be required to access the sys-
tem after the next ignition cycle.
l It is required for a little time after engine
stop that the entered password is actually re-corded in the system.
If the ignition switch or the operation mode
is made to ACC or ON or the engine is star- ted immediately after engine stop, there is a case when the entered password is not recor-ded in the system. At this time, please try to
enter the password again.
Entering the password
If a password has been set and the security
function is enabled, the voice guide will say “Hands-free system is locked. State the pass-word to continue” when the SPEECH button
is pressed to enter voice recognition mode.
Say the 4-digit password number to enter the
password.
If the entered password is wrong, the voice
guide will say “<4- digit password>, Incor-
rect password. Please try again”. Enter the correct password.NOTEl You can re-enter the password as many
times as you want.
l If you have forgotten your password, say
“Cancel” to quit the voice input mode andthen check with a MITSUBISHI MOTORS
Authorized Service Point.
Disabling the password
Use the following procedure to turn off the
security function by disabling the password.
NOTEl System must be unlocked to disable the
password.
1. Press the SPEECH button.
2. Say “Setup”.
3. Say “Password.”
4. The voice guide will say “Password is
enabled. Would you like to disable it?”
Answer “Yes.”
Answer “No” to cancel the disabling of the password and return to the main
menu.
Bluetooth ®
2.0 interface*
7-51OGAE17E2For pleasant driving7
Page 330 of 458
If the vehicle breaks downE00800101108
If the vehicle breaks down on the road, move it to the shoulder and turn on the hazard
warning flashers and set up a warning trian- gle, flashing lamp, etc.
Refer to “Hazard warning flasher switch” on
page 5-55.
If the engine stops/fails
Vehicle operation and control are affected if
the engine stops.
Before moving the vehicle to a safe area, be
aware of the following:
l The brake booster becomes inoperative
and the pedal effort will increase. Press down the brake pedal harder than usual.
l Since the power steering system is no
longer operative, the steering wheel feels
heavy when turning it.
Emergency starting
E00800504259
If the engine cannot be started because thebattery is weak or dead, the battery from an-other vehicle can be used with jumper cables to start the engine.
WARNINGl To start the engine by using jumper ca-
bles from another vehicle, perform thecorrect procedures according to the in-
struction below. Incorrect procedures could result in a fire or explosion or dam-
age to the vehicles.CAUTIONl Do not attempt to start the engine by pulling
or pushing the vehicle.
It could damage your vehicle.
l Always wear protective eye goggles when
working near the battery.
l Keep the battery out of the reach of children.
1.
Get the vehicles close enough so the
jumper cables can reach, but be sure the vehicles aren’t touching each other.
CAUTIONl Check the other vehicle. It must have a 12-
volt battery.
If the other system isn’t 12-volt, shorting can
damage both vehicles.
2. Turn off all lamps, heater and other elec-
trical loads.
3. Set the parking brake firmly on each ve-
hicle. Put an A/T, CVT in “P” (Park) or
a M/T in “N” (Neutral).
4. Turn the ignition switch to the “LOCK”
position or put the operation mode in
OFF.WARNINGl Perform step 4 on both vehicles before-
hand.
Make sure that the cables or your clothes
cannot be caught by the fan or drive belt.
Personal injury could result.
5. Make sure battery electrolyte is at the
proper level.
Refer to “Battery” on page 10-09.
WARNINGl If electrolyte fluid is not visible, or ap-
pears to be frozen, Do Not Attempt Jump
Starting!
A battery might rupture or explode if the temperature is below the freezing point orif it is not filled to the proper level.
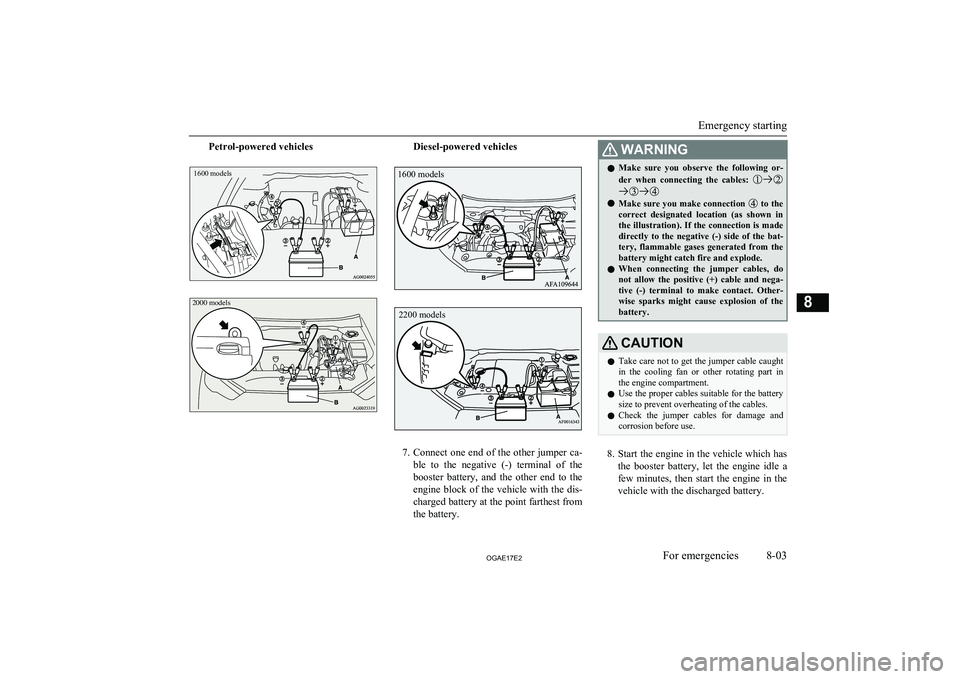
6. Connect one end of one jumper cable to
the positive (+) terminal of the dis-charged battery (A), and the other end to
the positive (+) terminal of the booster
battery (B).
If the vehicle breaks down
8-02OGAE17E2For emergencies8
Page 331 of 458
Petrol-powered vehicles1600 modelsDiesel-powered vehicles
7.Connect one end of the other jumper ca-
ble to the negative (-) terminal of the
booster battery, and the other end to the engine block of the vehicle with the dis-
charged battery at the point farthest from the battery.
WARNINGl Make sure you observe the following or-
der when connecting the cables:
l Make sure you make connection to the
correct designated location (as shown in the illustration). If the connection is made
directly to the negative (-) side of the bat- tery, flammable gases generated from the
battery might catch fire and explode.
l When connecting the jumper cables, do
not allow the positive (+) cable and nega-
tive (-) terminal to make contact. Other- wise sparks might cause explosion of the battery.
CAUTIONl Take care not to get the jumper cable caught
in the cooling fan or other rotating part in
the engine compartment.
l Use the proper cables suitable for the battery
size to prevent overheating of the cables.
l Check the jumper cables for damage and
corrosion before use.
8. Start the engine in the vehicle which has
the booster battery, let the engine idle a
few minutes, then start the engine in the vehicle with the discharged battery.
Emergency starting
8-03OGAE17E2For emergencies82000 models 1600 models 2200 models
Page 332 of 458
CAUTIONlKeep the engine of the vehicle giving assis-
tance running.NOTEl For vehicles equipped with the Auto Stop &
Go (AS&G) system, press the “AS&G OFF”switch to deactivate the AS&G system and
prevent the engine from automatically stop- ping before the battery is sufficiently charg-
ed.
Refer to “To deactivate” on page 6-22.
9. After the engine is started, disconnect
the cables in the reverse order and keep the engine running for several minutes.
WARNINGl If the battery has to be charged while fit-
ted in the vehicle, disconnect the vehicle side negative (-) terminal connected to the
battery.
l Keep sparks, cigarettes and flames away
from the battery because the battery may produce an explosion.
l Use adequate ventilation when charging
or using the battery in an enclosed space.
l Remove all the caps before charging the
battery.WARNINGl Electrolyte is corrosive diluted sulphuric
acid.
If electrolyte (battery acid) comes into contact with your hands, eyes, clothes and
the painted surface of your vehicle, it should be thoroughly flushed with water.If electrolyte gets in your eyes, flush them
with water immediately and thoroughly, and get prompt medical attention.NOTEl If the vehicle is put in motion without fully
charging the battery, it might cause the loss
of smooth engine operation and the anti-lock brake warning lamp to illuminate.
Refer to “Anti-lock brake system (ABS)” on
page 6-48.Engine overheating
E00800604090
When the engine is overheating, the informa-tion screen in the multi-information display
will be interrupted and the engine coolant
temperature warning display will appear. Al- so “
” will blink.
If this occurs, take the following corrective measures: 1. Stop the vehicle in a safe place.
2. Check whether steam is coming from the
engine compartment.
[If steam does not come from the engine
compartment]
With the engine still running, raise the
bonnet to ventilate the engine compart-
ment.NOTEl For vehicles equipped with the Auto Stop &
Go (AS&G) system, press the “AS&G OFF”switch to deactivate the AS&G system be-
fore stopping the vehicle.
Refer to “To deactivate” on page 6-22.
[If steam is coming from the engine
compartment]
Stop the engine, and when the steam
stops, raise the bonnet to ventilate the engine compartment. Restart the engine.
WARNINGl Do not open the bonnet while steam is
coming from the engine compartment. It
could cause steam or hot water to spurt out, causing burns. Hot water could spurt
out even when there is no steam coming out, and some parts will be very hot. Be
very careful when opening the bonnet.
Engine overheating
8-04OGAE17E2For emergencies8