brake light MITSUBISHI ASX 2018 Owner's Manual (in English)
[x] Cancel search | Manufacturer: MITSUBISHI, Model Year: 2018, Model line: ASX, Model: MITSUBISHI ASX 2018Pages: 514, PDF Size: 34.89 MB
Page 6 of 514
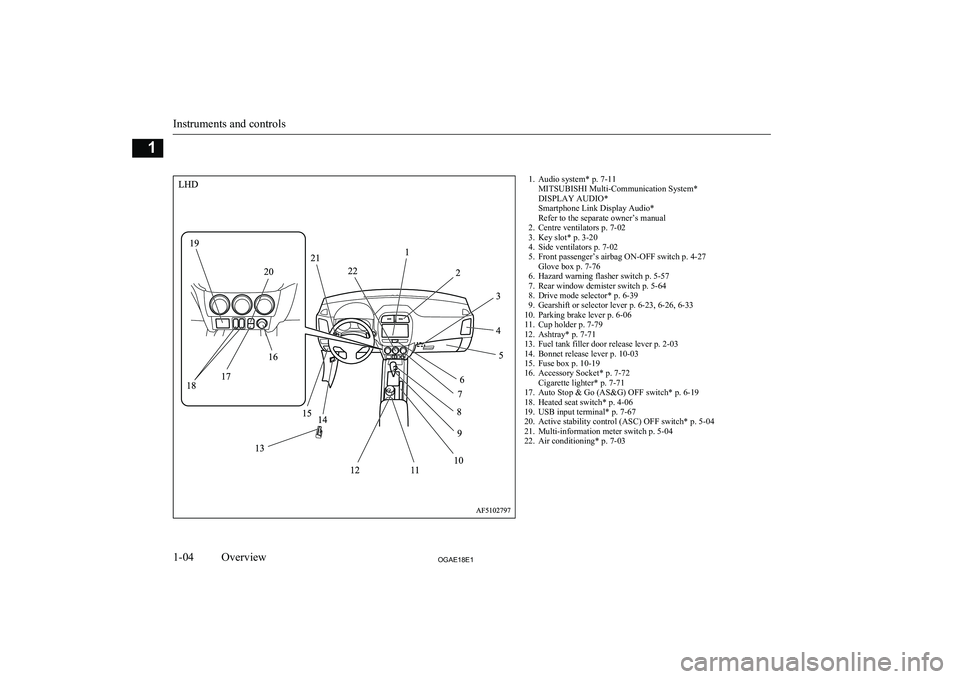
1. Audio system* p. 7-11MITSUBISHI Multi-Communication System*
DISPLAY AUDIO*
Smartphone Link Display Audio*
Refer to the separate owner’s manual
2. Centre ventilators p. 7-02
3. Key slot* p. 3-20
4. Side ventilators p. 7-02
5. Front passenger’s airbag ON-OFF switch p. 4-27 Glove box p. 7-76
6. Hazard warning flasher switch p. 5-57
7. Rear window demister switch p. 5-64
8. Drive mode selector* p. 6-39
9. Gearshift or selector lever p. 6-23, 6-26, 6-33
10. Parking brake lever p. 6-06
11. Cup holder p. 7-79
12. Ashtray* p. 7-71
13. Fuel tank filler door release lever p. 2-03
14. Bonnet release lever p. 10-03
15. Fuse box p. 10-19
16. Accessory Socket* p. 7-72 Cigarette lighter* p. 7-71
17. Auto Stop & Go (AS&G) OFF switch* p. 6-19
18. Heated seat switch* p. 4-06
19. USB input terminal* p. 7-67
20. Active stability control (ASC) OFF switch* p. 5-04
21. Multi-information meter switch p. 5-04
22. Air conditioning* p. 7-03
Instruments and controls
1-04OGAE18E1Overview1
Page 125 of 514
Changing the function settings(when the ignition switch or theoperation mode is ON)
E00522702023
1. Stop the vehicle in a safe place.
Firmly apply the parking brake and put
the gearshift lever into the “N” (Neutral) position ( M/T) or the selector lever into
the “P” (Park) position (A/T or CVT).
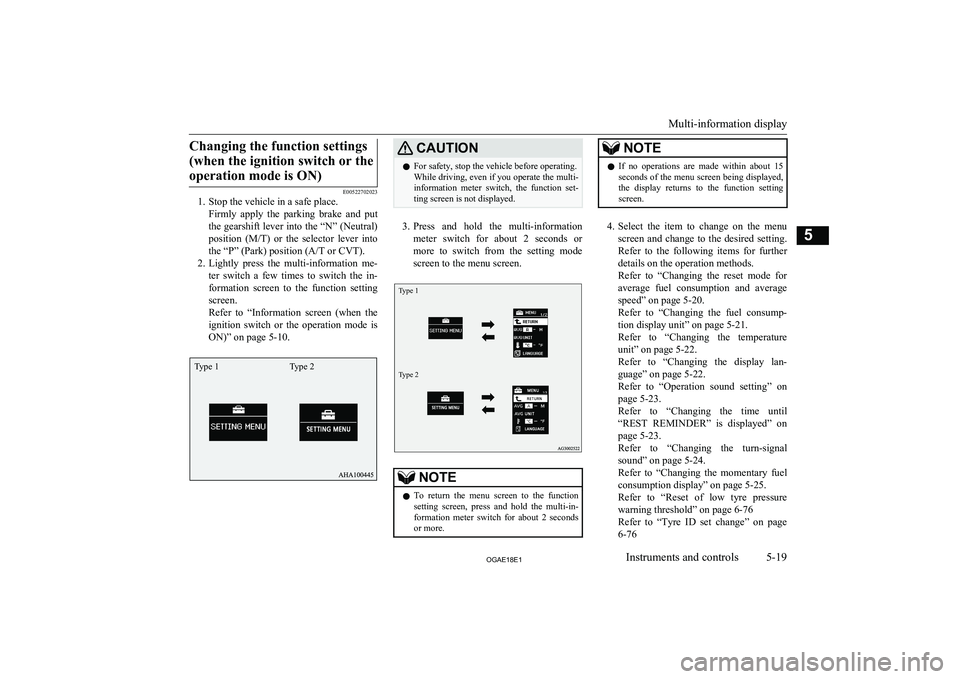
2. Lightly press the multi-information me-
ter switch a few times to switch the in-
formation screen to the function setting screen.
Refer to “Information screen (when the
ignition switch or the operation mode is ON)” on page 5-10.
CAUTIONl For safety, stop the vehicle before operating.
While driving, even if you operate the multi- information meter switch, the function set- ting screen is not displayed.
3. Press and hold the multi-information
meter switch for about 2 seconds or more to switch from the setting mode
screen to the menu screen.
Type 1Type 2
NOTEl To return the menu screen to the function
setting screen, press and hold the multi-in-formation meter switch for about 2 seconds
or more.NOTEl If no operations are made within about 15
seconds of the menu screen being displayed,
the display returns to the function setting screen.
4. Select the item to change on the menu
screen and change to the desired setting. Refer to the following items for further
details on the operation methods.
Refer to “Changing the reset mode for
average fuel consumption and average speed” on page 5-20.
Refer to “Changing the fuel consump-
tion display unit” on page 5-21.
Refer to “Changing the temperature unit” on page 5-22.
Refer to “Changing the display lan-
guage” on page 5-22.
Refer to “Operation sound setting” on page 5-23.
Refer to “Changing the time until
“REST REMINDER” is displayed” on
page 5-23.
Refer to “Changing the turn-signal sound” on page 5-24.
Refer to “Changing the momentary fuel
consumption display” on page 5-25.
Refer to “Reset of low tyre pressure warning threshold” on page 6-76
Refer to “Tyre ID set change” on page 6-76
Multi-information display
5-19OGAE18E1Instruments and controls5Type 1 Type 2
Page 174 of 514
Economical drivingE00600102624
For economical driving, there are some tech- nical requirements that have to be met. Theprerequisite for low fuel consumption is a
properly adjusted engine. In order to achieve longer life of the vehicle and the most eco- nomical operation, we recommend you tohave the vehicle checked at regular intervals in accordance with the service standards.
Fuel economy and generation of exhaust gas
and noise are highly influenced by personal
driving habits as well as the particular operat- ing conditions. The following points shouldbe observed in order to minimize wear of
brakes, tyres and engine as well as to reduce
environmental pollution.
Accelerating and decelerating
Drive according to the traffic conditions andavoid sudden starts, sudden acceleration and
sudden braking, as they will increase fuel
consumption.
Shifting
Shift only at an appropriate speed and engine speed. Always use the highest shift position
possible.
Selecting the 4WD drive mode
(4WD vehicles)
The drive mode-selector should be set to “2WD” when driving on normal roads and
express ways to obtain best possible fuel
economy.
City traffic
Frequent starting and stopping increases the average fuel consumption. Use roads with
smooth traffic flow whenever possible. When driving on congested roads, avoid use of a
low shift position at high engine speeds.
Idling
The vehicle consumes fuel even during
idling. Avoid extended idling whenever pos-
sible.
Speed
At higher vehicle speed, more fuel is con-
sumed. Avoid driving at full speed. Even a slight release of the accelerator pedal willsave a significant amount of fuel.
Tyre inflation pressure
Check the tyre inflation pressures at regular
intervals. Low tyre inflation pressure increa-ses road resistance and fuel consumption. In addition, low tyre pressures adversely affect
tyre wear and driving stability.
Cargo loads
Do not drive with unnecessary articles in the
luggage compartment. Especially during city
driving where frequent starting and stopping is necessary, the increased weight of the ve-
hicle will greatly affect fuel consumption. Al-
so avoid driving with unnecessary luggage or carriers, etc., on the roof; the increased air re- sistance will increase fuel consumption.
Cold engine starting
Starting of a cold engine consumes more fuel.
Unnecessary fuel consumption is also caused by keeping a hot engine running. After the
engine is started, commence driving as soon
as possible.
Air conditioning
The use of the air conditioning will increase the fuel consumption.
Economical driving
6-02OGAE18E1Starting and driving6
Page 178 of 514
Parking brakeE00600502833
To park the vehicle, first bring it to a com- plete stop, fully apply the parking brake leversufficiently to hold the vehicle.
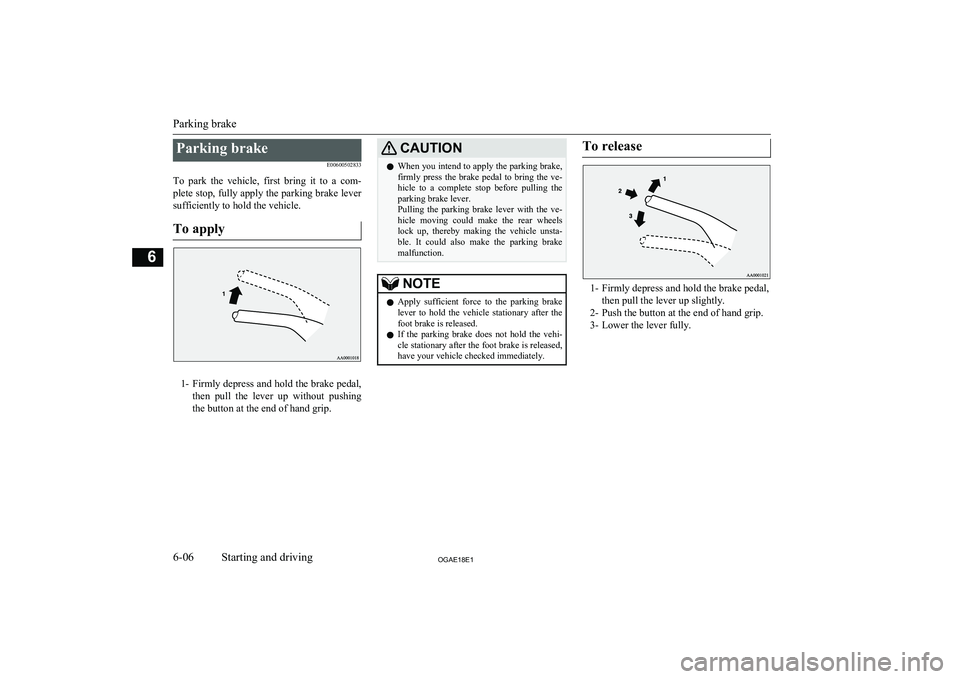
To apply
1- Firmly depress and hold the brake pedal,
then pull the lever up without pushing
the button at the end of hand grip.
CAUTIONl When you intend to apply the parking brake,
firmly press the brake pedal to bring the ve-hicle to a complete stop before pulling theparking brake lever.
Pulling the parking brake lever with the ve-
hicle moving could make the rear wheels lock up, thereby making the vehicle unsta-
ble. It could also make the parking brake malfunction.NOTEl Apply sufficient force to the parking brake
lever to hold the vehicle stationary after the foot brake is released.
l If the parking brake does not hold the vehi-
cle stationary after the foot brake is released,
have your vehicle checked immediately.To release
1- Firmly depress and hold the brake pedal,
then pull the lever up slightly.
2- Push the button at the end of hand grip.
3- Lower the lever fully.
Parking brake
6-06OGAE18E1Starting and driving6
Page 186 of 514
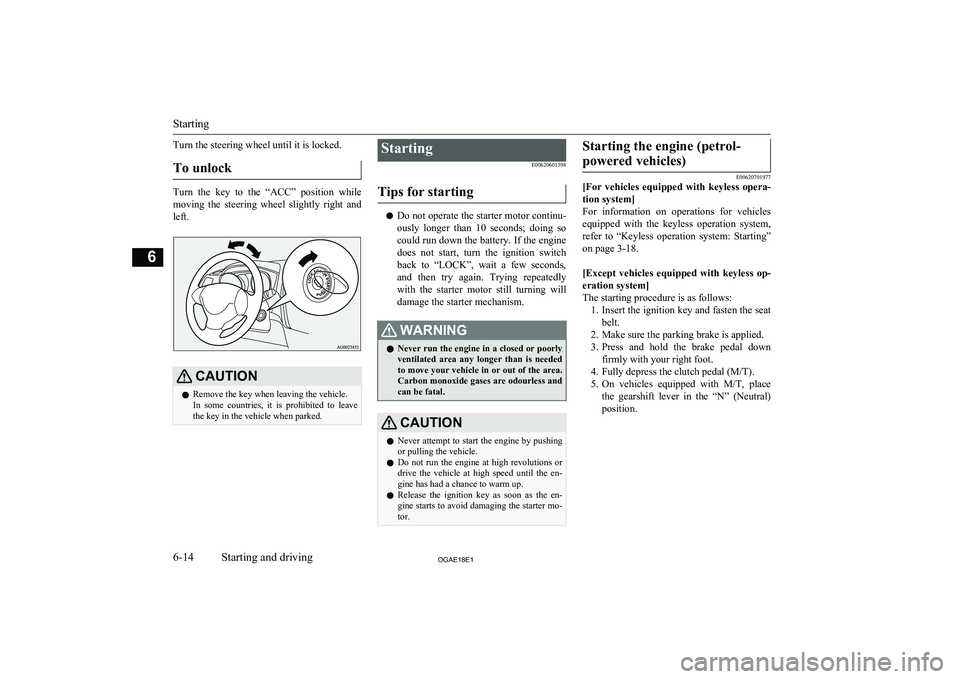
Turn the steering wheel until it is locked.To unlock
Turn the key to the “ACC” position while
moving the steering wheel slightly right and left.
CAUTIONl Remove the key when leaving the vehicle.
In some countries, it is prohibited to leave the key in the vehicle when parked.Starting
E00620601598
Tips for starting
l Do not operate the starter motor continu-
ously longer than 10 seconds; doing so
could run down the battery. If the engine
does not start, turn the ignition switch
back to “LOCK”, wait a few seconds,
and then try again. Trying repeatedly with the starter motor still turning will damage the starter mechanism.
WARNINGl Never run the engine in a closed or poorly
ventilated area any longer than is needed
to move your vehicle in or out of the area. Carbon monoxide gases are odourless and can be fatal.CAUTIONl Never attempt to start the engine by pushing
or pulling the vehicle.
l Do not run the engine at high revolutions or
drive the vehicle at high speed until the en- gine has had a chance to warm up.
l Release the ignition key as soon as the en-
gine starts to avoid damaging the starter mo-
tor.Starting the engine (petrol-
powered vehicles)
E00620701977
[For vehicles equipped with keyless opera-
tion system]
For information on operations for vehicles equipped with the keyless operation system,
refer to “Keyless operation system: Starting”
on page 3-18.
[Except vehicles equipped with keyless op-
eration system]
The starting procedure is as follows: 1. Insert the ignition key and fasten the seat
belt.
2. Make sure the parking brake is applied.
3. Press and hold the brake pedal down
firmly with your right foot.
4. Fully depress the clutch pedal (M/T).
5. On vehicles equipped with M/T, place
the gearshift lever in the “N” (Neutral) position.Starting
6-14OGAE18E1Starting and driving6
Page 191 of 514
Turbocharger
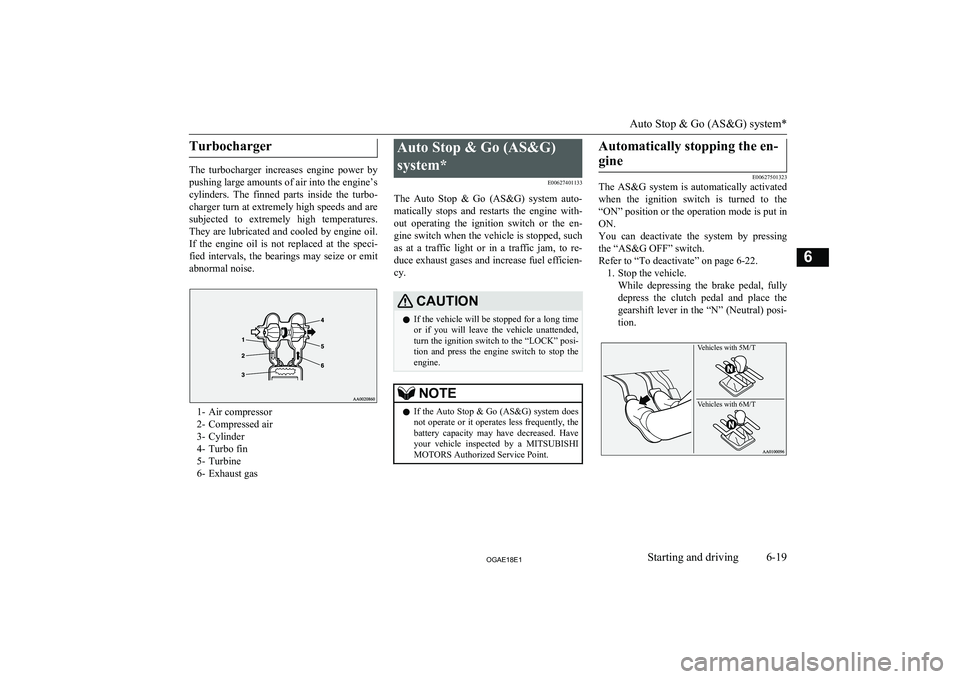
The turbocharger increases engine power by
pushing large amounts of air into the engine’s
cylinders. The finned parts inside the turbo-
charger turn at extremely high speeds and are subjected to extremely high temperatures. They are lubricated and cooled by engine oil.
If the engine oil is not replaced at the speci-
fied intervals, the bearings may seize or emit abnormal noise.
1- Air compressor
2- Compressed air
3- Cylinder
4- Turbo fin
5- Turbine
6- Exhaust gas
Auto Stop & Go (AS&G)
system* E00627401133
The Auto Stop & Go (AS&G) system auto- matically stops and restarts the engine with- out operating the ignition switch or the en-gine switch when the vehicle is stopped, such
as at a traffic light or in a traffic jam, to re- duce exhaust gases and increase fuel efficien- cy.CAUTIONl If the vehicle will be stopped for a long time
or if you will leave the vehicle unattended,
turn the ignition switch to the “LOCK” posi-
tion and press the engine switch to stop the
engine.NOTEl If the Auto Stop & Go (AS&G) system does
not operate or it operates less frequently, the battery capacity may have decreased. Have
your vehicle inspected by a MITSUBISHI
MOTORS Authorized Service Point.Automatically stopping the en-
gine
E00627501323
The AS&G system is automatically activated
when the ignition switch is turned to the
“ON” position or the operation mode is put in
ON.
You can deactivate the system by pressing the “AS&G OFF” switch.
Refer to “To deactivate” on page 6-22. 1. Stop the vehicle.
While depressing the brake pedal, fullydepress the clutch pedal and place the gearshift lever in the “N” (Neutral) posi-
tion.
Vehicles with 5M/T Vehicles with 6M/T
Auto Stop & Go (AS&G) system*
6-19OGAE18E1Starting and driving6
Page 214 of 514
NOTElDriving on rough roads can be hard on a ve-
hicle. Before you leave paved roads, be sure all scheduled maintenance and service has
been done, and that you have inspected your vehicle. Pay special attention to the condi- tion of the tyres, and check the tyre pres-
sures.
l MITSUBISHI
MOTORS is not responsible
to the operator for any damage or injury caused or liability incurred by improper and
negligent operation of a vehicle. All techni- ques of vehicle operation depend on the skill and experience of the operator and other par-
ticipating parties. Any deviation from the recommended operating instructions above
is at their own risk.
l Note that the stopping distance required of a
4-wheel drive vehicle differs very little from
that of a 2-wheel drive vehicle. When driv-
ing on a snow-covered road or a slippery, muddy surface, make sure that you keep a
sufficient distance between your vehicle and the one ahead of you.
l The driving posture should be more upright;
adjust the seat to a good position for easy
steering and pedal operation. Be sure to wear
the seat belt.
l After driving on rough roads, check each
part of the vehicle and wash it thoroughlywith water. Refer to the “Inspection andmaintenance following rough road opera-
tion” section and “Maintenance” section.CAUTIONl Setting the drive mode-selector to “4WD
LOCK” to drive on dry paved road will in-
crease fuel consumption, with possible noise generation.
Turning sharp corners
When turning a sharp corner in “4WD
LOCK” position at low speed, a slight differ- ence in steering may be experienced similar
to as if the brakes were applied. This is called tight corner braking and results from each of
the 4 tyres being at a different distance from
the corner. The phenomenon is typical of 4- wheel drive vehicles. If this occurs, either
straighten out the steering wheel, or change to “2WD” or “4WD AUTO” mode.
On snowy or icy roads
Set the drive mode-selector to “4WD AUTO”
or “4WD LOCK” in accordance with the road conditions, and then gradually depress the accelerator pedal for a smooth start.
NOTEl The use of snow tyres is recommended.
l Maintain a safe distance between vehicles,
avoid sudden braking, and use engine brak- ing (downshifting).CAUTIONl Avoid sudden braking, sudden acceleration
and sharp turning. Skidding occurs and con-
trol of the vehicle could be lost.
Driving on sandy or muddy
roads
Set the drive mode-selector to “4WD LOCK”
and then gradually depress the accelerator pedal for a smooth start. Keep the pressure on
the accelerator pedal as constant as possible,
and drive at low speed.
CAUTIONl Do not force the vehicle or drive recklessly
on sandy surfaces. In comparison with nor-
mal road surfaces, the engine and other
drive-system components are put under ex- cessive strain when driving on such a sur-
face. This could lead to accidents.
l If the engine coolant temperature display
flashes on the information screen in the mul-
ti-information display or the engine power
drops suddenly while the vehicle is being driven, park your vehicle immediately in asafe place.
Refer to “Engine overheating” on page
8-04 for details and take the required meas-
ures.
4-wheel drive operation
6-42OGAE18E1Starting and driving6
Page 215 of 514
WARNINGlWhen attempting to rock your vehicle out
of a stuck position, be sure that the area
around the vehicle is clear of people and physical objects. The rocking motion may
cause the vehicle to suddenly launch for- ward or backward, causing injury or damage to nearby people or objects.NOTEl Avoid sudden braking, sudden acceleration
and sharp turning; such operations could re-
sult in the vehicle becoming stuck.
l If the vehicle becomes stuck in sandy or
muddy roads, it can often be moved with a
rocking motion. Move the gearshift lever al-
ternately between the 1 st
and “R” (Reverse)
positions ( M/T), the “D” (DRIVE) and “R”
(REVERSE) positions ( A/T or CVT), while
pressing lightly on the accelerator pedal.
l Driving on rough roads can cause rust on the
vehicle; wash the vehicle thoroughly as soonas possible after such use.
Climbing/descending sharp
grades
Your vehicle may not provide sufficient hill
climbing ability and engine braking on steep slopes. Avoid driving on steep slopes even
though the vehicle is a 4-wheel drive vehicle.
Driving through water
E00618900106
If the electrical circuits become wet, further
operation of the vehicle will be impossible;
therefore, avoid driving through water unless absolutely necessary. If driving through wa-ter is unavoidable, use the following proce-
dure:
Check the depth of the water and the terrain before attempting to drive through it. Driveslowly to avoid creating excessive water
splashing.
CAUTIONl Never drive through water that is deep
enough to cover wheel hubs, axles or ex- haust pipe. Do not change the gearshift leverposition ( M/T) or the selector lever position
(A/T or CVT) while driving through water.
Frequent driving through water can adverse-
ly affect the life span of the vehicle; we rec- ommend you to take the necessary measuresto prepare, inspect, and repair the vehicle.
l After driving through water, apply the
brakes to be sure they are functioning prop- erly. If the brakes are wet and not function-
ing properly, dry them out by driving slowly
while lightly depressing the brake pedal. In- spect each part of the vehicle carefully.Inspection and maintenance
following rough roadoperation E00606700338
After operating the vehicle in rough road
conditions, be sure to perform the following inspection and maintenance procedures:
l Check that the vehicle has not been dam-
aged by rocks, gravel, etc.
l Carefully wash the vehicle with water.
Drive the vehicle slowly while lightly
depressing the brake pedal in order to dry out the brakes. If the brakes still do
not function properly, we recommend you to have the brakes checked as soon
as possible.
l Remove the insects, dried grass, etc.
clogging the radiator core.
l After driving through water, check the
engine, transmission and differential oil. If the oil or grease is milky or cloudy be-
cause of water contamination, it must be replaced with new oil or grease.
l Check the inside of the vehicle. If water
entry is found, dry the carpet etc.
l Inspect the headlamps, If the headlamp
bulb is flooded with water, we recom- mend you to have it drained.
Inspection and maintenance following rough road operation
6-43OGAE18E1Starting and driving6
Page 217 of 514
CAUTIONlAvoid driving habits that cause heavy brak-
ing and never “ride” the brakes by resting
your foot on the brake pedal while driving.
It causes brake overheating and fade.
Brake system
The service brake is divided into two brake
circuits. And your vehicle is equipped with
power brakes. If one brake circuit fails, the other is available to stop the vehicle. If you
should lose the power assist for some reason, the brakes will still work. In these situations,
even if the brake pedal moves down to the very end of its possible stroke or resists being
depressed, keep depressing the brake pedal
down harder and further than usual; stop
driving as soon as possible and have the brake system repaired.
WARNINGl Do not turn off the engine while your ve-
hicle is in motion. If you turn off the en- gine while driving, the power assistance
for the braking system will stop working and your brakes will not work effectively.
l If the power assist is lost or if either brake
hydraulic system stops working properly,
have your vehicle checked immediately.Warning display
The brake warning lamp illuminates to indi-
cate a fault in the braking system. A warning
is also displayed on the multi-information display. Refer to “Brake warning lamp” on page 5-47 and “Brake warning display” on
page 5-48.
When brakes are wet
Check the brake system while driving at a
low speed immediately after starting, espe- cially when the brakes are wet, to confirmthey work normally.
A film of water can be formed on the brake
discs and prevent normal braking after driv-
ing in heavy rain or through large puddles, or after the vehicle is washed. If this occurs, dry
the brakes out by driving slowly while lightly depressing the brake pedal.
When driving downhill
It is important to take advantage of the en-
gine braking by shifting to a lower shift posi- tion while driving on steep downhill roads in order to prevent the brakes from overheating.
WARNINGl Do not leave any objects near the brake
pedal or let a floor mat slide under it; do- ing so could prevent the full pedal stroke
that would be necessary in an emergency. Make sure that the pedal can be operated freely at all times. Make sure the floor mat is securely held in place.
Brake pad
l Avoid hard braking situations.
New brakes need to be broken-in by
moderate use for the first 200 km (124 miles).
l The disc brakes are provided with a
warning device which emits a shrieking
metallic sound while braking if the brake pads have reached their wear limit. Ifyou hear this sound, have the brake padsreplaced immediately.
WARNINGl Driving with worn brake pads will make
it harder to stop, and can cause an acci-
dent.
Braking
6-45OGAE18E1Starting and driving6
Page 219 of 514
NOTElThe hill start assist also operates when re-
versing on an uphill slope.Warning display
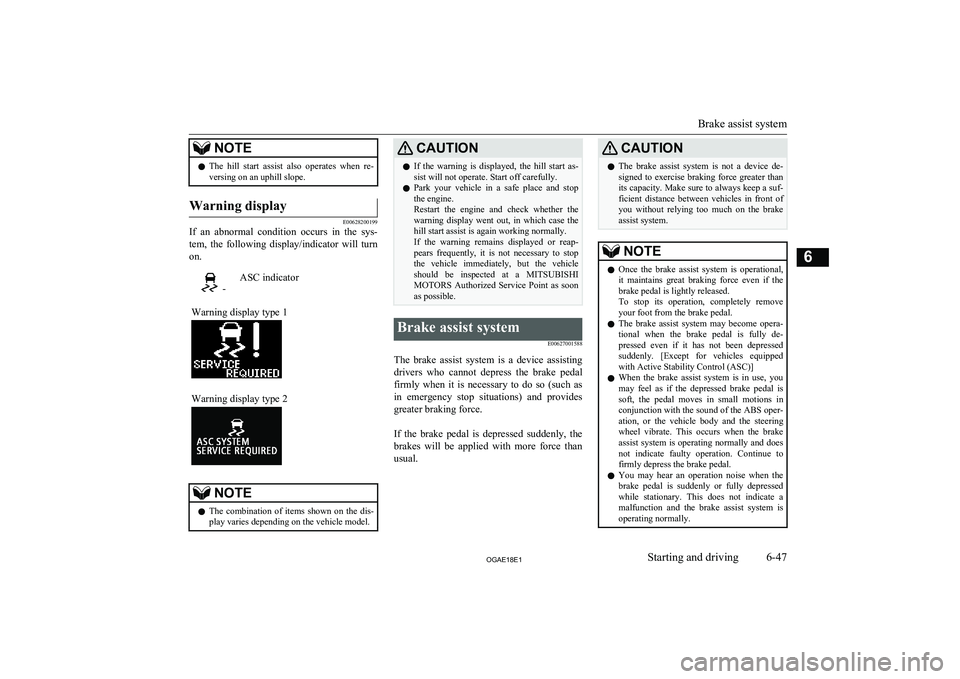
E00628200199
If an abnormal condition occurs in the sys-
tem, the following display/indicator will turn
on.
-ASC indicatorWarning display type 1Warning display type 2NOTEl The combination of items shown on the dis-
play varies depending on the vehicle model.CAUTIONl If the warning is displayed, the hill start as-
sist will not operate. Start off carefully.
l Park your vehicle in a safe place and stop
the engine.
Restart the engine and check whether the
warning display went out, in which case the hill start assist is again working normally.
If the warning remains displayed or reap-
pears frequently, it is not necessary to stop
the vehicle immediately, but the vehicle should be inspected at a MITSUBISHI
MOTORS Authorized Service Point as soon
as possible.Brake assist system
E00627001588
The brake assist system is a device assistingdrivers who cannot depress the brake pedalfirmly when it is necessary to do so (such as
in emergency stop situations) and provides
greater braking force.
If the brake pedal is depressed suddenly, the brakes will be applied with more force thanusual.
CAUTIONl The brake assist system is not a device de-
signed to exercise braking force greater than its capacity. Make sure to always keep a suf-
ficient distance between vehicles in front of
you without relying too much on the brake
assist system.NOTEl Once the brake assist system is operational,
it maintains great braking force even if the
brake pedal is lightly released.
To stop its operation, completely remove
your foot from the brake pedal.
l The brake assist system may become opera-
tional when the brake pedal is fully de- pressed even if it has not been depressed suddenly. [Except for vehicles equipped
with Active Stability Control (ASC)]
l When the brake assist system is in use, you
may feel as if the depressed brake pedal issoft, the pedal moves in small motions inconjunction with the sound of the ABS oper- ation, or the vehicle body and the steering
wheel vibrate. This occurs when the brake
assist system is operating normally and does not indicate faulty operation. Continue to
firmly depress the brake pedal.
l You may hear an operation noise when the
brake pedal is suddenly or fully depressed
while stationary. This does not indicate a malfunction and the brake assist system is
operating normally.
Brake assist system
6-47OGAE18E1Starting and driving6