buttons MITSUBISHI ASX 2018 Owner's Manual (in English)
[x] Cancel search | Manufacturer: MITSUBISHI, Model Year: 2018, Model line: ASX, Model: MITSUBISHI ASX 2018Pages: 514, PDF Size: 34.89 MB
Page 92 of 514

3.Use the locking clip to completely elimi-
nate any slackness.
4. Push and pull the child restraint in all di-
rections to be sure it is secure.WARNINGl For some types of child restraint, the lock-
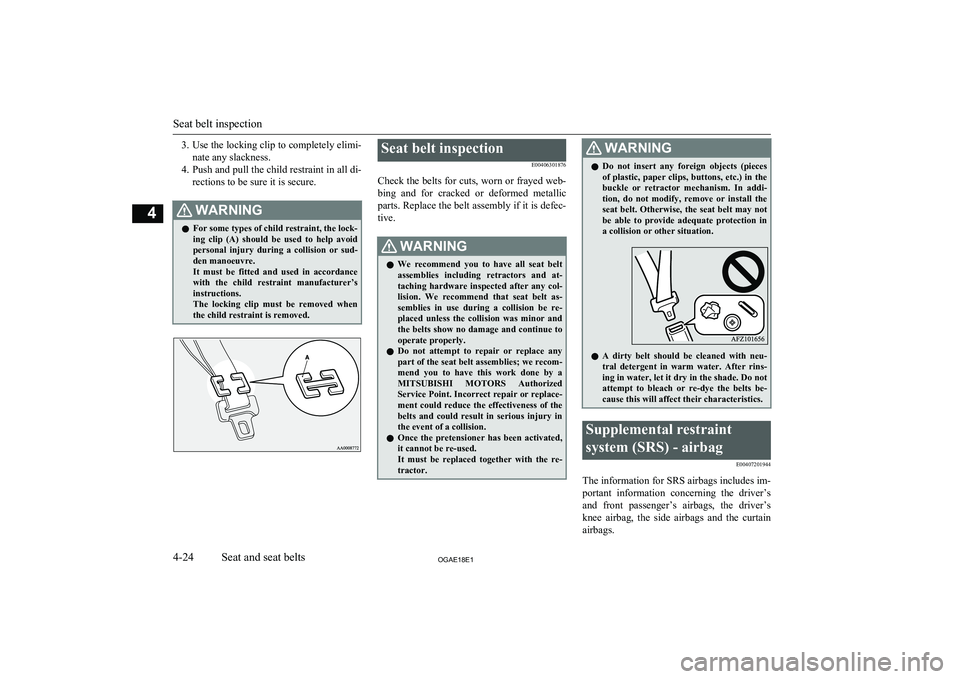
ing clip (A) should be used to help avoid personal injury during a collision or sud-den manoeuvre.
It must be fitted and used in accordance
with the child restraint manufacturer’s instructions.
The locking clip must be removed when the child restraint is removed.Seat belt inspection
E00406301876
Check the belts for cuts, worn or frayed web- bing and for cracked or deformed metallic
parts. Replace the belt assembly if it is defec-
tive.WARNINGl We recommend you to have all seat belt
assemblies including retractors and at-
taching hardware inspected after any col- lision. We recommend that seat belt as-
semblies in use during a collision be re- placed unless the collision was minor and
the belts show no damage and continue to operate properly.
l Do not attempt to repair or replace any
part of the seat belt assemblies; we recom-
mend you to have this work done by a MITSUBISHI MOTORS Authorized
Service Point. Incorrect repair or replace-
ment could reduce the effectiveness of the
belts and could result in serious injury in the event of a collision.
l Once the pretensioner has been activated,
it cannot be re-used.
It must be replaced together with the re-
tractor.WARNINGl Do not insert any foreign objects (pieces
of plastic, paper clips, buttons, etc.) in the
buckle or retractor mechanism. In addi- tion, do not modify, remove or install the
seat belt. Otherwise, the seat belt may not be able to provide adequate protection in a collision or other situation.
l A dirty belt should be cleaned with neu-
tral detergent in warm water. After rins-
ing in water, let it dry in the shade. Do not
attempt to bleach or re-dye the belts be-
cause this will affect their characteristics.
Supplemental restraint
system (SRS) - airbag E00407201944
The information for SRS airbags includes im-
portant information concerning the driver’s and front passenger’s airbags, the driver’s knee airbag, the side airbags and the curtain
airbags.
Seat belt inspection
4-24OGAE18E1Seat and seat belts4
Page 282 of 514

Explanation of Buttons
E00737501385
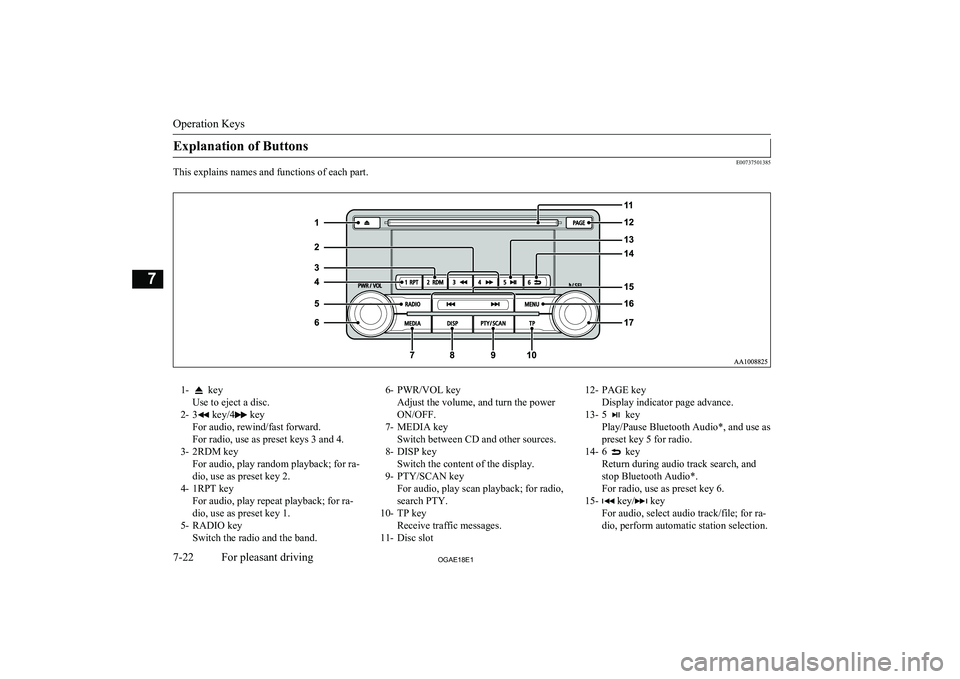
This explains names and functions of each part.
1- key
Use to eject a disc.
2- 3
key/4 key
For audio, rewind/fast forward.
For radio, use as preset keys 3 and 4.
3- 2RDM key For audio, play random playback; for ra-
dio, use as preset key 2.
4- 1RPT key For audio, play repeat playback; for ra-dio, use as preset key 1.
5- RADIO key Switch the radio and the band.
6- PWR/VOL key
Adjust the volume, and turn the power
ON/OFF.
7- MEDIA key Switch between CD and other sources.
8- DISP key Switch the content of the display.
9- PTY/SCAN key For audio, play scan playback; for radio,
search PTY.
10- TP key Receive traffic messages.
11- Disc slot12- PAGE key
Display indicator page advance.
13- 5
key
Play/Pause Bluetooth Audio*, and use as preset key 5 for radio.
14- 6
key
Return during audio track search, and stop Bluetooth Audio*.
For radio, use as preset key 6.
15-
key/ key
For audio, select audio track/file; for ra-
dio, perform automatic station selection.
Operation Keys
7-22OGAE18E1For pleasant driving7
Page 289 of 514

NOTElDepending on the generation, model, or soft-
ware version of the iPod/iPhone, playback
on this product may not be possible. (→7-12 ) Additionally, playback as ex-
plained in this document may not be possi- ble.
l For vehicles with a Bluetooth ®
2.0 interface,
the types of devices that can be connected
may vary.
For details, access the MITSUBISHI
MOTORS website.
Please read and agree to the “Warning about
Links to the Web Sites of Other Compa- nies”. The websites mentioned above may
connect you to websites other than the MITSUBISHI MOTORS website.
http://www.mitsubishi-motors.com/en/prod-
ucts/index.html
l Usage of iPod/iPhone hardware with the lat-
est software version is recommended.
l Regarding how to connect the iPod/iPhone,
refer to “How to connect an iPod” on page
7-68.
l When connecting the iPod/iPhone, use a
commerciallyavailable iPod connection ca- ble.
l Set up the device in order that no unsafe ac-
tions, such as plugging in the connection ca-ble are taken while driving.
l When inserting and removing the iPod/
iPhone, for safety’s sake first stop the vehi- cle.
l Depending on the status of the iPod/iPhone,
it may take some time until the device is rec-
ognized, or playback starts.NOTEl Buttons on the product will not operate
while iPod/iPhone is connected.
l iPod/iPhone specifications and settings may
mean that connection is not possible, or re- sult in differences in operation or display.
l Depending on audio data in the iPod/iPhone,
track information may not be displayed cor- rectly.
l Depending on the status of the vehicle and
device, the iPod/iPhone may not play back
after starting the engine.
l Data containing copyright information may
not play back.
l It is recommended that the iPod/iPhone
equaliser settings be set to flat.
l Operate the iPod/iPhone while connected to
this product.
l If the iPod/iPhone is connected via Blue-
tooth as a Bluetooth- capable audio device,
then do not connect the iPod/iPhone using
an iPod cable. Connection using both meth- ods will result in erroneous operation.
l If an iPod/iPhone does not operate correctly,
then remove the iPod/iPhone from the prod-
uct, reset, then reconnect.
Play iPod
Press the MEDIA key to set the iPod as the
source.
The selected source is indicated on the dis-
play.
Select the Track (File)
Press the key or key to select the
track.
This enables selection of the next or previous
track.
Fast Forward or Rewind
Hold down the 3 key or the 4 key.
Fast forward/rewind is possible.
Switch Playback Mode
Repeat playback and shuffle playback are
possible.
Repeat Playback (RPT)
Press the 1RPT key.
Repeat playback of the track currently being
played.
NOTEl Pressing again will cancel.
Shuffle Playback (RDM)
Press the 2RDM key.
Listen to an iPod
7-29OGAE18E1For pleasant driving7
Page 291 of 514

NOTElWhen connecting a USB device, use a con-
nection cable. Failure to use a connection ca-
ble when connecting may place undue load
on, or damage the USB connector.
l Set up the device in order that no unsafe ac-
tions, such as plugging in the connection ca-ble are taken while driving.
l When inserting and removing the USB de-
vice, for safety’s sake first stop the vehicle.
l Do not insert other than audio devices into
the USB port. Damage to the device or
equipment may result.
l Depending on the status of the USB device,
it may take some time until the device is rec-
ognized, or playback starts.
l Depending on USB devices, buttons on the
product will not operate while the USB de-
vice is connected.
l USB device specifications and settings may
mean that connection is not possible, or re- sult in differences in operation or display.
l Depending on audio data in the USB device,
track information may not be displayed cor- rectly.
l Depending on the status of the vehicle and
device, the iPod/iPhone may not play back after starting the engine.
l Data containing copyright information may
not play back.
l This product can play back MP3, WMA, and
AAC format audio files.
l Depending on the type of USB device, usage
may not be possible, or functions that can beused may be restricted.NOTEl The recommended file system for USB
memory is FAT32.
l The maximum supported capacity for USB
memory is 32GB.
l Operate the USB device containing recorded
audio files while connected to this product.
Play Back of Audio Files on a
USB Device
Press the MEDIA key to set
USB as the source. The selected source is in- dicated on the display.
Select the Track (File)
Press the key or key to select the
track.
This enables selection of the next or previous
track.
Fast Forward or Rewind
Hold down the 3 key or the 4 key.
Fast forward/rewind is possible.
Switch Playback Mode
Repeat playback, random playback, and scan
playback are possible.
Repeat Playback (RPT)
Press the 1RPT key.
Repeat playback of the track currently being played.
NOTEl Pressing again will cancel.
l Selecting a file will cancel this.
Folder Repeat Playback
Hold down the 1RPT key.
Repeat playback of the tracks within the fold- er currently being played.
NOTEl Pressing again will cancel.
l Even if the file is selected, folder repeat
playback will not be cancelled.
Folder Random Playback
(RDM)
Press the 2RDM key.
Listen to Audio Files on a USB Device
7-31OGAE18E1For pleasant driving7