ECO mode MITSUBISHI COLT 2008 (in English) User Guide
[x] Cancel search | Manufacturer: MITSUBISHI, Model Year: 2008, Model line: COLT, Model: MITSUBISHI COLT 2008Pages: 450, PDF Size: 14.57 MB
Page 192 of 450
4-26 Starting and driving
4
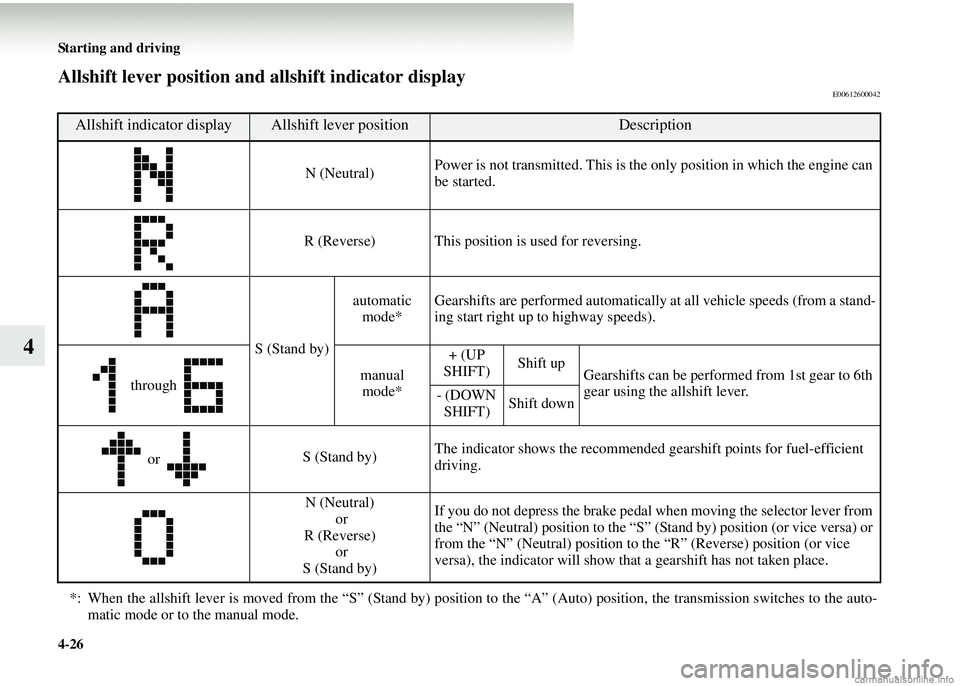
Allshift lever position and allshift indicator displayE00612600042
Allshift indicator displayAllshift lever positionDescription
N (Neutral) Power is not transmitted. This is the only position in which the engine can
be started.
R (Reverse) This position is used for reversing.
S (Stand by) automatic
mode* Gearshifts are performed automatically at all vehicle speeds (from a stand-
ing start right up to highway speeds).
through manual
mode* + (UP
SHIFT) Shift up
Gearshifts can be performed from 1st gear to 6th
gear using the allshift lever.
- (DOWN
SHIFT) Shift down
or S (Stand by)The indicator shows the recommended gearshift points for fuel-efficient
driving.
N (Neutral) or
R (Reverse) or
S (Stand by) If you do not depress the brake pedal when moving the selector lever from
the “N” (Neutral) position to the “S” (Stand by) position (or vice versa) or
from the “N” (Neutral) position to the “R” (Reverse) position (or vice
versa), the indicator w
ill show that a gearshift has not taken place.
*: When the allshift lever is moved from the “S” (Stand by) positi on to the “A” (Auto) position, the transmission switches to the auto-
matic mode or to the manual mode.
Page 198 of 450
4-32 Starting and driving
4
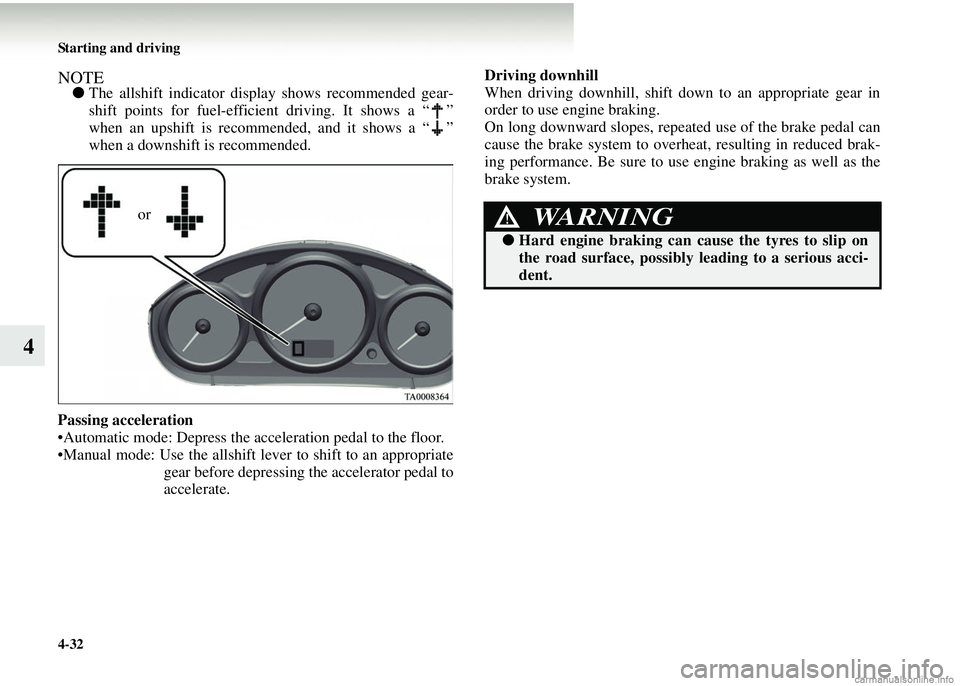
NOTE●The allshift indicator display shows recommended gear-
shift points for fuel-efficient driving. It shows a “ ”
when an upshift is recommended, and it shows a “ ”
when a downshift is recommended.
Passing acceleration
•Automatic mode: Depress the acceleration pedal to the floor.
•Manual mode: Use the allshift lever to shift to an appropriate gear before depressing the accelerator pedal to
accelerate. Driving downhill
When driving downhill, shift down to an appropriate gear in
order to use engine braking.
On long downward slopes, repeated use of the brake pedal can
cause the brake system to overh
eat, resulting in reduced brak-
ing performance. Be sure to us e engine braking as well as the
brake system.
orWARNING!
● Hard engine brak ing can cause the tyres to slip on
the road surface, possibly leading to a serious acci-
dent.
Page 235 of 450
For pleasant driving5-19
5
NOTE●If the outside air is dusty or otherwise contaminated, or if
high cooling performance is desired, set air selection
switch to the recirculation position and the temperature
control dial all the way to the left.
Switch to the outside position periodically to increase
ventilation so that the windows do not become fogged up.
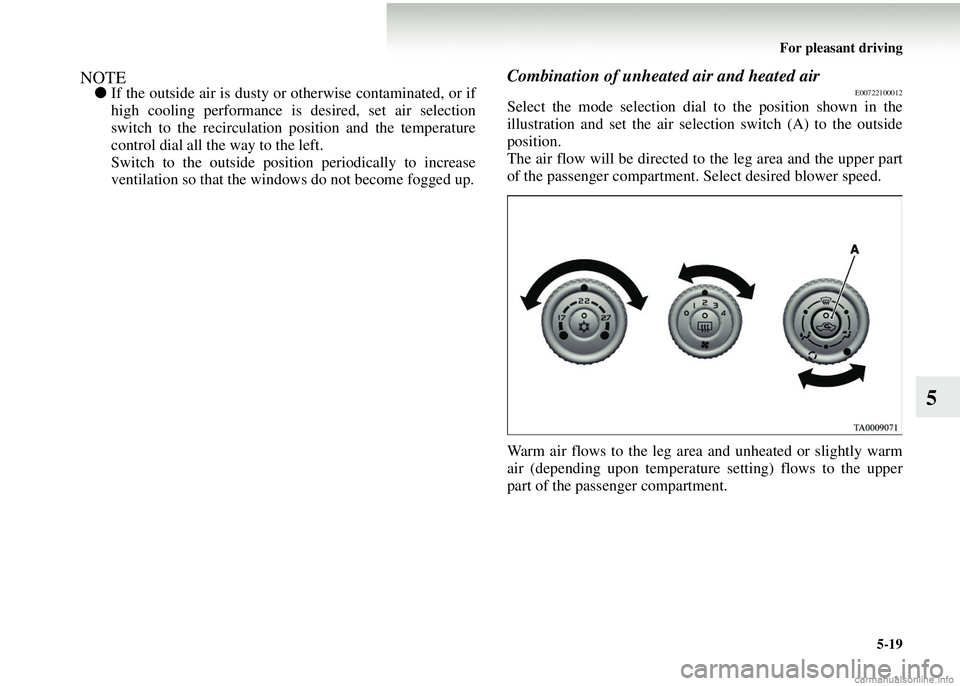
Combination of unheated air and heated airE00722100012
Select the mode selection dial to the position shown in the
illustration and set the air selection switch (A) to the outside
position.
The air flow will be directed to the leg area and the upper part
of the passenger compartment. Select desired blower speed.
Warm air flows to the leg area and unheated or slightly warm
air (depending upon temperature setting) flows to the upper
part of the passenger compartment.
Page 243 of 450
For pleasant driving5-27
5
To adjust the volumeE00708700085
VOL (Volume control)
Turn the VOL knob (2) clockwise to increase the volume;
anticlockwise to decrease the vo lume. The status will be dis-
played in the display (6).
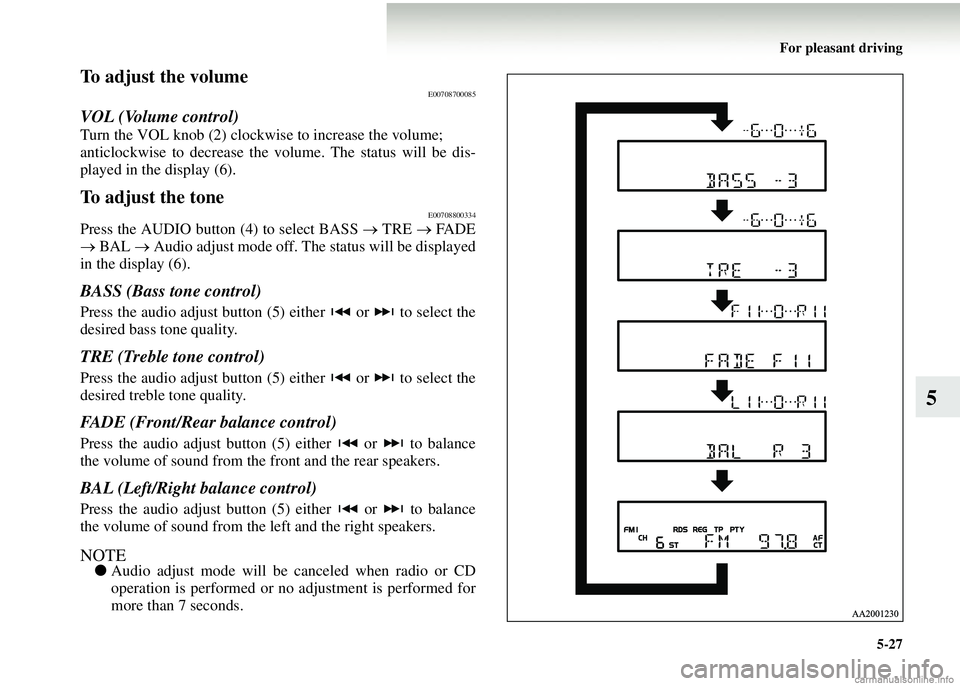
To adjust the toneE00708800334
Press the AUDIO button (4) to select BASS → TRE → FA D E
→ BAL → Audio adjust mode off. The status will be displayed
in the display (6).
BASS (Bass tone control)
Press the audio adjust button (5) either or to select the
desired bass tone quality.
TRE (Treble tone control)
Press the audio adjust button (5) either or to select the
desired treble tone quality.
FADE (Front/Rear balance control)
Press the audio adjust button (5) either or to balance
the volume of sound from the front and the rear speakers.
BAL (Left/Right balance control)
Press the audio adjust button (5) either or to balance
the volume of sound from the left and the right speakers.
NOTE● Audio adjust mode will be canceled when radio or CD
operation is performed or no adjustment is performed for
more than 7 seconds.
Page 247 of 450
For pleasant driving5-31
5
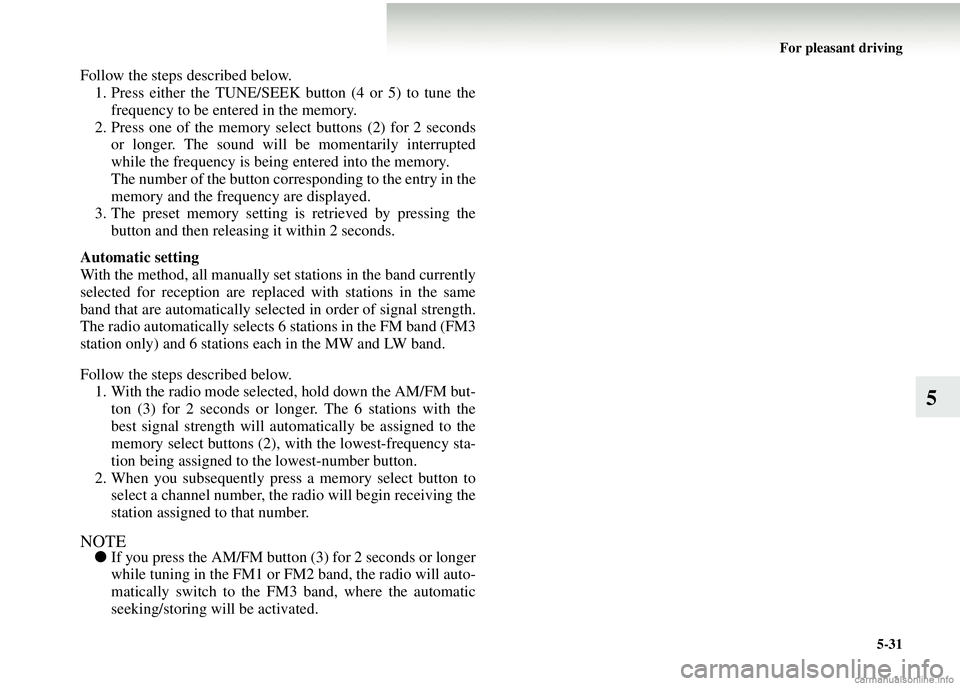
Follow the steps described below.1. Press either the TUNE/SEEK button (4 or 5) to tune the frequency to be entered in the memory.
2. Press one of the memory select buttons (2) for 2 seconds or longer. The sound will be momentarily interrupted
while the frequency is being entered into the memory.
The number of the button corresponding to the entry in the
memory and the frequency are displayed.
3. The preset memory setting is retrieved by pressing the
button and then releasing it within 2 seconds.
Automatic setting
With the method, all manually set stations in the band currently
selected for reception are replaced with stations in the same
band that are automatically selected in order of signal strength.
The radio automatically selects 6 stations in the FM band (FM3
station only) and 6 stations each in the MW and LW band.
Follow the steps described below. 1. With the radio mode selected, hold down the AM/FM but- ton (3) for 2 seconds or longer. The 6 stations with the
best signal strength will automatically be assigned to the
memory select buttons (2), wi th the lowest-frequency sta-
tion being assigned to the lowest-number button.
2. When you subsequently press a memory select button to select a channel number, the ra dio will begin receiving the
station assigned to that number.
NOTE● If you press the AM/FM button (3) for 2 seconds or longer
while tuning in the FM1 or FM2 band, the radio will auto-
matically switch to the FM 3 band, where the automatic
seeking/storing will be activated.
Page 251 of 450
For pleasant driving5-35
5
NOTE●If the TUNE/SEEK button (3 or 4) is pressed for more
than 1 second, the radio will try to find out another broad-
cast of the same program t ype as currently selected.
● If no station is found with your desired PTY, the display
will show “EMPTY” for about 5 seconds and the radio
will return to the previous station.
How to enter PTYs in the memoryE00721400034
As many as 6 PTYs can be entered in the memory.
Follow the steps described below.
1. Press either the TUNE/SEEK button (3 or 4) to tune the PTY to be entered in the memory.
2. Press one of the memory select buttons (2) for 2 seconds
or longer. The sound will be momentarily interrupted
while the PTY is being entered into the memory. The
number of the button corresponding to the entry into the
memory and the PTY are displayed.
3. The preset memory setting is retrieved by pressing the button and then releasing it within about 2 seconds.
To change the language of PTY displayE00721500110
You can select your favourite language among English, French,
German, Swedish, Spanish and Italian.
1. Press the “MENU” button (A ) to select the language of
PTY display mode.
Refer to “Function setup mode” on page 5-38.
2. Press the audio adjust button (B) to select a language.
NOTE● After selecting a mode, you can leave the function setup
mode by taking either of the following steps:
• Press the “MENU” button (A ) for at least 2 seconds.
• Make no entry for 7 seconds.
Page 253 of 450
For pleasant driving5-37
5
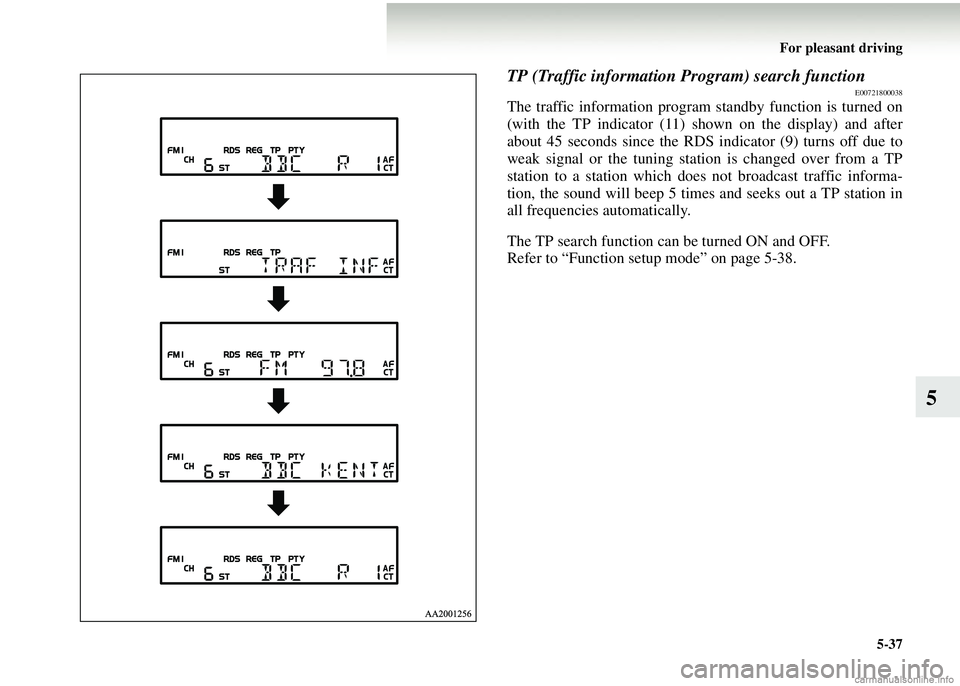
TP (Traffic information Program) search functionE00721800038
The traffic information program standby function is turned on
(with the TP indicator (11) shown on the display) and after
about 45 seconds since the RDS indicator (9) turns off due to
weak signal or the tuning station is changed over from a TP
station to a station which does not broadcast traffic informa-
tion, the sound will beep 5 times and seeks out a TP station in
all frequencies automatically.
The TP search function can be turned ON and OFF.
Refer to “Function setup mode” on page 5-38.
Page 256 of 450
5-40 For pleasant driving
5
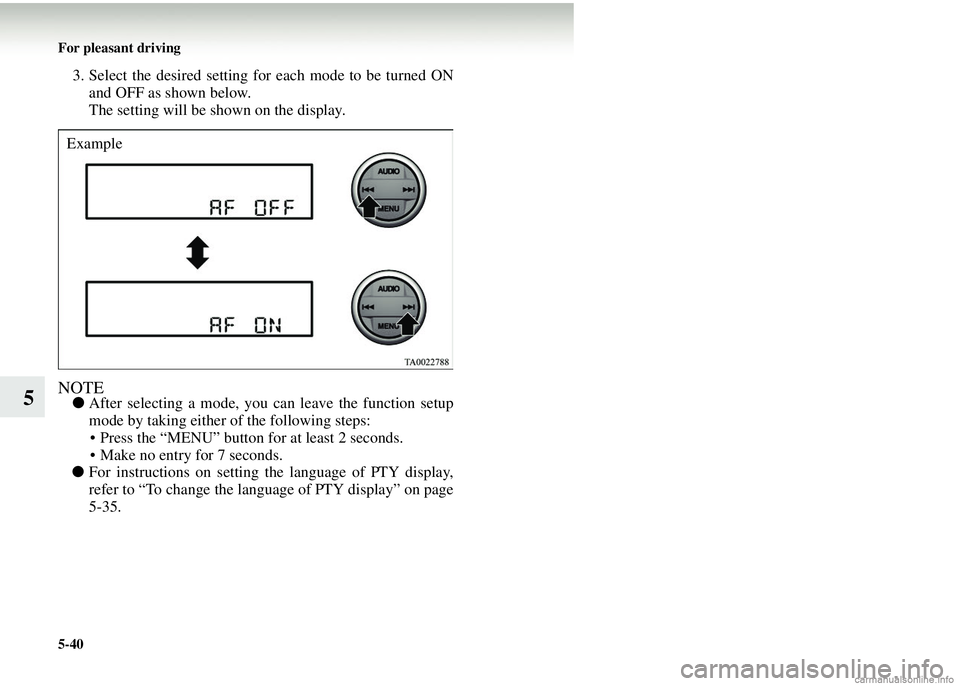
3. Select the desired setting for each mode to be turned ONand OFF as shown below.
The setting will be shown on the display.
NOTE● After selecting a mode, you can leave the function setup
mode by taking either of the following steps:
• Press the “MENU” button for at least 2 seconds.
• Make no entry for 7 seconds.
● For instructions on setting the language of PTY display,
refer to “To change the language of PTY display” on page
5-35.
Example
Page 259 of 450
For pleasant driving5-43
5
To repeat the same track or change the order of tracks
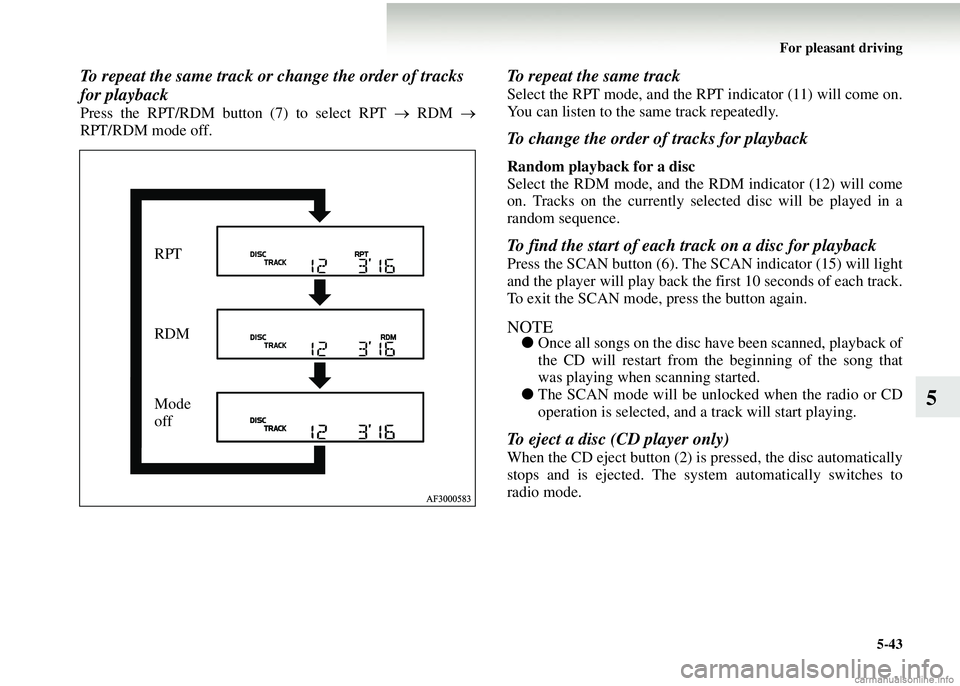
for playback
Press the RPT/RDM button (7) to select RPT → RDM →
RPT/RDM mode off.
To repeat the same track
Select the RPT mode, and the RPT indicator (11) will come on.
You can listen to the same track repeatedly.
To change the order of tracks for playback
Random playback for a disc
Select the RDM mode, and the RDM indicator (12) will come
on. Tracks on the currently select ed disc will be played in a
random sequence.
To find the start of each track on a disc for playback
Press the SCAN button (6). The SCAN indicator (15) will light
and the player will play back the first 10 seconds of each track.
To exit the SCAN mode, press the button again.
NOTE● Once all songs on the disc have been scanned, playback of
the CD will restart from the beginning of the song that
was playing when scanning started.
● The SCAN mode will be unlocked when the radio or CD
operation is selected, and a track will start playing.
To eject a disc (CD player only)
When the CD eject button (2) is pressed, the disc automatically
stops and is ejected. The syst em automatically switches to
radio mode.
RPT
RDM
Mode
off
Page 261 of 450
For pleasant driving5-45
5
To listen to a CDE00709601020
With a CD player1. Insert the disc with the label facing up.
When a disc is inserted, the DISC indicator (13) will come
on and the CD player will begin playing even if the radio
is being used. The CD player will also start playback
when the CD button (9) is pres sed with a disc in the player
even if the radio is being used.
2. To adjust the volume and tone, refer to “To adjust the vol- ume” on page 5-27 and “To adjust the tone” on page 5-27.
NOTE● When an 8 cm compact disc is used, the adapter is not
needed for playback. Insert th e disc in the centre of the
disc-loading slot.
● For information concerning the handling of compact
discs, refer to “Handling co mpact discs” on page 5-56.
To fast forward/reverse the disc
To fast forward or reverse, use the TRACK buttons (12).
Fast forward
You can fast forward by holding down the side of the
TRACK button (12) for more than 1 second.
Fast reverse
You can fast reverse by holding down the side of the
TRACK button (12) for more than 1 second.
NOTE●When you have fast-forwarded /fast-reversed the disc, the
playing-time may be shown with deviation.
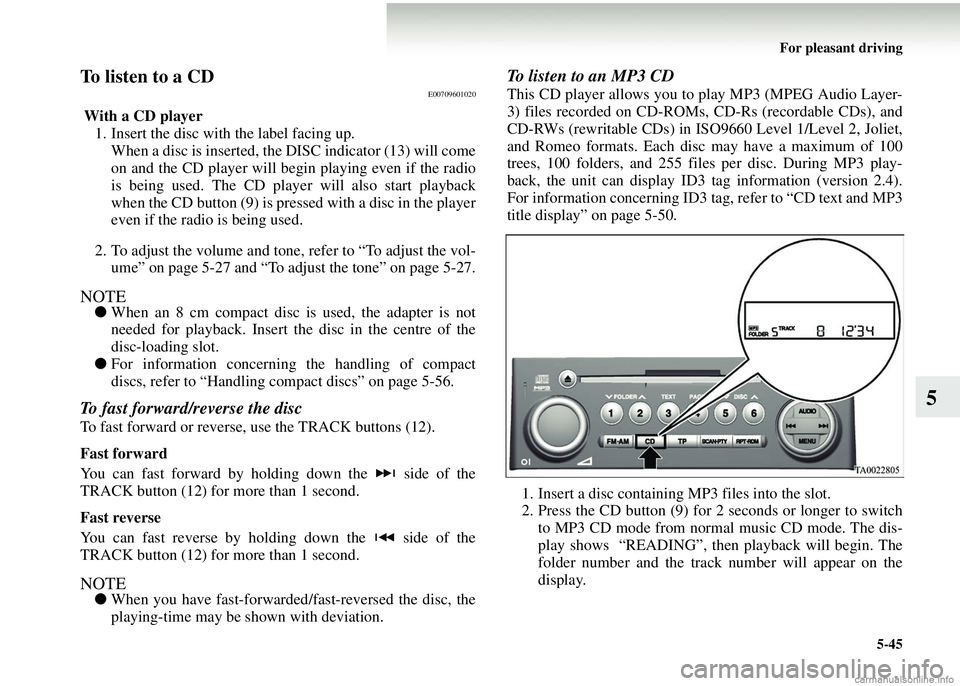
To listen to an MP3 CD
This CD player allows you to play MP3 (MPEG Audio Layer-
3) files recorded on CD-ROMs, CD-Rs (recordable CDs), and
CD-RWs (rewritable CDs) in ISO9660 Level 1/Level 2, Joliet,
and Romeo formats. Each disc may have a maximum of 100
trees, 100 folders, and 255 files per disc. During MP3 play-
back, the unit can display ID3 tag information (version 2.4).
For information concerning ID3 ta g, refer to “CD text and MP3
title display” on page 5-50.
1. Insert a disc containing MP3 files into the slot.
2. Press the CD button (9) for 2 seconds or longer to switch to MP3 CD mode from normal music CD mode. The dis-
play shows “READING”, then playback will begin. The
folder number and the track number will appear on the
display.