display MITSUBISHI COLT 2008 (in English) Owner's Guide
[x] Cancel search | Manufacturer: MITSUBISHI, Model Year: 2008, Model line: COLT, Model: MITSUBISHI COLT 2008Pages: 450, PDF Size: 14.57 MB
Page 198 of 450
4-32 Starting and driving
4
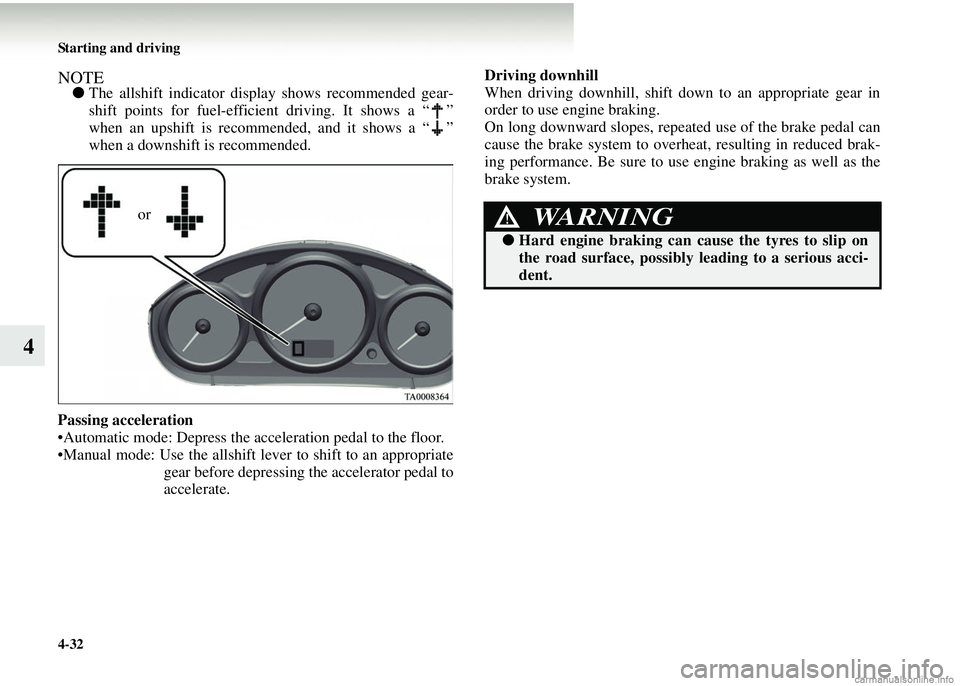
NOTE●The allshift indicator display shows recommended gear-
shift points for fuel-efficient driving. It shows a “ ”
when an upshift is recommended, and it shows a “ ”
when a downshift is recommended.
Passing acceleration
•Automatic mode: Depress the acceleration pedal to the floor.
•Manual mode: Use the allshift lever to shift to an appropriate gear before depressing the accelerator pedal to
accelerate. Driving downhill
When driving downhill, shift down to an appropriate gear in
order to use engine braking.
On long downward slopes, repeated use of the brake pedal can
cause the brake system to overh
eat, resulting in reduced brak-
ing performance. Be sure to us e engine braking as well as the
brake system.
orWARNING!
● Hard engine brak ing can cause the tyres to slip on
the road surface, possibly leading to a serious acci-
dent.
Page 199 of 450
Starting and driving4-33
4
WaitingE00613300046
1. With the allshift lever in the “S” (Stand by) position,firmly depress the brake pedal.
2. If necessary, apply the parking brake.
3. When you are stationary for a long period (for example,
when stuck in a traffic jam), place the allshift lever in the
“N” (Neutral) position. 4. When you are ready to start moving again, first confirm
that the allshift lever is in the “S” (Stand by) position or
“R”(Reverse) position and that an “A”, “1”, or “R” is
shown on the allshift indicator display.
NOTE● During vehicle operation, the transmission automatically
shifts down when the vehicl e speed decreases. It selects
1st gear just before the vehicle reaches a standstill.CAUTION!
●On an uphill slope, the tr ansmission’s creep effect
may not stop the vehicle from rolling backward if
the brakes are not applied. There is no creep effect
while 2nd gear is selected. When stopping, be sure to
depress the brake pedal and securely apply the
parking brake.
● Do not attempt to hold the vehicle in place on an
uphill road in 1st gear by depressing on the accelera-
tor pedal. The transmission could malfunction if you
do.
CAUTION!
● Continue to pay attention to the vehicle while sta-
tionary. If you allow your attention to wander and
the allshift lever is in an y position other than “N”
(Neutral), the vehicle co uld move suddenly and
unexpectedly.
CAUTION!
● The actions described below cause rapid clutch wear
and can cause clutch dama ge. Do not perform them.
• Depressing the brake and accelerator pedals at the
same time.
• Holding the vehicle in place on an uphill road by
depressing the accelerator pedal (and not depress-
ing the brake pedal) with 1st gear selected.
Page 200 of 450
4-34 Starting and driving
4
ParkingE00613400021
1. Bring the vehicle to a complete stop.
2. While depressing the brake pedal, securely apply theparking brake.
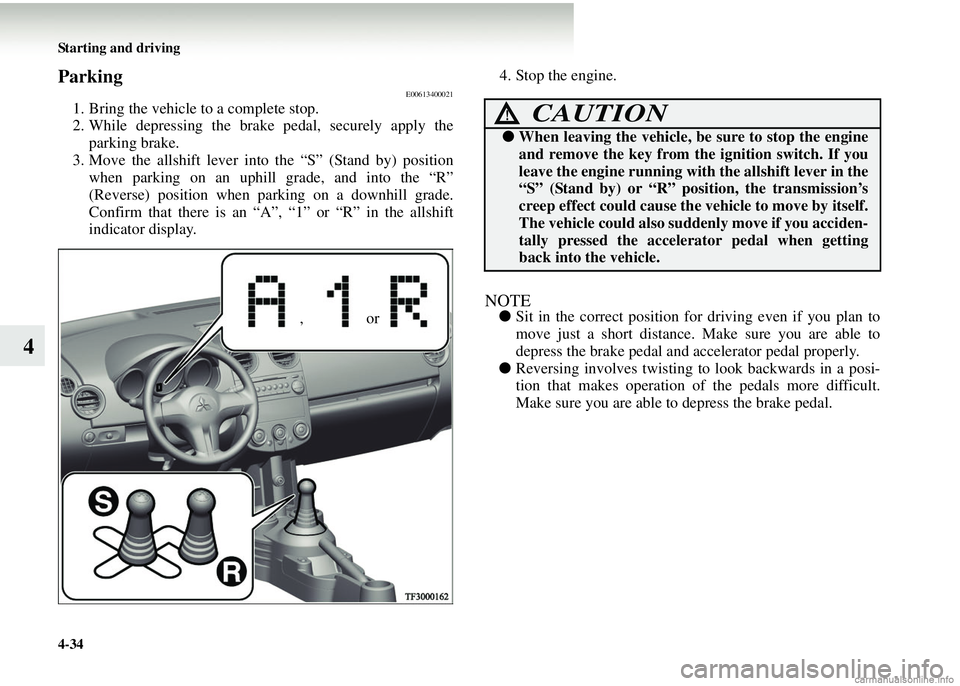
3. Move the allshift lever into the “S” (Stand by) position when parking on an uphill grade, and into the “R”
(Reverse) position when parking on a downhill grade.
Confirm that there is an “A”, “1” or “R” in the allshift
indicator display. 4. Stop the engine.
NOTE●
Sit in the correct position for driving even if you plan to
move just a short distance. Make sure you are able to
depress the brake pedal and accelerator pedal properly.
● Reversing involves twisting to look backwards in a posi-
tion that makes operation of the pedals more difficult.
Make sure you are able to depress the brake pedal.,or
CAUTION!
●When leaving the vehicle, be sure to stop the engine
and remove the key from th e ignition switch. If you
leave the engine running with the allshift lever in the
“S” (Stand by) or “R” position, the transmission’s
creep effect could cause the vehicle to move by itself.
The vehicle could also suddenly move if you acciden-
tally pressed the accelera tor pedal when getting
back into the vehicle.
Page 240 of 450
5-24 For pleasant driving
5LW/MW/FM electronic tuni
ng radio with CD player
*
E00708501022
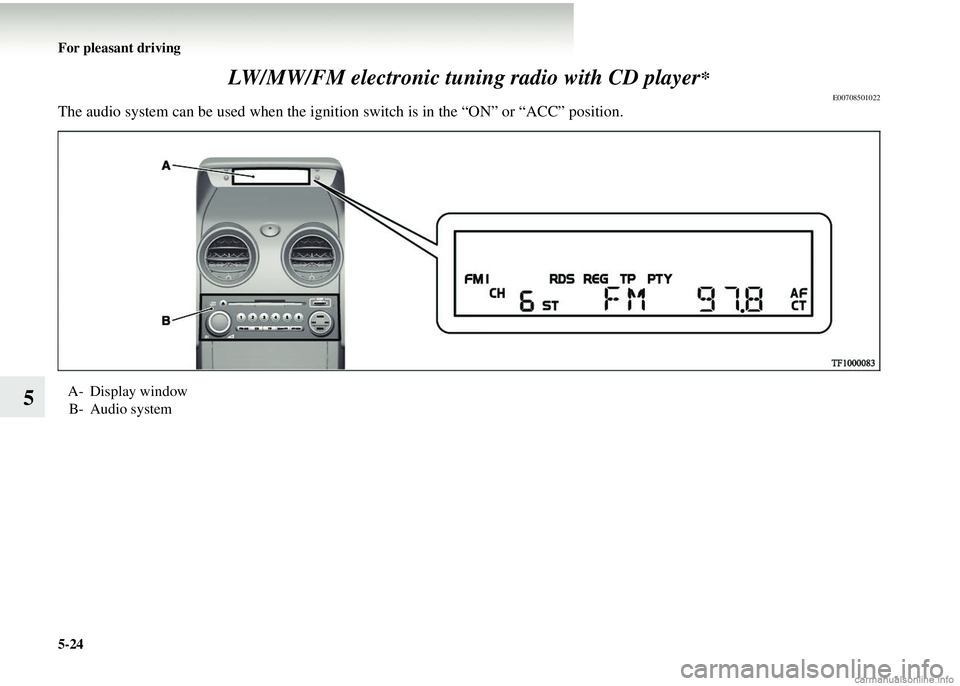
The audio system can be used when the igni tion switch is in the “ON” or “ACC” position.
A- Display window
B- Audio system
Page 242 of 450
5-26 For pleasant driving
5
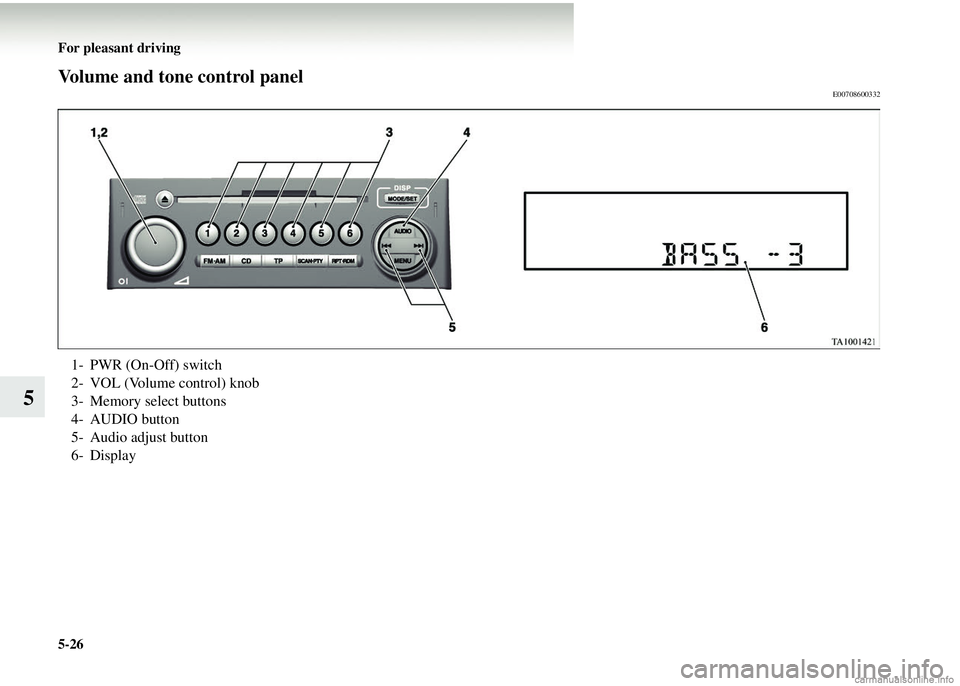
Volume and tone control panelE00708600332
1- PWR (On-Off) switch
2- VOL (Volume control) knob
3- Memory select buttons
4- AUDIO button
5- Audio adjust button
6- Display
Page 243 of 450
For pleasant driving5-27
5
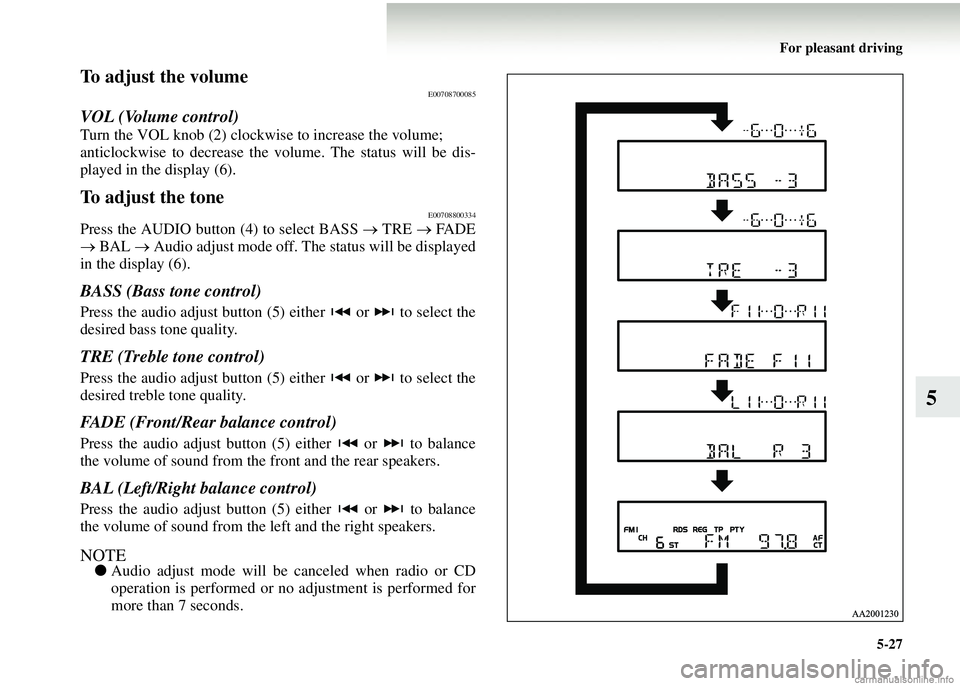
To adjust the volumeE00708700085
VOL (Volume control)
Turn the VOL knob (2) clockwise to increase the volume;
anticlockwise to decrease the vo lume. The status will be dis-
played in the display (6).
To adjust the toneE00708800334
Press the AUDIO button (4) to select BASS → TRE → FA D E
→ BAL → Audio adjust mode off. The status will be displayed
in the display (6).
BASS (Bass tone control)
Press the audio adjust button (5) either or to select the
desired bass tone quality.
TRE (Treble tone control)
Press the audio adjust button (5) either or to select the
desired treble tone quality.
FADE (Front/Rear balance control)
Press the audio adjust button (5) either or to balance
the volume of sound from the front and the rear speakers.
BAL (Left/Right balance control)
Press the audio adjust button (5) either or to balance
the volume of sound from the left and the right speakers.
NOTE● Audio adjust mode will be canceled when radio or CD
operation is performed or no adjustment is performed for
more than 7 seconds.
Page 244 of 450
5-28 For pleasant driving
5
To enter audio tone settings into the memory
It is possible to enter the audio adjustment condition (BASS,
TRE, FADE, BAL) into the memory.1. Make the desired adjustments in the audio adjust mode.
Refer to “To adjust the tone” on page 5-27.
2. In the audio adjust mode, press and hold one of the mem- ory select buttons (3) [1-6]. When you hear a bleep, the
memorization is complete. The display will show the but-
ton number [SOUND1-SOUND6] for which the settings
were memorized.
3. In future, when you gently press the memory select button in the audio adjust mode, the audio adjustment condition
memorized for that button will take effect.
Page 245 of 450
For pleasant driving5-29
5
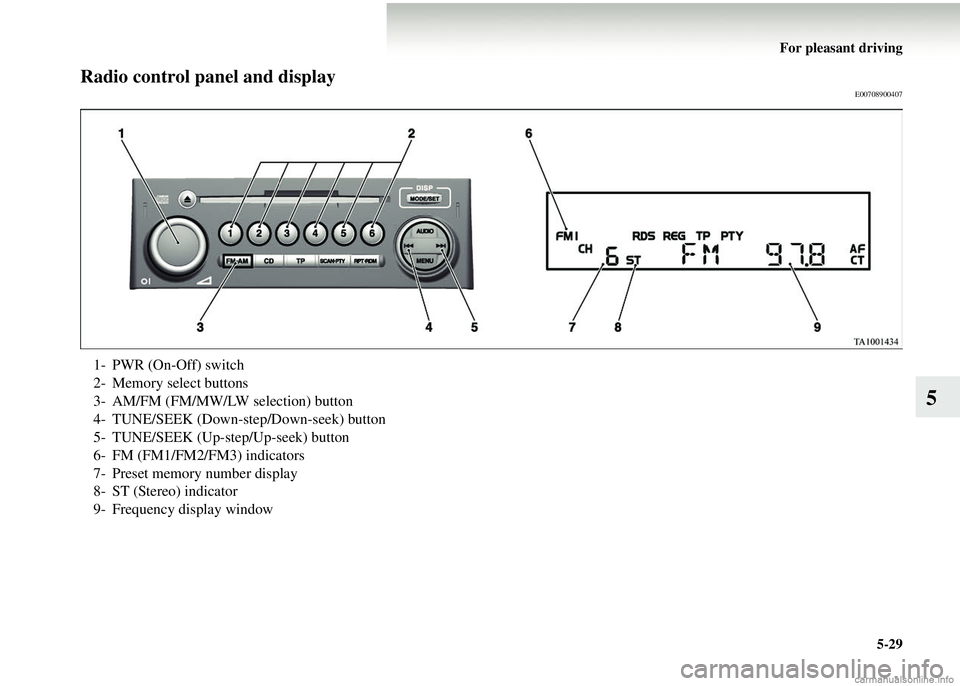
Radio control panel and displayE00708900407
1- PWR (On-Off) switch
2- Memory select buttons
3- AM/FM (FM/MW/LW selection) button
4- TUNE/SEEK (Down-step/Down-seek) button
5- TUNE/SEEK (Up-step/Up-seek) button
6- FM (FM1/FM2/FM3) indicators
7- Preset memory number display
8- ST (Stereo) indicator
9- Frequency display window
Page 247 of 450
For pleasant driving5-31
5
Follow the steps described below.1. Press either the TUNE/SEEK button (4 or 5) to tune the frequency to be entered in the memory.
2. Press one of the memory select buttons (2) for 2 seconds or longer. The sound will be momentarily interrupted
while the frequency is being entered into the memory.
The number of the button corresponding to the entry in the
memory and the frequency are displayed.
3. The preset memory setting is retrieved by pressing the
button and then releasing it within 2 seconds.
Automatic setting
With the method, all manually set stations in the band currently
selected for reception are replaced with stations in the same
band that are automatically selected in order of signal strength.
The radio automatically selects 6 stations in the FM band (FM3
station only) and 6 stations each in the MW and LW band.
Follow the steps described below. 1. With the radio mode selected, hold down the AM/FM but- ton (3) for 2 seconds or longer. The 6 stations with the
best signal strength will automatically be assigned to the
memory select buttons (2), wi th the lowest-frequency sta-
tion being assigned to the lowest-number button.
2. When you subsequently press a memory select button to select a channel number, the ra dio will begin receiving the
station assigned to that number.
NOTE● If you press the AM/FM button (3) for 2 seconds or longer
while tuning in the FM1 or FM2 band, the radio will auto-
matically switch to the FM 3 band, where the automatic
seeking/storing will be activated.
Page 248 of 450
5-32 For pleasant driving
5
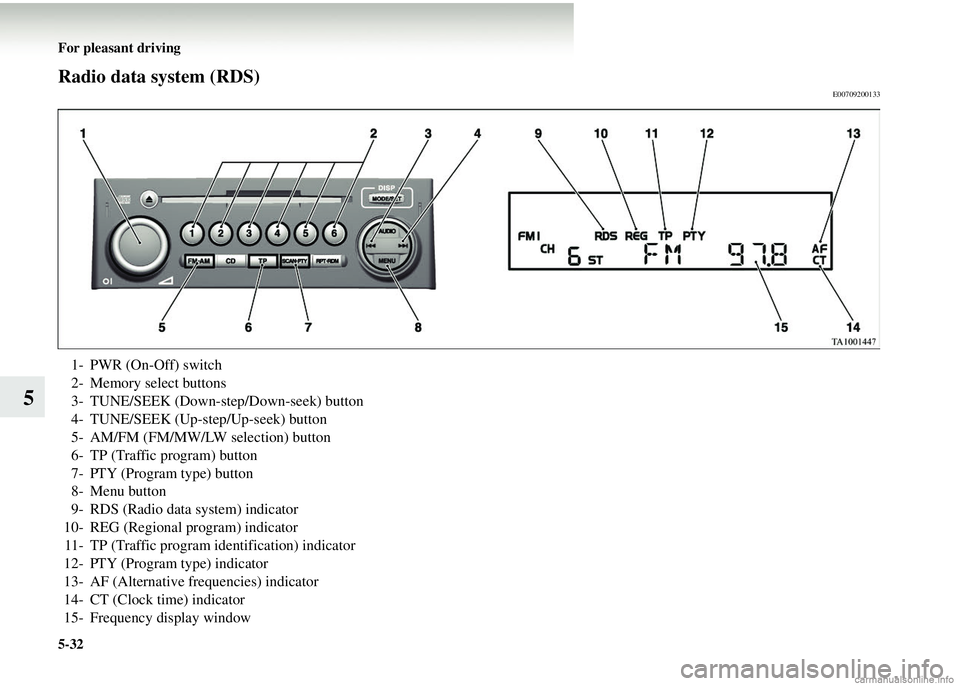
Radio data system (RDS)E00709200133
1- PWR (On-Off) switch
2- Memory select buttons
3- TUNE/SEEK (Down-step/Down-seek) button
4- TUNE/SEEK (Up-step/Up-seek) button
5- AM/FM (FM/MW/LW selection) button
6- TP (Traffic program) button
7- PTY (Program type) button
8- Menu button
9- RDS (Radio data system) indicator
10- REG (Regional program) indicator 11- TP (Traffic program identification) indicator
12- PTY (Program type) indicator
13- AF (Alternative frequencies) indicator
14- CT (Clock time) indicator
15- Frequency display window