clutch MITSUBISHI COLT 2008 Owner's Manual (in English)
[x] Cancel search | Manufacturer: MITSUBISHI, Model Year: 2008, Model line: COLT, Model: MITSUBISHI COLT 2008Pages: 450, PDF Size: 14.57 MB
Page 183 of 450

Starting and driving4-17
4
Starting the engine (petrol-powered vehicles)E00601701255
This vehicles is equipped with an electronically controlled fuel
injection system which is automa tically controlled. When start-
ing the engine, do not de press the accelerator pedal.
The starting procedure is as follows:
Vehicles with manual transmission 1. Insert the ignition key and fasten the seat belt.
2. Make sure the parking brake is applied.
3. Depress and hold the brake pedal.
4. Fully depress the clutch pedal.
5. Place the gearshift lever in the “N” (Neutral) position.
CAUTION!
●Never attempt to start the engine by pushing or pull-
ing the vehicle. This can be very dangerous.
●Do not run the engine at high rpm or drive the vehi-
cle at high speed until th e engine has had a chance to
warm up.
● Release the ignition key as soon as the engine starts
to avoid damaging the starter motor.
●If your vehicle is equipped with a turbocharger, do
not stop the engine immedi ately after high-speed or
uphill driving. First allow the engine to idle to give
the turbocharger a chance to cool down.
Page 185 of 450

Starting and driving4-19
4
6. Turn the ignition key to the “START” position withoutdepressing the acceler ator pedal, and release it when the
engine starts.
NOTE● For safety, the vehicle is designed so that the engine will
not start unless the allshift lever is in the “N” (Neutral)
position. Place the allshift leve r in the “N” (Neutral) posi-
tion before starting the engine.
● If you turn the ignition key to the “START” position when
the gearshift is not in the “N” (Neutral) position, the
allshift indicator display will behave as follows to indicate
that the engine will not start.
• Gearshift in “S” (Stand by) position: An “A” or “1” will
flash several times.
• Gearshift in “R” (reverse) position: An “R” will flash
several times.
Confirm that “N” is shown by the allshift indicator dis-
play.
● If the engine won’t start, depress the accelerator pedal
fully while cranking the engi ne. Once the engine starts,
release the accelerator pedal.
Starting the engine (diesel-powered vehicles)E00601800073
Vehicles with manual transmission 1. Insert the ignition key and fasten the seat belt.
2. Make sure the parking brake is applied.
3. Depress and hold the brake pedal.
4. Fully depress the clutch pedal.
5. Place the gearshift lever in the “N” (Neutral) position.
CAUTION!
●When starting the engine, make sure you depress
the brake pedal. If you start the engine with the
accelerator pedal depressed, move your foot to the
brake pedal as soon as the engine has started.
Page 188 of 450

4-22 Starting and driving
4Manual transmission
E00602000232
The shift pattern is shown on the gearshift lever knob. Be sure
to always fully depress the clutch pedal before attempting to
shift the lever.
NOTE●
If it is hard to shift into 1st, depress the clutch pedal again;
the shift will then be easier to make.
● To shift into reverse from 5th gear, move the gearshift
lever to the “N” (Neutral) position, and then shift it into
reverse.
● To avoid grinding noises when shifting into reverse, wait
approximately 3 seconds with the clutch depressed when
the vehicle is stationary.
Changing gearsE00610600022
Always use care to change the gear with the vehicle speed
matched to the engine speed. Proper shifting will improve fuel
economy and prolong engine life.
Avoid shifting down at high speed, as this may cause excessive
engine speed (the tachometer needle into the red zone) and
damage the engine.
CAUTION!
● Do not move the gearshif t lever into reverse while
the vehicle is moving forward; doing so will damage
the transmission.
● Do not rest your foot on the clutch pedal while driv-
ing as this will cause prem ature clutch wear or dam-
age.
Page 191 of 450
Starting and driving4-25
4
Automated manual transmission
E00612500025
An automated manual transmission is a transmission in which
operation of the clutch and shifting of gears are performed
automatically under electronic control. The transmission has 6
forward gears and 1 reverse gear.
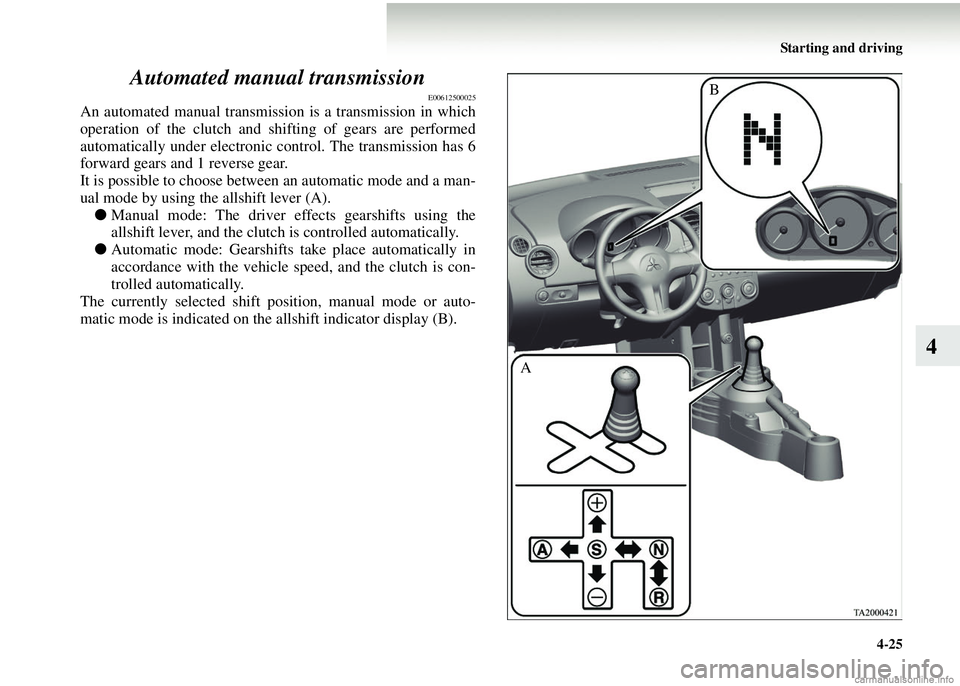
It is possible to choose between
an automatic mode and a man-
ual mode by using the allshift lever (A). ● Manual mode: The driver ef fects gearshifts using the
allshift lever, and the clutch is controlled automatically.
● Automatic mode: Gearshifts take place automatically in
accordance with the vehicle speed, and the clutch is con-
trolled automatically.
The currently selected shift po sition, manual mode or auto-
matic mode is indicated on the allshift indicator display (B).
AB
Page 199 of 450
Starting and driving4-33
4
WaitingE00613300046
1. With the allshift lever in the “S” (Stand by) position,firmly depress the brake pedal.
2. If necessary, apply the parking brake.
3. When you are stationary for a long period (for example,
when stuck in a traffic jam), place the allshift lever in the
“N” (Neutral) position. 4. When you are ready to start moving again, first confirm
that the allshift lever is in the “S” (Stand by) position or
“R”(Reverse) position and that an “A”, “1”, or “R” is
shown on the allshift indicator display.
NOTE● During vehicle operation, the transmission automatically
shifts down when the vehicl e speed decreases. It selects
1st gear just before the vehicle reaches a standstill.CAUTION!
●On an uphill slope, the tr ansmission’s creep effect
may not stop the vehicle from rolling backward if
the brakes are not applied. There is no creep effect
while 2nd gear is selected. When stopping, be sure to
depress the brake pedal and securely apply the
parking brake.
● Do not attempt to hold the vehicle in place on an
uphill road in 1st gear by depressing on the accelera-
tor pedal. The transmission could malfunction if you
do.
CAUTION!
● Continue to pay attention to the vehicle while sta-
tionary. If you allow your attention to wander and
the allshift lever is in an y position other than “N”
(Neutral), the vehicle co uld move suddenly and
unexpectedly.
CAUTION!
● The actions described below cause rapid clutch wear
and can cause clutch dama ge. Do not perform them.
• Depressing the brake and accelerator pedals at the
same time.
• Holding the vehicle in place on an uphill road by
depressing the accelerator pedal (and not depress-
ing the brake pedal) with 1st gear selected.
Page 215 of 450
Starting and driving4-49
4
Operating hints
●Do not let the clutch slip and do not increase the engine
speed more than necessary when starting.
● Be sure that the driving speed does not exceed the 100
km/h (62 mph) for trailer operation.
It is also recommended that you comply with the local
regulations if the driving speed with a trailer is limited to
less than 100 km/h (62 mph).
● To prevent shocks from an overrun brake, depress the
brake pedal lightly at first and then more strongly.
● To make full use of engine braking, change to a lower
gear before descending a slope.
● The body, brakes, clutch, and chassis will be under addi-
tional strain when towing a trailer.
● The heavier weight and high er rolling and air resistance
will increase fuel consumption.
Page 343 of 450

8
Maintenance
Service precautions . . . . . . . . . . . . . . . . . . . . . . . .8- 2
Catalytic converter . . . . . . . . . . . . . . . . . . . . . . . . .8- 3
Bonnet . . . . . . . . . . . . . . . . . . . . . . . . . . . . . . . . . .8- 4
Engine oil . . . . . . . . . . . . . . . . . . . . . . . . . . . . . . . .8- 7
Engine coolant . . . . . . . . . . . . . . . . . . . . . . . . . . . .8- 11
Washer fluid . . . . . . . . . . . . . . . . . . . . . . . . . . . . . .8- 14
Brake fluid/Clutch fluid* . . . . . . . . . . . . . . . . . . . .8- 14
Battery . . . . . . . . . . . . . . . . . . . . . . . . . . . . . . . . . .8- 15
Tyres . . . . . . . . . . . . . . . . . . . . . . . . . . . . . . . . . . . .8- 19
Parking brake lever stroke . . . . . . . . . . . . . . . . . . .8- 24
Wiper blades . . . . . . . . . . . . . . . . . . . . . . . . . . . . .8- 25
General maintenance . . . . . . . . . . . . . . . . . . . . . . .8- 28
For cold and snow weather . . . . . . . . . . . . . . . . . .8- 29
Fuse links . . . . . . . . . . . . . . . . . . . . . . . . . . . . . . . .8- 30
Fuses . . . . . . . . . . . . . . . . . . . . . . . . . . . . . . . . . . .8- 30
Replacement of lamp bulbs . . . . . . . . . . . . . . . . . .8- 40
Page 356 of 450

8-14 Maintenance
8Wa s h e r f l u i d
E01000700379
Check the washer fluid level in the container.
If the level is low, replenish the container with washer fluid.
NOTE●
The washer fluid container serves the windscreen and rear
window.
During cold weather
To ensure proper oper ation of the washers at low temperatures,
use a fluid containing an anti-freezing agent.
Brake fluid/Clutch fluid*
E01000800035
The brake fluid (A) and the clutch fluid (B) share a reservoir
tank.
To check the fluid level
The fluid level must be between the “MAX” and “MIN” marks
on the reservoir.
The brake fluid level is monitored by a float. When the fluid
level falls below the “MIN” mark, the brake fluid warning
lamp lights up.
The brake fluid level falls slightly with wear of the brake pads,
but this does not indicate any abnormality.
A- Brake fluid C- Partition
B- Clutch fluid
Page 357 of 450
Maintenance8-15
8
The fluid in the master cylinder should be checked when doing
other work under the bonnet. Th e brake system should also be
checked for leaks at the same time.
If the fluid level falls markedly in a short period of time, it indi-
cates a leak from the system.
If this occurs, we recommen d that you have the vehicle
checked.
Fluid type
Use brake fluid conforming to DOT4+ from a sealed container.
The brake fluid is hygroscopic. Too much moisture in the brake
fluid will adversely affect the br ake system and the clutch sys-
tem, reducing performance.
Battery
E01001201118
The condition of the battery is very important for quick starting
of the engine and proper functioning of the vehicle’s electrical
system. Regular inspection and care are especially important in
cold weather.
NOTE● Memory data for settings made by the user may be erased
when the battery is replaced. If this happens, establish the
settings again using the relevant procedures.
CAUTION!
● Take care when handling brake fluid as it is harmful
to the eyes, may irritate your skin and also damage
painted surfaces.
●Use only the speci fied brake fluid.
To prevent a chemical reaction do not mix or add
different brands of brake fluid.
Do not let any petroleum-based fluid touch, mix
with, or get into the brake fluid.
This will damage the seals.
● Keep the reservoir tank cap closed, except during
maintenance, to prevent th e brake fluid from deteri-
orating.
● Clean the filler cap before removing and close the
cap securely after maintenance.
Page 428 of 450

9-16 Specifications
9Other specifications
E01101000442
*: Optional equipment
ItemPetrol-powered vehiclesDiesel-powered vehicles1100 models, 1300 models1500 models
Fuel systemFuel control
Electric controlled injection Direct injection
Fuel pumpElectric motor type Electronically controlled
Clutch Dry single disc clutch, hydraulic action
Steering systemRack and pinion type, electric power assisted
SuspensionFrontIndependent type, MacPherson strut, coil spring
Rear Torsion beam rigid type
Service brakes
TypeHydraulic, dual diagonal circuit with power assistance and anti-lock brake system with elec-
tronic brake force distribution function
Front Ventilated disc brakes
RearDrum brakes, Disc brakes* Disc brakesDrum brakes, Disc brakes*
Parking brakes Parking brake acts mechanically on rear wheels