lamp MITSUBISHI COLT 2009 10.G User Guide
[x] Cancel search | Manufacturer: MITSUBISHI, Model Year: 2009, Model line: COLT, Model: MITSUBISHI COLT 2009 10.GPages: 273, PDF Size: 17.28 MB
Page 15 of 273
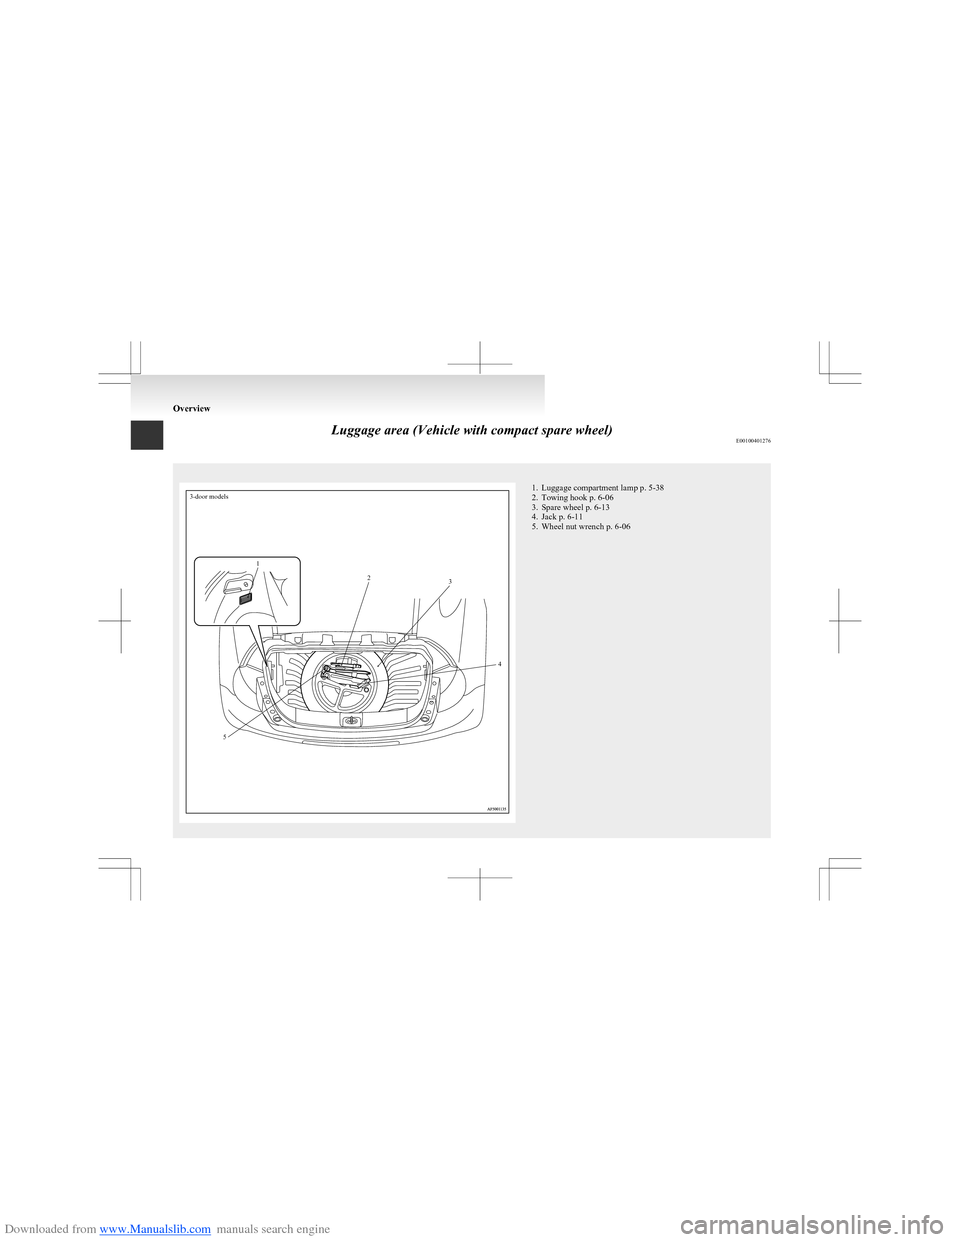
Downloaded from www.Manualslib.com manuals search engine Luggage area (Vehicle with compact spare wheel)E00100401276
3-door models123451. Luggage compartment lamp p. 5-38
2. Towing hook p. 6-06
3. Spare wheel p. 6-13
4. Jack p. 6-11
5. Wheel nut wrench p. 6-06
Overview
Page 16 of 273
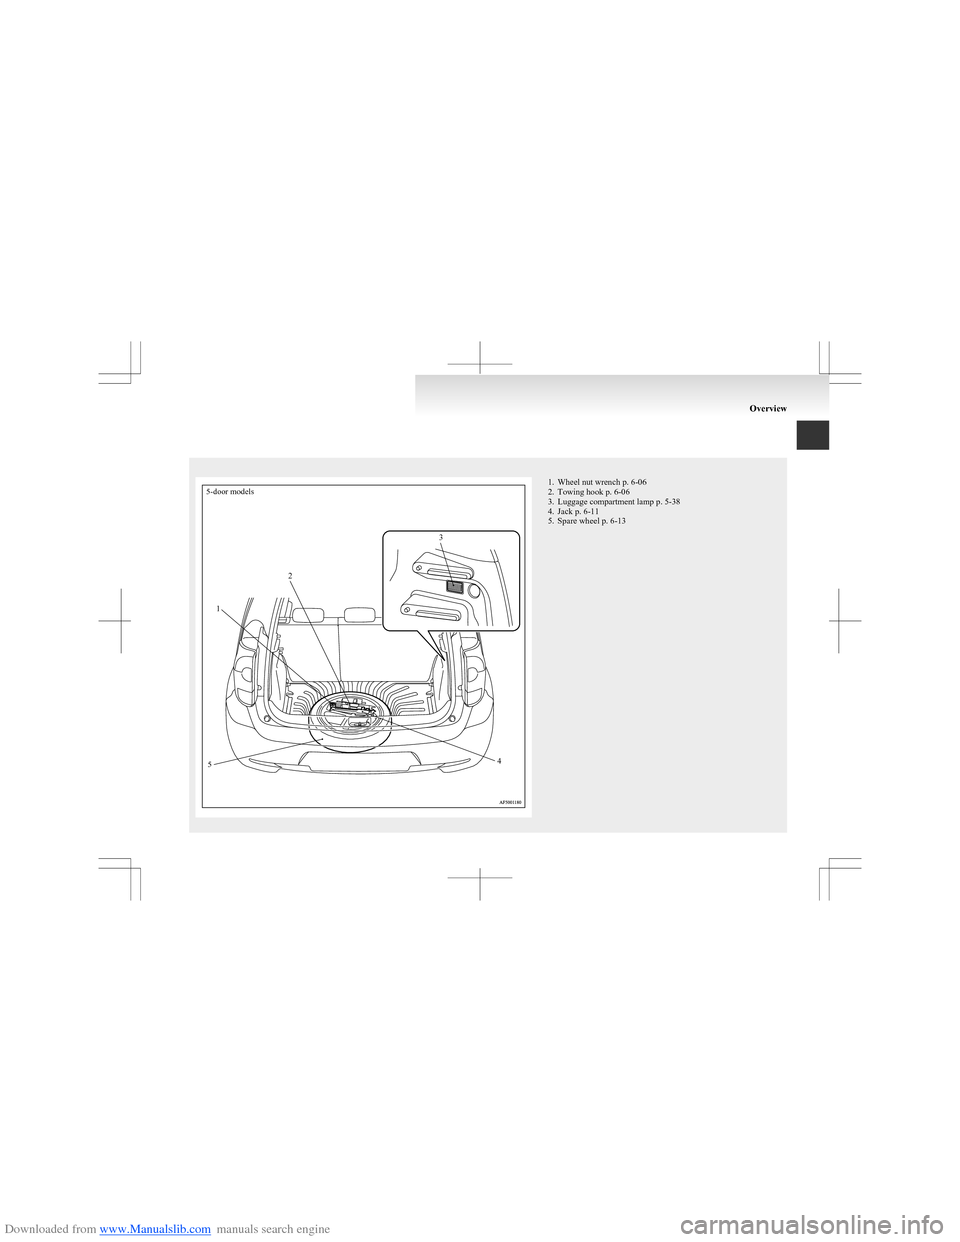
Downloaded from www.Manualslib.com manuals search engine 5-door models123451. Wheel nut wrench p. 6-06
2. Towing hook p. 6-06
3. Luggage compartment lamp p. 5-38
4. Jack p. 6-11
5. Spare wheel p. 6-13
Overview
Page 17 of 273
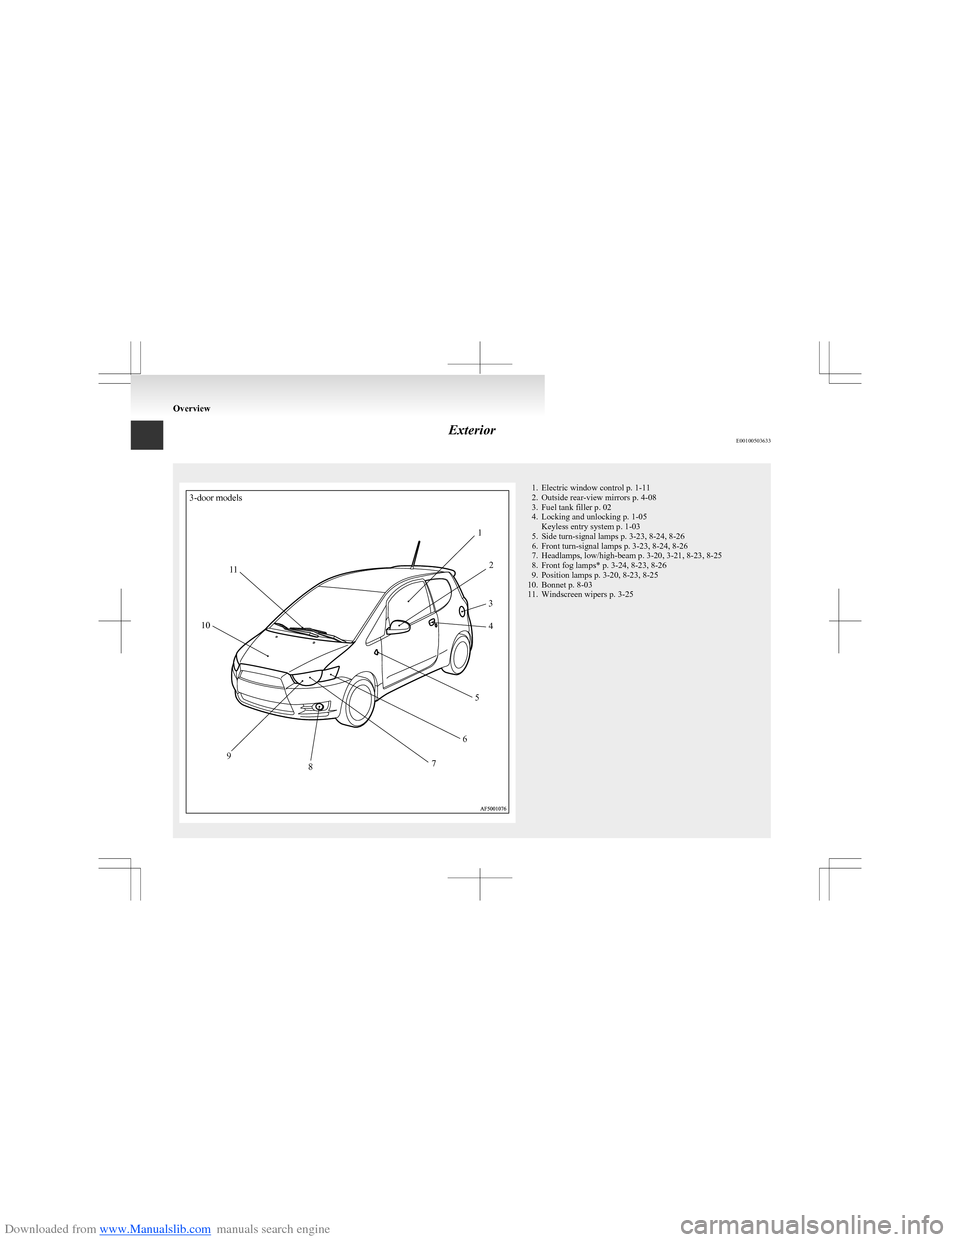
Downloaded from www.Manualslib.com manuals search engine ExteriorE00100503633
3-door models12345678910111. Electric window control p. 1-11
2. Outside rear-view mirrors p. 4-08
3. Fuel tank filler p. 02
4. Locking and unlocking p. 1-05 Keyless entry system p. 1-03
5. Side turn-signal lamps p. 3-23, 8-24, 8-26
6. Front turn-signal lamps p. 3-23, 8-24, 8-26
7. Headlamps, low/high-beam p. 3-20, 3-21, 8-23, 8-25
8. Front fog lamps* p. 3-24, 8-23, 8-26
9. Position lamps p. 3-20, 8-23, 8-25
10. Bonnet p. 8-03
11. Windscreen wipers p. 3-25
Overview
Page 18 of 273
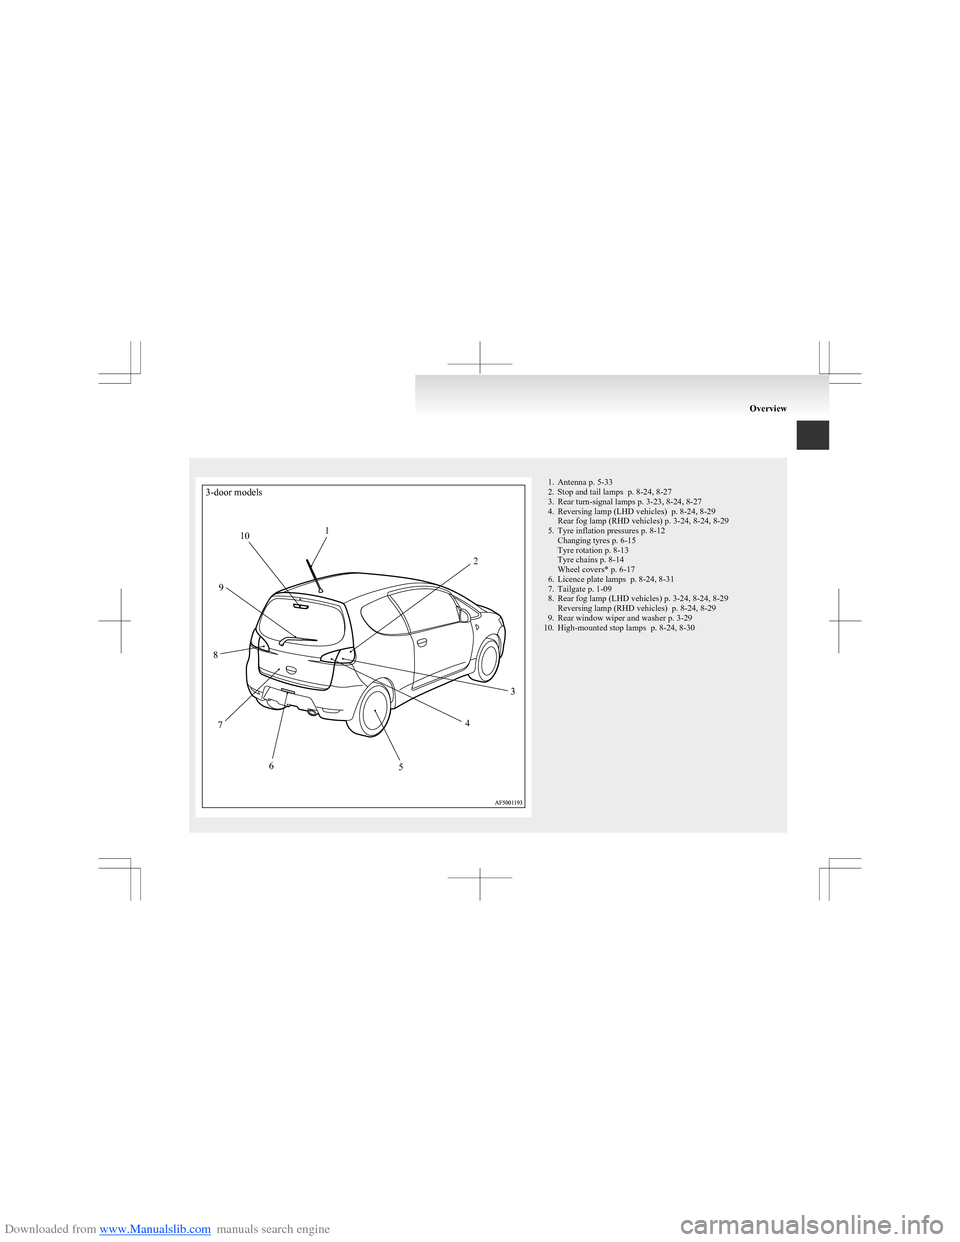
Downloaded from www.Manualslib.com manuals search engine 3-door models123456789101. Antenna p. 5-33
2. Stop and tail lamps p. 8-24, 8-27
3. Rear turn-signal lamps p. 3-23, 8-24, 8-27
4. Reversing lamp (LHD vehicles) p. 8-24, 8-29 Rear fog lamp (RHD vehicles) p. 3-24, 8-24, 8-29
5. Tyre inflation pressures p. 8-12 Changing tyres p. 6-15
Tyre rotation p. 8-13
Tyre chains p. 8-14
Wheel covers* p. 6-17
6. Licence plate lamps p. 8-24, 8-31
7. Tailgate p. 1-09
8. Rear fog lamp (LHD vehicles) p. 3-24, 8-24, 8-29 Reversing lamp (RHD vehicles) p. 8-24, 8-29
9. Rear window wiper and washer p. 3-29
10. High-mounted stop lamps p. 8-24, 8-30
Overview
Page 19 of 273
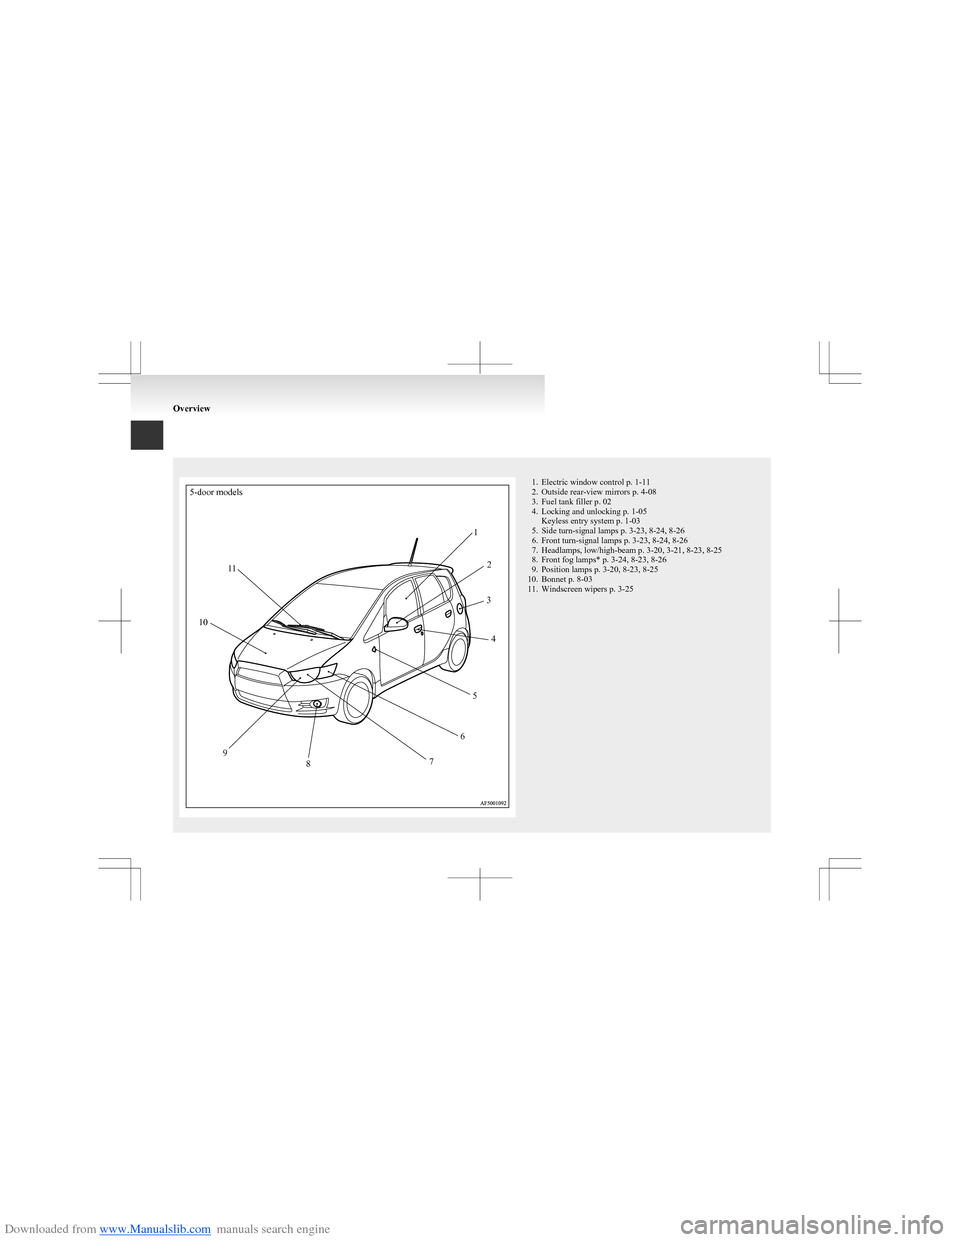
Downloaded from www.Manualslib.com manuals search engine 5-door models12345678910111. Electric window control p. 1-11
2. Outside rear-view mirrors p. 4-08
3. Fuel tank filler p. 02
4. Locking and unlocking p. 1-05 Keyless entry system p. 1-03
5. Side turn-signal lamps p. 3-23, 8-24, 8-26
6. Front turn-signal lamps p. 3-23, 8-24, 8-26
7. Headlamps, low/high-beam p. 3-20, 3-21, 8-23, 8-25
8. Front fog lamps* p. 3-24, 8-23, 8-26
9. Position lamps p. 3-20, 8-23, 8-25
10. Bonnet p. 8-03
11. Windscreen wipers p. 3-25
Overview
Page 20 of 273
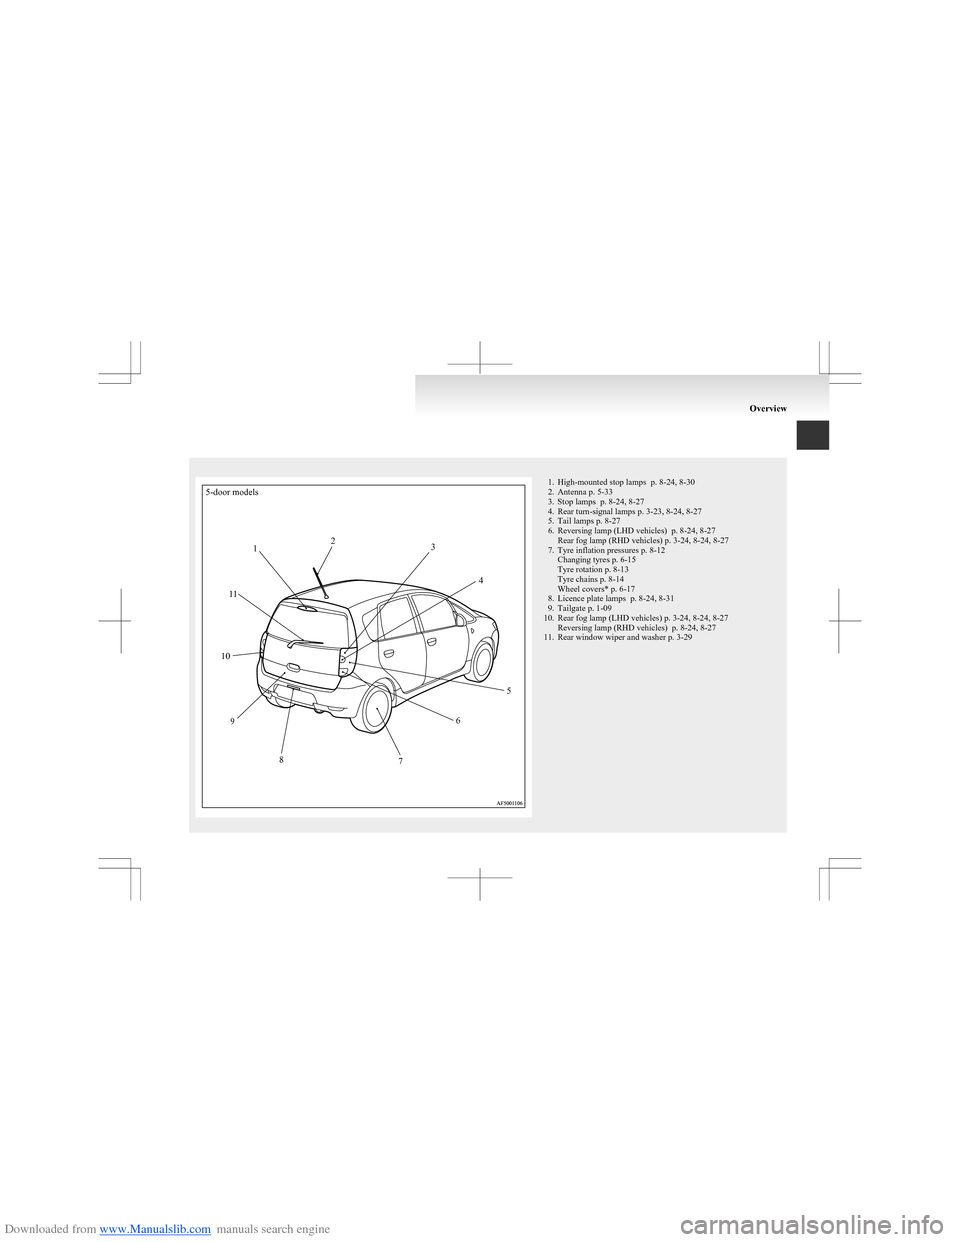
Downloaded from www.Manualslib.com manuals search engine 5-door models12345678910111. High-mounted stop lamps p. 8-24, 8-30
2. Antenna p. 5-33
3. Stop lamps p. 8-24, 8-27
4. Rear turn-signal lamps p. 3-23, 8-24, 8-27
5. Tail lamps p. 8-27
6. Reversing lamp (LHD vehicles) p. 8-24, 8-27 Rear fog lamp (RHD vehicles) p. 3-24, 8-24, 8-27
7. Tyre inflation pressures p. 8-12 Changing tyres p. 6-15
Tyre rotation p. 8-13
Tyre chains p. 8-14
Wheel covers* p. 6-17
8. Licence plate lamps p. 8-24, 8-31
9. Tailgate p. 1-09
10. Rear fog lamp (LHD vehicles) p. 3-24, 8-24, 8-27 Reversing lamp (RHD vehicles) p. 8-24, 8-27
11. Rear window wiper and washer p. 3-29
Overview
Page 23 of 273
Downloaded from www.Manualslib.com manuals search engine Fuel selectionE00200102590Recom-
mended
fuelUnleaded petrol octane num-
ber (EN228) 95 RON or higherCAUTIONlThe use of leaded fuel can result in seri-
ous damage to the engine and catalytic
converter. Do not use leaded fuel.
NOTE
l Your vehicle has the knock control system
so that you can use unleaded petrol 90 RON
as an emergent measure in case unleaded pet-
rol 95 RON or higher is not available on jour-
ney, etc. In such a case, you don’t need to ad-
just the engine specially.
In case of using unleaded petrol 90 RON, the
engine performance level is reduced.
l Repeatedly driving short distances at low
speeds can cause deposits to form in the fuel
system and engine, resulting in poor starting
and poor acceleration. If these problems oc-
cur, you are advised to add a detergent addi-
tive to the gasoline when you refuel the vehi-
cle. The additive will remove the deposits,
thereby returning the engine to a normal con-
dition. Be sure to use a genuine
MITSUBISHI FUEL SYSTEM CLEANER.
Using an unsuitable additive could make the
engine malfunction. For details, please con-
tact a MITSUBISHI MOTORS Authorized
Service Point.
l Poor quality petrol can cause problems such
as difficult starting, stalling, engine noise
and hesitation. If you experience these prob-
lems, try another brand and/or grade of petrol.
If the check engine warning lamp flashes,
have the system checked as soon as possible
at a MITSUBISHI MOTORS Authorized
Service Point.Filling the fuel tank E00200202331WARNINGlGasoline is highly flammable and explo-
sive. You could be burned or seriously in-
jured when handling it. When refueling
your vehicle, always turn the engine off
and keep away from flames, sparks, and
smoking materials. Always handle fuel in
well-ventilated outdoor areas.
l Before removing the fuel cap, be sure to
get rid of your body’s static electricity by
touching a metal part of the car or the
fuel pump. Any static electricity on your
body could create a spark that ignites
fuel vapour.
l Perform the whole refueling process
(opening the fuel tank filler door, remov-
ing the fuel cap, etc.) by yourself. Do not
let any other person come near the fuel
tank filler. If you allowed a person to
help you and that person was carrying
static electricity, fuel vapour could be ig-
nited.
l Do not move away from the fuel tank fill-
er until refueling is finished. If you
moved away and did something else (for
example, cleaning your windscreen) part-
way through the refueling process, you
could pick up a fresh charge of static elec-
tricity.
l Be careful not to inhale fuel vapour. Fuel
contains toxic substances.
General information
02
Page 29 of 273
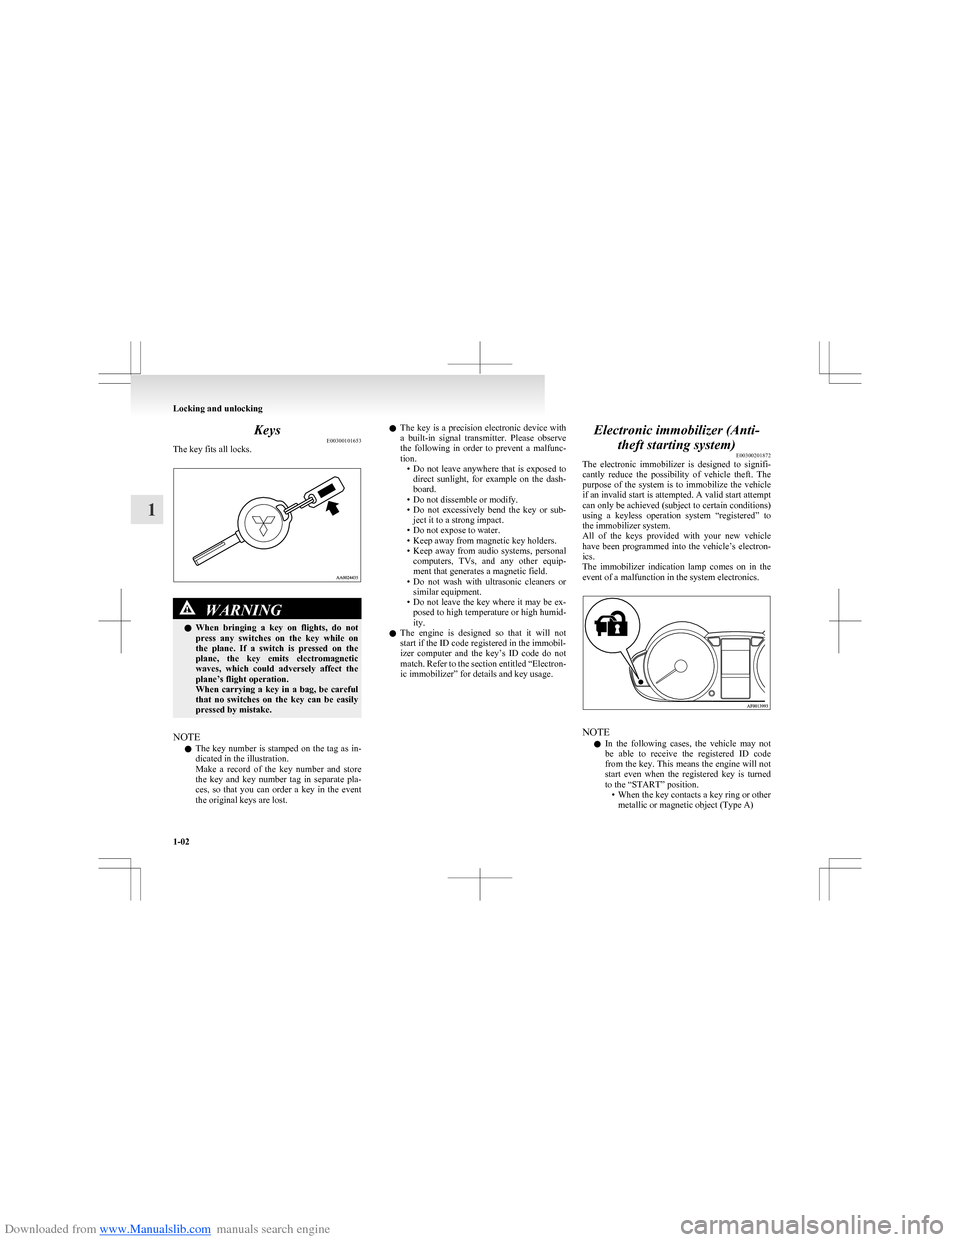
Downloaded from www.Manualslib.com manuals search engine KeysE00300101653
The key fits all locks.WARNINGl When bringing a key on flights, do not
press any switches on the key while on
the plane. If a switch is pressed on the
plane, the key emits electromagnetic
waves, which could adversely affect the
plane’s flight operation.
When carrying a key in a bag, be careful
that no switches on the key can be easily
pressed by mistake.
NOTE
l The key number is stamped on the tag as in-
dicated in the illustration.
Make a record of the key number and store
the key and key number tag in separate pla-
ces, so that you can order a key in the event
the original keys are lost.
l The key is a precision electronic device with
a built-in signal transmitter. Please observe
the following in order to prevent a malfunc-
tion. •Do not leave anywhere that is exposed to
direct sunlight, for example on the dash-
board.
• Do not dissemble or modify.
• Do not excessively bend the key or sub-
ject it to a strong impact.
• Do not expose to water.
• Keep away from magnetic key holders.
• Keep away from audio systems, personal
computers, TVs, and any other equip-
ment that generates a magnetic field.
• Do not wash with ultrasonic cleaners or
similar equipment.
• Do not leave the key where it may be ex-
posed to high temperature or high humid-
ity.
l The engine is designed so that it will not
start if the ID code registered in the immobil-
izer computer and the key’s ID code do not
match. Refer to the section entitled “Electron-
ic immobilizer” for details and key usage.Electronic immobilizer (Anti-
theft starting system) E00300201872
The electronic immobilizer is designed to signifi-
cantly reduce the possibility of vehicle theft. The
purpose of the system is to immobilize the vehicle
if an invalid start is attempted. A valid start attempt
can only be achieved (subject to certain conditions)
using a keyless operation system “registered” to
the immobilizer system.
All of the keys provided with your new vehicle
have been programmed into the vehicle’s electron-
ics.
The immobilizer indication lamp comes on in the
event of a malfunction in the system electronics.
NOTE
l In the following cases, the vehicle may not
be able to receive the registered ID code
from the key. This means the engine will not
start even when the registered key is turned
to the “START” position. •When the key contacts a key ring or other
metallic or magnetic object (Type A)
Locking and unlocking
1-02
1
Page 30 of 273
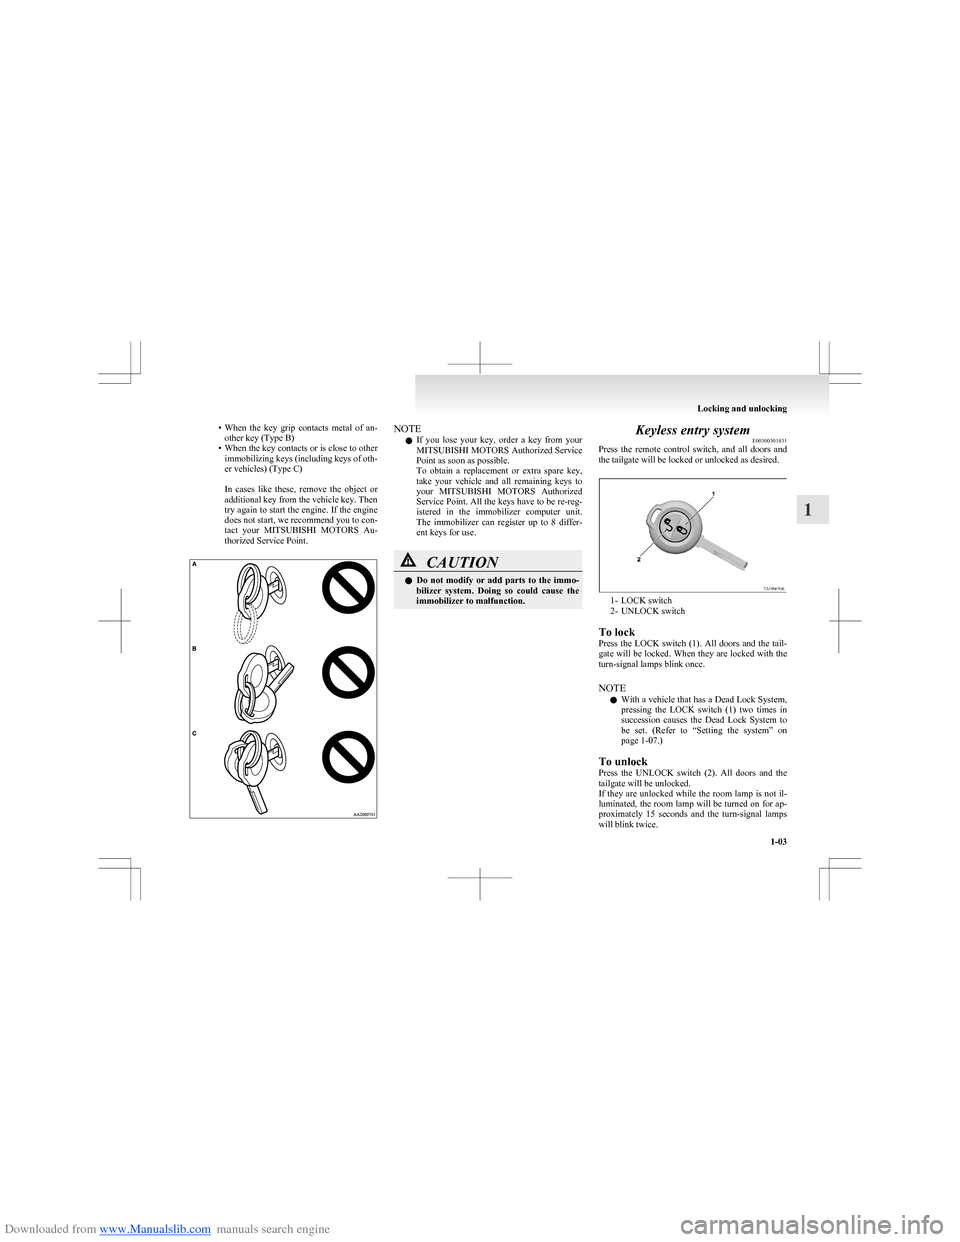
Downloaded from www.Manualslib.com manuals search engine •When the key grip contacts metal of an-
other key (Type B)
• When the key contacts or is close to other
immobilizing keys (including keys of oth-
er vehicles) (Type C)
In cases like these, remove the object or
additional key from the vehicle key. Then
try again to start the engine. If the engine
does not start, we recommend you to con-
tact your MITSUBISHI MOTORS Au-
thorized Service Point.NOTE
l If you lose your key, order a key from your
MITSUBISHI MOTORS Authorized Service
Point as soon as possible.
To obtain a replacement or extra spare key,
take your vehicle and all remaining keys to
your MITSUBISHI MOTORS Authorized
Service Point. All the keys have to be re-reg-
istered in the immobilizer computer unit.
The immobilizer can register up to 8 differ-
ent keys for use.CAUTIONl Do not modify or add parts to the immo-
bilizer system. Doing so could cause the
immobilizer to malfunction.Keyless entry system E00300301831
Press the remote control switch, and all doors and
the tailgate will be locked or unlocked as desired.
1- LOCK switch
2- UNLOCK switch
To lock
Press the LOCK switch (1). All doors and the tail-
gate will be locked. When they are locked with the
turn-signal lamps blink once.
NOTE l With a vehicle that has a Dead Lock System,
pressing the LOCK switch (1) two times in
succession causes the Dead Lock System to
be set. (Refer to “Setting the system” on
page 1-07.)
To unlock
Press the UNLOCK switch (2). All doors and the
tailgate will be unlocked.
If they are unlocked while the room lamp is not il-
luminated, the room lamp will be turned on for ap-
proximately 15 seconds and the turn-signal lamps
will blink twice.
Locking and unlocking
1-03
1
Page 31 of 273
Downloaded from www.Manualslib.com manuals search engine NOTEl If the UNLOCK switch (2) is pressed and
any of the doors or tailgate is not opened with-
in approximately 30 seconds: relocking will
automatically occur.
l It is possible to modify functions as follows:
For further information, contact your
MITSUBISHI MOTORS Authorized Service
Point. •The time from pressing the UNLOCK
switch (2) to the moment of automatic
locking can be changed.
• The confirmation function (flashing of
the turn-signal lamps) can be set to oper-
ate only when the doors and tailgate are
locked or only when the doors and tail-
gate are unlocked.
• The confirmation function (this indicates
locking or unlocking of the doors and tail-
gate with the flash of the turn-signal
lamps) can be deactivated.
• The number of times the turn-signal
lamps are flashed by the confirmation
function can be changed.
Operation of the Dead Lock System
With a vehicle that has a Dead Lock System, it is
possible to set the Dead Lock System using the re-
mote controller.
(Refer to “Dead Lock System” on page 1-07.)
NOTE l With a vehicle that has a Dead Lock System,
the keyless entry system does not work while
the key is in the ignition switch.l Pressing the LOCK switch (1) has no effect
(no locking takes place) while a door or the
tailgate is open.
l The remote control switch will operate with-
in about 4 m from the vehicle. However, the
operating range of the remote control switch
may change if the vehicle is located near a
TV transmitting tower, power station, or ra-
dio broadcasting station.
l If the turn-signal lamps flash nine times
when you press the remote control switch,
the battery may have run down. For further
information, please consult your
MITSUBISHI MOTORS Authorized Service
Point.
If you replace the battery yourself, refer to
“ Procedure for replacing the remote control
switch battery” on page 1-04.
l If your remote control switch is lost or dam-
aged, please contact your MITSUBISHI
MOTORS Authorized Service Point for a re-
placement remote control switch.
l If you wish to add a remote control switch,
we recommend you to contact your
MITSUBISHI MOTORS Authorized Service
Point.
A maximum of 8 remote control switches are
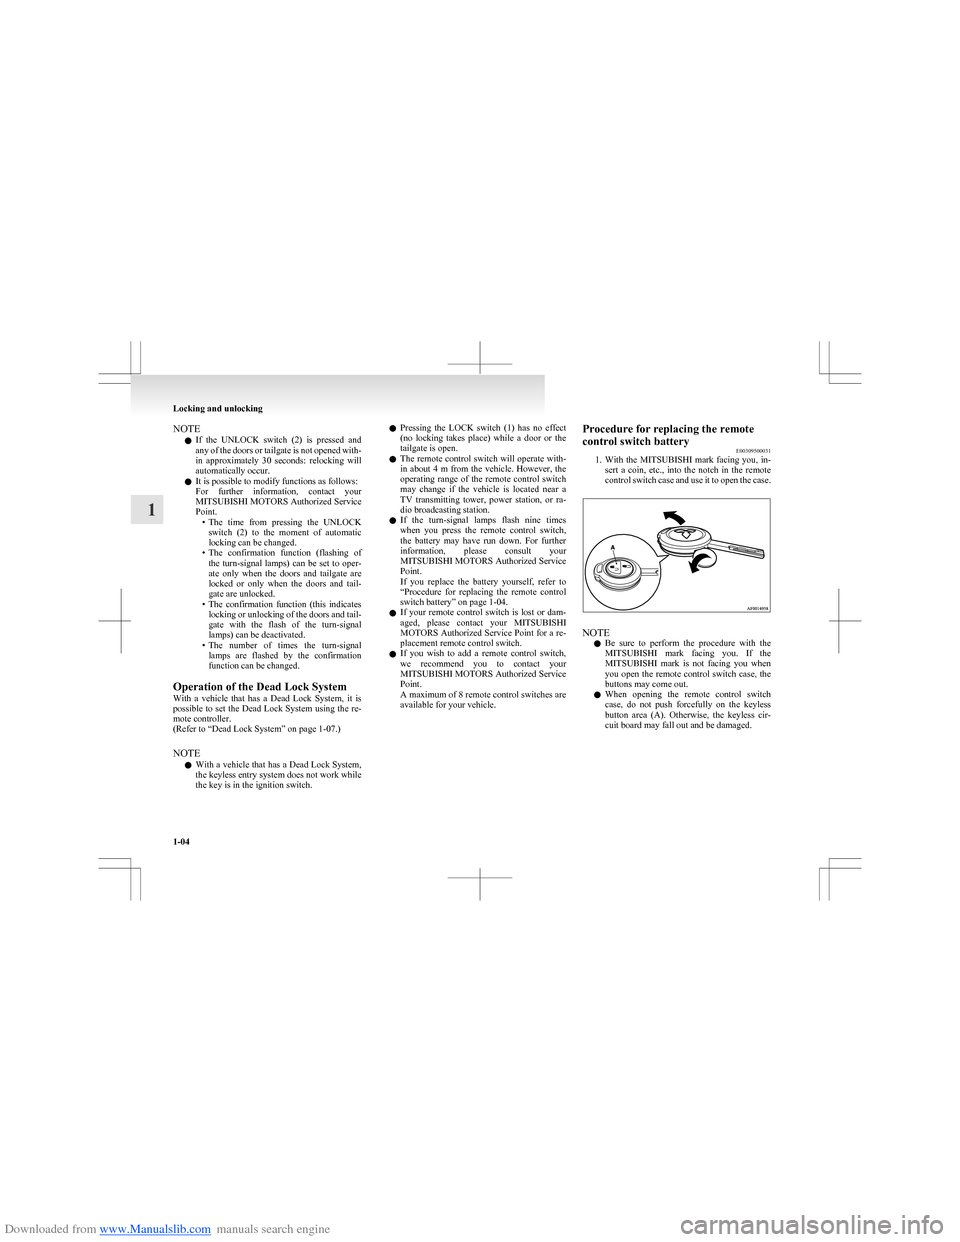
available for your vehicle.Procedure for replacing the remote
control switch battery E00309500031
1. With the MITSUBISHI mark facing you, in-
sert a coin, etc., into the notch in the remote
control switch case and use it to open the case.
NOTE
l Be sure to perform the procedure with the
MITSUBISHI mark facing you. If the
MITSUBISHI mark is not facing you when
you open the remote control switch case, the
buttons may come out.
l When opening the remote control switch
case, do not push forcefully on the keyless
button area (A). Otherwise, the keyless cir-
cuit board may fall out and be damaged.
Locking and unlocking
1-04
1