Windscreen wiper MITSUBISHI COLT 2011 (in English) User Guide
[x] Cancel search | Manufacturer: MITSUBISHI, Model Year: 2011, Model line: COLT, Model: MITSUBISHI COLT 2011Pages: 274, PDF Size: 17.88 MB
Page 211 of 274
NOTEl If genuine leather is wet with water or is wash-
ed in water, wipe off water as quickly as pos-
sible with a dry, soft cloth. If left damp, mil-
dew may grow.
l The genuine leather surface may be damaged
if a nylon brush or synthetic fibre is rubbed
hard against it.
l Organic solvents such as benzine, kerosene,
alcohol and petrol, acid or alkaline solvents
may discolour the genuine leather surface.
Be sure to use neutral detergents.
l Remove dirty patches or oil substances quick-
ly as they can stain genuine leather.
l The genuine leather surface may harden and
shrink if it is exposed to direct sun for long
hours. When your vehicle is parked, place it
in the shade as much as possible.
l When the temperature of the vehicle interior
rises in summer, vinyl products left on the
genuine leather seat may deteriorate and
stick to the seat.Cleaning the exterior of your
vehicle E00900700010
If the following is left on your vehicle, it may
cause corrosion, discolouration and stains, wash
the vehicle as soon as possible.
l Seawater, anti-freeze for road use.
l Soot and dust, iron powder from factories,
chemical substance (acids, alkalis, coal-tar,
etc.).
l Droppings from birds, carcasses of insects,
tree sap, etc.Washing E00900902351
Chemicals contained in the dirt and dust picked up
from the road surface can damage the paint coat
and body of your vehicle if left in prolonged contact.
Frequent washing and waxing is the best way to pro-
tect your vehicle from this damage. This will also
be effective in protecting it from environmental el-
ements such as rain, snow, salt air, etc.
Do not wash the vehicle in direct sunlight. Park the
vehicle in the shade and spray it with water to re-
move dust. Next, using an ample amount of clean
water and a car washing brush or sponge, wash the
vehicle from top to bottom.
Use a mild car washing soap if necessary. Rinse
thoroughly and wipe dry with a soft cloth. After
washing the vehicle, carefully clean the joints and
flanges of the doors, bonnet, etc., where dirt is like-
ly to remain.
CAUTIONl When washing the under side of your ve-
hicle or wheel, be careful not to injure
your hands.
l If your vehicle has rain sensor wipers,
place the wiper switch lever in the “
”
(OFF) position to deactivate the rain sen-
sor before washing the vehicle. Other-
wise, the wipers will operate in the pres-
ence of water spray on the windscreen
and may get damaged as a result.
l Refrain from using a car wash as its brush-
es may scratch the paint surface, causing
it to lose its gloss.
Scratches will be especially visible on
darker coloured vehicles.
l Never spray or splash water on the electri-
cal components in the engine compart-
ment, as this may adversely affect engine
starting.
Exercise caution also when washing the
underbody; be careful not to spray water
into the engine compartment.
l Some types of hot water washing equip-
ment apply high pressure and heat to the
vehicle. They may cause heat distortion
and damage to the vehicle resin parts and
may result in flooding of the vehicle inte-
rior. Therefore; observe the following. •Maintain a distance of approx. 50 cm
or more between the vehicle body and
the washing nozzle.
• When washing around the door glass,
hold the nozzle at a distance of more
than 50 cm and at right angles to the
glass surface.
Vehicle care
7-03
7
Page 213 of 274
CAUTIONlDo not bring the plastic parts into contact
with petrol, light oil, brake fluids, engine
oils, greases, paint thinners, and sulphu-
ric acid (battery electrolyte) which may
crack, stain or discolour the plastic parts.
If they touch the plastic parts, wipe them
off with soft cloth, chamois or the like
and an aqueous solution of neutral deter-
gent then immediately rinse the affected
parts with water.Chrome parts E00901400014
In order to prevent spots and corrosion of chrome
parts, wash with water, dry thoroughly, and apply a
special protective coating. This should be done
more frequently in winter.
Aluminium wheels* E00901500086
1.Remove dirt using a sponge while sprinkling
water on the wheel.
2. Use neutral detergent on any dirt that cannot
be removed easily with water.
Rinse off the neutral detergent after washing
the wheel.
3. Dry the wheel thoroughly using a chamois
leather or a soft cloth.
CAUTIONl Do not use a brush or other hard imple-
ment on the wheels.
Doing so could scratch the wheels.CAUTIONl Do not use any cleaner that contains an
abrasive substance or is acidic or alka-
line. Doing so could cause the coating on
the wheels to peel or become discoloured
or stained.
l Do not directly apply hot water using a
steam cleaner or by any other means.
l Contact with seawater and road deicer
can cause corrosion. Rinse off such sub-
stances as soon as possible.Window glass E00901600104
The window glass can normally be cleaned using
only a sponge and water.
Glass cleaner can be used to remove oil, grease,
dead insects, etc. After washing the glass, wipe dry
with a clean, dry, soft cloth. Never use the same
cloth to wipe the window glass as would be used to
wipe the paintwork; wax from the painted surfaces
could adhere to the glass and reduce its transparen-
cy and visibility.
CAUTIONl If your vehicle has rain sensor wipers,
place the wiper switch lever in the “”
(OFF) position to deactivate the rain sen-
sor before washing the windscreen. Oth-
erwise, the wipers will operate in the pres-
ence of water spray on the windscreen
and may get damaged as a result.NOTE
l To clean the inside of the tailgate window, al-
ways use a soft cloth and wipe the window
glass along the demister heater element so as
not to cause damage.Wiper blades E00901700017
Use a soft cloth and glass cleaner to remove grease,
dead insects, etc., from the wiper blades. Replace
the wiper blades when they no longer wipe proper-
ly. (Refer to page 8-16.)
Engine compartment E00902100265
Clean the engine compartment at the beginning and
end of winter. Pay particular attention to flanges,
crevices and peripheral parts where dust containing
road chemicals and other corrosive materials might
collect.
If salt and other chemicals are used on the roads in
your area, clean the engine compartment at least ev-
ery three months.
Never spray or splash water on the electrical com-
ponents in the engine compartment, as this may
cause damage.
Do not bring the nearby parts, the plastic parts and
so on into contact with sulphuric acid (battery elec-
trolyte) which may crack, stain or discolour them.
If they are in contact, wipe off with soft cloth, cha-
mois or the like and an aqueous solution of neutral
detergent then immediately rinse the affected parts
with plenty of water.
Vehicle care
7-05
7
Page 230 of 274
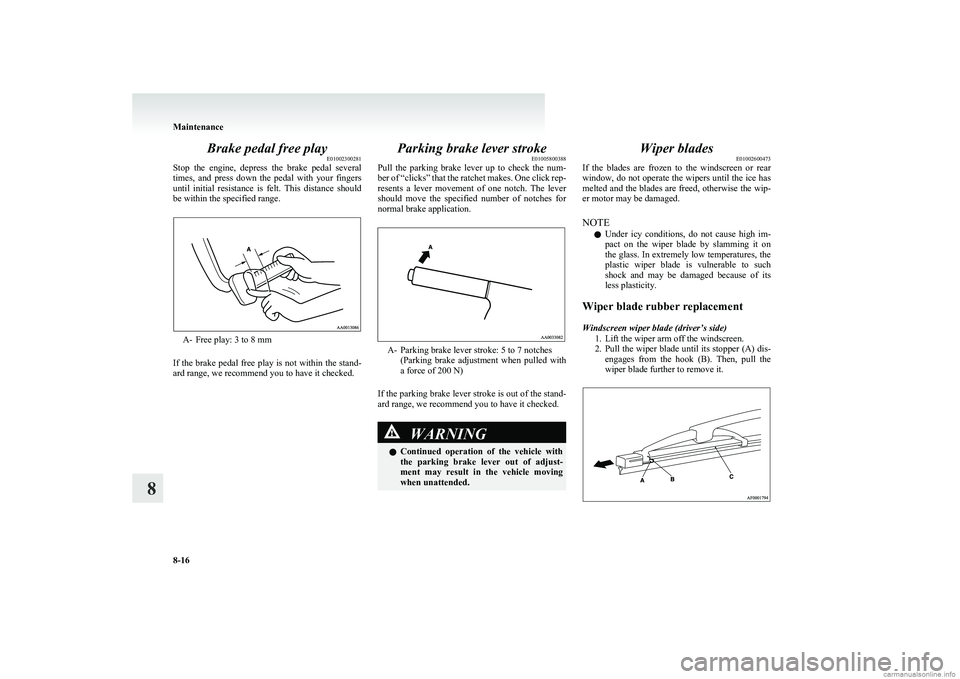
Brake pedal free playE01002300281
Stop the engine, depress the brake pedal several
times, and press down the pedal with your fingers
until initial resistance is felt. This distance should
be within the specified range.
A- Free play: 3 to 8 mm
If the brake pedal free play is not within the stand-
ard range, we recommend you to have it checked.
Parking brake lever stroke E01005800388
Pull the parking brake lever up to check the num-
ber of “clicks” that the ratchet makes. One click rep-
resents a lever movement of one notch. The lever
should move the specified number of notches for
normal brake application.
A- Parking brake lever stroke: 5 to 7 notches (Parking brake adjustment when pulled with
a force of 200 N)
If the parking brake lever stroke is out of the stand-
ard range, we recommend you to have it checked.
WARNINGl Continued operation of the vehicle with
the parking brake lever out of adjust-
ment may result in the vehicle moving
when unattended.Wiper blades E01002600473
If the blades are frozen to the windscreen or rear
window, do not operate the wipers until the ice has
melted and the blades are freed, otherwise the wip-
er motor may be damaged.
NOTE l Under icy conditions, do not cause high im-
pact on the wiper blade by slamming it on
the glass. In extremely low temperatures, the
plastic wiper blade is vulnerable to such
shock and may be damaged because of its
less plasticity.
Wiper blade rubber replacement
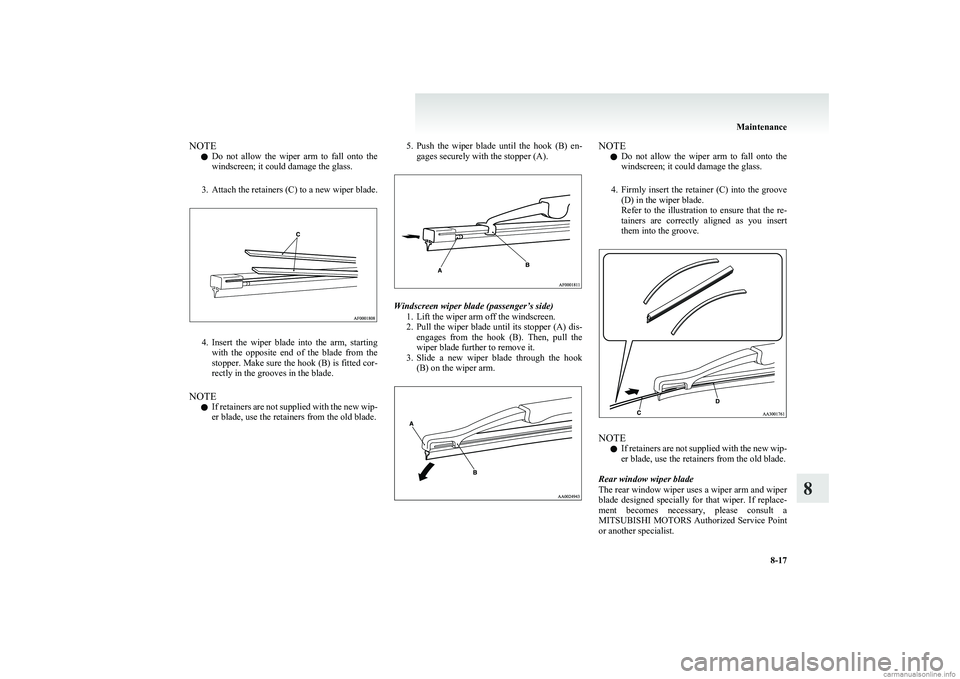
Windscreen wiper blade (driver’s side) 1. Lift the wiper arm off the windscreen.
2. Pull the wiper blade until its stopper (A) dis-
engages from the hook (B). Then, pull the
wiper blade further to remove it.
Maintenance
8-16
8
Page 231 of 274
NOTEl Do not allow the wiper arm to fall onto the
windscreen; it could damage the glass.
3. Attach the retainers (C) to a new wiper blade.
4.Insert the wiper blade into the arm, starting
with the opposite end of the blade from the
stopper. Make sure the hook (B) is fitted cor-
rectly in the grooves in the blade.
NOTE l If retainers are not supplied with the new wip-
er blade, use the retainers from the old blade.
5. Push the wiper blade until the hook (B) en-
gages securely with the stopper (A).
Windscreen wiper blade (passenger’s side)
1. Lift the wiper arm off the windscreen.
2. Pull the wiper blade until its stopper (A) dis-
engages from the hook (B). Then, pull the
wiper blade further to remove it.
3. Slide a new wiper blade through the hook
(B) on the wiper arm.
NOTE
l Do not allow the wiper arm to fall onto the
windscreen; it could damage the glass.
4. Firmly insert the retainer (C) into the groove
(D) in the wiper blade.
Refer to the illustration to ensure that the re-
tainers are correctly aligned as you insert
them into the groove.
NOTE
l If retainers are not supplied with the new wip-
er blade, use the retainers from the old blade.
Rear window wiper blade
The rear window wiper uses a wiper arm and wiper
blade designed specially for that wiper. If replace-
ment becomes necessary, please consult a
MITSUBISHI MOTORS Authorized Service Point
or another specialist.
Maintenance
8-17
8
Page 234 of 274
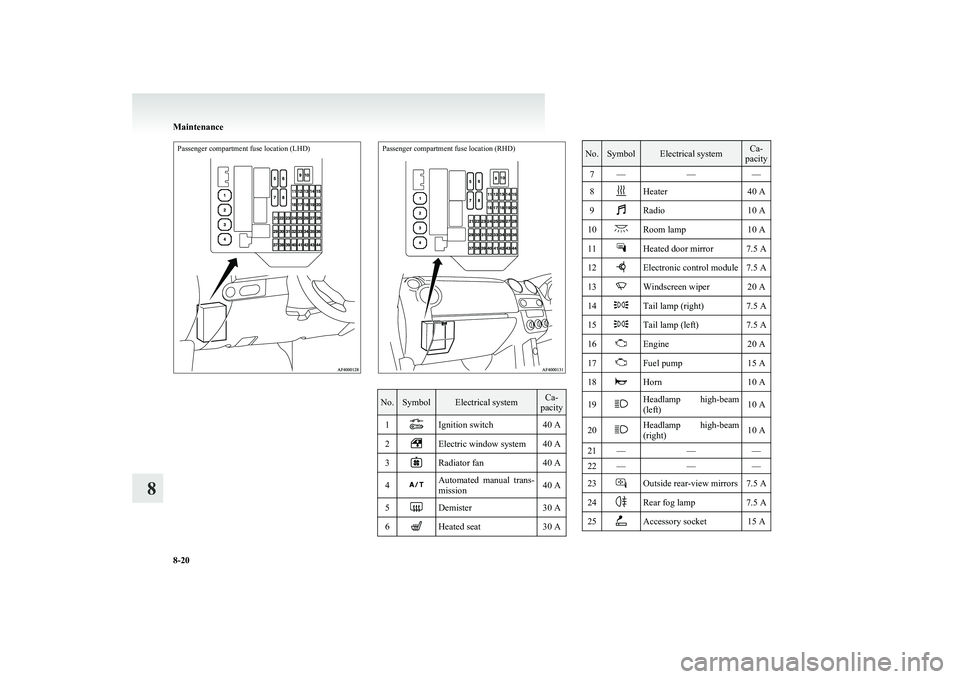
Passenger compartment fuse location (LHD)Passenger compartment fuse location (RHD)
No.SymbolElectrical systemCa-
pacity1Ignition switch40 A2Electric window system40 A3Radiator fan40 A4Automated manual trans-
mission40 A5Demister30 A6Heated seat30 ANo.SymbolElectrical systemCa-
pacity7———8Heater40 A9Radio10 A10Room lamp10 A11Heated door mirror7.5 A12Electronic control module7.5 A13Windscreen wiper20 A14Tail lamp (right)7.5 A15Tail lamp (left)7.5 A16Engine20 A17Fuel pump15 A18Horn10 A19Headlamp high-beam
(left)10 A20Headlamp high-beam
(right)10 A21———22———23Outside rear-view mirrors7.5 A24Rear fog lamp7.5 A25Accessory socket15 A
Maintenance
8-20
8