light MITSUBISHI COLT 2011 (in English) Owner's Guide
[x] Cancel search | Manufacturer: MITSUBISHI, Model Year: 2011, Model line: COLT, Model: MITSUBISHI COLT 2011Pages: 274, PDF Size: 17.88 MB
Page 117 of 274
lIf you turn the ignition key to the “START”
position when the gearshift is not in the “N”
(Neutral) position, the multi-information dis-
play will behave as follows to indicate that
the engine will not start. •Gearshift in “S” (Stand by) position: An
“A” or “1” will be shown. Or “0” will flash.
• Gearshift in “R” (Reverse) position: An
“R” will be shown. Or “0” will flash.
Confirm that “N” is shown by the multi-infor-
mation display.Auto Stop & Go (AS&G) system* E00627400022
The Auto Stop & Go (AS&G) system automatical-
ly stops and restarts the engine without operating
the ignition switch when the vehicle is stopped,
such as at a traffic light or in a traffic jam, to re-
duce exhaust gases, increase fuel efficiency.CAUTIONl If the vehicle will be stopped for a long
time or if you will leave the vehicle unat-
tended, turn the ignition switch to the
“LOCK” position to stop the engine.Automatically stopping the engine E00627500010
The Auto Stop & Go (AS&G) system is automati-
cally activated when the ignition switch is turned to
the “ON” position.
You can deactivate the system by pressing the “Au-
to Stop & Go (AS&G) OFF” switch.
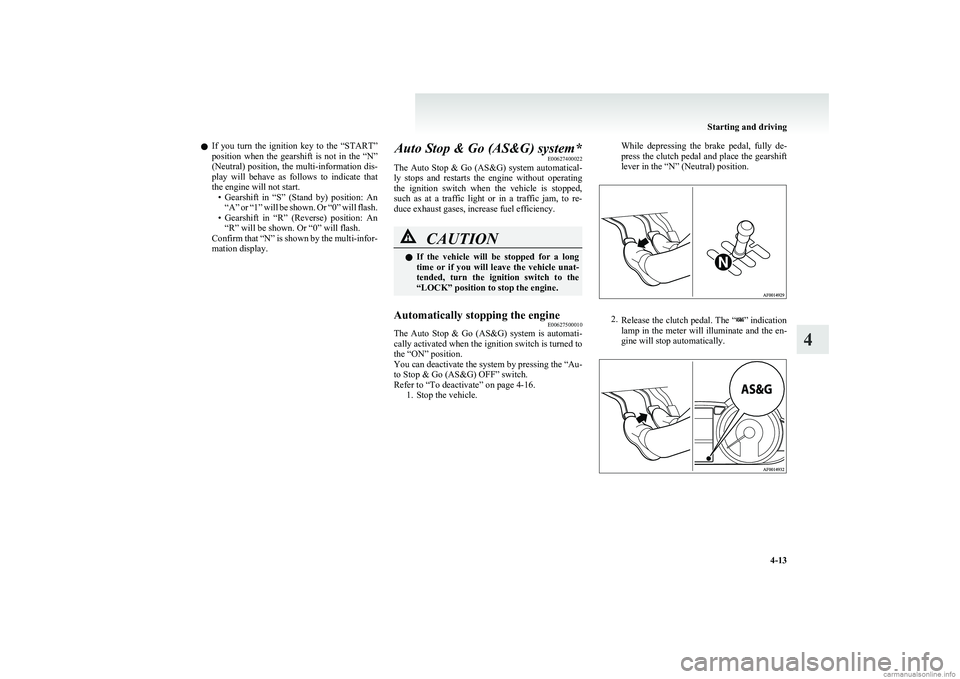
Refer to “To deactivate” on page 4-16. 1. Stop the vehicle.
While depressing the brake pedal, fully de-
press the clutch pedal and place the gearshift
lever in the “N” (Neutral) position.
2. Release the clutch pedal. The “” indication
lamp in the meter will illuminate and the en-
gine will stop automatically.
Starting and driving
4-13
4
Page 129 of 274
CAUTIONlWhen leaving the vehicle, be sure to stop
the engine and remove the key from the
ignition switch. If you were to leave the en-
gine running with the allshift lever in the
“S” (Stand by) or “R” position, the trans-
mission’s creep effect could cause the ve-
hicle to move by itself. Also, the vehicle
could suddenly move if you accidentally
pressed the accelerator pedal when get-
ting back in the vehicle.
NOTE
l Sit in the correct position for driving even if
you plan to move just a short distance. Make
sure you are able to depress the brake pedal
and accelerator pedal properly.
l Reversing involves twisting to look rearward
in a position that makes operation of the ped-
als more difficult. Make sure you are able to
depress the brake pedal.
Braking E00607001801
All the parts of the brake system are critical to safe-
ty. We recommend you to have the vehicle
checked at regular intervals according to the serv-
ice booklet.CAUTIONl Avoid driving habits that cause heavy
braking and never “ride” the brakes by
resting your foot on the brake pedal
while driving.
It causes brake overheating and fade.
Brake system
The service brake is divided into two brake cir-
cuits. And your vehicle is equipped with power
brakes. If one brake circuit fails, the other is availa-
ble to stop the vehicle. If you should lose the pow-
er assist for some reason, the brakes will still work.
In these situations, even if the brake pedal moves
down to the very end of its possible stroke or re-
sists being depressed, keep depressing the brake ped-
al down harder and further than usual; stop driving
as soon as possible and have the brake system re-
paired.
WARNINGl Do not turn off the engine while your ve-
hicle is in motion. If you turn off the en-
gine while driving, the power assistance
for the braking system will stop working
and your brakes will not work effectively.WARNINGl If the power assist is lost or if either
brake hydraulic system stops working
properly, have your vehicle checked im-
mediately.
Warning lamp
The brake warning lamp illuminates to indicate a
fault in the braking system. Read “Brake warning
lamp” on page 3-17.
When brakes are wet
Check the brake system while driving at a low
speed immediately after starting, especially when
the brakes are wet, to confirm they work normally.
A film of water can be formed on the brake discs
or brake drums and prevent normal braking after
driving in heavy rain or through large puddles, or
after the vehicle is washed. If this occurs, dry the
brakes out by driving slowly while lightly depress-
ing the brake pedal.
When driving downhill
It is important to take advantage of the engine brak-
ing by shifting to a lower shift position while driv-
ing on steep downhill roads in order to prevent the
brakes from overheating.
Starting and driving
4-25
4
Page 131 of 274
Brake assist systemE00627000262
The brake assist system is a device assisting drivers
who cannot depress the brake pedal firmly when it
is necessary to do so (such as in emergency stop sit-
uations) and provides greater braking force.
If the brake pedal is depressed suddenly, the brakes
will be applied with more force than usual.CAUTIONl The brake assist system is not a device de-
signed to exercise braking force greater
than its capacity. Make sure to always
keep a sufficient distance between vehi-
cles in front of you without relying too
much on the brake assist system.
NOTE
l Once the brake assist system is operational,
it maintains great braking force even if the
brake pedal is lightly released.
To stop its operation, completely remove
your foot from the brake pedal.
l The brake assist system may become opera-
tional when the brake pedal is fully de-
pressed even if it has not been depressed sud-
denly.
l When the brake assist system is in use, you
may feel as if the depressed brake pedal is
soft, the pedal moves in small motions in con-
junction with the sound of the ABS opera-
tion, or the vehicle body and the steering
wheel vibrate. This occurs when the brake as-
sist system is operating normally and does
not indicate faulty operation. Continue to
firmly depress the brake pedal.
l You may hear an operation noise when the
brake pedal is depressed suddenly while sta-
tionary. This does not indicate a malfunction
and the brake assist system is operating nor-
mally.Anti-lock brake system (ABS) E00607100791
Environmental conditions can have an effect on
braking. During sudden braking when there is
snow, ice, oil, water etc. on the road surface, a skid
may occur. In this situation, steering control and
braking effectiveness is reduced and the stopping
distance is increased. The vehicle may also go into
an uncontrolled spin.
The ABS helps prevent the wheels from locking dur-
ing braking, thus maintaining directional stability,
ensuring controllability and providing optimum
braking force.
Driving hints l When using the anti-lock brake system (sud-
den braking), steering is slightly different
from normal driving conditions. Use the steer-
ing wheel carefully.
l Always maintain the same distance from the
vehicle in front of you as you would for a ve-
hicle not equipped with ABS.
Compared with vehicles not fitted with ABS,
your vehicle may require a longer stopping
distance in the following cases: • Driving on gravel or snow-covered roads.
• Driving with tyre chains installed.
• Driving on roads where the road surface
is pitted or has other differences in sur-
face height.
• Driving on bumpy roads or other poor driv-
ing surfaces.
Starting and driving
4-27
4
Page 132 of 274
lOperation of ABS is not restricted to situa-
tions where brakes are applied suddenly.
This system may also operate to prevent
wheel lock when you are driving over man-
holes, steel road-work plates, or the vehicle
is driven over steps or level differences in
the road, road markings, or other surfaces
which are difficult for the wheels to grip.
l When the ABS is activated, you may feel the
brake pedal pulsating and hear a characteris-
tic noise. Also at this time, it may feel as if
the pedal attempts to resist being depressed.
In this situation, to let the ABS work for
you, just hold the brake pedal down more
firmly. Do not pump the brake. This will
result in reduced braking performance.CAUTIONl Even the ABS cannot prevent the natural
laws of physics from acting on the vehi-
cle. It cannot for instance avoid accidents
that may result from excessive speed on
bends or following another vehicle too
closely or aquaplaning. It should remain
the driver’s task to observe safety precau-
tions to judge speeds and brake applica-
tions correctly in such conditions.
l Be sure to use tyres of the same type and
size on 4 wheels.
If tyre types or sizes are mixed, ABS may
not function properly.CAUTIONl Never install a limited-slip differential,
which is not MITSUBISHI MOTORS gen-
uine parts, as the ABS may not function
properly.
We recommend to consult a
MITSUBISHI MOTORS Authorized
Service Point.ABS warning lamp E00607200835
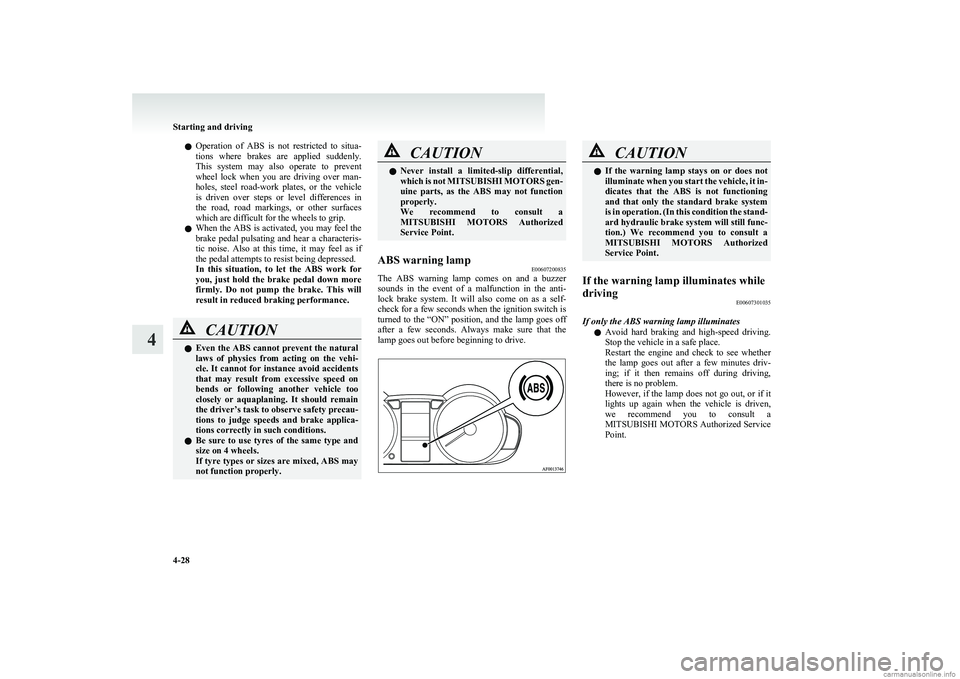
The ABS warning lamp comes on and a buzzer
sounds in the event of a malfunction in the anti-
lock brake system. It will also come on as a self-
check for a few seconds when the ignition switch is
turned to the “ON” position, and the lamp goes off
after a few seconds. Always make sure that the
lamp goes out before beginning to drive.
CAUTIONl If the warning lamp stays on or does not
illuminate when you start the vehicle, it in-
dicates that the ABS is not functioning
and that only the standard brake system
is in operation. (In this condition the stand-
ard hydraulic brake system will still func-
tion.) We recommend you to consult a
MITSUBISHI MOTORS Authorized
Service Point.If the warning lamp illuminates while
driving E00607301035
If only the ABS warning lamp illuminates
l Avoid hard braking and high-speed driving.
Stop the vehicle in a safe place.
Restart the engine and check to see whether
the lamp goes out after a few minutes driv-
ing; if it then remains off during driving,
there is no problem.
However, if the lamp does not go out, or if it
lights up again when the vehicle is driven,
we recommend you to consult a
MITSUBISHI MOTORS Authorized Service
Point.
Starting and driving
4-28
4
Page 142 of 274
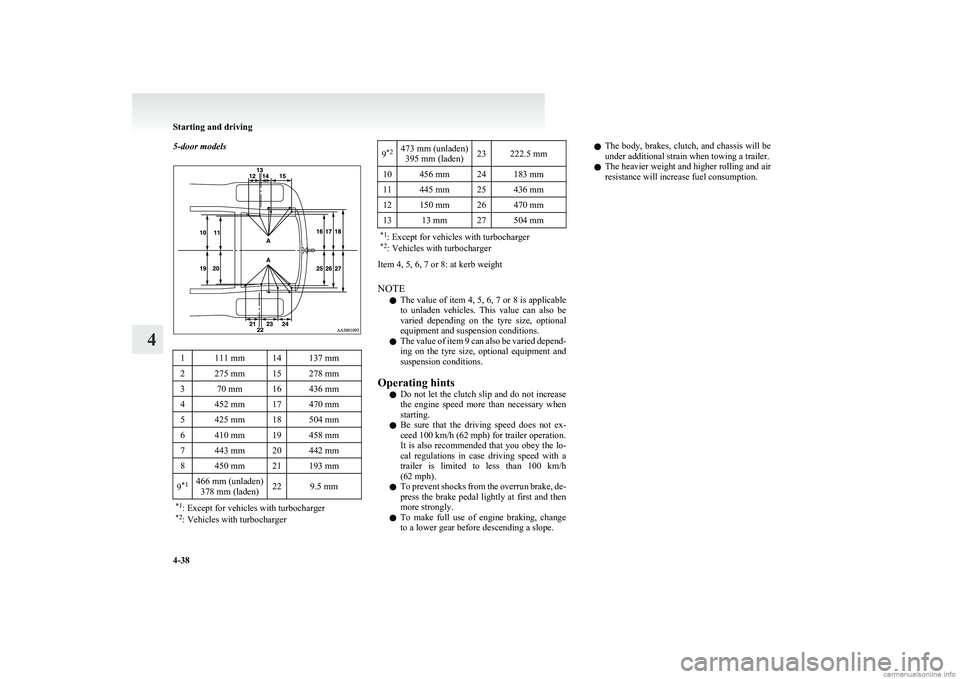
5-door models1111 mm14137 mm2275 mm15278 mm370 mm16436 mm4452 mm17470 mm5425 mm18504 mm6410 mm19458 mm7443 mm20442 mm8450 mm21193 mm9*1466 mm (unladen)
378 mm (laden)229.5 mm*1 : Except for vehicles with turbocharger
*2 : Vehicles with turbocharger9*2473 mm (unladen)
395 mm (laden)23222.5 mm10456 mm24183 mm11445 mm25436 mm12150 mm26470 mm1313 mm27504 mm*1 : Except for vehicles with turbocharger
*2 : Vehicles with turbocharger
Item 4, 5, 6, 7 or 8: at kerb weight
NOTE l The value of item 4, 5, 6, 7 or 8 is applicable
to unladen vehicles. This value can also be
varied depending on the tyre size, optional
equipment and suspension conditions.
l The value of item 9 can also be varied depend-
ing on the tyre size, optional equipment and
suspension conditions.
Operating hints l Do not let the clutch slip and do not increase
the engine speed more than necessary when
starting.
l Be sure that the driving speed does not ex-
ceed 100 km/h (62 mph) for trailer operation.
It is also recommended that you obey the lo-
cal regulations in case driving speed with a
trailer is limited to less than 100 km/h
(62 mph).
l To prevent shocks from the overrun brake, de-
press the brake pedal lightly at first and then
more strongly.
l To make full use of engine braking, change
to a lower gear before descending a slope.
l The body, brakes, clutch, and chassis will be
under additional strain when towing a trailer.
l The heavier weight and higher rolling and air
resistance will increase fuel consumption.
Starting and driving
4-38
4
Page 148 of 274
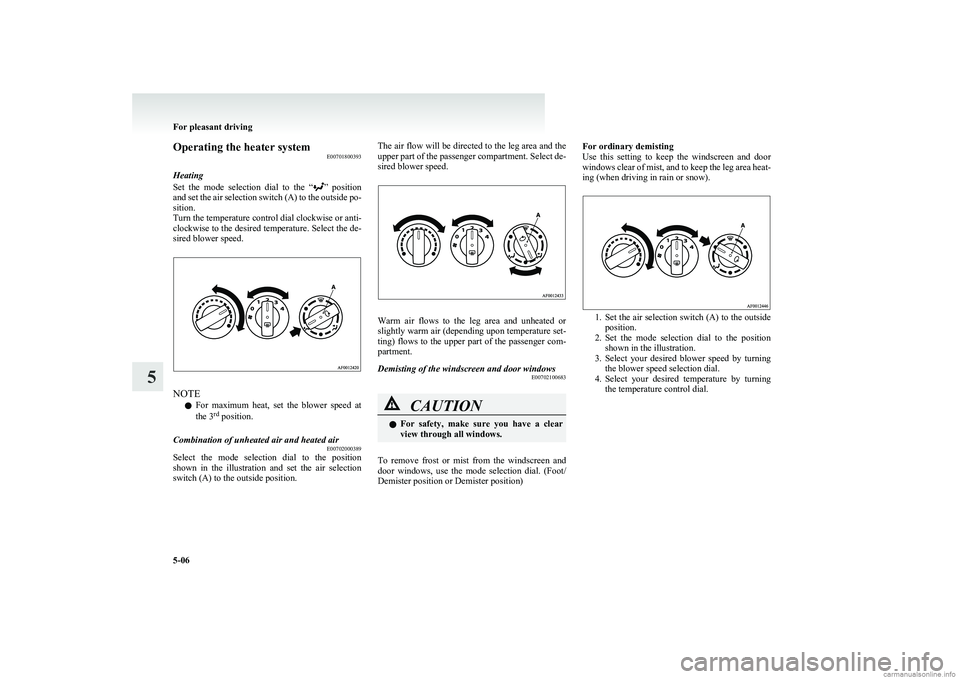
Operating the heater systemE00701800393
Heating
Set the mode selection dial to the “
” position
and set the air selection switch (A) to the outside po-
sition.
Turn the temperature control dial clockwise or anti-
clockwise to the desired temperature. Select the de-
sired blower speed.
NOTE
l For maximum heat, set the blower speed at
the 3 rd
position.
Combination of unheated air and heated air
E00702000389
Select the mode selection dial to the position
shown in the illustration and set the air selection
switch (A) to the outside position.
The air flow will be directed to the leg area and the
upper part of the passenger compartment. Select de-
sired blower speed.
Warm air flows to the leg area and unheated or
slightly warm air (depending upon temperature set-
ting) flows to the upper part of the passenger com-
partment.
Demisting of the windscreen and door windows E00702100683CAUTIONlFor safety, make sure you have a clear
view through all windows.
To remove frost or mist from the windscreen and
door windows, use the mode selection dial. (Foot/
Demister position or Demister position)
For ordinary demisting
Use this setting to keep the windscreen and door
windows clear of mist, and to keep the leg area heat-
ing (when driving in rain or snow).
1. Set the air selection switch (A) to the outside
position.
2. Set the mode selection dial to the position
shown in the illustration.
3. Select your desired blower speed by turning
the blower speed selection dial.
4. Select your desired temperature by turning
the temperature control dial.
For pleasant driving
5-06
5
Page 151 of 274
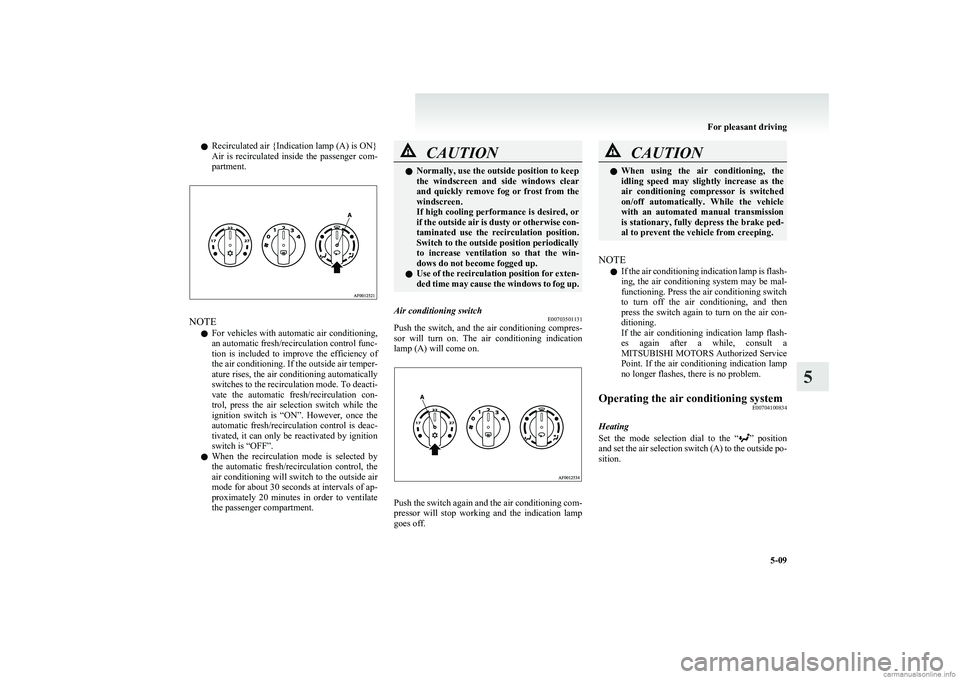
lRecirculated air {Indication lamp (A) is ON}
Air is recirculated inside the passenger com-
partment.
NOTE
l For vehicles with automatic air conditioning,
an automatic fresh/recirculation control func-
tion is included to improve the efficiency of
the air conditioning. If the outside air temper-
ature rises, the air conditioning automatically
switches to the recirculation mode. To deacti-
vate the automatic fresh/recirculation con-
trol, press the air selection switch while the
ignition switch is “ON”. However, once the
automatic fresh/recirculation control is deac-
tivated, it can only be reactivated by ignition
switch is “OFF”.
l When the recirculation mode is selected by
the automatic fresh/recirculation control, the
air conditioning will switch to the outside air
mode for about 30 seconds at intervals of ap-
proximately 20 minutes in order to ventilate
the passenger compartment.
CAUTIONl Normally, use the outside position to keep
the windscreen and side windows clear
and quickly remove fog or frost from the
windscreen.
If high cooling performance is desired, or
if the outside air is dusty or otherwise con-
taminated use the recirculation position.
Switch to the outside position periodically
to increase ventilation so that the win-
dows do not become fogged up.
l Use of the recirculation position for exten-
ded time may cause the windows to fog up.Air conditioning switch E00703501131
Push the switch, and the air conditioning compres-
sor will turn on. The air conditioning indication
lamp (A) will come on.
Push the switch again and the air conditioning com-
pressor will stop working and the indication lamp
goes off.
CAUTIONl When using the air conditioning, the
idling speed may slightly increase as the
air conditioning compressor is switched
on/off automatically. While the vehicle
with an automated manual transmission
is stationary, fully depress the brake ped-
al to prevent the vehicle from creeping.
NOTE
l If the air conditioning indication lamp is flash-
ing, the air conditioning system may be mal-
functioning. Press the air conditioning switch
to turn off the air conditioning, and then
press the switch again to turn on the air con-
ditioning.
If the air conditioning indication lamp flash-
es again after a while, consult a
MITSUBISHI MOTORS Authorized Service
Point. If the air conditioning indication lamp
no longer flashes, there is no problem.
Operating the air conditioning system E00704100834
Heating
Set the mode selection dial to the “
” position
and set the air selection switch (A) to the outside po-
sition.
For pleasant driving
5-09
5
Page 152 of 274
Turn the temperature control dial clockwise or anti-
clockwise to the desired temperature. Select the de-
sired blower speed.
NOTE
l For maximum heat, set the blower speed at
the 3 rd
position.
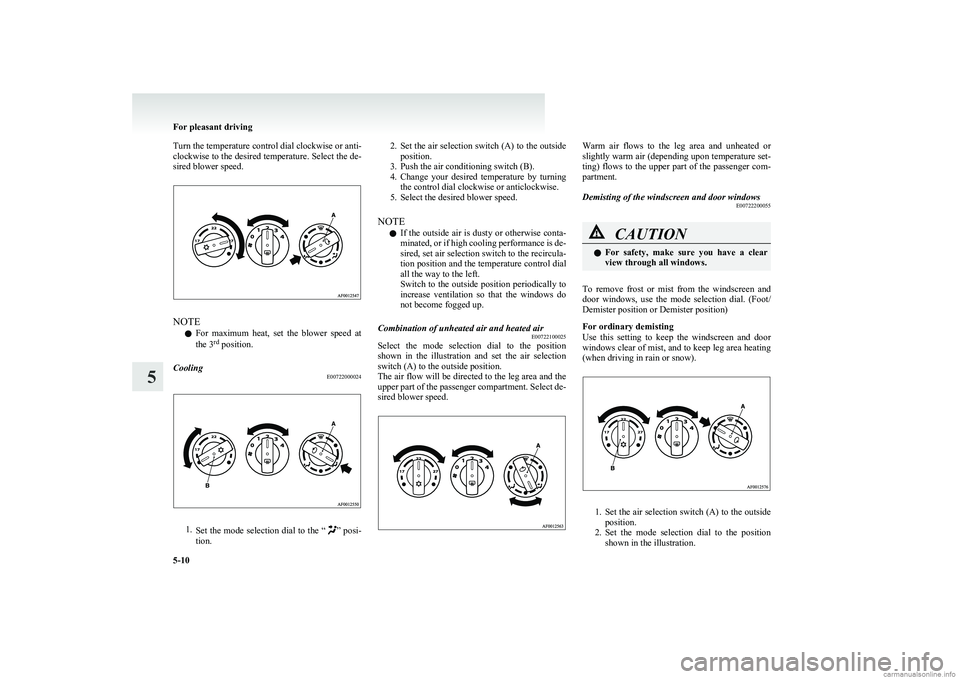
Cooling
E00722000024
1.Set the mode selection dial to the “” posi-
tion.
2. Set the air selection switch (A) to the outside
position.
3. Push the air conditioning switch (B).
4. Change your desired temperature by turning
the control dial clockwise or anticlockwise.
5. Select the desired blower speed.
NOTE l If the outside air is dusty or otherwise conta-
minated, or if high cooling performance is de-
sired, set air selection switch to the recircula-
tion position and the temperature control dial
all the way to the left.
Switch to the outside position periodically to
increase ventilation so that the windows do
not become fogged up.Combination of unheated air and heated air E00722100025
Select the mode selection dial to the position
shown in the illustration and set the air selection
switch (A) to the outside position.
The air flow will be directed to the leg area and the
upper part of the passenger compartment. Select de-
sired blower speed.
Warm air flows to the leg area and unheated or
slightly warm air (depending upon temperature set-
ting) flows to the upper part of the passenger com-
partment.Demisting of the windscreen and door windows E00722200055CAUTIONlFor safety, make sure you have a clear
view through all windows.
To remove frost or mist from the windscreen and
door windows, use the mode selection dial. (Foot/
Demister position or Demister position)
For ordinary demisting
Use this setting to keep the windscreen and door
windows clear of mist, and to keep leg area heating
(when driving in rain or snow).
1. Set the air selection switch (A) to the outside
position.
2. Set the mode selection dial to the position
shown in the illustration.
For pleasant driving
5-10
5
Page 160 of 274
AF (Alternative Frequencies) functionE00720900146
The AF function finds a station broadcasting the
same program and selects the station with the stron-
gest signal of AF lists.
The AF function is turned on (with the AF indica-
tor (10) shown on the display) at all times unless
you manually switch it off.
The AF function can be turned ON and OFF.
Refer to “Function setup mode” on page 5-20.CT (Clock Time) function E00721000128
The clock can be set automatically by using the sig-
nal from the local RDS stations. Refer to “Digital
clock” on page 5-34.
REG (Regional) function E00721100015
REG function limits to receive the stations broad-
casting regional programs.
Regional programming and regional networks are
organized differently depending on the country or
area (they may be changed according to the hour,
state, or broadcast area), so if you don’t want to re-
ceive the regional programs automatically, you can
set up REG ON not to receive regional programs.
The REG function can be turned ON and OFF.
Refer to “Function setup mode” on page 5-20.
PI (Program Identification) search function E00721200175
When travelling long distance and the recalled pre-
set station is weak, the radio searches another fre-
quency broadcasting the same programming with
the same PI code in AF list.
If there are no frequencies broadcasting the same
programming, the radio searches a frequency broad-
casting the regional programming. The radio suc-
ceeds in searching the regional programming, then
the display shows the REG indicator (14).
If the radio does not succeed in searching the re-
gional programming, the radio returns to the recal-
led preset station.
The PI function can be turned ON and OFF on
some vehicles.
Refer to “Function setup mode” on page 5-20.
NOTE l While searching, the audio system is muted.
The display shows “WAIT” or “SEARCH”.PTY (Program Type) E00721300264
RDS broadcasts are classified according to pro-
gram type (PTY) as follows. Use the TUNE/SEEK
button (3 or 4) to select your desired PTY.
1. NEWS
2. AFFAIRS (Current affairs)
3. INFO (Information)
4. SPORT
5. EDUCATE (Education)
6. DRAMA
7. CULTURE
8. SCIENCE
9. VARIED
10. POP M (Pop music)
11. ROCK M (Rock music)
12. EASY M (Easy music)
13. LIGHT M (Light classics)
14. CLASSICS
15. OTHER M (Other music)
16. WEATHER (Weather information)
17. FINANCE
18. CHILDREN
19. SOCIAL
20. RELIGION
21. PHONE IN
22. TRAVEL
23. LEISURE
24. JAZZ
25. COUNTRY
26. NATION M (National music)
27. OLDIES
28. FOLK M (Folk music)
29. DOCUMENT
30. TEST
31. ALARM
To search for a broadcast of desired program type: 1. Press the PTY button (7).
2. Press the TUNE/SEEK button (3 or 4) for
less than 1 second at a time to select your de-
sired PTY.
3. Two seconds after a desired PTY has been se-
lected, the radio will begin to search for a
broadcast of your selected PTY. During
search, the selected PTY on the display
blinks and the radio will begin to search for a
broadcast of your selected PTY.
For pleasant driving
5-18
5
Page 166 of 274
To listen to a CDE00709601554
1. Insert disc with label facing up.
When a disc is inserted, the CD player will
begin playing even if the radio is being used.
The CD player will also start playback when
the CD button (9) is pressed with a disc in
the player even if the radio is being used.
2. To stop the CD, turn off the power by press-
ing the PWR switch (1), or change over to
the radio mode by pressing the FM/AM but-
ton (8), or change over to the external audio
input mode by pressing the CD button (9), or
eject the disc by pressing the eject button (2).
NOTE l To adjust the volume and tone, refer to
“To
adjust the volume” on page 5-13 and “To ad-
just the tone” on page 5-13.
l When an 8 cm compact disc is used, the adapt-
er is not used for playback. Insert the disc in
the centre of the disc-loading slot.
l For information concerning the handling of
compact discs, refer to “Handling of compact
discs” on page 5-32.
To fast-forward/reverse the disc
To fast-forward or reverse the disc, use the
TRACK buttons (11).
Fast-forward
You can fast-forward by holding down the
side
of the TRACK button (11) for more than about 1
second.
Fast-reverse
You can fast-reverse by holding down the
side
of the TRACK button (11) for more than about 1
second.
NOTE
l When you have fast-forwarded/fast-reversed
the disc, the playing-time may be shown
with deviation.
To listen to an MP3 CD
This CD player allows you to play MP3 (MPEG Au-
dio Layer-3) files recorded on CD-ROMs, CD-Rs
(recordable CDs), and CD-RWs (rewritable CDs)
in ISO9660 Level 1/Level 2, Joliet, and Romeo for-
mats. Each disc may have a maximum of 100 trees,
100 folders, and 255 files per disc. During MP3
playback, the unit can display ID3 tag information.
For information concerning ID3 tag, refer to “CD
text and MP3 title display” on page 5-26.
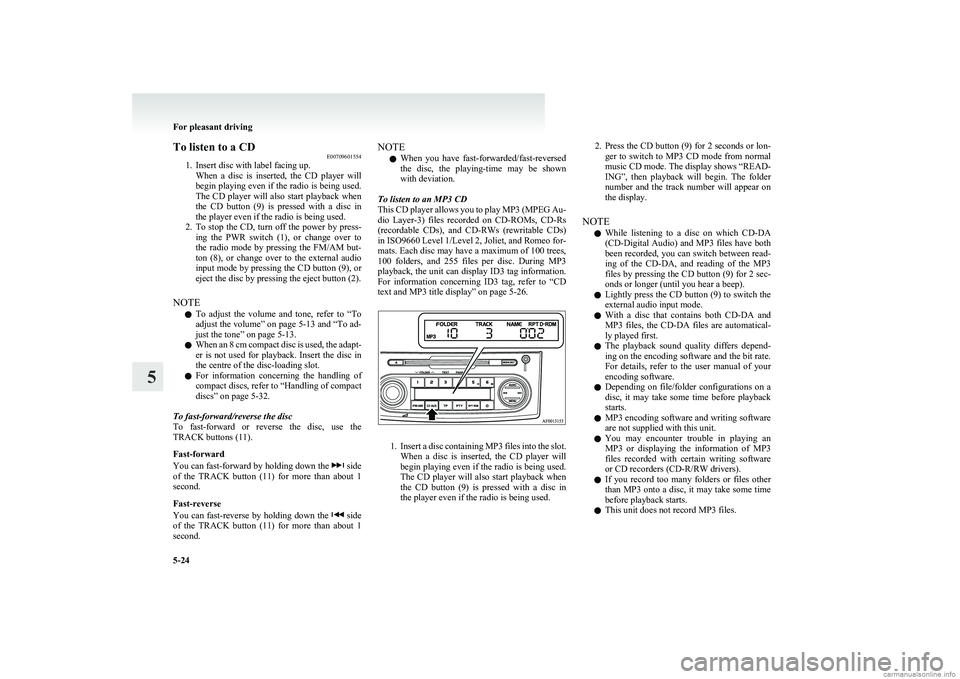
1. Insert a disc containing MP3 files into the slot.
When a disc is inserted, the CD player will
begin playing even if the radio is being used.
The CD player will also start playback when
the CD button (9) is pressed with a disc in
the player even if the radio is being used.
2. Press the CD button (9) for 2 seconds or lon-
ger to switch to MP3 CD mode from normal
music CD mode. The display shows “READ-
ING”, then playback will begin. The folder
number and the track number will appear on
the display.
NOTE l While listening to a disc on which
CD-DA
(CD-Digital Audio) and MP3 files have both
been recorded, you can switch between read-
ing of the CD-DA, and reading of the MP3
files by pressing the CD button (9) for 2 sec-
onds or longer (until you hear a beep).
l Lightly press the CD button (9) to switch the
external audio input mode.
l With a disc that contains both
CD-DA and
MP3 files, the CD-DA files are automatical-
ly played first.
l The playback sound quality differs depend-
ing on the encoding software and the bit rate.
For details, refer to the user manual of your
encoding software.
l Depending on file/folder configurations on a
disc, it may take some time before playback
starts.
l MP3 encoding software and writing software
are not supplied with this unit.
l You may encounter trouble in playing an
MP3 or displaying the information of MP3
files recorded with certain writing software
or CD recorders (CD-R/RW drivers).
l If you record too many folders or files other
than MP3 onto a disc, it may take some time
before playback starts.
l This unit does not record MP3 files.
For pleasant driving
5-24
5