clock setting MITSUBISHI COLT 2011 Owner's Manual (in English)
[x] Cancel search | Manufacturer: MITSUBISHI, Model Year: 2011, Model line: COLT, Model: MITSUBISHI COLT 2011Pages: 274, PDF Size: 17.88 MB
Page 148 of 274

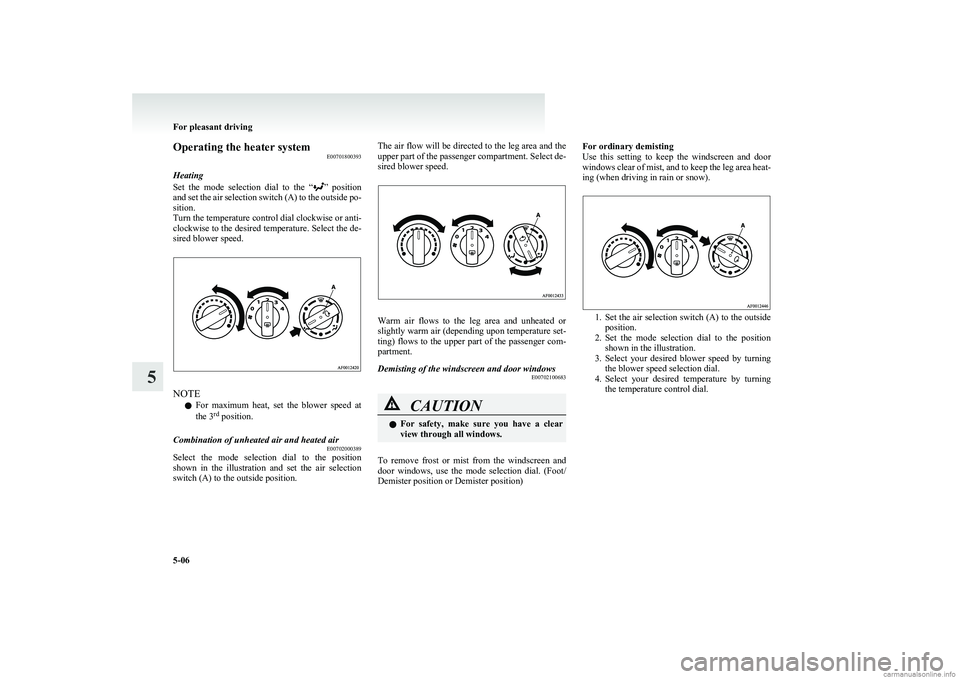
Operating the heater systemE00701800393
Heating
Set the mode selection dial to the “
” position
and set the air selection switch (A) to the outside po-
sition.
Turn the temperature control dial clockwise or anti-
clockwise to the desired temperature. Select the de-
sired blower speed.
NOTE
l For maximum heat, set the blower speed at
the 3 rd
position.
Combination of unheated air and heated air
E00702000389
Select the mode selection dial to the position
shown in the illustration and set the air selection
switch (A) to the outside position.
The air flow will be directed to the leg area and the
upper part of the passenger compartment. Select de-
sired blower speed.
Warm air flows to the leg area and unheated or
slightly warm air (depending upon temperature set-
ting) flows to the upper part of the passenger com-
partment.
Demisting of the windscreen and door windows E00702100683CAUTIONlFor safety, make sure you have a clear
view through all windows.
To remove frost or mist from the windscreen and
door windows, use the mode selection dial. (Foot/
Demister position or Demister position)
For ordinary demisting
Use this setting to keep the windscreen and door
windows clear of mist, and to keep the leg area heat-
ing (when driving in rain or snow).
1. Set the air selection switch (A) to the outside
position.
2. Set the mode selection dial to the position
shown in the illustration.
3. Select your desired blower speed by turning
the blower speed selection dial.
4. Select your desired temperature by turning
the temperature control dial.
For pleasant driving
5-06
5
Page 152 of 274

Turn the temperature control dial clockwise or anti-
clockwise to the desired temperature. Select the de-
sired blower speed.
NOTE
l For maximum heat, set the blower speed at
the 3 rd
position.
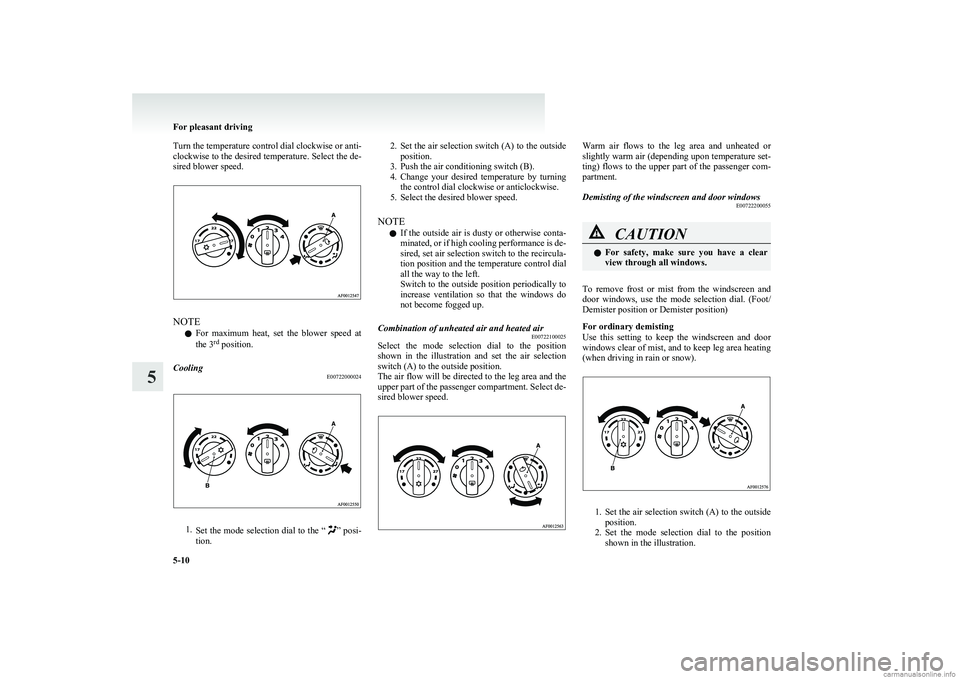
Cooling
E00722000024
1.Set the mode selection dial to the “” posi-
tion.
2. Set the air selection switch (A) to the outside
position.
3. Push the air conditioning switch (B).
4. Change your desired temperature by turning
the control dial clockwise or anticlockwise.
5. Select the desired blower speed.
NOTE l If the outside air is dusty or otherwise conta-
minated, or if high cooling performance is de-
sired, set air selection switch to the recircula-
tion position and the temperature control dial
all the way to the left.
Switch to the outside position periodically to
increase ventilation so that the windows do
not become fogged up.Combination of unheated air and heated air E00722100025
Select the mode selection dial to the position
shown in the illustration and set the air selection
switch (A) to the outside position.
The air flow will be directed to the leg area and the
upper part of the passenger compartment. Select de-
sired blower speed.
Warm air flows to the leg area and unheated or
slightly warm air (depending upon temperature set-
ting) flows to the upper part of the passenger com-
partment.Demisting of the windscreen and door windows E00722200055CAUTIONlFor safety, make sure you have a clear
view through all windows.
To remove frost or mist from the windscreen and
door windows, use the mode selection dial. (Foot/
Demister position or Demister position)
For ordinary demisting
Use this setting to keep the windscreen and door
windows clear of mist, and to keep leg area heating
(when driving in rain or snow).
1. Set the air selection switch (A) to the outside
position.
2. Set the mode selection dial to the position
shown in the illustration.
For pleasant driving
5-10
5
Page 155 of 274

Volume and tone control panelE00708600882
1- PWR (On-Off) switch
2- VOL (Volume control) knob
3- Memory select buttons
4- AUDIO button
5- Display
6- Audio adjust button
To adjust the volume E00708700649
VOL (Volume control)
Turn the VOL knob (2) clockwise to increase the
volume; anticlockwise to decrease the volume. The
status will be displayed in the display (5).
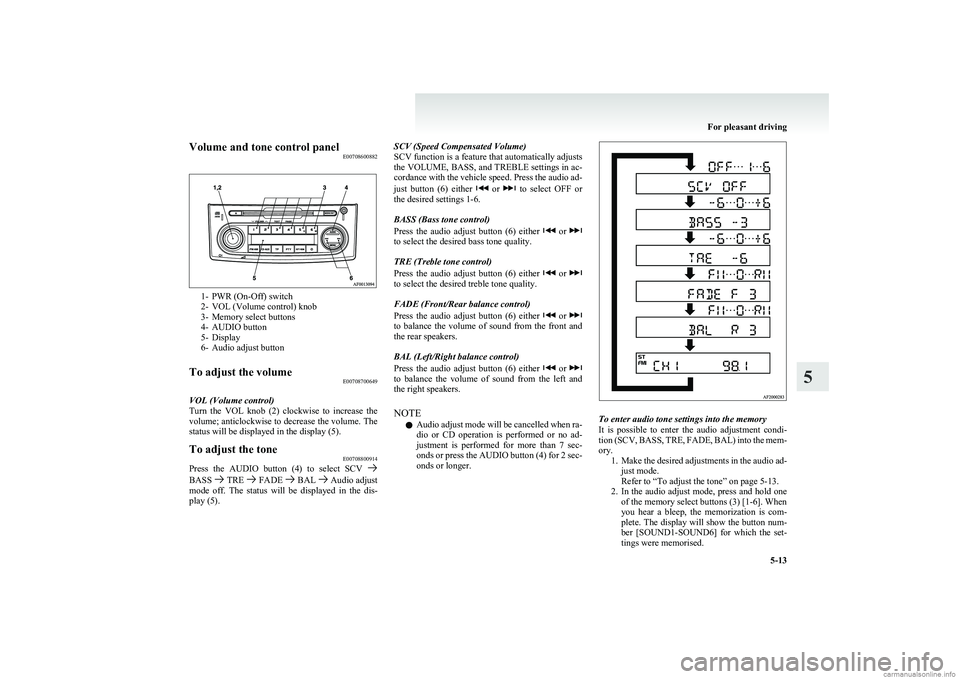
To adjust the tone E00708800914
Press the AUDIO button (4) to select SCV BASS TRE FADE BAL Audio adjust
mode off. The status will be displayed in the dis-
play (5).
SCV (Speed Compensated Volume)
SCV function is a feature that automatically adjusts
the VOLUME, BASS, and TREBLE settings in ac-
cordance with the vehicle speed. Press the audio ad-
just button (6) either
or to select OFF or
the desired settings 1-6.
BASS (Bass tone control)
Press the audio adjust button (6) either
or to select the desired bass tone quality.
TRE (Treble tone control)
Press the audio adjust button (6) either
or to select the desired treble tone quality.
FADE (Front/Rear balance control)
Press the audio adjust button (6) either
or to balance the volume of sound from the front and
the rear speakers.
BAL (Left/Right balance control)
Press the audio adjust button (6) either
or to balance the volume of sound from the left and
the right speakers.
NOTE l Audio adjust mode will be cancelled when ra-
dio or CD operation is performed or no ad-
justment is performed for more than 7 sec-
onds or press the AUDIO button (4) for 2 sec-
onds or longer.
To enter audio tone settings into the memory
It is possible to enter the audio adjustment condi-
tion (SCV, BASS, TRE, FADE, BAL) into the mem-
ory. 1.Make the desired adjustments in the audio ad-
just mode.
Refer to “To adjust the tone” on page 5-13.
2. In the audio adjust mode, press and hold one
of the memory select buttons (3) [1-6]. When
you hear a bleep, the memorization is com-
plete. The display will show the button num-
ber [SOUND1-SOUND6] for which the set-
tings were memorised.
For pleasant driving
5-13
5
Page 177 of 274

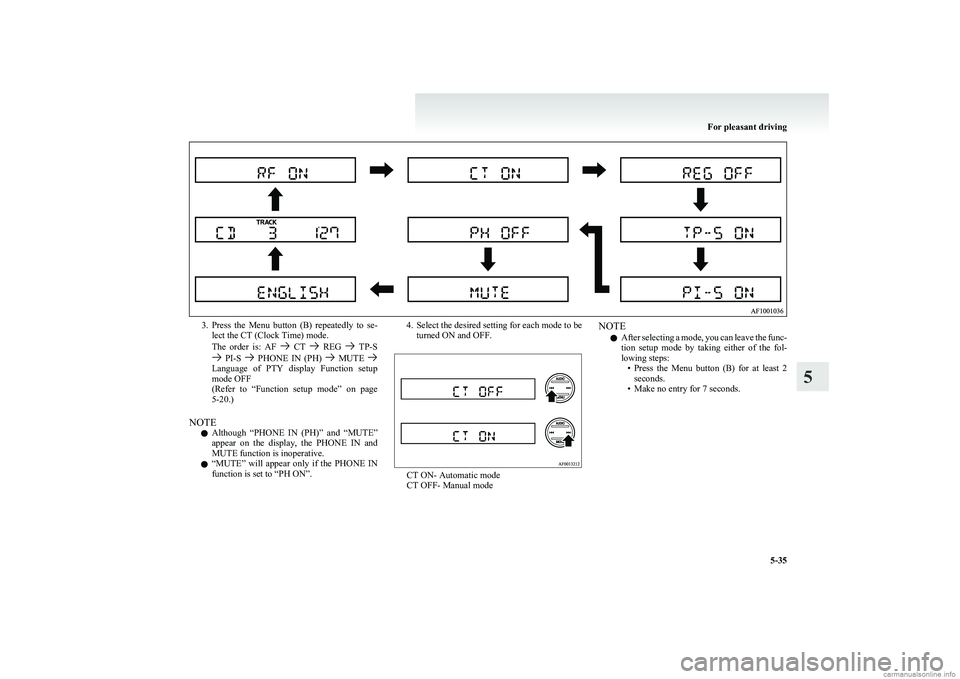
3.Press the Menu button (B) repeatedly to se-
lect the CT (Clock Time) mode.
The order is: AF
CT REG TP-S PI-S PHONE IN (PH) MUTE Language of PTY display Function setup
mode OFF
( Refer to “Function setup mode” on page
5-20.)
NOTE l Although “PHONE IN (PH)” and “MUTE”
appear on the display, the PHONE IN and
MUTE function is inoperative.
l “
MUTE” will appear only if the PHONE IN
function is set to “PH ON”.
4. Select the desired setting for each mode to be turned ON and OFF.
CT ON- Automatic mode
CT OFF- Manual mode
NOTE
l After selecting a mode, you can leave the func-
tion setup mode by taking either of the fol-
lowing steps: •Press the Menu button (B) for at least 2
seconds.
• Make no entry for 7 seconds.
For pleasant driving
5-35
5