set clock MITSUBISHI COLT 2011 Owner's Manual (in English)
[x] Cancel search | Manufacturer: MITSUBISHI, Model Year: 2011, Model line: COLT, Model: MITSUBISHI COLT 2011Pages: 274, PDF Size: 17.88 MB
Page 26 of 274
6.To close, turn the fuel tank filler tube cap
slowly clockwise until you hear clicking
sounds, then gently push the fuel tank filler
door closed.CAUTIONl If you need to replace the fuel tank filler
tube cap, use only the cap specified for
your model vehicle.Installation of accessories E00200300413
We recommend you to consult your MITSUBISHI
MOTORS Authorized Service Point.
l The installation of accessories, optional
parts, should only be carried out within the
limits prescribed by law in your country, and
in accordance with the guidelines fitting in-
structions and warnings contained within the
documents accompanying the parts or acces-
sories.
l Improper installation of electrical compo-
nents may cause an electrical fire if incorrect-
ly fitted. Please refer to the Modification/al-
teration to the electrical or fuel systems sec-
tion within this owner’s manual.
l Using a cellular phone or radio set inside the
vehicle without an external antenna may
cause electrical system interference, which
could lead to unsafe vehicle operation.
l Tyres and wheels which do not meet specifi-
cations must not be used.
Refer to the “Specifications” section for in-
formation regarding wheel and tyre sizes.
Important points!
Due to large number of accessory and replacement
parts of different manufactures available in the mar-
ket, it is not possible, not only for MITSUBISHI
MOTORS , but also for a MITSUBISHI MOTORS
Authorized Service Point, to check whether the at-
tachment or installation of such parts affects the
overall safety of your MITSUBISHI-vehicle.
Even when such parts are officially authorized, for
example by a “general operators permit” (an ap-
praisal for the part) or through the execution of the
part in an officially approved manner of construc-
tion, or when a single operation permit following
the attachment or installation of such parts, it can-
not be deduced from that alone, that the driving safe-
ty of your vehicle has not been affected.
Consider also that there basically exists no liability
on the part of the appraiser or the official. Only in
the case of parts ( MITSUBISHI MOTORS original
replacement or exchange parts as well as
MITSUBISHI MOTORS genuine accessories) that
are recommended and released by a MITSUBISHI
MOTORS Authorized Service Point and that are at-
tached or installed by a MITSUBISHI MOTORS
Authorized Service Point can you assume, that op-
timal safety has been provided. The same also per-
tains to modifications of MITSUBISHI vehicle
with respect to the production specifications. For
your own safety, in such cases, you should only un-
dertake modifications according to the recommen-
dations of a MITSUBISHI MOTORS Authorized
Service Point.
General information
04
Page 146 of 274
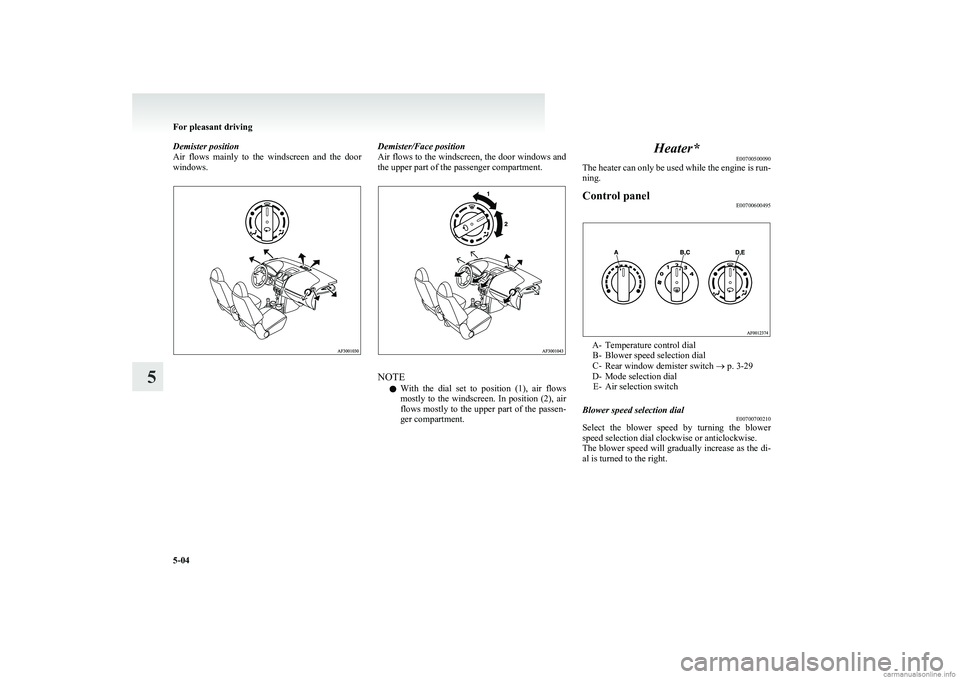
Demister position
Air flows mainly to the windscreen and the door
windows.Demister/Face position
Air flows to the windscreen, the door windows and
the upper part of the passenger compartment.
NOTE
l With the dial set to position (1), air flows
mostly to the windscreen. In position (2), air
flows mostly to the upper part of the passen-
ger compartment.
Heater* E00700500090
The heater can only be used while the engine is run-
ning.Control panel E00700600495
A- Temperature control dial
B- Blower speed selection dial
C- Rear window demister switch ® p. 3-29
D- Mode selection dial E- Air selection switch
Blower speed selection dial E00700700210
Select the blower speed by turning the blower
speed selection dial clockwise or anticlockwise.
The blower speed will gradually increase as the di-
al is turned to the right.
For pleasant driving
5-04
5
Page 147 of 274
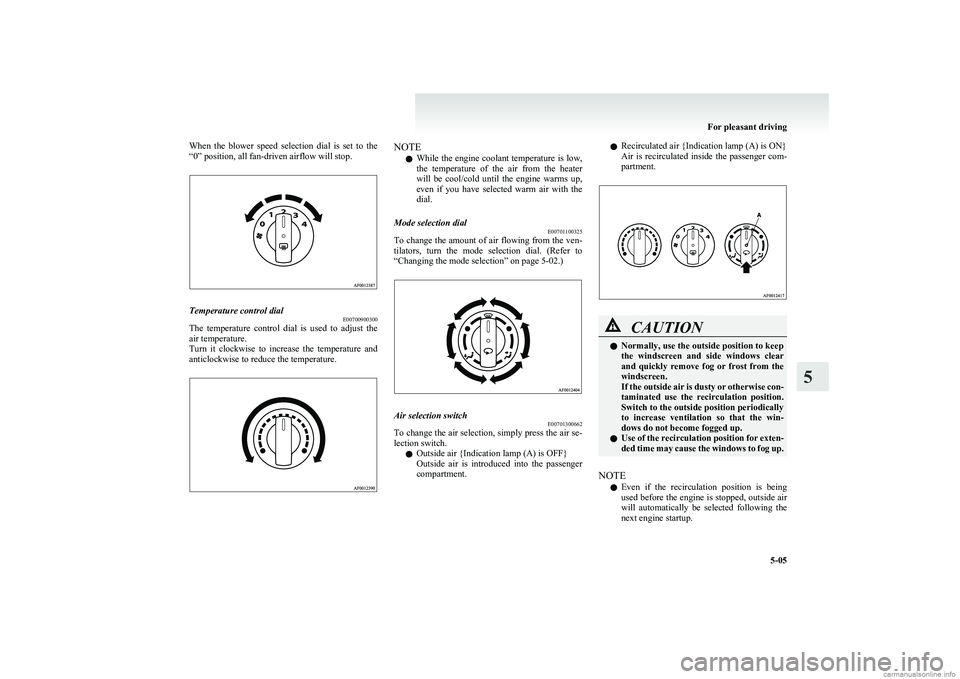
When the blower speed selection dial is set to the
“0” position, all fan-driven airflow will stop.Temperature control dial E00700900300
The temperature control dial is used to adjust the
air temperature.
Turn it clockwise to increase the temperature and
anticlockwise to reduce the temperature.
NOTE
l While the engine coolant temperature is low,
the temperature of the air from the heater
will be cool/cold until the engine warms up,
even if you have selected warm air with the
dial.Mode selection dial E00701100325
To change the amount of air flowing from the ven-
tilators, turn the mode selection dial. (Refer to
“Changing the mode selection” on page 5-02.)
Air selection switch E00701300662
To change the air selection, simply press the air se-
lection switch.
l Outside air {Indication lamp (A) is OFF}
Outside air is introduced into the passenger
compartment.
l Recirculated air {Indication lamp (A) is ON}
Air is recirculated inside the passenger com-
partment.CAUTIONl Normally, use the outside position to keep
the windscreen and side windows clear
and quickly remove fog or frost from the
windscreen.
If the outside air is dusty or otherwise con-
taminated use the recirculation position.
Switch to the outside position periodically
to increase ventilation so that the win-
dows do not become fogged up.
l Use of the recirculation position for exten-
ded time may cause the windows to fog up.
NOTE
l Even if the recirculation position is being
used before the engine is stopped, outside air
will automatically be selected following the
next engine startup.
For pleasant driving
5-05
5
Page 148 of 274
Operating the heater systemE00701800393
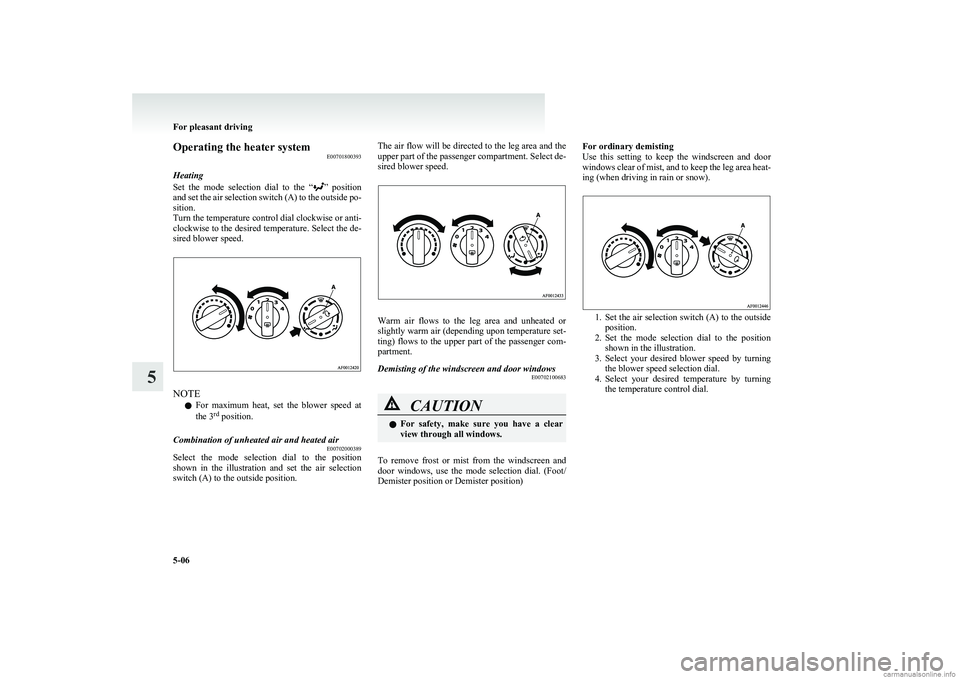
Heating
Set the mode selection dial to the “
” position
and set the air selection switch (A) to the outside po-
sition.
Turn the temperature control dial clockwise or anti-
clockwise to the desired temperature. Select the de-
sired blower speed.
NOTE
l For maximum heat, set the blower speed at
the 3 rd
position.
Combination of unheated air and heated air
E00702000389
Select the mode selection dial to the position
shown in the illustration and set the air selection
switch (A) to the outside position.
The air flow will be directed to the leg area and the
upper part of the passenger compartment. Select de-
sired blower speed.
Warm air flows to the leg area and unheated or
slightly warm air (depending upon temperature set-
ting) flows to the upper part of the passenger com-
partment.
Demisting of the windscreen and door windows E00702100683CAUTIONlFor safety, make sure you have a clear
view through all windows.
To remove frost or mist from the windscreen and
door windows, use the mode selection dial. (Foot/
Demister position or Demister position)
For ordinary demisting
Use this setting to keep the windscreen and door
windows clear of mist, and to keep the leg area heat-
ing (when driving in rain or snow).
1. Set the air selection switch (A) to the outside
position.
2. Set the mode selection dial to the position
shown in the illustration.
3. Select your desired blower speed by turning
the blower speed selection dial.
4. Select your desired temperature by turning
the temperature control dial.
For pleasant driving
5-06
5
Page 149 of 274
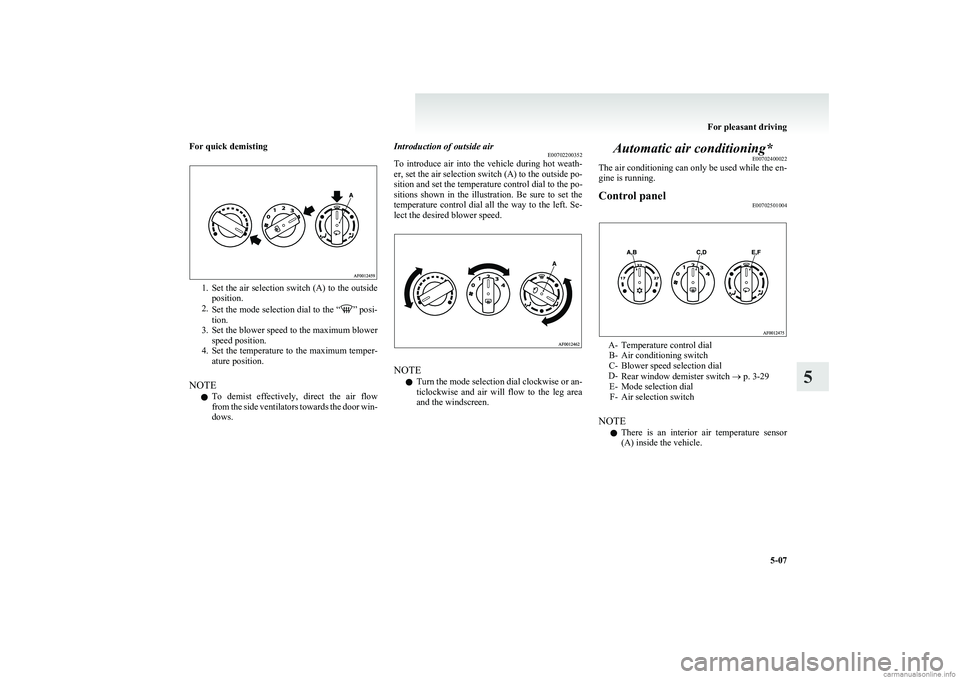
For quick demisting
1.Set the air selection switch (A) to the outside
position.
2. Set the mode selection dial to the “
” posi-
tion.
3. Set the blower speed to the maximum blower
speed position.
4. Set the temperature to the maximum temper-
ature position.
NOTE l To demist effectively, direct the air flow
from the side ventilators towards the door win-
dows.
Introduction of outside air E00702200352
To introduce air into the vehicle during hot weath-
er, set the air selection switch (A) to the outside po-
sition and set the temperature control dial to the po-
sitions shown in the illustration. Be sure to set the
temperature control dial all the way to the left. Se-
lect the desired blower speed.
NOTE
l Turn the mode selection dial clockwise or an-
ticlockwise and air will flow to the leg area
and the windscreen.
Automatic air conditioning* E00702400022
The air conditioning can only be used while the en-
gine is running.Control panel E00702501004
A- Temperature control dial
B- Air conditioning switch
C- Blower speed selection dial
D- Rear window demister switch ® p. 3-29
E- Mode selection dial F- Air selection switch
NOTE l There is an interior air temperature sensor
(A) inside the vehicle.
For pleasant driving
5-07
5
Page 150 of 274
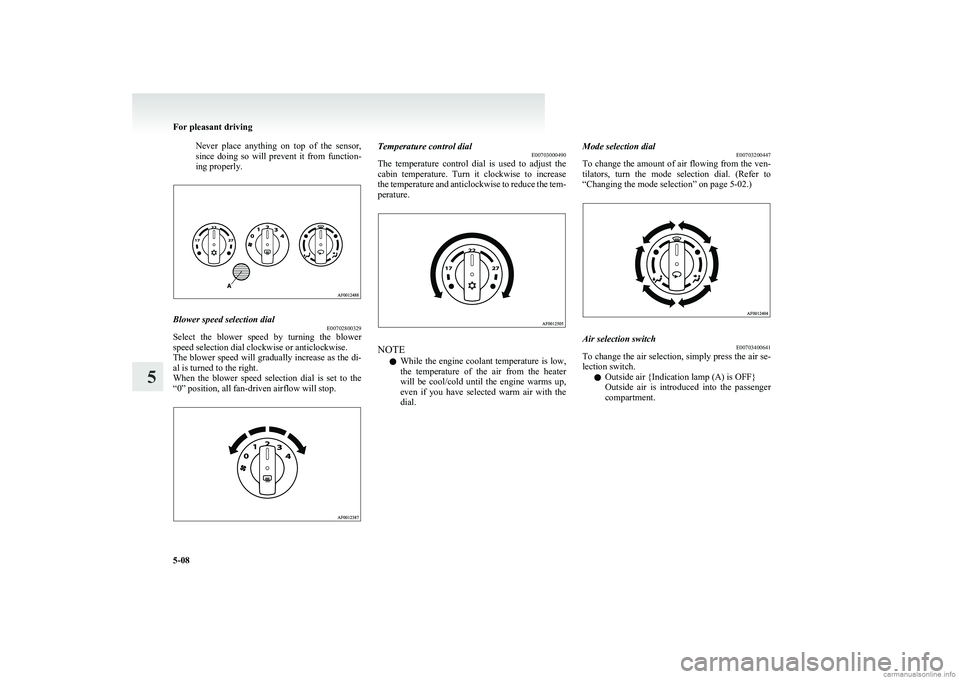
Never place anything on top of the sensor,
since doing so will prevent it from function-
ing properly.Blower speed selection dial E00702800329
Select the blower speed by turning the blower
speed selection dial clockwise or anticlockwise.
The blower speed will gradually increase as the di-
al is turned to the right.
When the blower speed selection dial is set to the
“0” position, all fan-driven airflow will stop.
Temperature control dial E00703000490
The temperature control dial is used to adjust the
cabin temperature. Turn it clockwise to increase
the temperature and anticlockwise to reduce the tem-
perature.
NOTE
l While the engine coolant temperature is low,
the temperature of the air from the heater
will be cool/cold until the engine warms up,
even if you have selected warm air with the
dial.
Mode selection dial E00703200447
To change the amount of air flowing from the ven-
tilators, turn the mode selection dial. (Refer to
“Changing the mode selection” on page 5-02.)Air selection switch E00703400641
To change the air selection, simply press the air se-
lection switch.
l Outside air {Indication lamp (A) is OFF}
Outside air is introduced into the passenger
compartment.
For pleasant driving
5-08
5
Page 152 of 274
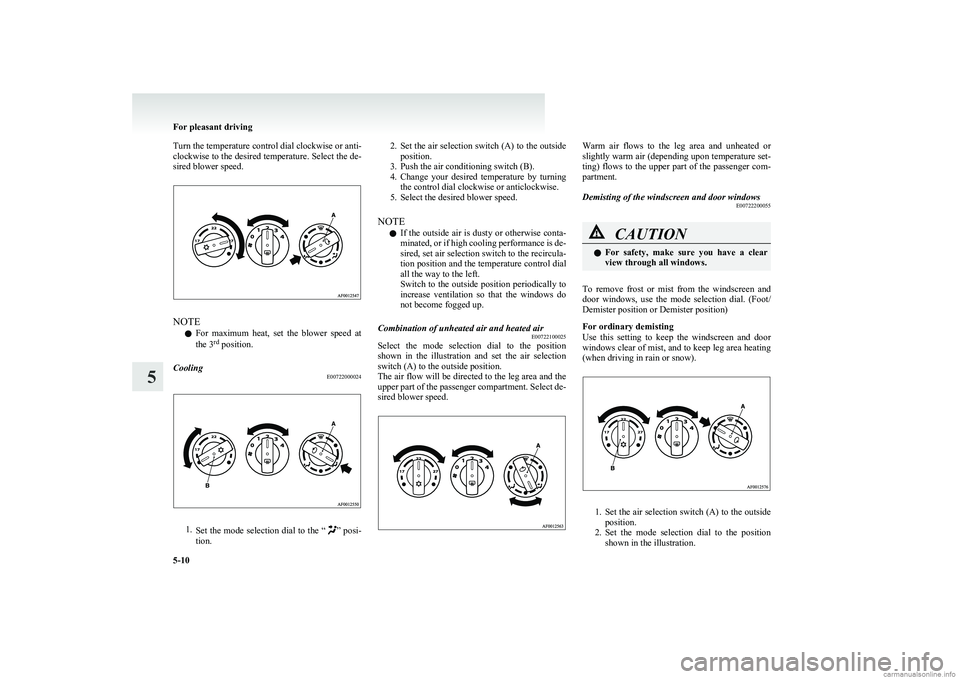
Turn the temperature control dial clockwise or anti-
clockwise to the desired temperature. Select the de-
sired blower speed.
NOTE
l For maximum heat, set the blower speed at
the 3 rd
position.
Cooling
E00722000024
1.Set the mode selection dial to the “” posi-
tion.
2. Set the air selection switch (A) to the outside
position.
3. Push the air conditioning switch (B).
4. Change your desired temperature by turning
the control dial clockwise or anticlockwise.
5. Select the desired blower speed.
NOTE l If the outside air is dusty or otherwise conta-
minated, or if high cooling performance is de-
sired, set air selection switch to the recircula-
tion position and the temperature control dial
all the way to the left.
Switch to the outside position periodically to
increase ventilation so that the windows do
not become fogged up.Combination of unheated air and heated air E00722100025
Select the mode selection dial to the position
shown in the illustration and set the air selection
switch (A) to the outside position.
The air flow will be directed to the leg area and the
upper part of the passenger compartment. Select de-
sired blower speed.
Warm air flows to the leg area and unheated or
slightly warm air (depending upon temperature set-
ting) flows to the upper part of the passenger com-
partment.Demisting of the windscreen and door windows E00722200055CAUTIONlFor safety, make sure you have a clear
view through all windows.
To remove frost or mist from the windscreen and
door windows, use the mode selection dial. (Foot/
Demister position or Demister position)
For ordinary demisting
Use this setting to keep the windscreen and door
windows clear of mist, and to keep leg area heating
(when driving in rain or snow).
1. Set the air selection switch (A) to the outside
position.
2. Set the mode selection dial to the position
shown in the illustration.
For pleasant driving
5-10
5
Page 155 of 274
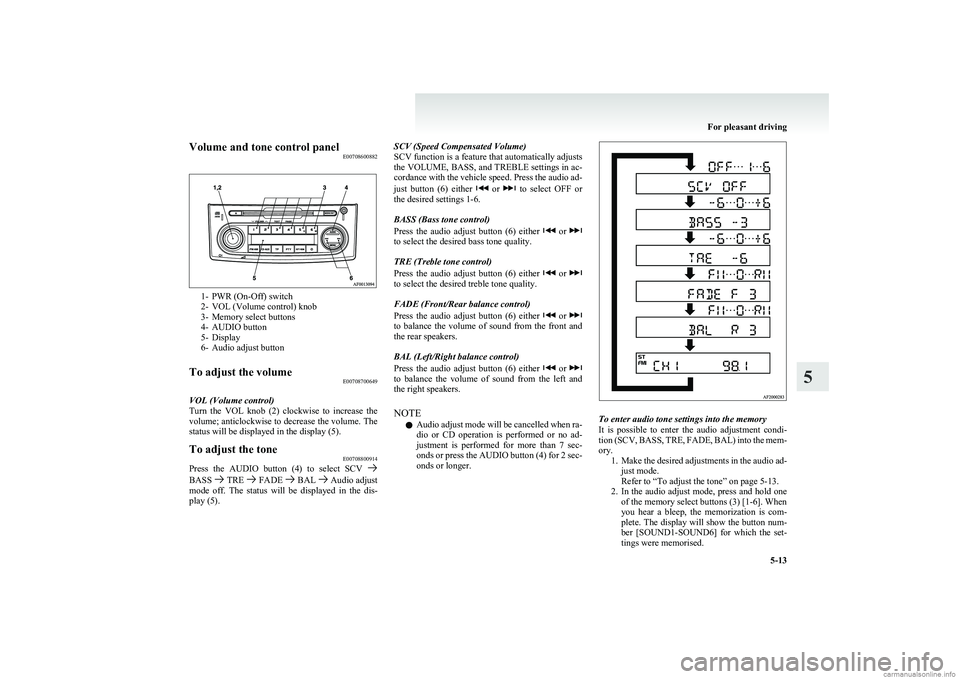
Volume and tone control panelE00708600882
1- PWR (On-Off) switch
2- VOL (Volume control) knob
3- Memory select buttons
4- AUDIO button
5- Display
6- Audio adjust button
To adjust the volume E00708700649
VOL (Volume control)
Turn the VOL knob (2) clockwise to increase the
volume; anticlockwise to decrease the volume. The
status will be displayed in the display (5).
To adjust the tone E00708800914
Press the AUDIO button (4) to select SCV BASS TRE FADE BAL Audio adjust
mode off. The status will be displayed in the dis-
play (5).
SCV (Speed Compensated Volume)
SCV function is a feature that automatically adjusts
the VOLUME, BASS, and TREBLE settings in ac-
cordance with the vehicle speed. Press the audio ad-
just button (6) either
or to select OFF or
the desired settings 1-6.
BASS (Bass tone control)
Press the audio adjust button (6) either
or to select the desired bass tone quality.
TRE (Treble tone control)
Press the audio adjust button (6) either
or to select the desired treble tone quality.
FADE (Front/Rear balance control)
Press the audio adjust button (6) either
or to balance the volume of sound from the front and
the rear speakers.
BAL (Left/Right balance control)
Press the audio adjust button (6) either
or to balance the volume of sound from the left and
the right speakers.
NOTE l Audio adjust mode will be cancelled when ra-
dio or CD operation is performed or no ad-
justment is performed for more than 7 sec-
onds or press the AUDIO button (4) for 2 sec-
onds or longer.
To enter audio tone settings into the memory
It is possible to enter the audio adjustment condi-
tion (SCV, BASS, TRE, FADE, BAL) into the mem-
ory. 1.Make the desired adjustments in the audio ad-
just mode.
Refer to “To adjust the tone” on page 5-13.
2. In the audio adjust mode, press and hold one
of the memory select buttons (3) [1-6]. When
you hear a bleep, the memorization is com-
plete. The display will show the button num-
ber [SOUND1-SOUND6] for which the set-
tings were memorised.
For pleasant driving
5-13
5
Page 160 of 274
AF (Alternative Frequencies) functionE00720900146
The AF function finds a station broadcasting the
same program and selects the station with the stron-
gest signal of AF lists.
The AF function is turned on (with the AF indica-
tor (10) shown on the display) at all times unless
you manually switch it off.
The AF function can be turned ON and OFF.
Refer to “Function setup mode” on page 5-20.CT (Clock Time) function E00721000128
The clock can be set automatically by using the sig-
nal from the local RDS stations. Refer to “Digital
clock” on page 5-34.
REG (Regional) function E00721100015
REG function limits to receive the stations broad-
casting regional programs.
Regional programming and regional networks are
organized differently depending on the country or
area (they may be changed according to the hour,
state, or broadcast area), so if you don’t want to re-
ceive the regional programs automatically, you can
set up REG ON not to receive regional programs.
The REG function can be turned ON and OFF.
Refer to “Function setup mode” on page 5-20.
PI (Program Identification) search function E00721200175
When travelling long distance and the recalled pre-
set station is weak, the radio searches another fre-
quency broadcasting the same programming with
the same PI code in AF list.
If there are no frequencies broadcasting the same
programming, the radio searches a frequency broad-
casting the regional programming. The radio suc-
ceeds in searching the regional programming, then
the display shows the REG indicator (14).
If the radio does not succeed in searching the re-
gional programming, the radio returns to the recal-
led preset station.
The PI function can be turned ON and OFF on
some vehicles.
Refer to “Function setup mode” on page 5-20.
NOTE l While searching, the audio system is muted.
The display shows “WAIT” or “SEARCH”.PTY (Program Type) E00721300264
RDS broadcasts are classified according to pro-
gram type (PTY) as follows. Use the TUNE/SEEK
button (3 or 4) to select your desired PTY.
1. NEWS
2. AFFAIRS (Current affairs)
3. INFO (Information)
4. SPORT
5. EDUCATE (Education)
6. DRAMA
7. CULTURE
8. SCIENCE
9. VARIED
10. POP M (Pop music)
11. ROCK M (Rock music)
12. EASY M (Easy music)
13. LIGHT M (Light classics)
14. CLASSICS
15. OTHER M (Other music)
16. WEATHER (Weather information)
17. FINANCE
18. CHILDREN
19. SOCIAL
20. RELIGION
21. PHONE IN
22. TRAVEL
23. LEISURE
24. JAZZ
25. COUNTRY
26. NATION M (National music)
27. OLDIES
28. FOLK M (Folk music)
29. DOCUMENT
30. TEST
31. ALARM
To search for a broadcast of desired program type: 1. Press the PTY button (7).
2. Press the TUNE/SEEK button (3 or 4) for
less than 1 second at a time to select your de-
sired PTY.
3. Two seconds after a desired PTY has been se-
lected, the radio will begin to search for a
broadcast of your selected PTY. During
search, the selected PTY on the display
blinks and the radio will begin to search for a
broadcast of your selected PTY.
For pleasant driving
5-18
5
Page 176 of 274
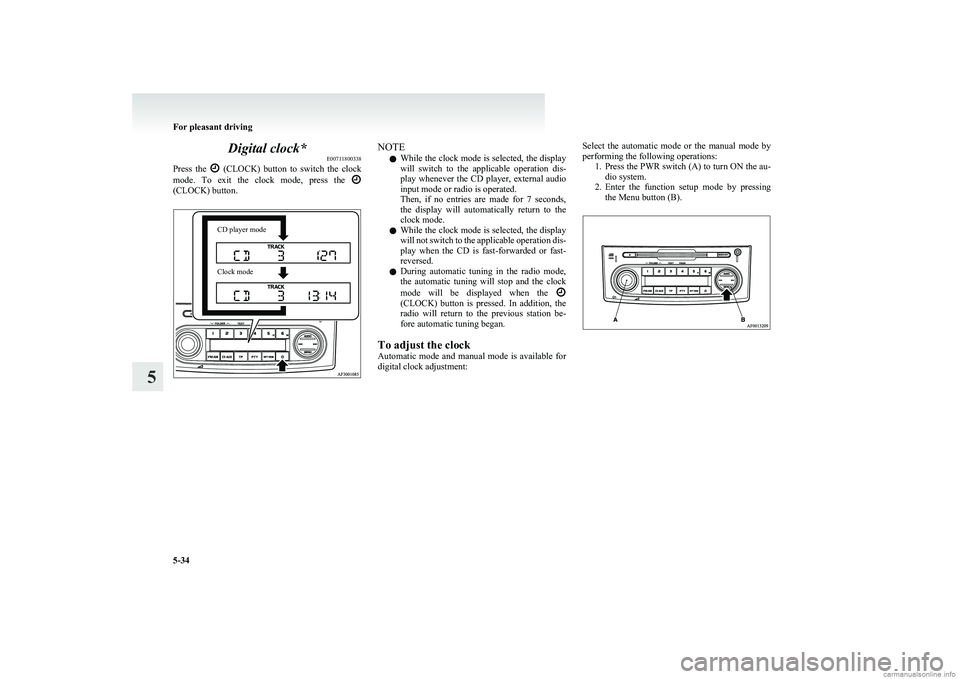
Digital clock*E00711800338
Press the
(CLOCK) button to switch the clock
mode. To exit the clock mode, press the
(CLOCK) button.
CD player modeClock modeNOTE
l While the clock mode is selected, the display
will switch to the applicable operation dis-
play whenever the CD player, external audio
input mode or radio is operated.
Then, if no entries are made for 7 seconds,
the display will automatically return to the
clock mode.
l While the clock mode is selected, the display
will not switch to the applicable operation dis-
play when the CD is fast-forwarded or fast-
reversed.
l During automatic tuning in the radio mode,
the automatic tuning will stop and the clock
mode will be displayed when the
(CLOCK) button is pressed. In addition, the
radio will return to the previous station be-
fore automatic tuning began.
To adjust the clock
Automatic mode and manual mode is available for
digital clock adjustment:
Select the automatic mode or the manual mode by
performing the following operations: 1.Press the PWR switch (A) to turn ON the au-
dio system.
2. Enter the function setup mode by pressing
the Menu button (B).
For pleasant driving
5-34
5