boot MITSUBISHI ECLIPSE 1993 Workshop Manual
[x] Cancel search | Manufacturer: MITSUBISHI, Model Year: 1993, Model line: ECLIPSE, Model: MITSUBISHI ECLIPSE 1993Pages: 57, PDF Size: 4.18 MB
Page 10 of 57
5-52
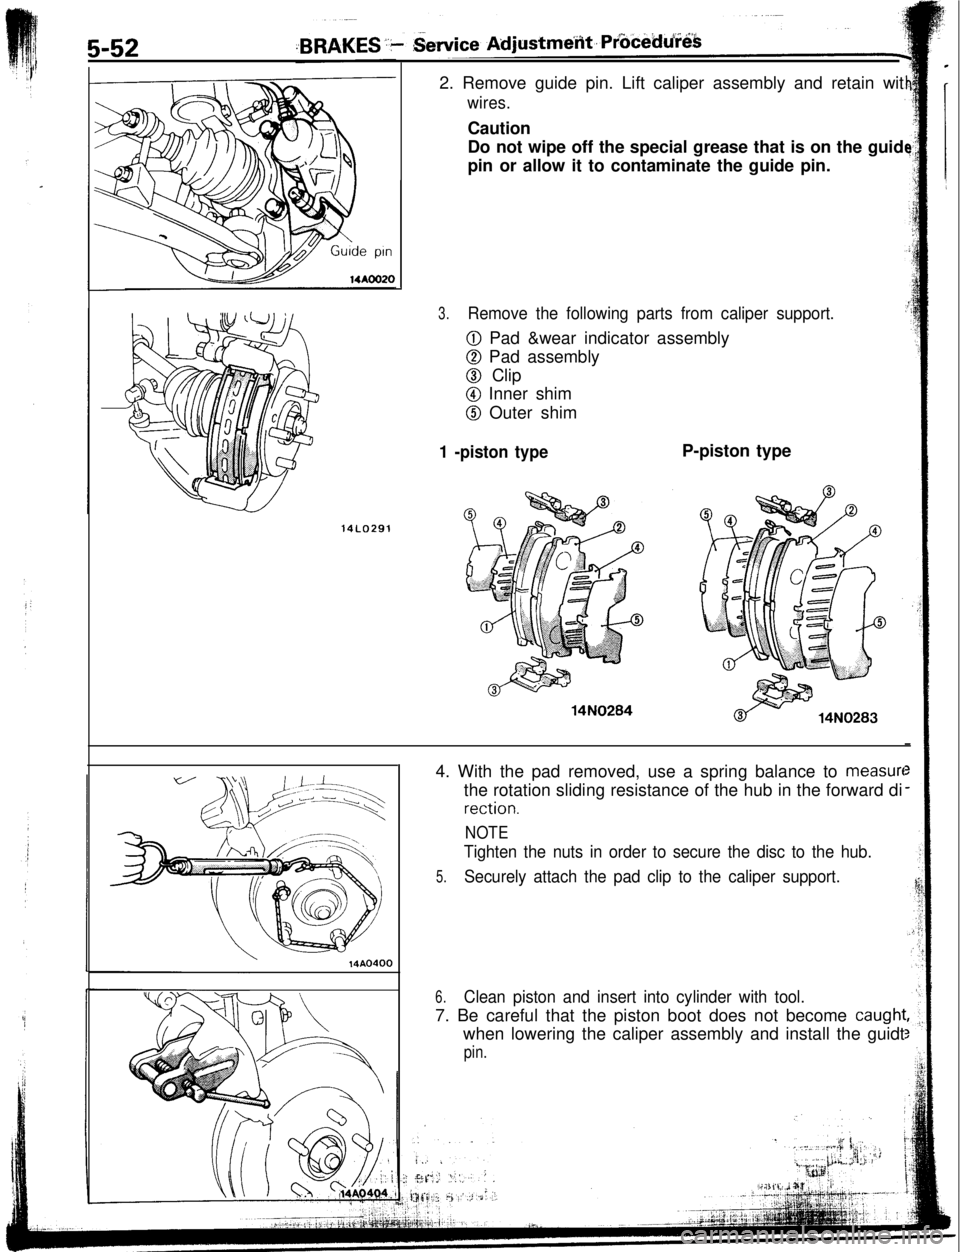
14LO2912. Remove guide pin. Lift caliper assembly and retain wit
wires.Caution
Do not wipe off the special grease that is on the guid
pin or allow it to contaminate the guide pin.
3.Remove the following parts from caliper support.
0 Pad &wear indicator assembly
0 Pad assembly
@ Clip
@I Inner shim
@ Outer shim
1 -piston type14N0284P-piston type
\14AO4004. With the pad removed, use a spring balance to
measurethe rotation sliding resistance of the hub in the forward di
rection.
NOTE
Tighten the nuts in order to secure the disc to the hub.
5.Securely attach the pad clip to the caliper support.
6.Clean piston and insert into cylinder with tool.7. Be careful that the piston boot does not become
caughlwhen lowering the caliper assembly and install the guidt
pin.
Page 20 of 57

-.
t
5-78BRAKES - Front Disc Bra&.iDISASSEMBLY AND REASSEMBLY
NO51
< 1 -piston type>
64-86
46-62
64-86
46-6216
/
w”! 14N0284
Caliper assembly disassembly steps
M 1. Guide pin
l + 2. Lock pin
l + 3. Bushing
4. Caliper support (Pad, clip, shim)
l + 5. Guide pin bootMI 6. Lock pin boot
**7. Boot ring4*8. Piston boot
l *** 9. Piston
+I) l * IO. Piston seal11. Brake hosel + 12. Caliper body
Pad assembly disassembly steps
e+ 1. Guide pin
l + 2. Lock pin*+ 3. Bushing4. Caliper support (Pad, clip, shim)
13. Pad and wear indicator assembly
14. Pad assembly
++ 15. Outer shim16. Clip
e+ 17. Inner shim
NOTE
(1) Reverse the disassembly procedures to reassemble.(2)
~~ : Refer to “Service Points of Disassembly”.(3) l + : Refer to “Service Points of Reassembly”.
(4) m : Non-reusable parts
1
i14AO537Brake caliper kit
Pad repair kitSeal and boots
repair kit
10 6
5’ 8 7
-.I.14AD54(
Page 21 of 57
Boot. ring14KO541460054L
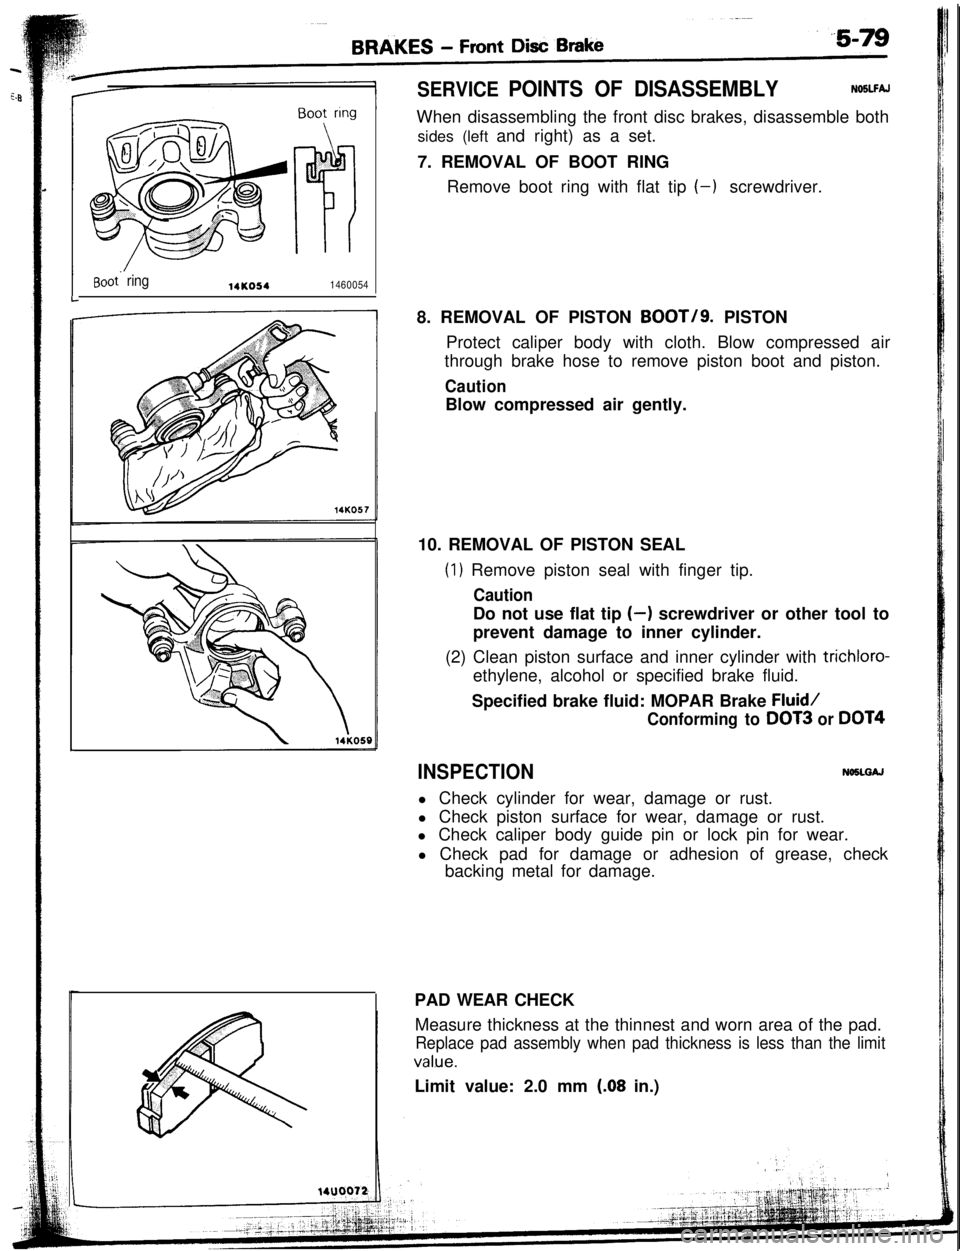
SERVICE POINTS OF DISASSEMBLYNOSLFAJWhen disassembling the front disc brakes, disassemble both
sides (left and right) as a set.
7. REMOVAL OF BOOT RING
Remove boot ring with flat tip (-1 screwdriver.
8. REMOVAL OF PISTON BOOT/g. PISTON
Protect caliper body with cloth. Blow compressed air
through brake hose to remove piston boot and piston.
CautionBlow compressed air gently.
10. REMOVAL OF PISTON SEAL
(1) Remove piston seal with finger tip.
CautionDo not use flat tip
(-) screwdriver or other tool to
prevent damage to inner cylinder.
(2) Clean piston surface and inner cylinder with
trichloro-ethylene, alcohol or specified brake fluid.
Specified brake fluid: MOPAR Brake
Fluid/
Conforming to DOT3 or DOT4
INSPECTIONNOXGAJ
l Check cylinder for wear, damage or rust.
l Check piston surface for wear, damage or rust.
l Check caliper body guide pin or lock pin for wear.
l Check pad for damage or adhesion of grease, check
backing metal for damage.
PAD WEAR CHECK
Measure thickness at the thinnest and worn area of the pad.
Replace pad assembly when pad thickness is less than the limit
value.Limit value: 2.0 mm
(.08 in.)
Page 22 of 57
----aI’-I
5-80BRAKES - Front Disc Brake
I-
Pad and wear
indicator assemblyPad assembly
Grease14FOO97
14KOIQPiston boot
’14KO70
Grease
L
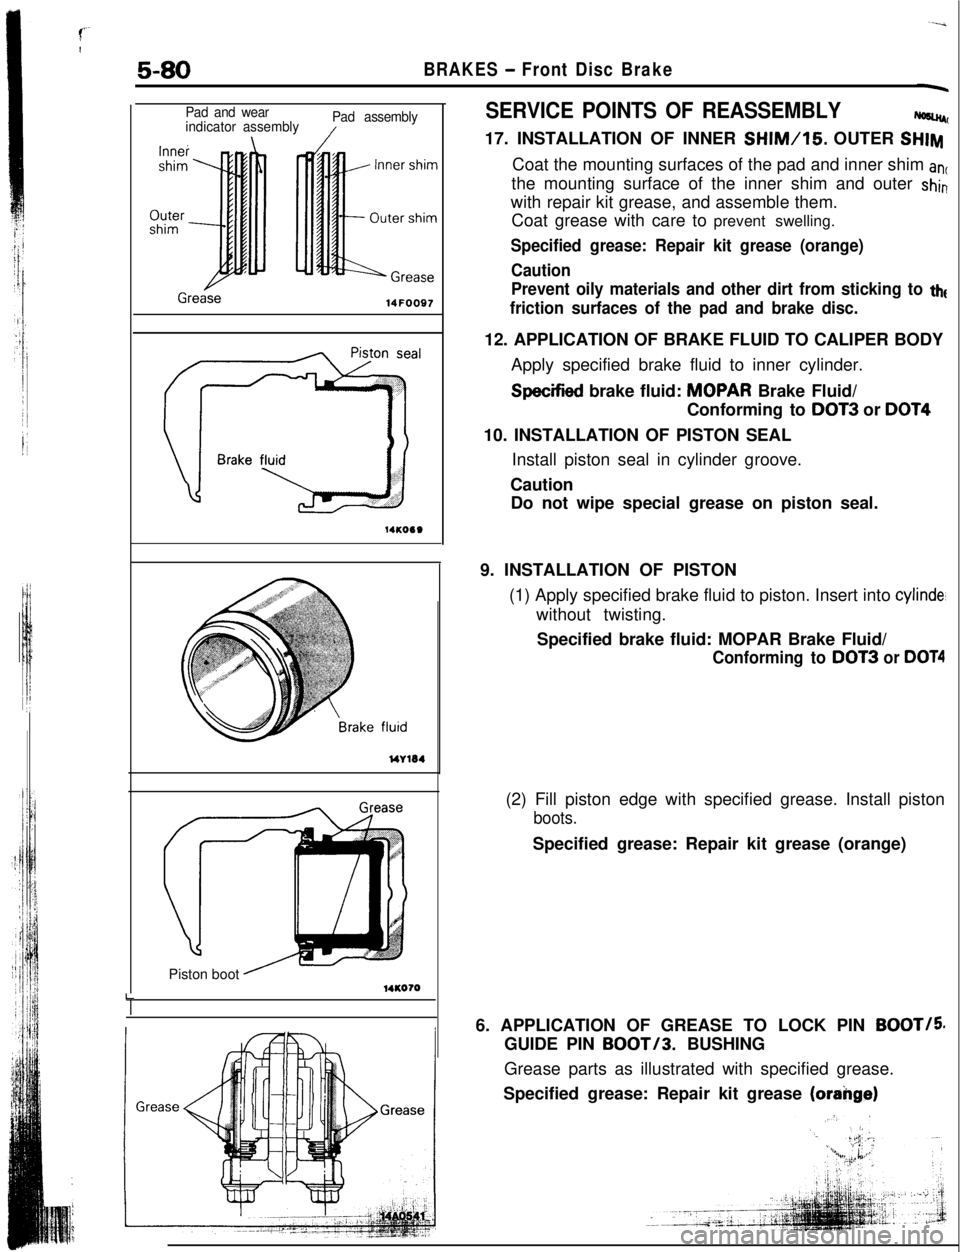
SERVICE POINTS OF REASSEMBLYWC17. INSTALLATION OF INNER
SHIM/15. OUTER SHIMCoat the mounting surfaces of the pad and inner shim
antthe mounting surface of the inner shim and outer
shinwith repair kit grease, and assemble them.
Coat grease with care to prevent swelling.
Specified grease: Repair kit grease (orange)
Caution
Prevent oily materials and other dirt from sticking to
tht
friction surfaces of the pad and brake disc.12. APPLICATION OF BRAKE FLUID TO CALIPER BODY
Apply specified brake fluid to inner cylinder.
Specified brake fluid: MDPAR Brake Fluid/
Conforming to DOT3 or
DOT410. INSTALLATION OF PISTON SEAL
Install piston seal in cylinder groove.
Caution
Do not wipe special grease on piston seal.
9. INSTALLATION OF PISTON
(1) Apply specified brake fluid to piston. Insert into
cylinde’without twisting.
Specified brake fluid: MOPAR Brake Fluid/
Conforming to DOT3 or DOT4(2) Fill piston edge with specified grease. Install piston
boots.Specified grease: Repair kit grease (orange)
6. APPLICATION OF GREASE TO LOCK PIN
BOOT/5GUIDE PIN BOOT/3. BUSHING
Grease parts as illustrated with specified grease.
Specified grease: Repair kit grease
(orange)
Page 24 of 57
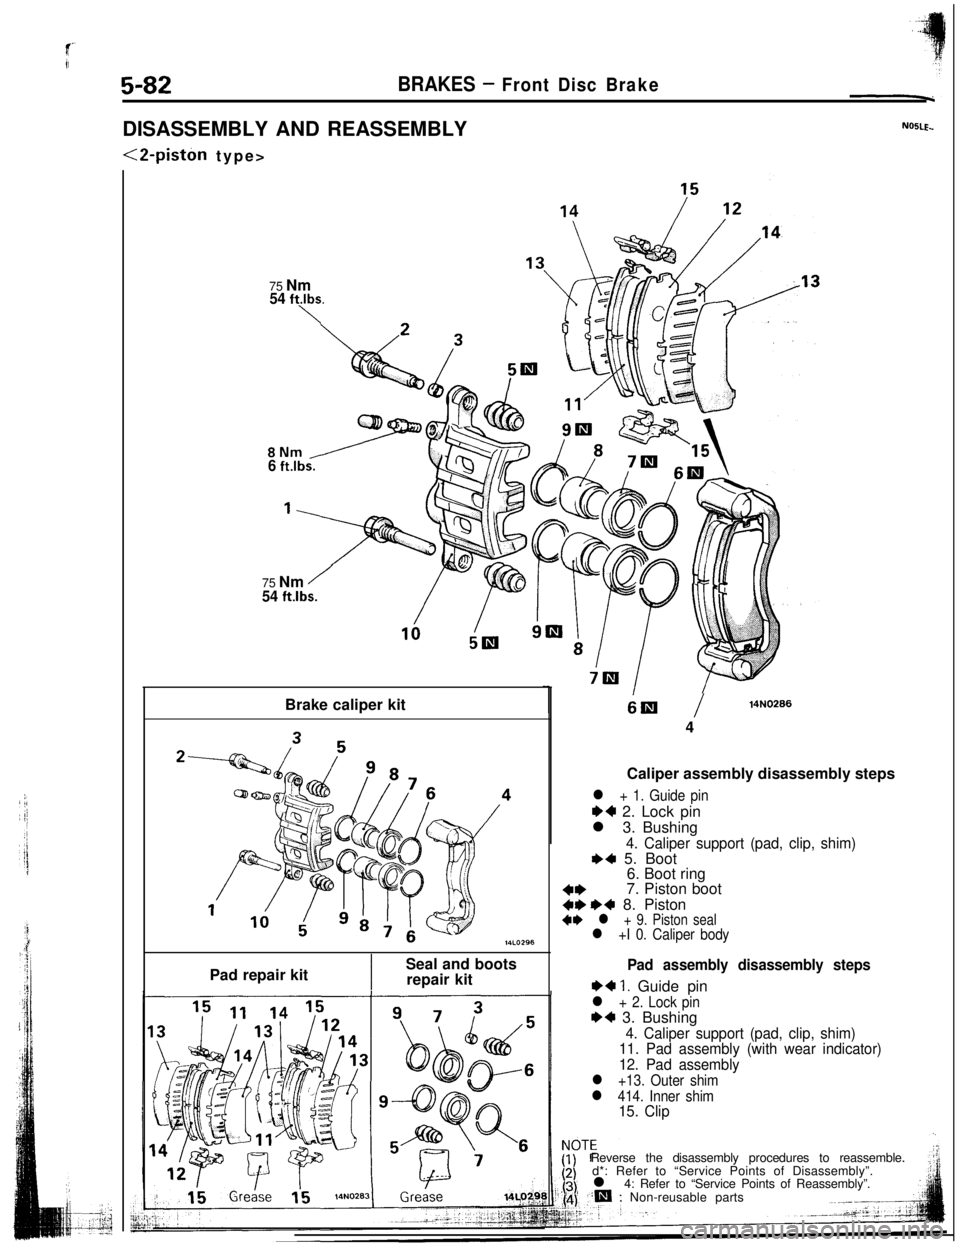
5-82BRAKES - Front Disc BrakeDISASSEMBLY AND REASSEMBLY
<2-piston type>
NOBLE..75 Nm
54 ft.lbs.
\
8Nm/6 ft.lbs.75 Nm
/
54 ft.lbs.Brake caliper kit
Pad repair kit
ISeal and boots
repair kit
6lEl/14N02664
Caliper assembly disassembly steps
l + 1. Guide pin
~~ 2. Lock pin
l 3. Bushing
4. Caliper support (pad, clip, shim)+4 5. Boot
6. Boot ring
4*7. Piston boot+e ++ 8. Piston** l + 9. Piston seall +I 0. Caliper body
Pad assembly disassembly steps
~~ 1. Guide pin
l + 2. Lock pinI)+ 3. Bushing
4. Caliper support (pad, clip, shim)
11. Pad assembly (with wear indicator)
12. Pad assembly
l +13. Outer shim
l 414. Inner shim15. ClipReverse the disassembly procedures to reassemble.
d*: Refer to “Service Points of Disassembly”.
l 4: Refer to “Service Points of Reassembly”.
‘:m: Non-reusable parts
Page 25 of 57
BRAKES 7 Front Disc Brake5-83
14AO55314A0552
\Piston seal\
14AO551
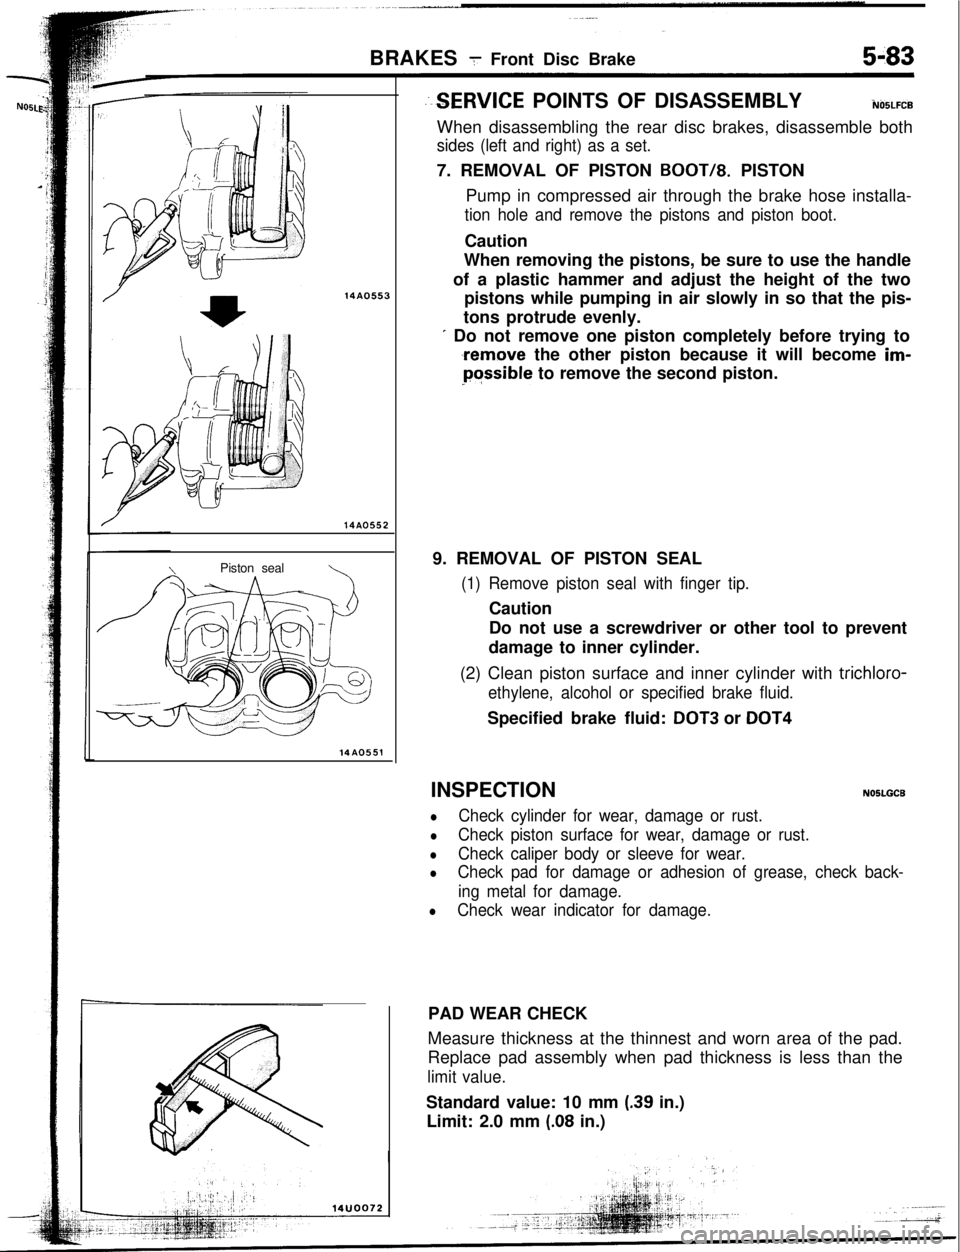
--SERVICE POINTS OF DISASSEMBLYiUO5LFCBWhen disassembling the rear disc brakes, disassemble both
sides (left and right) as a set.7. REMOVAL OF PISTON
BOOT/8. PISTON
Pump in compressed air through the brake hose installa-
tion hole and remove the pistons and piston boot.Caution
When removing the pistons, be sure to use the handle
of a plastic hammer and adjust the height of the two
pistons while pumping in air slowly in so that the pis-
tons protrude evenly.
I Do not remove one piston completely before trying to
,remove the other piston because it will become im-Possible to remove the second piston.
9. REMOVAL OF PISTON SEAL
(1) Remove piston seal with finger tip.Caution
Do not use a screwdriver or other tool to prevent
damage to inner cylinder.
(2) Clean piston surface and inner cylinder with trichloro-
ethylene, alcohol or specified brake fluid.Specified brake fluid:
DOT3 or DOT4INSPECTION
NOSLGCB
lCheck cylinder for wear, damage or rust.
lCheck piston surface for wear, damage or rust.
lCheck caliper body or sleeve for wear.
lCheck pad for damage or adhesion of grease, check back-
ing metal for damage.
lCheck wear indicator for damage.PAD WEAR CHECK
Measure thickness at the thinnest and worn area of the pad.
Replace pad assembly when pad thickness is less than the
limit value.Standard value: 10 mm
(.39 in.)
Limit: 2.0 mm
(.08 in.)
Page 26 of 57
BRAKES -Front Disc Brake
l-Pad and wear
indicator assembly Pad assembly
Inner
shim
Outershim
11Inner shim
Outer shim
GreaseGrease14FOO97
al
14LO127Brake fl
Grease
14LO128GreaseSERVICE
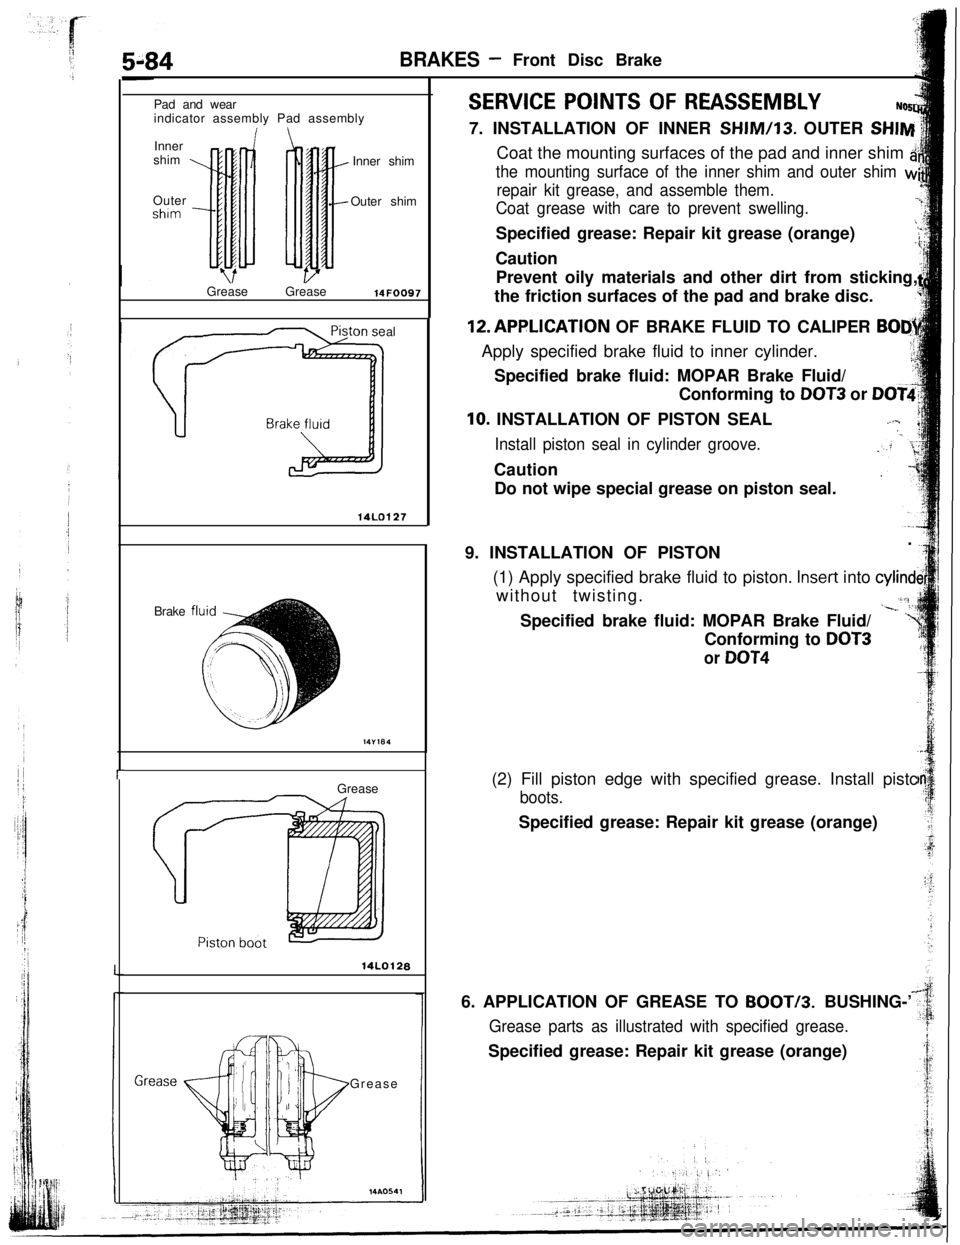
POINTS OF REASSEMBLYNW7. INSTALLATION OF INNER
SHIM/13. OUTER SHIM
Coat the mounting surfaces of the pad and inner shim
a
the mounting surface of the inner shim and outer shim vv
repair kit grease, and assemble them.
Coat grease with care to prevent swelling.Specified grease: Repair kit grease (orange)
Caution
Prevent oily materials and other dirt from sticking,
the friction surfaces of the pad and brake disc.12.APPLlCATlON OF BRAKE FLUID TO CALIPER
BODjApply specified brake fluid to inner cylinder.,.;Specified brake fluid: MOPAR Brake Fluid/;:ti
”Conforming to
DOT3 or DOT4
10. INSTALLATION OF PISTON SEAL..I.‘”Install piston seal in cylinder groove.Caution
Do not wipe special grease on piston seal.
9. INSTALLATION OF PISTON.
(1) Apply specified brake fluid to piston.
Insert into cylindlwithout twisting.
(/ifiL-_. i//Specified brake fluid: MOPAR Brake Fluid/
Conforming to
DOT3
or
DOT4(2) Fill piston edge with specified grease. Install pistc
boots.Specified grease: Repair kit grease (orange)
6. APPLICATION OF GREASE TO BOOT/3. BUSHING-’
Grease parts as illustrated with specified grease.Specified grease: Repair kit grease (orange)