MITSUBISHI ECLIPSE 1993 Workshop Manual
Manufacturer: MITSUBISHI, Model Year: 1993, Model line: ECLIPSE, Model: MITSUBISHI ECLIPSE 1993Pages: 57, PDF Size: 4.18 MB
Page 1 of 57
Page 2 of 57
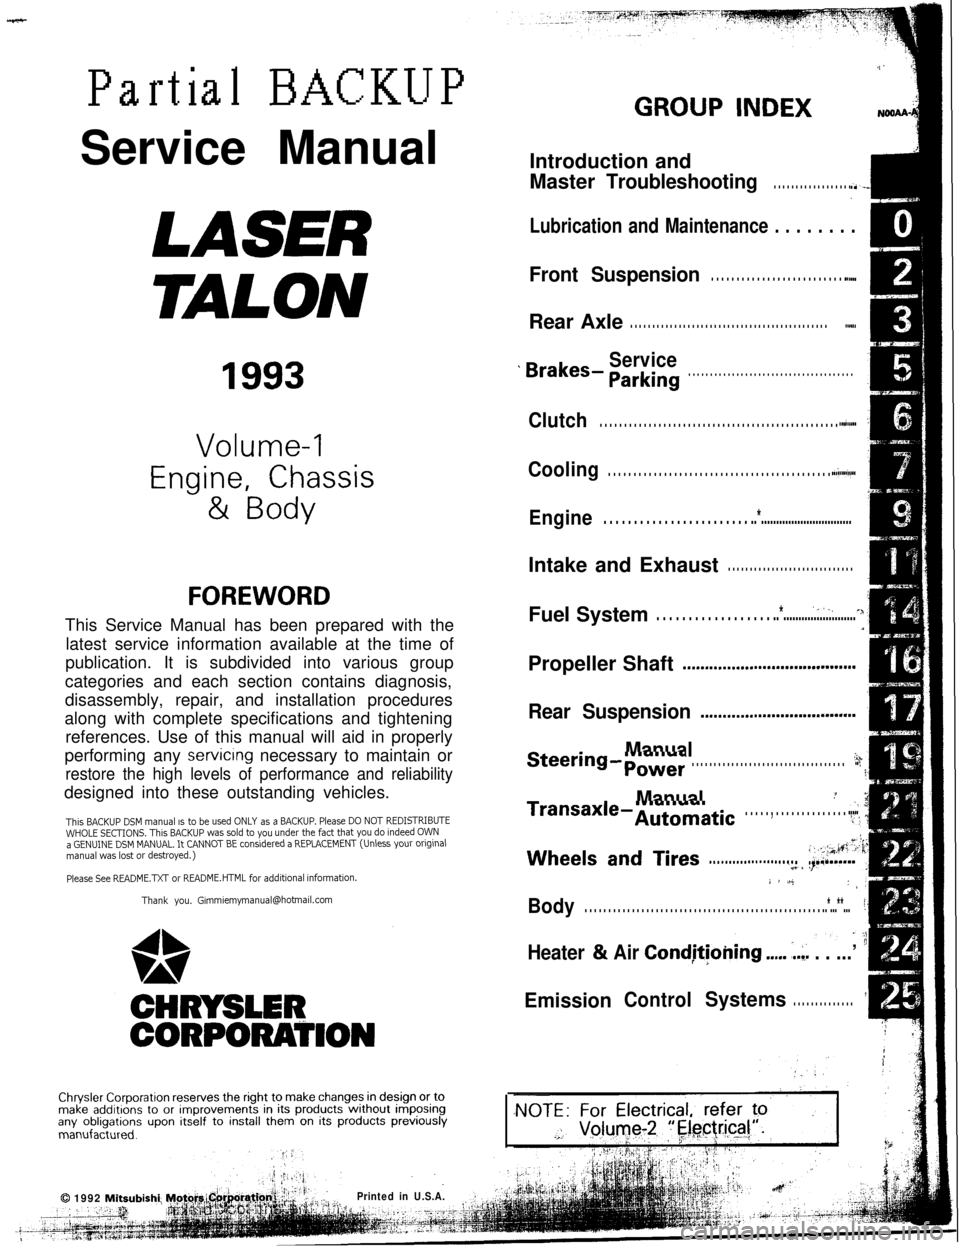
Partial BACKUPService Manual
.i’
GROUP INDEXNOSAl
LASER
TALON
1993
Volume-l
Engine, Chassis& Body
FOREWORDThis Service Manual has been prepared with the
latest service information available at the time of
publication. It is subdivided into various group
categories and each section contains diagnosis,
disassembly, repair, and installation procedures
along with complete specifications and tightening
references. Use of this manual will aid in properly
performing any
servicrng necessary to maintain or
restore the high levels of performance and reliabilitydesigned into these outstanding vehicles.
This BACKUP DSM manual IS to be used ONLY as a BACKUP. Please DO NOT REDISTRIBUTEWHOLE SECTIONS. This BACKUP was sold to you under the fact that you do indeed OWNa GENUINE DSM MANUAL. It CANNOT BE considered a REPLACEMENT (Unless your orlglnalmanual was lost or destroyed.)Please See
README.N or README.HTML for additional Information.
Thank you. G~mm~emymanual@hotma~l.com
CHRYSLER
CORPORATION
Chrysler Corporation reserves the right to make changes in design or tomake additions to or improvements in its products without imposingany obligations upon itself to install them on its products previouslymanufactured.Introduction and
Master
Troubleshooting.-I. . . . . . . . . . . . . . . . . . i
Lubrication and Maintenance . . . . . . . .El
Front Suspension. . . . . . . . . . . . . . . . . . . . . . . . . . . ..A..tiRear Axle
. . . . . . . . . . . . . . . . . . . . . . . . . . . . . . . . . . . . . . . . . . . . . ..~...
Service’ Brakes- Parking. . . . . . . . . . . . . . . . . . . . . . . . . . . . . . . . . . . . . .
Clutch. . . . . . . . . . . . . . . . . . . . . . . . . . . . . . . . . . . . . . . . . . . . . . . . . ..~.....
Cooling. . . . . . . . . . . . . . . . . . . . . . . . . . . . . . . . . . . . . . . . . . . . ..~.....~~..
Engine. . . . . . . . . . . . . . . . . . . . . . . . ..*..............................Intake and Exhaust
. . . . . . . . . . . . . . . . . . . . . . . . . . . . .Fuel System
‘,,, .*. . . . . . . . . . . . . . . . . . ..*........................4Propeller Shaft
..,.....,....,.................m.......
Rear Suspension.*........s........................
ManualSteering-po,er.h. . . . . . . . . . . . . . . . . . . . . . . . . . . . . . . . . . . ..$\
ManualiTransaxle-Automatic:. . . . . , . . . . . . . . . . . . . . r+:,
Wheels and Tires_. .;,:.;*&i. . . . . . . . . . . . . . . . . . . . . . ..&......
j 8 .A$: >
Body. . . . . . . . . . . . . . . . . . . . . . . . . . . . . . . . . . . . . . . . . . . . . . . . . . ..*...**...
Heater & Air CondjtJoning ..,.. ,.,. . . ...’
EmissionControlSystems1. . . . . . . . . . . . . .
0 1992 Mitsubishi)L-.”:
Printed in U.S.A.
Page 3 of 57
BRAKES
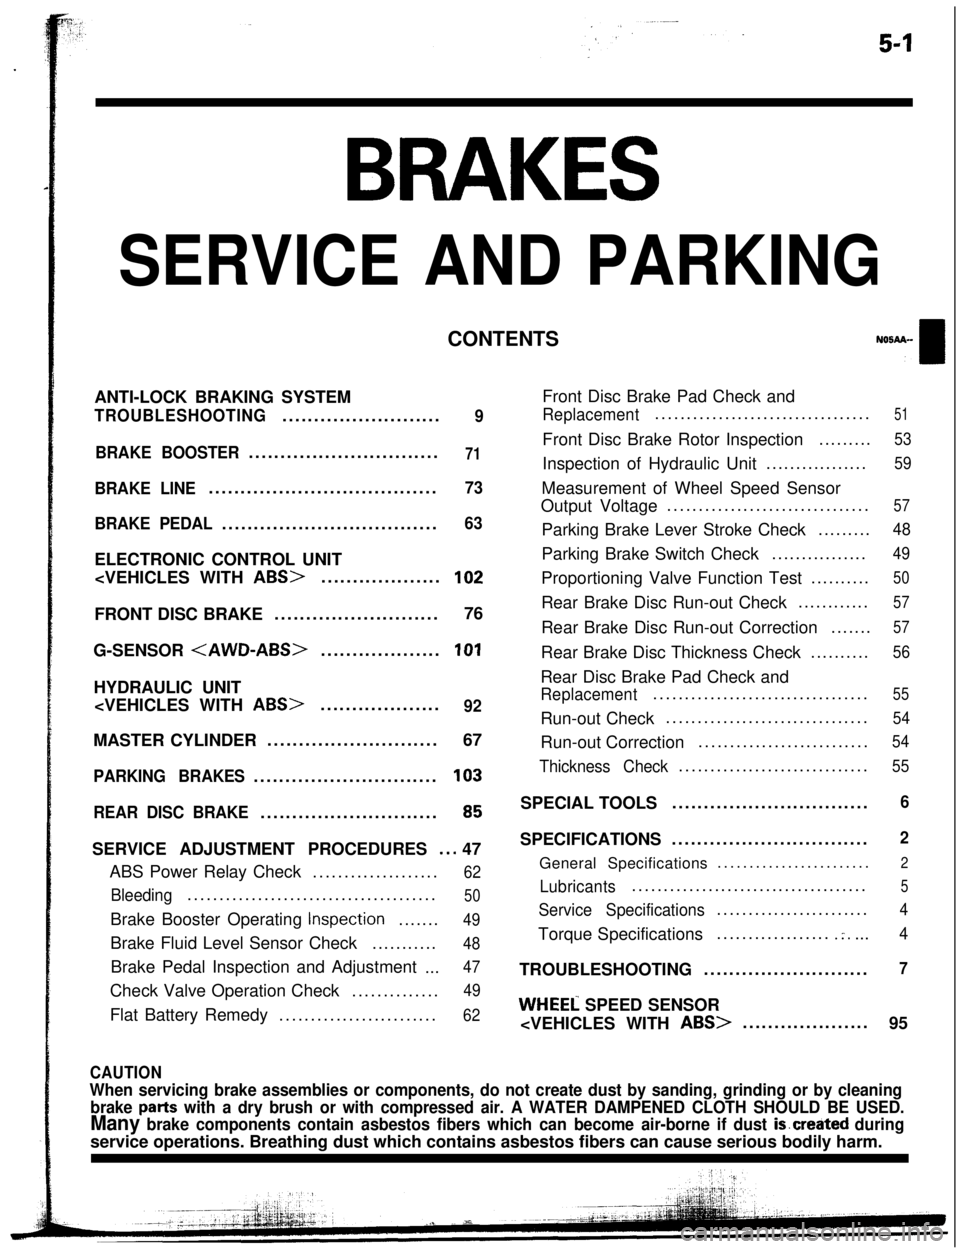
SERVICE AND PARKINGCONTENTS
ANTI-LOCK BRAKING SYSTEM
TROUBLESHOOTING.........................9
BRAKE BOOSTER..............................
71
BRAKE LINE....................................73
BRAKE PEDAL..................................
63ELECTRONIC CONTROL UNIT
G-SENSOR
PARKING BRAKES.............................103
REAR DISC BRAKE............................
65SERVICE ADJUSTMENT PROCEDURES
..a 47
ABS Power Relay Check....................
62
Bleeding.......................................50Brake Booster Operating
Inspection.......49Brake Fluid Level Sensor Check...........
48Brake Pedal Inspection and Adjustment
...
47Check Valve Operation Check..............
49Flat Battery Remedy.........................
62Front Disc Brake Pad Check and
Replacement..................................51Front Disc Brake Rotor Inspection.........
53Inspection of Hydraulic Unit.................
59Measurement of Wheel Speed Sensor
Output Voltage................................
57Parking Brake Lever Stroke Check.........
48Parking Brake Switch Check................
49Proportioning Valve Function Test..........
50Rear Brake Disc Run-out Check............
57Rear Brake Disc Run-out Correction.......
57Rear Brake Disc Thickness Check..........
56Rear Disc Brake Pad Check and
Replacement..................................55Run-out Check................................
54Run-out Correction...........................
54
Thickness Check..............................55SPECIAL TOOLS...............................
6SPECIFICATIONS...............................
2General Specifications........................
2
Lubricants.....................................5
Service Specifications........................4Torque Specifications..................
.:....4TROUBLESHOOTING..........................
7
WHEEL SPEED SENSOR
95
CAUTION
When servicing brake assemblies or components, do not create dust by sanding, grinding or by cleaning
brake
parts with a dry brush or with compressed air. A WATER DAMPENED CLOTH SHOULD BE USED.
Many brake components contain asbestos fibers which can become air-borne if dust is.created duringservice operations. Breathing dust which contains asbestos fibers can cause serious bodily harm.
Page 4 of 57
5-2BRAKES- Specifications
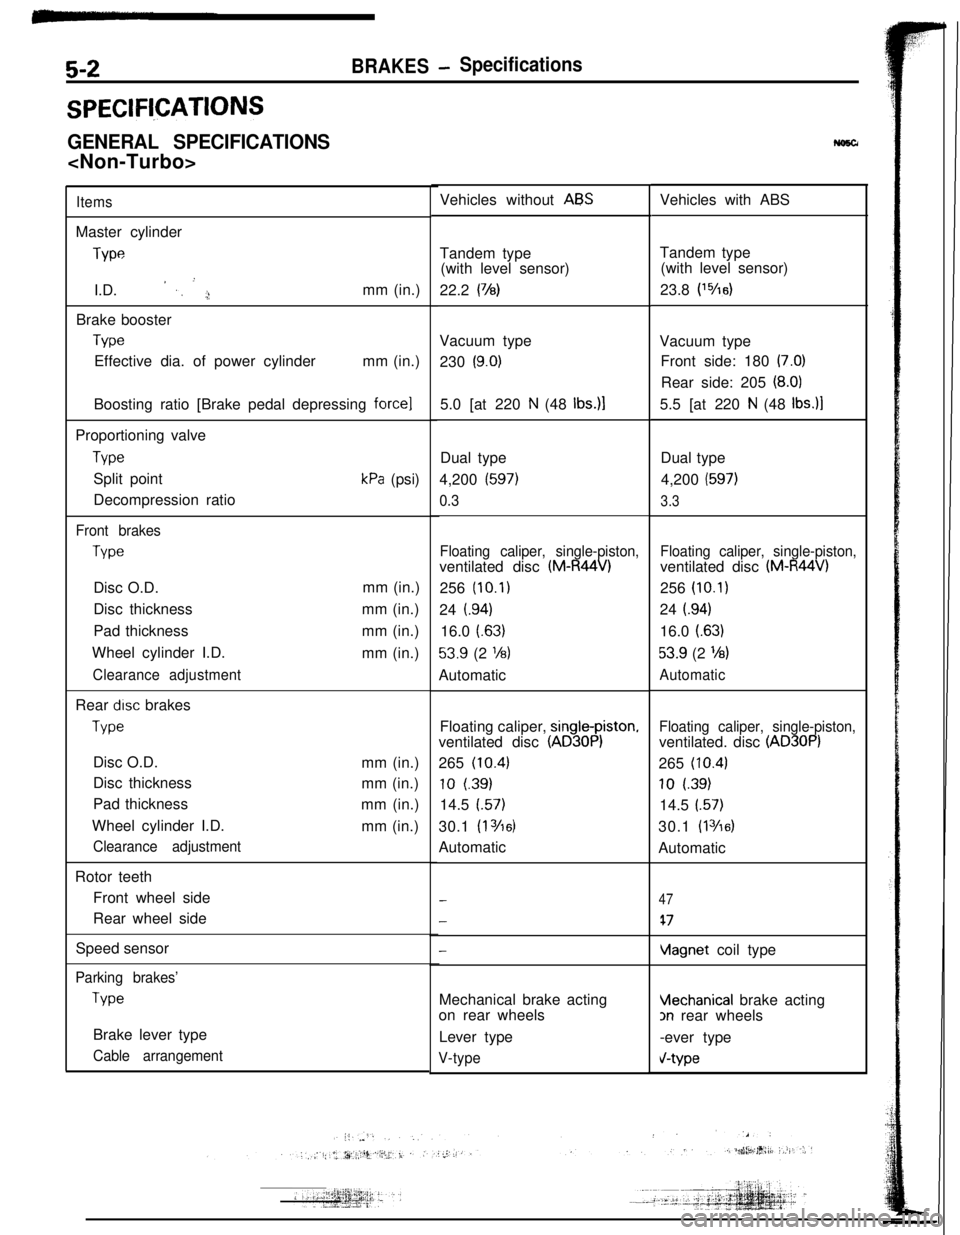
SPECIFl,CATIONS
GENERAL SPECIFICATIONS
ItemsMaster cylinder
J-wI.D.
’ ,, ’ ,;!mm (in.)
Brake booster
TvwEffective dia. of power cylindermm (in.)
Boosting ratio [Brake pedal depressing
force]5.0 [at 220 N (48 Ibs.)lProportioning valve
TypeSplit point
Decompression ratio
kPa (psi)
Front brakes
TypeDisc O.D.
Disc thickness
Pad thickness
Wheel cylinder I.D.
Clearance adjustmentmm (in.)
mm (in.)
mm (in.)
mm (in.)
Rear
drsc brakes
TypeDisc O.D.
Disc thickness
Pad thickness
Wheel cylinder I.D.
Clearance adjustmentmm (in.)
mm (in.)
mm (in.)
mm (in.)
Rotor teeth
Front wheel side
Rear wheel side
Speed sensor
-
Parking brakes’
TvwBrake lever type
Cable arrangementVehicles without
ABSVehicles with ABS
Tandem type
(with level sensor)
22.2
(78)Tandem type
(with level sensor)
23.8 P5/1dVacuum type
230
(9.0)Vacuum type
Front side: 180 (7.0)Rear side: 205
(8.0)5.5 [at 220
N (48 Ibs.)lDual type
4,200
(597)
0.3Dual type
4,200
(597)
3.3
Floating caliper, single-piston,ventilated disc
(M-R44V)256
(10.1)24
i.94)16.0
(.63)
53.9 (2 l/8)Automatic
Floating caliper, single-piston,ventilated disc
(M-R44V)256
(10.1)24
i.94)16.0
(.63)
53.9 (2 %)
AutomaticFloating caliper,
single-piston,ventilated disc
(AD30P)265
(10.43
10 (39)
14.5
(.57)30.1
(1 Yl6)Automatic
Floating caliper, single-piston,ventilated. disc
(AD30P)265
(10.4)
10 l.39)14.5
(.57)30.1
(1 3/6)Automatic
-
-
47
47
vlagnet coil type
Mechanical brake acting
Vlechanical brake acting
on rear wheels
3n rear wheels
Lever type
-ever type
V-typeV-type
Page 5 of 57
! y+
fr. .
‘iBR&gES - Specifications513
-
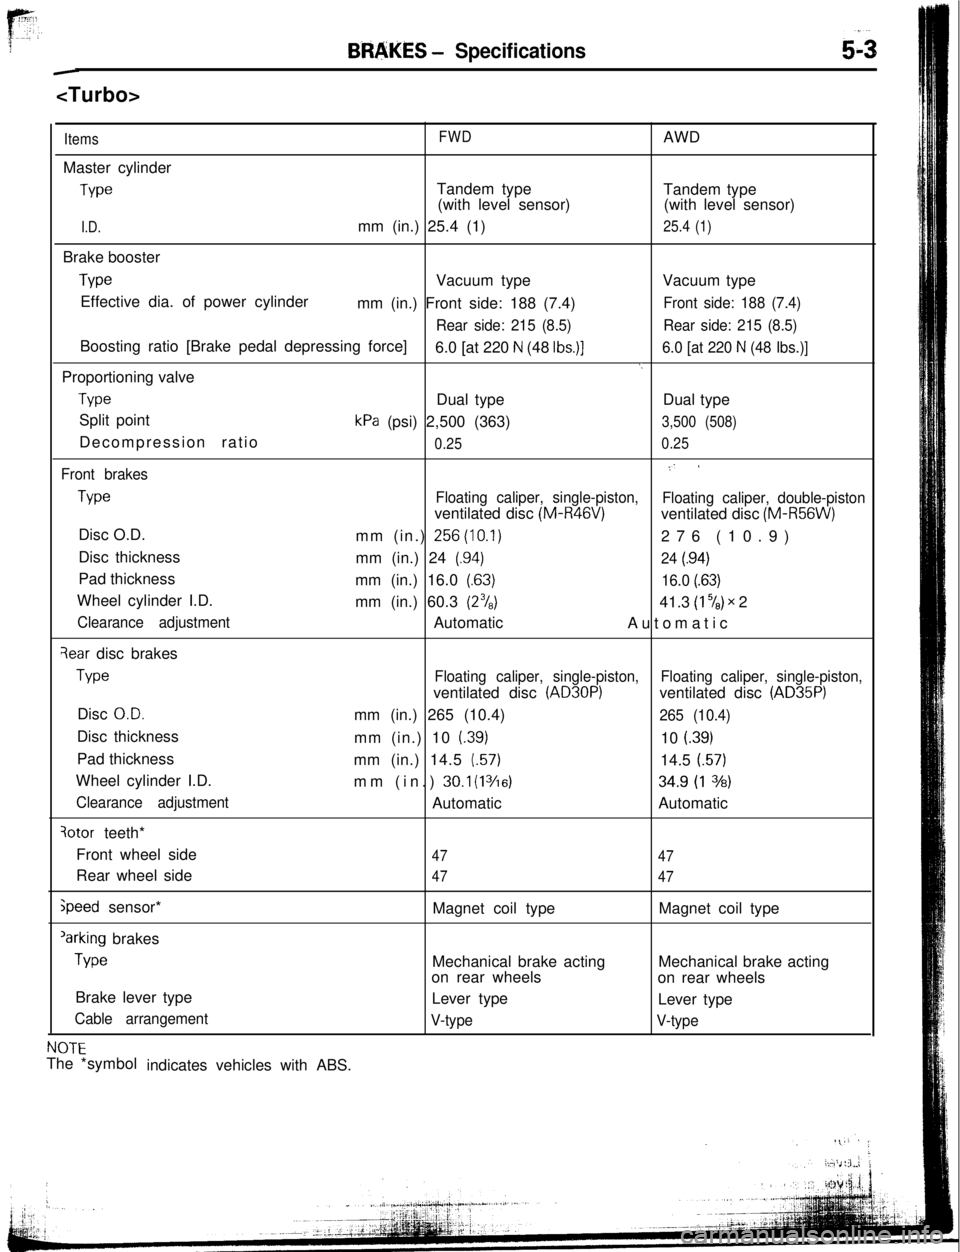
ItemsFWDAWD
Master cylinder
TypeTandem type
Tandem type
(with level sensor)(with level sensor)
I.D.mm (in.) 25.4 (1)25.4 (1)Brake booster
TypeVacuum typeVacuum type
Effective dia. of power cylinder
mm (in.) Front side: 188 (7.4)
Front side: 188 (7.4)
Rear side: 215 (8.5)Rear side: 215 (8.5)Boosting ratio [Brake pedal depressing force]
6.0 [at 220
N (48 Ibs.)]6.0 [at 220 N (48 Ibs.)]
‘.Proportioning valve
TypeDual typeDual type
Split point
kPa (psi) 2,500 (363)3,500 (508)Decompression ratio
0.250.25
Front brakes,,’ I
TypeFloating caliper, single-piston,
Floating caliper, double-pistonventilated disc
(M-R46V)ventilated disc (M-R56W)Disc O.D.
mm (in.)
256(10.1)276 (10.9)
Disc thickness
mm (in.) 24
(94)
24 (.94)Pad thickness
mm (in.) 16.0
(63)
16.0 (63)Wheel cylinder I.D.
mm (in.) 60.3
(2?,)41.3 (l”/*) x 2
Clearance adjustmentAutomatic
Automatic
?ear disc brakes
TypeFloating caliper, single-piston,Floating caliper, single-piston,ventilated disc
(AD30P)ventilated disc (AD35P)Disc
O.D.mm (in.) 265 (10.4)265 (10.4)Disc thickness
mm (in.) 10 (39)
10
f.39)Pad thickness
mm (in.) 14.5
(.57)14.5 (.57)Wheel cylinder I.D.
mm (in.)
30.1 (1 3/16)34.9 (1 3h)
Clearance adjustmentAutomaticAutomatic
3otor teeth*
Front wheel side
47
47Rear wheel side
47
47
speed sensor*
Magnet coil typeMagnet coil type
‘arking brakes
WeMechanical brake actingMechanical brake acting
on rear wheels
on rear wheels
Brake lever type
Lever type
Lever type
Cable arrangement
V-type
V-type
k ,.-YT--NultThe *symbol
indicates vehicles with ABS.
Page 6 of 57
-
5-4BRAKES- Specifications
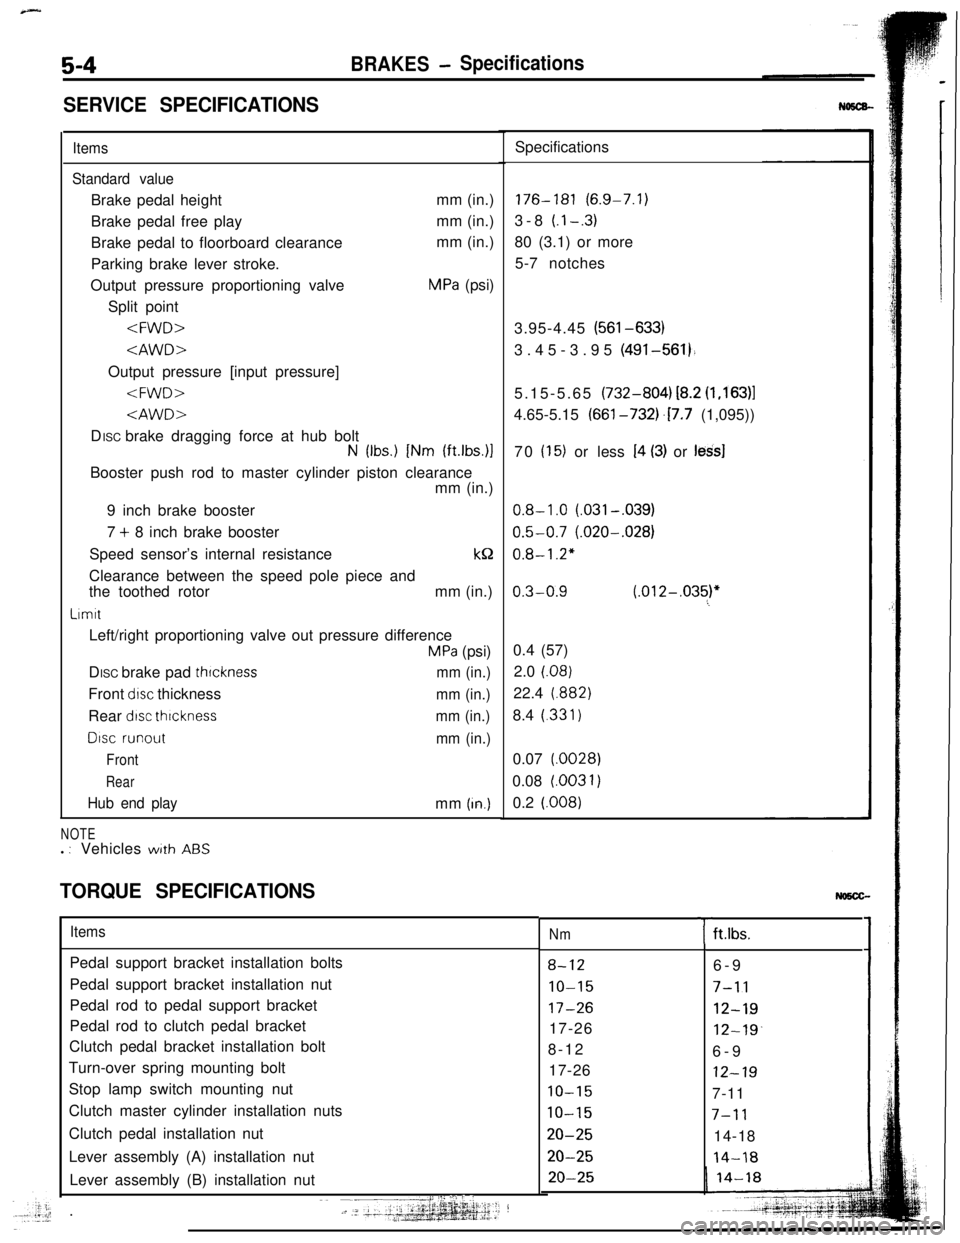
SERVICE SPECIFICATIONS
Items
Standard valueBrake pedal heightmm (in.)
Brake pedal free playmm (in.)
Brake pedal to floorboard clearancemm (in.)
Parking brake lever stroke.
Output pressure proportioning valve
MPa (psi)
Split point
N (Ibs.) [Nm (ft.lbs.)lBooster push rod to master cylinder piston clearance
mm (in.)
9 inch brake booster
7 + 8 inch brake booster
Speed sensor’s internal resistancek&
Clearance between the speed pole piece and
the toothed rotormm (in.)
LrmttLeft/right proportioning valve out pressure difference
MPa (psi)
DISC brake pad
thrcknessmm (in.)Front
drsc thicknessmm (in.)Rear
dtsc thrcknessmm (in.)
DISC runout
mm (in.)
Front
Rear
Hub end playmm (In.)
NOTEl : Vehicleswith ABS
TORQUE SPECIFICATIONSSpecifications176-181 (6.9-7.1)
3-8
(.l-.3)80 (3.1) or more
5-7 notches
3.95-4.45 (561-633)
3.45-3.95 (491-561).
5.15-5.65 (732-804) i8.2
(1,163)14.65-5.15 (661-732j.17.7 (1,095))
70
(15) or less I4 (3) or less]
0.8-1.0 (.031-,039)
0.5-0.7 (.020-.028)
0.8-1.2"
0.3-0.9 (.012-,035)"60.4 (57)
2.0
(.08)22.4
(.882)8.4
(.331)0.07
(.0028)0.08 l.0031)
0.2
(.008)
ItemsPedal support bracket installation bolts
Pedal support bracket installation nut
Pedal rod to pedal support bracket
Pedal rod to clutch pedal bracket
Clutch pedal bracket installation bolt
Turn-over spring mounting bolt
Stop lamp switch mounting nut
Clutch master cylinder installation nuts
Clutch pedal installation nut
Lever assembly (A) installation nut
Lever assembly (B) installation nut
I:: ::I .:‘i j ,:~~ -__j.-, .‘- ‘+‘+gg&p.~j:;.;1--?.+.k
Nm
8-12
IO-15
17-2617-26
8-12
17-26
10-15
10-15
20-25
20-25
20-25
Tft.lbs.
6-9
7-11
12-19
12-19.6-9
12-197-11
7-1114-18
14-18
Page 7 of 57
-
BRAKES - Specifications
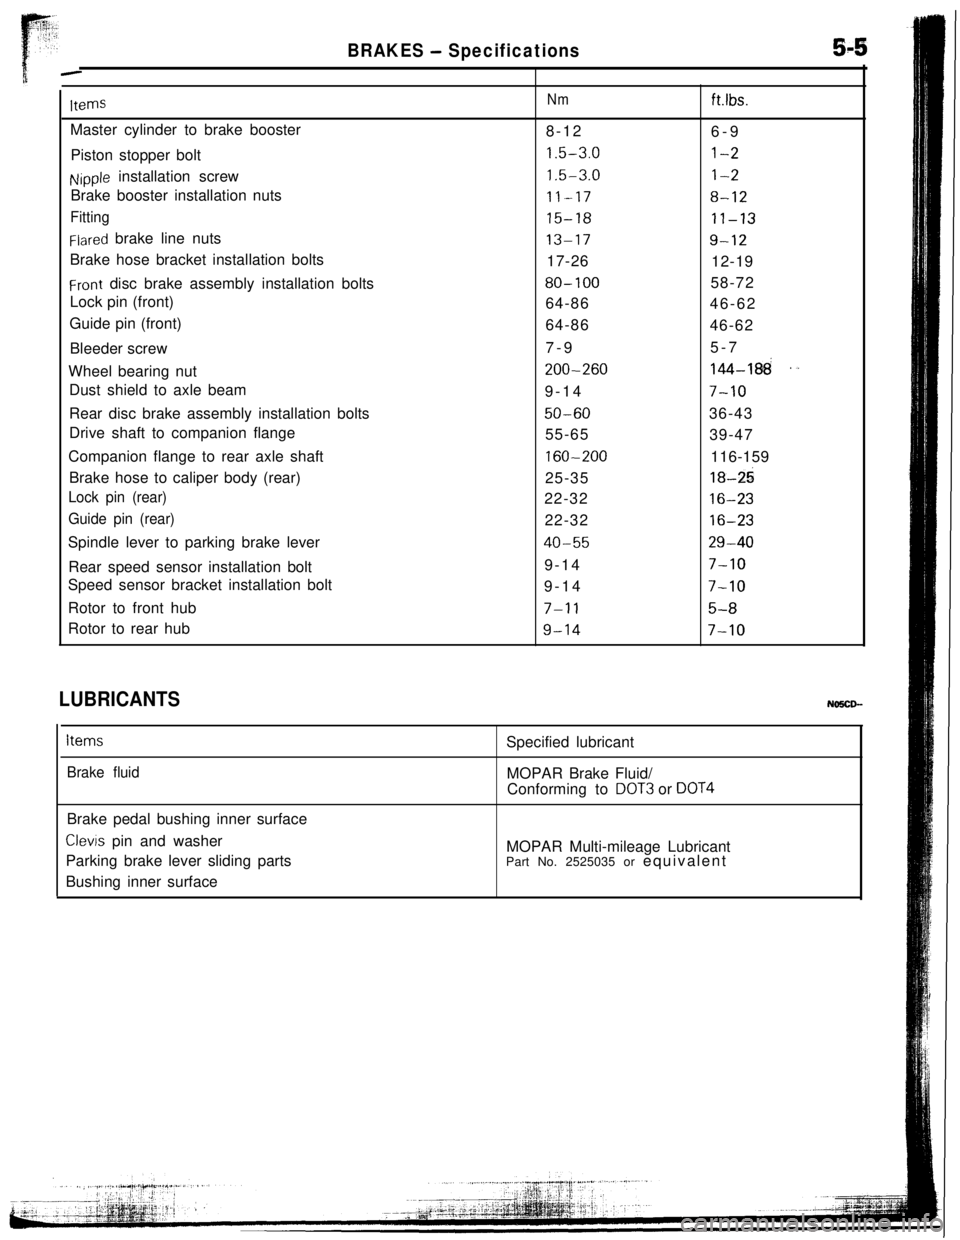
ItemsMaster cylinder to brake booster
Piston stopper bolt
Nipple installation screw
Brake booster installation nuts
Fitting
Flared brake line nuts
Brake hose bracket installation bolts
Front disc brake assembly installation bolts
Lock pin (front)
Guide pin (front)
Bleeder screw
Wheel bearing nut
Dust shield to axle beam
Rear disc brake assembly installation bolts
Drive shaft to companion flange
Companion flange to rear axle shaft
Brake hose to caliper body (rear)
Lock pin (rear)
Guide pin (rear)Spindle lever to parking brake lever
Rear speed sensor installation bolt
Speed sensor bracket installation bolt
Rotor to front hub
Rotor to rear hub
Nm8-12
1.5-3.0
1.5-3.0
11-17
15-18
13-1717-26
80-10064-86
64-86
7-9
200-2609-14
50-6055-65
160-20025-35
22-32
22-32
40-559-14
9-14
7-l 1
9-14
ft.lbs.6-9
l-2
l-2
8-12
11-13
9-1212-19
58-72
46-62
46-62
5-7
144-188”
7-1036-43
39-47
116-159
18-25
16-23
16-23
29-40
7-10
7-10
5-a
7-10
LUBRICANTSNo!xD-
Items
Brake fluidSpecified lubricant
MOPAR Brake Fluid/
Conforming to
DOT3 or DOT4Brake pedal bushing inner surface
Clevls pin and washer
Parking brake lever sliding parts
Bushing inner surfaceMOPAR Multi-mileage Lubricant
Part No. 2525035 or equivalent
Page 8 of 57
5-50BRAKES - Service Adjustment Proi?edur&
Brakebooster
sideSpring
’
/
Valve
Pressure
gaugePressure
PropGtioning valve14LO181input pressure
14uoo55
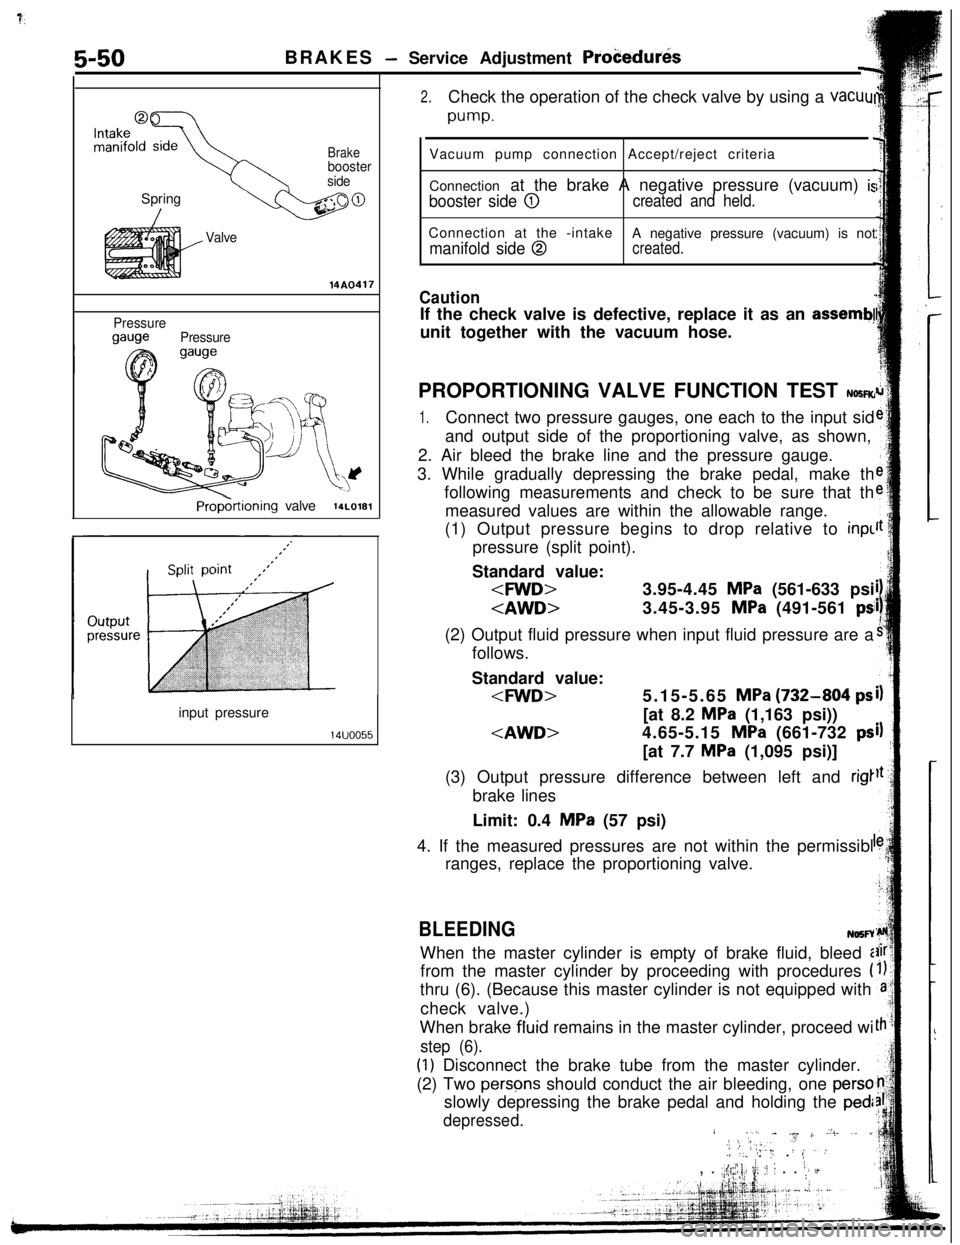
2.Check the operation of the check valve by using a vacuul
pump.Vacuum pump connection Accept/reject criteria
Connection at the brake A negative pressure (vacuum)
is
booster side @created and held.Connection at the -intake
manifold side @A negative pressure (vacuum) is notcreated.
CautionIf the check valve is defective, replace it as an
assemb!unit together with the vacuum hose.
PROPORTIONING VALVE FUNCTION TEST
NO!iR(r
1.Connect two pressure gauges, one each to the input sid
and output side of the proportioning valve, as shown,
2. Air bleed the brake line and the pressure gauge.
3. While gradually depressing the brake pedal, make th
following measurements and check to be sure that th
measured values are within the allowable range.
(1) Output pressure begins to drop relative to inpl
pressure (split point).
Standard value:
follows.
Standard value:
MPa (1,163 psi))
MPa (1,095 psi)]
(3) Output pressure difference between left and
rig1brake lines
Limit: 0.4
MPa (57 psi)
4. If the measured pressures are not within the permissibl
ranges, replace the proportioning valve.
BLEEDINGNo5FYWhen the master cylinder is empty of brake fluid, bleed i
from the master cylinder by proceeding with procedures
(thru (6). (Because this master cylinder is not equipped with
check valve.)
When brake fluid remains in the master cylinder, proceed wi
step (6).
(1) Disconnect the brake tube from the master cylinder.
(2) Two
persqs should conduct the air bleeding, one persoslowly depressing the brake pedal and holding the
ped:
depressed.i .I..[ j,‘I- .~ j, Z’:. ~. jl2;:‘,.Y .‘.:./ ‘:” ‘: ,, . 8,, .
.;$y; ii; :: 1 . . i;, d
Page 9 of 57
BRAKES - Service Adjustment Procedures5-51
2314A0454When new
When worn14G0017
1
14 LO169check the sliding coWsTm~3..“.W% ,Y :sleeve and guide pin-~I ._. ;;:i ‘.(3) In this condition, the other person should use a finger to
close the outlet part of the, master cylinder, and then the
first person should release the brake pedal.
(4) Steps (2) and (3) should be repeated three or four times,
and then the master cylinder should be filled with brake
fluid to the specified level.
NOTE
The air is completely bled from the master cylinder by steps
(1) to (4).
(5) Connect the brake tube to the master cylinder.
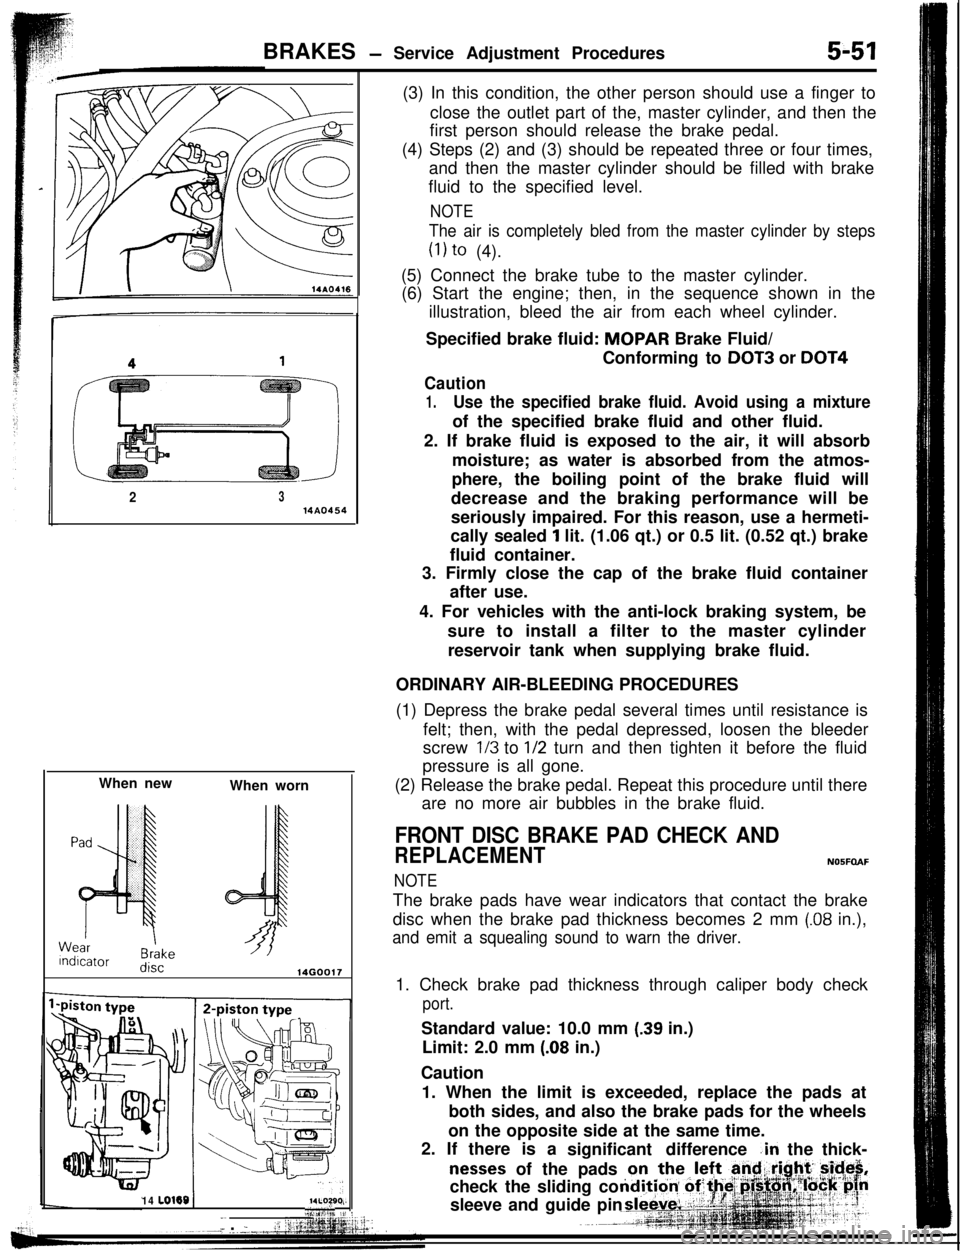
(6) Start the engine; then, in the sequence shown in the
illustration, bleed the air from each wheel cylinder.
Specified brake fluid: MOPAR Brake Fluid/
Conforming to
DOT3 or DOT4
Caution
1.Use the specified brake fluid. Avoid using a mixtureof the specified brake fluid and other fluid.
2. If brake fluid is exposed to the air, it will absorb
moisture; as water is absorbed from the atmos-
phere, the boiling point of the brake fluid will
decrease and the braking performance will be
seriously impaired. For this reason, use a hermeti-
cally sealed
1 lit. (1.06 qt.) or 0.5 lit. (0.52 qt.) brake
fluid container.
3. Firmly close the cap of the brake fluid container
after use.
4. For vehicles with the anti-lock braking system, be
sure to install a filter to the master cylinder
reservoir tank when supplying brake fluid.
ORDINARY AIR-BLEEDING PROCEDURES
(1) Depress the brake pedal several times until resistance is
felt; then, with the pedal depressed, loosen the bleeder
screw
l/3 to l/2 turn and then tighten it before the fluid
pressure is all gone.
(2) Release the brake pedal. Repeat this procedure until there
are no more air bubbles in the brake fluid.
FRONT DISC BRAKE PAD CHECK AND
REPLACEMENTN05FOAF
NOTEThe brake pads have wear indicators that contact the brake
disc when the brake pad thickness becomes 2 mm
(.08 in.),
and emit a squealing sound to warn the driver.1. Check brake pad thickness through caliper body check
port.Standard value: 10.0 mm
(.39 in.)
Limit: 2.0 mm
(.08 in.)
Caution
1. When the limit is exceeded, replace the pads at
both sides, and also the brake pads for the wheels
on the opposite side at the same time.
2. If there is a
significant difference
.in the thick-
nesses of the pads
Page 10 of 57
5-52
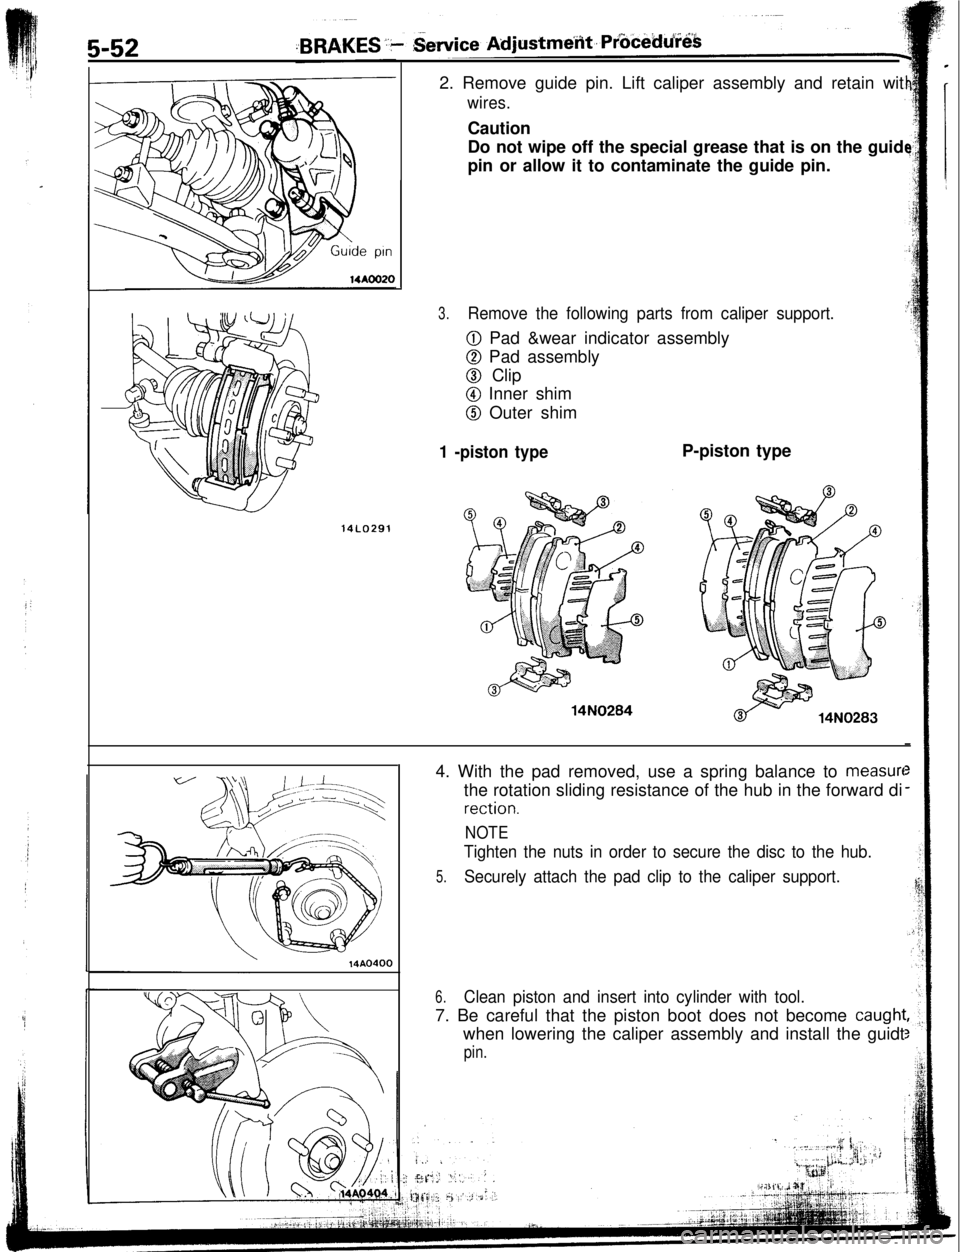
14LO2912. Remove guide pin. Lift caliper assembly and retain wit
wires.Caution
Do not wipe off the special grease that is on the guid
pin or allow it to contaminate the guide pin.
3.Remove the following parts from caliper support.
0 Pad &wear indicator assembly
0 Pad assembly
@ Clip
@I Inner shim
@ Outer shim
1 -piston type14N0284P-piston type
\14AO4004. With the pad removed, use a spring balance to
measurethe rotation sliding resistance of the hub in the forward di
rection.
NOTE
Tighten the nuts in order to secure the disc to the hub.
5.Securely attach the pad clip to the caliper support.
6.Clean piston and insert into cylinder with tool.7. Be careful that the piston boot does not become
caughlwhen lowering the caliper assembly and install the guidt
pin.