engine MITSUBISHI ECLIPSE CROSS 2019 Owner's Manual (in English)
[x] Cancel search | Manufacturer: MITSUBISHI, Model Year: 2019, Model line: ECLIPSE CROSS, Model: MITSUBISHI ECLIPSE CROSS 2019Pages: 423, PDF Size: 75.41 MB
Page 338 of 423
Dual-zone automatic climate control
air conditioning (if so equipped)
Comfort controls 7-17
7
The above indicates the factory settings. You can personalize the air selection switch and
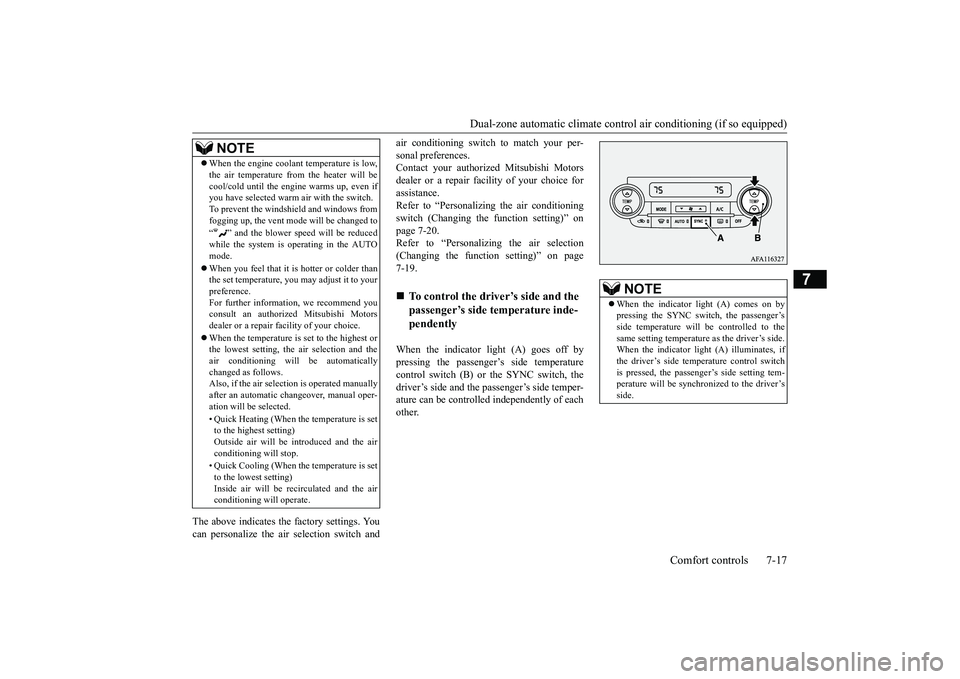
air conditioning switch to match your per- sonal preferences. Contact your authorized Mitsubishi Motors dealer or a repair facility of your choice forassistance. Refer to “Personalizing the air conditioning switch (Changing the function setting)” onpage 7-20. Refer to “Personalizing the air selection (Changing the function setting)” on page7-19. When the indicator light (A) goes off by pressing the passenger’s side temperature control switch (B) or the SYNC switch, thedriver’s side and the passenger’s side temper- ature can be controlled independently of each other.
When the engine coolant temperature is low, the air temperature from the heater will be cool/cold until the engine warms up, even if you have selected warm air with the switch. To prevent the windshield and windows fromfogging up, the vent mode will be changed to “ ” and the blower speed will be reduced while the system is operating in the AUTOmode. When you feel that it is hotter or colder than the set temperature, you may adjust it to your preference. For further information, we recommend youconsult an authorized Mitsubishi Motors dealer or a repair facility of your choice. When the temperature is set to the highest or the lowest setting, the air selection and the air conditioning will be automaticallychanged as follows. Also, if the air selection is operated manually after an automatic changeover, manual oper-ation will be selected. • Quick Heating (When the temperature is set to the highest setting) Outside air will be introduced and the air conditioning will stop. • Quick Cooling (When the temperature is set to the lowest setting) Inside air will be recirculated and the air conditioning will operate.NOTE
To control the driver’s side and the passenger’s side temperature inde-pendently
NOTE
When the indicator light (A) comes on by pressing the SYNC switch, the passenger’s side temperature will be controlled to the same setting temperature as the driver’s side.When the indicator light (A) illuminates, if the driver’s side temperature control switch is pressed, the passenger’s side setting tem-perature will be synchronized to the driver’s side.
BK0266800US.bo
ok 17 ページ 2018年6月27日 水曜日 午後5時6分
Page 340 of 423
Dual-zone automatic climate control
air conditioning (if so equipped)
Comfort controls 7-19
7
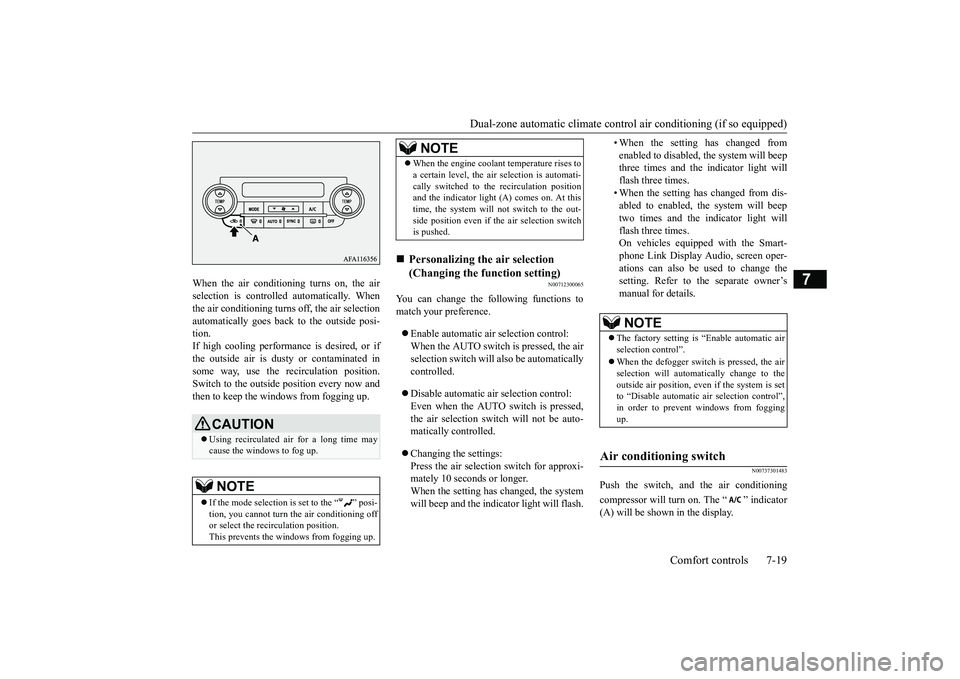
When the air conditioning turns on, the air selection is controll
ed automatically. When
the air conditioning turns off, the air selection automatically goes back to the outside posi- tion.If high cooling performance is desired, or if the outside air is dusty or contaminated in some way, use the recirculation position.Switch to the outside position every now andthen to keep the windows from fogging up.
N00712300065
You can change the following functions tomatch your preference. Enable automatic air selection control: When the AUTO switch is pressed, the air selection switch will also be automatically controlled. Disable automatic air selection control: Even when the AUTO switch is pressed, the air selection switch will not be auto- matically controlled. Changing the settings: Press the air selection switch for approxi- mately 10 seconds or longer. When the setting has changed, the systemwill beep and the indicator light will flash.
• When the setting has changed from enabled to disabled, the system will beep three times and the indicator light will flash three times.• When the setting has changed from dis- abled to enabled, the system will beep two times and the indicator light willflash three times. On vehicles equipped with the Smart- phone Link Display Audio, screen oper-ations can also be used to change thesetting. Refer to the separate owner’s manual for details.
N00737301483
Push the switch, and the air conditioning compressor will turn on. The “ ” indicator (A) will be shown in the display.
CAUTION Using recirculated air for a long time may cause the windows to fog up.NOTE
If the mode selection is set to the “ ” posi- tion, you cannot turn the air conditioning offor select the recirculation position. This prevents the windows from fogging up.
When the engine coolant temperature rises to a certain level, the air
selection is automati-
cally switched to the recirculation position and the indicator light (A) comes on. At this time, the system will not switch to the out-side position even if the air selection switch is pushed.
Personalizing the air selection (Changing the function setting) NOTE
NOTE
The factory setting is “Enable automatic air selection control”. When the defogger switch is pressed, the air selection will automatically change to theoutside air position, even if the system is set to “Disable automatic air selection control”, in order to prevent windows from foggingup.
Air conditioning switch
BK0266800US.bo
ok 19 ページ 2018年6月27日 水曜日 午後5時6分
Page 343 of 423
Dual-zone automatic climate contro
l air conditioning (if so equipped)
7-22 Comfort controls
7
N00731801125
Blower speed and vent mode may be con- trolled manually by setting the blower speed selection switch and the MODE switch to the desired positions. To return to automaticoperation, press the AUTO switch.
N00732401636
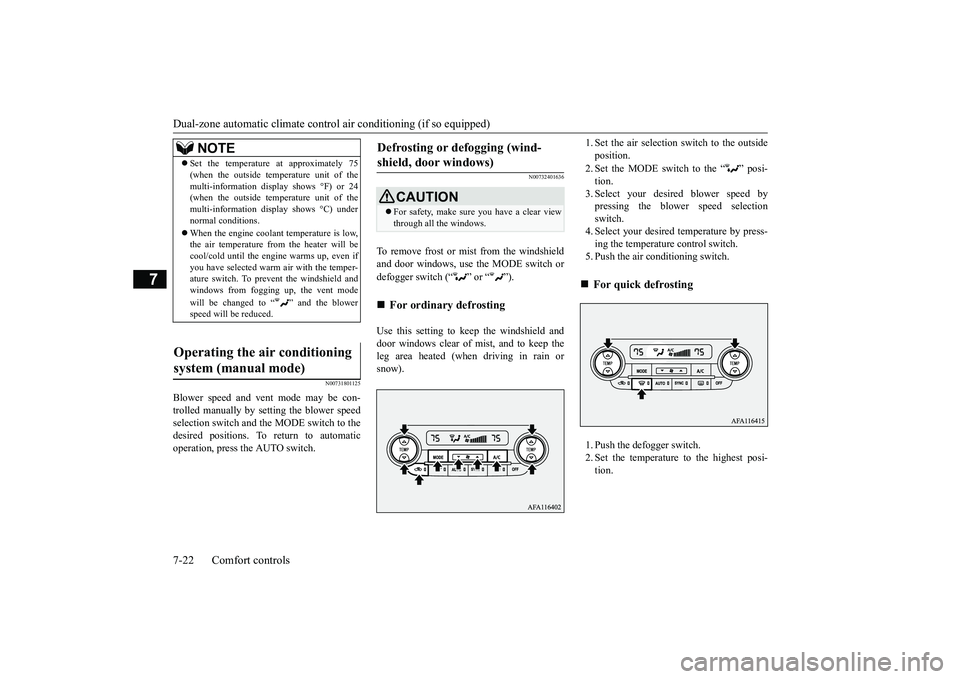
To remove frost or mist from the windshield and door windows, use the MODE switch or defogger switch (“ ” or “ ”). Use this setting to keep the windshield and door windows clear of mist, and to keep the leg area heated (when driving in rain orsnow).
1. Set the air selection switch to the outside position. 2. Set the MODE switch to the “ ” posi- tion.3. Select your desired blower speed by pressing the blower speed selection switch.4. Select your desired temperature by press- ing the temperature control switch. 5. Push the air conditioning switch. 1. Push the defogger switch. 2. Set the temperature to the highest posi-tion.
NOTE
Set the temperature at approximately 75 (when the outside temperature unit of the multi-information display shows °F) or 24 (when the outside temperature unit of the multi-information display shows °C) undernormal conditions. When the engine coolant temperature is low, the air temperature from the heater will be cool/cold until the engine warms up, even if you have selected warm air with the temper-ature switch. To prevent the windshield and windows from fogging up, the vent mode will be changed to “ ” and the blower speed will be reduced.
Operating the air conditioning system (manual mode)
Defrosting or defogging (wind- shield, door windows)
CAUTION For safety, make sure you have a clear view through all the windows.
For ordinary defrosting
For quick defrosting
BK0266800US.bo
ok 22 ページ 2018年6月27日 水曜日 午後5時6分
Page 348 of 423
8
For emergenciesIf the vehicle breaks
down ...............................................................8-2
If the operation mode cannot be changed to OFF (vehicles equipped with the
F.A.S.T.-key) ...................................8-2
Jump-starting the engine
........................................
..........................8-2
Engine overheating .........
.................................................................8-4
Jack and tools ..................
.................................................................8-5
How to change a tire
..............................................
..........................8-6
Towing ................................................
........................................... 8-11
Operation under adverse driv
ing conditions ..................................8-12
Fuel Pump Shut-off Sy
stem ...........................................................8-13
BK0266800US.bo
ok 1 ページ 2018年6月27日 水曜日 午後5時6分
Page 349 of 423
If the vehicle breaks down 8-2 For emergencies
8
N00836301230
If your vehicle breaks down on the road, move to the shoulder and turn on the hazardwarning flashers. If there is no shoulder, or the shoulder is not safe, drive in the right lane slowly with the hazard
lights flashing, until
you come to a safe stopping place. Keep the flashers flashing. If the engine stops, there will be no power assist to the steering and brakes, making these difficult to use. The brake booster will not work, so the brakes will not grip well. The brake pedalwill be harder to press than usual. Since there is no power steering assist, the steering wheel will be hard to turn.
Get help from your passengers, bystanders, etc. to push the vehicl
e and move it to a safe
area.
N00860700087
If the operation mode cannot be changed to OFF, perform the following procedure. 1. Move the selector lever to the “P” (PARK) position, and then change theoperation mode to OFF. 2. One of the other causes could be low bat- tery voltage. If this occurs, the keylessentry system and the F.A.S.T.-key opera- tion will also not operate. Contact an authorized Mitsubishi Motors dealer or arepair facility of your choice.
N00836401840
If the engine cannot be started because thebattery is weak or dead, you can start it with the battery from another vehicle using jumper cables.
1. Take off any metal jewelry such as watch bands or bracelets that might create anaccidental electrical contact. 2. Position the vehicles close enough together so that the jumper cables canreach, but be sure the vehicles aren’t touching each other. 3. Set the parking brake firmly on your vehi- cle and move the selector lever into the “P” (PARK) position.
If the vehicle breaks down If the engine stops/fails When the engine fails at the intersection
If the operation mode can- not be changed to OFF (vehicles equipped with the F.A.S.T.-key) Jump-starting the engine
WA R N I N G To reduce the risk of igniting flammable gas that may be emitted from the battery, carefully read this section before jump- starting the vehicle. Do not try to start your vehicle by pushing or towing. This can cause an accident resulting in serious injury or death andcan damage the vehicle.NOTE
Do not use jumper cables if they have dam- age or corrosion.CAUTION Check the other vehicle. It must have a 12- volt battery. If the other system isn’t 12-volt, both systems can be damaged.
BK0266800US.bo
ok 2 ページ 2018年6月27日 水曜日 午後5時6分
Page 350 of 423
Jump-starting the engine For emergencies 8-3
8
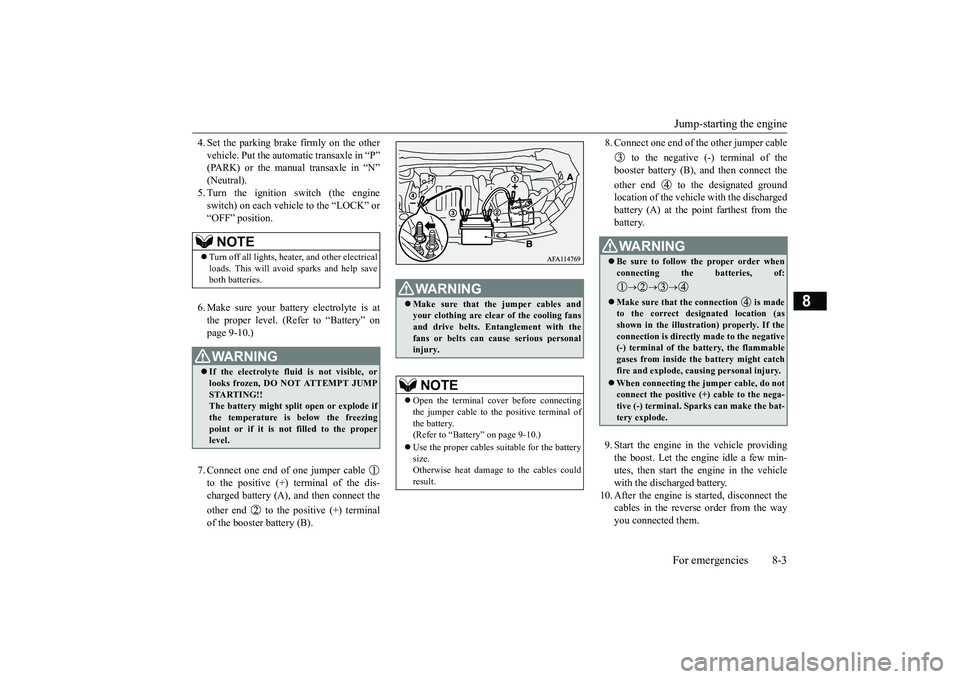
4. Set the parking brake firmly on the other vehicle. Put the automatic transaxle in “P” (PARK) or the manual transaxle in “N” (Neutral).5. Turn the ignition switch (the engine switch) on each vehicle to the “LOCK” or “OFF” position. 6. Make sure your battery electrolyte is at the proper level. (Refer to “Battery” on page 9-10.) 7. Connect one end of one jumper cable to the positive (+) terminal of the dis- charged battery (A), and then connect the other end to the positive (+) terminal of the booster battery (B).
8. Connect one end of the other jumper cable
to the negative (-) terminal of the booster battery (B), and then connect the other end to the designated ground location of the vehicle with the discharged battery (A) at the point farthest from thebattery. 9. Start the engine in the vehicle providing the boost. Let the engine idle a few min- utes, then start the engine in the vehicle with the discharged battery.
10. After the engine is started, disconnect the
cables in the reverse order from the way you connected them.
NOTE
Turn off all lights, heater, and other electrical loads. This will avoid sparks and help save both batteries.WA R N I N G If the electrolyte fluid is not visible, or looks frozen, DO NOT ATTEMPT JUMP STARTING!! The battery might split open or explode ifthe temperature is below the freezing point or if it is not filled to the proper level.
WA R N I N G Make sure that the jumper cables and your clothing are clear of the cooling fans and drive belts. Entanglement with the fans or belts can cause serious personalinjury.NOTE
Open the terminal cover before connecting the jumper cable to the positive terminal ofthe battery. (Refer to “Battery” on page 9-10.) Use the proper cables suitable for the battery size. Otherwise heat damage to the cables couldresult.
WA R N I N G Be sure to follow the proper order when connecting the batteries, of:
Make sure that the connection is made to the correct designated location (as shown in the illustration) properly. If the connection is directly made to the negative(-) terminal of the battery, the flammable gases from inside the battery might catch fire and explode, causing personal injury. When connecting the jumper cable, do not connect the positive (+) cable to the nega-tive (-) terminal. Sparks can make the bat- tery explode.
BK0266800US.bo
ok 3 ページ 2018年6月27日 水曜日 午後5時6分
Page 351 of 423
Engine overheating 8-4 For emergencies
8
If you drive your vehicle with a low battery charge after the engine has been started by using jumper cables, the engine may misfire. This can cause the anti-lock braking systemwarning light to blink on and off. This is only due to the low battery voltage. It is not a problem with the brake system. If this hap-pens, fully charge the battery and ensure thecharging system is operating properly.
N00836501421
When the engine is overheating, the informa-tion screen in the multi-information display will be interrupted and the engine coolant temperature warning display will appear. Also “ ” will blink. If these warnings are displayed: 1. Stop the vehicle in a safe place. Turn on the hazard warning flashers.2. With the engine still running, carefully raise the engine hood to vent the engine compartment.
3. Check that the cooling fan is running. If the fan is not turning, stop the engine immediately and contact an authorized Mitsubishi Motors dealer or a repair facil-ity of your choice for assistance. 4. If you see steam or spray coming from under the hood, turn off the engine. 5. If you do not see steam or spray comingfrom under the hood, leave the engine on until the high coolant temperature warn- ing goes off. After the high coolant tem-perature warning has gone off, you can start driving again. If the high coolant temperature warning stays on, turn off theengine.
Charging the battery by using an external battery charger
WA R N I N G Always remove the battery from your vehicle when the battery is charged by anexternal battery charger. Keep sparks, cigarettes, and flames away from the battery because the battery could explode. Keep your work area well vented when charging or using the battery in an enclosed space. Remove all the caps before charging the battery. Electrolyte (battery acid) is made of corro- sive diluted sulfuric acid. If electrolytecomes in contact with your hands, eyes, clothes, or the painted surface of your vehicle, thoroughly flush with water. Ifelectrolyte gets in your eyes, flush them immediately and thoroughly with water, and get prompt medical attention. Always wear protective clothing and gog- gles when working near the battery. Keep the battery out of the reach of chil- dren.
As your vehicle has anti-lock brakes Engine overheating
WA R N I N G To avoid personal injury, keep hands, hair, jewelry and clothes away from the coolingfan. The cooling fan can start at any time.WA R N I N G Before raising the engine hood, check to see if there is steam or spray coming from under the hood. Steam or spray coming from an overheated engine could seriously scald you.Do not open the hood until there is no steam or spray.
BK0266800US.bo
ok 4 ページ 2018年6月27日 水曜日 午後5時6分
Page 352 of 423
Jack and tools
For emergencies 8-5
8
6. When you do not see any more steam or spray, open the hood. Look for obvious leaks, such as a split radiator hose. Be careful as components will be hot. Anyleak source must be repaired. 7. If there is no obvious leak source, check the coolant level in the engine coolantreserve tank. If there is none, or if it is too low, slowly add coolant. 8. If the engine coolant reserve tank needscoolant, you will probably also need toadd coolant to the radiator. Do not loosen or remove the radiator cap until the engine has cooled down. 9. Start the engine, and slowly add coolant, up to the bottom of the filler neck. Useplain water if you have to (and replace it with the right coolant as soon as possible).
10. Replace the radiator cap and tighten it
fully. Check the engine coolant tempera- ture display on the multi-information dis- play. You can start driving again when thehigh coolant temperature warning does not come on.
11. Have the system inspected by your autho-
rized Mitsubishi Motors dealer or a repair facility of your choice.
N00836601435
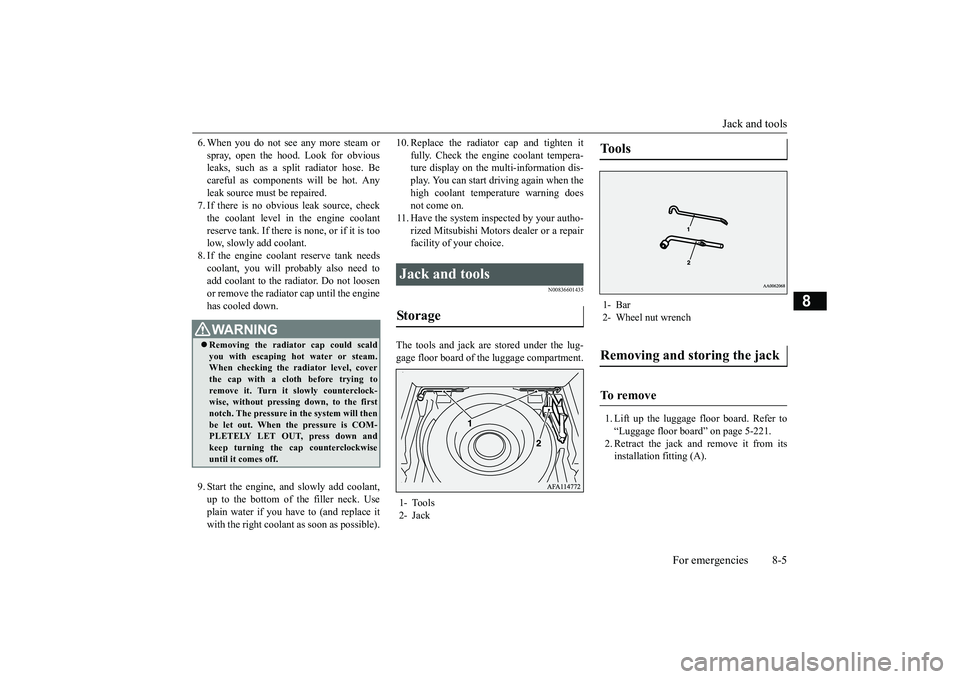
The tools and jack are stored under the lug- gage floor board of the luggage compartment.
1. Lift up the luggage floor board. Refer to “Luggage floor board” on page 5-221. 2. Retract the jack and remove it from its installation fitting (A).
WA R N I N G Removing the radiator cap could scald you with escaping hot water or steam.When checking the radiator level, cover the cap with a cloth before trying to remove it. Turn it slowly counterclock-wise, without pressing down, to the first notch. The pressure in the system will then be let out. When the pressure is COM-PLETELY LET OUT, press down and keep turning the cap counterclockwise until it comes off.
Jack and tools Storage 1- Tools 2- Jack
Tools 1- Bar2- Wheel nut wrenchRemoving and storing the jack To remove
BK0266800US.bo
ok 5 ページ 2018年6月27日 水曜日 午後5時6分
Page 353 of 423
How to change a tire 8-6 For emergencies
8
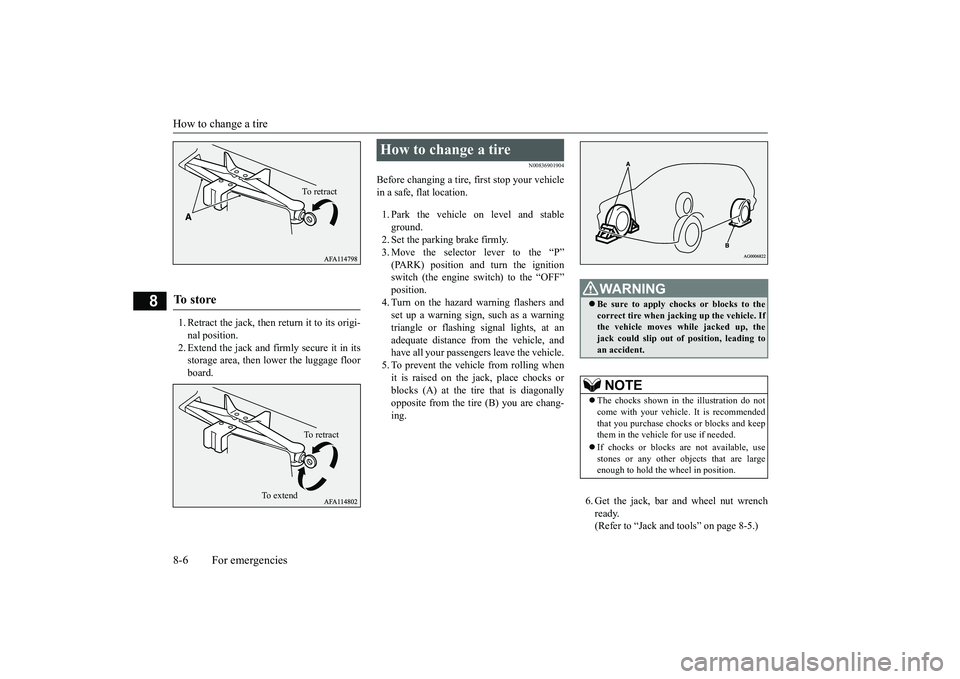
1. Retract the jack, then return it to its origi- nal position.2. Extend the jack and firmly secure it in its storage area, then lo
wer the luggage floor
board.
N00836901904
Before changing a tire, first stop your vehiclein a safe, flat location. 1. Park the vehicle on level and stable ground. 2. Set the parking brake firmly. 3. Move the selector lever to the “P”(PARK) position and turn the ignitionswitch (the engine switch) to the “OFF” position. 4. Turn on the hazard warning flashers andset up a warning sign, such as a warning triangle or flashing signal lights, at an adequate distance from the vehicle, andhave all your passengers leave the vehicle. 5. To prevent the vehicle from rolling when it is raised on the jack, place chocks orblocks (A) at the tire that is diagonally opposite from the tire (B) you are chang- ing.
6. Get the jack, bar and wheel nut wrench ready. (Refer to “Jack and tools” on page 8-5.)
To s t o r e
To r e t r a c tTo r e t r a c t
To e x t e n d
How to change a tire
WA R N I N G Be sure to apply chocks or blocks to the correct tire when jacking up the vehicle. If the vehicle moves while jacked up, thejack could slip out of position, leading to an accident.NOTE
The chocks shown in the illustration do not come with your vehicle. It is recommended that you purchase chocks or blocks and keep them in the vehicle for use if needed. If chocks or blocks are not available, use stones or any other objects that are largeenough to hold the wheel in position.
BK0266800US.bo
ok 6 ページ 2018年6月27日 水曜日 午後5時6分
Page 356 of 423

How to change a tire
For emergencies 8-9
8
5. Remove the wheel nuts with the wheel nut wrench, then take the wheel off.
6. Clean out any mud, etc. on the hub sur- face (F), hub bolts (G) or in the installa- tion holes (H) in the wheel, and then mount the spare tire.
7. Turn the wheel nut clockwise by hand to initially tighten them. Temporarily tighten the wheel nuts by hand until the flange parts of the wheelnuts make light contact with the wheel and the wheel is not loose.
WA R N I N G Stop jacking up the vehicle as soon as the tire is raised off the ground. It is danger- ous to raise the vehicle any higher. Do not get under your vehicle while using the jack. Do not bump the raised vehicle or leave it sitting on the jack for a long time. Both are very dangerous. Do not use a jack except the one that came with your vehicle. The jack should not be used for any pur- pose other than to change a tire. No one should be in your vehicle when using the jack. Do not start or run the engine while your vehicle is on the jack. Do not turn the raised wheel. The tires that are still on the ground could turn and make your vehicle fall off the jack.CAUTION Handle the wheel carefully when changing the tire, to avoid scratching the wheel sur- face.
WA R N I N G Mount the spare tire with the valve stem (I) facing outward. If you cannot see the valve stem (I), you have installed the wheel backwards.Operating the vehicle with the spare tire installed backwards can cause vehicle damage and result in an accident.
NOTE
Flange nuts can be temporarily used on the compact spare tire as shown in the illustra- tion, but return to the original wheel and tire as soon as possible.
BK0266800US.bo
ok 9 ページ 2018年6月27日 水曜日 午後5時6分