lock MITSUBISHI ECLIPSE CROSS 2019 (in English) Owner's Guide
[x] Cancel search | Manufacturer: MITSUBISHI, Model Year: 2019, Model line: ECLIPSE CROSS, Model: MITSUBISHI ECLIPSE CROSS 2019Pages: 423, PDF Size: 75.41 MB
Page 55 of 423

Seat belts 4-18 Seat and restraint systems
4
1. While holding the center seat belt, insert the latch plate (A) into the slot (F) in the detachable anchor (C) to release the seatbelt from the detachable anchor. 2. Pass the seat belt through the seat belt guide (E) and retract it completely toward the rear trim.
3. After the seat belt is retracted completely, insert the small latch plate (B) into theupper slit (G) and the latch plate (A) into the lower slit (H).
4. Store the detachable anchor between the seatback and the seat cushion.
N00418401411
A tone and warning light are used to remind the driver to fasten the seat belt.
The seat belt can be buckled up by inserting the latch plate (A) into the buckle (D) like other seat belts. If the seat belt switches to the Automatic Locking Retractor (ALR) child restraint installation function and cannot be pulled out, detach the latch plate (A) and move therear seat fully backward. Refer to “Installing a child restraint system using the seat belt” on page 4-27.
To d e t a c h
NOTE
Driver’s seat belt reminder/warning light and display
BK0266800US.bo
ok 18 ページ 2018年6月27日 水曜日 午後5時6分
Page 56 of 423
Seat belts
Seat and restraint systems 4-19
4
If the ignition switch is turned to the “ON” position or the operation mode is put in ON without the driver’s seat belt being fastened, a warning light will come on and a tone willsound for approximately 6 seconds to remind you to fasten your seat belt. If the vehicle is driven with the seat belt stillunfastened, the warning light will blink and the tone will sound intermittently until the seat belt is fastened. At the same time, “FAS-TEN SEAT BELT” is displayed on the infor-mation screen in the multi-information display.
N00418301276
The front passenger seat belt warning light is located in the instrument panel. When the ignition switch is turned to the “ON” position or the operation mode is put inON, this indicator normally comes on and goes off a few seconds later. The light comes on when a person sits on thefront passenger seat but does not fasten the seat belt. It goes off when the seat belt is sub- sequently fastened.
N00406301367
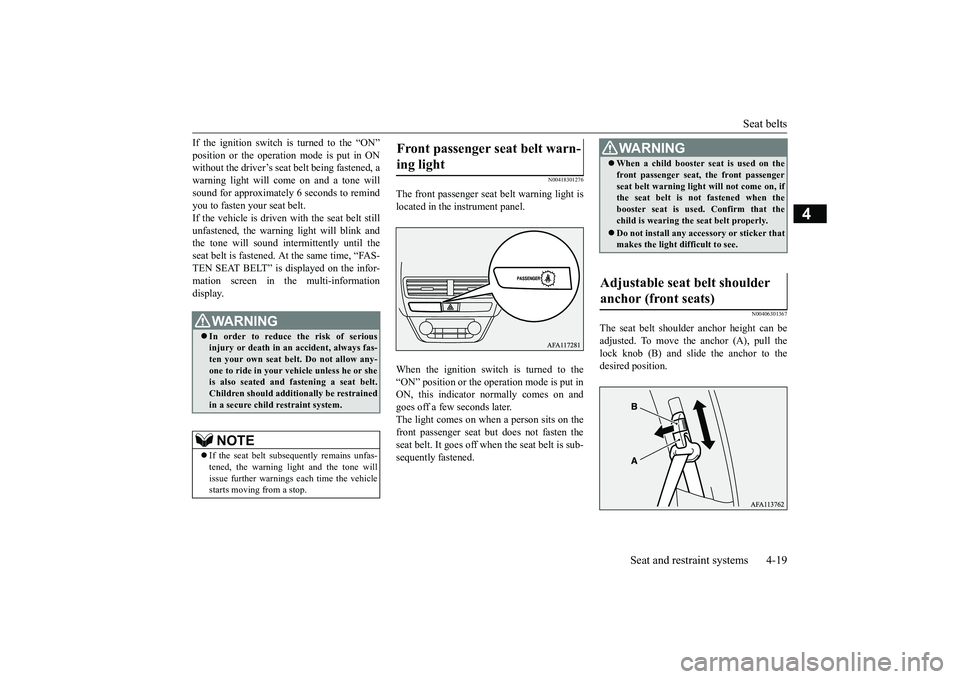
The seat belt shoulder anchor height can beadjusted. To move the anchor (A), pull the lock knob (B) and slide the anchor to the desired position.
WA R N I N G In order to reduce the risk of serious injury or death in an accident, always fas-ten your own seat belt. Do not allow any- one to ride in your vehicle unless he or she is also seated and fastening a seat belt.Children should additionally be restrained in a secure child restraint system.NOTE
If the seat belt subsequently remains unfas- tened, the warning light and the tone will issue further warnings each time the vehiclestarts moving from a stop.
Front passenger seat belt warn- ing light
WA R N I N G When a child booster seat is used on the front passenger seat, the front passenger seat belt warning light will not come on, if the seat belt is not fastened when the booster seat is used. Confirm that thechild is wearing the seat belt properly. Do not install any accessory or sticker that makes the light difficult to see.
Adjustable seat belt shoulder anchor (front seats)
BK0266800US.bo
ok 19 ページ 2018年6月27日 水曜日 午後5時6分
Page 57 of 423
Seat belts 4-20 Seat and restraint systems
4
N00406501138
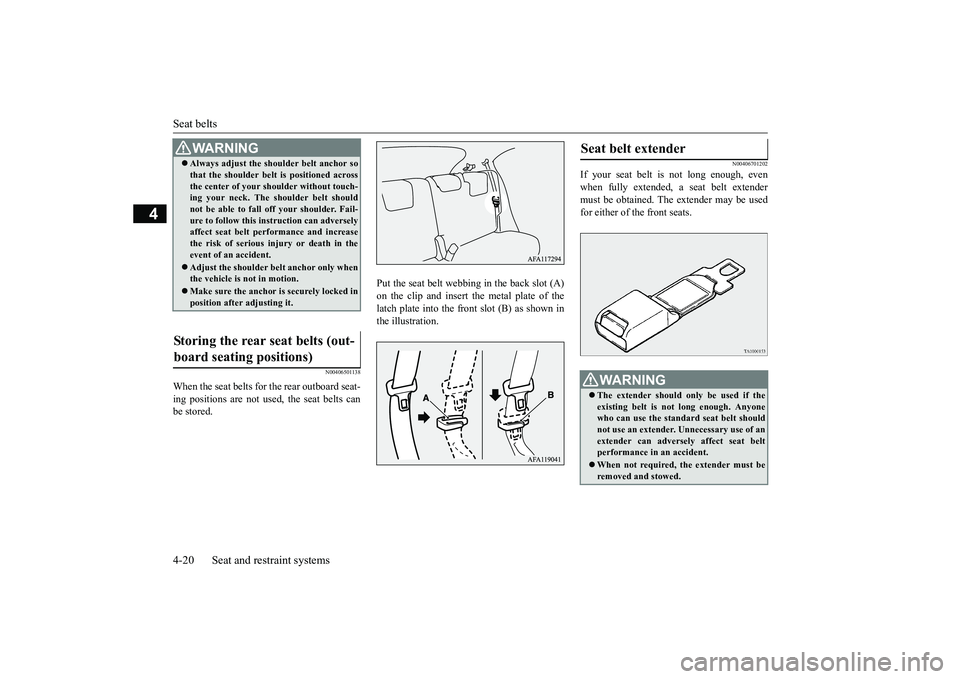
When the seat belts for the rear outboard seat- ing positions are not used, the seat belts can be stored.
Put the seat belt webbing in the back slot (A) on the clip and insert the metal plate of thelatch plate into the front slot (B) as shown in the illustration.
N00406701202
If your seat belt is not long enough, even when fully extended, a seat belt extendermust be obtained. The extender may be used for either of the front seats.
WA R N I N G Always adjust the shoulder belt anchor so that the shoulder belt is positioned across the center of your shoulder without touch- ing your neck. The shoulder belt should not be able to fall off your shoulder. Fail-ure to follow this instruction can adversely affect seat belt performance and increase the risk of serious injury or death in theevent of an accident. Adjust the shoulder belt anchor only when the vehicle is not in motion. Make sure the anchor is securely locked in position after adjusting it.
Storing the rear seat belts (out- board seating positions)
Seat belt extender
WA R N I N G The extender should only be used if the existing belt is not long enough. Anyonewho can use the standard seat belt should not use an extender. Unnecessary use of an extender can adversely affect seat beltperformance in an accident. When not required, the extender must be removed and stowed.
BK0266800US.bo
ok 20 ページ 2018年6月27日 水曜日 午後5時6分
Page 64 of 423
Child restraint systems
Seat and restraint systems 4-27
4
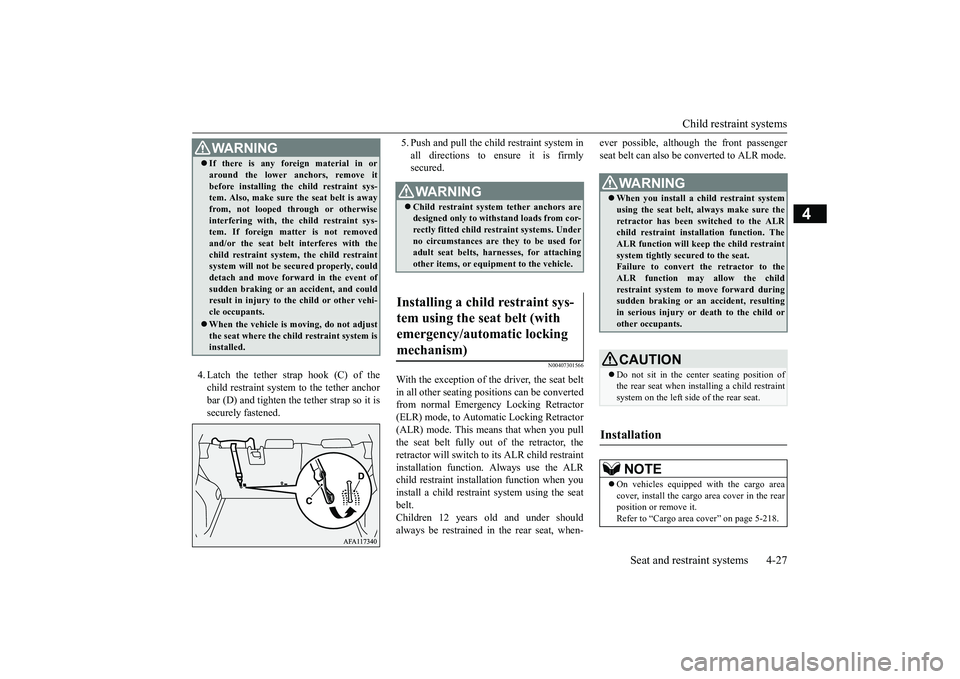
4. Latch the tether strap hook (C) of the child restraint system to the tether anchor bar (D) and tighten the tether strap so it issecurely fastened.
5. Push and pull the ch
ild restraint system in
all directions to ensure it is firmly secured.
N00407301566
With the exception of the driver, the seat belt in all other seating positions can be converted from normal Emergency Locking Retractor (ELR) mode, to Automatic Locking Retractor(ALR) mode. This means that when you pull the seat belt fully out of the retractor, the retractor will switch to its ALR child restraintinstallation function. Always use the ALR child restraint installa
tion function when you
install a child restraint system using the seatbelt. Children 12 years old and under should always be restrained in the rear seat, when-
ever possible, although the front passenger seat belt can also be converted to ALR mode.
WA R N I N G If there is any foreign material in or around the lower anchors, remove it before installing the child restraint sys- tem. Also, make sure the seat belt is away from, not looped through or otherwiseinterfering with, the child restraint sys- tem. If foreign matter is not removed and/or the seat belt interferes with thechild restraint system, the child restraint system will not be secured properly, could detach and move forward in the event ofsudden braking or an accident, and could result in injury to the child or other vehi- cle occupants. When the vehicle is moving, do not adjust the seat where the child restraint system isinstalled.
WA R N I N G Child restraint system tether anchors are designed only to withstand loads from cor- rectly fitted child restraint systems. Underno circumstances are they to be used for adult seat belts, harnesses, for attaching other items, or equipment to the vehicle.
Installing a child restraint sys- tem using the seat belt (with emergency/automatic locking mechanism)
WA R N I N G When you install a child restraint system using the seat belt, always make sure the retractor has been switched to the ALRchild restraint installation function. The ALR function will keep the child restraint system tightly secured to the seat.Failure to convert the retractor to the ALR function may allow the child restraint system to move forward duringsudden braking or an accident, resulting in serious injury or death to the child or other occupants.CAUTION Do not sit in the center seating position of the rear seat when installing a child restraint system on the left side of the rear seat.
Installation
NOTE
On vehicles equipped with the cargo area cover, install the cargo area cover in the rearposition or remove it. Refer to “Cargo area cover” on page 5-218.
BK0266800US.bo
ok 27 ページ 2018年6月27日 水曜日 午後5時6分
Page 65 of 423
Child restraint systems 4-28 Seat and restraint systems
4
1. Remove the head restraint from the loca- tion in which you wish to install a child restraint system. Refer to “Head restraints” on page 4-9.2. Adjust the seat where the child restraint system will be installed to the most rear- ward position.3. Adjust the seatback of the seat where the child restraint system will be installed as follows.[For front passenger’s seat]Adjust the seatback angle to six steps rearward from the most upright position. Refer to “Front seats:
To adjust the seat-
backs” on page 4-5. [For rear seats] Adjust the seatback angle to four stepsrearward from the most upright position. Refer to “Rear seats: To adjust the seat- backs” on page 4-7.4. Place the child restraint system on the seat. 5. Route the seat belt through the childrestraint system according to the instruc- tions provided by the child restraint sys- tem’s manufacturer. Then insert the seatbelt latch plate into the buckle. Make sure you hear a “click” when you insert the latch plate into the buckle.
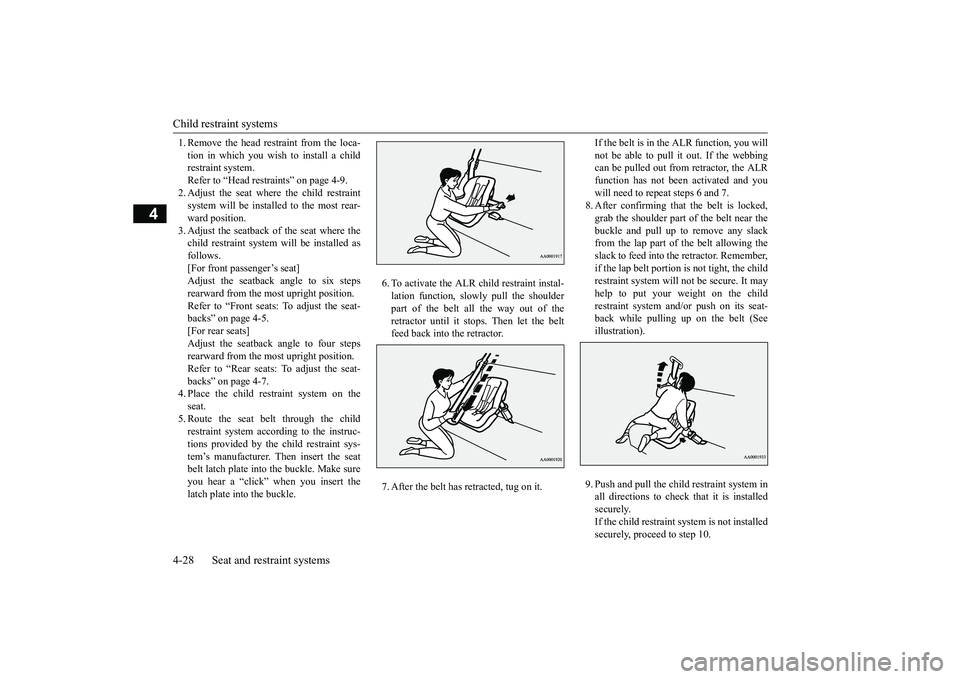
6. To activate the ALR child restraint instal- lation function, slow
ly pull the shoulder
part of the belt all the way out of theretractor until it stops. Then let the belt feed back into the retractor. 7. After the belt has retracted, tug on it.
If the belt is in the ALR function, you will not be able to pull it out. If the webbing can be pulled out from retractor, the ALR function has not been activated and youwill need to repeat steps 6 and 7. 8. After confirming that the belt is locked, grab the shoulder part of the belt near thebuckle and pull up to remove any slack from the lap part of the belt allowing the slack to feed into the retractor. Remember,if the lap belt portion is not tight, the childrestraint system will not be secure. It may help to put your weight on the child restraint system and/or push on its seat-back while pulling up on the belt (See illustration). 9. Push and pull the ch
ild restraint system in
all directions to check that it is installed securely.If the child restraint system is not installed securely, proceed to step 10.
BK0266800US.bo
ok 28 ページ 2018年6月27日 水曜日 午後5時6分
Page 66 of 423
![MITSUBISHI ECLIPSE CROSS 2019 (in English) Owners Guide Child restraint systems
Seat and restraint systems 4-29
4
10. [For front passenger’s seat]
Repeat steps 8 and 9. [For rear seats] Adjust the seatback angle forward untilthe child restraint system MITSUBISHI ECLIPSE CROSS 2019 (in English) Owners Guide Child restraint systems
Seat and restraint systems 4-29
4
10. [For front passenger’s seat]
Repeat steps 8 and 9. [For rear seats] Adjust the seatback angle forward untilthe child restraint system](/img/19/34870/w960_34870-65.png)
Child restraint systems
Seat and restraint systems 4-29
4
10. [For front passenger’s seat]
Repeat steps 8 and 9. [For rear seats] Adjust the seatback angle forward untilthe child restraint system is firmly secured, and then check that the seatback is locked in place. Then push and pull thechild restraint system in all directions to check that it is installed securely. If your child restraint system requires theuse of a tether strap, fasten the tether strapin accordance with the following step 11.
11. Latch the tether strap hook (A) of the
child restraint system to the tether anchorbar (B) and tighten the tether strap so it is securely fastened.
12. Before putting your child in the restraint,
push and pull the restraint in all directionsto be sure it is firmly secure. Do thisbefore each use. If the child restraint sys- tem is not firmly secure, repeat steps 4 through 11.
13. To remove a child restraint system from
the vehicle and deactivate the ALR mode, remove the child from the restraint.Unlatch the buckle. Then remove the belt from the restraint and let the belt fully retract.
14. Reinstall the head restraint.
Refer to “Head restraints” on page 4-9.
N00407601628
Children who have outgrown a child restraint system should be seated in the rear seat andwear the seat belt. If the shoulder belt crosses their face or neck, and/or the lap belt crosses their stomach, a commercially available
booster seat must be used to raise the child so that the shoulder belt crosses their shoulder and the lap belt remains positioned low across their hips. The booster seat should fitthe vehicle seat and have a label certifying compliance with Federal Motor Vehicle Safety Standards or Motor Vehicle RestraintSystems and Booster Seats Safety Regula- tions.
WA R N I N G Child restraint system tether anchors are designed only to withstand loads from cor- rectly fitted child restraint systems. Under no circumstances are they to be used for adult seat belts, harnesses, for attachingother items, or equipment to the vehicle.
Children who have outgrown child restraint systems
WA R N I N G Any child who is too small to properly wear a seat belt must be properly restrained in an appropriate child restraint system, to reduce their risk ofserious injury or death in an accident. A child should never be left unattended in, or unsupervised around, your vehicle. When you leave the vehicle, always take the child out as well. Children can die from he
at stroke if left or
trapped inside the vehicle, especially onhot days. Keep your vehicle locked when not in use. Keep your vehicle keys away from chil- dren.
BK0266800US.bo
ok 29 ページ 2018年6月27日 水曜日 午後5時6分
Page 67 of 423
Maintenance and inspection of seat belts 4-30 Seat and restraint systems
4
N00407001417
Regularly check your seat belt buckles and their release mechanisms for positive engage-ment and release of the latch plate. Check the retractors for automatic locking when in the Automatic Locking Retractor function. The entire seat belt assembly should be replaced if the webbing shows any obviouscuts, tears, increase in thickness in any sec- tion of the webbing from broken fibers, or severe fading from sunlight. All of these con-ditions indicate a weakening of the belt, which may adversely affect seat belt perfor- mance in an accident.
N00407701876
This vehicle is equipped with a SupplementalRestraint System (SRS), which includes air-bags for the driver and passengers. The SRS front airbags are designed to supple- ment the primary protection of the driver and front passenger seat belt systems by provid- ing those occupants with protection against
head and chest injuries in certain moderate to severe frontal collisions. The SRS front air- bags, together with sensors at the front of the vehicle and sensors attached to the frontseats, form an advanced airbag system. The SRS driver’s knee airbag is designed to supplement the primary protection of the driver’s seat belt system. It can reduce theforward movement of the driver’s lower legs and provide increased overall body protection in certain moderate to severe frontal colli-sions. The SRS side airbags and the curtain airbags are also designed to supplement the seat belts. The SRS side airbags provide the driver and front passenger with protection against chestinjuries by deploying the bag on the side impacted in moderate to severe side impact collisions. The SRS curtain airbags provide the driver and the passengers on the front seat and the rear outboard seats with protection against head injuries by deploying the curtain airbagon the side impacted in moderate to severe side impact collisions and by deploying both curtain airbags when a rollover is detected.The curtain airbags are also designed to help reduce the risk of complete and partial ejec- tion from the vehicle through side windows
Maintenance and inspection of seat belts
WA R N I N G Do not attempt to repair or replace any part of the seat belt assemblies. This work should be done by an authorizedMitsubishi Motors dealer. Failure to have an authorized Mitsubishi Motors dealer perform the work could reduce the effec- tiveness of the belts and could result in a serious injury or death in an accident.
Never use an organic solvent to clean the seat belt webbing. Do not attempt to bleach or re-dye the seat belt webbing. These may weaken the seat belt webbing, increasing risk of injury or death in anaccident. Clean seat belt webbing only with mild soap or detergent solution and rinse itwith lukewarm water, and dry the seat belt webbing completely before retracting it.
Supplemental Restraint Sys- tem (SRS) - airbag
NOTE
The SOS emergency assist (if so equipped) is designed to operate when any of the airbags deploy. Refer to “Telematics Control Unit (TCU)” on page 3-5.WA R N I N G
BK0266800US.bo
ok 30 ページ 2018年6月27日 水曜日 午後5時6分
Page 84 of 423
5
Features and controlsKeys ..........................................
.......................................................5-3
Electronic immobilizer (Anti-thef
t starting system) ........................5-4
Keyless entry system (if so equipped) ..............................................5-6 Free-hand Advanced Security Transmitter (F.A.S.T.-key) (if so equipped) .
.................................................
........................5-12
Door locks .......................
...............................................................5-31
Power door locks ............
...............................................................5-33
Child safety locks for r
ear door .....................................................5-34
Liftgate ......................................
.....................................................5-35
Theft-alarm system
................................................
........................5-37
Power window control
...........................................
........................5-39
Power panoramic sunroof (if
so equipped).....................................5-42
Parking brake ..................
...............................................................5-45
Steering wheel height and reach adjustment ..................................5-49 Inside rearview mirro
r ...........................................
........................5-50
Outside rearview mirr
ors ...............................................................5-52
Ignition switch ......
.................................................
........................5-56
Starting the engine
.................................................
........................5-57
Turbocharger operation
..........................................
........................5-59
Continuously variable trans
mission (CVT) ...................................5-59
S-AWC (Super-All Wheel Control) (if so equipped) .....................5-66 4-wheel drive operation
.........................................
........................5-68
Inspection and maintenance following rough road operation ........5-70Cautions on the handling of 4-wheel drive vehicles ......................5-71 Service brake ..................
...............................................................5-72
Brake auto hold (if so
equipped) ....................................................5-73
Hill start assist .......
.................................................
........................5-75
Brake assist system
................................................
........................5-76
Anti-lock braking syst
em .....................................
......................... 5-77
Electric power steering syst
em (EPS) ........................................... 5-79
Active stability control
(ASC) ....................
................................... 5-79
Cruise control ................
.................................................
............... 5-82
Adaptive Cruise Control System (ACC) (if so equipped) .............. 5-87 Forward Collision Mitigation system (FCM) (if so equipped) ...... 5-99 Blind Spot Warning (BSW) (with Lane Change Assist) (if so equipped) ..........
.................................................
............. 5-107
Rear Cross Traffic Alert (RCTA) (if so equipped) ....................... 5-113 Lane Departure Warning (LDW) (if so equipped) ....................... 5-117Tire pressure monitoring sy
stem (TPMS) ................................... 5-120
Rear-view camera ..........
.................................................
............. 5-125
Multi Around Monitor (if so
equipped)........................................ 5-127
Instrument cluster
.................................................
....................... 5-137
Multi-information disp
lay ....................................
....................... 5-138
Indicator light, warning light, and information screen display list
..............................................
....................... 5-158
Indicators .................................
.................................................... 5-178
Warning lights ................
.................................................
............. 5-179
Information screen disp
lay ........................
................................. 5-181
Head Up Display (HUD) (if
so equipped).................................... 5-182
Combination headlights and dimmer switch ............................... 5-186Headlight leveling switch (if
so equipped)................................... 5-194
Turn signal lever ..
.................................................
....................... 5-194
Hazard warning flasher
switch .................................................... 5-195
ECO mode switch ..........
.................................................
............. 5-196
Front fog light switch
...........................................
....................... 5-196
Wiper and washer swit
ch ......................................
....................... 5-196
BK0266800US.bo
ok 1 ページ 2018年6月27日 水曜日 午後5時6分
Page 86 of 423
Keys
Features and controls 5-3
5
N00508801787
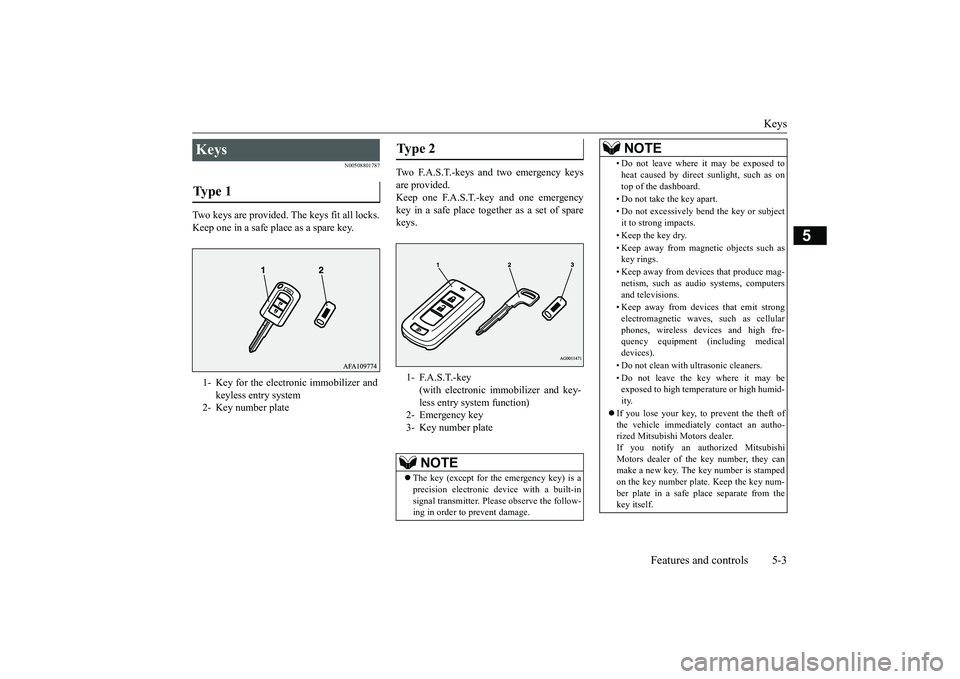
Two keys are provided. The keys fit all locks. Keep one in a safe place as a spare key.
Two F.A.S.T.-keys and two emergency keys are provided. Keep one F.A.S.T.-key and one emergencykey in a safe place together as a set of spare keys.
Keys Type 1 1- Key for the electronic immobilizer and
keyless entry system
2- Key number plate
Type 2 1- F.A.S.T.-key
(with electronic immobilizer and key- less entry system function)
2- Emergency key3- Key number plate
NOTE
The key (except for the emergency key) is a precision electronic device with a built-insignal transmitter. Please observe the follow- ing in order to prevent damage.
• Do not leave where it may be exposed toheat caused by direct sunlight, such as on top of the dashboard. • Do not take the key apart.• Do not excessively bend the key or subject it to strong impacts. • Keep the key dry. • Keep away from magnetic objects such as key rings. • Keep away from devices that produce mag- netism, such as audio systems, computers and televisions. • Keep away from devices that emit strong electromagnetic waves, such as cellularphones, wireless devices and high fre- quency equipment (including medical devices). • Do not clean with ultrasonic cleaners. • Do not leave the key where it may be exposed to high temperature or high humid- ity.
If you lose your key, to prevent the theft of the vehicle immediately contact an autho-rized Mitsubishi Motors dealer. If you notify an authorized Mitsubishi Motors dealer of the key number, they can make a new key. The key number is stamped on the key number plate. Keep the key num-ber plate in a safe place separate from the key itself.NOTE
BK0266800US.bo
ok 3 ページ 2018年6月27日 水曜日 午後5時6分
Page 87 of 423
![MITSUBISHI ECLIPSE CROSS 2019 (in English) Owners Guide Electronic immobilizer (Anti-theft starting system) 5-4 Features and controls
5
N00509101905
[For vehicles equipped with the F.A.S.T.-key] For information on operations for vehiclesequipped with the F MITSUBISHI ECLIPSE CROSS 2019 (in English) Owners Guide Electronic immobilizer (Anti-theft starting system) 5-4 Features and controls
5
N00509101905
[For vehicles equipped with the F.A.S.T.-key] For information on operations for vehiclesequipped with the F](/img/19/34870/w960_34870-86.png)
Electronic immobilizer (Anti-theft starting system) 5-4 Features and controls
5
N00509101905
[For vehicles equipped with the F.A.S.T.-key] For information on operations for vehiclesequipped with the F.A.S.T.-key, refer to “Free-hand Advanced Security Transmitter
(F.A.S.T.-key): Electronic immobilizer (Anti- theft starting system)” on page 5-26. [Except for vehicles equipped with the F. A . S . T. - k e y ] The electronic immobilizer is designed to sig-nificantly reduce the possibility of vehicle theft. The purpose of the system is to immo- bilize the vehicle if an invalid start isattempted. A valid start attempt can only be achieved (subject to certain conditions) using a key “registered” to the immobilizer system.All of the keys provided with your new vehi-cle have been programmed to the vehicle’s electronics.
No keys other than those registered in advance can be used to start the engine. Refer to “Electronic immobilizer (Anti-theft starting system)” on page 5-4. Refer to “Free-hand Advanced SecurityTransmitter (F.A.S.T.-key): “Electronic immobilizer (Anti-theft starting system)” on page 5-26. When the theft-alarm is in the system opera- tional status, the alarm operates if a door orliftgate is opened after using the key, the door lock knob or the power door lock switch to unlock the vehicle. The system does not enter the preparation state if the keyless entry system or theF.A.S.T.-key was not used to lock the vehi- cle.
Electronic immobilizer (Anti-theft starting system)
CAUTION Do not make any alterations or additions to the immobilizer system. Alterations or addi- tions could cause failure of the immobilizer.NOTE
NOTE
In the following cases, the vehicle may not be able to recognize the registered ID codefrom the key. This means the engine will not start even when the ke
y is turned to the
“START” position. • When the key contacts a key ring or other metallic or magnetic object
• When the key grip contacts metal of another key • When the key contacts or is close to other immobilizer keys (including keys of other vehicles) In cases like the above, move the offending object(s) away from the key and turn the key back to the “ACC” or “OFF” position. Thentry to start the engine again. If the engine does not start, contact an authorized Mitsubishi Motors dealer. The key may not operate properly when it is near an object or fac
ility that emits strong
electromagnetic waves.NOTE
BK0266800US.bo
ok 4 ページ 2018年6月27日 水曜日 午後5時6分