MITSUBISHI ECLIPSE CROSS 2019 (in English) Service Manual
Manufacturer: MITSUBISHI, Model Year: 2019, Model line: ECLIPSE CROSS, Model: MITSUBISHI ECLIPSE CROSS 2019Pages: 423, PDF Size: 75.41 MB
Page 41 of 423
Front seats 4-4 Seat and restraint systems
4
N00401901397
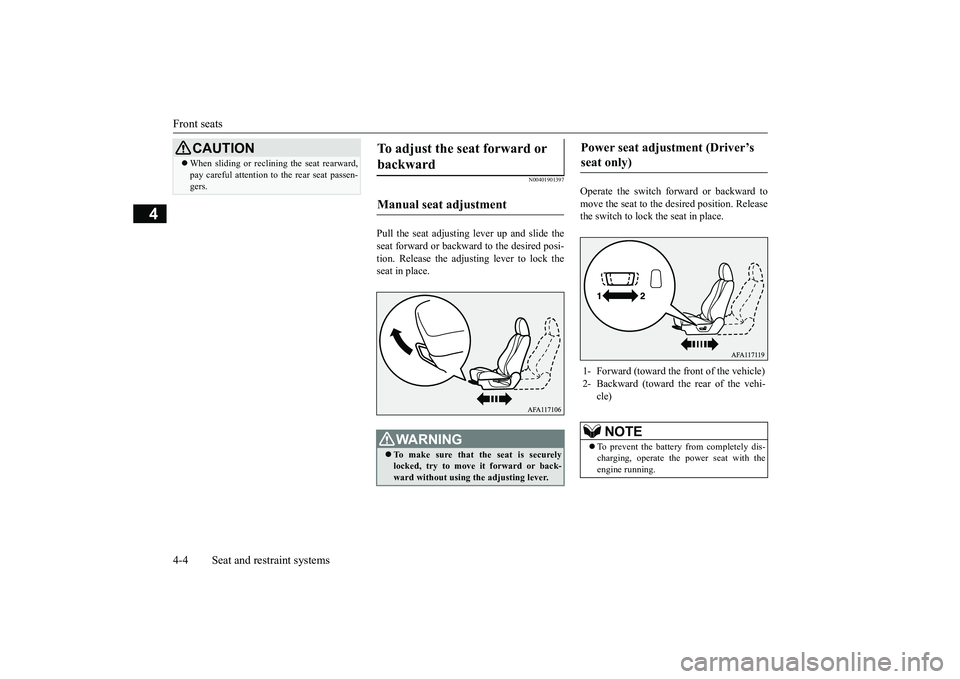
Pull the seat adjusting lever up and slide the seat forward or backward to the desired posi- tion. Release the adjusting lever to lock the seat in place.
Operate the switch forward or backward to move the seat to the desired position. Release the switch to lock the seat in place.
When sliding or reclining the seat rearward, pay careful attention to the rear seat passen- gers.CAUTION
To adjust the seat forward or backward Manual seat adjustment
WA R N I N G To make sure that the seat is securely locked, try to move it forward or back- ward without using the adjusting lever.
Power seat adjustment (Driver’s seat only) 1- Forward (toward the front of the vehicle) 2- Backward (toward the rear of the vehi-
cle)NOTE
To prevent the battery from completely dis- charging, operate the power seat with theengine running.
BK0266800US.bo
ok 4 ページ 2018年6月27日 水曜日 午後5時6分
Page 42 of 423
Front seats
Seat and restraint systems 4-5
4
N00402001441
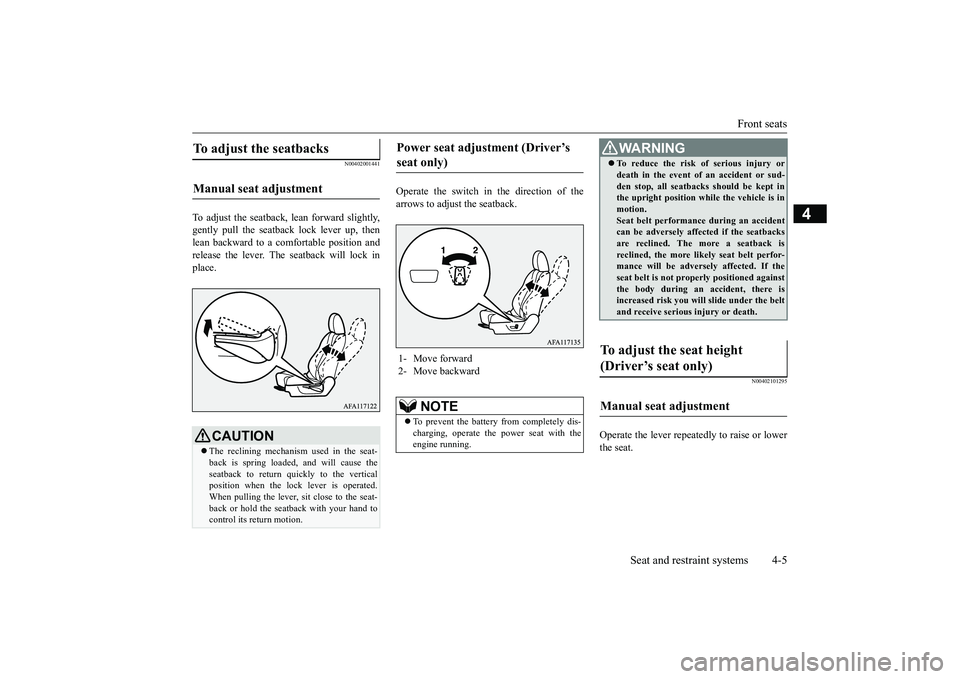
To adjust the seatback, lean forward slightly, gently pull the seatb
ack lock lever up, then
lean backward to a comfortable position and release the lever. The seatback will lock in place.
Operate the switch in the direction of the arrows to adjust the seatback.
N00402101295
Operate the lever repeatedly to raise or lowerthe seat.
To adjust the seatbacks Manual seat adjustment
CAUTION The reclining mechanism used in the seat- back is spring loaded
, and will cause the
seatback to return quickly to the vertical position when the lock lever is operated.When pulling the lever, sit close to the seat- back or hold the seatback with your hand to control its return motion.
Power seat adjustment (Driver’s seat only) 1- Move forward 2- Move backward
NOTE
To prevent the battery from completely dis- charging, operate the power seat with the engine running.
WA R N I N G To reduce the risk of serious injury or death in the event of an accident or sud- den stop, all seatbacks should be kept in the upright position while the vehicle is in motion.Seat belt performance during an accident can be adversely affected if the seatbacks are reclined. The more a seatback isreclined, the more likely seat belt perfor- mance will be adversely affected. If the seat belt is not properly positioned againstthe body during an accident, there is increased risk you will slide under the belt and receive serious injury or death.
To adjust the seat height (Driver’s seat only) Manual seat adjustment
BK0266800US.bo
ok 5 ページ 2018年6月27日 水曜日 午後5時6分
Page 43 of 423
Rear seats 4-6 Seat and restraint systems
4
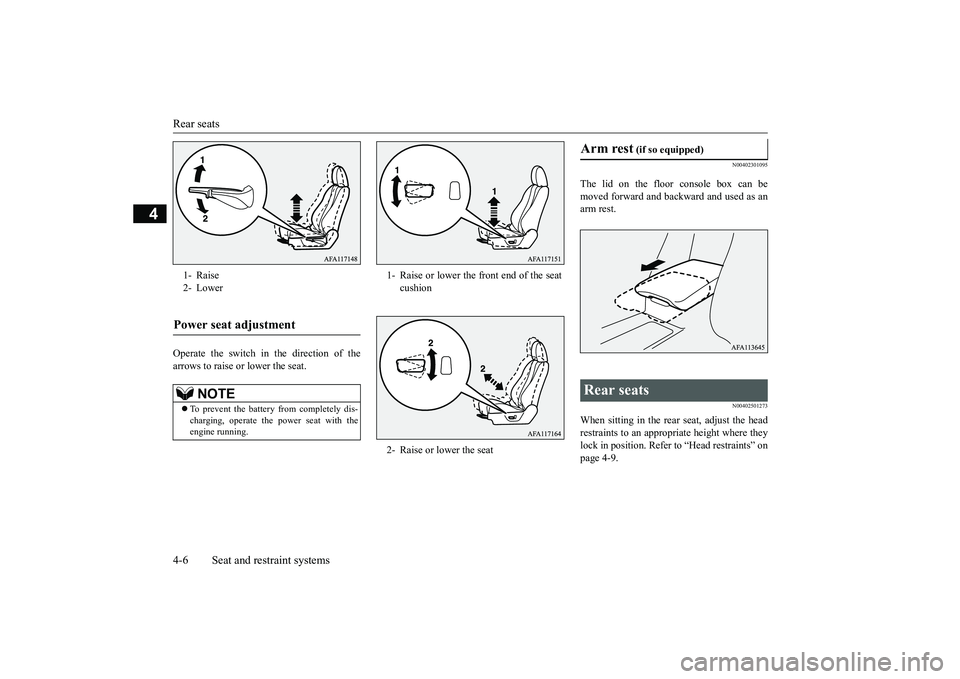
Operate the switch in the direction of the arrows to raise or lower the seat.
N00402301095
The lid on the floor console box can bemoved forward and backward and used as an arm rest.
N00402501273
When sitting in the rear seat, adjust the headrestraints to an appropriate height where they lock in position. Refer to “Head restraints” onpage 4-9.
1- Raise 2- LowerPower seat adjustment
NOTE
To prevent the battery from completely dis- charging, operate the power seat with theengine running.
1- Raise or lower the front end of the seat
cushion
2- Raise or lower the seat
Arm rest
(if so equipped)
Rear seats
BK0266800US.bo
ok 6 ページ 2018年6月27日 水曜日 午後5時6分
Page 44 of 423
Rear seats
Seat and restraint systems 4-7
4
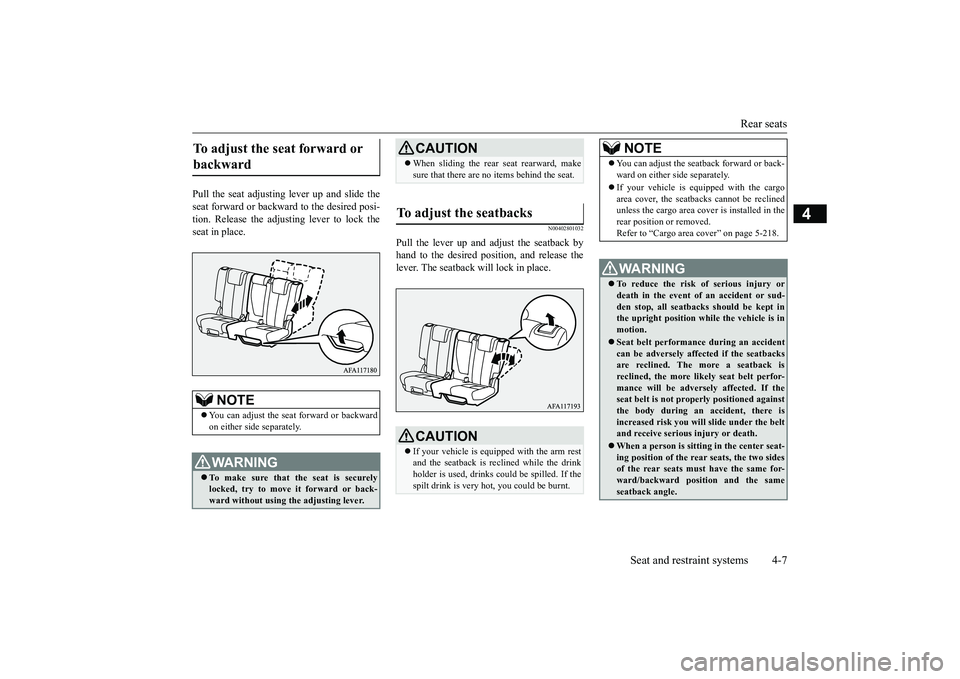
Pull the seat adjusting lever up and slide the seat forward or backwa
rd to the desired posi-
tion. Release the adjusting lever to lock the seat in place.
N00402801032
Pull the lever up and adjust the seatback by hand to the desired position, and release the lever. The seatback will lock in place.
To adjust the seat forward or backward
NOTE
You can adjust the seat forward or backward on either side separately.WA R N I N G To make sure that the seat is securely locked, try to move it forward or back-ward without using the adjusting lever.
CAUTION When sliding the rear seat rearward, make sure that there are no items behind the seat.
To adjust the seatbacks
CAUTION If your vehicle is equipped with the arm rest and the seatback is reclined while the drink holder is used, drinks could be spilled. If the spilt drink is very hot, you could be burnt.
NOTE
You can adjust the seatback forward or back- ward on either side separately. If your vehicle is equipped with the cargo area cover, the seatbacks cannot be reclinedunless the cargo area cover is installed in the rear position or removed. Refer to “Cargo area cover” on page 5-218.WA R N I N G To reduce the risk of serious injury or death in the event of an accident or sud- den stop, all seatbacks should be kept inthe upright position while the vehicle is in motion. Seat belt performance during an accident can be adversely affected if the seatbacks are reclined. The more a seatback isreclined, the more likely seat belt perfor- mance will be adversely affected. If the seat belt is not properly positioned againstthe body during an accident, there is increased risk you will slide under the belt and receive serious injury or death. When a person is sitting in the center seat- ing position of the rear seats, the two sides of the rear seats must have the same for- ward/backward position and the sameseatback angle.
BK0266800US.bo
ok 7 ページ 2018年6月27日 水曜日 午後5時6分
Page 45 of 423
Heated seats (if so equipped) 4-8 Seat and restraint systems
4
N00403001347
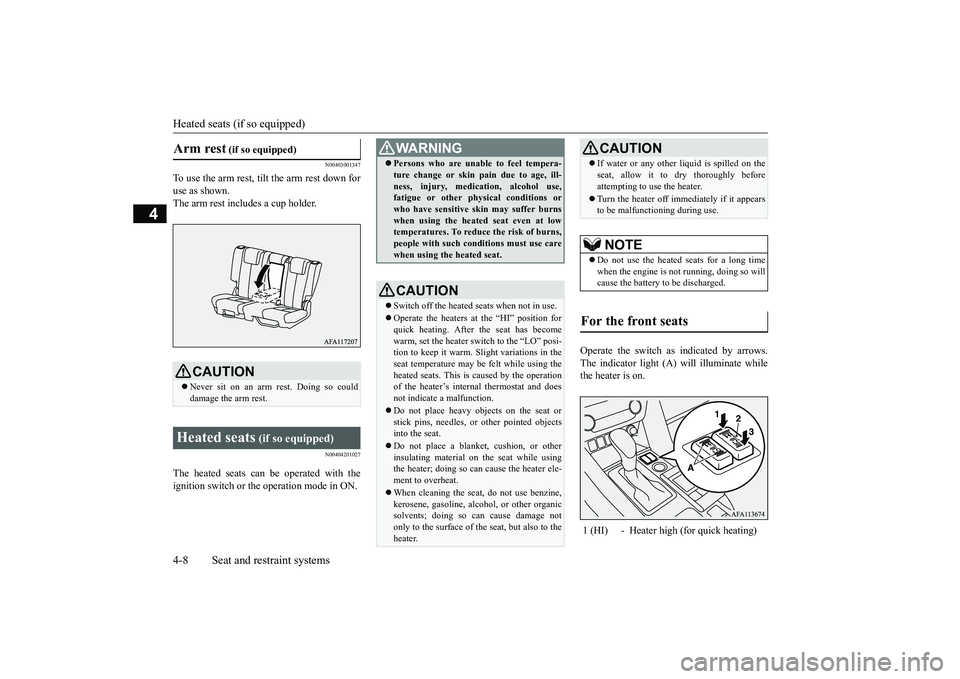
To use the arm rest, tilt the arm rest down for use as shown.The arm rest includes a cup holder.
N00404201027
The heated seats can be operated with the ignition switch or the operation mode in ON.
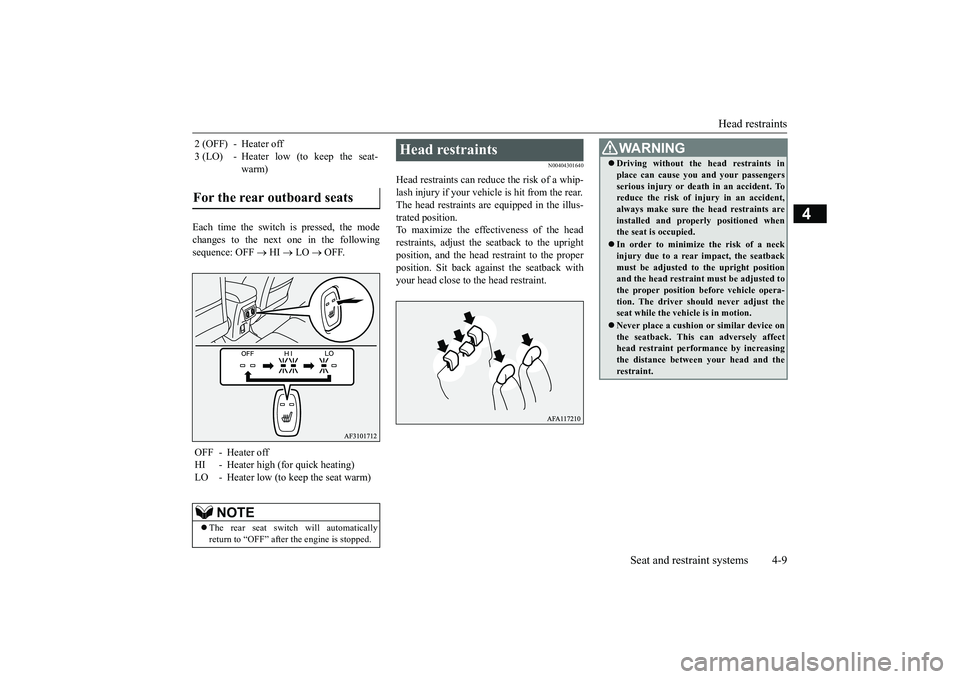
Operate the switch as indicated by arrows. The indicator light (A) will illuminate while the heater is on.
Arm rest
(if so equipped)
CAUTION Never sit on an arm rest. Doing so could damage the arm rest.
Heated seats
(if so equipped)
WA R N I N G Persons who are unable to feel tempera- ture change or skin pain due to age, ill- ness, injury, medication, alcohol use, fatigue or other physical conditions or who have sensitive skin may suffer burnswhen using the heated seat even at low temperatures. To reduce the risk of burns, people with such conditions must use carewhen using the heated seat.CAUTION Switch off the heated seats when not in use.Operate the heaters at the “HI” position for quick heating. After the seat has become warm, set the heater switch to the “LO” posi-tion to keep it warm. Slight variations in the seat temperature may be felt while using the heated seats. This is caused by the operationof the heater’s internal thermostat and does not indicate a malfunction. Do not place heavy objects on the seat or stick pins, needles, or other pointed objects into the seat. Do not place a blanket,
cushion, or other
insulating material on the seat while using the heater; doing so can cause the heater ele- ment to overheat. When cleaning the seat, do not use benzine, kerosene, gasoline, alcohol, or other organicsolvents; doing so can cause damage not only to the surface of the seat, but also to the heater.
If water or any other li
quid is spilled on the
seat, allow it to dry thoroughly before attempting to use the heater. Turn the heater off immediately if it appears to be malfunctioning during use.NOTE
Do not use the heated seats for a long time when the engine is not running, doing so will cause the battery to be discharged.
For the front seats
1 (HI) - Heater high (for quick heating)
CAUTION
BK0266800US.bo
ok 8 ページ 2018年6月27日 水曜日 午後5時6分
Page 46 of 423
Head restraints
Seat and restraint systems 4-9
4
Each time the switch is pressed, the mode changes to the next one in the following sequence: OFF
HI
LO
OFF.
N00404301640
Head restraints can reduce the risk of a whip- lash injury if your vehicle is hit from the rear.The head restraints are equipped in the illus- trated position. To maximize the effectiveness of the headrestraints, adjust the seatback to the upright position, and the head
restraint to the proper
position. Sit back against the seatback withyour head close to the head restraint.
2 (OFF) - Heater off 3 (LO) - Heater low (to keep the seat-
warm)
For the rear outboard seats
OFF - Heater offHI - Heater high (for quick heating) LO - Heater low (to keep the seat warm)
NOTE
The rear seat switch will automatically return to “OFF” after the engine is stopped.
Head restraints
WA R N I N G Driving without the head restraints in place can cause you and your passengers serious injury or death in an accident. To reduce the risk of injury in an accident, always make sure the head restraints areinstalled and properly positioned when the seat is occupied. In order to minimize the risk of a neck injury due to a rear impact, the seatback must be adjusted to the upright positionand the head restraint must be adjusted to the proper position before vehicle opera- tion. The driver should never adjust theseat while the vehicle is in motion. Never place a cushion or similar device on the seatback. This can adversely affect head restraint performance by increasing the distance between your head and therestraint.
BK0266800US.bo
ok 9 ページ 2018年6月27日 水曜日 午後5時6分
Page 47 of 423
Head restraints 4-10 Seat and restraint systems
4
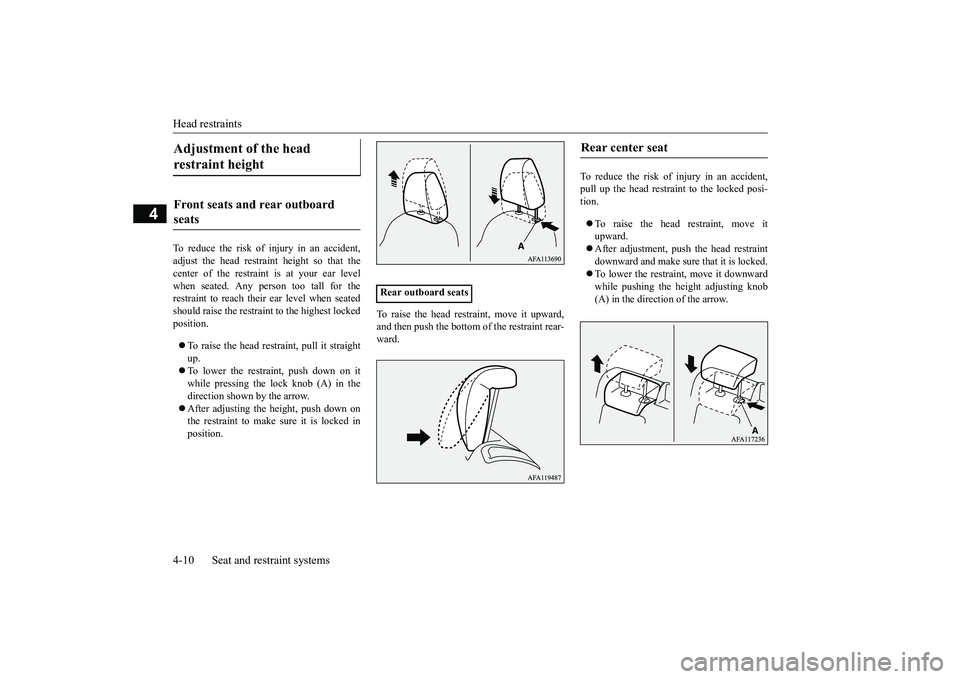
To reduce the risk of injury in an accident, adjust the head restraint height so that thecenter of the restraint is at your ear levelwhen seated. Any person too tall for the restraint to reach their ear level when seated should raise the restraint to the highest lockedposition. To raise the head restraint, pull it straight up. To lower the restraint, push down on it while pressing the lock knob (A) in the direction shown by the arrow. After adjusting the height, push down on the restraint to make sure it is locked in position.
To raise the head restraint, move it upward, and then push the bottom of the restraint rear-ward.
To reduce the risk of injury in an accident, pull up the head restraint to the locked posi-tion. To raise the head restraint, move it upward. After adjustment, push the head restraint downward and make sure that it is locked. To lower the restraint, move it downward while pushing the height adjusting knob (A) in the direction of the arrow.
Adjustment of the head restraint height Front seats and rear outboard seats
Rear outboard seats
Rear center seat
BK0266800US.bo
ok 10 ページ 2018年6月27日 水曜日 午後5時6分
Page 48 of 423
Head restraints
Seat and restraint systems 4-11
4
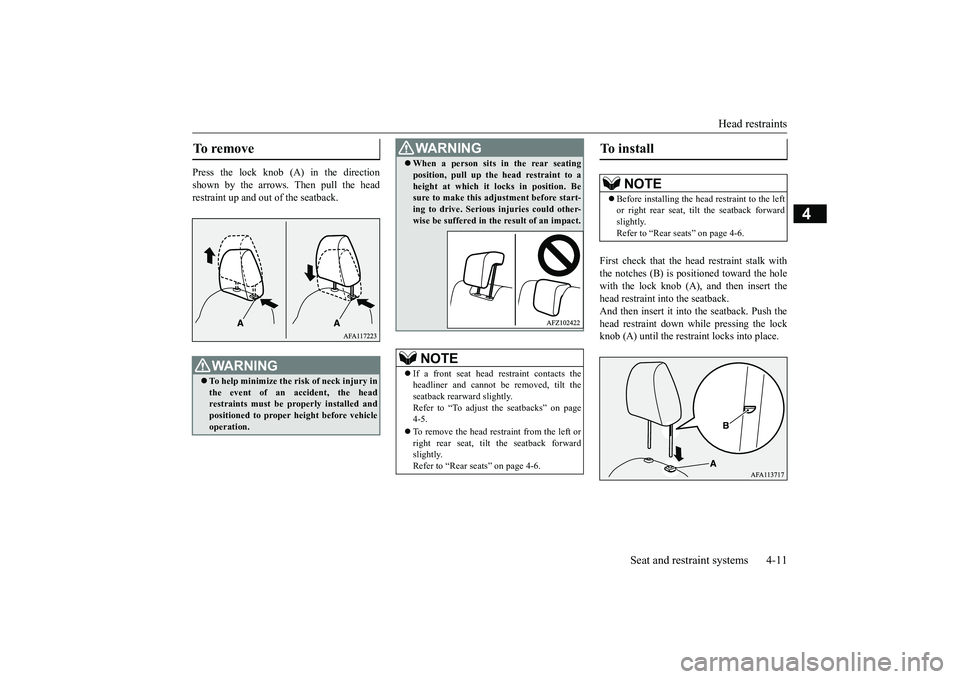
Press the lock knob (A) in the direction shown by the arrows. Then pull the head restraint up and out of the seatback.
First check that the head restraint stalk with the notches (B) is positioned toward the holewith the lock knob (A), and then insert the head restraint into the seatback. And then insert it into the seatback. Push thehead restraint down while pressing the lock knob (A) until the restraint locks into place.
To remove
WA R N I N G To help minimize the risk of neck injury in the event of an accident, the head restraints must be properly installed and positioned to proper height before vehicleoperation.
WA R N I N G When a person sits in the rear seating position, pull up the head restraint to a height at which it locks in position. Be sure to make this adjustment before start- ing to drive. Serious injuries could other-wise be suffered in th
e result of an impact.
NOTE
If a front seat head restraint contacts the headliner and cannot be removed, tilt the seatback rearward slightly.Refer to “To adjust the seatbacks” on page 4-5. To remove the head restraint from the left or right rear seat, tilt the seatback forward slightly. Refer to “Rear seats” on page 4-6.
To install
NOTE
Before installing the head restraint to the left or right rear seat, tilt the seatback forward slightly. Refer to “Rear seats” on page 4-6.
BK0266800US.bo
ok 11 ページ 2018年6月27日 水曜日 午後5時6分
Page 49 of 423
Making a cargo area 4-12 Seat and restraint systems
4
N00405501131
N00405701162
The rear seatbacks can be folded forward to create an additional cargo area. 1. When folding the left side rear seat, store the seat belt for the
center seating position
of the rear seat. Refer to “Detachable rear center seat belt” on page 4-17.
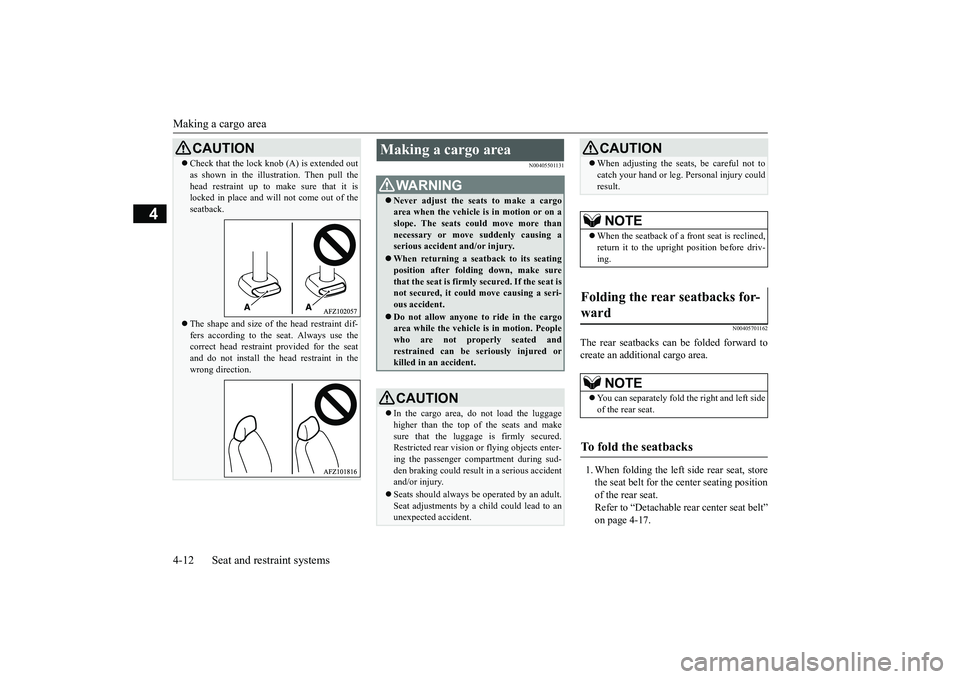
CAUTION Check that the lock knob (A) is extended out as shown in the illustration. Then pull the head restraint up to make sure that it is locked in place and will not come out of the seatback. The shape and size of the head restraint dif- fers according to the seat. Always use the correct head restraint provided for the seatand do not install the head restraint in the wrong direction.
Making a cargo area
WA R N I N G Never adjust the seats to make a cargo area when the vehicle is in motion or on a slope. The seats could move more than necessary or move suddenly causing aserious accident and/or injury. When returning a seatback to its seating position after folding down, make sure that the seat is firmly secured. If the seat is not secured, it could move causing a seri-ous accident. Do not allow anyone to ride in the cargo area while the vehicle is in motion. People who are not properly seated and restrained can be seriously injured orkilled in an accident.CAUTION In the cargo area, do not load the luggage higher than the top of the seats and makesure that the luggage is firmly secured. Restricted rear vision or flying objects enter- ing the passenger compartment during sud- den braking could result in a serious accident and/or injury. Seats should always be operated by an adult. Seat adjustments by a child could lead to anunexpected accident.
When adjusting the seats, be careful not to catch your hand or leg. Personal injury could result.NOTE
When the seatback of a front seat is reclined, return it to the upright position before driv- ing.
Folding the rear seatbacks for- ward
NOTE
You can separately fold the right and left side of the rear seat.
To fold the seatbacks
CAUTION
BK0266800US.bo
ok 12 ページ 2018年6月27日 水曜日 午後5時6分
Page 50 of 423
Seat belts
Seat and restraint systems 4-13
4
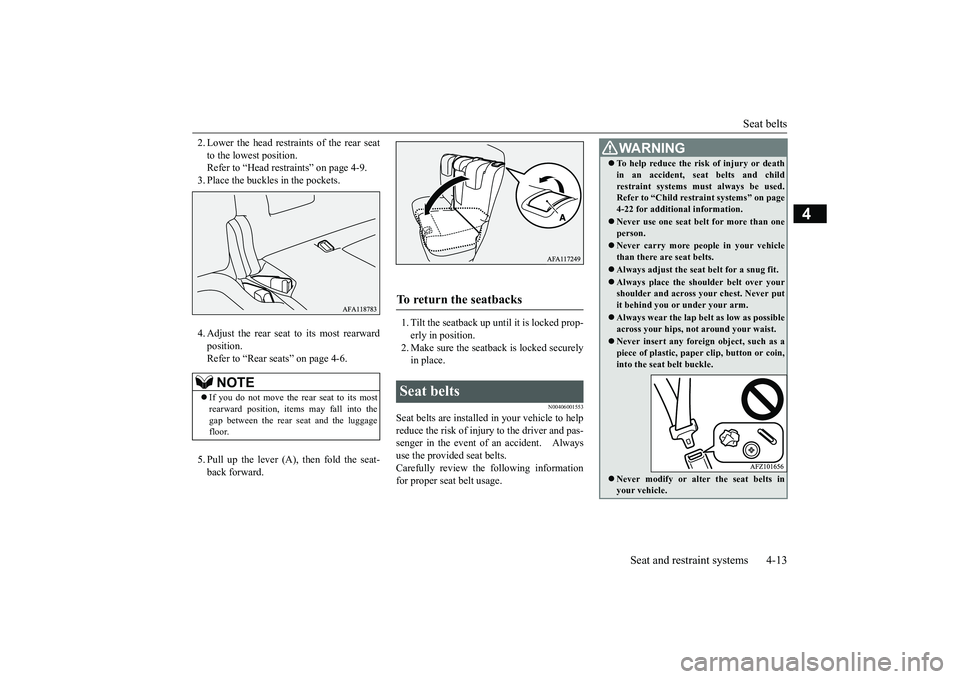
2. Lower the head restraints of the rear seat to the lowest position. Refer to “Head restraints” on page 4-9. 3. Place the buckles in the pockets. 4. Adjust the rear seat to its most rearward position. Refer to “Rear seats” on page 4-6. 5. Pull up the lever (A), then fold the seat- back forward.
1. Tilt the seatback up until it is locked prop- erly in position.2. Make sure the seatback is locked securely in place.
N00406001553
Seat belts are installed in your vehicle to help reduce the risk of injury to the driver and pas- senger in the event of an accident. Always use the provided seat belts.Carefully review the following information for proper seat belt usage.
NOTE
If you do not move the rear seat to its most rearward position, items may fall into the gap between the rear seat and the luggagefloor.
To return the seatbacks Seat belts
WA R N I N G To help reduce the risk of injury or death in an accident, seat belts and child restraint systems must always be used. Refer to “Child restraint systems” on page 4-22 for additional information. Never use one seat belt for more than one person. Never carry more people in your vehicle than there are seat belts. Always adjust the seat belt for a snug fit.Always place the shoulder belt over your shoulder and across your chest. Never put it behind you or under your arm. Always wear the lap belt as low as possible across your hips, not around your waist. Never insert any foreign object, such as a piece of plastic, paper clip, button or coin,into the seat belt buckle. Never modify or alter the seat belts in your vehicle.
BK0266800US.bo
ok 13 ページ 2018年6月27日 水曜日 午後5時6分